DFR0125 - jimaobian/DFRobotWikiCn GitHub Wiki
重写
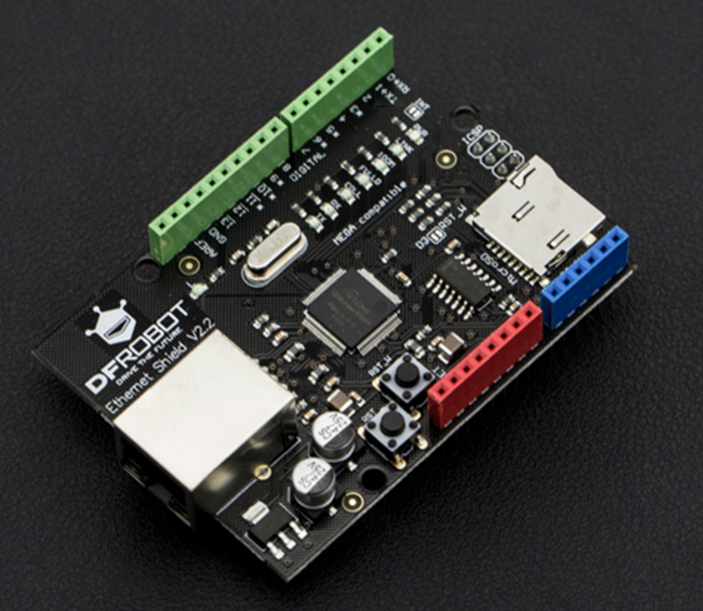
- 扩展板工作电压:5v
- 以太网插座
- 支持Micro SD卡读/写
- Ethernet和SD卡共用SPI接口,只能单独启用一个功能
- 兼容Arduino标准尺寸控制器,同时支持Arduino Mega系列
- 尺寸:70x55x30mm
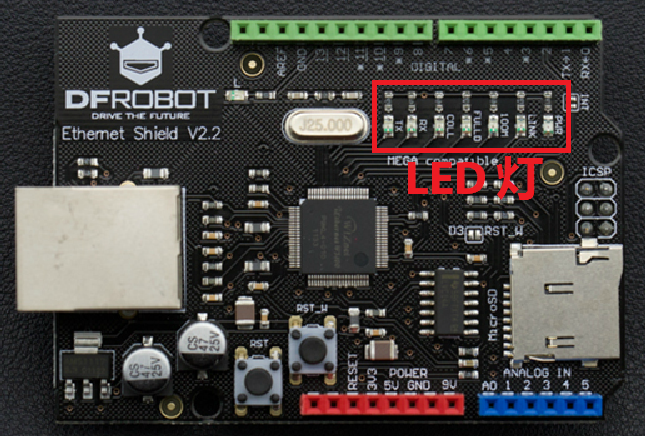
- PWR:电源指示灯
- LINK:指示网络连接状况,在主控板收发数据时LED闪烁
- 100M:表示存在100Mb / s的网络连接(与10Mb / s相反)
- FULLD:表示网络连接是全双工的
- COLL:当检测到网络冲突时闪烁
- RX:当接收数据时闪烁
- TX:当发送数据时闪烁
兼容:
- Arduino Mega 1280/2560
- Arduino UNO
- Arduino Dumlinove
实现功能:向SD卡创建一个txt文件,写入数据并读出文件中的数据。
-
硬件
- 1 x Arduino UNO控制板
- 1 x DFRduino Ethernet W5100
- 1 x 闪迪 Class10 8G 内存卡
-
软件
- Arduino IDE (1.8.2)
第一步:将DFRduino Ethernet W5100拓展板对准插到Arduino UNO板上。
第二步:将USB线一端插在电脑USB口,一端插在Arduino UNO板上。
第三部:将SD卡插入DFRduino Ethernet W5100上的SD卡卡槽。
|
#include <SPI.h>
#include <SD.h>

File myFile;

void setup() {
  // Open serial communications and wait for port to open:
  Serial.begin(9600);
  while (!Serial) {

    ; // wait for serial port to connect. Needed for native USB port only
  }


  Serial.print("Initializing SD card...");

  if (!SD.begin(4)) {
    Serial.println("initialization failed!");
    return;
  }
  Serial.println("initialization done.");
  // open the file. note that only one file can be open at a time,
  // so you have to close this one before opening another.
  myFile = SD.open("test.txt", FILE_WRITE);

  // if the file opened okay, write to it:
  if (myFile) {
    Serial.print("Writing to test.txt...");
    myFile.println("testing 1, 2, 3.");
    // close the file:
    myFile.close();
    Serial.println("done.");
  } else {
    // if the file didn't open, print an error:
    Serial.println("error opening test.txt");
  }

  // re-open the file for reading:
  myFile = SD.open("test.txt");
  if (myFile) {
    Serial.println("test.txt:");

    // read from the file until there's nothing else in it:
    while (myFile.available()) {
      Serial.write(myFile.read());
    }
    // close the file:
    myFile.close();

  } else {
    // if the file didn't open, print an error:
    Serial.println("error opening test.txt");
  }
}

void loop() {
  // nothing happens after setup
}
|}
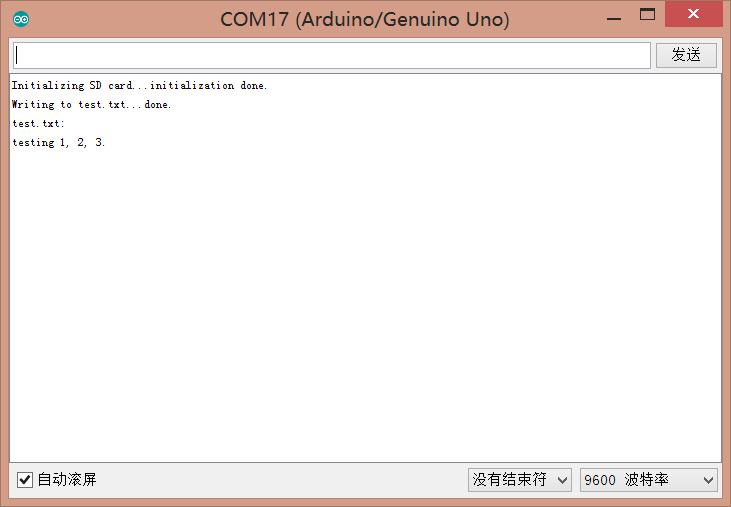
在图中我们可以看到,我们向SD卡中创建了一个命名为“test.txt”的文件,并向其中存入数字1,2,3,SD卡工作正常。
实现功能:读取六个模拟信号引脚的值,并在局域网中显示。
-
硬件
- 1 x Arduino UNO控制板
- 1 x DFRduino Ethernet W5100
- 1 x 网线
-
软件
- Arduino IDE (1.8.2)
第一步:将DFRduino Ethernet W5100拓展板对准插到Arduino UNO板上。
第二步:将USB线一端插在电脑USB口,一端插在Arduino UNO板上。
第三部:将网线一端插在电脑网口,一端插在DFRduino Ethernet W5100拓展板的网口。
|
#include <SPI.h>
#include <Ethernet.h>

// Enter a MAC address and IP address for your controller below.
// The IP address will be dependent on your local network:
byte mac[] = {
  0xDE, 0xAD, 0xBE, 0xEF, 0xFE, 0xED
};
IPAddress ip(192, 168, 1, 177);

// Initialize the Ethernet server library
// with the IP address and port you want to use
// (port 80 is default for HTTP):
EthernetServer server(80);

void setup() {
  // Open serial communications and wait for port to open:
  Serial.begin(9600);
  while (!Serial) {
    ; // wait for serial port to connect. Needed for native USB port only
  }


  // start the Ethernet connection and the server:
  Ethernet.begin(mac, ip);
  server.begin();
  Serial.print("server is at ");
  Serial.println(Ethernet.localIP());
}


void loop() {
  // listen for incoming clients
  EthernetClient client = server.available();
  if (client) {
    Serial.println("new client");
    // an http request ends with a blank line
    boolean currentLineIsBlank = true;
    while (client.connected()) {
      if (client.available()) {
        char c = client.read();
        Serial.write(c);
        // if you've gotten to the end of the line (received a newline
        // character) and the line is blank, the http request has ended,
        // so you can send a reply
        if (c == '\n' && currentLineIsBlank) {
          // send a standard http response header
          client.println("HTTP/1.1 200 OK");
          client.println("Content-Type: text/html");
          client.println("Connection: close");  // the connection will be closed after completion of the response
          client.println("Refresh: 5");  // refresh the page automatically every 5 sec
          client.println();
          client.println("<!DOCTYPE HTML>");
          client.println("<html>");
          // output the value of each analog input pin
          for (int analogChannel = 0; analogChannel < 6; analogChannel++) {
            int sensorReading = analogRead(analogChannel);
            client.print("analog input ");
            client.print(analogChannel);
            client.print(" is ");
            client.print(sensorReading);
            client.println("<br />");
          }
          client.println("</html>");
          break;
        }
        if (c == '\n') {
          // you're starting a new line
          currentLineIsBlank = true;
        } else if (c != '\r') {
          // you've gotten a character on the current line
          currentLineIsBlank = false;
        }
      }
    }
    // give the web browser time to receive the data
    delay(1);
    // close the connection:
    client.stop();
    Serial.println("client disconnected");
  }
}
|}
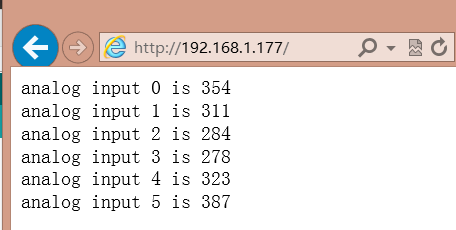
在页面中我们可以看到板子6路模拟口输入值在网页上按5S/次的频率自动刷新显示,此时说明我们创造的一个小型Web Server已经正常工作了。
对于计算机浏览器出现“网页无法加载”问题的小伙伴儿先不要着急,请按照如下步骤配置你的网络适配器:
1、打开控制面板-->网络和 Internet-->网络和共享中心-->更改适配器设置
2、找到你连接模块的网络-->右键-->属性-->在网络选项卡中找到“Internet协议版本4(TCP/IPv4)"并双击进入属性设置
3、输入下图所示参数并点击确定。在此之后再按照上面示例中第六步操作就行了....
**注意:**因为W5100和SD卡公用SPI口,而只有一个能在同一时间激活。如果你想要一起使用两个设备,需采用分时复用的办法,两个设备,通过CS片选引脚来激活(低电平激活,高电平禁止)。当你不用其中任一外设,你需要特别说明不选择使用它们。想不用SD卡,把4号口设为输出并且写为高电平。同理,想不用W5100,把10号设为高电平输出。
| 更多问题及有趣的应用,可以 访问论坛 进行查阅或发帖。 |


