X Board_V2_(SKU_DFR0162) - jimaobian/DFRobotWiki GitHub Wiki

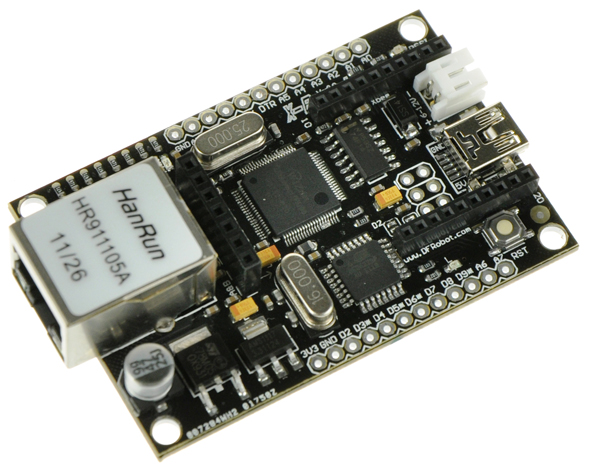
This is Version 2.0 of the X-board. The main improvement is that it now operates at 5V, making it compatible with most sensors and I2C protocol with out the need of a voltage level converter.
The XBoard is a unique Arduino board which features a WIZnet ethernet port, an XBee socket, and an ATMega328. This board will add wireless XBee control as well as internet connectivity to your projects. Its great for anything from home automation to robot control. The possibilities are endless!
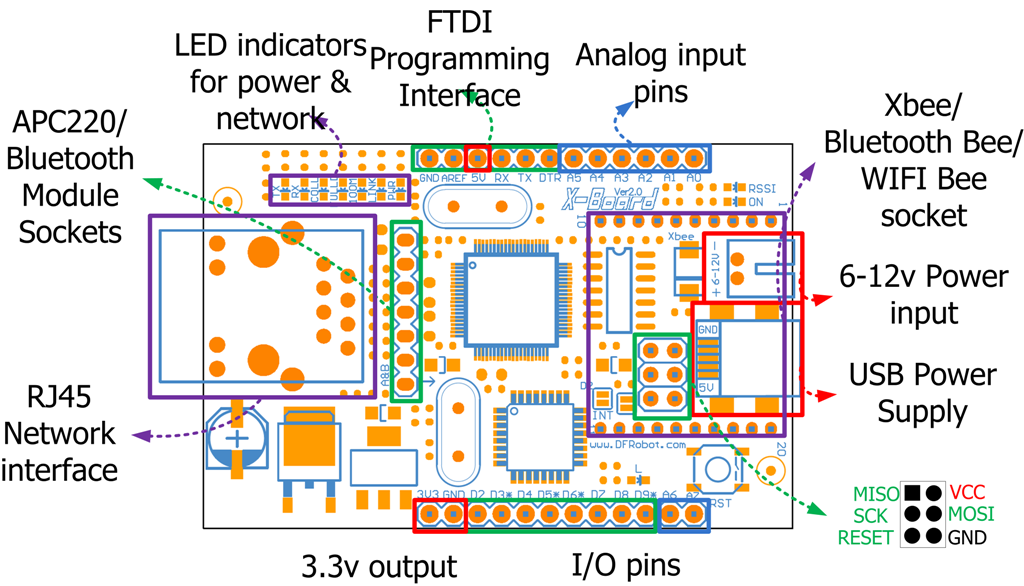
It has 8 Analog I/O pins and 8 digital pins, 4 of which have PWM (indicated by an asterisk). It is compatible with all XBee modules, and also comes with an integrated socket for APC220 RF Module or DF-Bluetooth Module. The XBoard can be programmed via an FTDI programmer or via the ICSP header. Power is provided through a Mini USB connector. You can setup a web server through which you may communicate with a remote Arduino using XBee radios, bluetooth or APC modules. This information can be posted to a web site, or to Twitter.
We have used our XBoard to control our office door from the internet. All we need to do if we forget our RFID badge is to login to our office WiFi and send the command to open the door! We have created a project guide which includes the list of parts, and source code to get this project going for yourself. The board requires FTDI basic board to upload sketches. It can be powered by a mini USB.
| '''Basic ''' | Led |
| - MCU: Atmega328P low voltage version (16Mhz) |
           -   Ethernet: WIZ5100
        -   Arduino Uno Bootloader
         -   Supply voltage: 5~12v
        -   Output voltage: 5v/3.3v
             -   Digital IO: 8
             -   Analog IO: 8
 -   Envionment Friendly: ROHS Compliance     |                          -   PWR: indicates that the board and shield are powered
                                                -   LINK: indicates the presence of a network link and flashes when the shield transmits or receives data
                                                                     -   FULLD: indicates that the network connection is full duplex
                                                        -   100M: indicates the presence of a 100 Mb/s network connection (as opposed to 10 Mb/s)
                                                                              -   RX: flashes when the shield receives data
                                                                               -   TX: flashes when the shield sends data
                                                                         -   COLL: flashes when network collisions are detected                           |

-
Hardware
- X-Board V2 x1
- FTDI Basic Breakout x1
- Ethernet cable x1
- USB x1
-
Software
- Arduino IDE V1.6.8 Click to Download Arduino IDE from Arduino®
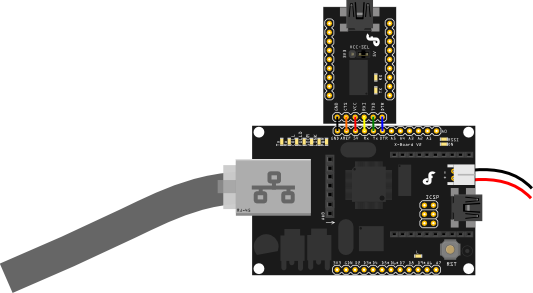
This connection diagram shows how to connect the FTDI programmer to the X-board for uploading an Arduino sketch.
NOTE: Please select "arduino UNO" from the boards list in the Arduino IDE. 
#include <Client.h>
#include <Ethernet.h>
#include <Server.h>
#include <Udp.h>
#include <SPI.h>
/*
 * Web Server
 *
 * A simple web server: Displays a button to open/close
 * a door and door status
 */
 //-----------------------BEGIN Variable setup -------------------------------

String readString = String(30); //string for fetching data from address
boolean LEDON = false; //LED status flag

int state;
int val=0;

byte mac[] = {
  0xDE, 0xAD, 0xBE, 0xEF, 0xFE, 0xED };
byte ip[] =  {
  192, 168, 0, 177 }; //Change your IP Address here
Server server(80); //Standard HTTP server port

//-----------------------END Variable setup-------------------------------

void setup()
{
  pinMode(4, OUTPUT);

  Ethernet.begin(mac, ip);
  server.begin();
  delay(100);
  Serial.begin(57600);  //XBee module Baud rate
  delay(100);
  }
void loop()
{
//---------------Web Server initialization------------------------------
  Client client = server.available();
  if (client) {

    boolean current_line_is_blank = true;
    while (client.connected()) {
      if (client.available()) {
        char c = client.read();
        if (readString.length() < 100)
      {

        readString += c;
      }
///////////Check button status to determine actions to take for submit button///////////////
       if(readString.indexOf("IO=1") >0){ // If door open request sent;
                                          // send instruction to remote arduino
             if (LEDON== false){          //Ensure it only send the info once
             //led has to be turned ON
             LEDON = true;                //Change LED state to print on the page
             Serial.print('G');           //Send command to remote Arduino
            }
           }
           if(readString.indexOf("IO=0") >0){//Same as above but not used in
                                             //this application
           if (LEDON== true){
             //led has to be turned OFF
             LEDON = false;
             Serial.print('K');
           }
           }
///////////////Finish checking and actions for submit button//////////////////

//------------------Standard web Server Jargon-------------------------------
        if (c == 'n' && current_line_is_blank) {
          // send a standard http response header
          client.println("HTTP/1.1 200 OK");
          client.println("Content-Type: html");
          client.println();
          client.println("<html>");
          client.println("<head>");
          client.println("<title>Xboard interface--Door control</title>");
          client.println("</head>");
          client.println("<body>");
          client.print("welcome to DFRobot"); //Print your own message here
          client.println("<br />");
          client.print("//*************************************");
          client.println("<br />");
          client.println("<br />");
          client.print("//*************************************");
          client.println("<br />");
          client.println("<br />");
          client.print("<form>");
          client.print("<input type=radio name=IO value=1 /> Open<br />");
          client.print("<input type=submit value=Submit/> </form><br />");
          client.println("</body>");
            break;
            }

        if (c == 'n') {
          // we're starting a new line
          current_line_is_blank = true;
        }
        else if (c != 'r') {
          // we've gotten a character on the current line
          current_line_is_blank = false;
        }
      }
    }
//------------------END Standard web Server Jargon-------------------------------

//-----------------Print door status on web page and auto refresh----------------
     if (LEDON){
          //printing LED status
         client.print("<font size='5'>DOOR status: ");
         client.println("<font color='green' size='5'>OPEN");
         client.println("<META HTTP-EQUIV=REFRESH CONTENT=2;url=http://192.168.0.177/>"); //Autorefresh
                        //Auto-refresh the site after 2 seconds to reset the door status to closed
     }
     else{
          client.print("<font size='5'>DOOR status: ");
          client.println("<font color='grey' size='5'>CLOSED");
     }
          client.println("<hr />");
          client.println("<hr />");
          client.println("</body></html>");
          //clearing string for next read
          readString="";
//-----------------END Print door status on web page and auto refresh----------------
    client.stop();
  }

/*Routine to read response from remote Arduino
 *and light local LED on PIN4
 */
   if (Serial.available() > 0) {
    val = Serial.read();
    if (val == 'H') { //These values ('H')can be changed to what ever you want
                      //just make sure you change them in both the server
                      //program and the client program
      digitalWrite(4, HIGH);
      delay (20);
     }
    if (val == 'L') {
      digitalWrite(4, LOW);
       delay (20);
    }
   }
}Schematics Tutorial V1(Remote Door Open via Mobile Phone)
The main differences between all 3 versions of the X-Board shown in the flowing table:

 get it from dfrobot store or dfrobot distributor.
category: Product Manual category: DFR Series category: MicroControllers