Relay_Shield_for_Arduino_V2.1_(SKU_DFR0144) - jimaobian/DFRobotWiki GitHub Wiki
Introduction
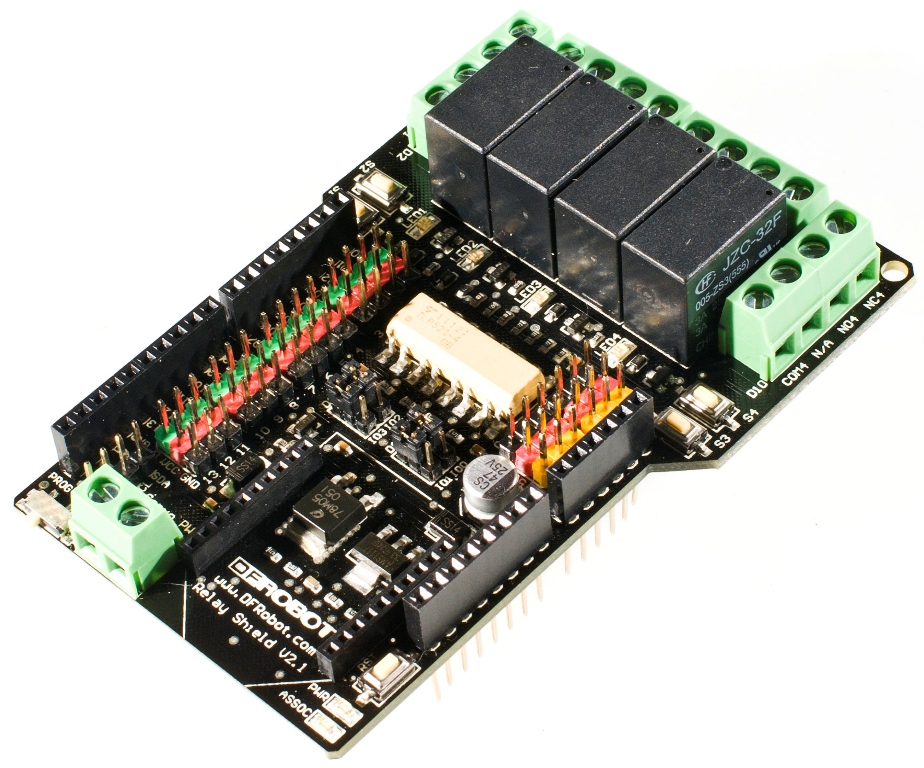
The DFRobot Relay shield V2.1 is capable of controlling 4 relays. The max switching power is DC 90W or AC 360VA. It is possible to control the Relay shield through Arduino/DFRduino using digital IOs with external 7 to 12V supply. With the built in xbee socket, it can be wirelessly controlled via Xbee/bluetooth/WPM. This makes it an ideal solution for automation and robotics.
Specification
- Compatible with Arduino Rev3
- 4 buttons to test module
- LED status indicator of relay
- Support Xbee IO directly control
- Xbee socket for wireless communication
- Selectable digital IO pin for control(Default digital 2,7,8,10)
- 6 channels Analog IO & 13 channels Digital IO
- Up to 4 Relay with photo-coupled circuit
- Relay information:
- Contact Rating 3A AC 120V / DC 24V
- Max Switching Voltage AC 240V / DC 60V
- Max Switching Current 5A
- Max Switching Power AC 360VA / DC 90W
- Electrical Life (Min) 100,000 Operations
- Mechanical Life (Min) 10,000,000 Operations
- Safety Standard(relay) UL cUL TUV CQC
- Coil Working Voltage 9VDC
- Working temperature -30℃ to +85℃
- Working temperature 40% - 85%
- Size:95x65mm
PinOut
 |
                                              |-----------------------------------------------|-------------------------------|-------------------------------|
                                              | **Pin**                                       | **Pin State:HIGH**            | **Pin State:LOW**             |
                                              | Digital 2                                     | NC1 is disconnected with COM1 | NC1 is connected with COM1    |
                                              |                                               | NO1 is connected with COM1    | NO1 is disconnected with COM1 |
                                              | Digital 7                                     | NC2 is disconnected with COM2 | NC2 is connected with COM2    |
                                              |                                               | NO2 is connected with COM2    | NO2 is disconnected with COM2 |
                                              | Digital 8                                     | NC3 is disconnected with COM3 | NC3 is connected with COM3    |
                                              |                                               | NO3 is connected with COM3    | NO3 is disconnected with COM3 |
                                              | Digital 10                                    | NC4 is disconnected with COM4 | NC4 is connected with COM4    |
                                              |                                               | NO4 is connected with COM4    | NO4 is disconnected with COM4 |
                                              | Note: NC: Normally Closed; NO: Normally Open. |                                                                  |
More detalis:
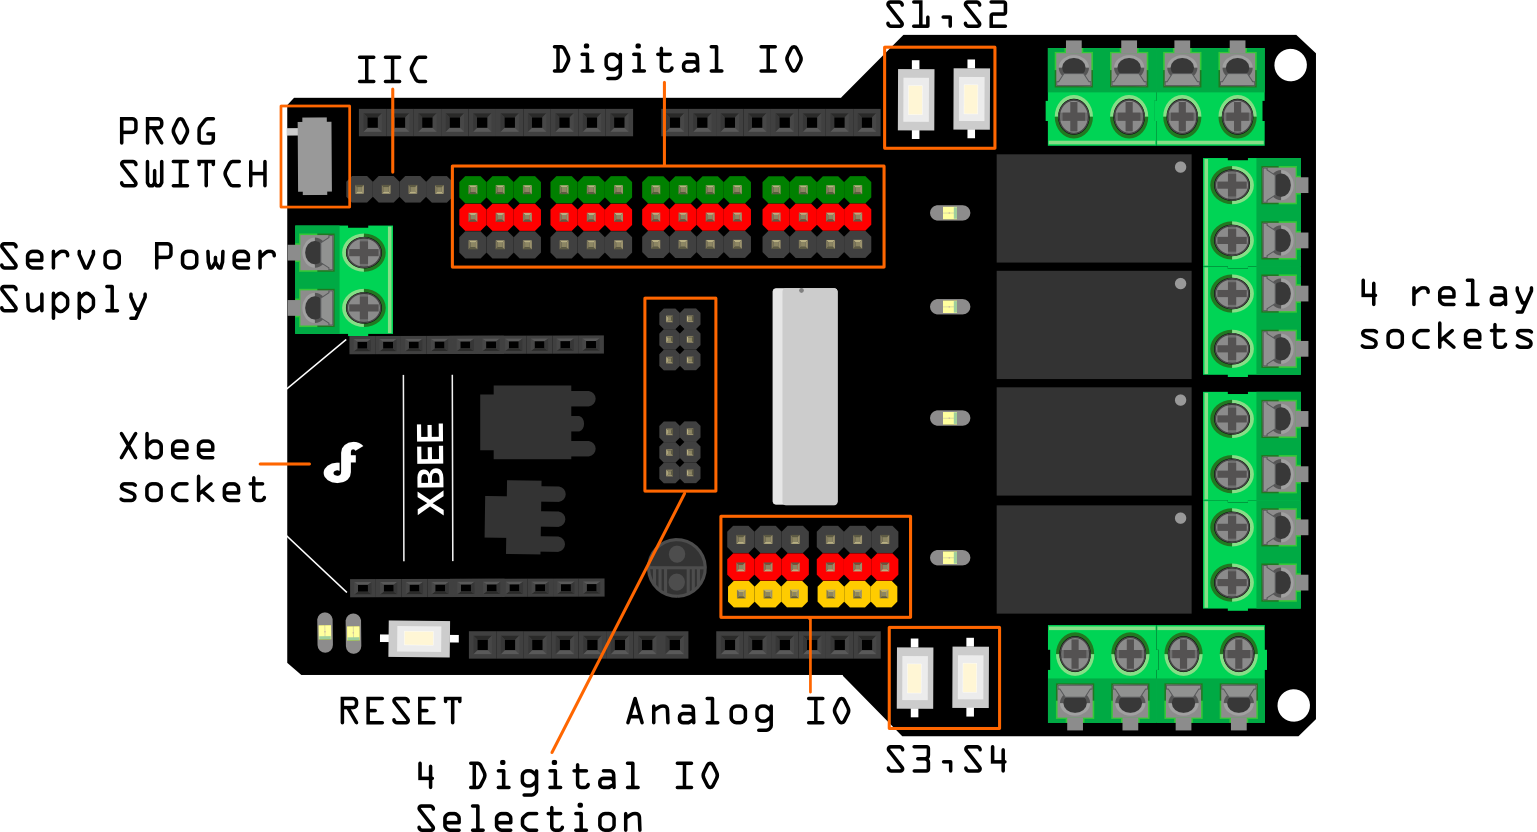
- PROG SWITCH:
- PROG: When programming or download the code if you plug the Xbee/bluetooth on the module
- RGN: Run the module after finishing downloading the code
- S1,S2,S3,S4: 4 Buttons to test the module that you needn't program,S1- S4 correspond to relay1-relay4
- Servo Power Supply: Just can supply power to the digital IO pins.
- 4 Digital IO selection headers for the Relays:
- D2,D7,D8,D10: Default,connect to Arduino digital 2,7,8,10 to drive the relays
- IO0,IO1,IO2,IO3:Connect to XBee's IO pins
- You can connect the middle pin header after you unplug the jumper, to Arduino digital IO with jumper cables depend on your needed pin mapping to drive relays. For example, when you use the board with an Arduino Ethernet board. They will conflict the digital 10, so you should remove the jumper on D10, and connect the middle pin to other digital IO.
- XBee interface: The XBee module supports Xbee radios, Bluetooth Bee, and the Wireless programming module. This gives the project a versatile wireless communications capability.
Tutorial
Connection Diagram
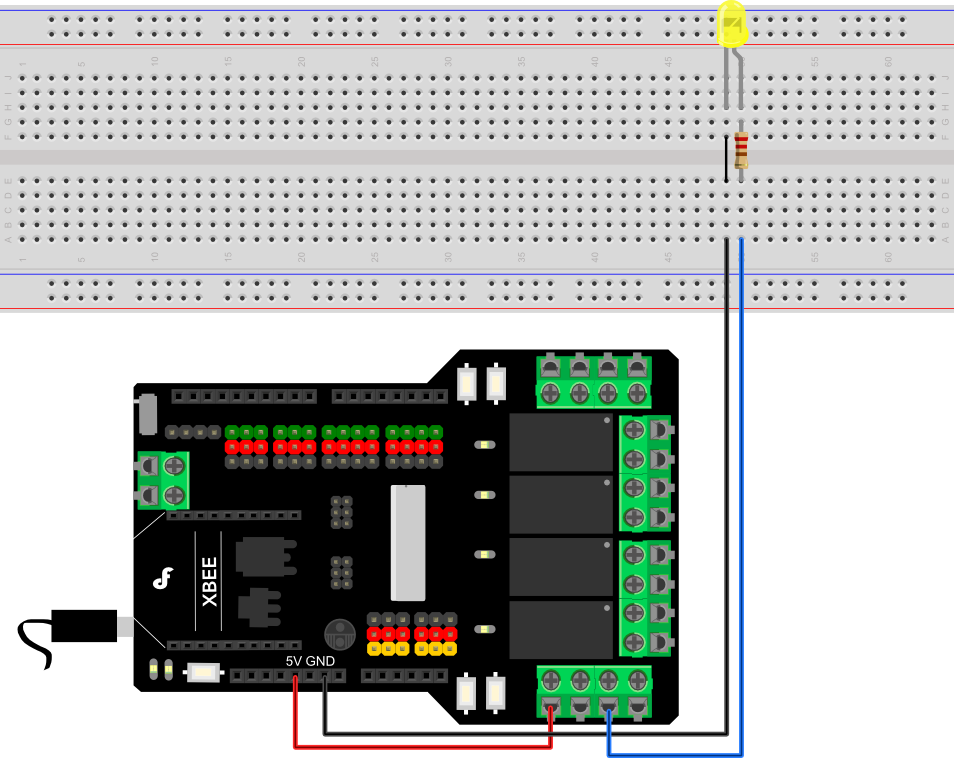
In this sample connection diagram it shows how LED can be controlled via relays, while this is a bit of overkill for controlling LEDs its only meant to be an example. These relays can be used to control lamps, or some other mid-voltage range appliances.
Plugging in an appliance
We will use "NO" for our example, using "NC" will simply reverse the logic, as explained above.
We recommend using a swappable cable to do this with, as using a relay requires you to perform some minor surgery on the appliance's cable. To plug in an appliance such as a lamp: Cut and strip a portion of the positive wire so that you end up with two ends of the wire as shown in Figure 2.
The relay should have the positive wire of the device being used connected to "COM" and to "NO" as shown in figure 2, and any digital signal pin on the arduino end (For example pin 13). Sending a digital high or a "1" will trigger the relay. Sending a digital low or "0" will disable the relay. 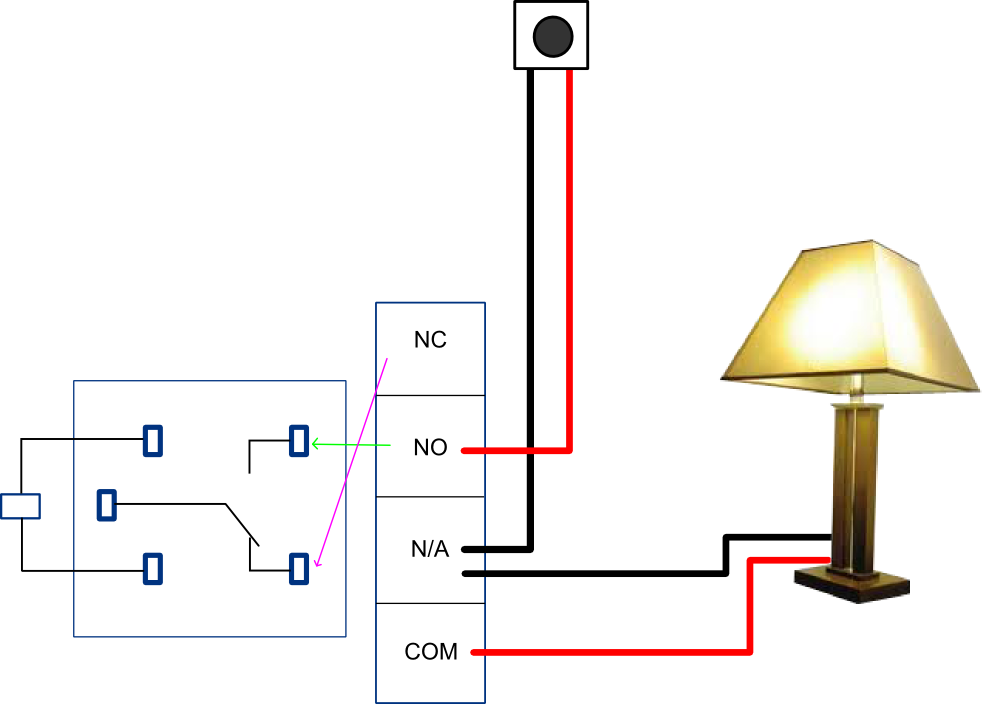
 Please be vary carful not to play with live circuits! 120V or 220V should not be taken lightly. Make sure the appliance to be tinckered with is unplugged from mains. DO NOT CONNECT IT TO THE WALL WHILE MESSING WITH THE CABLE!
Sample Code
byte relayPin[4] = {2,7,8,10};

//D2 -> RELAY1
//D7 -> RELAY2
//D8 -> RELAY3
//D10 -> RELAY4

void setup(){
  for(int i = 0; i < 4; i++)  pinMode(relayPin[i],OUTPUT);
}

// an sample to switch the 4 relays

void loop(){

  int i;
  for(i = 0; i < 4; i++)  digitalWrite(relayPin[i],HIGH);
  delay(1000);
  for(i = 0; i < 4; i++)  digitalWrite(relayPin[i],LOW);
  delay(1000);

}
A more elaborate sample code
/*
 # This Sample code is for testing the Relay shield V2.1 for Arduino.

 # Editor : Phoebe
 # Date   : 2013.2.28
 # Ver    : 0.1
 # Product: Relay shield for Arduino
 # SKU    : DRI0144

 # Hardwares:
 1. Arduino UNO
 2. Relay Shield For Arduino V2.1
 3  Power Supply:7~ 12V
 */

byte relayPin[4] = {
  2,7,8,10};
//D2 -> RELAY1
//D7 -> RELAY2
//D8 -> RELAY3
//D10 -> RELAY
char input=0;
int val;

void setup() {
  for(int i = 0; i < 4; i++)  pinMode(relayPin[i],OUTPUT);
  Serial.begin(57600);
  delay(100);
  Serial.println("Press 1-4 to control the state of the relay");
  Serial.println("waiting for input:");
  for(int j = 0; j < 4; j++)  digitalWrite(relayPin[j],LOW);
}

void loop() {
  if (Serial.available())
  {
    char input= Serial.read();
    if(input != -1)
    {
      switch(input)
      {

      case '1':
        Serial.println("Relay1");
        val=digitalRead(relayPin[0]);
        val=!val;
        digitalWrite(relayPin[0],val);
        break;
      case '2':
        Serial.println("Relay2");
        val=digitalRead(relayPin[1]);
        val=!val;
        digitalWrite(relayPin[1],val);
        break;
      case '3':
        Serial.println("Relay3");
        val=digitalRead(relayPin[2]);
        val=!val;
        digitalWrite(relayPin[2],val);
        break;
      case '4':
        Serial.println("Relay4");
        val=digitalRead(relayPin[3]);
        val=!val;
        digitalWrite(relayPin[3],val);
        break;

      default:
        if(input != '\r' && input != '\n')
         Serial.println("invalid entry");
        break;
      }
    }
//    else unablerelay();
  }
}
FAQ
| '''Q1. ''' I uploaded the first sketch to arduino, the 4 relays should be turned on and off every second, but nothing happened. What did I miss? |
'''A1. ''' It needs an external power supply to drive the xbee module and relays. Suggested: 7-12V.
| '''Q2. ''' I got te shield working with several types of code but need to have both 9V power and USB cable conected. This can't be right. |
'''A2. ''' Please check if your power supply was working correctly.
| '''Q3. '''Is it possible to use Arduino D4 to control Relay 1? |
'''A3. ''' It's easy to make it just by removing the jumper on the board and then connect the pin of Relay1 to any Digital pin you need, read more on DFRobot Forum.
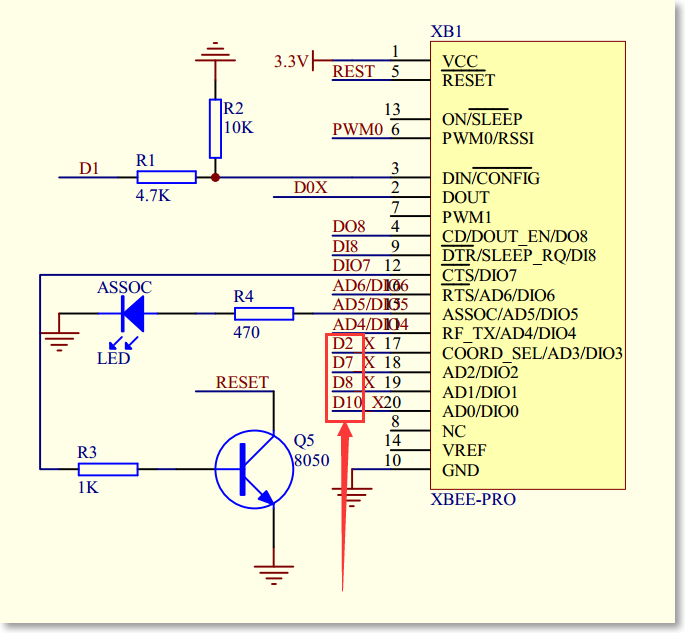
| '''Q4. ''' Is it possible to use your relay shield v2.1 with only an XBee radio and no Arduino? If so, what jumpers need to be a applied and where? |
'''A4. '''It is feasible since some Xbee pins have been attached to the control pins of the relays, shown as the schematic. So the left thing is to power the shield: Leads from a battery can be inserted in the Gnd and Vin pin headers of the POWER connector.
| '''Q5. '''With your relay shield v2.1 is it possible for the Arduino to read the status of some of the digital I/O pins of an XBee? Because the XBee is 3.3 volt there would need to be a logic level converter on the board, I believe. |
'''A5. '''It is OK. 3.3V will be recognized as high level.
 For any questions/advice/cool ideas to share, please visit DFRobot Forum or email to [email protected]
More
- Relay shield for Arduino v1.2 Wiki Doc
- Schematic
- HJR4102 datasheet
- [http://www.dfrobot.com/wiki/index.php/Xbee| Xbee tutorial]
- Library installation
 get it from dfrobot store or dfrobot distributor.
category: Product Manual category: DFR Series category: Shield category: Diagram category: DFRobot