MicroSD_card_module_for_Arduino_(SKU_DFR0229) - jimaobian/DFRobotWiki GitHub Wiki

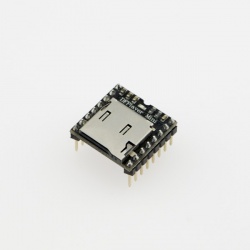
This is a Micro SD(TF) module from DFRobot. It is compatible with TF SD card (commonly used in Mobile Phone) which is the most tiny card in the market. SD module has various applications such as data logger, audio, video, graphics. This module will greatly expand the capbility an Arduino can do with their poor limited memory.
This module has SPI interface and 5V power supply which is compatible with Arduino UNO/Mega. The Pinout is fully compatiblw with DFRobot's IO Expansion Shield V5.
- Working Voltage:5V
- Size:20x28mm
- Interface: SPI
- Compatible: MicroSD(TF)
 |
                                                      |:-------------:|:-----------:|
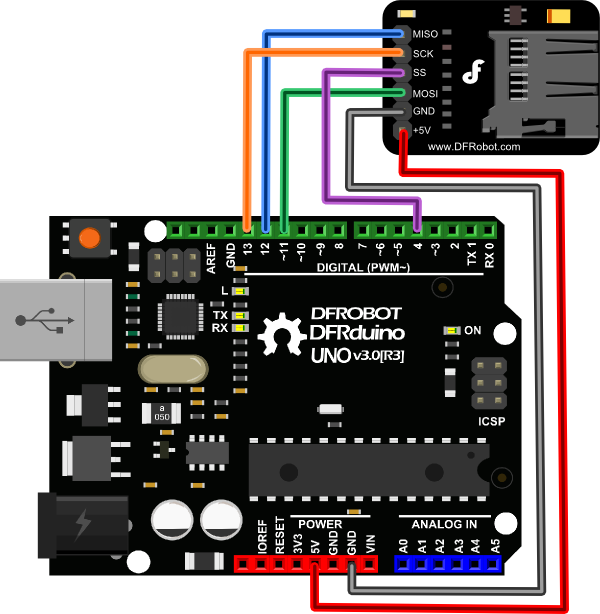
                                                      |  **SDmodule** | **Arduino** |
                                                      |      MISO     |     D12     |
                                                      |      SCK      |     D13     |
                                                      | SS chipSelect |      D4     |
                                                      |      MOSI     |     D11     |
                                                      |      GND      |     GND     |
                                                      |      VCC      |      5V     |  |
| NOTE: Different Boards may have different SPI pin map, please check the datasheet of your controller. |
How to install Library? Open the sample sketch "CardInfo"in the Arduino IDE. As you can see, it include the SD library called SD.h, you could also download other open source library on the web.
/*
  SD card test

 This example shows how use the utility libraries on which the'
 SD library is based in order to get info about your SD card.
 Very useful for testing a card when you're not sure whether its working or not.

 The circuit:
  * SD card attached to SPI bus as follows:
 ** MOSI - pin 11 on Arduino Uno/Duemilanove/Diecimila
 ** MISO - pin 12 on Arduino Uno/Duemilanove/Diecimila
 ** CLK - pin 13 on Arduino Uno/Duemilanove/Diecimila
 ** CS - depends on your SD card shield or module.
    Pin 4 used here for consistency with other Arduino examples


 created  28 Mar 2011
 by Limor Fried
 modified 9 Apr 2012
 by Tom Igoe
 */
 // include the SD library:
#include <SD.h>

// set up variables using the SD utility library functions:
Sd2Card card;
SdVolume volume;
SdFile root;

// change this to match your SD shield or module;
// Arduino Ethernet shield: pin 4
// Adafruit SD shields and modules: pin 10
// Sparkfun SD shield: pin 8
const int chipSelect = 4;

void setup()
{
 // Open serial communications and wait for port to open:
  Serial.begin(9600);
   while (!Serial) {
    ; // wait for serial port to connect. Needed for Leonardo only
  }


  Serial.print("\nInitializing SD card...");
  // On the Ethernet Shield, CS is pin 4. It's set as an output by default.
  // Note that even if it's not used as the CS pin, the hardware SS pin
  // (10 on most Arduino boards, 53 on the Mega) must be left as an output
  // or the SD library functions will not work.
  pinMode(10, OUTPUT);     // change this to 53 on a mega


  // we'll use the initialization code from the utility libraries
  // since we're just testing if the card is working!
  if (!card.init(SPI_HALF_SPEED, chipSelect)) {
    Serial.println("initialization failed. Things to check:");
    Serial.println("* is a card is inserted?");
    Serial.println("* Is your wiring correct?");
    Serial.println("* did you change the chipSelect pin to match your shield or module?");
    return;
  } else {
   Serial.println("Wiring is correct and a card is present.");
  }

  // print the type of card
  Serial.print("\nCard type: ");
  switch(card.type()) {
    case SD_CARD_TYPE_SD1:
      Serial.println("SD1");
      break;
    case SD_CARD_TYPE_SD2:
      Serial.println("SD2");
      break;
    case SD_CARD_TYPE_SDHC:
      Serial.println("SDHC");
      break;
    default:
      Serial.println("Unknown");
  }

  // Now we will try to open the 'volume'/'partition' - it should be FAT16 or FAT32
  if (!volume.init(card)) {
    Serial.println("Could not find FAT16/FAT32 partition.\nMake sure you've formatted the card");
    return;
  }


  // print the type and size of the first FAT-type volume
  uint32_t volumesize;
  Serial.print("\nVolume type is FAT");
  Serial.println(volume.fatType(), DEC);
  Serial.println();

  volumesize = volume.blocksPerCluster();    // clusters are collections of blocks
  volumesize *= volume.clusterCount();       // we'll have a lot of clusters
  volumesize *= 512;                            // SD card blocks are always 512 bytes
  Serial.print("Volume size (bytes): ");
  Serial.println(volumesize);
  Serial.print("Volume size (Kbytes): ");
  volumesize /= 1024;
  Serial.println(volumesize);
  Serial.print("Volume size (Mbytes): ");
  volumesize /= 1024;
  Serial.println(volumesize);


  Serial.println("\nFiles found on the card (name, date and size in bytes): ");
  root.openRoot(volume);

  // list all files in the card with date and size
  root.ls(LS_R | LS_DATE | LS_SIZE);
}


void loop(void) {

}If your SD card is good and wiring is correct, open the Arduino IDE serial monitor, then you can see your SD card information. Or you might get this warn shown in the right picture.
File:500px-DFR0229resture1.png%7CSuccess File:500px-DFR0229resfail1.jpg%7CFailure
| For any questions and more cool ideas to share, please visit DFRobot Forum |
