LCD_Keypad_Shield_V2.0_SKU__DFR0374 - jimaobian/DFRobotWiki GitHub Wiki

Introduction
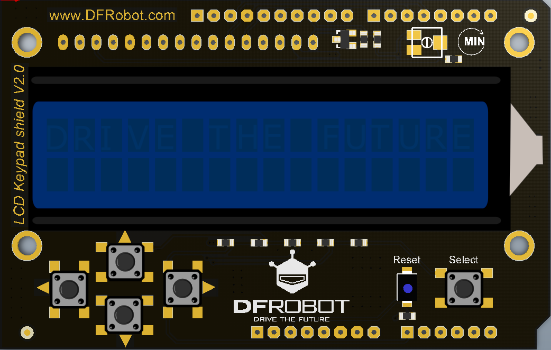
Our LCD Keypad Shield V2.0 is a 2 line, 16 character Arduino LCD display expansion shield, based on V1.0. We have simplified the APC interface and the other GPIO pins and retained 5 input buttons: 1 menu select button and 4 control buttons. We have provided a simple Arduino library that makes screen driving easier and means you do not have to learn complicated LCD working principles to get it functioning. It is compatible with most Arduino boards, such as UNO and Leonardo.
|
|
 |
IOREF pin for Version 2: |
                                             The board's IOREF pin is connected with pin 5V! So when adding the DFR0374 to the stack of board( controller), the controller's supply voltage would changed to 5V! So it only can be compatible with the controller working at 5V. If you need to use controller working at other voltage, e.g. 3.3V, you need **CUT OFF** the IOREF pin of DRI0009.

                                             We are deeply sorry about the mistake! We will revise the design in the next version.                                                                                                                                                                                                                                                                  |
Specification
- Operating Voltage: 5V
- 5 input buttons
- Drive Pin: D4~D10
- Module size: 54*84mm
- 1602 blue background liquid crystal display (16 lines, 2 bytes)
Layout
|
|
 |
|
| Pin |
Function |
| ANALOG A0 |
BUTTON (SELECT, UP, RIGHT, DOWN,LEFT) |
| DIGITAL 4 |
DB4 |
| DIGITAL 5 |
DB5 |
| DIGITAL 6 |
DB6 |
| DIGITAL 7 |
DB7 |
| DIGITAL 8 |
RS (DATA OR SELECT) |
| DIGITAL 9 |
ENABLE |
| DIGITAL 10 |
Backlight Control |
Tutorial
- Hardware
- UNO x1
- LCD Keypad Shield V2.0 x1
- Software
Libraries
- Download and install the LiquidCrystal Library: Click here to download library files (Arduino Library Installation Tutorial)
- Next, open the Arduino IDE and copy the following code to the IDE window.
- Select the correct serial port (the serial port varies depending on your machine) and board (Arduino UNO).
- When the code has successfully uploaded, try pressing buttons on the shield observe what happens with the LCD.
#include <LiquidCrystal.h>

/*******************************************************

This program is used to test the LCD module display and 5 buttons.

********************************************************/

// Select the pin used on LCD
LiquidCrystal lcd(8, 9, 4, 5, 6, 7);

// define the button
int lcd_key     = 0;
int adc_key_in  = 0;

#define btnRIGHT  0
#define btnUP     1
#define btnDOWN   2
#define btnLEFT   3
#define btnSELECT 4
#define btnNONE   5

//read the button value
int read_LCD_buttons()
{
 adc_key_in = analogRead(0);          // read analog A0 value
 // when read the 5 key values in the vicinity of the following:0,144,329,504,741
 // By setting different threshold, you can read the one button
 if (adc_key_in > 1000) return btnNONE;
 if (adc_key_in < 50)   return btnRIGHT;
 if (adc_key_in < 250)  return btnUP;
 if (adc_key_in < 450)  return btnDOWN;
 if (adc_key_in < 650)  return btnLEFT;
 if (adc_key_in < 850)  return btnSELECT;

 // V1.0 Use the following version threshold:
/*
 if (adc_key_in < 50)   return btnRIGHT;
 if (adc_key_in < 195)  return btnUP;
 if (adc_key_in < 380)  return btnDOWN;
 if (adc_key_in < 555)  return btnLEFT;
 if (adc_key_in < 790)  return btnSELECT;
*/


 return btnNONE;
}

void setup()
{
 lcd.begin(16, 2);              // star
 lcd.setCursor(0,0);
 lcd.print("Push the buttons"); // display“Push the buttons”
}

void loop()
{
 lcd.setCursor(9,1);            // The cursor is set at second. and have 9 spaces
 lcd.print(millis()/1000);      // Output waiting time
 lcd.setCursor(0,1);            // The cursor moves to the beginning of the second line.
 lcd_key = read_LCD_buttons();  // read key

 switch (lcd_key)               // display key
 {
   case btnRIGHT:
     {
     lcd.print("RIGHT ");
     break;
     }
   case btnLEFT:
     {
     lcd.print("LEFT   ");
     break;
     }
   case btnUP:
     {
     lcd.print("UP    ");
     break;
     }
   case btnDOWN:
     {
     lcd.print("DOWN  ");
     break;
     }
   case btnSELECT:
     {
     lcd.print("SELECT");
     break;
     }
     case btnNONE:
     {
     lcd.print("NONE  ");
     break;
     }
 }
}
More
LCD Keypad Shield V2.0 Schematic
|
| If you have any questions or more cool ideas to share, please visit the DFRobot Forum |
 buy from dfrobot store or dfrobot distributor list


 buy from dfrobot store or dfrobot distributor list