Gravity__Vibration_Module_SKU__DFR0440 - jimaobian/DFRobotWiki GitHub Wiki

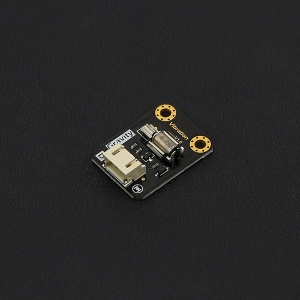
Have you ever wondered how to implement a vibration motor in your project, like you would find in a mobile phone? The newest vibration module in the DFRobot "Gravity" series gives you in-depth understanding of vibration motor principles. This module uses a high quality small vibration motor that is the size of a coin. Using the Gravity 3 pin interface, you can plug and play this module for your convenience.
- Operating Voltage: 5v
- Control mode: High-Low level/PWM signal
- Dimension: 30 x 22 mm/ 1.18 * 0.78 inches
 |
                                                            |---------|-----------|----------------------|
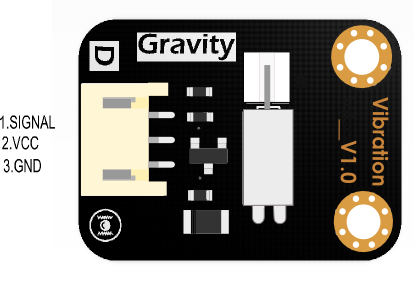
                                                            | **Num** | **Label** | **Description**      |
                                                            | 1       | Signal    | Control signal input |
                                                            | 2       | VCC       | VCC                  |
                                                            | 3       | GND       | GND                  |  |
- Introduce working principles of the vibration module.
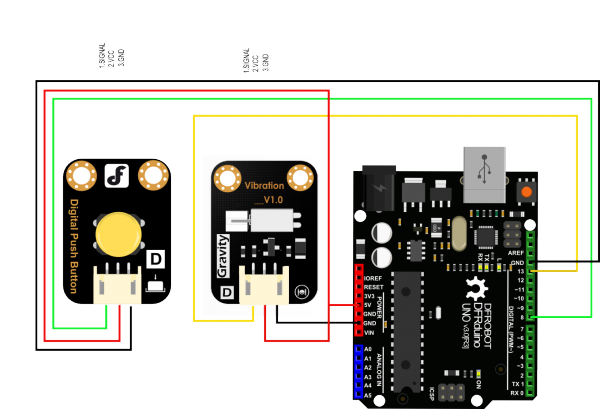
- Introduce control mode of the micro vibration module by simple examples and pictures.(high level work, low level stop).
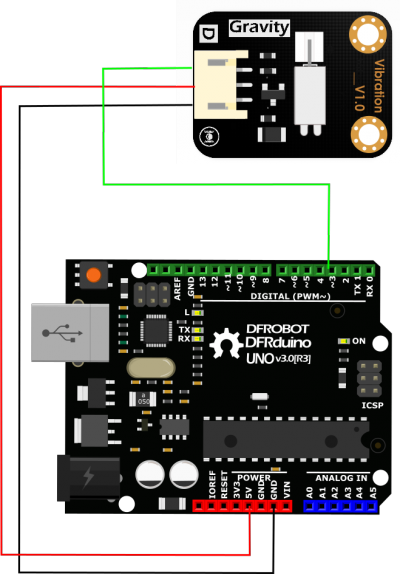
- Control the module vibration intensity by PWM.
-
Hardware
- DFRduino UNO x1
- Vibration Module x1
- Dupont jumpers
- Digital Push Button DFR0029-Y X1
-
Software
- Arduino IDE Click to download Arduino IDE
The vibration module uses a vibration motor as its vibration source. Vibration is created by a set of adjustable weighted blocks attached to the end of rotating shaft. The centrifugal force generated by high speed rotation of the shaft and weighted blocks creates vibration.

/***************************************************
* Vibration
* ****************************************************
*  This example shows that the module will vibrate for 5 seconds when we press the button


* @author Dongzi([email protected])
* @version  V1.0
* @date  2016-5-26
* All above must be included in any redistribution
* ****************************************************/
const int buttonPin = 8;     // the number of the pushbutton pin
const int VibPin =  11;      // the number of the Vibration Module pin
int key=0;
void setup()
    {
     pinMode(VibPin,OUTPUT);    // Set the digital pin(11) as output
     pinMode(buttonPin, INPUT); // Set the digital pin(8) as input
    }

void loop()
       {
             key=digitalRead(buttonPin);
              if(key==LOW)
                    {
                    digitalWrite(VibPin,HIGH);   //Turn on the  Vibration Module
                      delay(5000);   //Waits for 5 seconds
                    digitalWrite(VibPin,LOW);  //Turn off the  Vibration Module
                     }
               else
               digitalWrite(VibPin,LOW); //Turn off the  Vibration Module
  // put your main code here, to run repeatedly:

       }
Results: when the button of pin 8 is pressed, the vibration module will be on for 5 seconds, then stop and wait for the button to be pushed again

//Arduino Sample Code for Vibration Module
//www.DFRobot.com
//Version 1.0

#define Vibration 3    //define driver pins

void setup()
{
  pinMode(Vibration,OUTPUT);
  Serial.begin(9600);    //Baudrate: 9600
}
void loop()
{
  analogWrite(Vibration, 160);   //PWM
  delay(1000);
  analogWrite(Vibration, 200);   //PWM
  delay(1000);
  analogWrite(Vibration, 255);   //PWM
  delay(1000);
}
Results: With the PWM value increases, amplitude increases
| For more questions or interesting projects, you can visit the forum! |
Schematic
Layout
 shopping from [link dfrobot store] or dfrobot distributor.