Gravity_Analog_AC_Current_Sensor_(SKU_SEN0211) - jimaobian/DFRobotWiki GitHub Wiki

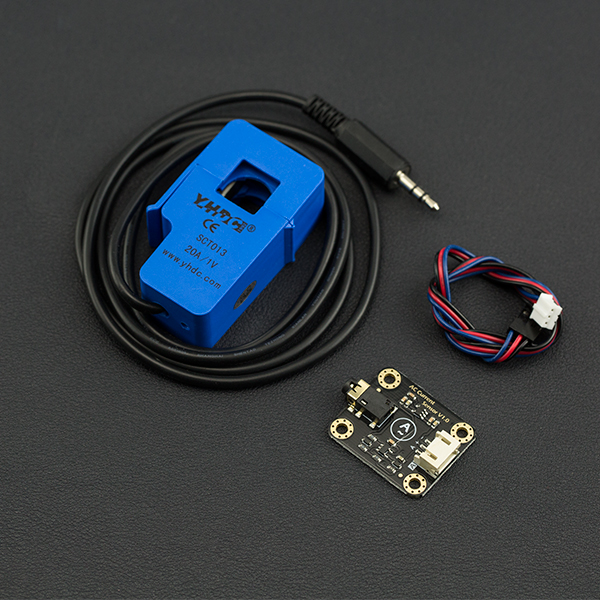
When you want to measure AC current it is impractical and hazardous to cut in to your live wiring. The analog AC current sensor developed by DFRobot is a good solution to this problem. Using induction you can measure AC current without intrusive methods. Place your AC wire inside the unit, connect the unit to the sensor board using the 3.5mm jack connector and connect the sensor board to an analog input on your microcontroller. Use this sensor to measure AC motors, lighting equipment, air compressors or any other devices that use AC current.
-
Module
- Operating Voltage: 3.3V - 5.5V
- Analog Output Voltage: 0.2V - 2.8V (DC)
- AC Signal Input Range: 0 - 1V (AC)
- Relative Error: + 3%
- Interface: PH2.0-3P
- Dimensions: 32 * 27 mm/1.26 * 1.06 inches
-
AC Current Sensor Probe
- AC Measurement Range: 0 - 20A
- AC Signal Output: 0 - 1V AC map onto 0-20 A
- Non-linearity: ±3% (10% ~ 120% of the rated input current)
- lead length: 1.5 meters
- Opening and closing times: >= 1000 times
- Working temperature: -25℃ to +70℃
- Dimensions: 13 * 13mm/ 0.51 * 0.51 inches
| --------------------------------------------- | |
 |
                                               |-----------------------------------------------------------------------------|
                                               | |                                                                         |
                                                |-------------------------------------------------------------------------|
                                                | |           |                           |                             |
                                                 |-----------|---------------------------|-----------------------------|
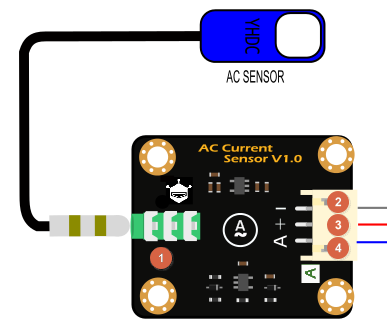
                                                 | **LABEL** | **NAME**                  | **Function Description**    |
                                                 | 1         | AC Transformer Connection | AC Transformer Input Signal |
                                                 | 2         | GND                       | GND                         |
                                                 | 3         | VCC                       | Power Input +(3.3V-5.5V)    |
                                                 | 4         | Signal Output             | Signal Output               |  |  |  |
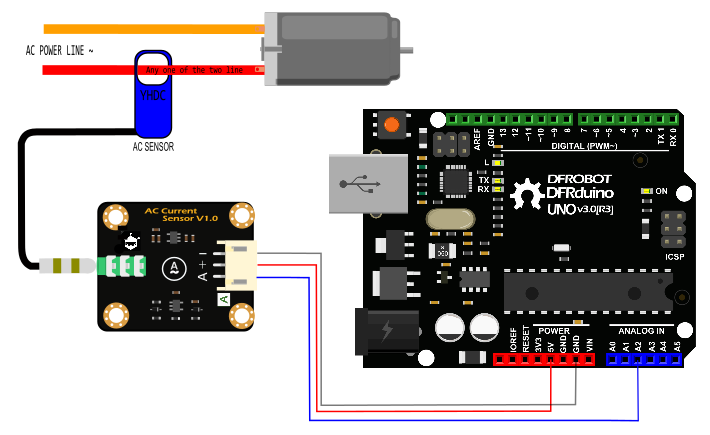
This tutorial will demonstrate how to use the AC transformer and AC sensor module to detect AC current
-
Hardware
- UNO x1
- AC current transformer x1
- AC current sensor module x1
- LCD Keypad Shield For Arduino x1
- PH2.0-3P cable x1
-
Software
- Arduino IDE V1.6.5 Click to Download Arduino IDE from Arduino®

 |
the probe of the ac transformer can only clamp to one ac wire at a time. It cannot be clamped to two at the same time! |
/***************************************************
 This example reads Analog AC Current Sensor.

 Created 2016-3-10
 By berinie Chen <[email protected]>

 GNU Lesser General Public License.
 See <http://www.gnu.org/licenses/> for details.
 All above must be included in any redistribution
 ****************************************************/

/***********Notice and Troubleshooting***************
 1.Connection and Diagram can be found here  http://wiki.dfrobot.com.cn/index.php?title=%EF%BC%88SKU:SEN0211%EF%BC%89%E6%A8%A1%E6%8B%9F%E9%87%8F%E4%BA%A4%E6%B5%81%E7%94%B5%E6%B5%81%E4%BC%A0%E6%84%9F%E5%99%A8#.E6.A0.B7.E4.BE.8B.E4.BB.A3.E7.A0.81
 2.This code is tested on Arduino Uno.
 ****************************************************/

float Vref = 0;
const int ACPin = A2;         //set arduino signal read pin
#define ACTectionRange 20;    //set Non-invasive AC Current Sensor tection range (20A,30A,50A,100A)
void setup()
{
  Serial.begin(115200);
  pinMode(13, OUTPUT);
  Vref = readVref();          //Read reference voltage
}

void loop()
{
  float ACCurrentValue = readACCurrentValue(); //read AC Current Value
  Serial.println(ACCurrentValue);
  digitalWrite(13, HIGH);
  delay(50);
  digitalWrite(13, LOW);
  delay(50);
}

float readACCurrentValue()
{
  float ACCurrtntValue = 0;
  unsigned int peakVoltage = 0;
  unsigned int voltageVirtualValue = 0;  //Vrms
  for (int i = 0; i < 5; i++)
  {
    peakVoltage += analogRead(ACPin);   //read peak voltage
    delay(1);
  }
  peakVoltage = peakVoltage / 5;
  voltageVirtualValue = peakVoltage * 0.707;    //change the peak voltage to the Virtual Value of voltage

  /*The circuit is amplified by 2 times, so it is divided by 2.*/
  voltageVirtualValue = (voltageVirtualValue * Vref / 1024) / 2;

  ACCurrtntValue = voltageVirtualValue * ACTectionRange;

  return ACCurrtntValue/1000;
}


/*Read reference voltage*/
long readVref()
{
  long result;
#if defined(__AVR_ATmega168__) || defined(__AVR_ATmega328__) || defined (__AVR_ATmega328P__)
  ADMUX = _BV(REFS0) | _BV(MUX3) | _BV(MUX2) | _BV(MUX1);
#elif defined(__AVR_ATmega32U4__) || defined(__AVR_ATmega1280__) || defined(__AVR_ATmega2560__) || defined(__AVR_AT90USB1286__)
  ADMUX = _BV(REFS0) | _BV(MUX4) | _BV(MUX3) | _BV(MUX2) | _BV(MUX1);
  ADCSRB &= ~_BV(MUX5);   // Without this the function always returns -1 on the ATmega2560 http://openenergymonitor.org/emon/node/2253#comment-11432
#elif defined (__AVR_ATtiny24__) || defined(__AVR_ATtiny44__) || defined(__AVR_ATtiny84__)
  ADMUX = _BV(MUX5) | _BV(MUX0);
#elif defined (__AVR_ATtiny25__) || defined(__AVR_ATtiny45__) || defined(__AVR_ATtiny85__)
  ADMUX = _BV(MUX3) | _BV(MUX2);
#endif
#if defined(__AVR__)
  delay(2);                                        // Wait for Vref to settle
  ADCSRA |= _BV(ADSC);                             // Convert
  while (bit_is_set(ADCSRA, ADSC));
  result = ADCL;
  result |= ADCH << 8;
  result = 1126400L / result;  //1100mV*1024 ADC steps http://openenergymonitor.org/emon/node/1186
  return result;
#elif defined(__arm__)
  return (3300);                                  //Arduino Due
#else
  return (3300);                                  //Guess that other un-supported architectures will be running a 3.3V!
#endif
}| ### Connection Diagram with LiquidCrystal |

 |
the probe of the ac transformer can only clamp one ac wire at a time. It cannot be clamped two at the same time! |
/***************************************************
 This example reads Analog AC Current Sensor.

 Created 2016-3-10
 By berinie Chen <[email protected]>

 GNU Lesser General Public License.
 See <http://www.gnu.org/licenses/> for details.
 All above must be included in any redistribution
 ****************************************************/

/***********Notice and Troubleshooting***************
 1.Connection and Diagram can be found here  http://www.dfrobot.com/wiki/index.php?title=Gravity:Analog_AC_Current_Sensor_(SKU:SEN0211)#Sample_Code
 2.This code is tested on Arduino Uno.
 ****************************************************/
#include <LiquidCrystal.h>

LiquidCrystal lcd(8, 9, 4, 5, 6, 7);        // select the pins used on the LCD panel

float Vref = 0;
const int ACPin = A2;         //set arduino signal read pin
#define ACTectionRange 20; //set Non-invasive AC Current Sensor tection range (20A,30A,50A,100A)
void setup()
{
  Serial.begin(115200);
  lcd.begin(16, 2);                       // start the library
  pinMode(13, OUTPUT);
  Vref = readVref();    //Read reference voltage
}

void loop()
{
  lcd.setCursor(3, 0);
  float ACCurrentValue = readACCurrentValue(); //read AC Current Value
//  Serial.println(ACCurrentValue);
  lcd.print("AC CURRENT");
  lcd.setCursor(5, 1);
  lcd.print(ACCurrentValue);
  lcd.print("  A");
  digitalWrite(13, HIGH);
  delay(50);
  digitalWrite(13, LOW);
  delay(50);
}

float readACCurrentValue()
{
  float ACCurrtntValue = 0;
  unsigned int peakVoltage = 0;
  unsigned int voltageVirtualValue = 0;  //Vrms
  for (int i = 0; i < 5; i++)
  {
    peakVoltage += analogRead(ACPin);   //read peak voltage
    delay(1);
  }
  peakVoltage = peakVoltage / 5;
  voltageVirtualValue = peakVoltage * 0.707;    //change the peak voltage to the Virtual Value of voltage

  /*The circuit is amplified by 2 times, so it is divided by 2.*/
  voltageVirtualValue = (voltageVirtualValue * Vref / 1024) / 2;

  ACCurrtntValue = voltageVirtualValue * ACTectionRange;

  return ACCurrtntValue/1000;
}


/*Read reference voltage*/
long readVref()
{
  long result;
#if defined(__AVR_ATmega168__) || defined(__AVR_ATmega328__) || defined (__AVR_ATmega328P__)
  ADMUX = _BV(REFS0) | _BV(MUX3) | _BV(MUX2) | _BV(MUX1);
#elif defined(__AVR_ATmega32U4__) || defined(__AVR_ATmega1280__) || defined(__AVR_ATmega2560__) || defined(__AVR_AT90USB1286__)
  ADMUX = _BV(REFS0) | _BV(MUX4) | _BV(MUX3) | _BV(MUX2) | _BV(MUX1);
  ADCSRB &= ~_BV(MUX5);   // Without this the function always returns -1 on the ATmega2560 http://openenergymonitor.org/emon/node/2253#comment-11432
#elif defined (__AVR_ATtiny24__) || defined(__AVR_ATtiny44__) || defined(__AVR_ATtiny84__)
  ADMUX = _BV(MUX5) | _BV(MUX0);
#elif defined (__AVR_ATtiny25__) || defined(__AVR_ATtiny45__) || defined(__AVR_ATtiny85__)
  ADMUX = _BV(MUX3) | _BV(MUX2);
#endif
#if defined(__AVR__)
  delay(2);                                        // Wait for Vref to settle
  ADCSRA |= _BV(ADSC);                             // Convert
  while (bit_is_set(ADCSRA, ADSC));
  result = ADCL;
  result |= ADCH << 8;
  result = 1126400L / result;  //1100mV*1024 ADC steps http://openenergymonitor.org/emon/node/1186
  return result;
#elif defined(__arm__)
  return (3300);                                  //Arduino Due
#else
  return (3300);                                  //Guess that other un-supported architectures will be running a 3.3V!
#endif
}There are no questions about this product yet. If you have any problems or suggestions, you are welcome to email us or post on the DFRobot forum!
 For any questions/advice/cool ideas to share, please visit the DFRobot Forum or email [email protected]
Arduino Sample code
Schematic
Layout
Github Respository
 get it from dfrobot store or dfrobot distributor.