Curie_Nano_SKU___DFR0453 - jimaobian/DFRobotWiki GitHub Wiki

Introduction
The Curie Nano is a small development tool based on the Intel® Curie™ module. It is easy to use and perfectly compatible with the Genuino/Arduino 101. The small size allows it to better fit your project's development and creation and makes it ideal for wearable tech and small prototypes. The Intel Curie module contains a x86 quark core and a 32bit ARC architecture core (Zephyr), integrated Bluetooth 4.0 and 6 axis attitude sensor. The module's clock frequency is0 32MHZ and the cross tool chain of Intel can support the development of two cores. The Intel Curie includes dual core storage and users are able to use 196Kb Flash (total 384Kb) and 24Kb SRAM (total 80Kb). It is more than sufficient for most development scenarios with the added bonus of Intel's strong support network to aid your development.
Specification
- Control Chip: Intel Curie
- BAT Port Power Supply Voltage: 3.5V-6.5V
- 5V Port Voltage: 4.5V-5.5V
- 3V3 Port Voltage: 2.97V-3.63V
- Digital IO Ports: 15 (including 4 PWM pins D3, D5, D6, D9,)
- Analog IO Input: 6
- IO Port DC Drive Current: 20mA
- Integrated Bluetooth 4.0
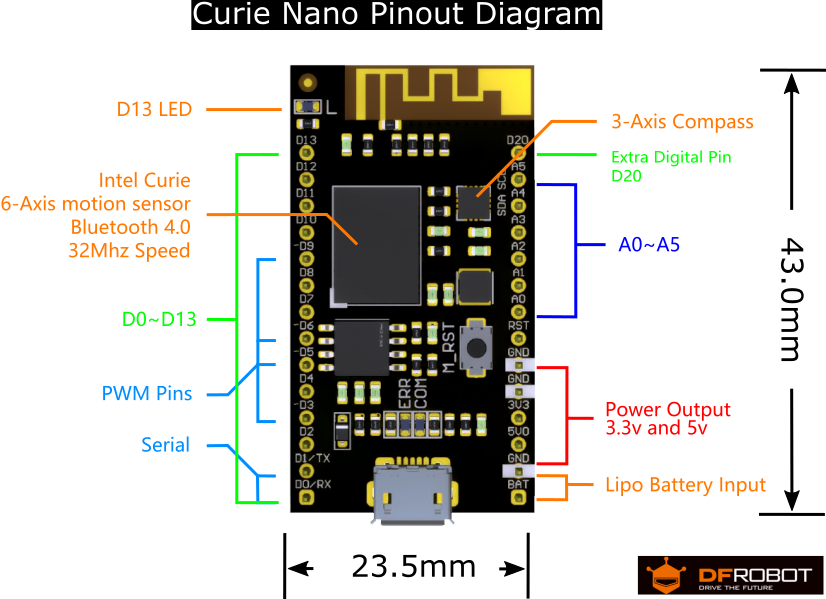
- Integrated 6 axis accelerometer and 3 axis electronic compass on board, full inertial navigation
- Onboard boost circuit can provide 1.5A@5v sensor power supply when using lithium battery supply
- Clock speed: 32Mhz
- Compatible with Arduino IDE 1.6.7 or above
- Bootloader: Arduino/Genuino 101
Board Overview
 Function Description:
- Onboard D13 LED, ERR and COM light
- Onboard TI TPS61020 boost circuit
- Extended D20 Digital Pin
Tutorial
Curie Nano is perfectly compatible with all the features of Arduino/Genuino 101 with the bonus of added features.
| ### Requirements |
- Hardware
- Curie Nano x1
- Micro USB x1
- Software
- Arduino IDE V1.6.9 Click to Download Arduino IDE from Arduino®
| NOTE: This is based on the Intel Curie motherboard design. When developing in Arduino IDE you will need to add it's extension plug-in. If you have Arduino 1.6.7 IDE or above, you can skip the reload step. |
| ### Install Arduino/Genuino 101 Plug-in |
Open Arduino IDE, select "Tools" in the menu bar, click "Board" to open the board manager and install the Intel Curie motherboard programming libraries and drivers.
 In the pop-up window of the board manager find "Intel Curie Boards by Intel version...", at the bottom left, select the latest version of the "select version", and click on install. When it is installed successfully you will see the following image.
 After the successful installation of Intel Curie Boards of plug-in and driver package, you should find Intel Curie in the "Board" menu. You may now program for all based Curie development board.
Curie Nano Example Program
Once you have successfully installed the development environment, programming the Curie Nano the same as using an Arduino. The following is a brief tutorial:
*Open Arduino IDE and connect the Curie Nano using a MicroUSB cable. The system should automatically install Arduino 101 drivers and identify Curie Nano COM port at the bottom right of the window.
 *Open the famous "Blink" Example program. Under "Board" select Arduino 101. Under "port" select the corresponding COM port. Finally click "upload" to upload the sample program.
- If your upload was successful you should see this:

Click to view:Curie Nano(Arduino/Genuino 101)Bluetooth, Accelerometer + Gyroscope, and Real-Time Clock Libraries
Click to view:Curie Nano Advanced Tutorial(Step Count,Shock detection and Heart Rate Monitor,etc.)
Curie Nano Project Development
The Curie Nano is designed to be compatible with Arduino 101. Use a 3.7V lithium battery-power to use the Batt interface Curie is ideal for small prototype projects, such as wearables, IoT Bluetooth sensor nodes and robotics projects'''.
| ### Onboard Electronic Compass |
HMC5883L libraries About Library installation.
Download "Arduino-HMC5883L-master.zip" and unpack it, copy the HMC5883L folder to the Libraries folder of Arduino and then open Arduino IDE.
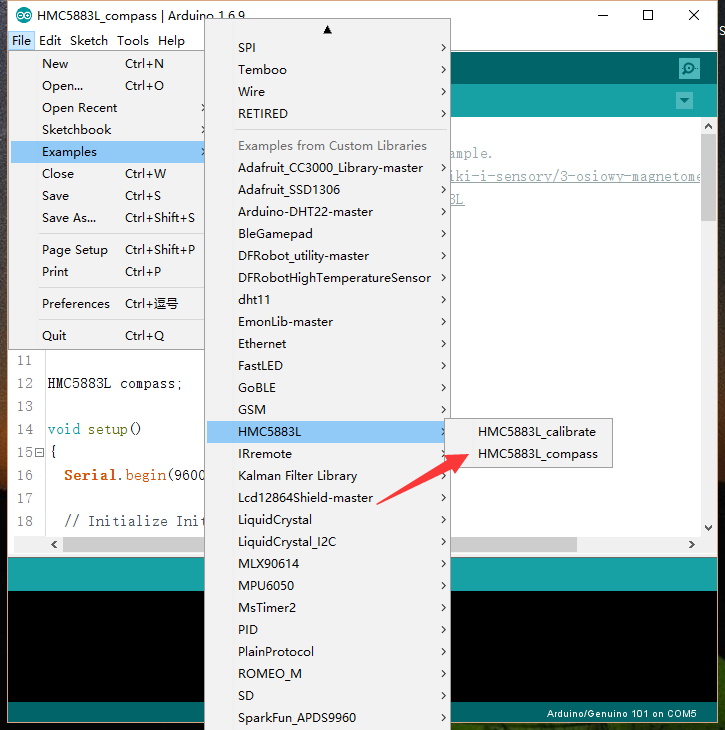
From "File -> Examples -> HMC5883L -> HMC5883L_compass" to open "HMC5883L_compass.ino", select your "board" and "port" and upload to the Curie Nano in the same way you uploaded the blink sketch.
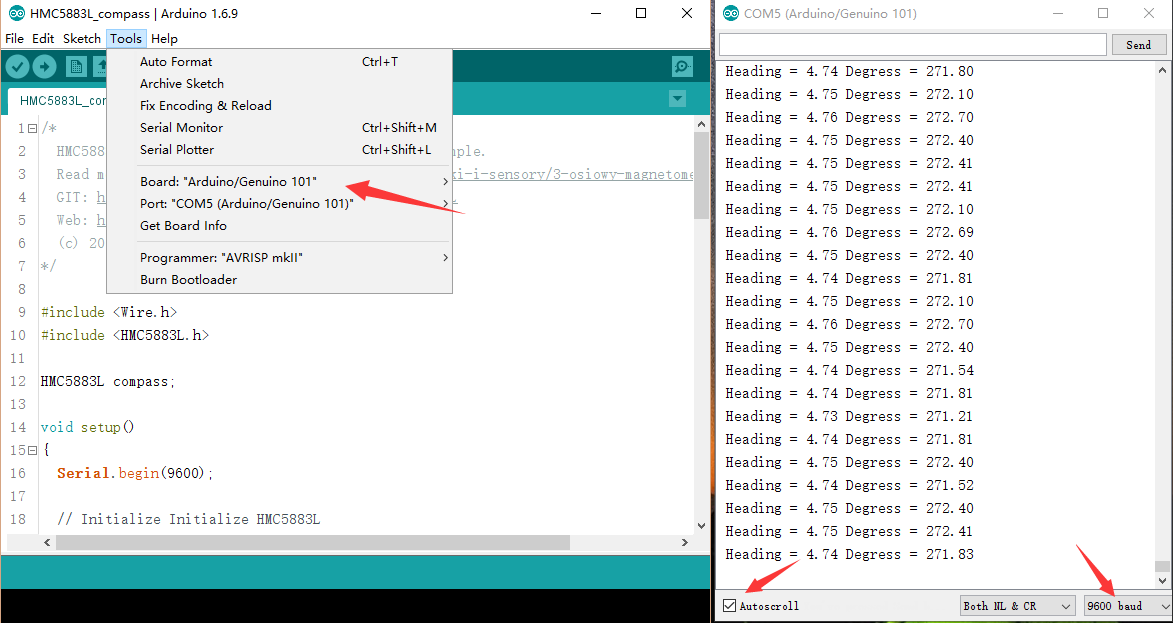
 Wait five seconds after the download is complete, open the serial monitor port and set the baud rate 9600. Rotate the Curie Nano board and you should see the angle change.

FAQ
There are no questions about this product yet. If you have any problems or suggestions, you are welcome to email us or post on the DFRobot forum!
 For any questions/advice/cool ideas to share, please visit the DFRobot Forum or email [email protected]
More Documents
 Get it from [StoreLink DFRobot Store]