Cookie IO_Expansion_Shield_V2_SKU_DFR0375 - jimaobian/DFRobotWiki GitHub Wiki

Introduction
The Cookie I/O expansion shield is designed for beginners to electronics and suitable for classroom settings. The shield is directly compatible with the Boson kit and includes a fail safe system that prevents reverse voltage connections from destroying the board - no need to worry about students making the wrong connections!
Features
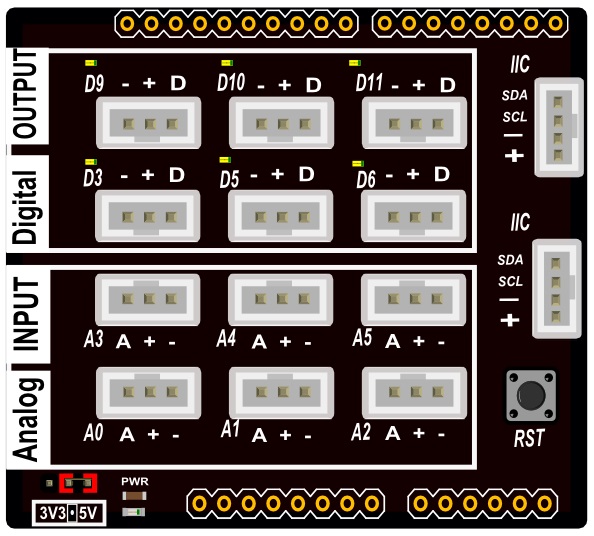
- 6 digital ports: D3, D5, D6, D9, D10, D11, PH2.0-3P Interface
- 6 analog ports: A0-A5, PH2.0-3P Interface
- Two I2C ports, PH2.0-4P Interface
- 5V or 3.3V power supply (to power the sensor expansion board can be selected via the power jumper cap)
- Size: 58 * 52 mm/ 2.28 * 2.04 inches
Pin Definition

Details Description
D&A
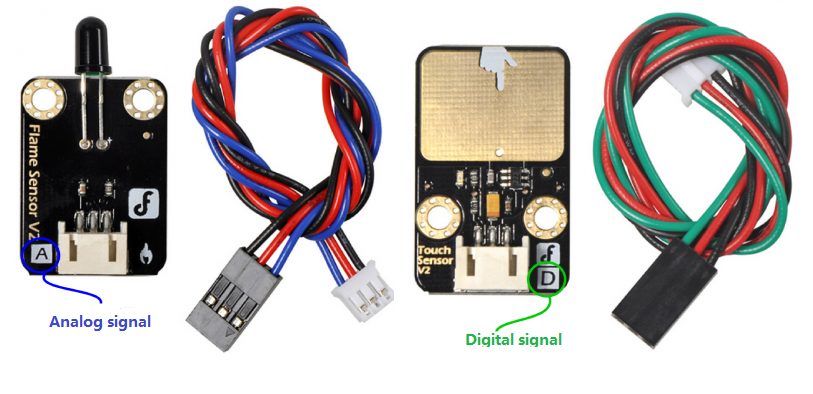
Expansion shield with the words "D" and "A" 
"D": represents a Digital Signal. Which is connected to the corresponding control board digital pins. "A": represents a Analog Signal. Which is connected to the corresponding control board analog pins.
One of the biggest benefits of the IO expansion shield is that respecting to several power interfaces on the control board, expansion shield greatly increased the power and GND interface. When connecting a plurality of sensors, it wouldn't appear that power interface is not enough.
The Special instructions in color-coded:
* Green: digital signal
* Blue: analog signal
* Red: VCC
* Black: GND

- The above interface is called Gravity Interface. The colorful pins make it easy to be recognized, and support most of DFRobot IO expansion shield or board, just search "Gravity" in the store, you'll get more interesting modules.
3.3V / 5V power switching
The shield is designed to be compatible with 3.3V and 5V microcontroller. You only need to change the position of the jumper cap.

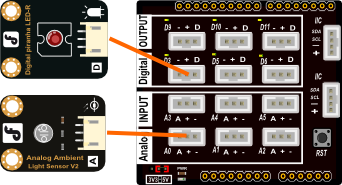
Cookie IO Expansion Shield Application
This application requires
- hardware
- UNO Dashboard x1
- DFR0375 expansion shield x1
- Analog sensors (ambient light sensor) x1
- Several DuPont line
- software
- Arduino IDE V1.6.5 click to download Arduino IDE
When the ambient light is dark, the LED will be turned ON. 
- Sample Code
int light=0;

void setup() {
  // put your setup code here, to run once:
  pinMode(3,OUTPUT);
  Serial.begin(9600);
}
void loop() {
  // put your main code here, to run repeatedly:
  light=analogRead(0);
  Serial.println(light);
  if(light>100)
    digitalWrite(3,HIGH);
  else  digitalWrite(3,LOW);
  delay(100);
}
FAQ
| For any questions/advice/cool ideas to share, please visit DFRobot Forum. |
More
 get it from [storelink dfrobot store] or dfrobot distributor.