cisstStereoVision tutorial 1 - jhu-cisst/cisst GitHub Wiki
Important
This wiki page is outdated and no longer maintained. The official documentation has moved to Read the Docs: https://cisst.readthedocs.io/
Table of Contents generated with DocToc
- Introduction to the cisst libraries
- Windows specific pre-requisites
- Linux specific pre-requisites
- Mac OS X specific pre-requisites
- A collection of libraries to perform functions like
- Basic linear algebra calculations (
cisstVector) - Numerical methods, like SVD, Point-cloud registration, etc. (
cisstNumerical) - Real-time computer vision (
cisstStereoVision) - Handling various devices like trackers, haptic devices, etc. (SAW components, previously
cisstDevices) - Robot control (
cisstRobot) - Communication through networks (
cisstMultiTask,cisstOSAbstraction,cisstStereoVision)
- Basic linear algebra calculations (
- Object-oriented C++ API
- Some parts of the library are heavily templated C++ templates (Wikipedia)
- Open source, available through an online github repository
- Platform independent (regularly tested on various Windows, Linux, and Mac OS X versions)
- Uses CMake to create compiler/platform dependent projects from source
- Microsoft Visual Studio
- Integrated Development Environment (Wikipedia IDE) for Microsoft Windows
- Contains C++ compiler and building tools
- Versions
VS2008(9.0) andVS2010(10.0) are fully supported (VS2005(8.0) might also work) - Get a legal copy from your lab administrator
- Tools and external dependencies
- Download the CMake binary package from cmake.org and install it
- ZLIB, JPEG and PNG dependencies (optional)
- Download the ZLIB, JPEG and PNG support libraries (zip)
- Decompress the zip file into a folder called
gnuwin32inside your code dependencies folder (if you have one) - Add your
[dependencies]\gnuwin32\binfolder into the$PATH(Control Panel > System > Advanced > Environment variables) as the first entry - You will need to restart the computer for the
$PATHchanges to take effect
- OpenCV (optional)
- Download the binary installer and install it to the default location
- In CMake, point to the folder containing the file
OpenCVConfig.cmake
-
The following instructions apply to Ubuntu 9.04 or newer distributions; it is recommended that you keep your OS version up-to-date
-
Tools and external dependencies
-
Make sure that the latest version of the following software packages (and all of their dependencies) are installed using Synaptic Package Manager (Wikipedia) (System > Administration > Synaptic Package Manager)
-
If you don't have synaptic installed,
sudo apt-get install synaptic.packages . . . subversion libcv +dev zlib +dev gcc cmake libhighgui +dev libjpeg +dev g++ libx11 +dev libcvaux +dev libpng +dev libxv +dev libdc1394 +dev libqt4 +dev qt-creator -
Optional: Qt Creator as your IDE (Wikipedia)
- Apple Xcode
- Integrated Development Environment (IDE) (see on Wikipedia) for Apple platforms
- Contains C++ compiler and building tools
- Xcode is available from the Apple AppStore
- Tools and external dependencies
- In the followings we will assume that Mac OS X users have MacPorts installed
- Once installed, enter the following commands in the terminal:
sudo port selfupdate
sudo port upgrade outdated
sudo port install opencv
sudo port install subversion
sudo port install libpng
sudo port install jpeg
sudo port cleanup all
-
Please note: This installation process may take several hours to complete. If you need to interrupt the process, you may do that any time by pressing
CTRL+C. In order to resume, just enter the last command that you previously terminated. - After all the above commands finish successfully, you will have all the external dependencies available on your computer that are required for the
cisstStereoVisiontutorial. However, you might need additional dependencies in the future to use with other cisst libraries.
-
Tool to create platform-specific compiler projects for platform-independent source code
-
Supports virtually all major compilers and [ IDEs (Wikipedia)](http://en.wikipedia.org/wiki/Integrated_development_environment, such as MS Visual C++, XCode or Makefile)
-
Windows
- Download as binary installer from cmake.org
- Run it from the Start Menu
- All GUI based, no terminal commands required
-
Linux, Mac OS X
- Get it using
apt-getor Synaptic on Linux - Get it using MacPorts on Mac OS X (see above):
sudo port install cmake - Requires a simple terminal command to first create the project
- Already existing projects are managed in the textual GUI similar to the Windows version
-
Note: Command name is
ccmake(notcake) for the text/curse based interface,cmake-guifor a GUI.
- Get it using
-
In order to keep the cisst source code management simple, it is highly recommended that the build (compiler specific project) directories are created on the same level as the source code directory.
-
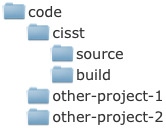
In the following example the directory
cisstwas created inside some maincodedirectory, and insidecisstthere is a singlesourcedirectory for storing the source code and three differentbuild-xxxdirectories for storing the compiler/platform specific projects for the single source code:

- However, for most users who use only one development platform, a single
builddirectory will suffice:
-
Windows
- Visual Studio
-
Open CMake from the Start Menu
-
Set the location of your
sourcedirectory -
Set the location of your
builddirectory that you want to use for the Visual Studio project -
Click Configure
-
Select your compiler from the list, and wait until your CISST settings show up
-
Check
CISST_BUILD_cisstStereoVision -
Check
CISST_BUILD_EXAMPLES -
Click Configure, and wait until done
-
Enable Advanced mode (just under the
builddirectory field) -
Un-check all
CISST_BUILD_*_EXAMPLESbut keepCISST_BUILD_cisstStereoVision_EXAMPLESchecked (we need only the stereo vision examples for this tutorial) -
Click Configure, and wait until done
-
Scroll down in the list to find the options called
CISST_SVL_HAS_* -
CISST_SVL_HAS_DIRECTSHOWshould appear to be already checked -
If you have OpenCV installed on your computer, check
CISST_SVL_HAS_OPENCV2. You might need to manually setOpenCV_DIRin CMake. This should point to the directory that contains the file OpenCVConfig.cmake. -
If you have the ''ZLIB+JPEG+PNG'' dependencies (see the paragraph ''Windows specific pre-requisites'') on your computer: a. Check
CISST_SVL_HAS_JPEG,CISST_SVL_HAS_PNGandCISST_SVL_HAS_ZLIBa. Click Configure, and wait until an error message shows up indicating that CMake failed to automatically find those dependencies a. Dismiss the error message dialog box a. Scroll down in the list and set the following options:JPEG_INCLUDE_DIR = [dependencies]\gnuwin32\include JPEG_LIBRARY = [dependencies]\gnuwin32\lib\jpeg.liba. Click Configure, and wait until done a. CMake should automatically be able to find all your ZLIB+JPEG+PNG dependencies; the newly found locations will show up on top of the list in red a. Click Configure, and wait until done
-
You're all set: click Generate to create the Visual Studio "solution" (
.slnfile), then close CMake.
-
- Visual Studio
-
Linux
-
makefile (no IDE)
- Open a terminal
- Change to the
builddirectory - Enter the following command:
ccmake ../source
- Press
cto Configure - Set
CISST_BUILD_cisstStereoVisiontoON - Set
CISST_BUILD_EXAMPLEStoON - Press
cto Configure, and wait until done - Press
tto enable Advanced mode - Set all
CISST_BUILD_*_EXAMPLEStoOFFbut keepCISST_BUILD_cisstStereoVision_EXAMPLESON(we need only the stereo vision examples for this tutorial) - Make sure
CISST_HAS_FLTK,CISST_HAS_QTandCISST_MTS_HAS_ICEare all set toOFF(these are not needed for this tutorial) - Press
cto Configure, and wait until done (CMake will automatically find all the dependencies for you) - You're all set: press
gto Generate the makefile project, then pressqto quit CMake.
-
Qt Creator
- Create a makefile project, as described above
- Open Qt Creator application (Applications > Programming > Qt Creator)
- In Qt Creator: select File > Open File or Project...
- Navigate to your
sourcedirectory and select theCMakeLists.txtfile to open - In the pop-up CMake Wizard window set your
builddirectory, then click Next - On the next screen of the 'CMake Wizard click Run CMake, and wait until done
- You're all set: click Finish to create the Qt Creator project
-
-
Mac OS X
-
Xcode
-
Open a terminal
-
Change to the
builddirectory -
Enter the following command:
ccmake -G Xcode ../source
-
Press
cto Configure -
Set
CISST_BUILD_cisstStereoVisiontoON -
Set
CISST_BUILD_EXAMPLEStoON -
Press
cto Configure, and wait until done -
Press
tto enable Advanced mode -
Set all
CISST_BUILD_*_EXAMPLEStoOFFbut keepCISST_BUILD_cisstStereoVision_EXAMPLESON(we need only the stereo vision examples for this tutorial) -
Press
cto Configure, and wait until done (CMake will automatically find all the dependencies for you) -
You're all set: press
gto Generate the Xcode project, then pressqto quit CMake.
-
-
makefile (no IDE) - same as for Xcode, except launch with the command line:
ccmake ../source
-
-
Windows
- Visual Studio
- Open Visual Studio application in the Start Menu
- In Visual Studio: select File > Open > Project
/Solution... - Select the file
[build]\cisst.slnto open (orcisst-saw.slnif you decided to have cisst and SAW) - Select Build > Build Solution from the menu bar to start compilation
- Visual Studio
-
Linux
- makefile
- Open a terminal
- Change to your
builddirectory - Compilation
- For single-thread compilation, enter the command:
make - For multi-thread compilation, enter the command (where
xis the number of threads:2,4,8, etc.):make -jx
- For single-thread compilation, enter the command:
- Qt Creator
- Make sure that the project was created by following the instructions in paragraph Creating compiler specific projects using CMake
- Open Qt Creator application (Applications > Programming > Qt Creator)
- In Qt Creator: select File > Open File or Project...
- Navigate to your
sourcedirectory and select theCMakeLists.txtfile to open - Select Build > Build All from the menu bar to start compilation
- makefile
-
Mac OS X
- Xcode
- Open Xcode application
- In Xcode: select File > Open...
- Select the file
[build]\cisst.xcodeprojto open (orcisst-saw.xcodeproj) - Select Build > Build from the menu bar to start compilation
- makefile - same as Linux makefile
- Xcode