Appendix L Adding a Propane Fuel Gauge to Genmon - jgyates/genmon GitHub Wiki
Adding A Propane Fuel Gauge to Genmon
This third party tank monitor is compatible with genmon via the External Tank Fuel Monitor (tankutility) Add On. In addition there are two options for building your own tank gauge monitor that is compatible with genmon.
DIY Tank Method 1
Thanks to @zekyl314 for the following:
While there are other propane tank monitors you can purchase, you can also create one of your own. The first step is to get a gauge that is compatible with your tank. For this project the tank already had the gauge at this link. If you are interested in changing your tank gauge see this guide.
The tank reference above has the ability read the gauge via a sensor like this one.
Since the output of the sensor is analog, and analog to digital converter is needed to interface to the pi. This Analog to Digital Converter (ADC) was used as it converts the analog signal to a digital format than can be read via I2C. Since the raspberry pi supports I2C this was a natural fit.
The following diagram shows how the gauge, sensor, ADC and pi are connected:
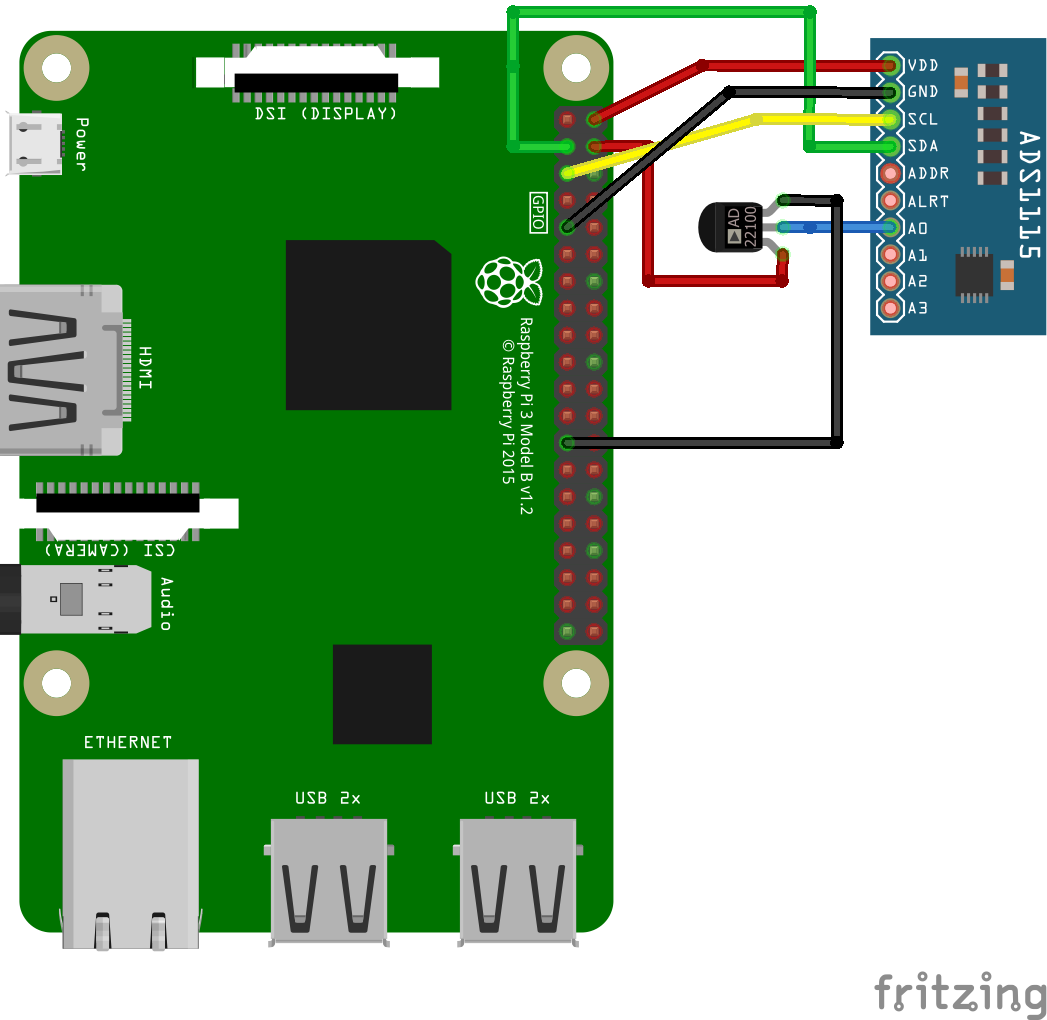
This page contains information about using the ADS1115 ADC with I2C on the raspberry pi.
Follow the instruction here to enable I2C on the Raspberry Pi.
To test that the above circuit is working you can install the i2c-tools package on the pi with the following commands:
 sudo apt-get update
 sudo apt-get install i2c-tools
Once enabled, verify the ADC is active on the I2C bus with the i2cdetect command.
sudo i2cdetect -y 1
This allows you to verify the ADS1115 was connected at address 0x48.
You can validate your hardware is working by using the program i2cget from the command line (installed with I2C tools). To test the ADC you can use a 1.5 AA battery and a pair of batteries for 3.0 volts to validate the readings were correct.
sudo i2cget -y 1 0x48 0
The C code referenced in the link above has been modified and ported to python and is not integrated into genmon as an add on program.
For this gauge, 5 volts output is 100% full tank and zero volts is 0% (empty). The program will read the data and import it into genmon to display a gauge on the web interface. Emails will be sent when the fuel is below 20% and again at 10%.
DIY Tank Method 2
Thanks to @curtis1757 for the following:
Making an R3D Propane Gauge Module
Note: This sensor module is NOT compatible with the existing ones you can buy (but hard to find a supplier and ones I have seen cost $100+). If you have that type of RD3 Module already, then see here and the DIY sensor listed above, the sensor has one direct voltage output for the reading, the one made below has two, being the sine and cosine of the angle of the gauge dial. Using the sin and cos values it is then easy to calculate the angle to then get a percent value. The advantage to the sensor described below is mainly cost (less than $20) and ease of getting parts and the fun of building it!
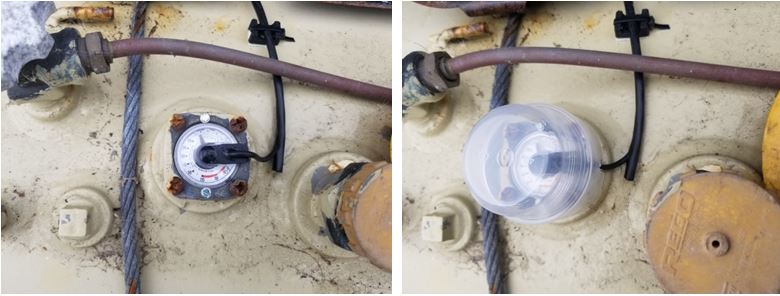
If your propane tank does not already have a R3D Ready dial you will need to purchase one. There are several styles, make sure to get the right one for your propane tank, even Amazon has some. Make sure you get one with the standard Remote Ready removable cover that will be used to put the TLE5501 into.

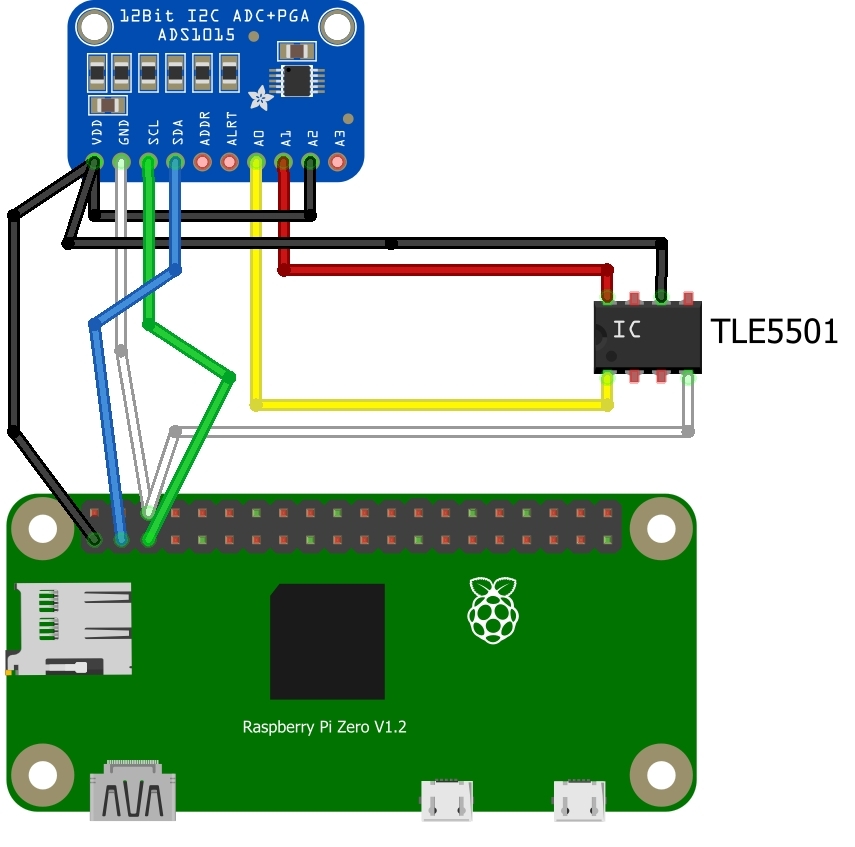
The TLE5501 TMR-Based Angle Sensor from Infineon is used to read the angle of the magnet in the dial. This on may also work: KMZ60 from NXP, I have not tried it.
I bought several of the TLE5501’s (for experimenting) from DigiKey @ $2.74 ea. It is a very small SOIC-8 package, but big enough to be able to solder four 28AWG wires to. Only 4 of the 8 connections are needed.
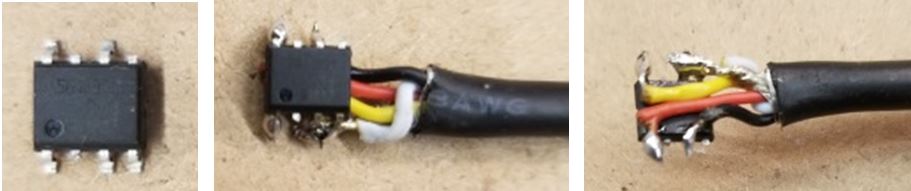
I used this wire to connect to the TLE5501, likely could use a heavier gauge too. Pins 1 (yellow) and 8 (red) for sin and cos output values, pin 6 (black) for VDD (3.3V) and 3 and/or 4 to ground (white).
Next, Drill hole in Remote Ready cover for the wire to pass through.
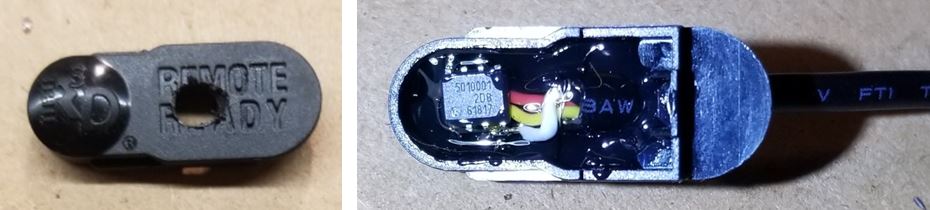
Feed wire through hole and position the TLE5501 as squarely as possible in the Remote Ready cover and as flush as possible to then bottom of it. Does not have to be perfect, an angle to percentage calibration table will be used in the Python code to convert the TLE5501 output to the tank percentage reading and correct any variances. I already had some Bondic, so I used that for potting the TLE5501 into the plastic Remote Ready cover, but Epoxy could work too. The Bondic is especially easy to use for this and I’d recommend it.
Two (A0 and A1) of the four Analog Inputs of this A/D Converter are used to convert the sin and cos voltage signals from the TLE5501 to digital I2C signal to connect the Raspberry Pi. This A/D Converter uses the TI ADS1015 but one using the TI ADS1115 could also be used. Note: optionally can connect A2 to VDD to use as the reference voltage, if not connected 3.3V is assumed in gentankdiy.py.
The following diagram shows how the TLE5501 sensor, ADC and Raspberry Pi are connected:
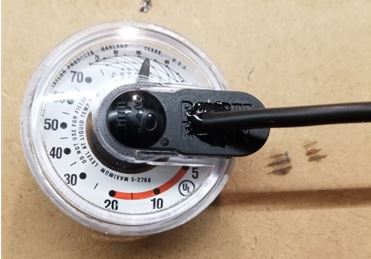
Installed on propane tank: (Optional: laundry detergent plastic cup makes a perfect weather protector cover!)
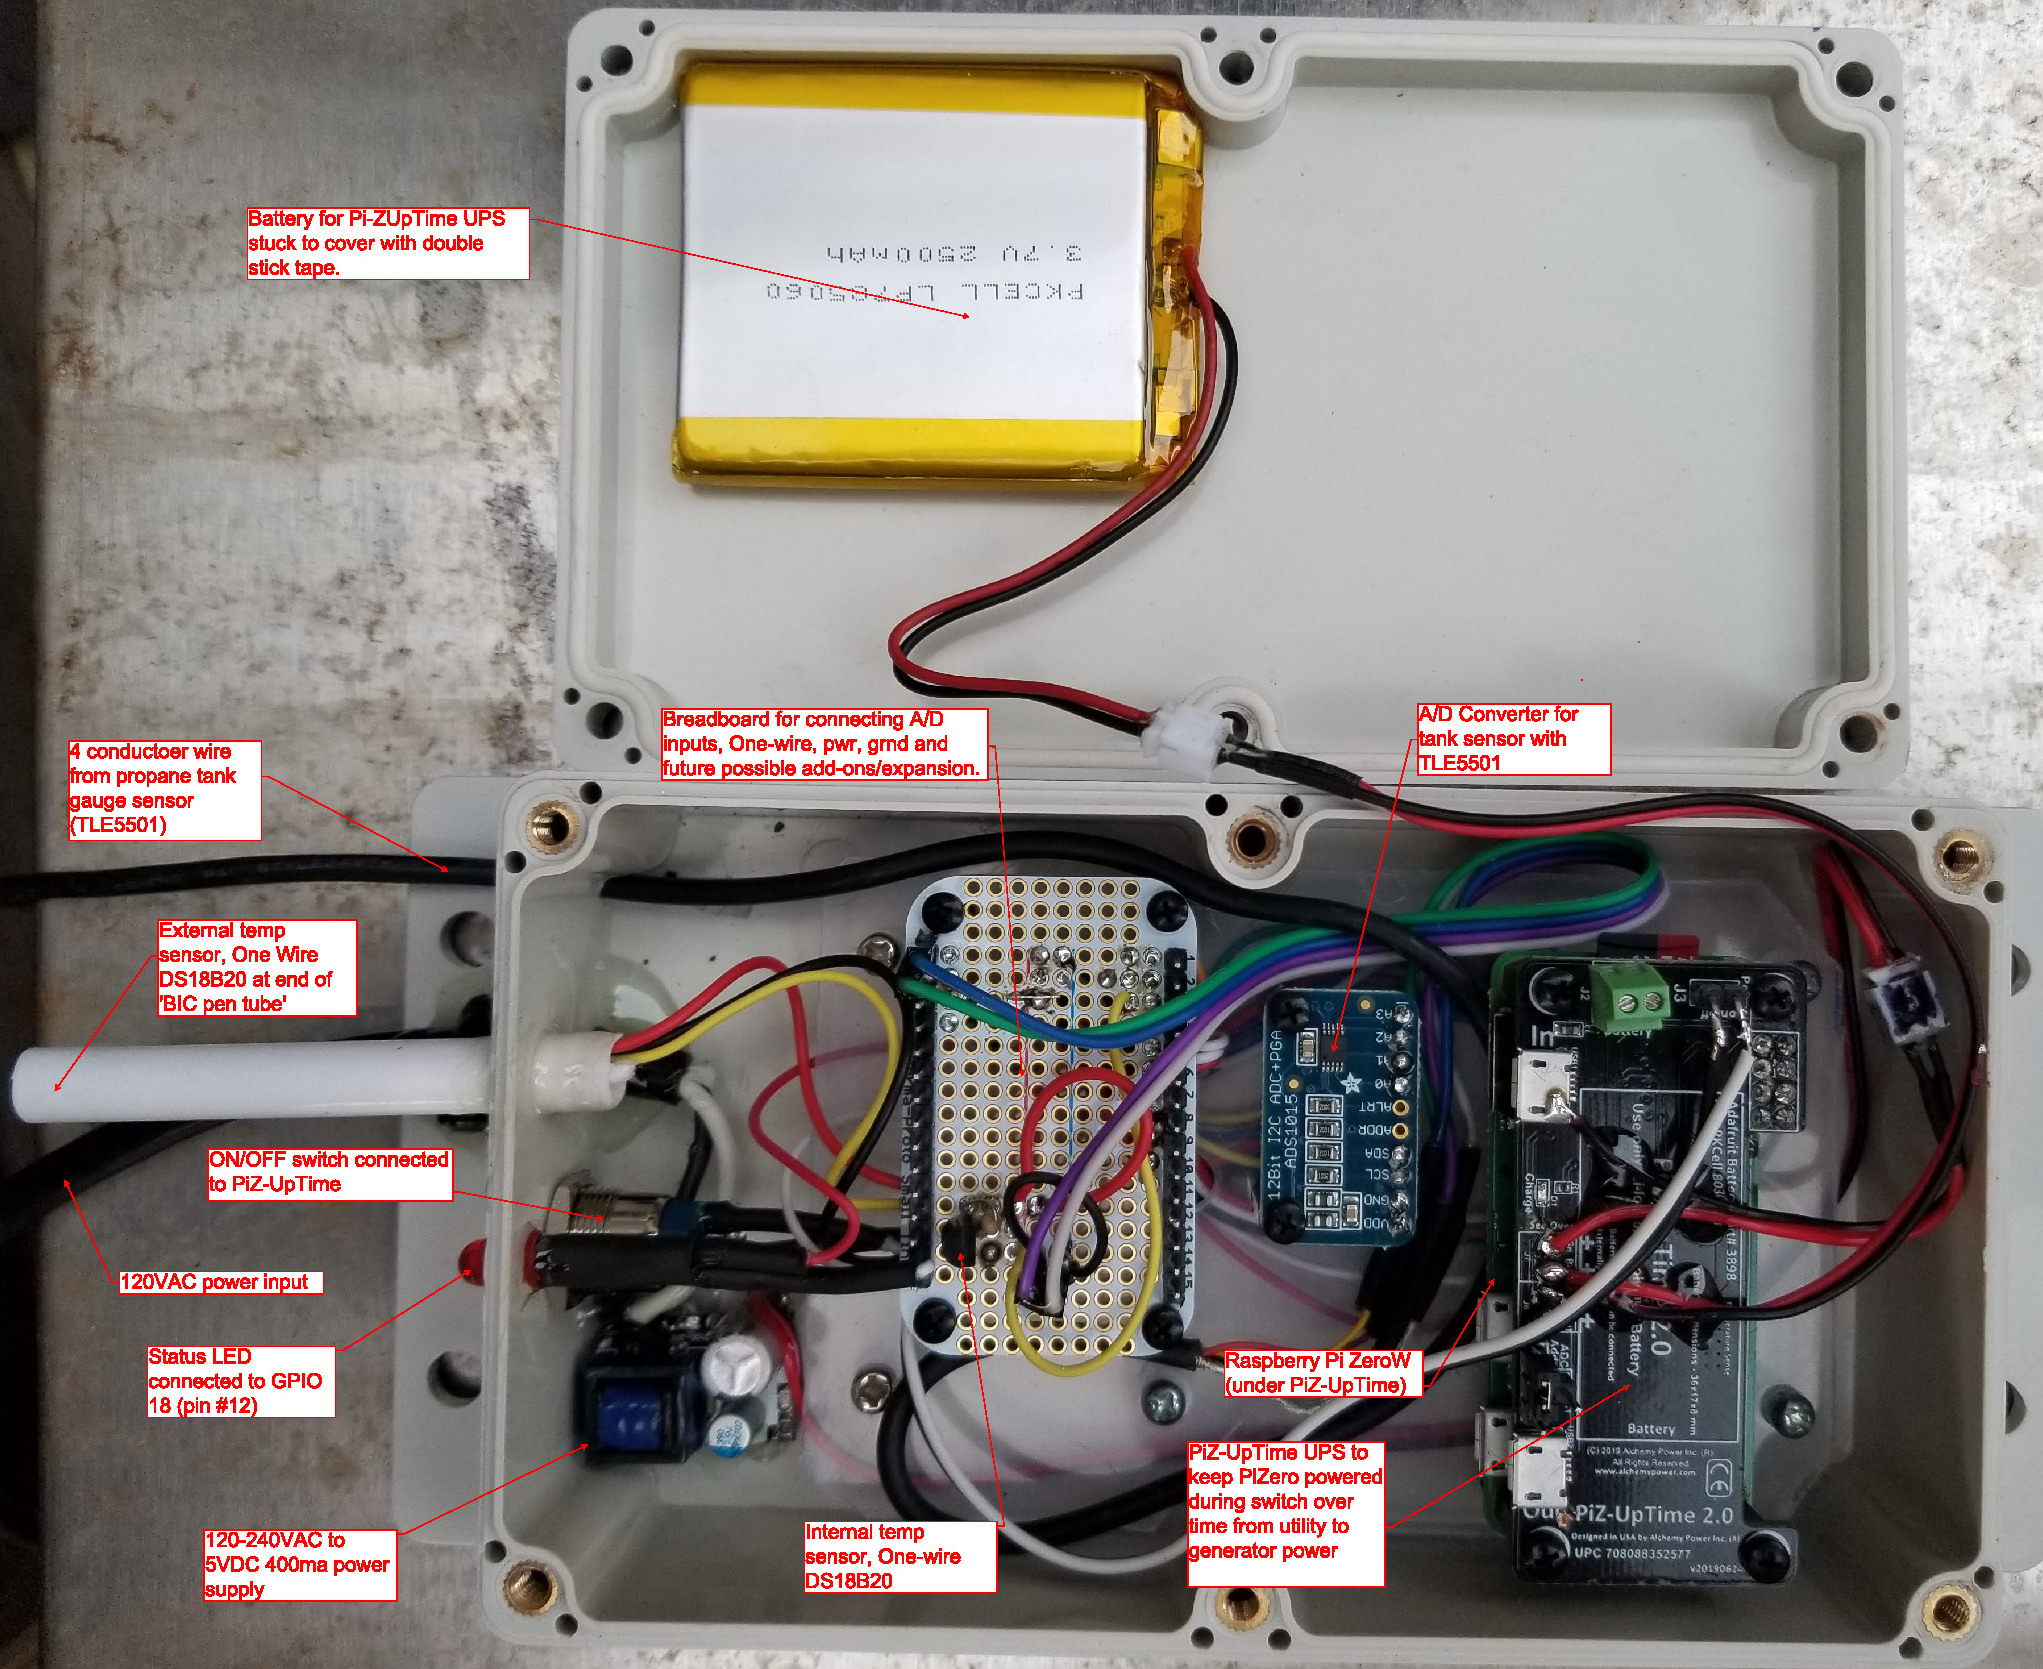
My setup for genmon and tank monitor, using Raspberry Pi ZeroW:
Arduino ESP32
This link shows how to use an old TankUtility enclosure with an arduino ESP32 to monitor the propane tank.