Udemy: Unreal Engine 5 Beginner Blueprints: Make your first game!: Moving platforms - jgoffeney/Cesium4Unreal GitHub Wiki
This section adds platforms to the game.
Create Materials
- Create two new material components to make red and green platforms.
- Click on the component to open the materials editor. You will start with a component of pins to the various material properties. The goal is to make a green and glowing material (and then do the same for the red material).
- To set the base color create a VectorParameter node and click on its body to open the color menu and select a green. It has 5 output pins with the top being the RGBA color vector and the other's being the values of the individual color channels. Connect the top pin to the material Base Color.
- To remove any specular highlights create a Constant node (with a default value of 0) and connect it to the material Specular.
- To create the glow, create a Multiply node and connect input A to the RGBA pin of the VectorParameter. Then create a Constant node, set its value to 10 in the Details panel, and connect it to the input B. Then connect the output to the Emissive Color pin.

Building Platforms
- Make a hole in the bottom of the level by making 3 copies of the floor and moving them around until there is an rectangular opening in the center.
Creating the Geometry
- The goal is to create a pair of post objects which the platform will move between. This way you can drop and instance into the scene, move the posts to where you want and the behavior will just work.
- Create a blueprint class based on an Actor and call it MovingPlatform.
- Open its editor and add two arrow components pointing upwards. These are the post objects for the platform to move between. Name them Point1 and Point2.
- Then create a cube (named Platform) and scale it to about 2.0, 2.0 and 0.2.
- Create a second cube (named Edge Glow) and scale it to 2.1, 2.1 and 0.18 and assign it the Green Glow material. In the components tab parent this cube to the main cube so they will move together.
- The result is a square platform with a glowing lip.
Creating the Graph
Switch to the graph for the Platform.
Adding Variables
Add four variables via the Variables section to provide configuration for the platforms. As you add them click to the Eye icon at the right to open to make them publicly accessible and editable. After you compile the blueprint you can set the variable default values in their Details.
- Ease In as Boolean : Does it slow when approaching a post or is it constant speed? (Default: False)
- Move Time as Float : How fast does the platform move? (Default: 3)
- Pause Time as Float : How long does the platform pause at a post? (Default: 1)
- Activate as Boolean : Is the platform active for movement? (Default: True)
Programming the Graph
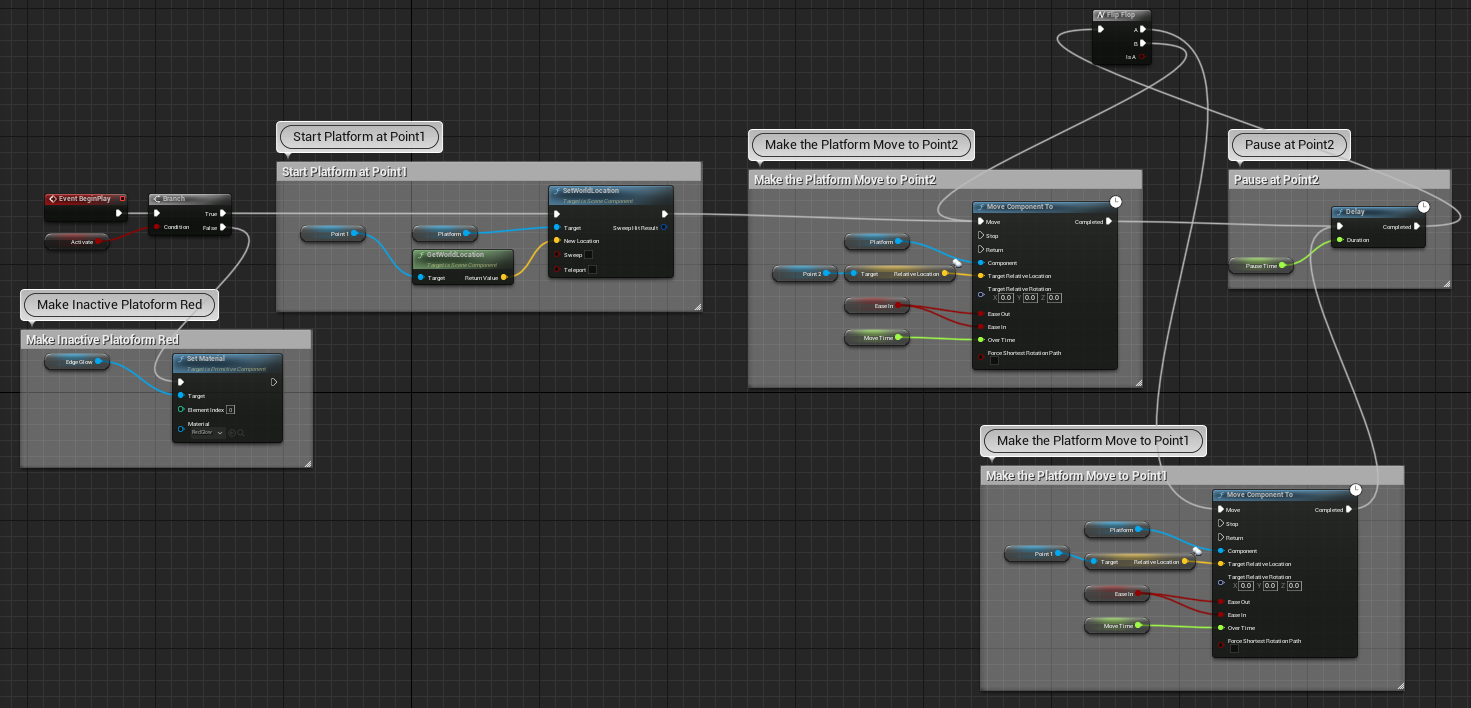
Event BeginPlay
The graph from this node is responsible for initializing the platform to start at the first arrow and set its edge to red if it is not active.
- From the event exec pin create a Branch node with the condition being the Activate variable.
- From the False pin:
- Create a SetMaterial node with its Target connected to the Edge Glow cube and its material as the RedGlow material we created. So if the platform is set to inactive it stays where it was placed and its edge is red.
- From the True pin:
- Create a SetWorldLocation pin and set up its inputs as:
- Target: connect to an instance of the Platform cube
- New Location: Drag in Point1 and connect its output to a GetWorldLocation node and, then, connect its Return Value to the New Location pin of SetWorldLocation.
- Create a SetWorldLocation pin and set up its inputs as:
- As a result an active platform will start at the location of Point1.
- From the output pin of SetWorldLocation create a MoveComponentTo node and set up its inputs to make the platform move to Point2
- Target: connect to an instance of the Platform cube
- TargetRelativeLocation: connect an instance of Point2 to a GetRelativeLocation node to input
- Ease Out and Ease In: connect to our Ease In variable
- Over Time: connect to our Move Time variable.
- Repeat (or copy) the above node and its inputs but then replace Point2 with Point1 for the TargetRelativeLocation input. This moves the platform from Point2 back to Point1
- From the output of the first MoveComponentTo create a Delay node with its input Duration set to our variable Pause Time so the platform waits at Point2 for the duration.
- From the output of Delay create a FlipFlop node. This node swaps between its A and B output pins each time it is called. Functionally this will move the platform from Point1 to Point2 and then move it back the next iteration.
- Now do some wiring:
- The outputs of both of the MoveComponentTo nodes should go to the input of Delay so both will pause when movement is complete.
- The output of Delay should be the input of FlipFlop so after the pause the platform will start moving back.
- The A output of FlipFlop should go to the input of the MoveComponentTo that moves toward Point1.
- The B output of FlipFlop should go to the input of the MoveComponentTo that moves toward Point2.
- From the False pin:
Adding Pressure Plates
Create a new blueprint Actor called PressurePlate. It is composed of a cube (named Plate) scaled to (2.0, 2.0, 0.1) with a slightly smaller cube (named Glow and parented to Plate) protruding from it with the Red Glow material so it appears there is a button on top. It is red by default but turns green when it is ready to be stepped on. Then add a Box Collision as Box (parented to Plate)and size it to just contain the pressure plate cubes.
Creating the Graph
Switch to the graph for the PressurePlate.
Adding Variables
- Platform Ref as Moving Platform: a reference to a specific platform object
Programming the Graph
-
Select Box and from its Details->Events select On Component Begin Overlap. An event will be fired whenever anything collides with Box.
-
From the On Component Begin Overlap drag out a Cast To FirstPersonCharacter node. This is a check to see if the collider with the Box is a FirstPersonCharacter.
-
From the Cast To FirstPersonCharacter node output create a Do Once node.
-
From the Do Once node create a Set Material node with the Glow cube as the Target and the Material set to the Green Glow.
-
We will return to this below...
-
Switch To the MovingPlatform blueprint to create an event dispatcher.
- For the blueprint add a new entry for EVENT DISPATCHERS and give it the name Activate Platform.
- Drag it onto the MovingPlatform blueprint and select Bind when it asks and then insert it between the Event BeginPlay node and the Branch node.
- From the newly added node drag from the Event pin and create a Custom Event named Active.
- This custom event is now callable from other blueprints to activate the platform.
- From the event pin create a new Set Material node for the Edge Glow platform and set the material as the Green Glow.
- Connect the Set Material node exec pin to the existing Move Component To node that targets Point2.
- For the blueprint add a new entry for EVENT DISPATCHERS and give it the name Activate Platform.
NOTE: for the blueprint below the Branch node was moved after the SetWorldLocation to make sure all platforms will begin at their Point1 location.

- Go back to the Pressure Plate graph.
- Drag in the Platform Ref variable and from its output create a Call Activate Platform node and connect its input to the Set Material node output.
- When the character collides (steps on) the pressure plate then it turns to green and activates the platform.

Adding Sounds
Pressure Plate
The pressure plate will make a sound the first time it is stepped on.
Audio Details
- In the viewport for the Pressure Plate blueprint add an Audio component and parent it to the Plate component.
- Within the Audio details:
- Set the Sound to the PressurePlateSound.wav.
- Under Attenuation set Override Attenuation.
- Under Attenuation Volume reduce the Inner Radius to about 200 to encompass the object but also the player's head when standing on it, then set the Falloff Distance to about 2000 and set the _Attenuation Function to Natural Sound.
- Under Attenuation (Spatialization) set to the Spatialization Method to Binaural.
- Under Activation uncheck Auto Activate.
Event Graph
- The graph from the On Component Begin Overlap event is extended.
- Drag in the ActivationSound component and create an Activate node and connect its input to the output of Call Activate Platform.

Platform
The platform will make a continuous hum unless it is deactivated.
Audio Details
- Mostly repeat the steps for the Pressure Plate with Audio component (PlatformHum) parented to the Platform and the PlatformHum.wav sound being used.
- Under Sound after setting the file open the sound material and check Sound->Looping.
- Under Attenuation Volume reduce the Inner Radius to just encompass the object, then set the Falloff Distance to about 1500
- Under Activation leave Auto Activate checked.
Event Graph
- Turning off the sound
- Drag in an instance of the PlatformHum object and create a SetVolumeMultiplier node.
- Connect its input to the output exec pin of the SetMaterial that is part of the False output path of the Branch node.
- Turning on the sound
- Drag in an instance of the PlatformHum object and create a SetVolumeMultiplier node with the parameter New Volume Multiplier set to 2.0.
- Find the SetMaterial node coming off of the Active event node and insert the SetVolumeMultiplier node between its output and the MoveComponentTo node it is originally connected to.
