HomeAssistant Integration - jens-maus/RaspberryMatic GitHub Wiki
After having installed RaspberryMatic either as a native Home Assistant Add-on or as a standalone CCU operating system Home Assistant (HA) can be additionally used as a third-party smarthome automation system by connecting it directly to a HomeMatic CCU including RaspberryMatic. This will then allow to control all your HomeMatic/homematicIP devices directly from Home Assistant and also use all the different automation possibilities Home Assistant provides.
The following documentation explains how to setup the HomeMatic/homematicIP Integration within Home Assistant as soon as you have RaspberryMatic correctly running either as a HA Add-on or as a standalone CCU system.
Home Assistant Community Store (HACS) Setup
To be able to bind/connect your Home Assistant installation to a CCU/RaspberryMatic system the so-called Home Assistant Community Store (HACS) has to be previously installed so that HomeMatic/homematicIP devices can be integrated into your HA installation. The following step will quickly guide you through the process of setting up HACS within your existing Home Assistant installation:
- Enable 'Advanced Mode' in HA: As a first step, make sure you have the
Advanced Modeenabled in your Home Assistant setup. This is required for the next coming step where you will have to install a SSH Add-on to install HACS afterwards. To do so, click your username in the bottom-left corner of the Home Assistant web interface, then scroll down until you findAdvanced Mode:
- Install 'SSH & Web Terminal' Add-on: To be able to install HACS you need a possibility to execute a command within the context of Home Assistant. For this you should have a SSH Terminal session Add-on installed. Preferably, you can install the
SSH & Web TerminalAdd-on from the Community Add-on section. To do so, go toConfiguration -> Add-ons -> Add-on Storeand search for 'SSH'. Then select theSSH & Web TerminalAdd-on and install it accordingly:
- Setup SSH Password: Once the SSH Add-on is installed make sure to switch to the
Configurationtab of the Add-on and then setup either an authorized SSH key or dedicated password for being able to connect via SSH:
- Open SSH Add-on Web UI: Afterwards make sure to start the new SSH Add-on and then open the Web UI of the Add-on so that you will be forwarded to a terminal session within Home Assistant:

- Execute HACS Installation: Once the terminal session to your HA is established, you have to enter the following command-line and execute it to execute the HACS installation:
wget -O - https://get.hacs.xyz | bash -
- Restart Home Assistant: To finalize the HACS installation, make sure to reboot your Home Assistant installation, preferably by rebooting your whole Home Assistant host or just the core engine:

- Add new 'HACS' integration: After the successful restart of Home Assistant make sure to change to
Configuration -> Devices & Servicesand press+ Add integration. In the integration list, make sure to search forHACSand then select it accordingly. Once you are going to install the new integration make sure to tick all checkboxes you may be asked so that you understand the deal when using HACS:
- Install HACS integration: To be able to install and use the new HACS integration, make sure to authenticate it using your
github.comaccount since the whole HACS functionality heavily relies on github to be used as a repository service:
- Access HACS UI: After successful installation of the new HACS integration a new
HACStop-level item in your HA menubar should appear, which means that HACS is now correctly installed:
- Finalize HACS Setup: To finalize the HACS setup you will have to make sure to perform a final restart of Home Assistant by using
Configuration -> Settings -> Check Configurationfirst and then pressRestartafterwards to make sure that Home Assistant will be restarted a last time: Warning: After a fresh HACS installation/setup you will have to keep your Home Assistant running for about 10-15 minutes so that HACS can fetch all necessary third-party repository information from github. Depending on your connection speed and github use, this can take a long time until HACS has correctly fetched all necessary information in the background.
'Homematic(IP) Local' Integration Setup
After having correctly installed HACS as the base platform for third-party integration setups, you can now proceed with the installation of the Homematic(IP) Local integration (also called custom_homematic integration) by performing the following steps. This new integration will then allow you to connect your Home Assistant to any "HomeMatic/homematicIP CCU" device including RaspberryMatic installed as a native Home Assistant Add-on or as a standalone system:
- Add custom repository to HACS: To be able to install the
Homematic(IP) Localintegration within HACS you have to add a custom repository path to HACS. To do so, go toHACS -> Integrationsand then press the three vertical dots on the top-right corner. Then a drop-down menu should appear in which you should be able to selectCustom repositories: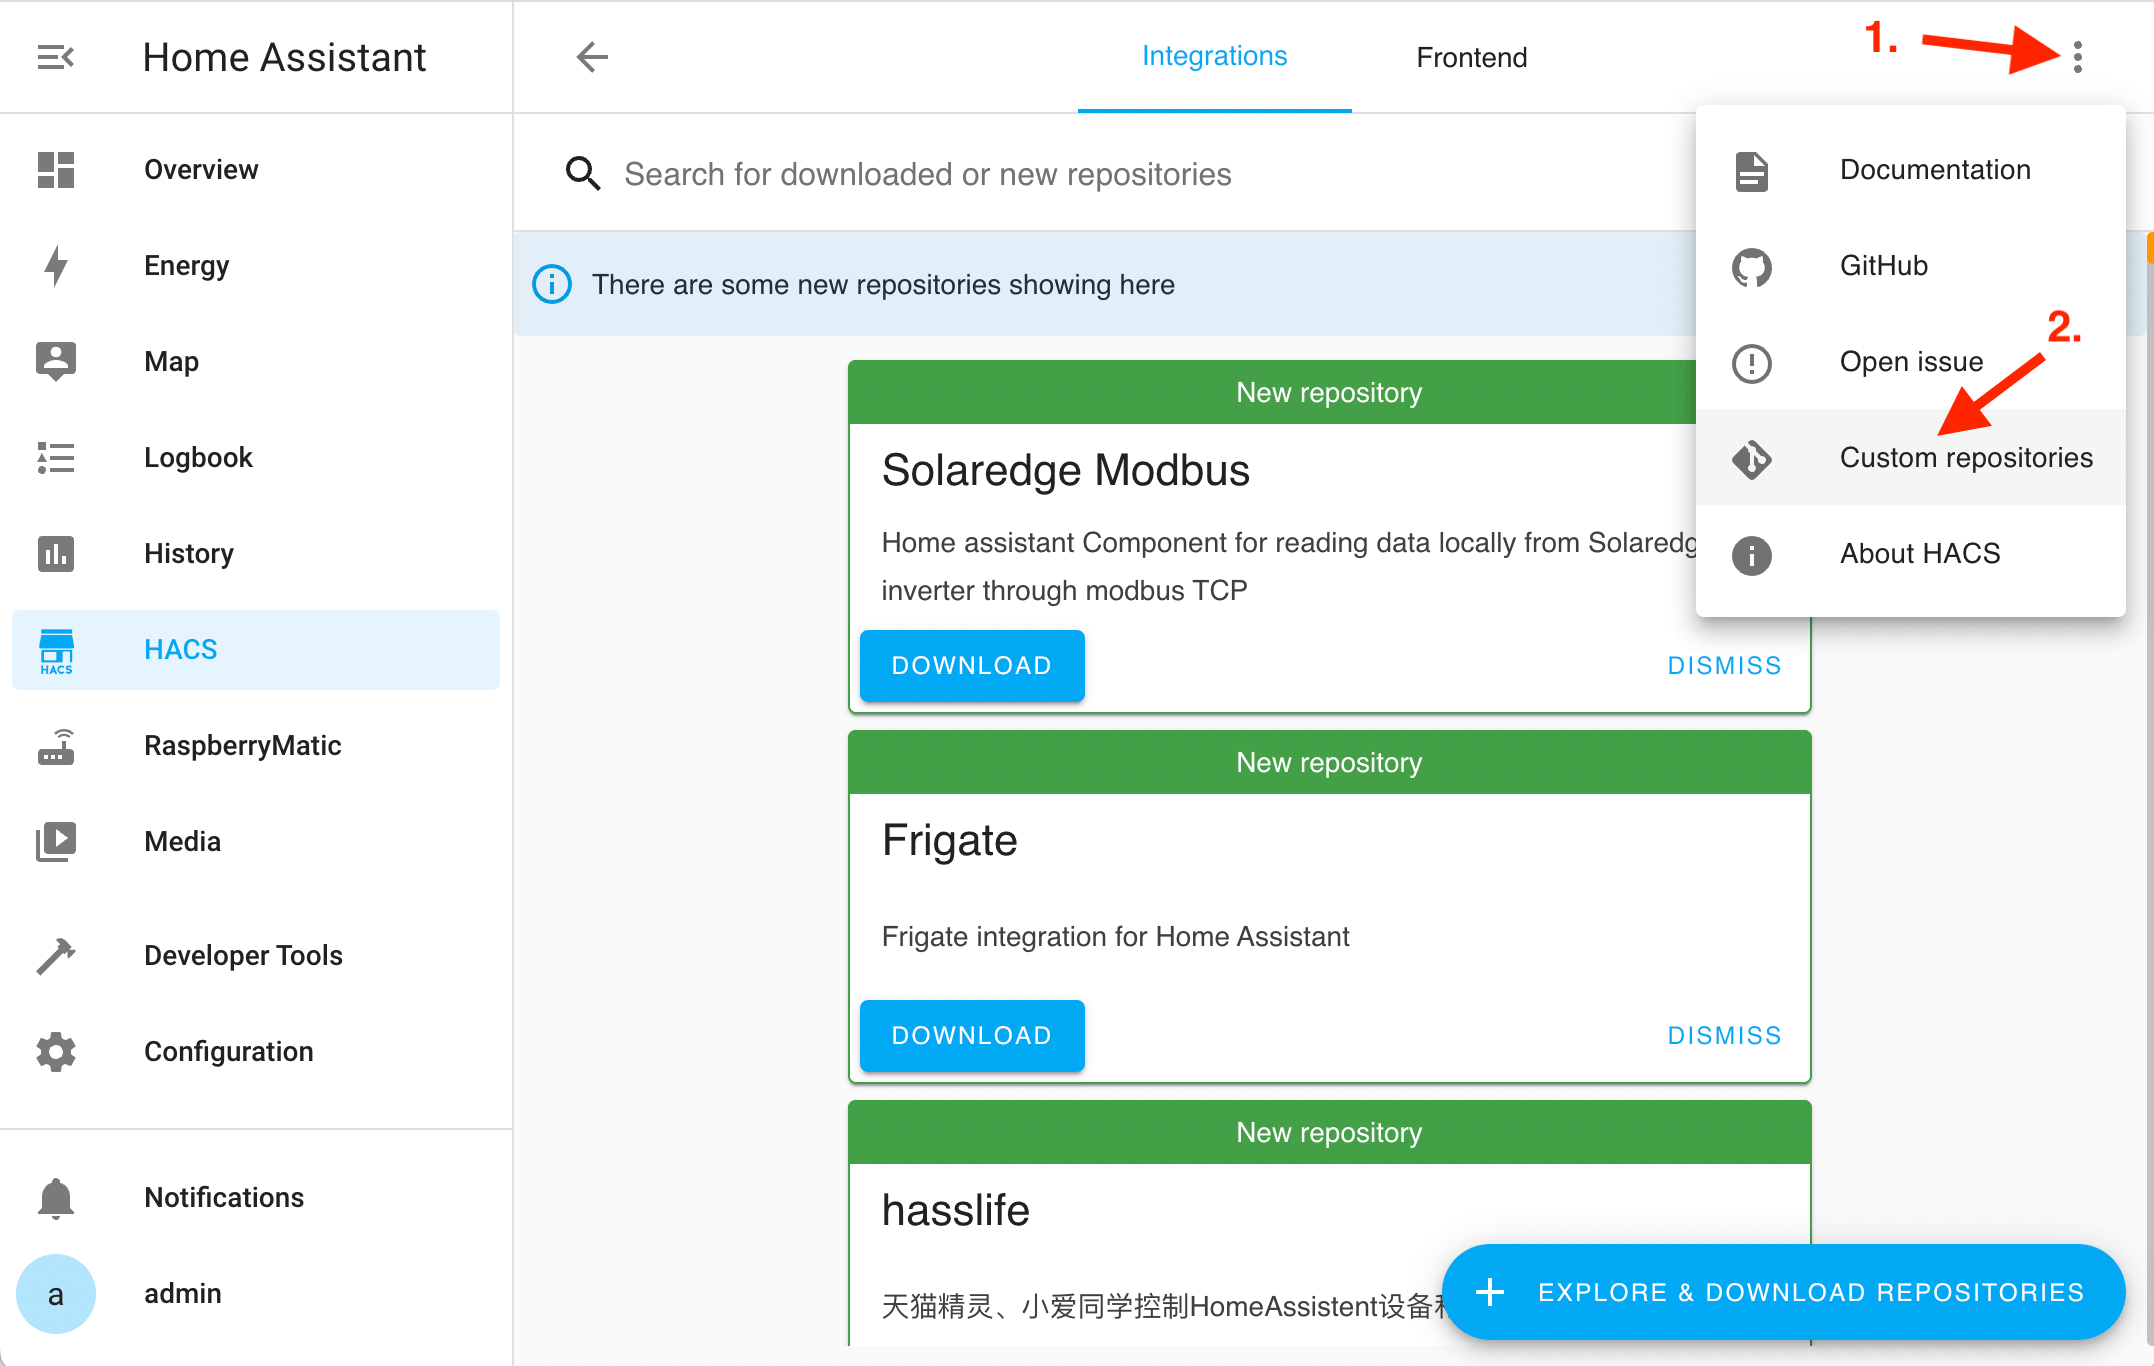 Note: Please note, that in case the
 Custom repositoriesitem is not selectable your HACS installation is still fetching additional information in the background. So please wait some minutes until this item can actually be selected and is NOT greyed out. - Add 'custom_homematic' as a repository: In the
Custom repositoriespop-up window, make sure to add the URL to thecustom_homematicrepository and selectIntegrationas a category:https://github.com/danielperna84/custom_homematic
- Add 'Homematic(IP) Local' repository: After adding the
custom_homematicrepository to HACS, you should be able to press the+ Explore & Download Respositoriesbutton withinHACS -> Integrationsand then enterhomematicas a search pattern to find and select theHomematic(IP) Localrepository:
- Download/Install latest version: In the next pop-up window make sure to select the latest version (not 0.38.2 like in the screenshot) of the respository and press
Downloadto finally download+install theHomematic(IP) Localrepository within HACS:
- Collect RaspberryMatic hostname: In case you want to use the new
Homematic(IP) Localintegration to connect to a RaspberryMatic install within Home Assistant, make sure to change toConfiguration -> Add-onsand then selectRaspberryMatic CCUand make sure to write down the displayed hostname of the running add-on install. Also make sure that the add-on is actually running and working correctly: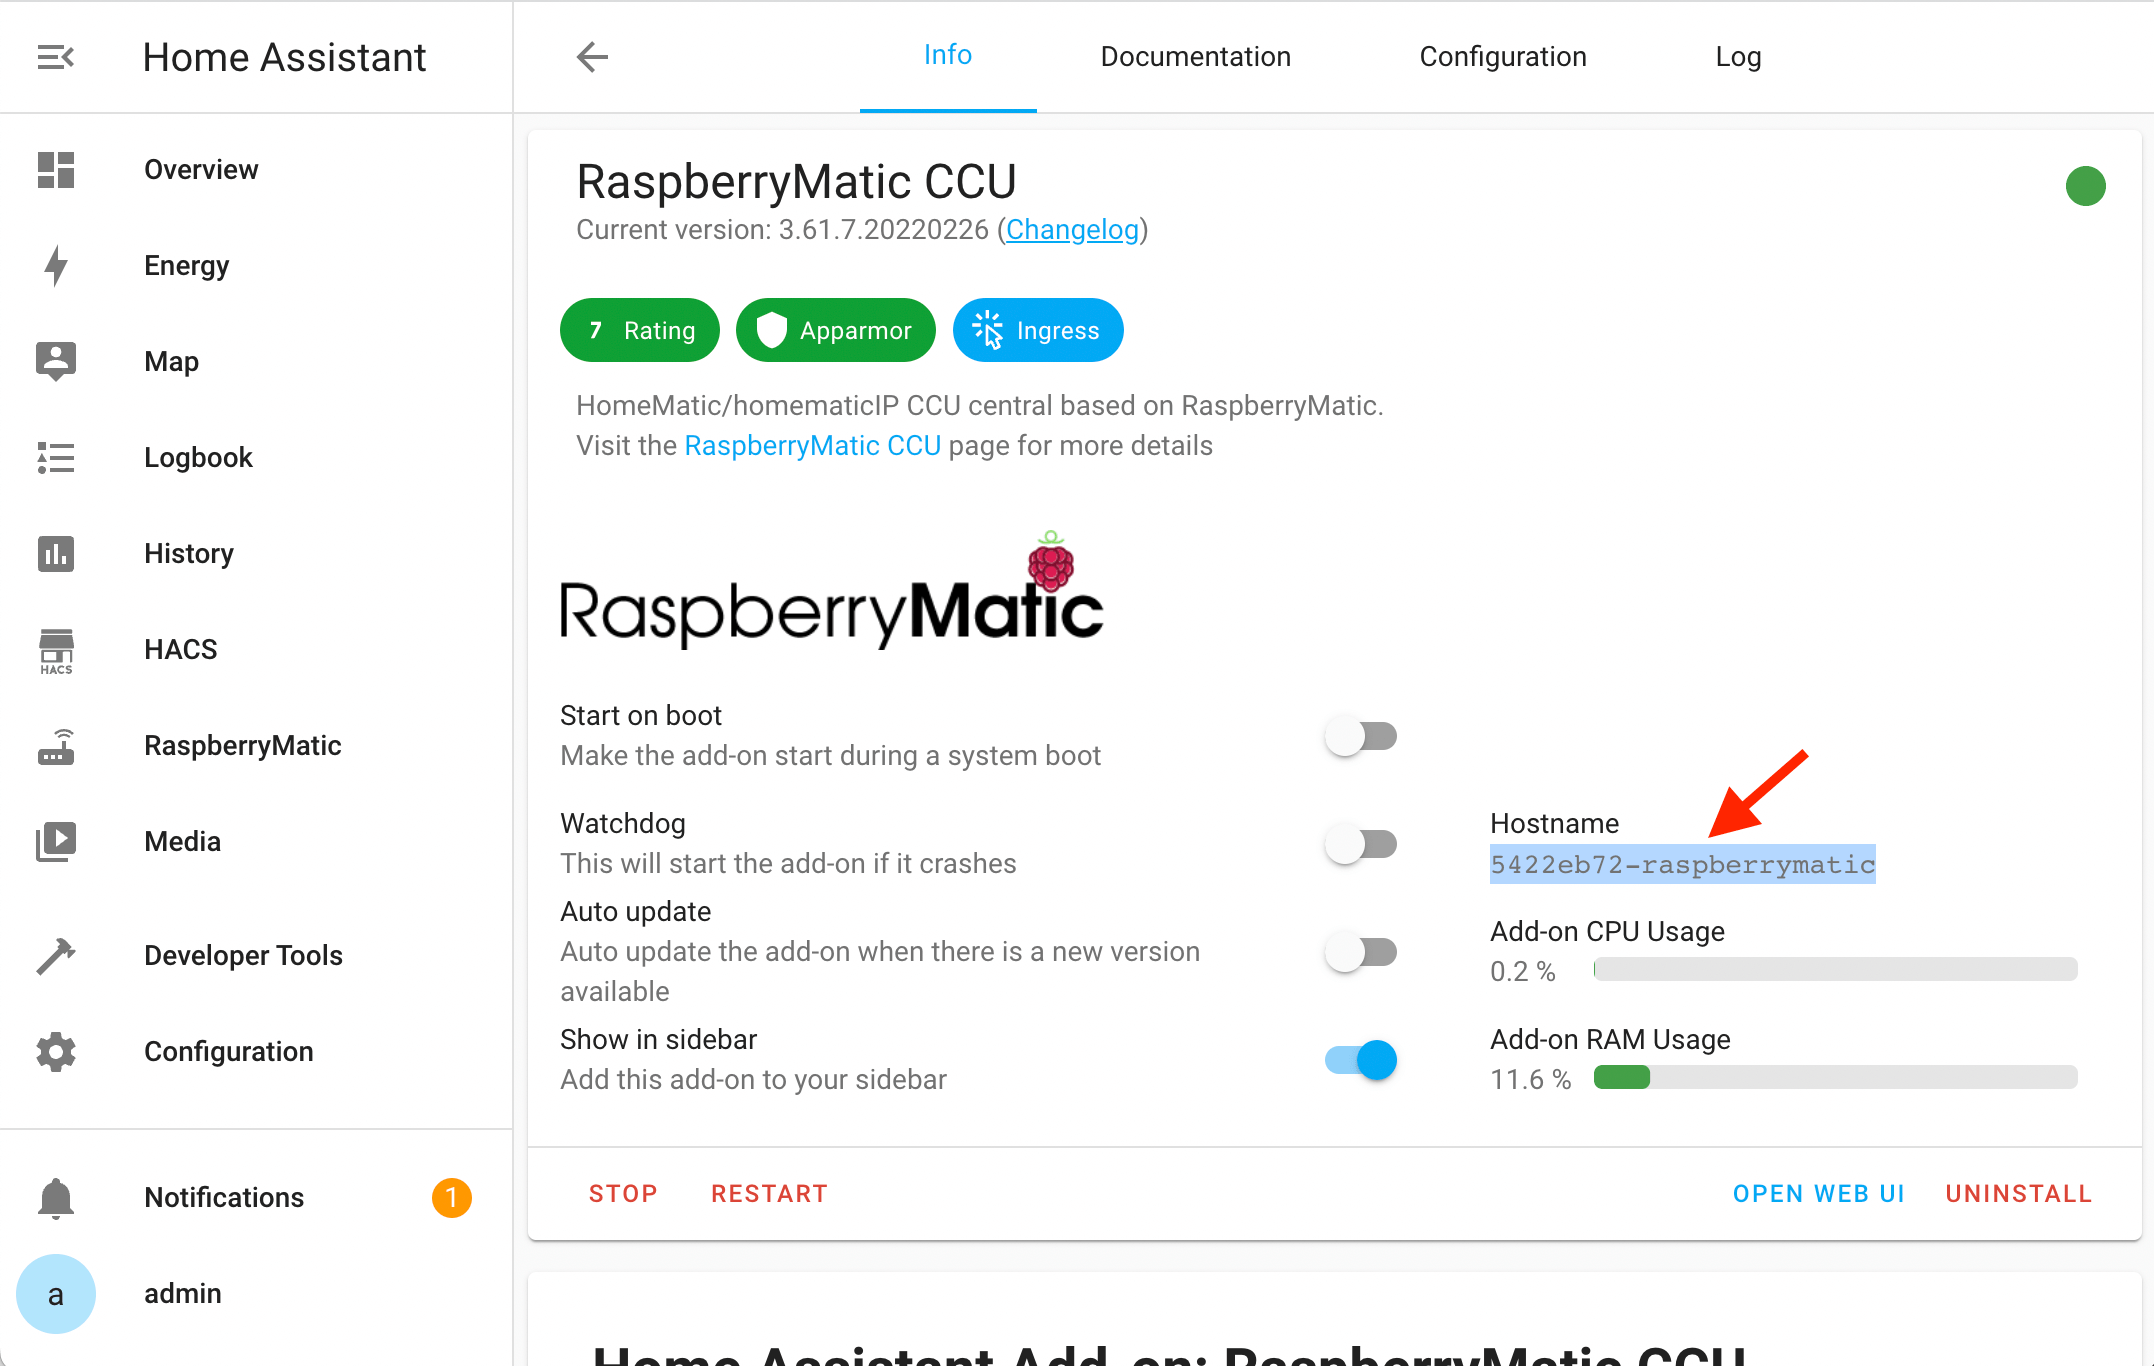
- Setup CCU Firewall: To allow the new 'Homematic(IP) Local' integration to access all necessary Homematic XML-RPC and Scripting APIs on your CCU/RaspberryMatic, you should make sure that you have the necessary firewall ports open in
Settings -> Firewall configuration. Take special care that the XML-RPC and Scripting APIs are accessible from the HomeAssistant host you are installing the integration to. - Install 'Homematic(IP) Local' integration: Now that this new HACS installed integration is ready for you, change to
Configuration -> Devices & Servicesand press+ Add integration. In the following pop-up window make sure to enterhomematicas a search pattern again and then select theHomematic(IP) Localintegration for install:
- Configure the 'Homematic(IP) Local' Integration:
In the configuration window that appears after installing the integration, provide the required details to connect to your CCU/RaspberryMatic device:
- Enter the CCU Username and CCU Password. These credentials must exactly match an existing user with full admin privileges defined in your CCU WebUI.
Important: The username and password are case-sensitive, and the password may not work properly if it contains special characters. If you encounter login issues, consider using a simpler password without special characters. - For CCU Hostname/IP-Address, enter the hostname or IP address of your CCU.
Note: If you're using RaspberryMatic as a Home Assistant add-on, use the internal Home Assistant hostname you noted earlier.
Your configuration should look similar to the following:
 7. Interface setup: In the next pop-up you will be prompted for selecting which communication interfaces (BidCos-RF, homematicIP, VirtualGroups, etc.) your CCU device provides. Make sure to select all the different interfaces your CCU has available. Do not select interfaces for devices you don't have, as this may result in errors during startup:
  8. Finalize setup: After having entered the correct user credentials and homematic interface setup, the next pop-up should present you all the found HomeMatic/homematicIP devices within your CCU/RaspberryMatic. You can now either assign an
 Area for each devices within this popup or assign them later on and just press Finish to finalize the setup:  9. Verify functionality: To be able to verify a correct functionality of the new integration, you should now see the new
 Homematic(IP) Local integration listed in the Configuration -> Devices & Services list including the number of devices, services and entities that have been fetched from the RaspberryMatic CCU:  10. Display device parameters: To view any parameters of Homematic devices being identified you can now press on the number of devices display and then select any of the device to display diagnostic information. For example, here you can see the
 DutyCycle Level and Carrier Sense Level being display for a HmIP-RFUSB used within the queried RaspberryMatic: 
Following these installation steps and setups you should then be able to see and use all your HomeMatic/homematicIP devices within Home Assistant and add them to any automation or Lovelace display card just as you do for any other devices added through other integrations.
Additional Resources
If you need more assistance on the topic of HomeAssistant Add-on installation, please have a look at the following external resources:
YouTube-Video on "RaspberryMatic AddOn auf Home Assistant installieren und einrichten 2022" (🇩🇪)
