Setup Nextcloud with reverse proxy - janschmid/NextcloudSetupTutorial GitHub Wiki
Introduction
This guide describes how to setup a Nextcloud server from scratch on a SBC (Single board computer). Even my setup is based on Ubuntu 18 with a RockPi4, this tutorial will also describe the equivilative on a Raspberry Pi, since it is far more common. To follow this guide, no previous knowledge is required, but it will be helpful.
This tutorial will guide you from flashing your SBC until your Nextcloud server is ready to use, with an encrypted communication and accessible from everywhere in the world with a public URL.
Table of contents
- Introduction
- Required hardware
- Summary of the used tools
- Setup SBC
- Setup proxy
- Setup a dynamic dns
- Setup OpenVPN
- Setup Nextcloud
- Recommended development environment
Required hardware
-
RockPi4 or similar, for example Raspberry Pi 4
-
Micro SD card (minimum size: 16GB, recommended: 32GB)
-
External hard drive
-
Wifi or LAN access
I recommend the RockPi4, Raspberry Pi 4 with 4GB Ram, or something similar.
Summary of the used tools
What's a RockPi
The Rock Pi 4 is like a Raspberry Pi a Single Board Computer (SBC). The available interfaces are a Gigabit Ethernet, USB 3 interface, and a 2.4 GHz wifi module.
What's Nextcloud
Nextcloud started in 2016 as a Fork from Owncloud. Nextcloud is a free Software to store, share and save data at your own server. It is licensed under the AGPLv3 license. Mobile clients are available for Linux, Mac-OS, Windows, as well as for IOS and Android.
What's Let's Encrypt
Let's Encrypt is a free, automated, and open certificate authority brought to you by the nonprofit Internet Security Research Group (ISRG) [letsencrypt].
What's MS Azure
Microsoft Azure is a cloud computing platform from Microsoft with the services such as SQL Azure or AppFabric, which is primarily aimed at software developers. Azure was announced in October 2008, and started with the code name "Project Red Dog". Since February 2010 the platform is officially available.
Setup SBC
To setup the SBC, a computer with a micro SD card slot is required. To remote access it, SSH has to be activated.
Flash SBC
Download balenaEtcher to Flash your SBC. Download the Image for:
-
Raspberry Pi
-
RockPi
After the download succeeded, open Balena Etcher, select the Image and double-check your selected device, see the image below. Be careful, all data will be deleted on the device.

Enable SSH
Since 2016, SSH has to be activated manually. This is done by creating a file with the name "ssh" in the boot partition of your flashed SD card.
Linux
Open a terminal, change to the boot partition directory, which is most likely in "/media/yourUserName/". Create a new file by entering the command:
touch ssh
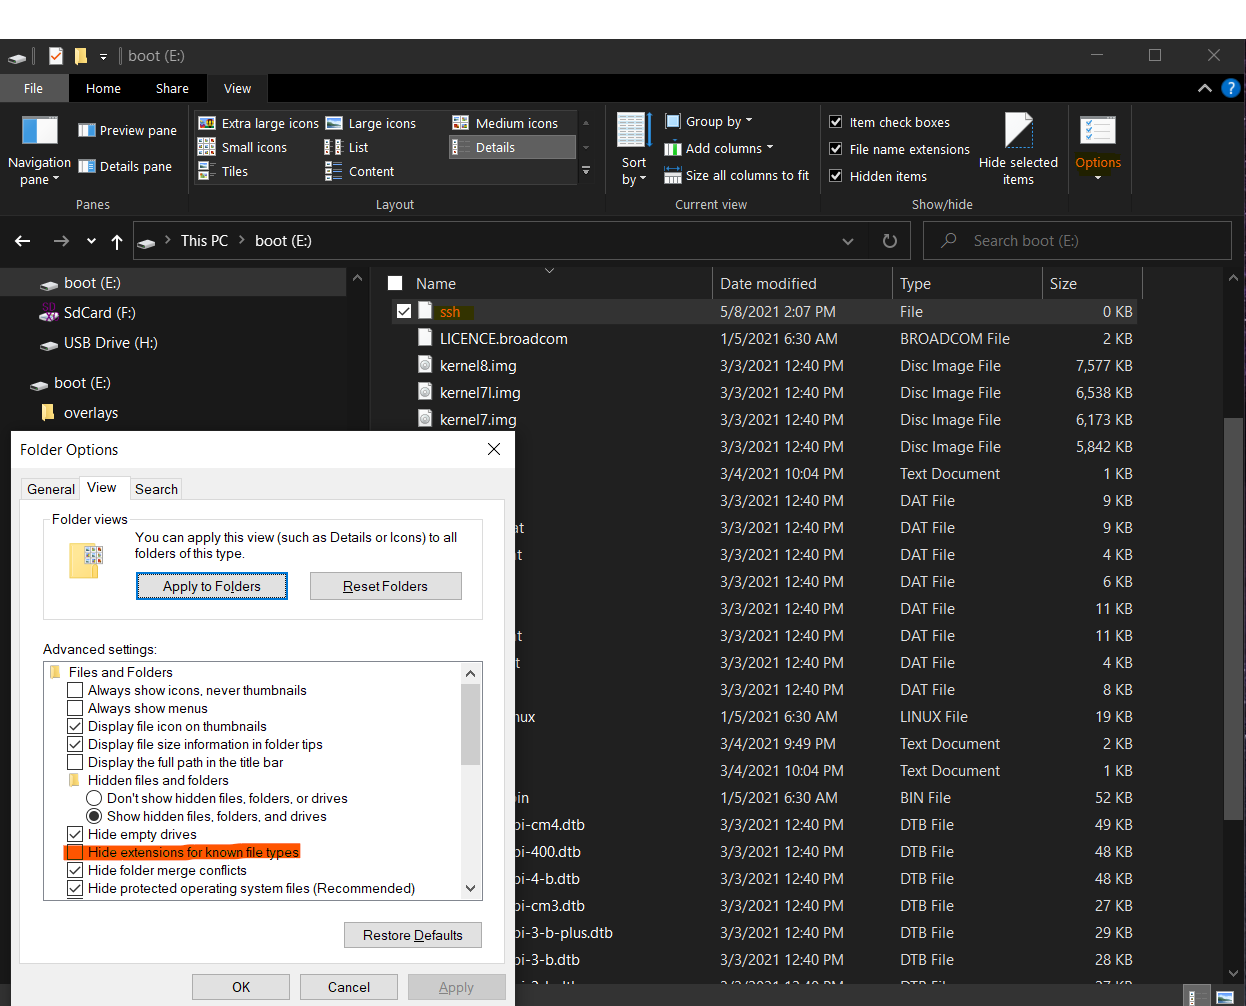
Windows
Open the drive "boot" and create a new file with the name "ssh", without the file extension ".txt". If the boot partition is not mounted, try to unplug and plug your SD card. If you can't see the file unselect "Hide extensions for known file types", see the figure below.
SSH
Connect your SBC to the same network as your PC. An easy way to get the local address of your SBC, is by an arp scan. This can be done in Linux and Windows by the command:
arp -a
To determine your device after the arp scan, compare it with the physical address range of the Raspberry Pi or RockPi. To establish a connection to your SBC, open a terminal and enter:
-
Raspberry:
- ssh pi@yourLocalIpAddress, password: raspberry
-
RockPi4:
- ssh rock@yourLocalIpAddress, password: rock
Change your password with:
sudo passwd
Recommended: setup ssh key
See section Setup SSH Keys
Setup proxy
This section describes how to setup a reverse proxy with Ms Azure. This step is only required if you can't forward a port (no access to router or if you have a DS-lite connection). If this is not the case for you, skip this section and have a look here. The basic setup is described in following figure:
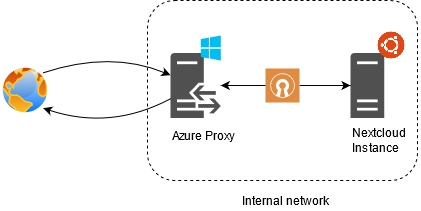
Because the virtual machine of Ms Azure has a static port, this port can be used to access our SBC. The SBC establishes a connection to Ms Azure with OpenVPN (or alternatively WireGuard), and the traffic is redirected. The costs are 5$ per month. Azure offers a free student account credit.
Create Ms Azure account
Create a free account or free student account. Afterwards, sign in to the azure portal.
-
Press "Create a resource"
-
Service: Select latest Ubuntu server version -> Create
-
Tab: "Create a virtual machine - Basic"
-
Virtual machine name: Reverse proxy for Nextcloud
-
Region: Your home region
-
Size: smallest size, currently: Standard_B1ls - 1 vcpu, 0.5 GiB memory
-
Authentication type: SSH public key
-
Select inbound ports: Select SSH(22), HTTPS, HTTP
-
Press "next"
-
-
Tab: "Create a virtual machine - Disk"
-
OS disk type: Standard HDD
-
Advanced: Use managed disks -> unselect (you pay only for the storage you are using)
-
-
Review +create -> Create
-
Press "Download private key and create resource"
-
Copy the downloaded key to your .ssh folder
-
Linux: ~/.ssh
-
Windows: C:/Users/UserName/.ssh
-
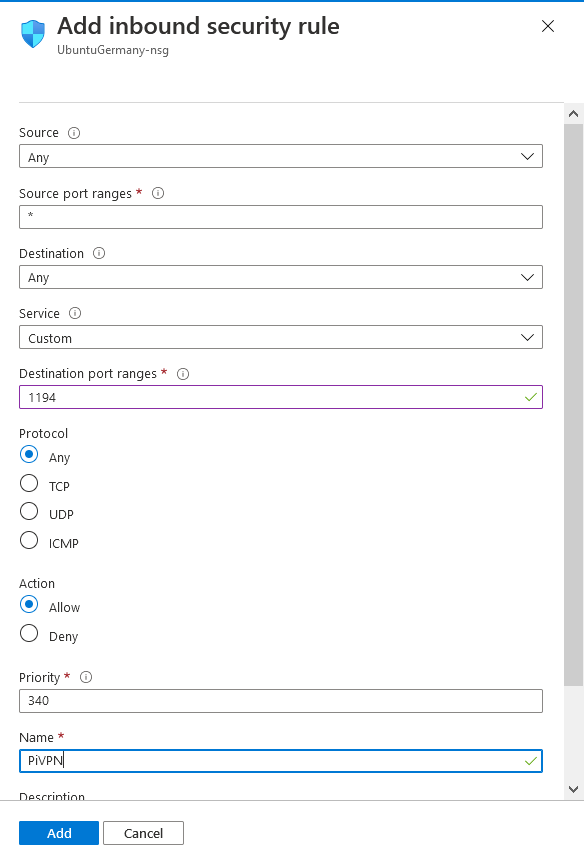
Go back to "All resources" -> Virtual machine -> Networking -> Inbound port rules -> Add inbound port rules.
Set the settings as shown in the figure:
Setup a dynamic dns
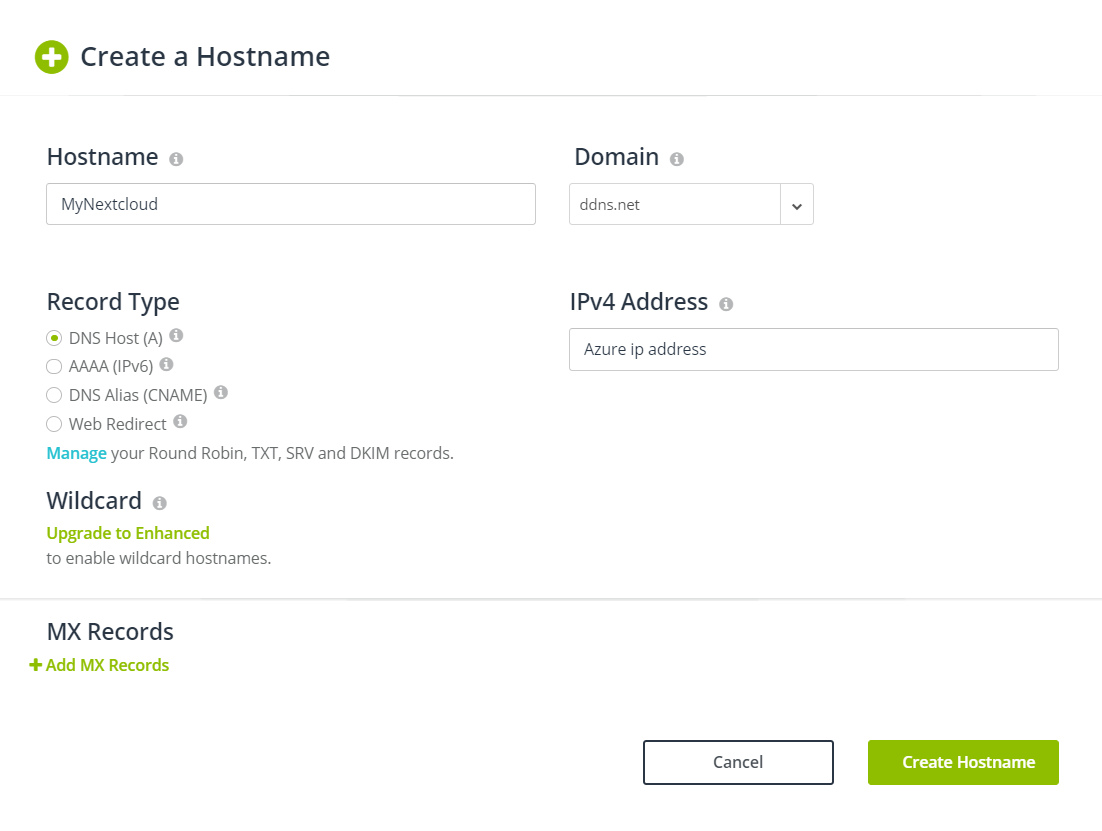
To access your Nextcloud with a web address instead of an IP address, create a free account at a dynamic dns provider, for example noip. Select a host name and domain and set the IP address from your Azure server. Since Azure provides a static IP address, no further steps are required.
Setup OpenVPN
Server
Before you continue, I recommend to follow section Setup and install Vs Code and Direct connection to device. Open a SSH connection with Vs Code to AzureUbuntu. Open on the left panel of Vs Code the remote explorer, right click "AzureUbuntu" and select "Connect in current window". If no new Terminal opens, select "Terminal-> New Terminal".
Congratulations, you have now a connection to your Ms Azure server. Before we start, you should update the system, enter following in your Vs Code terminal:
sudo apt update && sudo apt upgrade -y
Let's install OpenVPN, where PiVPN is an easy way to set it up. It works for Raspbian and Ubuntu. Enter following in your Vs Code terminal:
curl -L https://install.pivpn.io | bash
Follow the installation instructions. You can navigate with "Tab". Select your choice with "Space". Choose OpenVPN as VPN. Use your previously created DNS entry.
Create client profile
Connect with Vs Code to Azure. Create a new client certificate with:
pivpn -a -nopass
Press the folder icon in Vs Code -> open folder -> open "/home/azureuser/ovpns". Right click on your ovpn profile and download it to your development machine.
Client
Install the OpenVPN client on your SBC:
sudo apt install openvpn
Change the file type of your OpenVPN profile to .conf. Open the folder "/etc/openvpn" with Vs Code and paste your OpenVPN profile. It will now automatically connect to Azure after a reboot. Restart the service to establish a connection:
sudo systemctl restart openvpn
Now you can setup the SSH access to your raspberry through Azure with a proxy, see section Connection via proxy.
Setup Nextcloud
Everything is now prepared to get started. First, we will setup Nextcloud on the SBC, afterwards some configurations at the reverse proxy are required. Most of the following information are from the latest Nextcloud installation instructions. The required dependencies get installed with:
    echo "deb http://mirrordirector.raspbian.org/raspbian/ buster main contrib non-freee rpi">/etc/apt/sources.list.d/10-buster.list
    sudo apt update
    sudo apt install git nano unzip nginx postgresql curl libcurl4 redis-server php7.3-fpm php7.3-curl php7.3-gd php7.3-intl php7.3-bcmath php7.3-gmp php7.3-imagick imagemagick php7.3-mbstring php7.3-opcache php7.3-xml php7.3-xmlrpc php7.3-zip php7.3-apcu php7.3-common php7.3-intl php-pear php7.3-apcu php7.3-xml php7.3-mbstring php7.3-zip  php7.3-pgsql php7.3-intl php-imagick php7.3-json php7.3-bz2 php-smbclient redis-server php-redis -y
Set your default php version to 7.3:
sudo update-alternatives --set php /usr/bin/php7.3
Install Nextcloud:
        cd /var/www/
        wget https://download.nextcloud.com/server/releases/latest.zip
        sudo unzip latest.zip
        sudo rm latest.zip
        sudo rm -R html
        sudo mv nextcloud html
        sudo chown -R www-data:www-data /var/www/html
Change mount location of the hard drive
To automount your HDD at each boot , get the UUID of your device with:
sudo blkid
It should look similar to:

Adjust your fstab
sudo nano /etc/fstab
It should look similar to:
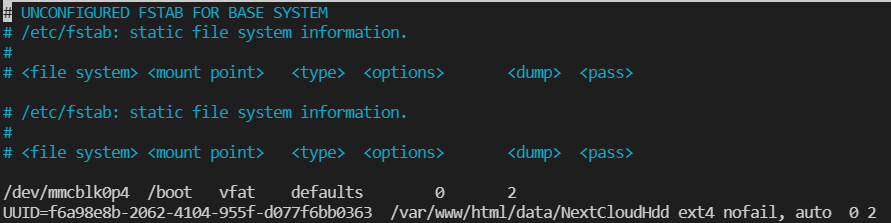
In case you run into issues, have a look here.
Configure nginx
Open /etc/nginx/sites-enabled/default
        upstream php-handler {
            server unix:/var/run/php/php7.3-fpm.sock;
        }
        server {
            set $myDomain myDomain;
            listen 80;
            listen [::]:80;
            add_header Strict-Transport-Security "max-age=15768000; includeSubDomains; preload;";
            add_header X-Content-Type-Options nosniff;
            add_header X-XSS-Protection "1; mode=block";
            add_header X-Robots-Tag none;
            add_header X-Download-Options noopen;
            add_header X-Permitted-Cross-Domain-Policies none;
            add_header X-Frame-Options "SAMEORIGIN";
            add_header Referrer-Policy "no-referrer" always;

            # Remove X-Powered-By, which is an information leak
            fastcgi_hide_header X-Powered-By;
            # Path to the root of your installation
            root /var/www/html/;

            location = /robots.txt {
                allow all;
                log_not_found off;
                access_log off;
            }

            # set max upload size
            client_max_body_size 5120M;
            client_body_buffer_size 4096k;
            fastcgi_buffers 64 4K;

            # Enable gzip but do not remove ETag headers
            gzip off;
            gzip_vary on;
            gzip_comp_level 4;
            gzip_min_length 256;
            gzip_proxied expired no-cache no-store private no_last_modified no_etag auth;
            gzip_types application/atom+xml application/javascript application/json application/ld+json application/manifest+json application/rss+xml application/vnd.geo+json application/vnd.ms-fontobject application/x-font-ttf application/x-web-app-manifest+json application/xhtml+xml application/xml font/opentype image/bmp image/svg+xml image/x-icon text/cache-manifest text/css text/plain text/vcard text/vnd.rim.location.xloc text/vtt text/x-component text/x-cross-domain-policy;

            location / {
                rewrite ^ /index.php;
            }

            location ~ ^/(?:build|tests|config|lib|3rdparty|templates|data)/ {
                deny all;
            }
            location ~ ^/(?:\.|autotest|occ|issue|indie|db_|console) {
                deny all;
            }

            location ~ ^\/(?:index|remote|public|cron|core\/ajax\/update|status|ocs\/v[12]|updater\/.+|oc[ms]-provider\/.+)\.php(?:$|\/)  {
                fastcgi_split_path_info ^(.+\.php)(/.*)$;
                try_files $fastcgi_script_name =404;
                include fastcgi_params;
                fastcgi_param SCRIPT_FILENAME $document_root$fastcgi_script_name;
                fastcgi_param PATH_INFO $fastcgi_path_info;
                fastcgi_param modHeadersAvailable true;
                fastcgi_param front_controller_active true;
                fastcgi_pass php-handler;
                fastcgi_intercept_errors on;
                fastcgi_request_buffering off;
            }


            location ~ ^\/(?:updater|oc[ms]-provider)(?:$|\/) {
                try_files $uri/ =404;
                index index.php;
            }

            location ~ \.(?:css|js|woff2|svg|gif)$ {
                try_files $uri /index.php$uri$is_args$args;
                add_header Cache-Control "public, max-age=15778463";
                add_header X-Content-Type-Options nosniff;
                add_header X-XSS-Protection "1; mode=block";
                add_header X-Robots-Tag none;
                add_header X-Download-Options noopen;
                add_header X-Permitted-Cross-Domain-Policies none;
                # Optional: Don't log access to assets
                access_log off;
            }


            location ~ \.(?:png|html|ttf|ico|jpg|jpeg)$ {
                try_files $uri /index.php$uri$is_args$args;
                # Optional: Don't log access to other assets
                access_log off;
            }
        }
Replace "myDomain" with your domain. It should be similar to "myNextCloud.spdns.eu". Now restart nginx with:
sudo systemctl restart nginx
Setup PostgreSQL user and database
        sudo -u postgres psql
        \password postgres
        \q
        #Enter save password for user
        sudo -u postgres createuser -P -d nextcloud
        sudo -u postgres createdb -O nextcloud nextcloud
Setup Nextcloud
Type the URL from your SBC in your browser. Don't use your administrator user name or password as login data. Choose a save password, since the website will be accessible through the web later. Set as "User" and "Database" nextcloud. The password for your database is the previously defined postgresql password.

Setup Memory Cache
Nextcloud recommends using the memcache. Set it up by:
sudo nano /var/www/html/config/config.php
Append following line:
'memcache.local' => '\OC\Memcache\APCu',
Configure environemnt variables, use OPcache
sudo nano /etc/php/7.3/fpm/pool.d/www.conf
Search with nano "Ctrl+w" for ;env[HOSTNAME] and uncomment it by removing the semicolon in front of the line:
        ;env[HOSTNAME] = $HOSTNAME
        ;env[PATH] = /usr/local/bin:/usr/bin:/bin
        ;env[TMP] = /tmp
        ;env[TMPDIR] = /tmp
        ;env[TEMP] = /tmp
Save the file with "Ctrl+x". Open
sudo nano /etc/php/7.3/fpm/php.ini
replace
memory_limit = 16G
and append
        opcache.enable=1
        opcache.enable_cli=1
        opcache.interned_strings_buffer=8
        opcache.max_accelerated_files=10000
        opcache.memory_consumption=128
        opcache.save_comments=1
        opcache.revalidate_freq=1
Save the file with "Ctrl+x".
Use system cron service for background jobs
It is recommended to execute the background jobs with cron. For that we will configure a systemd service and systemd timer
sudo nano /etc/systemd/system/nextcloudcron.service
Add
        [Unit]
        Description=Nextcloud cron.php job

        [Service]
        User=www-data
        ExecStart=/usr/bin/php -f /var/www/html/cron.php

        [Install]
        WantedBy=basic.target
Save the file with "Ctrl+O & Ctrl+X"
sudo nano /etc/systemd/system/nextcloudcron.timer
Add
        [Unit]
        Description=Run Nextcloud cron.php every 15 minutes

        [Timer]
        OnBootSec=5min
        OnUnitActiveSec=15min
        Unit=nextcloudcron.service

        [Install]
        WantedBy=timers.target
Start and enable service with
        sudo systemctl start nextcloudcron.timer
        sudo systemctl enable nextcloudcron.timer
restart nginx
sudo systemctl restart nginx
Setup reverse proxy
Install nginx and certbot
sudo apt install python3 nginx certbot python3-certbot-nginx
Get a certificate
sudo certbot --nginx
Follow the setup, enter your domain if requested. Configure your reverse proxy, determine the local IP address of your SBC with:
pivpn -c
Keep in mind that your SBC has to be connected to the VPN server to get and IP address, remember the Virtual IP, we will need it later. Configure your reverse proxy:
sudo nano /etc/nginx/sites-enabled/default
Your configuration should look similar like following, replace the proxy_pass with your Virtual IP. Append the ẇell-known locations as well.
        server {
            listen 80 default_server;
            listen [::]:80 default_server;
        }

        server {
            root /var/www/html;

            # Add index.php to the list if you are using PHP
            #index index.html index.htm index.nginx-debian.html;
            server_name yourDomain.spdns.eu; # managed by Certbot

            location / {
                # First attempt to serve request as file, then
                # as directory, then fall back to displaying a 404.
                #try_files $uri $uri/ =404;
                proxy_headers_hash_max_size 512;
                proxy_headers_hash_bucket_size 64;
                proxy_set_header Host $host;
                proxy_set_header X-Forwarded-Proto $scheme;
                proxy_set_header X-Real-IP $remote_addr;
                proxy_set_header X-Forwarded-For $proxy_add_x_forwarded_for;

                add_header Front-End-Https on;
                proxy_pass http://10.8.0.1/; #Replace with the Virtual Ip of the SBC
            }
            location /.well-known/{
                rewrite ^/\.well-known/carddav https://$server_name/remote.php/dav/;
                rewrite ^/\.well-known/caldav https://$server_name/remote.php/dav/;
                rewrite ^/\.well-known/webfinger https://$server_name/index.php/.well-known/webfinger;
                rewrite ^/\.well-known/nodeinfo https://$server_name/index.php/.well-known/nodeinfo;
            }


            listen 443 ssl; # managed by Certbot
            ssl_certificate /etc/letsencrypt/live/yourDomain.spdns.eu/fullchain.pem; # managed by Certbot
            ssl_certificate_key /etc/letsencrypt/live/yourDomain.spdns.eu/privkey.pem; # managed by Certbot
            include /etc/letsencrypt/options-ssl-nginx.conf; # managed by Certbot
            ssl_dhparam /etc/letsencrypt/ssl-dhparams.pem; # managed by Certbot

        }

        server {
            if ($host = yourDomain.spdns.eu) {
                return 301 https://$host$request_uri;
            } # managed by Certbot


            listen 80 ;
            listen [::]:80 ;
            server_name yourDomain.spdns.eu;
            return 404; # managed by Certbot
        }

        server {
            if ($host = yourDomain.spdns.eu) {
                return 301 https://$host$request_uri;
            } # managed by Certbot


            server_name yourDomain.spdns.eu;
            listen 80;
            return 404; # managed by Certbot
        }
Change the max body size of nginx
sudo nano /etc/nginx/nginx.conf
set client_max_body_size = 128G;"
Recommended development environment
This section is optional, but in my opinion it's worth spending some minutes to setup the remote access on your local machine.
Setup SSH Keys
This section describes how connect to your raspberry pi without a password promt. Open a terminal on your development machine
        cd ~/.ssh
        ssh-keygen
        #FileName promt: SSHForMyRaspi
        # Press enter until key is generated, for ease of use don't setup a password
        #Now, let's copy your key to the raspberry
        scp .\SSHForMyRaspi.pub pi@myLocalIpAddress:/.ssh/authorized_keys
It's important that the key get copied to the file "authorized_keys", if not it will not work.
Setup and install Vs Code
-
Windows
- Download VsCode for Windows
-
Linux
-
Install VsCode for Linux:
sudo snap install --classic code
-
-
Install the Remote extension
Direct connection to device
-
Open Vs Code and select the "Remote explorer" on the left
-
Press on the configure button next to SSH Targets, select "../yourUserName/.ssh/config"
        IdentityFile ~/.ssh/SSHForMyRaspi
        Host AzureUbuntu
            HostName IpAddressOfAzure
            IdentityFile C:/Users/yourUserName/.ssh/YourDownloadedAzureKey.pem
            User azureuser
        Host Raspberry
            HostName RaspberryPiLocalIp
            User pi
Let's have a look what's happening here:
-
IdentityFile
- Your private key which is required to connect to your SBC, you got in in the section Setup SSH Keys
-
AzureUbuntu
-
This is your Azure reverse proxy. You can get the public IP from your azure portal
-
The file YourDownloadedAzureKey is the azure access key, you got that after you created the virtual machine.
-
-
Raspberry
- This is your local address of the Raspberry, you can access it when you are in your local network
Connection via proxy
This allows you to connect to your SBC outside from the local network
-
Open Vs Code and select the "Remote explorer" on the left
-
Press on the configure button next to SSH Targets, select "../yourUserName/.ssh/config"
Append to the previous configured file
        Host RaspberryOverAzure
            HostName YourRaspberryOpenVpnIpInAzure
            User pi
            ProxyCommand C:\Windows\System32\OpenSSH\ssh.exe -q -W %h:%p AzureUbuntu
Let's have a look again whats happening here
-
A connection to AzureUbuntu is established
-
From Azure, a connection to your Raspberry is established
-
"AzureUbuntu" from the proxycommand has to match the Host name of Azure