3D Reconstruction using RTAB Map with Intel RealSense D435 RGB D Camera - jacobmoroni/robotic_vision GitHub Wiki
3D Reconstruction using RTAB Maps with Intel RealSense D435 RGB-D Camera
-Jacob Olson
Introduction
This wiki will walk through how to use RTAB-Map with an Intel RealSense D435 Camera to generate a 3D point cloud of an environment.
RGB-D Cameras
RGB-D stands for Red Green Blue - Depth, or Color and Depth. An RGB-D Camera is a 3D camera that outputs an image with color and depth information at the pixel level. For the most part, these cameras use a pair of stereo IR (Infrared) cameras and a color (RGB) camera. They are also equipped with an IR projector which projects a pattern onto the environment which is used to get more accurate depth information than a standard stereo camera. Until recently, RGB-D cameras had some weaknesses that limited their practicality in the real world. They had a very limited depth range, and were rendered nearly useless when used outdoors. This was caused by the IR from the projector getting washed out by the ambient IR from sunlight.

The Intel RealSense D435 RGB-D Camera, Intel's newest RGB-D camera, shown above, has greatly improved upon these weaknesses. By improving both the hardware and the software running the camera, Intel was able to ge the D435 camera a 10+ m range both indoors and outdoors. This camera also has a global shutter and a wide field of view, making them very useful for robotics and UAV applications.
Below is a link to an example video of the depth output of the D435 camera.
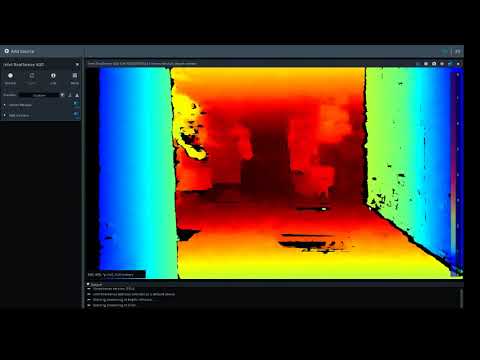
Here is another video showing the Color, Depth, and IR camera feeds and RGBXYZ (color and depth) point cloud that the camera generates in ROS. If you pay attention to the IR camera feed (the bottom one on the left), you can see the dots from the IR projector visible in the feed.
Intel has released open source software to develop with this camera. We will be using their ROS package to use the camera in ROS.
RTAB-Map
RTAB-Map (Real-Time Appearence-Based Mapping) is a very powerful software package made for 3D mapping and navigating with RGB-D Cameras. There is also a ROS package that allows it to be used seamlessly in ROS. RTAB-Map uses the depth images received from the camera to perform Graph-Based SLAM, generating a dense, color point cloud and odometry of the camera. It is also able to do loop closure real-time, using bag of words and SIFT feature detectors.
Some other aspects of the ROS package that are noteworthy is that it lets you pass in your own odometry topic rather than generating one if you have a way of computing it more accurately. You can also use your own 2D or 3D laser scans to improve the quality of your maps if desired. RTAB-Map is also integrated with some nice tools for post-processing the data to create an optimized 3D point-cloud. RTAB-Map is also compatible with various data structures such as Octomaps and Voxels, which are much better than pointclouds for 3D planning and meshing multiple maps more efficiently. There is other really good information about RTAB-Map available online both from the creators and others that have used it.
Here is a link to the RTAB-Map Wiki with some more in-depth explanations and references to the papers written explaining the inner workings of RTAB-Map.
Here is a link to an RTAB-Map Forum with really good troubleshooting questions and answers.
For this project we will implement RTAB-Map to generate a 3D point cloud of an environment using only the Intel RealSense D435 Camera. We will not use any external odometry measurements or any external sensors.
Implementation
It will save a lot of trouble if you are already familiar with ROS (Robot Operating System). It is a very powerful open source platform for robotics. If you aren't familiar with it, I suggest doing the tutorials. you can find them here
Installing the ROS Packages and building your workspace
Put the following packages in the same ROS workspace:
-
First, install and build the realsense_camera package from source. make sure to install its dependencies also by following the instructions found here realsense_camera2 github.
-
Next, install and build the rtabmap_ros package from source, since we will need to edit the launch files. Follow the instructions here to do so. rtabmap_ros install from source. Make sure to install the required dependencies along with it. For now, we won't worry about the optional dependencies (SIFT/SURF, g20, and GTSAM). They can be useful, but are not necessary for the 3D Reconstruction to work.
-
We will also use the depthimage_to_laserscan package, so download this one too depthimage_to_laserscan. and put in in the same workspace as realsense_camera and rtabmap_ros. This package uses the depth image from the RGB-D camera and generated a 2D laserscan from it. I'll explain why we need this later
Once you have these installed, make sure your workspace will still build and don't forget to source it.
Changing the launch files.
We are going to make a few changes to the launch files to get everything in the right format and make sure all of the subscribers and publishers are talking to each other correctly.
To make it easier, I uploaded my altered files to the reconstruction_3d folder in this repository. You can download those files and replace the original ones as follows.
NOTE: These files are functional replacements for the files as of April 24,2018. It is possible that after an update of one of the packages, the replacement files could stop working. If that is the case, you may need to make these adjustments to the new launch files.
The first file we will replace is the rs_rgbd.launch file found in "YOUR_WORKSPACE/src/realsense/realsense_ros_camera/launch/". Replace this one with the one in this repository
The changes made to that are to output the correct format for the depth image and tweak some of the parameters to give publish the correct type of depth topic. It also adds a node to convert the color image to grayscale and publish that to ROS. It is common to need a grayscale image for many robotic vision applications.
for that node to work you will have to place the grayscaler.py file in "YOUR_WORKSPACE/src/realsense/realsense_ros_camera/src/" and make it executable.
To test if the new launch file is working, launch it using
roslaunch realsense_ros_camera rs_rgbd.launch
Then run the rgbd_visualize.rviz file from the downloaded repository. do this by navigating to the folder that the file is stored in and run
rosrun rviz rviz -d rgbd_visualize.rviz
It should show the output of the RGB camera, IR camera, depth image, and an RGBXYZ point cloud. The "Sample RVIZ Footage of RealSense D435" video included earlier in this wiki is an example of what this should look like.
Once that is working, we can move on to using rtabmap_ros to generate a 3D point cloud.
replace the rtabmap.launch file located in "YOUR_WORKSPACE/src/rtabmap_ros/launch" with the one from the repository.
The changes in this launch file line up the publishers and subscribers to the correct topics. It also adds a node that uses the depthimage_to_laserscan package to generate a 2D laserscan from the depth image and then uses that to generate a 2D occupancy grid map to help make the map easier to read. RTAB-Map needs a laserscan to generate the occupancy grid, but since we are not using a laserscanner, we generate a fake laserscan from the depth image. This is the launch file that you would modify to add in your own odometry topic or a real laserscan topic to improve the quality of the maps.
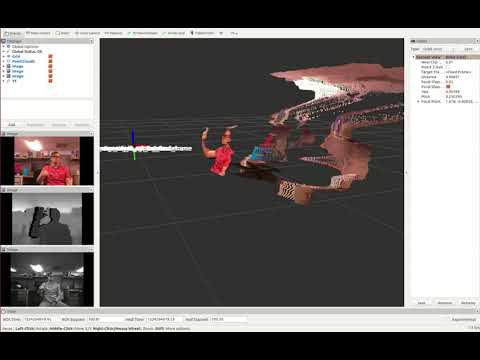
I have also changed a couple of the settings in the rtabmap gui to display the occupancy grid along with the point cloud and loop closure windows. Below is an example of what it will look like.
 To use this GUI, you need to move the rtabmap_gui.ini file from the repository into "~/.ros/" folder.
Mapping and Cleaning up Point Cloud
Now you are ready to map. To get everything running, first launch the camera node with
roslaunch realsense_ros_camera rs_rgbd.launch
then launch RTAB-Map with
roslaunch rtabmap_ros rtabmap.launch
There are a lot of settings you can tweak in RTAB-Map to get different results. Refer to the documentation for these settings and troubleshooting. Using the rtabmap_gui.ini file that I provided has the settings that I used already selected.
The RTAB-Map GUI is very intuitive to use when creating your map. I have a couple pointers that will help improve the quality of the map. When making your map, remember to include some loop closures in your path to make the map better. You will probably notice that the maps are initially pretty noisy, especially when you are not using any additional odometry or laser scans. RTAB-Map provides some very good tools for post-processing the data to clean it up. To run the post-processing on the point cloud, click on "Tools>Post-processing.." in the GUI. This will search over your data for more loop closures and adjust the point cloud accordingly. You should notice that the post-processing significantly improves your point cloud and occupancy grid, especially if your path has good loop closures. Changing the parameters in the post-processing optimization will change the results, I found that turning the loop closure search area ended up improving my results.
The point cloud that shows up in the RTAB-Map GUI will still have random points floating from noise in the data as it built the map and if it temporarily saw through a doorway or hallway that you didn't explore further. One last step that I found to be very helpful was to display the point cloud by clicking "Edit>View Point Clouds.."
Then by selecting and tuning the additional optimization options shown below, RTAB-Map is able to generate a very clean point cloud of the environment mapped.

Below is a link to a video of an optimized point cloud of my research lab from a quick pass through with the RealSense D435 camera.
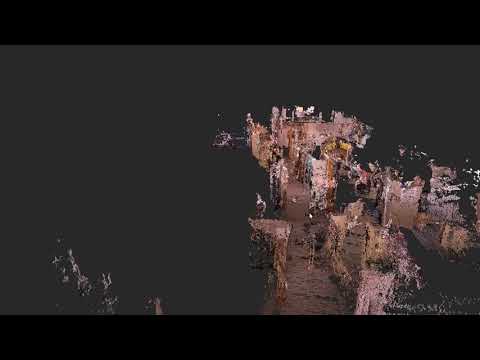
Hopefully you got it working too.