video production Notes - ipatch/dotfiles GitHub Wiki
- Working with Aspect Ratios
- Working with Blender as a Video Editor
- Avidemux
- ffmpeg
- Working with mpv
- Working with mkv files
- Useful Links
- TODOs
To calculate the aspect ratio of a screen given the resolution of a screen, ie. my MacBook Pro 2013; width = 1440 pixels @ 2x | height = 900 pixels @ 2x
- Divide the width by the height
Ex
1440 / 900 = 1.616 / 10 = 1.6Another way of saying the aspect ratio is that the screen is 16 by 10
A decent video for calculating aspect ratios here
Blender can be used not only as a 3D animation / modeling program but also has support for editing video based files, ie. raw mpeg files, DVD mpeg 2 files, and so on.
Blender stores its configuration directory, ie. Blender in different paths based on the system that Blender is running on, ie. if running Blender on macOS as a standard user, then Blender will store its configuration files in $HOME/Library/Application\ Support/Blender, whereas on most GNU+Linux distros, Blender will store it's configuration directory / files in $XDG_CONFIG_HOME, ie. $HOME/.config/Blender.
In short, avidemux is a great lightweight utility for trimming the beginning and ending of a a video clip / movie, ie. if one has recorded a screencast using OBS, and wants to remove the first and end three seconds of the clip avidemux is a decent tool for the job.
To install ffmpeg with all the goodies 🍩 🥃 🍪
brew install ffmpeg --with-tools --with-fdk-aac --with-libvpx --with-x265 --HEAD- general best practices for a smooth multimedia video & audio editing experience.
- try to use a intraframe codec as opposed to using a codec with long GOPs Group of Pictures
- x264 can be recorded losslessly using a
-crf 0setting when running the ffmpeg command - some other codecs decent for video editing are ProRes from Apple, and DNxHD from Avid
TL;DR
ffmpeg is an awesome solution for doing screen casting on macOS, however it does require a lot of patience and effort to get setup.
After running concurrent processes to record the screen and mic simultaneously the streams will more than likely need to be combined to produce a single media file of the screen cast.
ffmpeg -i video-input.mkv -i audio-input.aac \
-c:v copy -c:a copy media-file-output.mkv
The above command will take the two input files and merge the streams into a single container mkv file.
- video.stackexchange my little info dump 💩
- ffmpeg.org capturing your desktop/ screen recording
- ffmpeg.org #4437 macOS AVFoundation issue
- ffmpeg.org #4437 mailing list
- ffmpeg.org #4437 git patch
- stackexchange capture mouse cursor & clicks
- stackexchange ffmpeg merge audio video into single file
- github > gist > ffmpeg settings for YT recordings
- google Official recommended settings for YT recordings
- wikipedia chroma sub sampling yuv420p
- watch the following youtube video
TL;DR
❗️ NVENC & NVDEC are not compatible with macOS ⌘
Kindof went down a rabbit hole reading about hardware acceleration for Nvidia GPUs for encoding and decoding common encoders such h264 on macOS using hardware acceleration. In short, as far as I can tell videotoolbox is the only API compatible with ffmpeg on macOS. If running Linux or Windows the native NVENC/NVDEC can be used to encode / decode h264/hevc streams.
A compatible Nvidia GPU will be required for performing hw encoding or decoding
Wanted to see if it's even possible to compile NVENC/NVDEC on macOS to experiment if I could use the native NVENC/NVDEC on macOS, in short no. the ffmpeg guys / gals have separated the Nvidia headers required for using NVENC/NVDEC into a separate git repo.
https://git.videolan.org/git/ffmpeg/nv-codec-headers.gitThe make and make install process will successfully run without issues, but ffmepg will not be able to compile using the --enable-nvenc compile time flag due to headers referencing addtional headers that system OS specific to Windows and Linux, ie. features.h does not appear to be a valid header file on macOS.
The experiemntal command I tried to use to compile ffmpeg on macOS with NVENC,
./configure --enable-nonfree --enable-cuda-nvcc --enable-libnpp \
--extra-cflags=-I/usr/local/cuda/include
--extra-ldflags=-L/usr/local/cuda/lib --toolchain=llvm-cov
The above configure command will eventually fail when it tries to import / include the features.h file.
On a side note Cuda can still be used on macOS along with the Nvidia web drivers for performing GPU related tasks such as machine learning
To get info about the GPU
cd /Developer/NVIDIA/CUDA-10.1/samples/1_Utilities/deviceQuery
echo "compile the app"
make
echo "run, to get diagnostic info about GPU"
./deviceQuery- ffmpeg hw accel info
- github nvenc encode / decode patch for multile GPU support
- nvidia nvidia codec sdk
hold on to your butts 🦖
"I shoot iphone videos, I like iphone videos", and for nobody's fault but mine I tend to forget or find it easier to hold the phone in portrait mode, (i know ...i'm lame). There's plenty of YT tuts about fuzzing the corners to remove the black bars from the video to and not distort the video for YT. That's not what I'm aiming for, I'd rather crop the unnecessary parts of the video, scale the video to a more appropriate size while preserving the aspect ratio of the framed / cropped elements in the original recording. A combination of Shotcut plus ffmpeg can be used to crop, encode, reencode, and convert an iphone recording to a sizable animated gif for upload to github to aid in further describing an issue.
An example of a gif I uploaded to complement an issue I responded to is located here. The gif demonstrates cropping of a portrait iphone recording (removing unnecessary parts of the video) while preserving aspect ratio. A useful aspect ratio calculator can be found here.
From my experience in recording iphone videos in portrait mode, the video is recorded with an aspect ratio of 1.78 and a resolution of 1920 x 1080. Now the resolution may be a bit miss leading but an iPhone does record a video in 1920 x 1080, however it also adds a metadata attribute of rotate video 90 degrees which can been seen using ffprobe. So viewing the video on a device with a different aspect ratio, ie. a computer monitor, black bars will be added to the video during playback. (something I do not want contained in the final animated gif).
- Use ffmpeg to detect the black bar regions of the original iphone portrait recording.
echo "example of detecting cropable regions of a portrait recording"
ffmpeg -i IMG_0042.MOV -vf cropdetect -f null -- The cropped resolution will be printed towards the EOL of the output, in a
crop=[WIDTH]:[HEIGHT]:0:0format.
- Use ffmpeg to reencode the video with cropped regions, more info
ffmpeg -i IMG_0042.MOV -vf crop=[WIDTH]:[HEIGHT]:0:0 -c:a copy IMG_0042-cropped.mp4The above command will change the aspect ratio and resolution of the video so it will not contain the black bars on the left and right side of the video.
📸

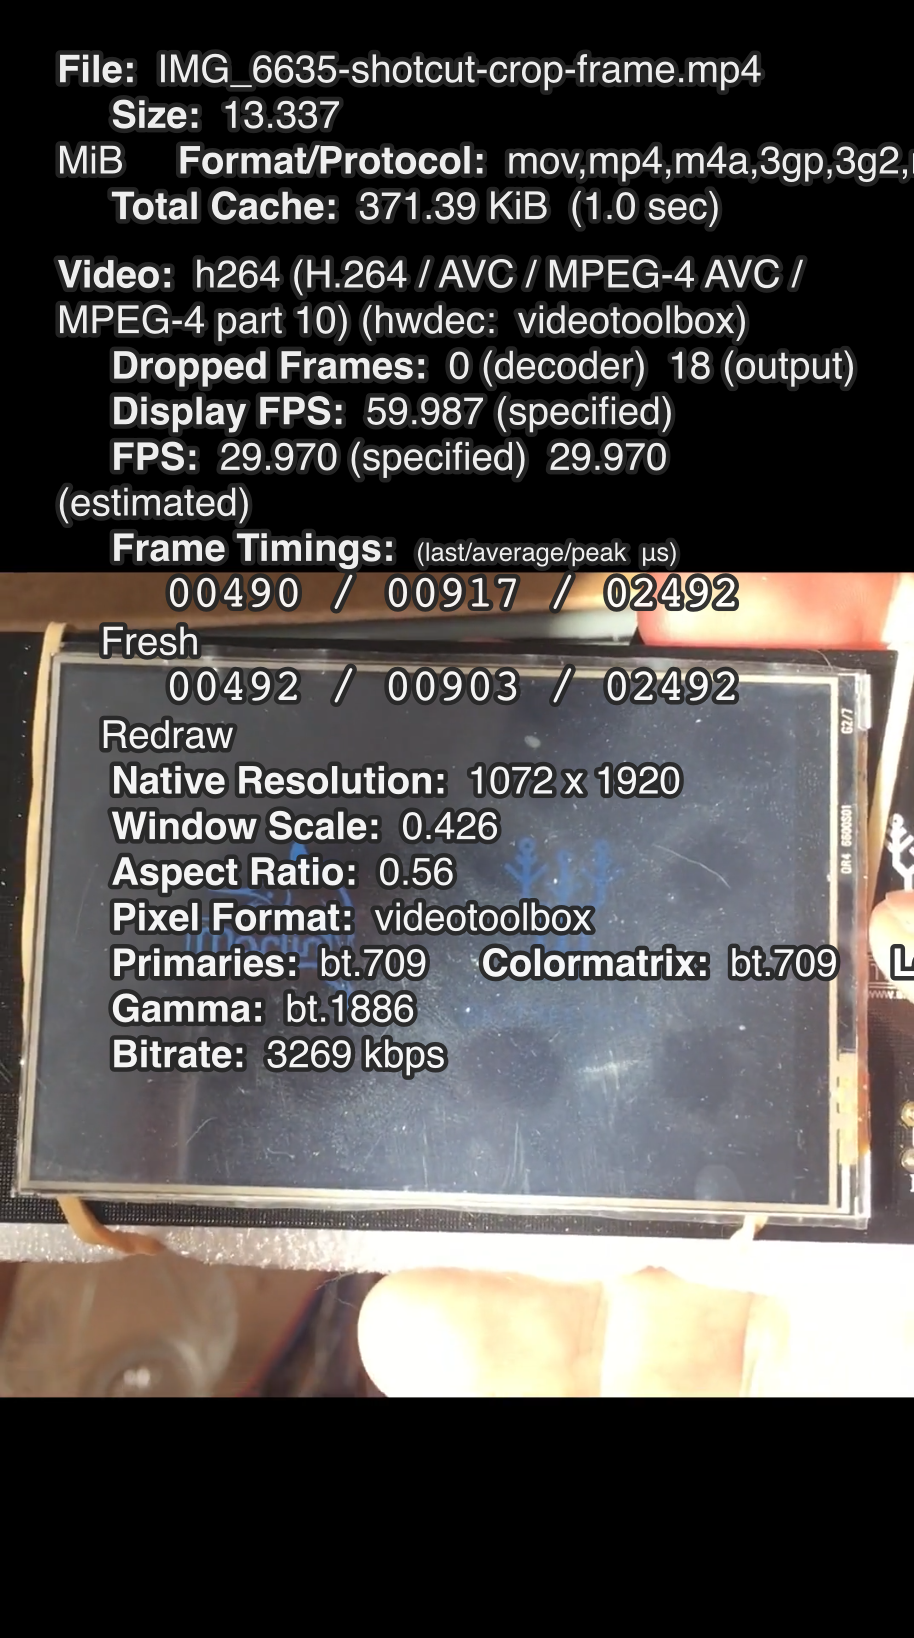
- The newly cropped video can be brought into Shotcut and then a crop video filter can be applied to the video to frame only the important parts of the video.
The frame region does not need to be a specific resolution or aspect ratio
Shotcut should pickup on the resolution of the video, and presently shotcut can use the same integer values for resolution and aspect ratio, ie. 1072 x 1920. Also if the final content is planned to be an animated gif then exporting the audio from the video is optional. Shotcut will now output a framed video that should have a black bar on the top and bottom of the video.
📸
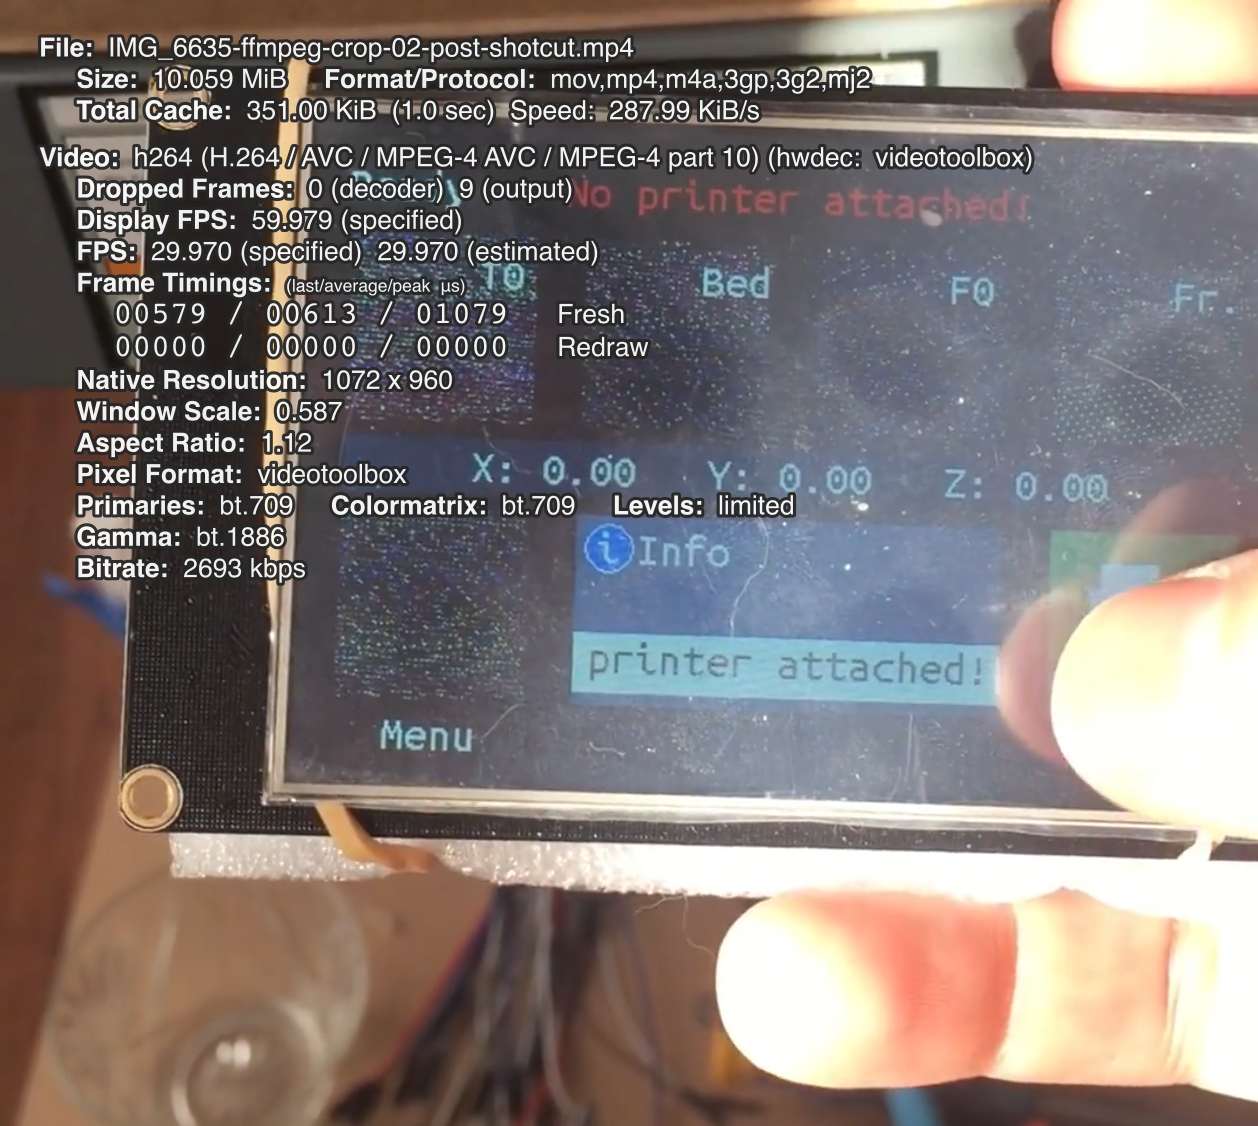
- so once again we will use ffmpeg to remove the top and bottom black bars using the cropdetect feature of ffmpeg.
echo "detect cropped region"
ffmpeg -i IMG_0042-shotcut-cropped.mp4 -vf cropdetect -f null -
ffmpeg -i IMG_0042-shotcut-cropped.mp4 crop=[WIDTH:HEIGHT:NUM:NUM] -c:a copy IMG_0042-ffmpeg-crop-02.mp4
Now that the image is at a more managable size, and does not contain black borders it can be converted to a gif using ffmpeg
📸
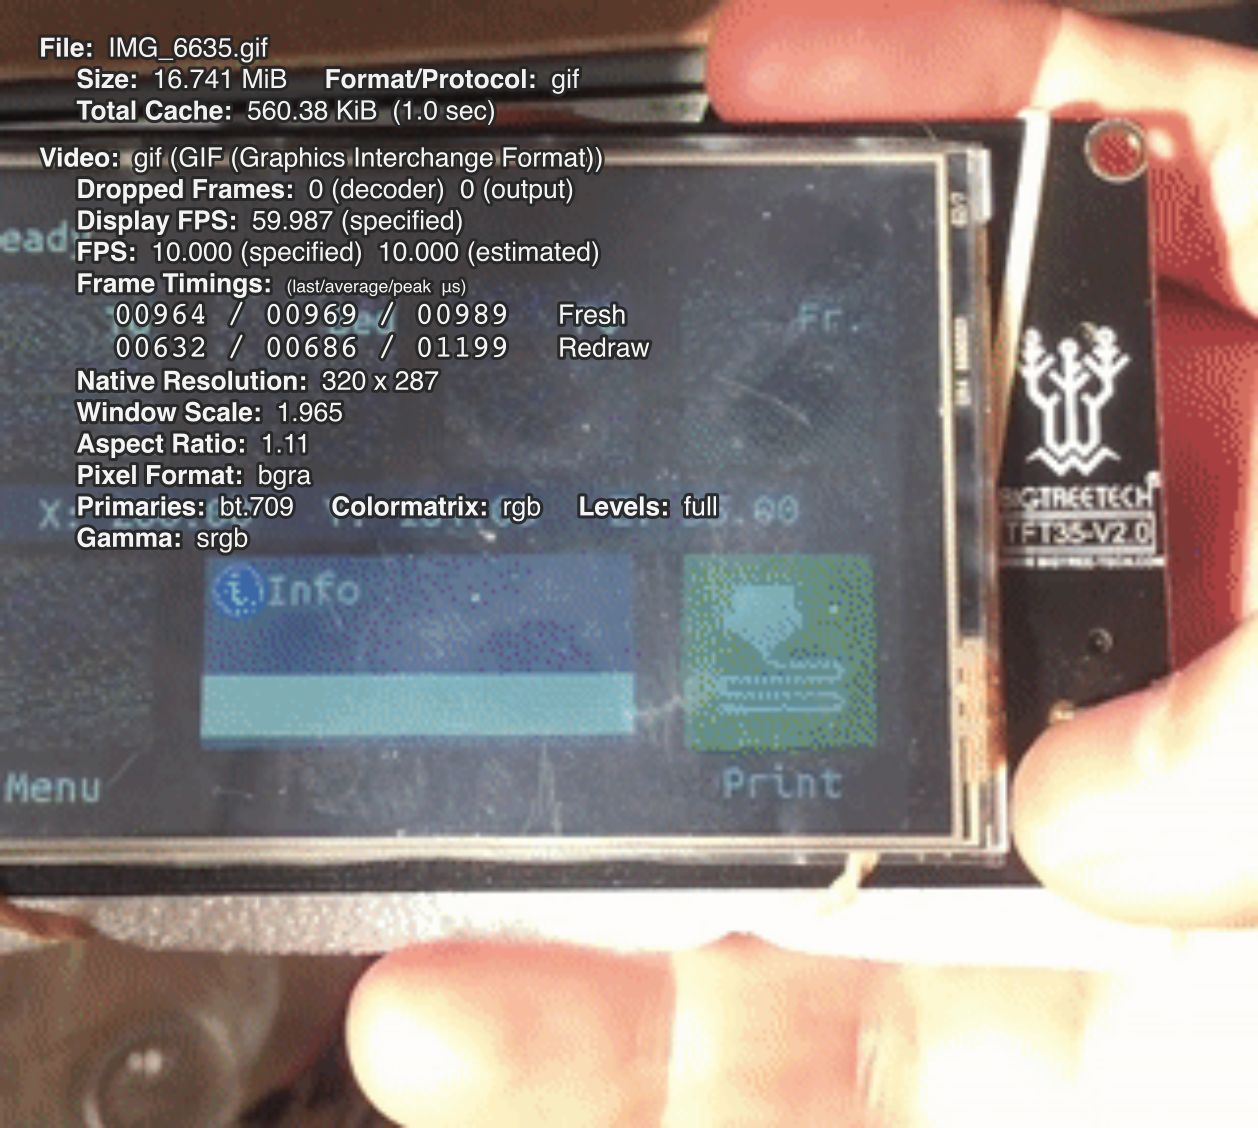
- Convert cropped video to a gif using ffmpeg
echo "convert mp4 video to animated gif, and loop forever"
ffmpeg -t 3 -i IMG_0042-ffmpeg-crop-02.mp4 -vf "fps=10,scale=320:-1:flags=lanczos,split[s0][s1];[s0]palettegen[p];[s1]paletteuse" -loop 0 IMG_0042.gif
📸
To transcode a video to x264 from a prior codec such XVID
ffmpeg -i [input.avi] -c:v libx264 -crf 19 -preset slow -c:a aac -b:a 192k -ac 2 [output.mp4]
- [input.avi] obviously refers to the media file to transcode
- -crf 19 quality of the output video, lower equals higher quality
echo "below example will reset the metadata info of an iphone recording to 0"
ffmpeg -i input.mp4 -c copy -metadata:s:v:0 rotate=0 output.mp4
To rotate a video using ffmpeg, ie. rotate a video recorded in portrait mode via an iOS device to landscape ie. more suitable for watching on YouTube.
-
method 1 should not reencode video but rather fill unused space with black bars.
ffmpeg -i [input.mov] -metadata:s:v rotate="90" -codec copy [output.mov]❗️ the
"transpose=[0,1,2,3]"options have since been deprecated, and it more suitable to use"transpose=[cclock_flip,clock,cclock,clock_flip]" -
method 2 should reencode the video but the video not contain blackbars
ffmpeg -i [input.mov] -vf "transpose=cclock" [output.mov]❗️ the above cmd will reencode both the audio and video, ⌚️ that said, the audio can be copied without reencoding as we only need to rotate the video.
ffmpeg -i [input.mov] -vf "transpose=cclock" -c:a copy [output.mov]
To transcode a x265 HEV1 encoded video file
ffmpeg -i input.MOV \
-filter:v scale=1280:-1 -r 30 -c:v libx265 \
-crf 21 -c:a aac -b:a 128k -f mp4 -pix_fmt yuv420p \
-tag:v hvc1 -movflags faststart output.mp4
To transcode a video from one container format to another, ie. from .mkv to .mp4
ffmpeg -i input.mkv -codec copy output.mp4To transcode an audio file from one codec to another, ie. Microsoft WAV to mp3
ffmpeg -i input.wav -vn -ar 44100 -ac 2 -ab 192k -f mp3 output.mp3To extract an audio stream from a audio video interlieved file
ffmpeg -i input.avi -vn -acodec copy output.mp3The above command will NOT transcode the stream and keep the audio stream in the original codec.
To convert an audio file useful for working with Mozilla's DeepSpeech
ffmpeg -i [INPUT.aac] -acodec pcm_s16le -ac 1 -ar 16000 [OUTPUT.wav]The above ffmpeg command will take a aac input file and convert it to 16bit 16khz mono channel WAV file useful for working with Mozilla's DeepSpeech project.
To combine multiple video files into one output file
echo file file1.mp4 > list.txt
echo file file2.mp4 >> list.txt
echo file file3.mp4 >> list.txt
echo file file4.mp4 >> list.txt
Concatenate the files into one continuos file
ffmpeg -f concat -i list.txt -c copy output.mp4A use case that I have quickly come across is being able to record an audio stream playing through the system audio on macOS, ie. when I listen to a YouTube stream in my terminal using mpv. Ideally I would want to record the audio stream in it's native codec to avoid real-time or transcoding on the fly to minimize CPU usage when recording a stream. ffmpeg is a great tool for recording audio via the command line.
To list available sources that ffmpeg can record from on macOS
ffmpeg -f avfoundation -list_devices true -i ""To list available capture devices on different OS's such as Windows or Linux see
After displaying the capturing devices use ffmpeg to select a capture device and begin recording the stream from the system audio.
For my particular use case mpv decodes YouTube live streams on macOS using an aac audio codec, so I would want to record the stream using an aac codec on my system. Also, as opposed to recording the output of the speakers playing the audio, which would be a "turrible" idea, I route my audio through app known as Background Music on macOS which is quite magical 🕴 to say the least, so I'm able to record the audio stream being funneled into Background Music using ffmepg with minimal to no audio degredation.
To capture only audio being streamed through Background Music
ffmpeg -f avfoundation -i ":0" /path/to/recording.aacffmpeg will require a known audio file extension in order to capture the audio.
⏱ In other words, this section describes a way one can spend an afternoon fucking around with a multimedia file to get a deeper understanding of the tools provided by ffmpeg and friends.
In short, ffmpeg supports working with chapters for .mp4 files which allow for labeling a particular section a video file, and also allow for quickly jumping between different segments of a video file. For more info see
ffmpeg provides utilites to extract a certain segment of a particular video file based on timecodes of the source video file, thus allowing to create a smaller segmenting video from the original file, ie. the source. For more info see
ffmpeg -i [INPUT.file] -ss 00:42:42 -to 00:84:84 -vcodec copy -acodec copy -y [OUTPUT.file]To extract / trim the first ten seconds of an audio clip
ffmpeg -ss 00 -t 10 -i [INPUT.aac] -acodec copy [OUTPUT.mp4]ffmpeg provides utilities for combining multiple video files useful if certain parts were extracted from a particular video file. Also the segmented files can be combined in a single file without transcoding the output file thus allowing for lightning ⚡️ fast concatenation of files. For more info, see
shepherd is a tool written in rust that aims to split the encoding process across a series of hosts accessible on a network.
To use the -c flag with shepherd and associating a network hots by a name other than an IP address more than likely the local /etc/hosts file will need to be edited on the local machine starting the shepherd command.
- superuser convert 10-bit h.265 hevc to 8-bit h.264 using fffmpeg
- stackoverflow rotating a portrait video by adjusting metadata
- Working with AV1 and ffmpeg
- CRF Guide
- Nvidia.com > decode / encode matrix
When working with audio in shotcut try and get the audio tracks as close to 0db without going into the positive db or else the audio with begin to distort going over 0db
To play a audio & video file, but not play the video portion of the file, ie. just decode and play the audio portion of the file.
mpv --vid=no /path/to/media/file.{mkv,mp4}To record the playback of a audio or video stream using mpv read below.
In short, I setup a couple of key bindings in my input.conf to quickly start recording mpv playback using the IPC protocol along with JSON to send a command to the active mpv process using a shell script. The key binding in the input.conf calls the shell script which send a command which contains a JSON response which gets sent to mpv. mpv then updates the flags / propterties for the current process.
Also the set_property and get_property can be sent to mpv directly using echo with socot to send JSON responses to the mpv socket.
❗️❗️❗️ mpv must be started with ipc socket mode enabled in order to use the above key bindings
To control the volume output of the audio in mpv via CLI
9 or 0
To jump to the next & previous chapters in mpv
PGUP PGDWN
On a MBP Macbook Pro use fn + arrow keys, ie.
fn + ↑ fn + ↓
For a more detailed list about key bindings see
The main difference between hardware decoding vs. software decoding is that hardware decoding decompresses the binary blob of data, ie. the video file directly on the video card, where as with software decoding it is to my understanding that the binary blob of data will be decompressed via the CPU and then moved onto the GPU, ie. the decompressing of the video / blob of data does not happen on the GPU.
To print a list of video output drivers accessible to mpv
mpv --vo=helpOn macOs put
vo=gpuin~/.config/mpv/mpv.conf
To print a list of hardware, ie. GPU accelerated decoding codecs
mpv --hwdec=helpQuick note, videotoolbox is Apple's implementation for macOS to interface with a GPU to peform common video tasks on the GPU as opposed to a CPU, that said, videotoolbox API is relevant for *nix or Windows, but if a Nvidia GPU is present Nvidia provides nvenc for GPU's ≥ to Keepler for using a GPU for video related tasks.
On macOS put
hwdec=videotoolboxin~/.config/mpv/mpv.confRunning mpv on Linux, and using hardware acceleration will obviously require different settings. 🤷
To troubleshoot the below warning / error message on macOS add the below config settings.
Not trying to use hardware decoding: codec h264 is not on whitelist, or does not support hardware acceleration.mpv.conf settings macOS specific
vo=gpu
hwdec=videotoolboxTo start vlc with logging
vlc --verbose=2 --file-logging --logfile=/path/to/vlc.logMKVToolNix provides great tools for working with the matroska container format for multimedia files. It allows features such as adding additional subtitile tracks to existing mkv file.
🚨 When saving files with OBS while recording, set the container format to mov as opposed to mp4 because mp4 files are more corruptible if the recording fails, ie. the entire file can become trashed whereas mov does a better job in preserving the file.
The native resolution on my MBP is 2880 x 1800, so in order to make usable with YouTube I scale down to 1728 x 1080 which preserves the 2880 x 1800 aspect ratio of my mac's computer screen.
Also I scaled down the FPS from the native 60FPS to 30FPS to save on file size for outputting to YouTube.