Guide of Xenomai co kernel Build and Installation on top of Ubuntu - intel/linux-stable-xenomai GitHub Wiki
Contents
- 1 Overview
- 2 Enviroment Setup
- 3 SourceCode Download
- 4 Package Build
- 5 Kernal Install
- 6 Tools Install
- 7 BIOS Tune
- 8 Testing Run
- 9 Further Read
- 10 Support
1. Overview
This wiki descript how to set up an environment to test the performance on xenomai.
Xenomai 3.x official document for install and setup is here: Setting_Up
This wiki page is a simplified guide focus on x86_64 uefi hardware.
2. Enviroment Setup
Install Ubuntu Desktop 18.04 https://ubuntu.com/tutorials/tutorial-install-ubuntu-desktop
Source code download and package building depend on the following tools and libraries.
sudo apt-get update
sudo apt-get install -y git build-essential libssl-dev libelf-dev iasl python nasm openssl gcc-multilib bison flex lz4
3. Source Code Download
Get the Linux kernel source code with pre-patched Ipipe&Xenomai from the github. https://github.com/intel/linux-stable-xenomai
  git clone https://github.com/intel/linux-stable-xenomai
  cd linux-stable-xenomai
  git checkout F/4.19.59/base/ipipe/xenomai_3.1
4. Deb Package Build
Create an 'out' directory to save the temporary build result, then start the build procedure.
outdir=../out_4.19.59
mkdir ../${outdir}
cp arch/x86/configs/xenomai_test_defconfig ../${outdir}/.config
make O=../${outdir} olddefconfig
make bindeb-pkg O=../${outdir} KDEB_PKGVERSION=3.1 -j$(nproc --all)
or
mkdir ../out_4.19.59
export KBUILD_OUTPUT=../out_4.19.59
export KBUILD_VERBOSE=1
cp arch/x86/configs/xenomai_test_defconfig ../${KBUILD_OUTPUT}/.config
make olddefconfig
make bindeb-pkg KDEB_PKGVERSION=3.1 -j$(nproc --all)
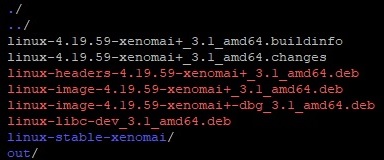
If the build is successful, those below files will be generated under '../' directory.
5. Kernal Install
Install those new kernel packages on the target board.
sudo dpkg -i linux-image-4.19.59-xenomai+_3.1_amd64.deb
sudo dpkg -i linux-headers-4.19.59-xenomai+_3.1_amd64.deb
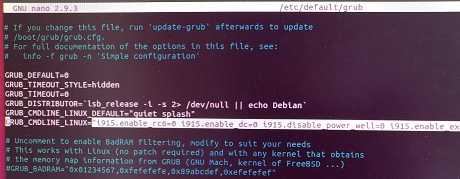
Set new value to GRUB_CMDLINE_LINUX="value of kernel-cmdline" in '/etc/default/grub' file. Then update the grub configuration.
In this case, cpu1 is isolated for the following latency testing. 'isolcpus=1' is added in the CMDLINE. Accordingly, in the following "run_latency.sh" script file, the cpu1 is specified to the 'latency' program by 'taskset' command.
sudo nano /etc/default/grub
sudo update-grub
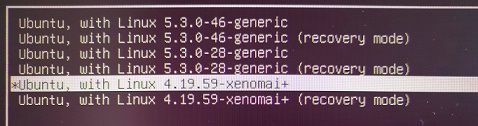
Select the right kernel version after reboot the system.
reboot
6. Xenomai userspace lib install guide
Download 'xenomai-3.1.tar.bz2' package from xenomai.org and install it with the below steps. The program 'latency' will be generated in '/opt/xenomai-3.1/bin' folder and used to evaluate the xenomai latency.
wget https://xenomai.org/downloads/xenomai/stable/xenomai-3.1.tar.bz2
tar xvf xenomai-3.1.tar.bz2
cd xenomai-3.1
./configure --prefix=/opt/xenomai-3.1 --with-core=cobalt  --enable-smp  --enable-pshared
sudo make -j4
sudo make install
sudo /opt/xenomai-3.1/bin/latency   ### successfully run means installation good!
Note: if "latency" program failed to run under root, please close group rt schedule policy use:
sudo sysctl -w kernel.sched_rt_runtime_us=-1
The program 'glmark2' and 'stressapptest' are used as workload tasks when xenomai latency testing. You can install 'glmark2' and 'stressapptest' directly by 'apt-get' if the board is online.
sudo apt-get install glmark2
sudo apt-get install stressapptest
Copy those below packages to the target board manually and install them by 'dpkg' is also a valid option to install the program 'glmark2' and 'stressapptest'.
libpng12-0_1.2.54-1ubuntu1_amd64.deb
glmark2-data_2014.03+git20150611.fa71af2d-0ubuntu2_all.deb
glmark2_2014.03+git20150611.fa71af2d-0ubuntu2_amd64.deb
msr-tools_1.3-2build1_amd64.deb
sudo dpkg -i libpng12-0_1.2.54-1ubuntu1_amd64.deb
sudo dpkg -i glmark2-data_2014.03+git20150611.fa71af2d-0ubuntu2_all.deb
sudo dpkg -i glmark2_2014.03+git20150611.fa71af2d-0ubuntu2_amd64.deb
sudo dpkg -i msr-tools_1.3-2build1_amd64.deb
7. BIOS Setting
Most Industry PC on the market cannot pass basic real-time benchmarks. Therefore, checking the BIOS configuration for the real-time profile is needed before your testing. Here are some recommendations (including but not limited):
- Disable any sleep & power saving;
- Disable Hyperthreading;
- Disable lower CPU power states (C states);
- Set [SA GV] freq running at fixed high, it is about internal bus matrix's power saving.
- Reduce graphics frequency to minimum (100Hhz) if possible;
8. Testing Run
Download those below script files and copy them to '/opt/' folder.
run_glmark2.sh run_latency.sh turnoff_rt-group-sched.sh
Make them executable using 'chmod +x' and checking the kernel version before running test case.
chmod +x run_glmark2.sh run_latency.sh turnoff_rt-group-sched.sh
uname -a
Open a new terminal, execute ./run_glmark2.sh
Open a new terminal, execute sudo ./run_latency.sh
If meet error(operation not permitted), execute sudo ./turnoff_rt-group-sched.sh then sudo ./run_latency.sh
To avoid negative value for minimum latency, set xenomai “gravity” to 0,
$echo 0 > /proc/xenomai/clock/coreclk, or write your own value to the calibration file,
$echo ${value_in_ns} > /proc/xenomai/latency
9. Further Read
resource-director-technology
cache-allocation-technology (CAT)
intel-cmt-cat
10. Support
Pls fill issue or send email to Xenomai maillist: [email protected] if any question rise, thanks.