Notification Service Extension for Rich Notifications and better delivery reporting on iOS - infobip/mobile-messaging-sdk-ios GitHub Wiki
- Setting up App Group ID for an App ID
- Enabling App Groups capability
- Setting up Xcode project
- Customising the push notification content
- App icon badge count
- Troubleshooting
In order to achieve full control over the push notification content that is displayed to the users, and offer Rich Notifications actions, you need a Notification Service Extension. With it you'll be able to attach static or animated (GIF) images, or even a video, to push notifications, as well as modifying the notification text content prior to showing it to the user. But what is more important: Notification Service Extensions can run arbitrary code in background even if your main application is killed by the user. This feature gives us an opportunity to improve message handling and delivery reporting.
In this tutorial you will learn how to integrate the Notification Service Extension with your existing application.
- Ruby 2.3.8 or higher to run "mmine" command.
As a prerequisite, you need to register a new App Group with a unique App Group Id on this site: https://developer.apple.com/account/ios/identifier/applicationGroup. The App Group is needed for your application and notification extension to exchange important data via shared data container, remember this ID for further integration steps.
Enable the App Groups capability for your main application target in Xcode: select your main target, go to the Signing & Capabilities tab, click + Capability, and add App Groups. Then check the App Group you created in the previous step.

The mmine tool will automatically enable the same App Group for the notification extension target.
Mmine script will pick up signing from the main app target so it is very important signing is set up correctly before running mmine script.
- Please make sure you've committed all your project changes before going further!
- If you are integrating Mobile Messaging SDK via Swift Package Manager, check this guide
-
Install and run our special Ruby Gem called "mmine", passing appropriate parameters:
$ sudo gem install mmine
$ mmine integrate \
--project <absolute path to your Xcode project (.xcodeproj file)> \
--app-group <your App Group Id from previous section> \
--target <name of your projects main target>
This tool will automatically integrate the
MobileMessagingNotificationExtensioninto your Xcode project. The extension module is a lightweight, standalone library with zero dependencies on the main SDK. For CocoaPods users, mmine will also add the required entry to your Podfile automatically.All mmine parameters
Flag Description Required -p,--projectPath to .xcodeproj file Yes -g,--app-groupApp Group ID Yes -t,--targetMain Xcode target name Yes --spmUse when SDK is integrated via SPM No --swift-versionSwift version for extension (default: 5) No -s,--override-signingOverride extension signing via build flags No -v,--verboseShow detailed logs No
If your Podfile defines
use_frameworks!inside the main app target block (per-target), you must also adduse_frameworks!inside theMobileMessagingNotificationServiceExtensiontarget block that mmine added to your Podfile. Both targets must use the same linking style, otherwisepod installwill fail. This is not needed ifuse_frameworks!is defined globally (outside any target block), as CocoaPods will apply it to all targets automatically. Flutter projects typically defineuse_frameworks!per-target by default.
If you use Carthage, next steps are on Integration via Carthage page.
- Run
pod updatefrom Terminal.
If you are facing with the following error in your console:
[User Defaults] Failed to read values in CFPrefsPlistSource<0xXXXXXXX> (Domain: ..., User: kCFPreferencesAnyUser, ByHost: Yes, Container: (null)): Using kCFPreferencesAnyUser with a container is only allowed for SystemContainers, detaching from cfprefsd.Although this warning doesn't mean that our code doesn't work, you can shut it up by prefixing your App Group ID with a Team ID of a certificate that you are signing the build with. For example:
"9S95Y6XXXX.group.com.mobile-messaging.notification-service-extension". The App Group ID itself doesn't need to be changed though.
Originally, your newly created NotificationServiceExtension looks like this:
import UserNotifications
import MobileMessagingNotificationExtension

class NotificationService: UNNotificationServiceExtension {

    var contentHandler: ((UNNotificationContent) -> Void)?
    var originalContent: UNNotificationContent?

    override func didReceive(_ request: UNNotificationRequest, withContentHandler contentHandler: @escaping (UNNotificationContent) -> Void) {
        self.contentHandler = contentHandler
        self.originalContent = request.content

        if MobileMessagingNotificationServiceExtension.isCorrectPayload(request.content.userInfo as? [String: Any] ?? [:]) {
            MobileMessagingNotificationServiceExtension.didReceive(request, withContentHandler: contentHandler)
        } else {
            // handling by another push provider different than Infobip's
            contentHandler(request.content)
        }
    }

    override func serviceExtensionTimeWillExpire() {
        MobileMessagingNotificationServiceExtension.serviceExtensionTimeWillExpire()
        if let originalContent = originalContent {
            contentHandler?(originalContent)
        }
    }
}
But you can alter the title and body texts of the notifications, for example applying localised strings of your own, as follows:
import UserNotifications
import MobileMessagingNotificationExtension

class NotificationService: UNNotificationServiceExtension {

    var contentHandler: ((UNNotificationContent) -> Void)?
    var originalContent: UNNotificationContent?

    override func didReceive(_ request: UNNotificationRequest, withContentHandler contentHandler: @escaping (UNNotificationContent) -> Void) {
        self.contentHandler = contentHandler
        self.originalContent = request.content

        if MobileMessagingNotificationServiceExtension.isCorrectPayload(request.content.userInfo as? [String: Any] ?? [:]) {
            MobileMessagingNotificationServiceExtension.didReceive(
                content: customiseContentFor(request.content),
                withContentHandler: contentHandler)
        } else {
            contentHandler(request.content)
        }
    }

    private func customiseContentFor(_ content: UNNotificationContent) -> UNNotificationContent {
        guard let customContent = content.mutableCopy() as? UNMutableNotificationContent else {
            return content
        }
        customContent.title = "This is your custom push notification title"
        customContent.body = "This is your custom push notification body text. You can localise it or apply any logic according to your needs"
        return customContent
    }

    override func serviceExtensionTimeWillExpire() {
        MobileMessagingNotificationServiceExtension.serviceExtensionTimeWillExpire()
        if let originalContent = originalContent {
            contentHandler?(originalContent)
        }
    }
}On iOS, you have full control on the notification badge count (the red indicator with a number in your app's icon). This number is meant to indicate "unread messages", but with a meaning and logic that depends on your app's use case. For example, you may want to receive a single push notification with a badge count of "25", indicating 25 unread messages exist, or you may want to increase the count for each push notification individually. It is up to you if you want to rely in the push notification badge value (which does not accumulate), or prefer to handle the counting yourself. An example of local count handling is shown in our example app, and would follow these steps:
Step 1: increase the count when a push notification arrives
There are several ways to achieve this:
- Using a notification service extension, as explained in this page, that will work even when your app is not running, not even in background. This is the recommended and most reliable option.
- Through the library event MMNotificationInAppChatUnreadMessagesCounterUpdated.
- If you are using InAppChat, through MMInAppChatDelegate's didUpdateUnreadMessagesCounter(_ count: Int) method
Step 2: Once you have the new count value, you need to apply it as follows:
 if #available(iOS 16.0, *) {
     UNUserNotificationCenter.current().requestAuthorization(options: .badge) { (authorised, error) in
         guard authorised, error == nil else { return }
         UNUserNotificationCenter.current().setBadgeCount(newValue, withCompletionHandler: { error in
             // you can ignore or handle the error here as you need
         })
     }
 } else {
     UIApplication.shared.applicationIconBadgeNumber = newValue // Note: badge count in older iOS versions need to use this UIApplication method, that CANNOT be used in notification service extensions, only in parent apps
 }
Step 3:
Reset the count to zero when you want, for example when your app goes to foreground, or when a specific view or "mark as seen" button has been tapped.
Note:
If you expect the badge count to arrive within the data of the push notifications themselves, you can simply initialise the SDK accepting "badge" notification type, among others. That way, your app icon badge number will be refreshed/overwritten with each push. You can combine all of these strategies based on your needs.
MobileMessaging.withApplicationCode("<your actual app code>",
notificationType: MMUserNotificationType(options: [.badge, .alert, .sound]))?
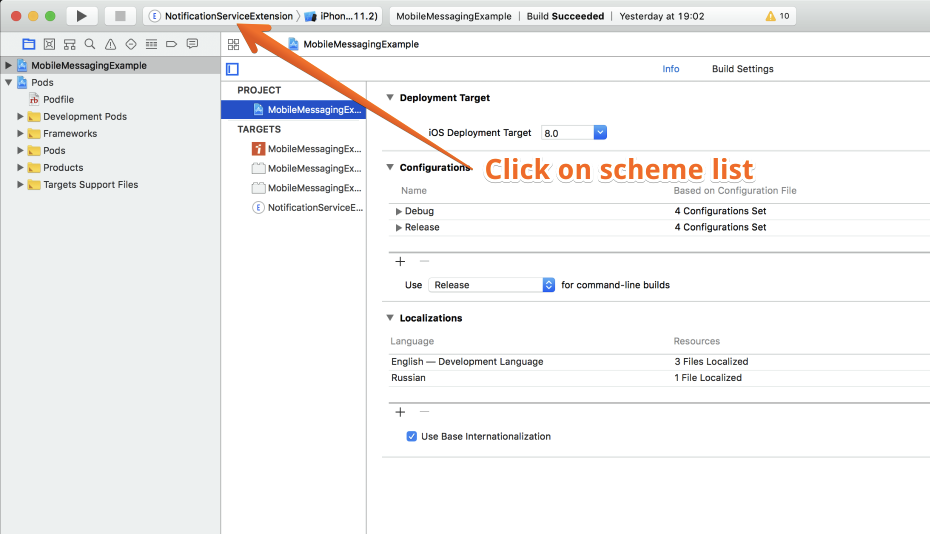
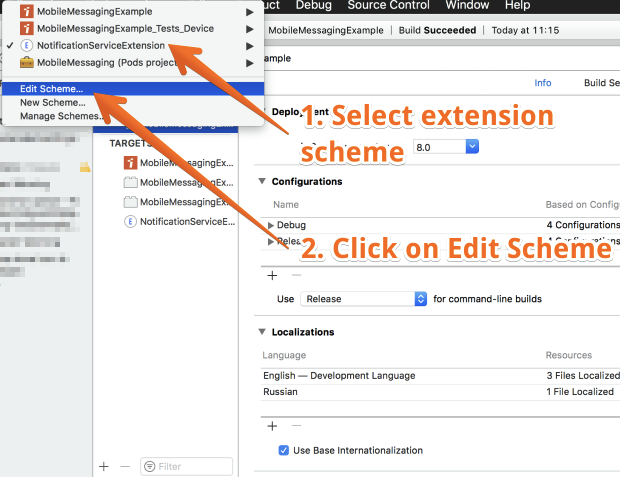
.start()- While developing, make sure you run the project right way. You should build and run the extension's scheme as follows:


- Make sure your extension allows arbitrary loads from non-secure sources (i.e. images from non-https (http) sources). In order to allow your extension to load from non-secure sources, append the following settings in your extensions Info.plist:

-
The
MobileMessagingNotificationExtensionmodule includes built-in logging. To view the extension logs, open Console.app on your Mac, select your device, and filter by your extension's process name orMobileMessagingNotificationServiceExtension. This will show you the full flow: keychain access, delivery reporting, rich content downloading, and shared storage operations. -
If you notice errors or the extension is not working as expected, try removing the extension target completely from your Xcode project along with all associated files that belong to the Extension group (source code, Info.plist, entitlements), clean build folder (⌘ + Shift + K or in Xcode 'Product' -> 'Clean Build Folder') then run
mmine integrateagain to recreate it from scratch.