Amazon_Android_Initialization - imobile/app-mediation GitHub Wiki
※以下の文書はAmazon Publisher ServicesのドキュメントをAmazonの許諾を得て転載したものです。
Android SDK initialization
This documentation will outline how to import the APS SDK and set your app id. Please ensure you have completed the first three steps outlined in the Introduction before importing the SDK.
There are two ways to import the APS SDK:
- jCenter: This is our recommended method of importing the APS SDK. Learn more about jCenter
- Manual integration: The Android SDK is also available to download and import into your Android Studio project.
The APS Android SDK requires the following:
- Android 4.4 (KitKat API 19) or later
- If your SDK supports API versions lower than 19, please see required changes to your manifest file in Step 2.
- Android Studio or Eclipse installed with the Android Development Tools (ADT) Plugin
- Java 8 or later
- AndroidX migration
- Please refer to the Android documentation to migrate your project to AndroidX.
Step 1. Import APS SDK
jCenter (recommended)
Open your project’s build.gradle file, and add the following to the repositories and dependencies objects:
repositories {

    ...

    jcenter()
}
dependencies {

    ...

    implementation 'com.amazon.android:aps-sdk:8.2.1@aar'
}
If you’re using AdMob, include the AdMob adapter as a dependency:
dependencies {

    ...

    implementation 'com.amazon.android:aps-sdk:8.2.1@aar'
    implementation 'com.amazon.android:aps-admob-adapter:1.2.0@aar'
}
Manual integration
- Extract and unzip the
aps-sdk.aarfile from the downloaded SDK package. - Add
aps-sdk.aarto your app:- On the File menu, click New, and then click New Module.
- Choose Import .JAR/.AAR Package in the pop-up dialogue, and then click Next.
- In the new dialogue box, find the
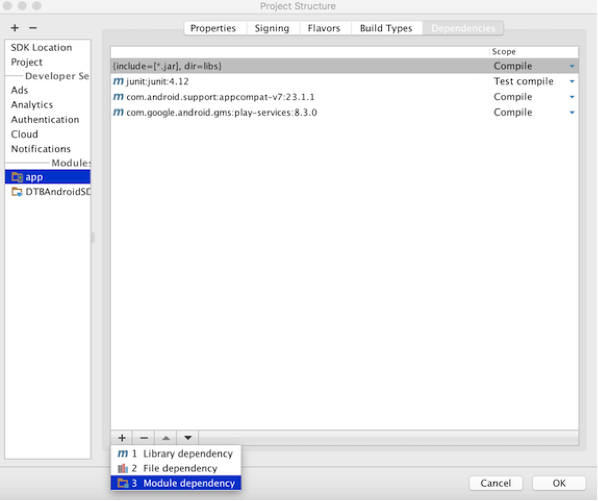
aps-sdk.aarlocation and import it. - On the File menu, click Project Structure.
- Under Modules, click app, and then click the Dependencies tab.
- Add the
.aarfile as a dependency.
AdMob
If you are using AdMob, import aps-admob-adapter.aar into your project by repeating the steps above.
ProGuard
If you are using ProGuard, complete the following steps:
- Add the following configuration to your project’s
build.gradlefile:
buildTypes {
  release {
    minifyEnabled true
    proguardFiles getDefaultProguardFile('proguard-android.txt'), 'proguard-rules.pro'
  }
}
- Add the following line to your project’s
proguard-rules.profile:
-keep class com.amazon.device.ads.** { *; }
Step 2. Add permissions/activities to Android manifest
The following permissions must be present in your manifest file:
<uses-permission android:name="android.permission.INTERNET" />
<uses-permission android:name="android.permission.ACCESS_NETWORK_STATE" />
<uses-permission android:name="android.permission.ACCESS_WIFI_STATE" />
If you wish to pass geo location information, please include the following permissions in your manifest file:
<uses-permission android:name="android.permission.ACCESS_COARSE_LOCATION" />
<uses-permission android:name="android.permission.ACCESS_FINE_LOCATION" />
For those integrating with AdMob, please add the following under the <application> section of your manifest file:
<activity android:name="com.amazon.device.ads.DTBInterstitialActivity"/>
<activity android:name="com.amazon.device.ads.DTBAdActivity"/>
If your minSdkVersion is lower than API 19, please make the following changes:
- Add the following to your AndroidManifest.xml file:
<manifest xmlns:android="http://schemas.android.com/apk/res/android"
            xmlns:tools = "http://schemas.android.com/tools"
            package="com.pbs.sampledtbapp"/>
            <uses-sdk tools:overrideLibrary="com.amazon.device.ads"/>
- Use the following condition to check the Android version during runtime to invoke APS functionality:
if (Build.VERSION.SDK_INT >= Build.VERSION_CODES.KITKAT) {
    // APS code here
}
Step 3. Set your app id/key
During setup, you generated an APS app id. If you have not done so, please complete step 1 within the APS portal. This app id is associated to your app and allows APS to attribute all applicable impressions. Your app should call the AdRegistration getInstance() method on every app start using the app id/key:
AdRegistration.getInstance(APP_KEY, getApplicationContext());
MRAID
Please pass MRAID info as part of the SDK initialization. Choose one according to your ad server:
// For Google Ad Manager (Google Play Ads Services version 15.0.0 and above)
AdRegistration.setMRAIDSupportedVersions(new String[] {"1.0", "2.0", "3.0"});
AdRegistration.setMRAIDPolicy(MRAIDPolicy.CUSTOM);
// For Google Ad Manager (Google Play Ads Services versions below 15.0.0)
AdRegistration.setMRAIDPolicy(MRAIDPolicy.DFP);
// For MoPub
AdRegistration.setMRAIDPolicy(MRAIDPolicy.MOPUB);
// For other ad servers, pass in the MRAID versions your ad server SDK version support
AdRegistration.setMRAIDSupportedVersions(new String[] {"1.0", "2.0", "3.0"});
AdRegistration.setMRAIDPolicy(MRAIDPolicy.CUSTOM);
Geo location tracking
If your app does not collect geo location, the APS SDK will not receive geo location even if setUseGeoLocation is enabled. If your app does collect geo location, your app should call the AdRegistration.useGeoLocation() method:
AdRegistration.useGeoLocation(true);
Logging/testing
To enable SDK logging and test mode, call the below methods. For more information, visit the Integration Verification guide.
AdRegistration.enableLogging(true);
AdRegistration.enableTesting(true);
Do not forget to remove enableTesting() in production as the test ads are not eligible for monetization.