Ender 3 Pro Octoprint with LCD Display - imlabor/3d-printing GitHub Wiki
Hardware
- Ender 3 Pro with Silent Board 1.1.5
- Waveshare LCD4.3inch
- Raspberry Pi 4 (B)
- Raspberry Pi Cam V2
- Raspberry Pi 4 Turm Ice Fan 7 Color LED
- SD Card 16GB / 32GB
- SD Card Reader with USB
Software
- OctoPrint Server octopi-buster-lite0.17.0 Image
- balenaEtcher for Windows
- PuttY
Hardware Installation:
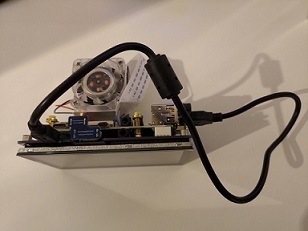
We assemble the hardware completely:
First of all, turn the small spacer screws which are the 4 holes provided for this purpose.
Now place the Raspberry pi at the back of the LCD display and the Raspberry Pi 4 tower ice fan 7 color LED on the Raspberry Pi.
Use the 4 screws to fix everything together.
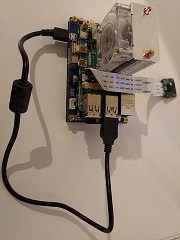
Plug the HDMI with micro hdmi connector into the appropriate port and connect the micro USB to USB cable from the LCD display to the Raspberry Pi.
Finally, you can connect the flash cable to the camera.
Downloading Software:
Download and install the PuttY software at https://www.putty.org/
Download the image octopi-buster-lite0.17.0 from https://octoprint.org/
Download the software for flashing the image to the Micro SD card from https://www.balena.io/etcher/
First installation under Windows:
Insert the Micro SD card into the SD card reader and connect it to the PC via USB.
Install the downloaded software balenaEtcher and start it.
- Click on Select Image and select the image downloaded from https://octoprint.org/
- Click on Select Target and select your USB reader with the Micro SD Card
- Click on Flash and wait until the Micro SD Card is flashed and validated
When the process is finished, the SD Card Reader is automatically unmounted.
Setting up the Raspberry Pi:
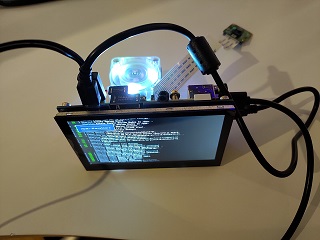
Now insert the Micro SD Card into the Raspberry pi and connect it to the power supply.
On startup you will see the login console for a moment, but you can't really use this command line.
Now we start the previously installed software Putty and connect via SSH to the Raspberry Pi.
Enter octopi.local under Host Name and click on Open.
(if you know the IP address of your Raspberry Pi, you can also use it)
A command line window opens with the login.
login as: pi password: raspberry
Now you are logged in and start directly with the filesystem.
Type df -H, now you can see how your filesystem is built and how much is used.
Expanding the filesystem:
Type sudo raspi-config and press Enter.
Enter the password raspberry again.
Now you see the Raspberry GUI
Go to Advanced Options and press Enter at Expand Filesystem.
Click on OK and then on Finish, you will be asked if you want to restart the system.
Click on Yes.
Log in again with login as: pi Password: raspberry
Enter df-H again and you will see that the file system has expanded.
Update your system so everything is up to date.
Type sudo apt-get update and press Enter.
After entering the password again: raspberry your system will start with the updates.
Now we have updated and installed the packages and will upgrade the system.
Enter the command sudo apt-get upgrade and confirm with Y to start.
It takes about 15-20 minutes.
Now is a good time to reboot the system with the installed updates.
Enter sudo reboot now and the system will reboot.
Let's connect to the system again via Putty and enter the login data again:
login as: pi Password: raspberry
Install Driver for the LCD Display
For this we use github to download the drivers.
Enter git clone https://github.com/UCTRONICS/UCTRONICS_LCD35_HDMI_RPI.git to download the driver software.
Once the drivers are downloaded enter ls and you will see a folder with UCTRONICS_LCD35_HDMI_RPI
Change the directory with cd UCTRONICS_LCD35_HDMI_RPI now
Change the permissions for all shell files needed for execution as follows:
- Enter
sudo chmod 777 UCTRONICS_hdmi_backupand confirm with Enter - Enter
sudo chmod 777 UCTRONICS_hdmi_installand confirm with Enter - Enter
sudo chmod 777 UCTRONICS_hdmi_restoreand confirm with Enter
Now we enter ls again, here we see from the green files that the permissions have been changed.
We create a backup from UCTRONICS.
Enter sudo ./UCTRONICS_hdmi_backup and confirm with Enter.
We install the UCTRONICS drivers with sudo ./UCTRONICS_hdmi_install
We now see how the drivers are installed and the Raspberry Pi is restarted automatically
The Raspberry Pi starts with a better resolution.
If you are using a 4.3inch LCD display we have to adjust some settings here to get the right resolution.
Enter nano /boot/config.txt and go to the point
- #Enable audio (loads snd_bcm2835):
- dtparam=audio=on
- hdmi_force_hotplug=1
- hdmi_drive=2
- hdmi_group=2
- hdmi_mode=87
- hdmi_cvt 480 320 60 6 0 0 0
We change the following value: delete the 320 and enter the number 800 before the 480
The value should now look like this: hdmi_cvt 800 480 60 6 0 0 0
Confirm this with CTRL+O and press ENTER to save.
With CTRL+X we leave the nano Editor.
A reboot with sudo reboot now
First start with Octoprint in Browser
Now start your browser and enter your Raspberry Pi with octopi.local or alternatively the IP address.
You will now be guided through a setup wizard to set up OctoPrint.
Click on Next, enter the username of your choice and set a password that you can remember.
Click on Keep Access Control Enabled and click on Next.
Enter the check of the interval you like, default to 15 minutes I set it to 60 minutes.
Test if the Google DNS server is reachable with the settings Host IP 8.8.8.8 Port 53 and click on Test host & Port.
If you get the green message The Server is reachable the port is working.
Click on Enable Connectivity Check and click on Next.
Configure plungin blacklist processing with Enable Plugin Blacklist Processing and click on Next.
Now set your printer profile as follows:
General: Name: Ender3 Model: Ender 3/ Pro
Print bed & build volume: Width (X) 220mm Depth (Y) 220mm Height (Z) 250mm
Axes: let's leave the prescribed values
Hotend & Extruder: indicate the suitable nozzle size (standard on 0,4 mm)
continue with Next and Finish
Now you can set the Connection SERIAL Port to AUTO and Baudrate to AUTO on the main page and click on Connect.
Now your printer is connected.
Now we go to the settings icon on the top right of the main page.
Navigate to Plugin Manager, click on get more, enter touchui and click on install.
If TouchUI is installed, you have to reboot the system, the message restart now appears in the upper right corner.
Now the TouchUI Plgun is installed and we see a Smartphone in the navigation bar on the top right.
Install TouchUi interface on Raspberry Pi.
Go back to the command line and enter the following command
git clone https://github.com/BillyBlaze/OctoPrint-TouchUI-autostart.git ~/TouchUI-autostart/
it was executed successfully enter sudo ~/TouchUI-autostart/helpers/install.
The GUI will open and you will be asked to enter your username of your choice.
Press enter and YES and Octoprint will restart.
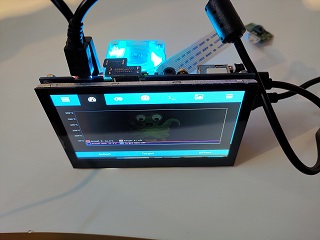
When the installation is finished, TouchUI will start on your LCD display.
As an addition we will adapt the file "config.yaml
enter the following commands:
cd .octoprint/
sudo nano config.yaml
add the following under autologinAs: your name
localNetworks:
“127.0.0.1/8”
“::1/128”
this is what it was supposed to look like:
 accessControl:
 autologinLocal: true
 autologinAs: your name
 localNetworks:
 “127.0.0.1/8”
 “::1/128”
Let's save the whole thing with CTRL+O and finish nano with CTRL+X
Reboot the system again with sudo reboot now
The installation with OctoPrint with an LCD display is finish.