Docker - ilya-khadykin/notes-outdated GitHub Wiki
They are considered to be Operation System Virtualization with the following features:
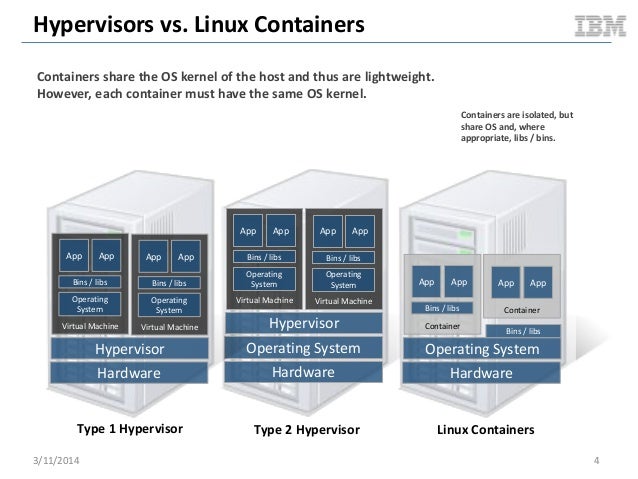
- they are isolated user space instances;
- they give isolated view of processes, user space and file system for user or owner;
- they share host Linux kernel;
- abstraction on container engines (libvirt, LXC etc)
- command line and HTTP API
- standardized packaging for app and libraries
- layered image format
- ecosystem of tools and services (public images repository)
- used for application deployment
Docker Engine is a client\server application

Allows running Docker client on non-linux machines and manage remote containers
It's a clustering tool and allows managing a group of Docker hosts as if they were a single Docker host. Docker Swarm API is compatible with Docker, so we can easily scale to multiple hosts.
We can containerize an application with multiple components (db, java etc) using Docker Compose (docker-compose.yml) and wire them together.

Ctrl + P and Ctrl + Q
docker run -d -it ubuntu bash

docker attach container_namedocker exec -it container_name bashWindows systems don't have Docker native support, thus we have to install additional software (VirtualBox) to start working with Docker. Docker Toolbox was created to simplify this process for us, it contains the following tools:
- Docker CLI client for running Docker Engine to create images and containers
- Docker Machine so you can run Docker Engine commands from Windows terminals
- Docker Compose for running the docker-compose command
- Kitematic, the Docker GUI
- the Docker QuickStart shell preconfigured for a Docker command-line environment
- Oracle VM VirtualBox
Ubuntu - https://docs.docker.com/engine/installation/linux/ubuntulinux/
| Command | Purpose |
|---|---|
docker build |
Build a Docker image. |
docker run |
Run a Docker image as a container. |
docker commit |
Commit a Docker container as an image. |
docker tag |
Tag a Docker image. |
docker-machine ls # list all available Docker hosts

eval $(docker-machine env test-host) # switch to specified host

docker-machine create --driver virtualbox test-host  # creates a new host with specified driver and hostname

docker-machine ip test-host  # shows IP address of a Docker host

docker-machine stop test-host
docker-machine start test-host

docker-machine rm test-host # removes specified hostdocker ps # lists all running containers
docker ps -a # shows all containers including stopped ones
docker ps -l # lists recent running containers
docker port web # shows binding port for the 'web' container
docker run -e "HELLO=OREILLY" ubuntu /bin/bash -c export # passing environment variable to the container
docker run ubuntu pwd
docker run -i -t ubuntu /bin/bash
docker run -d hello-world # runs container in detach mode
docker run -d -p 4567:4567 --name container1 rickfast/hello-oreilly-http
docker run -d -p 4567:4567 --name container2 --restart unless-stopped redis
docker stop container1
docker start container1
docker restart container1
docker rm d563d18c43cb # removes specified container
docker search alpine
docker pull alpine:latest
docker imagesLayers:
- Pick a base image (Linux distribution, Ubuntu for example)
- Add additional software (Python interpreter)
- Add frameworks depended on additional software (Flask for example)
- Configure run command
- Configure port mapping
Docker file lists instructions to be performed on an image to produce a new layer. Each instruction corresponds to a layer:
FROM ubuntu:15.10RUN apt-get install pythonRUN pip install flaskADD app.pyEXPOSE 5000
Dockerfile:
FROM ubuntu:15.10
RUN apt-get install python
RUN pip install flask
ADD app.py
EXPOSE 5000
ENTRYPOINT python app.py
We can put our dockerfile in a version control system and revert any changes to it or automate them.
docker search alpineLet's create a node.js app based on Alpine Linux:
docker pull alpine

docker run -i -t alpine /bin/sh
> apk update  # apk - package manager for Alpine Linux
> apk add nodejs  # installing node.js
> node --version  # verification
> mkdir average
> cd average
> apk nano
> nano average.js
...
#!/usr/bin/env node
var sum = 0;
var count = 0;
process.argv.forEach(function (val, index, array) {
  if(index > 1) {
    sum += parseInt(val);
    count++;
  }
});
console.log(sum / count);
...
> chmod +x average.js  # make it executable
> ./average.js 3 4 5  # a quick test
> hostname  # prints container id
> exit

docker commit -m 'installed node and wrote average application' 08a8cc8361ae  # commiting changes to the container

docker run YOUR_IMAGE_ID_FROM_COMMIT average/average.js 3 4 5 # running with new image id- FROM — first line of Dockerfile, base for an image
- MAINTAINER — who is responsible for supporting the image
- RUN — run inside the container
- CMD — usually the last command, defines what command should be run by default when container runs
- EXPOSE — list of ports that will be listening by the container
- ENV — create environment variable
- ADD — copy file/directory inside an image (URL can be used a first argument).
- ENTRYPOINT — will be run when container starts (by default /bin/sh -c).
- USER — change user inside container
- WORKDIR — change directory inside the container
- ONBUILD [INSTRUCTION] — run the instruction only if the image is used for building another image
Example:
FROM alpine
MAINTAINER ilya.khadykin <[email protected]>
RUN apk update && apk add nodejs
RUN mkdir average
ADD average.js average/
WORKDIR average
ENTRYPOINT ["node","average.js"]
docker build .
docker build -t ilyakhadykin/average . # specifying name with -tWe can overwrite commands while running the container with 'docker run`
FROM alpine
MAINTAINER ilya.khadykin <[email protected]>
CMD ["ping", "google.com"]
FROM alpine
MAINTAINER ilya.khadykin <[email protected]>
CMD echo $PATH
FROM alpine
MAINTAINER ilya.khadykin <[email protected]>
CMD ping google.com
We pass arguments to the container with 'docker run`
FROM alpine
MAINTAINER ilya.khadykin <[email protected]>
ENTRYPOINT ["ping"]
FROM ruby
EXPOSE 4567
ENTRYPOINT ["bundle","exec","rackup","-p","4567","--host","0.0.0.0"]
ONBUILD ADD . /
ONBUILD RUN bundle install
docker ps -a
docker ps -l  # last running containers

docker logs
docker logs -f

docker inspect redis
docker inspect --format='{{.NetworkSettins.IPAddress}}' redis  # Go programming language template support

docker exec -i -t redis /bin/bash  # runs a new process in the container
Docker runs 3 networks by default (host network is a network which host uses, bridge is an internal network):
NETWORK ID          NAME                DRIVER
1b6bdd696f2e        bridge              bridge
066b36dc618c        host                host
a32ce4ad6468        none                null
docker network ls

docker-machine ssh default
> ifconfig

docker run -d -P --net none --name no-network-app rickfast/hello-oreilly-http
docker exec -i -t no-network-app /bin/sh
> ifconfigBy create our own networks we can isolate containers even more.
docker network create --driver bridge my-networkdocker network create --driver bridge dns-test
docker network ls
docker run -d --net dns-test --name dns-test-app rickfast/oreilly-dns-test
docker run alpine wget -qO- dns-test-app:4567 # wget: bad address 'dns-test-app:4567'
docker run --net dns-test alpine wget -qO- dns-test-app:4567 # You found me! My IP is 172.18.0.2docker run -d --net dns-test --name dns-test-app --net-alias dns-alias rickfast/oreilly-dns-test
docker run --net dns-test alpine wget -qO- dns-test-app:4567 # still works
docker run --net dns-test alpine wget -qO- dns-alias:4567 # also worksClusterHQ (https://clusterhq.com/) - Container data managment for the entire lifecycle of your app
docker run -d -p 5984:5984 -v $(pwd)/data:/usr/local/var/lib/couchdb --name couchdb klaemo/couchdb
docker run -P alpine /bin/sh -c "apk update && apk add curl; curl -X PUT http://192.168.99.100:5984/db"  # creating db
docker run -P alpine /bin/sh -c "apk update && apk add curl; curl -H 'Content-Type: application/json' -X POST http://192.168.99.100:5984/db -d '{\"value\":\"CouchDB is awesome\"}'"  # creating document
docker run -P alpine /bin/sh -c "apk update && apk add curl; curl http://192.168.99.100:5984/db/f0b25cd18d25ea1e3c8a026012000412" # retrieving created documentdocker create -v /usr/local/var/lib/couchdb --name db-data debian:jessie /bin/true
docker ps -a
docker run -d -p 5984:5984 -v /usr/local/var/lib/couchdb --name db1 --volumes-from db-data klaemo/couchdb
docker run -d -p 5985:5985 -v /usr/local/var/lib/couchdb --name db2 --volumes-from db-data klaemo/couchdbManaging a group of containers as a single unit
docker-compose.yml:
version "2"
services:
  kv-store-1:
    image: redis
  kv-store-2:
    image: redis
kv-store-1/* - containers
docker-compose up
docker-compose up -d
Logstash collects log files and sends them to Elasticsearch Kibana is UI which visualizes index data in Elasticsearch or quires them. docker-compose.yml:
version: '2'
services:
  elasticsearch:
    image: elasticsearch:2.2.1
  kibana:
    image: kibana:4.4.2
    ports:
      - "5601:5601"
    environment:
      - ELASTICSEARCH_URL=http://elasticsearch:9200
    depends_on:
      - elasticsearch
  logstash:
      image: logstash:2.2.2
      command: -e 'input { tcp { port => 5555 } } output { elasticsearch { hosts => ['elasticsearch:9200'] } }'
      ports:
        - "5555:5555"
      depends_on:
        - elasticsearch
Run the composition:
docker-compose up
App`s code:
require 'sinatra'
require 'redis'

set :bind, '0.0.0.0'

configure do
  $redis = Redis.new(:host => 'redis')
end

get '/' do
  count = $redis.incr('count')

  "<h1>Hello World!</h1>"\
  "<p>This page has been viewed #{count} times</p>"
end
Dockerfile:
FROM alpine
MAINTAINER ilya.khadykin <[email protected]>
RUN apk update && apk add ruby
RUN gem install sinatra --no-ri --no-rdoc
RUN gem install redis --no-ri --no-rdoc
ADD counter.rb counter.rb
EXPOSE 4567
ENTRYPOINT ["ruby", "counter.rb"]
docker-compose.yml:
version: '2'
services:
  counter:
    build: .
    ports:
      - "4567:4567"
    depends_on:
      - redis
  redis:
    image: redis:3.0.7
To keep track of available nodes you'll need key-value store, zookeeper for example.
docker run -d -p 2181:2181 --name zookeeper jplock/zookeeper
Swarm Master
docker run -d -p 3376:3376 --name manager -t -v /var/lib/boot2docker:/certs:ro swarm manage -H tcp://0.0.0.0:3376 --tlsverify --tlscacaert=/certs/ca.pem --tlscert=/certs/server.pem --tlskey=/certs/server-key.pem zk://192.168.99.100:2181

docker-machine create --driver virtualbox node1

eval $(docker-machine env node1)
docker run -d swarm join --addr $(docker-machine ip node1):2376 zk://192.168.100:2181

docker-machine create --driver virtualbox node2

eval $(docker-machine env node2)
docker run -d swarm join --addr $(docker-machine ip node2):2376 zk://192.168.100:2181

eval $(docker-machine env default)
export DOCKER_HOST=192.168.99.100:3376

docker run -d -P rickfast/hello-oreilly-http
docker run -d -P rickfast/hello-oreilly-http
docker run -d -P rickfast/hello-oreilly-http
To keep track of available nodes you'll need key-value store, zookeeper for example.
docker run -d -p 2181:2181 --name zookeeper jplock/zookeeper
Next we should create Swarm Master and nodes:
# creating swarm master using docker-machine and overlay network
docker-machine create -d virtualbox --swarm --swarm-master --swarm-discovery="zk://192.168.99.100:2181/swarm" --engine-opt="cluster-store=zk://192.168.99.100:2181/overlay" --engine-opt="cluster-advertise=eth1:2376" swarm-master

# creating node1 using the same params as swarm master
docker-machine create -d virtualbox --swarm --swarm-master --swarm-discovery="zk://192.168.99.100:2181/swarm" --engine-opt="cluster-store=zk://192.168.99.100:2181/overlay" --engine-opt="cluster-advertise=eth1:2376" node1

# creating node1 using the same params as swarm master
docker-machine create -d virtualbox --swarm --swarm-master --swarm-discovery="zk://192.168.99.100:2181/swarm" --engine-opt="cluster-store=zk://192.168.99.100:2181/overlay" --engine-opt="cluster-advertise=eth1:2376" node2

# switching to newly create swarm master
eval $(docker-machine env --swarm swarm-master)
docker network create --driver overlay overlay-net

# starting an actual application containers
docker run --name counter -p 4567:4567 -d --net=overlay-net --env="constraint:node==node1" rickfast/counter
docker run --name redis -p 4567:4567 -d --net=overlay-net --env="constraint:node==node2" redis

docker psdocker run --log-driver=json-file rickfast/hello-oreilly
docker run --name splunk -p 8000:8000 -p 8088:8088 -d outcoldman/splunk:6.3.3
docker run --name hello --log-driver=splunk --log-opt splunk-token=xxxx-xxx-xxxxx-xxx --log-opt splunk-url=http://192.168.99.100:8088 --log-opt splunk-sourcetype=Docker rickfast/hello-oreilly-http
The docker run --restart flag allows you to apply a set of rules to be followed (a so-called “restart policy”) when the container terminates.
| Policy | Description |
|---|---|
| no | Do not restart when container exits |
| always | Always restart when container exits |
| on-failure[:max-retry] | Restart only on failure |
docker run -d -P --name redis redis  # starting Redis in the background

docker -run --link redis -i -t ubuntu /bin/bash  # run ubuntu container and link Redis container to it
> env # shows environment variables of running ubuntu container

docker run -d --link redis --name web rickfast/oreilly-simple-web-app  # no port mapping
docker kill web
docker rm web

docker run -p 4567:4567 --link redis --name web rickfast/oreilly-simple-web-app  # with port mapping app is available from outside on port 4567

docker run -P --link redis --name web rickfast/oreilly-simple-web-app  # binds the container to any available port on the host
docker port web

docker run -d -e "REDIS_PORT_6379_TCP_ADDR=172.17.0.2" --name web -p 4567:4567 rickfast/oreilly-simple-web-app # passing environment variable to the web containerCredits - https://github.com/SamSaffron/graphite_docker
docker run -v /data/graphite:/data -e SECRET_KEY='^v#$-*9=v-(0msh$jv0l0_78=%#6$fvf&qa5ds@!%y5s#zcmo6' -p 80:80 -p 3000:3000 -p 2003:2003 -p 2004:2004 -p 7002:7002 -p 8125:8125/udp -p 8126:8126 -d samsaffron/graphitedocker run -d -p 6379:6379 --name redis redisWe use containers name in the code since we use --link` to link several containers.
require 'sinatra'
require 'redis'

set :bind, '0.0.0.0'

configure do
  $redis = Redis.new(:host => 'redis')
end

get '/' do
  count = $redis.incr('count')

  "<h1>Hello World!</h1>"\
  "<p>This page has been viewed #{count} times</p>"
end
docker build -t ilyakhadykin\counter .
docker run -p 4567:4567 --link redis:redis ilyakhadykin/counterQ: How to remove old Docker containers?
A: Use the following one-liner:
docker ps -a | grep 'weeks ago' | awk '{print $1}' | xargs --no-run-if-empty docker rmCredit - http://stackoverflow.com/a/17237701 and https://twitter.com/jpetazzo/status/347431091415703552
docker rm $(docker ps -q -f status=exited)Credit - http://stackoverflow.com/a/29474367
Q: How to remove all Docker images?
A: Use the following one-liner:
docker images | grep 'weeks ago' | awk '{print $3}' | xargs --no-run-if-empty docker rmiQ: How to change where Docker stores its data?
A: Stop and start the Docker daemon, specifying the new location with the -g flag.
docker daemon -g /home/dockeruser/mydocker
If you want to make this move permanent, you’ll need to configure your host system’s startup process accordingly.
Problem: You want a way to host your images locally. Solution: Set up a registry server on your local network.
docker run -d -p 5000:5000 -v $HOME/registry:/var/lib/registry registry:2Problem: You have a VM you want to convert to a Docker image.
Solution: Create a TAR file of your VM filesystem, using either qemu-nbd (available as part of the qemu-utils package on Ubuntu), tar over ssh, or another method, and use the ADD command in a Dockerfile on your TAR to create your image.
The ADD Dockerfile command (unlike its sibling command COPY) unpacks TAR files (as well as gzipped files and other similar file types) when placed in an image like this.
- Learning Docker
- Docker in Practice
- Get Started with Docker for Windows
- Getting Started: FAQs
- Official Documentation
- https://training.docker.com/
- http://www.slideshare.net/jpetazzo/docker-linux-containers-lxc-and-security
- https://docs.docker.com/registry/
Tool that privisions Docker hosts and installs the Docker Engine on them
Tool that clusters many Engines and schedules containers
Tool to create and manage multi-container appplications
- Developers focus on building their apps
- System admins focus on deployment
Containers can be spin up in seconds
- Build in one environment, ship to another
- Easily spin up new containers if needed
docker run [options] [image] [command] [args]
docker run ubuntu:14.04 echo "Hello World"
docker run ubuntu ps ax

docker run -ti ubuntu /bin/bash
> adduser test
docker run creates a new container
PID 1
Ctrl + P + Q - exiting container without closing it
docker ps -a
- Long ID obtained by inspecting a container
- Short ID
docker run -d centos ping 127.0.01 -c 100
docker logs [container_id]
docker run -d -P tomcat
- Images are comprised of multiple layers
- A layer is also just another image
- Every image contains a base layer
- Docker uses a copy on write system
- Layers are read only
The Container Writable Layer
- Docker creates a top writable layer for containers
- Parent images are read only
- All changes are made at the writable layer
docker commit [container_id] ilyakhadykin/applicaion-name:1.0
Build Cache
A Dockerfile is a configuration file that contains instructions for building a Docker image
More effective way to build images compared to using docker commit
Easily fits into your continuous integration and deployment process
docker build [options] [path]
Docker client pack all the files into .tar and send it to the deamon
docker build -t repositoy/image-name:latest .
- CMD defines a default command to execute when a container is created
- CMD performes no action during the image build
- Shell format and EXEC format
- Can only be specified once in a Dockerfile
- Can be overridden at run time
Shell format (runs in a shell):
CMD ping 127.0.0.1 -c 30
Exec format (is supplied with json array of arguments):
CMD ["ping", "127.0.0.1", "-c", 30]
- Defines the command that will run when a container is executed
- Run time arguments and CMD instruction are passed as parameters to the ENTRYPOINT instruction
- Shell and EXEC form
- EXEC form preferred as shell form cannot accept arguments at run time
- Container essentially runs as an executable
ENTRYPOINT ['ping']
docker exec -it [container ID] /bin/bash
docker rm -f [container id]
docker rmi [image name or id]
docker push [repo:tag]
Local repo must have same name and tag as the Docker Hub repo
A Volume is a designated directory in a container, which is designed to persist data, independent of the container`s life cycle
- Volume changes are excluded when updating an image
- Persist when a container is deleted
- Can be mapped to a host folder
- Can be shared between containers
- Volumes are mounted when creating or executing a container
- Can be mapped to a host directory
- Volume paths specified must be absolute
docker run -it -v /data/src:/test/src nginx:1.7
- VOLUME instruction creates a mount point
- Can specify arguments JSON array of string
- Cannot map volumes to host directories
- Volumes are initialized when the container is executed
- De-couple the data that is stored from the container which created the data
- Good for sharing data between containers (Can setup a data containers which has a volume you mount in other containers)
- Mounting directories from the host is good for testing purposes but generally not recommended for production use
docker run -d -p 8080:80 nginx:1.7
'docker run -d -P nginx:1.7' ports from 49153 to 65535, only aplies for EXPOSE instruction
Linking is a communicaion method between containers which allows them to securely transfer data from one to another
Links are established using container names
docker run -d --name database postgres

docker run -d -P --name website --link database:db nginx
db is an alias -> cat /etc/hosts
- Essential for micro service application architecure
- Containers can talk to each other without having to expose ports to the host
- Example ** Container with Tomcat running ** Container with MySQL running ** Application on Tomcat needs to connect to MySQL
docker inspect databse | grep IPAddress
- Container PID 1 process output can be viewed with
docker logscommand
docker logs <container name or id>

docker logs -f --tail 1 <container name or id>

docker run -d -P -v /nginxlogs:/var/log/nginx nginx
-
docker inspectcommand displays all the details about a container - Outputs details in JSON array
- Use grep to find a specific property
docker inspect <container name>

docker inspect <container name> | grep IPAddress

docker inspect --format {{.NetworkSettings.IPAddress}} <container name or id>
sudo service docker stop
sudo service docker start
sudo service docker restart

sudo kill $(pidof docker)

sudo docker -d &
- Located in /etc/default/docker
- Use DOCKER_OPTS to control the startup options for the daemon when running as a service
- Restart the service for changes to take effect
DOCKER_OPTS="--log-level debug --insecure-registry myserver.org:5000"
- Levels (Debug, Info, Warn, Error, Fatal)
sudo docker -d --log-level=debug

DOCKER_OPTS="--log-level debug"
- Docker helps make applications safer as it provides a reduced set of default privileges and capabilities
- Namespaces provide an isolated view of the system. Each container has its own ** IPC, network stack, root file system etc
- Processes running in one container cannot see and effect processes in another container
- Control groups (Cgroups) isolate resource usage per container ** Ensures that a compromised container won't bring down the entire host by exhusting resources (during DDoS)
- Docker daemon needs to run as root
- Only ensure that trusted users can control the Docker daemon ** Watch who you add to docker group
- if binding the daemon to a TCP socket, secure it with TLS
- Use Linux hardening solution ** Apparmor
- SELinux
- GRSEC
Docker Machine is a tool that automatically provisions Docker hosts and installs the Docker Engine on them
- Create additional hosts on your own computer
- Create hosts on cloud providers (e.g. Amazon AWS, DigitalOcean etc...)
- Machine creates the server, installs Docker and configures the Docker client
docker-machine create -d virtualbox --engine-env HTTP_PROXY=http://proxy.vlg.sperasoft.com:3129 --engine-env HTTPS_PROXY=http://proxy.vlg.sperasoft.com:3129 default

docker-machine create --driver digitalocean --digitalocean-access-tocken <your access token> --digitalocean-size 2gb testhost
- Download the binary for the operating system
- Place the binary into a directory of your choice
- Add the directory to your system environment PATH
docker-machine ls

docker-machine ssh host3
Docker Swarm is a tool that clusters Docker hosts and schedules containers
- Turns a pool of host machines into a single virtual host
- Ships with simple scheduling backend
- Supports many discovery backends (using Swarm agent): ** Hosted discovery ** etcd ** Consul ** ZooKeeper ** Static files
- On the machine that you will use as the Swarm master, run a command to create the cluster
- Start Swarm master
- For each node with Docker installed, run a command to start the Swarm agent
- Note: Agents can be started before or after the master
Installing and running Swarm
- Swarm image on Docker Hub
- Swarm containers can be run from the image to do the following: ** Create a cluster ** Start the Swarm manager ** Join nodes to the cluster ** List nodes on a cluster
Only works using TCP (not UNIX socket)
DOCKER_HOST=localhost:2375
export DOCKER_HOST
docker run -rm swarm create  # getting cluster tocken
docker run -d -P swarm manage token://<cluster token>  # starting a manager
docker run -d swarm join --addr=<node ip>:<daemon port> token://<cluster token>  # adding a node
export DOCKER_HOST=127.0.0.1:<swarm port> # pointing the Docker client to Swarm
docker version  # verifiyng the setup
docker info  # listing available nodes
docker run -d -P nginx  # running containers using docker Swarm
Docker Compose is a tool for creating and managing multicontainer applications
- Containers are all defined in a single file called docker-compose.yml
- Each container runs a particular component/service of your application. For example: ** Web front end ** User authentication ** Payments ** Database
- Container links are defined
- Compose will spin up all your containers in a single command
docker-compose.yml:
javaclient:
  build: .
  command: java HelloWorld
  links:
   - redis
redis:
  image: redis
docker-compose up
docker-compose up -d
- Each service can be develped and upgraded independently
- Easier for developers to understand ** Only have to focus on their service
- If one service goes down, the application should still run, albeit with reduced functions
- Application is easier to troubleshoot
- The whole application does not have to be committed to one technology stack