5. ODrive - iangohy/SUTDoggo GitHub Wiki
5.1 Preparing your computer
-
Install
odrivetoolby following steps found here.On Ubuntu:
sudo apt install -y python3 python3-pip sudo pip3 install --upgrade odrive -
Power the ODrive.
Source: https://docs.odriverobotics.com/#safety--power-up
- Unlike some devices, the ODrive does not recieve power over the USB port so the 24/56 volt power input is required even just to communicate with it using USB. It is ok to power up the ODrive before or after connecting the USB cable.
- To power up the ODrive, connect the power source to the DC terminals. Make sure to pay attention to the polarity. Try to connect the power source first and then turn it on to avoid inrush current. If this can’t be avoided then a small spark is normal. This is caused by the capacitors charging up.
-
Open a terminal and run
odrivetool -
Connect the ODrive board and wait for
odrivetoolto detect it. Below is a example of successful detection.
ODrive control utility v0.5.1
Please connect your ODrive.
Type help() for help.

Connected to ODrive 306A396A3235 as odrv0
- If the ODrive is not connecting, try changing the power source. A dim light on the ODrive indicates insufficient power.
-
Install recommended ODrive development tools. Follow instructions here.
For Ubuntu >= 20.04
sudo apt-get update
sudo apt-get install -y ncurses-dev git make openocd tup python3 python3-yaml python3-jinja2 python3-jsonschema python-is-python3 gcc-arm-none-eabi
5.2 Build custom firmware
- Navigate to
.../ODrive/Firmware. - Edit
tup.configto change the value ofCONFIG_BOARD_VERSIONto match your ODrive board.
| ODrive model | Value | Remarks |
|---|---|---|
| 3.1 | v3.1 | Untested |
| 3.2 | v3.2 | Untested |
| 3.3 | v3.3 | Untested |
| 3.4 24v | v3.4-24V | Untested |
| 3.4 48v | v3.4-48V | Untested |
| 3.5 24v | v3.5-24V | |
| 3.5 48v | v3.5-48V | |
| 3.6 24v | v3.6-24V | |
| 3.6 56v | v3.6-56V |
- Run
make.
5.3 Erase configuration
- Open a terminal and run
sudo odrivetool. - Plug in powered ODrive and wait for odrivetool to detect the ODrive.
Downloading json data from ODrive... (this might take a while)
Connected to ODrive 3355365B3339 as odrv0
- Run
odrv0.erase_configuration(). - Run
exit().
5.4 Flash custom firmware
- Turn off ODrive power and plug in the BLDC motors to the ODrive.
- Flash the doggo custom ODrive firmware.
For ODrive 3.5 and higher, navigate to
.../Odriverun the following:
sudo odrivetool dfu Firmware/build/ODriveFirmware.hex
For users of ODrive 3.4 and lower please refer to https://docs.odriverobotics.com/odrivetool.html#flashing-with-an-stlink for firmware flashing instructions When successful,
Device firmware update successfulwill be printed.
- Configure the ODrive. Be careful as the motors will move.
python3 tools/doggo_setup.py
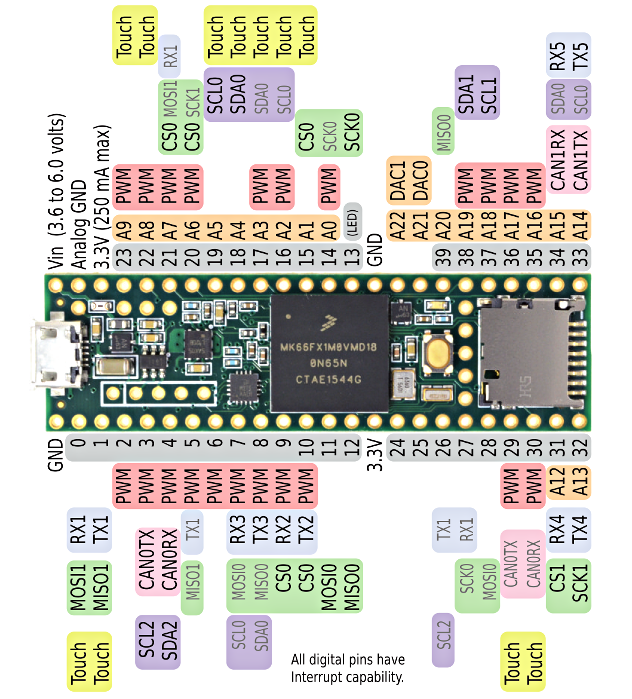
5.5 Connecting ODrive to Teensy
5.5.1 Table of connection pins
| Connection | Teensy Pins | ODrive Pins |
|---|---|---|
| ODrive1 (odrv0) | P0 (RX1) | GPIO1 (ODrive TX) |
| ODrive1 (odrv0) | P1 (TX1) | GPIO2 (ODrive RX) |
| ODrive1 (odrv0) | GND | GND |
| ODrive2 (odrv1) | P9 (RX2) | GPIO1 (ODrive TX) |
| ODrive2 (odrv1) | P10 (TX2) | GPIO2 (ODrive RX) |
| ODrive2 (odrv0) | GND | GND |
| ODrive3 (odrv2) | P7 (RX3) | GPIO1 (ODrive TX) |
| ODrive3 (odrv2) | P8 (TX3) | GPIO2 (ODrive RX) |
| ODrive3 (odrv0) | GND | GND |
| ODrive4 (odrv3) | P31 (RX4) | GPIO1 (ODrive TX) |
| ODrive4 (odrv3) | P32 (TX4) | GPIO2 (ODrive RX) |
| ODrive4 (odrv0) | GND | GND |
5.5.2 Teensy 3.6 Pinout
