Navigation modes - iNavFlight/inav GitHub Wiki
This page lists and explains all the different navigational flight modes of INAV:
- NAV ALTHOLD - Altitude hold
- NAV POSHOLD - 3D Position hold
- NAV MC BRAKING - Poshold faster braking
- NAV COURSE HOLD - Course Hold
- NAV CRUISE - Course Hold + Altitude Hold
- NAV RTH - Return to home
- NAV WP - Autonomous waypoint mission
- WP PLANNER - On the fly waypoint mission planner
- GCS NAV - Ground control station
See also non-navigation modes
For safety reasons, initial setup requires the conditions below to be met before navigation modes will appear in the Configurator modes tab:
- ACC and MAG are calibrated properly. Also note other specifics
- GPS for navigation and telemetry must be enabled. Along with the GNSS module being allocated to a serial port
- A valid altitude source is available
[!Note] After the initial setup. Navigation modes will remain viewable in the modes tab for the sake of some flight controllers that do not provide USB power to drive the barometer. This requirement was added to prevent navigation modes from being left out of the DIFF file, if the users saves a DIFF without the flight battery being connected.
When it comes to Arming at the flying field or for bench testing. It's not good enough to just meet the requirement of 6 satellites, for what is considered a valid 3D fix. This also includes an acceptable level of satellite precision. HDOP or EPH/EPV must be low enough so the software can use it for reliable navigation.
nav_extra_arming_safety = ALLOW_BYPASS in active by default. So you can use the RC sticks command to bypass arming checks. But when doing so, remember your home location will not be saved, so RTH will not work correctly!
Navigation mode assistance:
- All multicopter navigation flight modes are self contained. For example: In RTH, POSHOLD, CRUISE and WP modes, it is NOT necessary to enable ANGLE, ALTHOLD or Heading control along with the mode you select. The software will enable what is required for that mode to work as it was designed to.
- The same applies to fixed wing aircraft. But enabling RTH, LOITER, CRUISE or WP modes, will also enable TURN ASSIST.
TURN ASSISTANCE applies elevator and rudder input when the airplane is banked, to obtain a coordinated turn. fw_turn_assist_pitch_gain and fw_turn_assist_yaw_gain
In later releases there is some flexibility in what sensors can be used for multicopter and fixedwing navigation. But as a general rule. The more sensors you have enabled, the more precise navigation will be.
- Default (
✓) - Optional (
O) - Default for Copters, but can be disabled for convenience, with loss of precision. Or a Magnetometer can be enable on a fixedwing to provide greater heading precision.
| Active Modifier/Sensor | COURSE HOLD | CRUISE | POSHOLD | WAYPOINT | RTH |
|---|---|---|---|---|---|
| ANGLE | ✓ | ✓ | ✓ | ✓ | ✓ |
| ALTHOLD | ✓ | ✓ | ✓ | ✓ | |
TURN ASSIST - FW only |
✓ | ✓ | ✓ | ✓ | ✓ |
MAG - MC ✓ O/ FW O |
✓ | ✓ | ✓ | ✓ | |
BARO - MC/FW ✓/ MC/FW O |
✓ | ✓ | ✓ | ✓ | |
| GNSS | ✓ | ✓ | ✓ | ✓ | ✓ |
ALTHOLD - Altitude hold
ALTHOLD is not a flight mode in it's own right. It is a modifier which when activated in combination with a flight mode, will maintains the aircraft's altitude.
Please see the platform specific notes for ALTHOLD below.
Rangefinder (LIDAR/SONAR): When a rangefinder is configured, its data is automatically fused into altitude estimates. On multirotors, enabling Surface Mode switches ALTHOLD to terrain-following mode, maintaining constant height above ground instead of absolute altitude. Surface mode is not available on fixed wings - they always use barometric/GPS altitude. See Optic Flow and Rangefinder Setup for configuration details.
[!Caution] It is not advisable to use ALTHOLD combine with ACRO or HORIZON modes, on either a multicopter or fixedwing plateform. ALTHOLD doesn't account for bank angles greater than 90° or inverted maneuvers. The only independent flight mode you should apply ALTHOLD with is ANGLE mode.
However I will go on to say. ALTHOLD can be used by advanced multicopter users, together with ACRO mode. But ONLY if the user understands the importance of maintaining smooth control over the copters attitude.
Altitude is calculated by INAV's vertical position estimator, and is derived from up to four sensors. It is logged to BLACKBOX as navPos[2].
Using ALTHOLD with a MultiCopter (MC):
Operation and Control :
When just using ALTHOLD on a multicopter, it requires a barometer at minimum, to maintain a fixed altitude.
Activating AIRMODE along with ANGLE mode can provide extra stability for a multicopter in a fast descent. But it's advisable to disable AIRMODE before landing, if your copter has a very high thrust to weight ratio. Otherwise it may flip-over from i-term windup, as it touches down.
Climb rate in ALTHOLD mode: The throttle stick can be used to manually alter Climb or Descent rate, based on your predetermined maximum nav_mc_manual_climb_rate.
The maximum climb and decent rate in autonomous flight modes is defined by nav_mc_auto_climb_rate
The neutral position of the throttle stick to hold current altitude is defined by nav_mc_althold_throttle.
This setting provides three means for the ALTHOLD throttle stick position to be acquired. The default setting STICK, is smoother in most cases when transitioning to a flight mode that holds altitude, from one that did not.
But it may cause issues under some conditions. e.g. If switching from ACRO to an altitude holding mode, at high throttle in fast forward flight. In this case, the throttle/stick offset can be considerably higher than expected. Making it hard to alter altitude when the hover stick position is closer to max_check. Use HOVER or MID_STICK in this case.
When you enable ALTHOLD, INAV sends the nav_mc_hover_thr value to the motors as the starting point for the altitude velocity controller to begin working from.
You should configure this setting to your copter's approximate hover throttle value if it doesn't hover close to the default value of 1300us. Otherwise it may begin to ascend or descend, depending on the thrust availability of the specific model.
nav_mc_hover_thr should be set to an approximate value within 5% of what the copter requires to maintain a fixed hover in ACRO or ANGLE mode.
The primary reason for this setting is to provide the software with a general baseline for hover. And prevent excessive nav_mc_vel_z i-term error accumulation. Which in turn will make the copter become more sluggish, in response to altitude changes.
To acquire your copters hover throttle value. You should do your best to hold a fixed hover position while in ANGLE mode. Then reference that throttle value from a log, OSD or even the LUA telemetry on your radio's display. Once you have landed, enter that value into nav_mc_hover_thr.
Because battery voltage reduces throughout the flight; it is beneficial to enable feature THR_VBAT_COMP. Which can help compensate for the thrust reduction, and assist altitude control.
The alt_hold_deadband provides a deadband region either side of nav_mc_althold_throttle hover stick position, like an expo, to prevent unwanted altitude change occurring.
If ALTHOLD is activated at zero throttle below min_check, INAV will account for this by moving the neutral "zero climb rate" position a little higher to make sure you are able to descend.
Load lifting :
In cases when a multicopter maybe used to carry different weight loads. e.g. Camera rigs, Fishing burley, Lite construction etc.
It is still important that the hover throttle be set. An acceptable value in this case could be 5 - 10% higher than is required for a stable hover in POSHOLD, without the load applied. However this is highly dependent on what percentage of the copters weight is being lifted.
[!Tip] Tests with different size machines (3" to 10") have shown the success can vary considerably depending on the size of the propeller disc area, and the power the motors can provide to do the work, more so than throttle or thrust to weight. A smaller 5" cine-lifter will find it much harder for the altitude velocity controller to adjust to altitude changes without saturating its i-term, than a larger 15" copter, which will allow it to work with more ease. Even if they are both carrying the same percentage of their weight in the load.
In any case. The tuning of the nav_mc_hover_thr setting and the MC velocity controller to accomplish this task, should be done specifically for load lifting. i.e. I would not recommend you use the same tune for good altitude precision in WP mission.
Always ensure any lifted weight is placed as close to the copters C.G. as possible. This also includes the attachment point of a lifting tether.
INAV presently does not support Slung Payload Oscillation Suppression.
OSD altitude adjustment alert:
For visual awareness, the OSD altitude element has a symbol that will appear to the left side of the altitude value. This symbol can be used to inform the pilot of when they're making a change via the throttle stick to adjust the copters altitude.
Once the throttle stick is centered again to hold the new altitude position, the symbol will disappear.
Related setting parameters for multicopters: These setting are also found in the Configurators Advanced Tuning tab
Only found in the CLI:
More related setup and tuning information can be found here: Multicopter navigation PID tuning
Using ALTHOLD with a FixedWing (FW):
INAV controls pitch angle and throttle. It assumes that altitude is held (roughly) when pitch angle is zero. If the airplane has to climb, INAV will also increase throttle. If plane has to dive, INAV will reduce throttle and glide. The strength of this function is controlled by nav_fw_pitch2thr.
Trim the aircraft via the Auto Level Trim mode fw_level_pitch_trim in such a way that your airplane is flying level both in "MANUAL" and in "ANGLE", when not touching the sticks.
Related setting parameters for fixed wings: These setting are also found in the Configurators Advanced Tuning tab
- nav_fw_min_thr = 1200
- nav_fw_cruise_thr = 1450
- nav_fw_max_thr = 1750
- nav_fw_bank_angle = 45
- nav_fw_climb_angle = 25
- nav_fw_dive_angle = 18
- nav_fw_pitch2thr = 11
- nav_fw_loiter_radius = 5000
More related setup and tuning information can be found here: Fixedwing navigation PID tuning
NAV POSHOLD - Position hold
MULTIROTOR
The Multirotor will hold 3D position.
ALTHOLD is already active by default, and uses the Barometer, GNSS altitude and the Accelerometer.
And that together with gyro based HEADING HOLD which is updated from the Mag bearing or GNSS course, to achieve full 3D position control.
If the throttle stick is increased or decreased, the copters altitude will either climb or descend until you center the throttle stick, then it will hold the current altitude. This should be tuned for your hardware by settings mentioned earlier.
You can also use the roll or pitch sticks to move the copters location in POSHOLD. Then once you center the roll/pitch sticks again, it will stop and hold the new position. You can also use the Yaw stick to rotate the copter. The speed that rotation occurs, is based on the setting heading_hold_rate_limit.
POSHOLD can be modified via the Advanced Tuning Tab under the Multirotor Navigation settings.
FIXED WING - aka LOITER
A fixed wing will loiter in a circle, holding altitude, with the throttle automatically controlled. The circles radius is defined by the setting nav_fw_loiter_radius. The altitude can be adjusted via the pitch stick if required.
Loiter direction can be selected by fw_loiter_direction. It can be altered in flight by the Yaw stick or by the LOITER CHANGE mode, via a switch.
Please see other factors that will also effect the loiter radius below
MC Braking mode - POSHOLD modifier
MC Braking mode is a subset of POSHOLD. Its purpose is to allow faster braking when the pitch stick is released back to center. It also provides the advantage of setting the stopping position where the copter finishes braking. Opposed to it backing-up to the point you released the stick, when Braking mode isn't active.
MC Braking mode requires the following conditions to be met for its operation.
- Must be in POSHOLD
- nav_user_control_mode =
CRUISEin place of the defaultATTITUDE - Selected MC BRAKING in the modes tab - Enable on its own channel switch for independent use. Or have it activated together with POSHOLD on its channel switch.
Braking mode can be tuned by its setting in the Configurator Advance Tuning tab - under Multirotor braking mode configuration
MC Braking mode is OPTIONAL due to the way POSHOLD is controlled at the navigation level. By the setting below.
The Nav_User_Control_Mode can be either ATTI or CRUISE:
-
ATTITUDE - When the Pitch/Roll sticks are moved, autopilot position control is disengaged. So the multicopter behaves with the freedom of ANGLE mode, until the sticks are released back to center.
-
CRUISE - The autopilot position control always remains active. So when the Pitch/Roll sticks are moved, the input is transformed from a command to speed and merged with the current position. To provide more precise 3D position control over the craft. But it may feel a little more vague than Attitude mode, if the satellite precision is poor. i.e. Low Sat count and Higher HDOP
This makes CRUISE ideal for monitoring the stick release velocity of the copter, as well peak braking, slowdown and stopping positions. However it isn't always possible to have precise GNSS heading, position and velocity data. Especially when the copter is tilting to travel/brake or banking to turn. Due to this issue, CRUISE mode can be a bit jerky in its motion, or even temporally run away for a few meters, when it should be braking. So if you want smoother consistent flight in POSHOLD; ATTITUDE should be chosen over CRUISE.
ATTITUDE and CRUISE is only relevant for POSHOLD mode. Except in the case of MC CRUISE and COURSE-HOLD flight modes. They use the same underlying control code as CRUISE, regardless of whether you have ATTITUDE or CRUISE selected.
While all other navigation modes use nav_mc_bank_angle as the deceleration pitch angle and nav_mc_pos_deceleration_time.
NAV COURSE HOLD - Course Hold
Course hold is only available for multirotor from INAV 7.0.
When enabled the craft will try to maintain the current course and compensate for any external disturbances (2D CRUISE). Control behaviour is different for fixed wing and multirotor as follows:
Multirotor
The heading is adjusted using the YAW stick or the ROLL stick (ROLL stick behaves exactly the same as the YAW stick). Cruise speed is increased by raising the pitch stick with the speed set in proportion to stick deflection up to a maximum limit of nav_manual_speed. This speed is maintained after the stick returns to centre. If the multirotor is already moving when Course Hold is selected the current speed will be maintained up to the nav_manual_speed limit. Speed is decreased by lowering the pitch stick with the rate of reduction proportional to stick position such that at maximum deflection it should take around 2s to slow to a stop. Position is held when the speed drops below 0.5m/s.
Fixed wing
The flight direction is controlled directly with ROLL stick as usual or with the YAW stick which provides a smoother way to adjust the flight direction.
The rate either platform will turn in COURSE HOLD or CRUISE is set by nav_cruise_yaw_rate. It will adjust the yaw rate at full stick deflection.
If the mode is enabled in conjunction with NAV ALTHOLD the current altitude will also be maintained, essentially making it CRUISE mode. Altitude can be adjusted as usual, via the pitch stick for a fixed wing or the throttle stick for a multirotor. ANGLE mode is automatically activated so the craft will auto level and the heading will also be held on both platforms.
NAV CRUISE - Course Hold + Altitude Hold
Equivalent to the combination of NAV COURSE HOLD and NAV ALTHOLD described above.
RTH - Return to home
RTH will attempt to bring your model back to the arming or Safehome location. RTH will control both position and altitude. It is activated by RTH flight mode.
[!Note] Even though the FAILSAFE flight mode will also bring your aircraft back to the home location. It is NOT recommended to use it for this purpose, and can cause undesirable results under some conditions. FAILSAFE mode is only designed to simulate whether return to home will work correctly, if your radio signal is lost.
MultiCopter
With the default settings, if the Copter is farther than 10 meters from the arming location or a Safehome, it will climb according to the setting nav_rth_climb_first and then fly home.
Once within 1 meters of the arming location or Safehome. The copter will attempt to land, according to the setting nav_rth_allow_landing = ALWAYS. And control the descent speed via the nav_land settings. Once on the ground, landing will be detected and it will disarm.
FixedWing
A fixedwing uses the same setting to return to home as a copter. But it may be advisable to set nav_rth_allow_landing = NEVER or FS instead, if you do not have fixed wing auto land configured. This will allow the airplane to loiter around the arming or safehome location until you exit the RTH mode and take-over control again.
Landing detector settings
The operation of the landing detector disarming functions can be found here.
There are many different RTH fly-home altitude modes, see the RTH mode page for details.
WP - Autonomous waypoint mission
Autonomous waypoint missions allow the craft to fly a predefined sequence of mission waypoints. The mission waypoints include information about the type of waypoint, latitude, longitude, height and speed between the waypoints as well as other settings that control the behaviour during a mission. GUIs such as INAV Configurator Mission Control, MWP Tools, EZ-GUI, Mission Planner for INAV, Mobile Flight and can be used to set the waypoints and upload the mission as well as store missions locally for reuse. Uploaded missions are saved in FC volatile memory until a reboot or a new uploaded mission overwrites the old one. Missions can also be saved to EEPROM non volatile memory which retains the mission after power off/reboot.
When waypoint mode is activated (using a switch as other modes), the quad/plane will start to fly the waypoint mission following the waypoints in numerical order. Waypoint missions can be interrupted during a mission by switching NAV WP off (Manual mode on a fixed wing or RTH will also interrupt a WP mission). Up to INAV 4.0 WP missions always start from the first WP. From INAV 4.0 it is possible to resume an interrupted mission from an intermediate WP using the nav_wp_mission_restart setting.
Up to 30 waypoints can be set on F1 boards. On F3 boards and better 60 waypoints are available. This is increased to 120 waypoints from INAV 4.0.
There is an additional wiki page further describing way point missions, tools and telemetry options.
The MSP navigation message protocol documentation describes optional parameters affecting WP behaviour.
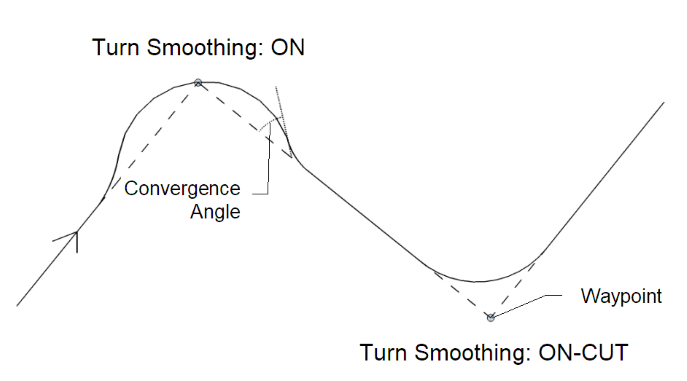
Fixed Wing Waypoint Tracking Accuracy and Turn Smoothing
Waypoint tracking accuracy forces the craft to quickly head toward and track along the waypoint course line as closely as possible. 2 settings control the alignment behaviour. nav_fw_wp_tracking_accuracy adjusts the stability of the alignment. Higher values dampen the response reducing possible overshoot and oscillation. nav_fw_wp_tracking_max_angle sets the maximum alignment convergence angle to the waypoint course line (see below). This is the maximum angle allowed during alignment and in reality will only be acheived when some distance away from the course line with the angle reducing as the craft gets closer to alignment. Lower values result in smoother alignment with the course line but a greater distance along the course line will be required until this is achieved.
Turn Smoothing helps to smooth turns during WP missions by switching to a loiter turn at waypoints with the turn initiated slightly before the waypoint is actually reached. This helps to avoid the overshoot often seen on tighter turns. The nav_fw_wp_turn_smoothing setting provides 2 options as shown below.
(Available from INAV 6.0)
[!NOTE] Besides the waypoint track angle and accuracy settings, there are other setting that will influence the turn accuracy of a fixedwing aircraft in a Waypoint mission, RTH Trackback or Loiter. It may also be beneficial to adjust these setting for windy conditions or for flying a tighter mission course. These setting can be found in the Advanced Tuning Tab or the CLI.
- nav_wp_radius - A lower value can be beneficial, however a value around 600 (6m) will allow the plane to commence the turn earlier on a tail wind leg. With less likelihood of it being pushed past or overshooting the turn.
- nav_fw_bank_angle - A higher bank angle will allow a sharper turn. Helping the plane to pull through the corner faster. Practical responsive values are between 45° to 55°.
- nav_fw_control_smoothness - Lower values can produce a more abrupt banking motion. But will also allow the plane to react faster to navigation course and heading commands.
- nav_use_fw_yaw_control - If your plane has a form of yaw control e.g. Rudder or Differential Thrust. This setting allows the plane to yaw as well as bank when making a turn. Therefore a lower
nav_fw_bank_angle(35°) should be used, for a flatter turn. - nav_fw_cruise_thr - Waypoint overshoot is more likely to occur if the plane is holding a higher velocity, especially if it is traveling on a down-wind or lateral leg before the turn. Tuning this setting so your plane will hold an airspeed between 50 - 70km/h, is ideal.
Multi-Missions
Multi-missions allows up to 9 missions to be stored in the FC at the same time. It works with missions saved to and loaded from EEPROM rather than missions loaded into the FC by other means. It requires the OSD MISSION INFO field be enabled in order to select loaded missions.
Multi-missions can be planned in Configurator Mission Control or MWP Tools and saved to/loaded from the FC as normal. It is also possible to load them into the FC using the CLI.
The OSD MISSION INFO field will display the total number of missions loaded on power up. The required mission can be selected either by using the CMS MISSIONS menu or by using the roll stick to change the mission number in the MISSION INFO field. MISSION INFO will display the mission waypoint count if the current mission number is loaded or 'LOAD' if it isn't. To load a mission use the Mission load stick command. It is also possible to change missions in flight using adjustment function Multi mission Index Adjustment or by selecting MISSION CHANGE mode. The mission index is changed in MISSION CHANGE mode using the WP mode switch to cycle through the available missions. The newly selected mission becomes active when either the adjustment function or MISSION CHANGE mode is deselected.
Selecting mission numbers 1 to 9 will load missions saved in EEPROM. Mission selection behaviour changed slightly with INAV 6.0 as follows:
Pre INAV 6.0
It is possible to select Mission number 0 which appears in the MISSION INFO field as "WP CNT". This shows the current active WP count loaded in FC volatile memory and changes depending on the Arm state. When disarmed with a mission loaded it shows the total number of WPs for all missions stored in EEPROM. After arming and until another mission is loaded on disarm it displays the number of WPs in the loaded mission. "WP CNT" will also display the waypoint count for missions loaded to the FC from a source other than EEPROM, e.g. via telemetry. When less than 2 missions are loaded in the FC EEPROM mission numbers can only be selected using the CMS MISSIONS menu.
From INAV 6.0
Only mission numbers 1 - 9 can be selected and "WP CNT" only appears if a mission has been loaded from a source other than EEPROM. Also waypoint count now only shows the number of WPs in the selected mission.
The only limitation with multi missions relates to single WP RTH missions. There seems little purpose in such a mission but if used it must be saved as mission number 1 (if saved at any other position it will truncate loading of other missions beyond that number).
WP PLANNER - On the fly waypoint mission planner
WP PLANNER mode allows a mission to be planned "on the fly" simply by moving the craft to a desired location and saving a waypoint at that point then repeating for further waypoints until the mission is complete.
The OSD MISSION INFO field must be enabled and WP mode must be off before WP PLANNER mode can be used.
When WP PLANNER mode is selected MISSION INFO will display SAVE. To save a waypoint at the current location, just operate the WP Mode switch. MISSION INFO will display OK if the waypoint was saved and the WP count will increment. WP Mode must be set to off before another waypoint can be saved (OK will change back to SAVE). MISSION INFO will show WAIT if position data isn't valid. e.g. no GPS lock, or FULL if all available waypoints have been used.
The mission can be run at any time by turning WP PLANNER mode off and selecting WP mode as usual. In this case the MISSION INFO field will display PLAN indicating a WP PLANNER mission is currently active.
The mission can be reset if setting nav_mission_planner_reset is ON and the WP PLANNER Mode switch toggled ON-OFF-ON (resets WP count to 0). It is possible to save the mission to the FC EEPROM on disarm in the usual way, e.g. by using the Save WP Mission stick command.
It should be noted that unlike other Nav modes WP PLANNER will work when disarmed. It should also be noted that it saves the WP altitude using the sea level datum so if a WP is set with the craft on the ground it will use ground level as the WP altitude regardless of the subsequent takeoff location.
GCS_NAV - Ground control station
This mode is just an permission for GCS to change position hold coordinates and the altitude. So it's not a flight mode itself, and needs to be combined with other flight modes.
In order to let the GCS have full control over the aircraft, e.g. 'follow me', the following modes must be activated: NAV POSHOLD with GCS_NAV. In order to update the home position, no other mode is required.
-
For more details.
-
There is a companion wiki page further describing way point missions, tools and telemetry options here.
GPS loss during navigation
Loss of GPS during navigation will have the following affect on the different modes:
- RTH and WP: Emergency landing triggered. Switching the modes off will stop the emergency landing allowing the craft to be flown manually.
- CRUISE/COURSE HOLD: Heading hold no longer maintained (Altitude hold only maintained during CRUISE if ALTHOLD mode set independently).
- POSHOLD: Falls back to forced ANGLE mode.
- ALTHOLD mode should still work normally if a barometer is available.
However a Fixedwing can continue to run a WP mission or RTH, if the GNSS fix is lost. Setup requirements and limitations of operation are found here GPS Fix estimation - Dead Reckoning.
Emergency Landing
An emergency landing will be triggered during WP and RTH modes if navigation sensors fail or in the case of RTH if the craft heads off in the wrong direction.
It is also possible to manually trigger an emergency landing at any time using MULTIFUNCTION mode or by using POSHOLD mode. To trigger using POSHOLD mode rapidly toggle the mode ON/OFF at least 5 times. Repeat this action to cancel the emergency landing once started.
Mode switch diagram
A diagram to indicate flight modes relation to navigation modes and illustrate sensor requirements:

Advanced CLI Commands
See the Navigation Dev Docs for advanced CLI Commands.