Getting Started with HydraBus flash and use hydrafw on windows - hydrabus/hydrafw GitHub Wiki
Flash and use hydrafw on Windows
Prerequisites for Windows:
- Putty Terminal or other terminal to communicate with HydraBus board through USB called USB communications device class (or USB CDC).
- Download the latest release (.zip archive example build_HydraFW.xxx.zip): https://github.com/hydrabus/hydrafw/releases
- Optionally you can also build the firmware from source code see https://github.com/hydrabus/hydrafw/blob/master/README.md
Flash hydrafw on Windows:
1) PowerOff HydraBus board (disconnect all USB)
2) Keep pressing UBTN button at PowerON/RESET in order to enter USB DFU (you do not need any jumper wire)
Note: You can also do that step with an HydraNFC connected on Top (or any other official shield)
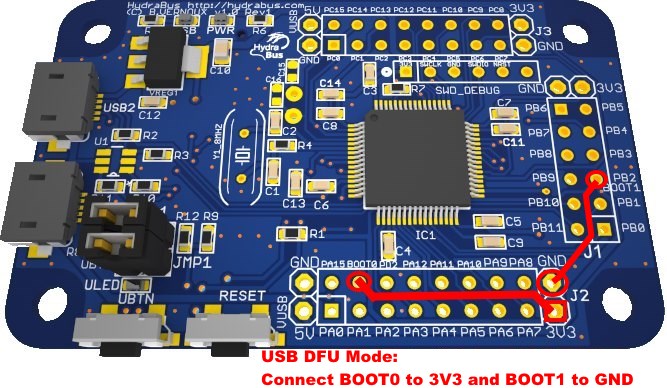
If you have some problems to enter USB DFU remove all wires/extension connected (on J1/J2/J3) and connect BOOT0 & BOOT1 like described hereafter(it works on any revision of HydraBus Board).
For very old HydraBus Board v1.0 Rev1 with HydraFW < v0.5 (those boards are not sold anymore since years) do this step
2) Connect HydraBus pins "BOOT0 to 3V3" & "BOOT1 to GND" (using two dual female splittable jumper wire) to enter USB DFU (this step is not required for HydraBus v1.0 Rev1.1/Rev1.2 or more)
3) Connect MicroUsb cable (USB Type-C cable for HydraBus v1.0 Rev1.5 or more) from PC to HydraBus USB1 board, now windows shall detect a new device
Note: USB DFU is working only on HydraBus USB1 (USB2 cannot be used for that)
If windows have problem to detect the device use an External USB1.1 or 2.0 Hub as there is problem with USB3.0 port/internal USB Hub on some computer and windows version.
4) Install the USB DFU driver
- Download and Extract archive STSW-STM32080 from URL: http://www.st.com/web/catalog/tools/FM147/CL1794/SC961/SS1533/PF257916
- When archive STSW-STM32080 is extracted follow readme.txt (in root dir) to install USB DFU driver and other tools.
- By default Windows DFU USB Driver are available in
C:\Program Files (x86)\STMicroelectronics\Software\DfuSe v3.0.6\Bin\Driver- Install the version for your computer
- Example for
Windows 10 64bitsexecuteC:\Program Files (x86)\STMicroelectronics\Software\DfuSe v3.0.6\Bin\Driver\Win10\dpinst_amd64.exe
- By default Windows DFU USB Driver are available in
5) go into the utils\windows_dfu_util folder and run update_fw_usb_dfu_hydrafw.bat (will flash latest firmware during about 10s)
Before this step you shall build the firmware or extract a prebuilt firmware from https://github.com/hydrabus/hydrafw/releases example build_HydraFW.xxx.zip and extract it in root of hydrafw in order to have build directory with all prebuilt files in it.
Steps to build the firmware are available in https://github.com/hydrabus/hydrafw
Note: If you have error to update the firmware, change USB port or try with an External USB 2.0 Hub as there is sometimes problems with some USB2.0/USB3.0 ports, then retry this step.
6) Disconnect USB cable from HydraBus (disconnect also jumper wire "BOOT0 to 3V3" and "BOOT1 to GND" if they was previously connected)
7) Reconnect USB cable on USB1 or USB2(both port are supported), Now hydrafw is started (ULED shall blink)
Important: Since firmware release HydraFW v0.10 Windows 8.1 and 10 automatically use the standard usbser.sys USB driver, so no any driver shall be manually installed for more details see https://github.com/hydrabus/hydrafw/commit/44d5d0962d7e6ab6edbc50a3a93e37a1e3409576
When hydrafw is running and connected on a Windows XP, Vista, 7, 8 you need to install HydraBus Virtual COM Port Driver (only the first time) from: https://github.com/hydrabus/hydrafw/tree/master/utils/windows_usb_driver
- Also depending on Windows system especially Windows 8 it is required to disable signed driver else install of USB CDC driver is impossible.
- Step by step tutorial to disable signed driver on Windows 8: https://learn.sparkfun.com/tutorials/disabling-driver-signature-on-windows-8/disabling-signed-driver-enforcement-on-windows-8
- Retry to install USB CDC driver (from https://github.com/hydrabus/hydrafw/tree/master/utils/windows_usb_driver)
- You can follow this tutorial to explain how to install USB CDC Driver on Windows https://startingelectronics.org/articles/atmel-ARM/SAM-BA-USB-CDC-driver-install/ thanks to choose https://github.com/hydrabus/hydrafw/tree/master/utils/windows_usb_driver
- Note: You shall have only one file hydrabus_usb_cdc.inf in its own directory windows_usb_driver before to install the driver (the best is to clone https://github.com/hydrabus/hydrafw/tree/master/utils/windows_usb_driver directory)
Using HydraBus with Putty Terminal on Windows:
- In order to communicate with HydraBus (Through USB Virtual COM Port), I recommend the use of Putty Terminal
- HydraFW commands are described in wiki https://github.com/hydrabus/hydrafw/wiki/HydraFW-console-commands