Getting Started with HydraBus flash and use hydrafw on linux - hydrabus/hydrafw GitHub Wiki
Flash and use hydrafw on Linux
Prerequisites for Linux:
Download, build & install dfu-util:
cd ~
rm -rf ~/dfu-util
git clone git://git.code.sf.net/p/dfu-util/dfu-util dfu-util
cd ~/dfu-util
./autogen.sh
./configure
sudo make install
Download and extract hydrafw build release:
export hydrafw_build_name=build_HydraFW_v0.11-1-g4d74500_HydraBus_HydraNFC
export hydrafw_build_name_ext="$hydrafw_build_name".zip
export hydrafw_build_url=https://github.com/hydrabus/hydrafw/releases/download/v0.11/$hydrafw_build_name_ext
rm -rf ~/hydrafw
rm -rf ~/$hydrafw_build_name
rm -rf ~/$hydrafw_build_name_ext

cd ~
wget $hydrafw_build_url
unzip $hydrafw_build_name_ext -d hydrafw
mv $hydrafw_build_name hydrafw
wget https://raw.githubusercontent.com/hydrabus/hydrafw/master/utils/udev-rules/09-hydrabus.rules -O ~/hydrafw/09-hydrabus.rules
Alternative way is to build yourself hydrafw see https://github.com/hydrabus/hydrafw/wiki/how-to-build-flash-and-use-hydrafw-on-linux
Flash hydrafw on Linux:
Before to execute those steps you shall Build the firmware or Download and extract hydrafw build release.
1) PowerOff HydraBus board (disconnect all USB)
2) Keep pressing UBTN button at PowerON/RESET in order to enter USB DFU (you do not need any jumper wire)
Note: You can also do that step with an HydraNFC connected on Top (or any other official shield)
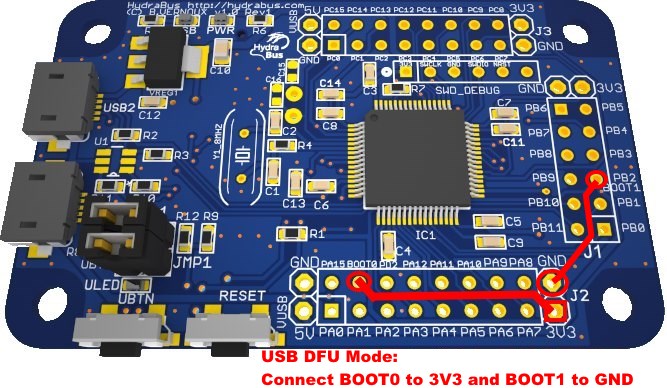
If you have some problems to enter USB DFU remove all wires/extension connected (on J1/J2/J3) and connect BOOT0 & BOOT1 like described hereafter(it works on any revision of HydraBus Board).
For very old HydraBus Board v1.0 Rev1 with HydraFW < v0.5 (those boards are not sold anymore since years) do this step
2) Connect HydraBus pins "BOOT0 to 3V3" & "BOOT1 to GND" (using two dual female splittable jumper wire) to enter USB DFU (this step is not required for HydraBus v1.0 Rev1.1/Rev1.2 or more)
3) Connect MicroUsb cable (USB Type-C cable for HydraBus v1.0 Rev1.5 or more) from PC to HydraBus USB1 board
Note: USB DFU is working only on HydraBus USB1 (USB2 cannot be used for that)
If Linux have problem to detect the device use an External USB1.1 or 2.0 Hub as there is problem with USB3.0 port on some computer.
4) Check Linux detect HydraBus in DFU mode, execute command:**
sudo dfu-util -l
Note It shall returns something like:
dfu-util 0.8

Copyright 2005-2009 Weston Schmidt, Harald Welte and OpenMoko Inc.
Copyright 2010-2014 Tormod Volden and Stefan Schmidt
This program is Free Software and has ABSOLUTELY NO WARRANTY
Please report bugs to [email protected]

Found DFU: [0483:df11] ver=2200, devnum=4, cfg=1, intf=0, alt=3, name="@Device Feature/0xFFFF0000/01*004 e", serial="385636783233"
Found DFU: [0483:df11] ver=2200, devnum=4, cfg=1, intf=0, alt=2, name="@OTP Memory /0x1FFF7800/01*512 e,01*016 e", serial="385636783233"
Found DFU: [0483:df11] ver=2200, devnum=4, cfg=1, intf=0, alt=1, name="@Option Bytes  /0x1FFFC000/01*016 e", serial="385636783233"
Found DFU: [0483:df11] ver=2200, devnum=4, cfg=1, intf=0, alt=0, name="@Internal Flash  /0x08000000/04*016Kg,01*064Kg,07*128Kg", serial="385636783233"
5) Flash hydrafw, execute command:
cd ~/hydrafw
sudo dfu-util -i 0 -a 0 -d 0483:df11 -D ./build/hydrafw.dfu
Note It shall returns something like:
dfu-util 0.8

Copyright 2005-2009 Weston Schmidt, Harald Welte and OpenMoko Inc.
Copyright 2010-2014 Tormod Volden and Stefan Schmidt
This program is Free Software and has ABSOLUTELY NO WARRANTY
Please report bugs to [email protected]

Opening DFU capable USB device...
ID 0483:df11
Run-time device DFU version 011a
Claiming USB DFU Interface...
Setting Alternate Setting #0 ...
Determining device status: state = dfuERROR, status = 10
dfuERROR, clearing status
Determining device status: state = dfuIDLE, status = 0
dfuIDLE, continuing
DFU mode device DFU version 011a
Device returned transfer size 2048
DfuSe interface name: "Internal Flash  "
file contains 1 DFU images
parsing DFU image 1
image for alternate setting 0, (1 elements, total size = 132744)
parsing element 1, address = 0x08000000, size = 132736
Download	[=========================] 100%       132736 bytes
Download done.
done parsing DfuSe file
If Linux have problem to flash the device use an External USB1.1 or 2.0 Hub as there is problem with USB3.0 port on some computer.
6) Disconnect USB cable from HydraBus (disconnect also jumper wire "BOOT0 to 3V3" and "BOOT1 to GND" if they was previously connected)
7) Reconnect USB cable on USB1 or USB2(both port are supported), Now hydrafw is started (ULED shall blink)
Note: If you have error to update the firmware with dfu-util, change USB port or try with an External USB 2.0 Hub as there is sometimes problems with some USB2.0/USB3.0 ports, then retry dfu-util line.
Using HydraBus hydrafw with Debian/Ubuntu
Do not forget to add hydrabus rules to your linux distribution (shall be done only one time) in order to use /dev/ttyACM0 without needs to be root
sudo cp 09-hydrabus.rules /etc/udev/rules.d/09-hydrabus.rules
sudo udevadm trigger
Using HydraBus hydrafw with Arch Linux
See PR https://github.com/hydrabus/hydrafw/pull/151
See script https://github.com/hydrabus/hydrafw/blob/master/utils/udev-rules/09-hydrabus-arch_linux.rules
Using HydraBus hydrafw with WSL2 on Ubuntu
See https://learn.microsoft.com/en-us/windows/wsl/connect-usb
Using HydraBus with Putty Terminal on Ubuntu/Xubuntu...
sudo apt-get install putty
putty /dev/ttyACM0
Note: On some systems putty does not work fine so choose screen ...
Using HydraBus, alternative method using screen for Ubuntu/Debian...
sudo apt-get install screen
screen /dev/ttyACM0
If you have error to open the device add sudo
sudo screen /dev/ttyACM0
HydraFW commands are described in wiki https://github.com/hydrabus/hydrafw/wiki/HydraFW-commands
Documentation updated October 22, 2016 using system:
Laptop Asus N56VZ Intel Core i7-3630QM CPU 2.40GHz, 8GB DDR3
Tested on Ubuntu 14.04.3 LTS and Ubuntu 16.04.1 LTS
ModemManager Probing
If your system is using ModemManager you may have some conflicts because ModemManager will probe your device which commands like:
AT
AT+CMEE=1
To prevent that either you have to stop ModemManager daemon with:
systemctl stop ModemManager
or edit /lib/systemd/system/ModemManager.service and add the line
Environment="MM_FILTER_RULE_TTY_ACM_INTERFACE=0"
in the [Unit] section. Then restart the daemon:
systemctl daemon-reload
systemctl restart ModemManager