Getting Started with Azure CAF TLZ - htxsg/devXops GitHub Wiki
1. Introduction
This is a getting started guide to get your first CAF TLZ running in Azure.
1.1 What is Cloud Adoption Framework?
To put it simply, it is a collection of concepts, tools, methods, and guides on designing an entire environment in Azure for an organization. Read more.
1.2 CAF Enterprise-Scale Landing Zone
For a small-scale setup, we can jump into Azure and start creating our VNETs, subnets for our multi-tier networks, add on key vaults, incorporate some policies and continue to refractor as we grow. However, it can be a mess over time. Enterprise Scale Landing Zone is part of CAF, it let us design the enterprise environment structurally from the start. Read more.
1.3 CAF for Azure Terraform landing zones
CAF TLZ essentially turns the landing zone design into Terraform IaC (infra-as-code). Go to CAF Terraform Landingzones readme for the overview.

There are 3 components that CAF TLZ implements for terraform:
- CAF Terraform provider: the provider need to run CAF terraform modules.
- CAF Module: for provisioning of Azure resources in CAF landing zone.
- Enterprise-Scale Module: for provisioning of enterprise-scale landing zone architecture.
Recap: Terraform Modules allow us to group resources together, define input variables that are used to change needed resource configuration parameters, define output variables that other resources or modules can use. Modules are basically like files with exposed input and output variables that facilitate reuse.
1.4 Landing Zone Levels
Landing zones are divided into Levels to have clear segregation of responsibilities and minimize the impact of configuration errors. The levels are summarised below:
| Level | Description |
|---|---|
| Level 4 | Manage the deployment of application itsef |
| Level 3 | Manage deployment of application's landing zone e.g. AS cluster and WAF |
| Level 2 | Manage hub and spokes and shared services e.g. backup, DR, Azure monitor, patch management |
| Level 1 | Manages security and compliance e.g. RBAC, Policies,etc |
| Level 0 | Bootstrap, create subscriptions, terraform state repository for all levels, service principals and managed identities |
2. Prepare Your Environment
The deployment to Azure is handled by a CAF TLZ component called Rover. Essentially IaC code goes from Dev to Rover, then Rover deploys to Azure.
2.1 What is Rover?
Rover is a container image that contains the Terraform binary and scripts for deploying CAF LTZ to Azure. See it as a wrapper for provisioning terraform infrastructure and managing terraform state. In the CI/CD parlance, the Rover container is instantiated as a runner for the deployment job.
2.2 Developer Machine Pre-requsites
You need an Azure subscription and the following installed on your developer machine:
2.3 Remote Development in Containers
Visual Studio Code has a neat extension named Visual Studio Code Remote - Containers that allows one to run a Docker container as a development environment. We are going to use this extension to run the Rover container on your developer machine to push code to Azure.
Install this extension with the following steps:
- Run the Docker Desktop application to start Docker.
- Confirm Docker is running with the following command:
$ docker --version
Docker version 20.10.5, build 55c4c88
- Open Visual Studio Code
- Install the Remote - Containers extension

- Check installation - you will see a new green status bar item at the bottom left of VS Code.

The above steps are taken from VS Code Remote Containers Tutorial.
2.4 Launch Rover
- Clone the starter repository.
git clone https://github.com/Azure/caf-terraform-landingzones-starter.git
-
Launch VS Code. File -> Open -> caf-terraform-landingzones-starter
-
click on the bottom left green status bar; and in the palette opening on the top of Visual Studio Code Window, select
Open Folder in containerorReopen in container. It will take some time. Observe the output from the terminal, you should see the command prompt. Execute thelscommand:
vscode@beb28d39a9ef:/tf/caf$ ls
CHANGELOG.md        configuration  enterprise_scale  LICENSE    reference_implementations
CODE_OF_CONDUCT.md  documentation  landingzones      README.md
- Login to rover
vscode@beb28d39a9ef:/tf/caf$ rover login

  /$$$$$$   /$$$$$$  /$$$$$$$$       /$$$$$$$
 /$$__  $$ /$$__  $$| $$_____/      | $$__  $$
| $$  \__/| $$  \ $$| $$            | $$  \ $$  /$$$$$$  /$$    /$$/$$$$$$   /$$$$$$
| $$      | $$$$$$$$| $$$$$         | $$$$$$$/ /$$__  $$|  $$  /$$/$$__  $$ /$$__  $$
| $$      | $$__  $$| $$__/         | $$__  $$| $$  \ $$ \  $$/$$/ $$$$$$$$| $$  \__/
| $$    $$| $$  | $$| $$            | $$  \ $$| $$  | $$  \  $$$/| $$_____/| $$
|  $$$$$$/| $$  | $$| $$            | $$  | $$|  $$$$$$/   \  $/ |  $$$$$$$| $$
 \______/ |__/  |__/|__/            |__/  |__/ \______/     \_/   \_______/|__/


              version: aztfmod/rover:1.0.1-2106.3012

@calling verify_azure_session

Checking existing Azure session
WARNING: To sign in, use a web browser to open the page https://microsoft.com/devicelogin and enter the code SRTH094B2 to authenticate.
- Check your default Azure account:
vscode@beb28d39a9ef:/tf/caf$ az account show
{
  "environmentName": "AzureCloud",
  "homeTenantId": "xxxxx",
  "id": "xxxxx",
  "isDefault": true,
  "managedByTenants": [],
  "name": "Pay-As-You-Go",
  "state": "Enabled",
  "tenantId": "xxxx",
  "user": {
    "name": "xxxx",
    "type": "user"
  }
}
- If this is not the right subscription, modify it using the following command:
az account set -s <subscription_name_OR_GUID>
- You are now ready to deploy CAF TLZ in Azure.
3. Deploy Demo Environment
The CAF TLZ starter template comes with a Demo Environment. Perform the following steps to deploy Level 0-3 landing zones.
3.1 Set Environment Variable
export environment=demo
export caf_environment=contoso-demo
3.2 Level 0: Launchpad Landing Zone
- Execute the following command to deploy the L0 landing zone:
rover -lz /tf/caf/landingzones/caf_launchpad \
  -launchpad \
  -var-folder /tf/caf/configuration/${environment}/level0/launchpad \
  -parallelism 30 \
  -level level0 \
  -env ${caf_environment} \
  -a apply
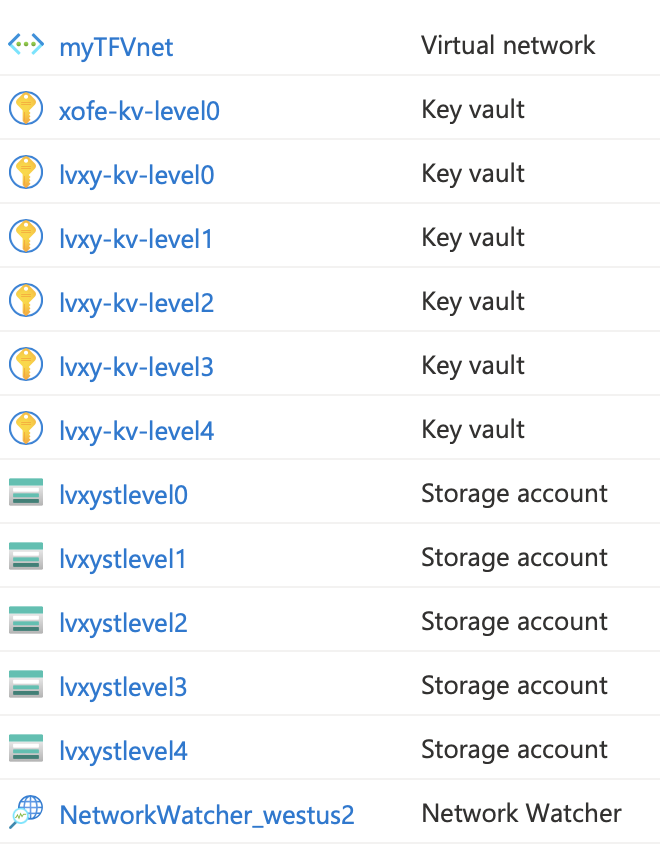
- Login to Azure portal to check what is deployed:

3.3 Level 1: Foundation Landing Zone
- Execute the following command to deploy the L1 landing zone:
rover -lz /tf/caf/landingzones/caf_solution/ \
  -tfstate caf_foundations.tfstate \
  -var-folder /tf/caf/configuration/${environment}/level1 \
  -parallelism 30 \
  -level level1 \
  -env ${caf_environment} \
  -a apply
- Login to Azure portal to check what is deployed:

3.4 Level 2 Landing Zone
- Deploy Shared Services:
rover -lz /tf/caf/landingzones/caf_solution/ \
  -tfstate caf_shared_services.tfstate \
  -var-folder /tf/caf/configuration/${environment}/level2/shared_services \
  -parallelism 30 \
  -level level2 \
  -env ${caf_environment} \
  -a apply
- Login to Azure portal to check what is deployed:

- Deploy the networking hub:
rover -lz /tf/caf/landingzones/caf_solution/ \
  -tfstate networking_hub.tfstate \
  -var-folder /tf/caf/configuration/${environment}/level2/networking/hub \
  -parallelism 30 \
  -level level2 \
  -env ${caf_environment} \
  -a apply
- Login to Azure portal to check what is deployed:

3.5 Level 3 Landing Zone
- Deploy an AKS landing zone:
rover -lz /tf/caf/landingzones/caf_solution/ \
  -tfstate landing_zone_aks.tfstate \
  -var-folder /tf/caf/configuration/${environment}/level3/aks \
  -parallelism 30 \
  -level level3 \
  -env ${caf_environment} \
  -a apply
- Login to Azure portal to check what is deployed:

Congrats! You have successfully deployed the Demo CAF TLZ.
4. Clean Up
Destroy what you have created.
- Destroy Level 3
rover -lz /tf/caf/landingzones/caf_solution/ \
  -tfstate landing_zone_aks.tfstate \
  -var-folder /tf/caf/configuration/${environment}/level3/aks \
  -parallelism 30 \
  -level level3 \
  -env ${caf_environment} \
  -a destroy
- Destroy Level 2
rover -lz /tf/caf/landingzones/caf_solution/ \
  -tfstate networking_hub.tfstate \
  -var-folder /tf/caf/configuration/${environment}/level2/networking/hub \
  -parallelism 30 \
  -level level2 \
  -env ${caf_environment} \
  -a destroy

rover -lz /tf/caf/landingzones/caf_solution/ \
  -tfstate caf_shared_services.tfstate \
  -var-folder /tf/caf/configuration/${environment}/level2/shared_services \
  -parallelism 30 \
  -level level2 \
  -env ${caf_environment} \
  -a destroy
- Destroy Level 1
rover -lz /tf/caf/landingzones/caf_solution/ \
  -tfstate caf_foundations.tfstate \
  -var-folder /tf/caf/configuration/${environment}/level1 \
  -parallelism 30 \
  -level level1 \
  -env ${caf_environment} \
  -a destroy
- Destroy Level 0
rover -lz /tf/caf/landingzones/caf_launchpad \
  -launchpad \
  -var-folder /tf/caf/configuration/${environment}/level0/launchpad \
  -parallelism 30 \
  -level level0 \
  -env ${caf_environment} \
  -a destroy
-
Go to Azure portal to delete any resource group that could be left dangling.
-
On VS Code, click on the bottom green status bar and select
Close Remote Connection.
5. Resources
GitHub Repo
- https://github.com/Azure/caf-terraform-landingzones
- https://github.com/Azure/caf-terraform-landingzones-starter
- https://github.com/aztfmod/terraform-azurerm-caf
Terraform Registry
- https://registry.terraform.io/modules/Azure/caf-enterprise-scale/azurerm/latest
- https://registry.terraform.io/modules/aztfmod/caf/azurerm/latest
Others