Disposal Issue Returns - hmislk/hmis GitHub Wiki
The Disposal Issue Return feature allows pharmacy staff to process returns for items that were previously issued for disposal. This typically happens when:
- Items issued for disposal are no longer needed
- Incorrect items were issued
- Quantities issued were more than required
- Patient situation changed and items need to be returned
The system tracks all returns and maintains proper stock levels and financial records.
Use the Disposal Return feature when:
- Items Not Used: Disposal items that were issued but not used need to be returned
- Excess Quantities: More items were issued than needed for disposal
- Wrong Items: Incorrect items were dispensed and need to be returned
- Patient Discharge: Patient discharged before using all disposal items
- Quality Issues: Items have quality concerns and need to be returned
- Click Menu in the top navigation
- Select Pharmacy
- Click Returns and Cancellations
- Navigate to the Disposal section
You will see several options:
- Disposal Issue Return - Create new disposal returns
- Disposal Return Finalize - Finalize pending return requests
- Disposal Return Approve - Approve finalized returns
- Completed Disposal Returns - View completed returns
- From the Disposal section, click Disposal Issue Return
- The system displays the Search Disposal Issue Bills page
- Use the search filters:
- From Date: Select the start date for your search
- To Date: Select the end date for your search
- Click Search to find disposal issue bills
- The system displays all matching disposal issue bills
Understanding Bill Status:
- Available (Green badge) - Can create returns for this bill
- Partially Returned (Yellow badge) - Some items already returned
- Fully Returned (Red badge) - All items returned, no more returns allowed
- Review the list of disposal issue bills showing:
- Issue Date
- Bill Number
- Patient Name
- From Department
- To Department
- Issue Value
- Status
- Click Create Return button next to the bill you want to process
- The system opens the Disposal Issue Return page with the bill details
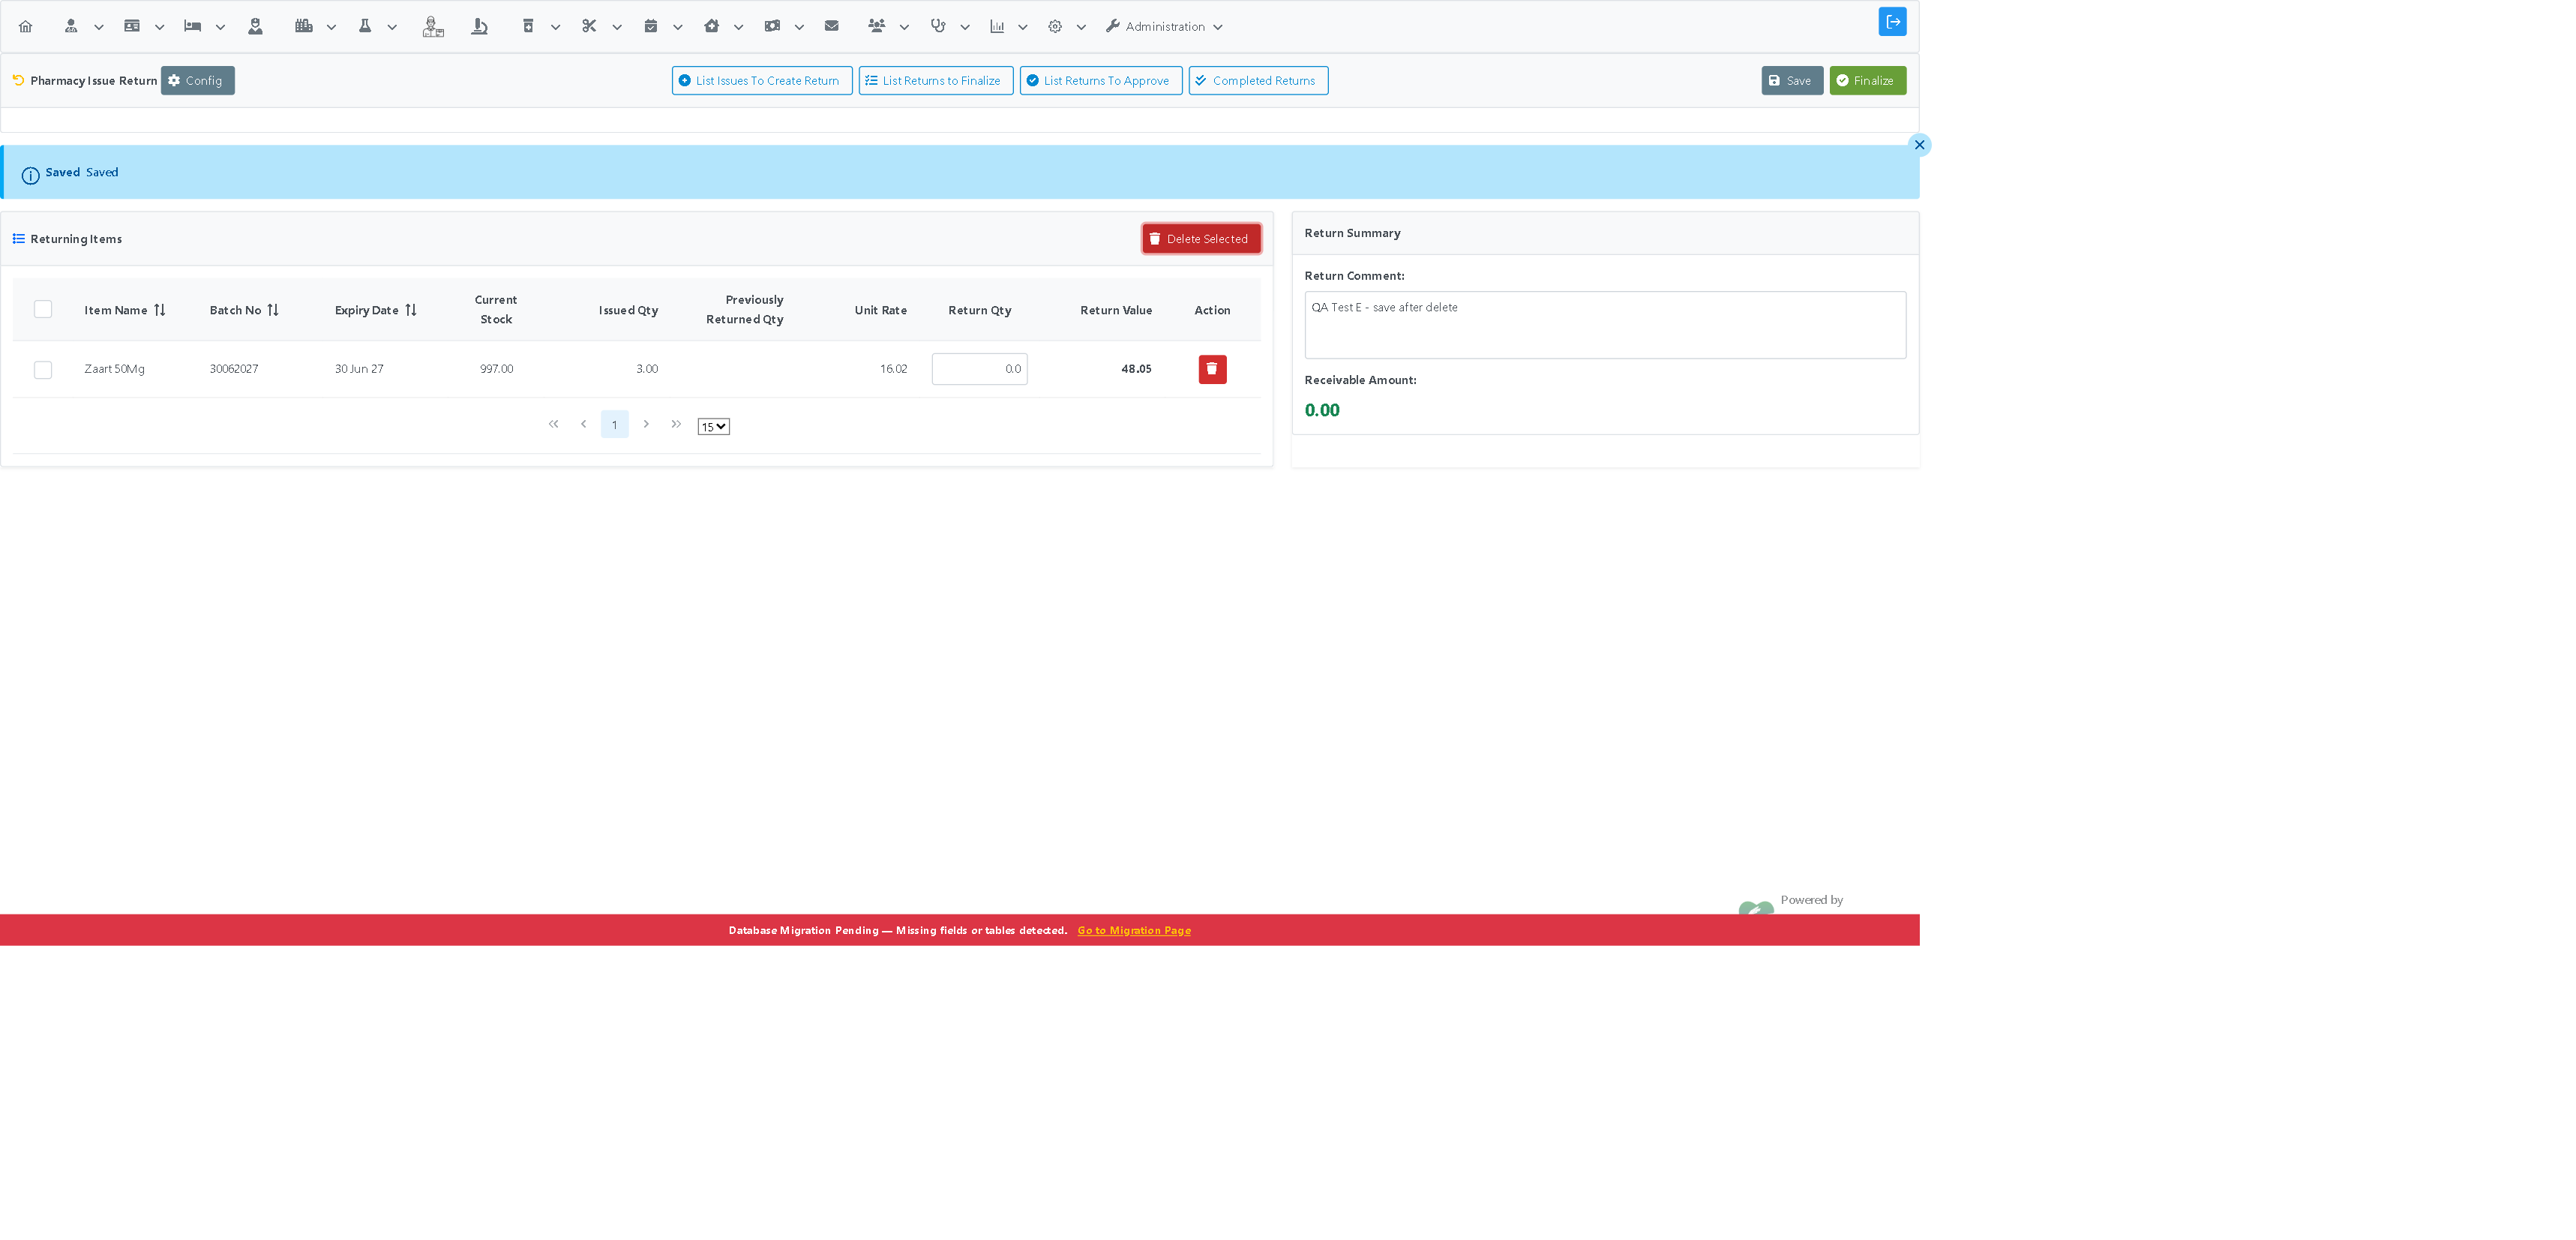
The return page displays all items from the original disposal issue:
-
Review the item details:
- Item Name: Medicine or supply name
- Batch No: Batch number of the item
- Expiry Date: When the item expires
- Current Stock: Available stock quantity
- Issued Qty: Originally issued quantity
- Previously Returned Qty: Already returned quantity
- Unit Rate: Cost per unit
-
For each item you want to return:
- Click in the Return Qty column
- Enter the quantity you are returning
- The system automatically calculates the Return Value
-
The system validates:
- You cannot return more than the remaining quantity
- You cannot return items already fully returned
- Quantities must be positive numbers
Important Validation Messages:
- "You can't return over than balanced Qty" - Attempted return exceeds available quantity
- "Return Quantity is Zero. Cannot Return" - No quantities entered for return
Sometimes you may need to remove items from the return — for example, if the wrong item was selected, or if you decide not to return certain items from the original disposal issue.
The return form provides two ways to delete items:
Method 1: Delete a Single Item (Row Delete)
Each item row has a Delete button (trash can icon ) in the Action column:
- Click the trash can icon on the row you want to remove
- A confirmation dialog appears: "Are you sure you want to delete this item?"
- Click Yes to confirm, or No to cancel
- After clicking Yes:
- The item is removed from the table immediately (no page reload — smooth AJAX update)
- The Receivable Amount total recalculates automatically
- A success message appears: "Item deleted successfully"
Method 2: Delete Multiple Items (Delete Selected)
Use this when you need to remove several items at once:
- Select items: Check the checkbox in the first column of each row you want to remove
- Click Delete Selected: Find the Delete Selected button (red button with trash icon ) above the table
- The confirmation dialog appears: "Are you sure you want to delete the selected items?"
- Click Yes to confirm
- After confirmation:
- All selected items disappear from the table
- The Receivable Amount total updates to reflect only remaining items
- Success message: "Selected items deleted successfully"
What Happens If No Items Are Selected
If you click Delete Selected without checking any checkboxes:
- An error message appears: "No items selected for deletion"
- No items are removed
- The table and totals remain unchanged
After Deleting Items
After removing items from the return:
- The deleted items do not reappear even if you refresh the page
- You can continue entering return quantities for the remaining items
- You can save the return as a draft (the deleted items are permanently removed from this return)
- You can delete additional items later even after saving multiple times
- If you delete all items, the table shows "No records found" and the Receivable Amount shows 0.00
Tip: If you accidentally delete the wrong items and haven't saved yet, you can close/abandon this return and start a new one from the original disposal issue bill. See Closing/Abandoning a Return below.
You have three options:
Option A: Save
- Click Save button
- Use this when you want to save your work and continue later
- You can save multiple times before finalizing
- The return is saved but not yet submitted for approval
- The system shows "Saved" message in green when successful
Option B: Finalize
- Click Finalize button
- Use this when you have completed entering all return quantities
- The return is submitted and ready for approval
- The system shows a print preview of the return bill
- You can print the return bill if needed
Option C: Authorize Return (Special Privilege Required)
- This button appears only if:
- The return has been finalized by another user
- You have approval privileges
- Click Authorize Return to complete the return process
- This updates stock and completes the transaction
System Messages:
- "Saved" - Draft saved successfully
- "Finalized" - Return submitted for approval
- "Successfully Returned" - Return completed and stock updated
If you need to close/cancel a return and start fresh:
Close a return when:
- You made mistakes and want to start over
- The return is no longer needed
- You want to create a different return for the same disposal issue
For Draft Returns (Not Yet Finalized):
- Go to Disposal Return Finalize page
- Search for your pending returns
- Find the return you want to close
- Click the Close button (red outlined button with X icon)
- Confirm the action when prompted
For Finalized Returns (Not Yet Approved):
- Go to Disposal Return Approve page
- Search for finalized returns
- Find the return you want to close
- Click the Close button (red outlined button with X icon)
- Confirm the action when prompted
Confirmation Dialog:
- Message: "Are you sure you want to close this disposal return?"
- Details: "This will allow creating a new return for the same bill."
- Click Yes to close or No to cancel
What Happens After Closing:
- ✅ Return is marked as "Closed"
- ✅ Shows with gray "Closed" badge and X icon
- ✅ You can now create a new return for the same disposal issue bill
- ✅ Closed return remains in system for audit trail
Important Restrictions:
- ✅ Can close: Draft returns (not finalized)
- ✅ Can close: Finalized returns (not yet approved)
- ❌ Cannot close: Completed/approved returns
- ❌ Cannot close: Already closed returns
Success Message: "Disposal return closed successfully. You can now create a new return for this bill."
If you saved a return as draft and want to finalize it later:
- From Returns and Cancellations menu
- Go to Disposal section
- Click Disposal Return Finalize
- Use search filters:
- From Date: Search start date
- To Date: Search end date
- Patient Name: Search by patient name (optional)
- Click Search Disposal Returns
The system displays pending returns showing:
- Created At: When the return was created
- Created By: User who created the return
- Patient: Patient name
- Return No: Return bill number
- Original Issue Bill: Original disposal issue bill number
- Department: Department handling the return
- Return Value: Total return amount
To finalize a return:
- Find the return you want to finalize
- Click the Finalize button
- The system opens the return for review and finalization
- Review the quantities
- Click Finalize to submit for approval
Status Indicators:
- Finalized (Green outlined) - Already finalized
- Cancelled - Return was cancelled
- Checked - Return has been verified
Users with approval privileges can approve finalized returns:
- From Returns and Cancellations menu
- Go to Disposal section
- Click Disposal Return Approve
- Use search filters:
- From Date: Search start date
- To Date: Search end date
- Patient Name: Search by patient name (optional)
- Click Search Disposal Returns
The system displays finalized returns showing:
- Finalized At: When it was finalized
- Finalized By: User who finalized
- Patient: Patient name
- Return No: Return bill number
- Original Issue Bill: Original issue bill number
- Department: Department
- Return Value: Total amount
To approve a return:
- Find the return to approve
- Click the Approve button
- Review the return details carefully
- Click Authorize Return to complete the approval
- The system updates stock and completes the transaction
Status Indicators:
- Approved (Green outlined) - Already approved
- Cancelled - Return was cancelled
- Approved with checkmark - Completed and approved
To view and reprint completed disposal returns:
- From Returns and Cancellations menu
- Go to Disposal section
- Click Completed Disposal Returns
- Use search filters:
- From Date: Search start date
- To Date: Search end date
- Patient Name: Search by patient name (optional)
- Click Search Completed Returns
The system displays completed returns showing:
- Completed At: When the return was approved
- Completed By: User who approved
- Patient: Patient name
- Return No: Return bill number
- Original Issue Bill: Original issue bill number
- Department: Department
- Return Value: Total return amount
To print a completed return:
- Find the return you need
- Click the Print button
- The system displays the return bill in print preview
- Click Print to send to printer
- Use Settings to change print format if needed (requires special privilege)
All disposal return pages have quick navigation buttons at the top:
- List Issues To Create Return - Start a new return
- List Returns to Finalize - View saved drafts
- List Returns To Approve - Approve pending returns
- Completed Returns - View finished returns
Click any button to quickly move between different stages of the return process.
| Message | Meaning | Action Required |
|---|---|---|
| "Saved" | Draft saved successfully | None - Continue editing or finalize later |
| "Finalized" | Return submitted for approval | None - Wait for approval or approve if you have privileges |
| "Successfully Returned" | Return completed and stock updated | None - Process complete |
| Message | Meaning | How to Fix |
|---|---|---|
| "Nothing selected" | No bill selected | Select a disposal issue bill before proceeding |
| "This disposal issue bill has been fully returned" | All items already returned | Cannot create more returns for this bill |
| "U can't return another department's Issue" | Wrong department | Log in to the correct department |
| "There is already a pending disposal return for this bill" | Duplicate return exists | Complete, approve, or close the existing return first |
| "Cannot close a completed disposal return" | Return already approved | Completed returns cannot be closed |
| "This disposal return is already closed" | Return already closed | Cannot close an already closed return |
| "You can't return over than balanced Qty" | Return quantity too high | Reduce the return quantity to remaining amount |
| "Return Quantity is Zero. Cannot Return" | No quantities entered | Enter at least one item quantity to return |
| "Please Finalize Bill First. Cannot Return" | Trying to authorize unfinalised return | Finalize the return first |
| "You are NOT authorized" | Insufficient privileges | Contact your administrator for access |
| "No items selected for deletion" | Clicked Delete Selected without checking any checkboxes | Check at least one item checkbox before clicking Delete Selected |
| "Selected items deleted successfully" | Items were deleted successfully | Continue with remaining items or save the return |
| "Are you sure you want to delete the selected items?" | Confirmation prompt before deletion | Click Yes to delete, No to keep items |
| "Are you sure you want to delete this item?" | Confirmation prompt for single item delete | Click Yes to delete, No to keep the item |
| Message | Meaning | Action |
|---|---|---|
| "Low Stock!" | Item stock is very low | Be aware of stock levels when returning |
| Partial returns exist | Some items already returned | Check previously returned quantities |
- Verify the Bill: Ensure you have the correct disposal issue bill
- Check Status: Confirm the bill is not fully returned
- Note Partial Returns: Review any previously returned quantities
- Confirm Department: Make sure you're in the correct department
- Verify Batch Numbers: Ensure items match the original batch
- Check Expiry Dates: Note expiry dates of returned items
- Count Carefully: Double-check physical quantities before entering
- Consider Stock Levels: Be aware of current stock when processing returns
- Document Reasons: Note why items are being returned (if required by your facility)
- Save Frequently: Use Save if you need to pause your work
- Review Before Finalizing: Double-check all quantities before finalizing
- Print Immediately: Print return bills right after finalization for records
- Track Return Numbers: Keep note of return bill numbers for reference
- Timely Approval: Approve returns promptly to maintain accurate stock levels
- Verify Physical Returns: Confirm items are physically returned before approving
- Check Quantities: Verify entered quantities match physical count
- Review Stock Impact: Consider how the return affects stock levels
- Investigate Patterns: Look for patterns if returns are frequent
- Document Issues: Note any quality or other issues with returned items
Problem: "Create Return" button is disabled or shows "Fully Returned"
Solutions:
- Check if the disposal issue has been fully returned already
- Verify you're viewing the correct disposal issue bill
- Check if there's a pending return for this bill
- Ensure the original issue was completed successfully
Problem: System shows validation errors when saving
Solutions:
- Verify all return quantities are valid numbers
- Ensure you're not returning more than the remaining quantity
- Check that at least one item has a return quantity
- Confirm you haven't exceeded the available stock
Problem: Finalize button doesn't work or shows errors
Solutions:
- Ensure all quantities are properly entered
- Verify no validation errors are showing
- Check that you have finalization privileges
- Make sure the return hasn't been finalized already
Problem: Authorize button is not visible or disabled
Solutions:
- Verify the return has been finalized first
- Check that you have approval privileges (ApproveDisposalReturn)
- Ensure the return hasn't been approved already
- Confirm you're in the correct department
Problem: Print preview doesn't display correctly
Solutions:
- Try refreshing the page
- Click Settings to select a different print format
- Ensure your browser allows pop-ups from the system
- Check with IT if print settings need adjustment
Problem: Delete Selected button doesn't remove items
Solutions:
- Ensure you have checked at least one item checkbox before clicking Delete Selected
- Click Yes on the confirmation dialog (clicking No cancels the operation)
- If the button shows "No items selected for deletion", check the checkboxes and try again
- If items remain after deletion, refresh the page and try again — if the problem persists, report to IT
Problem: Deleted items reappear after page refresh
Solutions:
- This may indicate a network or synchronization issue
- Check that you received a "Selected items deleted successfully" message
- If items consistently reappear, save the return first and then refresh
- Contact IT support if the issue continues
Administrators with special privileges can configure print formats:
- Click Settings button in print preview
- Select from available formats:
- A4 Paper Format - Standard A4 size receipt
- Custom Format 1 - Custom template design 1
- Custom Format 2 - Custom template design 2
- Click Apply & Close to save settings
| Task | Required Privilege |
|---|---|
| Create disposal returns | CreateDisposalReturn |
| Finalize returns | FinalizeDisposalReturn |
| Approve returns | ApproveDisposalReturn |
| View completed returns | ViewDisposalReturn |
| Change print formats | ChangeReceiptPrintingPaperTypes |
Contact your system administrator to request these privileges if needed.
No, once a return is finalized, you cannot edit it. If you need to make changes:
- Contact someone with approval privileges to review
- If not yet approved, it may need to be cancelled and recreated
- For approved returns, a new corrective return may be needed
When a return is approved:
- Stock levels are updated immediately
- Returned items are added back to the department's stock
- The original disposal issue bill is marked as having returns
- If all items are returned, the bill is marked as "Fully Returned"
No, each return must be for a single disposal issue bill. If you need to return items from multiple issues:
- Process each disposal issue separately
- Create individual returns for each original issue
Your facility may have policies about return timeframes. The system doesn't enforce a time limit, but:
- Earlier returns are better for stock accuracy
- Some items may have quality concerns if returned late
- Check with your supervisor for facility-specific guidelines
Once approved and completed:
- Returns cannot be reversed in the system directly
- Contact your supervisor or pharmacy manager
- A corrective transaction may need to be created
- Document the error for audit purposes
Yes, when viewing a disposal issue bill:
- Previously returned quantities are shown
- Partial return status is displayed
- You can see remaining quantities available to return
- Use the Completed Returns page to view all finished returns
Navigation buttons are shown based on your privileges:
- You only see buttons for features you have access to
- Contact your administrator if you need additional privileges
- Some buttons may be hidden in certain workflow states
- Pharmacy Navigation Guide - Complete pharmacy module navigation reference
- Disposal Issue Search - Finding disposal issue bills and items
- Pharmacy Disposal Issue - Creating original disposal issues
- Stock Management - Viewing and managing stock levels
- Reports - Generating disposal and return reports
- Audit Trail - Tracking all disposal and return transactions
If you encounter issues not covered in this guide:
- Check System Messages: Read error messages carefully for specific guidance
- Contact Supervisor: Your pharmacy supervisor can help with process questions
- IT Support: Contact IT for system access or technical issues
- Training: Request additional training if needed