Prepare self install tutorial - henrikstengaard/hstwb-installer GitHub Wiki
This tutorial describes step by step how to prepare self install to run in an emulator or on real Amiga.
Self install can be run in following ways:
- HstWB Installer Setup: Switch to test mode and run installer.
- Emulator: Start WinUAE, FS-UAE or similar Amiga emulator using an A1200 configuration with HDF files and/or directories added.
- Real Amiga: Use Write image to CF/SD card tutorial and skip to running self install.
Running self install has following prerequisites:
- Kickstart rom 3.1 or newer.
- Workbench 3.1 adf files or floppy disks.
HstWB Installer builds ready-made configurations for WinUAE and FS-UAE emulators when running install or self install mode. These are written in the configured image directory and are configured to use image harddrives, Workbench 3.1 adf and Kickstart rom directories as configured in HstWB Installer.
If the image is moved to a different directory or another computer, then Install UAE Config scripts can be used to update and install WinUAE and FS-UAE emulators configuration files. Configuration files can also be updated manually by updating Kickstart rom file and harddrive directories.
HstWB Installer writes following Install UAE Config scripts to image directory:
- install_uae_config.cmd.
- install_uae_config.command.
- install_uae_config.desktop.
- install_uae_config.ps1.
- install_uae_config.py.
- install_uae_config.sh.
- install_uae_config_patch_only.cmd.
- install_uae_config_patch_only.command.
- install_uae_config_patch_only.desktop.
- install_uae_config_patch_only.ps1.
- install_uae_config_patch_only.py.
- install_uae_config_patch_only.sh.
Windows users can use following Install UAE Config scripts:
- install_uae_config.cmd: Double-click from Windows Explorer or run from Command Prompt to patch and install WinUAE and FS-UAE configuration files.
- install_uae_config_patch_only.cmd: Double-click from Windows Explorer or run from Command Prompt to patch WinUAE and FS-UAE configuration files.
macOS users can use following Install UAE Config scripts:
- install_uae_config.command: Double-click from macOS Finder to patch and install FS-UAE configuration files.
- install_uae_config_patch_only.command: Double-click from macOS Finder to patch FS-UAE configuration files.
Ubuntu users can use following Install UAE Config scripts:
- install_uae_config.desktop: Double-click from Ubuntu Files to patch and install FS-UAE configuration files.
- install_uae_config_patch_only.desktop: Double-click from Ubuntu Files to patch FS-UAE configuration files.
Linux users can use following Install UAE Config scripts:
- install_uae_config.sh: Run from terminal to patch and install FS-UAE configuration files.
- install_uae_config_patch_only.sh: Run from terminal to patch FS-UAE configuration files.
WinUAE users can double click hstwb-installer.uae configuration file in image directory and click Start to start the image without having to install it in WinUAE configuration directory.
Installation of Workbench 3.1, Kickstart roms and Amiga OS 3.9 can be automated, when running self install in an emulator. This is required, if ready-made configuration files are not used.
Following harddrive directories can be configured for installation:
- WORKBENCHDIR: Harddrive directory with device name and volume label set to
WORKBENCHDIRto automate installation of Workbench 3.1 from adf files. - KICKSTARTDIR: Harddrive directory with device name and volume label set to
KICKSTARTDIRto automate installation of Kickstart roms for WHDLoad. - OS39DIR: Harddrive directory with device name and volume label set to
OS39DIRto automate installation of Amiga OS 3.9 from iso and Boing Bag 1 & 2 from lha files. - USERPACKAGESDIR: Harddrive directory with device name and volume label set to
USERPACKAGESDIRfor installation of user packages.
Installation of Workbench 3.1 can be automated by add a harddrive as directory in the emulator containing Workbench 3.1 adf files. The harddrive directory must have device name and volume label set to WORKBENCHDIR for self installation to detect and use it for installation.
Example of Cloanto Amiga Forever shared adf added as a directory with device name and volume label set to WORKBENCHDIR to automate installation of Workbench 3.1:

HstWB Installer supports following Workbench 3.1 adf files:
- Cloanto Amiga Forever 2016 & 7 Plus Edition or better.
- Dumps of original floppy disks.
Users with Cloanto Amiga Forever installed can use the directory c:\Users\Public\Documents\Amiga Files\Shared\adf, which contains following Workbench 3.1 adf files:
- amiga-os-310-extras.adf: Workbench 3.1 Extras Disk.
- amiga-os-310-fonts.adf: Workbench 3.1 Fonts Disk.
- amiga-os-310-install.adf: Workbench 3.1 Install Disk.
- amiga-os-310-locale.adf: Workbench 3.1 Locale Disk.
- amiga-os-310-storage.adf: Workbench 3.1 Storage Disk.
- amiga-os-310-workbench.adf: Workbench 3.1 Workbench Disk.
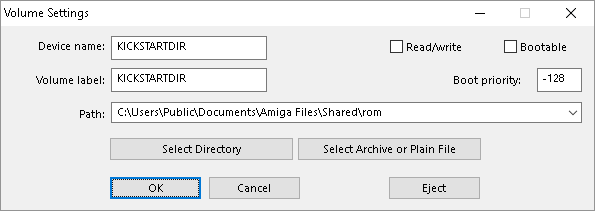
Installation of Kickstart roms for WHDLoad can be automated by add a harddrive as directory in the emulator containing Kickstart rom files. The harddrive directory must have device name and volume label set to KICKSTARTDIR for self installation to detect and use it for installation.
Example of Cloanto Amiga Forever shared rom added as a directory with device name and volume label set to KICKSTARTDIR to automate installation of Kickstart roms for WHDLoad:
HstWB Installer supports following Kickstart rom files:
- Cloanto Amiga Forever 2016 & 7 Plus Edition or better.
- Dumps of original Kickstart roms.
Users with Cloanto Amiga Forever installed can use the directory c:\Users\Public\Documents\Amiga Files\Shared\rom, which contains following Kickstart rom files:
- amiga-os-120.rom: Kickstart 1.2 (33.180) (A500) Rom.
- amiga-os-130.rom: Kickstart 1.3 (34.5) (A500) Rom.
- amiga-os-310-a600.rom: Kickstart 3.1 (40.063) (A600) Rom.
- amiga-os-310-a1200.rom: Kickstart 3.1 (40.068) (A1200) Rom.
- amiga-os-310-a4000.rom: Kickstart 3.1 (40.068) (A4000) Rom.
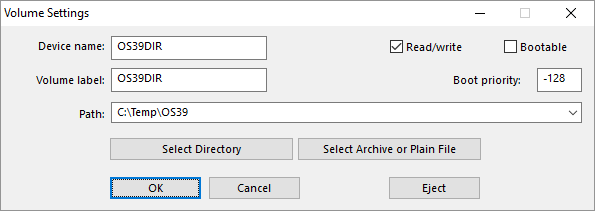
Installation of Amiga OS 3.9 can be automated by adding a harddrive as directory in the emulator containing Amiga OS 3.9 files. The harddrive directory must have device name and volume label set to OS39DIR for self installation to detect and use it for installation.
Configuring and installing Amiga OS 3.9 is optional and can be skipped, if Amiga Os 3.9 doesn't apply to the self install being prepared.
Example of C:\Temp\OS39 added as a directory with device name and volume label set to OS39DIR to automate installation of Amiga OS 3.9:
HstWB Installer supports following Amiga OS 3.9 files:
- Amiga OS 3.9 iso file created from Amiga OS 3.9 cd-rom.
- Boing Bag 1 and 2 lha files.
Amiga OS 3.9 files must have the following filenames (case insensitive):
- AmigaOS3.9.iso: Amiga OS 3.9 iso file for automated installation of Amiga OS 3.9.
- BoingBag39-1.lha: Boing Bag 1 for automated installation of Amiga OS 3.9.
- BoingBag39-2.lha: Boing Bag 2 for automated installation of Amiga OS 3.9.
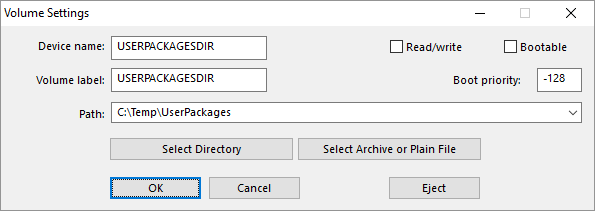
User packages can be installed by adding a harddrive as directory in the emulator containing user packages. The harddrive directory must have device name and volume label set to USERPACKAGESDIR for self installation to detect and use it for installation.
Configuring and installing user packages is optional and can be skipped, if user packages doesn't apply to the self install being prepared.
Example of C:\Temp\UserPackages added as a directory with device name and volume label set to USERPACKAGESDIR for installation of user packages:
HstWB Installer user packages supports installation of following:
- EAB WHDLoad Packs.
Support for EAB WHDLoad Packs installation is done with a script called Build EAB WHDLoad Install.
These scripts have been written in both Powershell and Python for cross platform support of Windows, macOS and Linux.
It finds .lha and lzx files for each EAB WHDLoad Pack directory in user packages directory e.g. "C:\Temp\UserPackages" and builds an install scripts supported by HstWB Installer user packages.
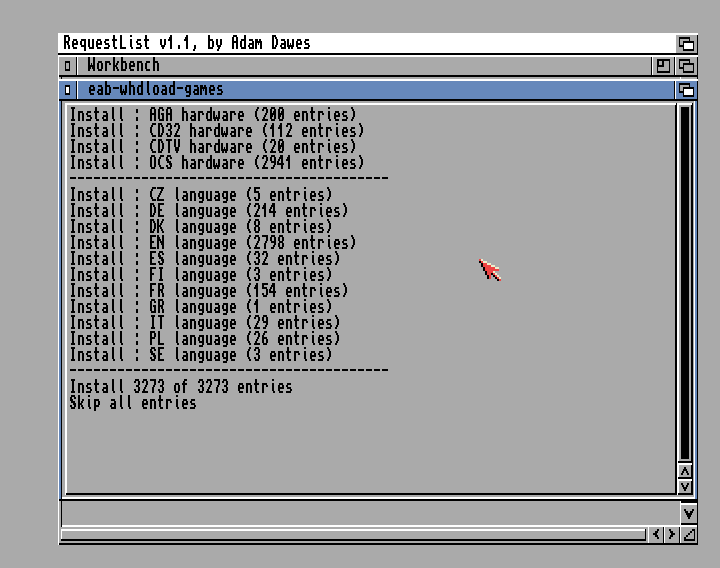
From the naming convention used in .lha and lzx filenames it detects hardware (AGA, CD32, CDTV, OCS), language (EN, DE, DE, IT, SE, PL, ES, CZ, DK, FI, GR, CV) and builds a menu to select which hardware and language versions to install. It also adds counts to indicate how many entries will be installed for selected hardwares and languages.
Example of eab-whdload-games menu shown when running self install or user package installation:
Download EAB WHDLoad Packs with following steps:
- Open a browser and search for "eab file server" to find ftp connection details on EAB forum page.
- Download and install FileZilla from https://filezilla-project.org or use similar ftp client.
- Start ftp client and connect to EAB file server using ftp connection details from EAB forum page. Limit the number of simultaneous connections to 1 due to restrictions on EAB file server otherwise it will return 530 errors.
- Change remote directory to "/Commodore_Amiga/Retroplay/".
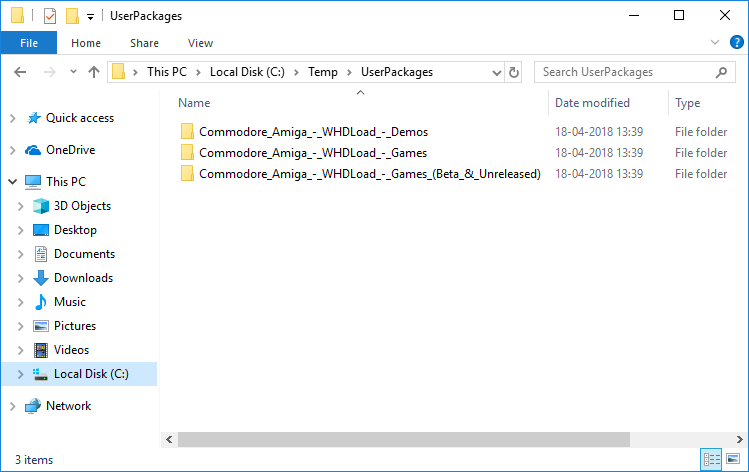
- Download remote directories to user packages directory e.g. "C:\Temp\UserPackages":
-
Commodore_Amiga_-_WHDLoad_-_Demos. -
Commodore_Amiga_-_WHDLoad_-_Games. -
Commodore_Amiga_-_WHDLoad_-_Games_(Beta_&_Unreleased).
-
Example of EAB WHDLoad Packs downloaded to user packages directory e.g. "C:\Temp\UserPackages":
To run Build EAB WHDLoad Install script, the downloaded EAB WHDLoad Packs needs to be prepared first.
Prepare Build EAB WHDLoad Install with following steps:
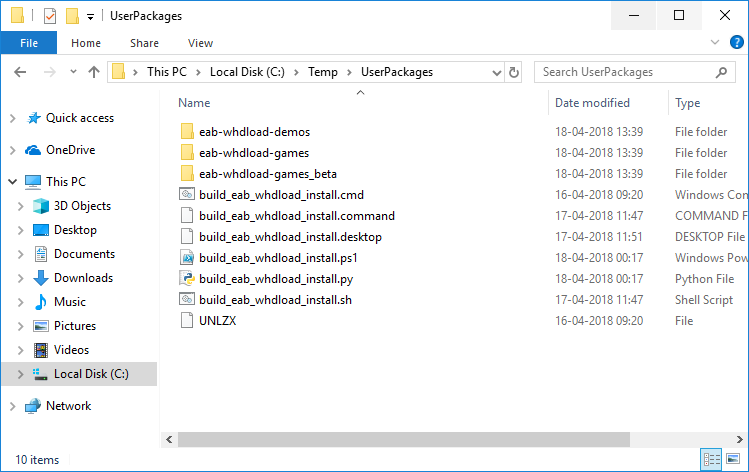
- Rename directories in user packages directory e.g. "C:\Temp\UserPackages":
-
Commodore_Amiga_-_WHDLoad_-_Demostoeab-whdload-demos. -
Commodore_Amiga_-_WHDLoad_-_Gamestoeab-whdload-games. -
Commodore_Amiga_-_WHDLoad_-_Games_(Beta_&_Unreleased)toeab-whdload-games_beta.
-
- Copy all files from HstWB Installer
Support\User Packagesto user packages directory e.g. "C:\Temp\UserPackages".
Example of EAB WHDLoad Packs prepared in user packages directory e.g. "C:\Temp\UserPackages":
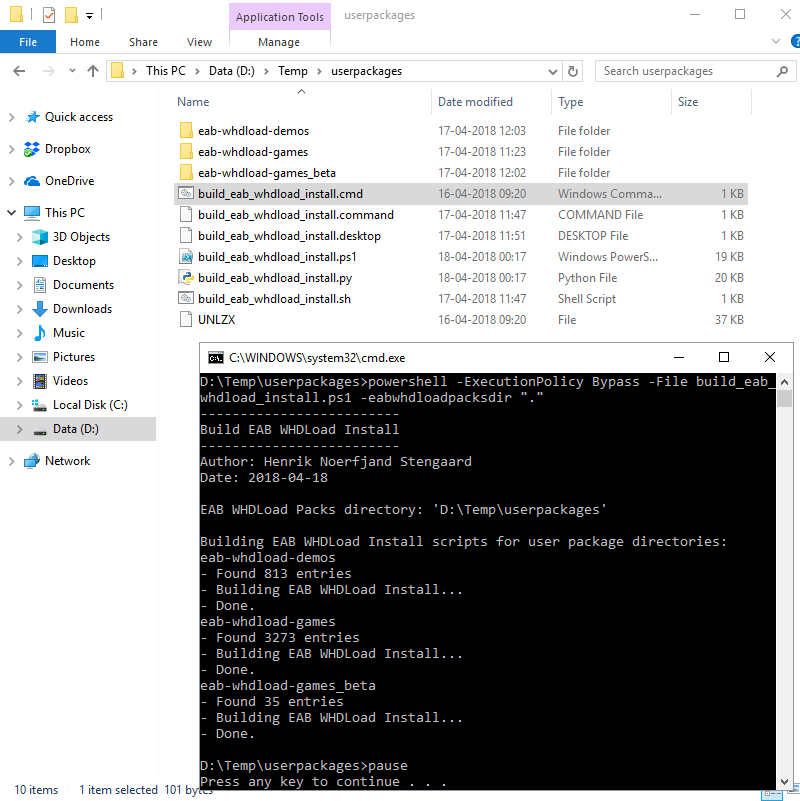
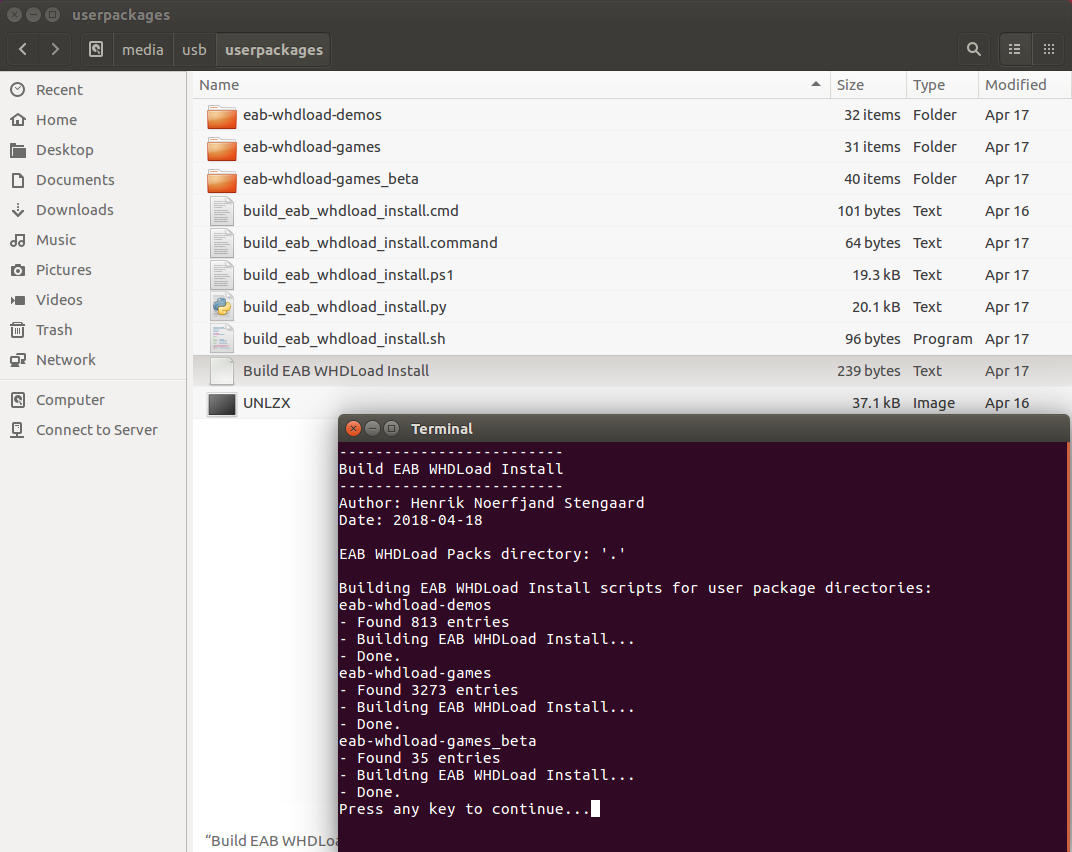
When EAB WHDLoad Packs have been prepared, run Build EAB WHDLoad Install script depending on platform used to prepare self install:
- Windows: Open user packages directory e.g. "C:\Temp\UserPackages" in Windows Explorer and double-click
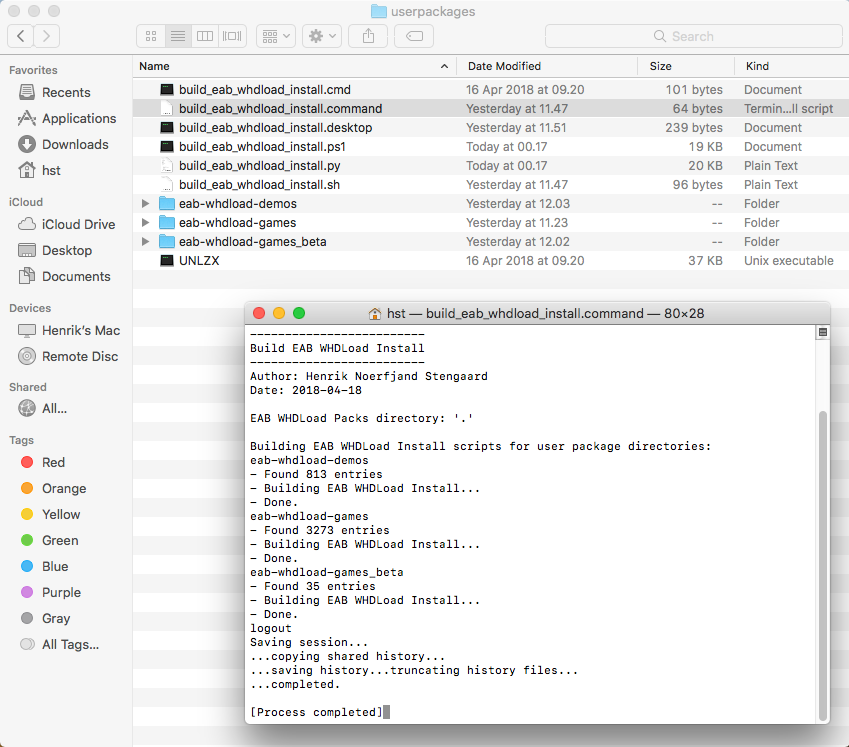
build_eab_whdload_install.cmd. - macOS: Open user packages directory e.g. "C:\Temp\UserPackages" in Finder and double-click
build_eab_whdload_install.command. - Ubuntu: Open user packages directory e.g. "/media/usb/userpackages" in Ubuntu Files and double-click
Build EAB WHDLoad Install. - Linux: Open terminal and change directory to user packages directory e.g. "/media/usb/userpackages" and type
./build_eab_whdload_install.shand press enter.
Example of running Build EAB WHDLoad Install script on Windows by double-clicking build_eab_whdload_install.cmd in Windows Explorer:
Example of running Build EAB WHDLoad Install script on macOS by double-clicking build_eab_whdload_install.command in Finder:
Example of running Build EAB WHDLoad Install script on Ubuntu by double-clicking Build EAB WHDLoad Install in Ubuntu Files:
1. Start WinUAE
Configure harddrive directories for WinUAE in following ways:
- Double-click "hstwb-installer.uae" configuration file in image directory to start WinUAE and configure harddrive directories.
- Use HstWB Installer in test mode with WinUAE emulator and press F12 after WinUAE is started to configure harddrive directories.
- Manually start WinUAE and use own configuration and configure harddrive directories.
2. Configure harddrive directories
Click "CD & Hard drives".
3. Add WORKBENCHDIR harddrive directory
Click "Add Directory or Archive".
Enter "WORKBENCHDIR" in device name and volume label textboxes.
Uncheck "Read/Write" and "Bootable" checkboxes.
Click "Select Directory" and select directory e.g. "c:\Users\Public\Documents\Amiga Files\Shared\adf" with Workbench 3.1 adf files.
Click "OK" to add the directory as a harddrive.
4. Add KICKSTARTDIR harddrive directory
Click "Add Directory or Archive".
Enter "KICKSTARTDIR" in device name and volume label textboxes.
Uncheck "Read/Write" and "Bootable" checkboxes.
Click "Select Directory" and select directory e.g. "c:\Users\Public\Documents\Amiga Files\Shared\rom" with Kickstart rom files.
Click "OK" to add the directory as a harddrive.
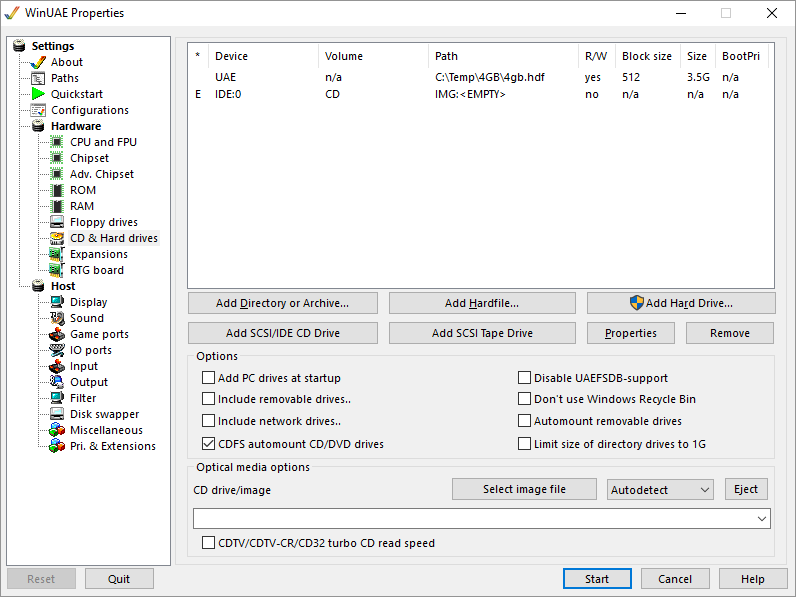
5. Add OS39DIR harddrive directory
Click "Add Directory or Archive".
Enter "OS39DIR" in device name and volume label textboxes.
Check "Read/Write" and uncheck "Bootable" checkboxes.
Read/Write must be checked as Amiga filedisk.device and AmiCDFS used for mounting iso file requires write access.
Click "Select Directory" and select directory e.g. "C:\Temp\OS39" with Amiga OS 3.9 files.
Click "OK" to add the directory as a harddrive.
6. Add USERPACKAGESDIR harddrive directory
Click "Add Directory or Archive".
Enter "USERPACKAGESDIR" in device name and volume label textboxes.
Uncheck "Read/Write" and "Bootable" checkboxes.
Click "Select Directory" and select directory e.g. "C:\Temp\UserPackages" with user packages.
Click "OK" to add the directory as a harddrive.
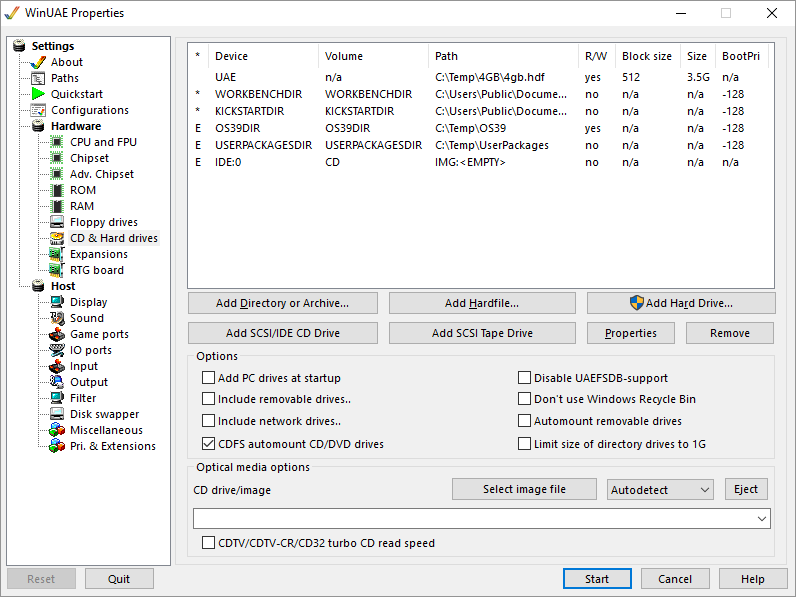
7. Verify configured harddrives
Verify WinUAE has image HDF files and/or directories added together with "WORKBENCHDIR", "KICKSTARTDIR", "OS39DIR" and "USERPACKAGESDIR" directory harddrives.
8. Reset WinUAE
Click "Reset" to reset WinUAE emulator, which will make self install detect added harddrive directories for automated installation.