How to Review Pull Requests - hackforla/website GitHub Wiki
| Supplementary Materials |
|---|
| The Do's and Don't's when Reviewing Pull Requests |
| Frequently Asked Questions |
| Checklist |
| Sample Feedback |
| Flowchart* |
| Documentation/Useful Links |
Hi! Before we begin, allow me to thank you for taking your time to read this document! Pull requests are the heart and soul of the Hack for LA website project. By reviewing them, you ensure that the hackforla website is always up-to-date and provides a bug-free experience for our visitors.
As a member of the website team, you are expected to review pull requests. If the phrase, "pull request", inspires apprehension, worry not! This guide will equip you with the confidence you need to succeed at reviewing your first, and all subsequent, pull requests.
When multiple collaborators –ahem– collaborate on a project, changes are constantly made. Because not all changes are desirable, the review process allows the team to intercept and assess changes before they are merged with the website.
The review process starts when a collaborator creates a pull request, a fancy word meaning, "I, the collaborator, have made changes, so please go over and approve them!". As a reviewer, your goal is to examine the website's appearance and source code following these changes. Specifically, you need to ensure the changes are: 1) applicable, 2) does not break the main website, and 3) clean (collectively know as the ABCs).
If the changes passes the ABC's, the pull request is approved for eventual merging with the website. Otherwise, you, as the reviewer, must leave feedback for the collaborator.
How to leave a comment or request changes
When changes fail to follow any of the ABC's, there are a couple of ways to leave feedback for the collaborator: leave a comment, request changes, or leave an inline comment. As required, all three can be done at once, but one will often suffice.
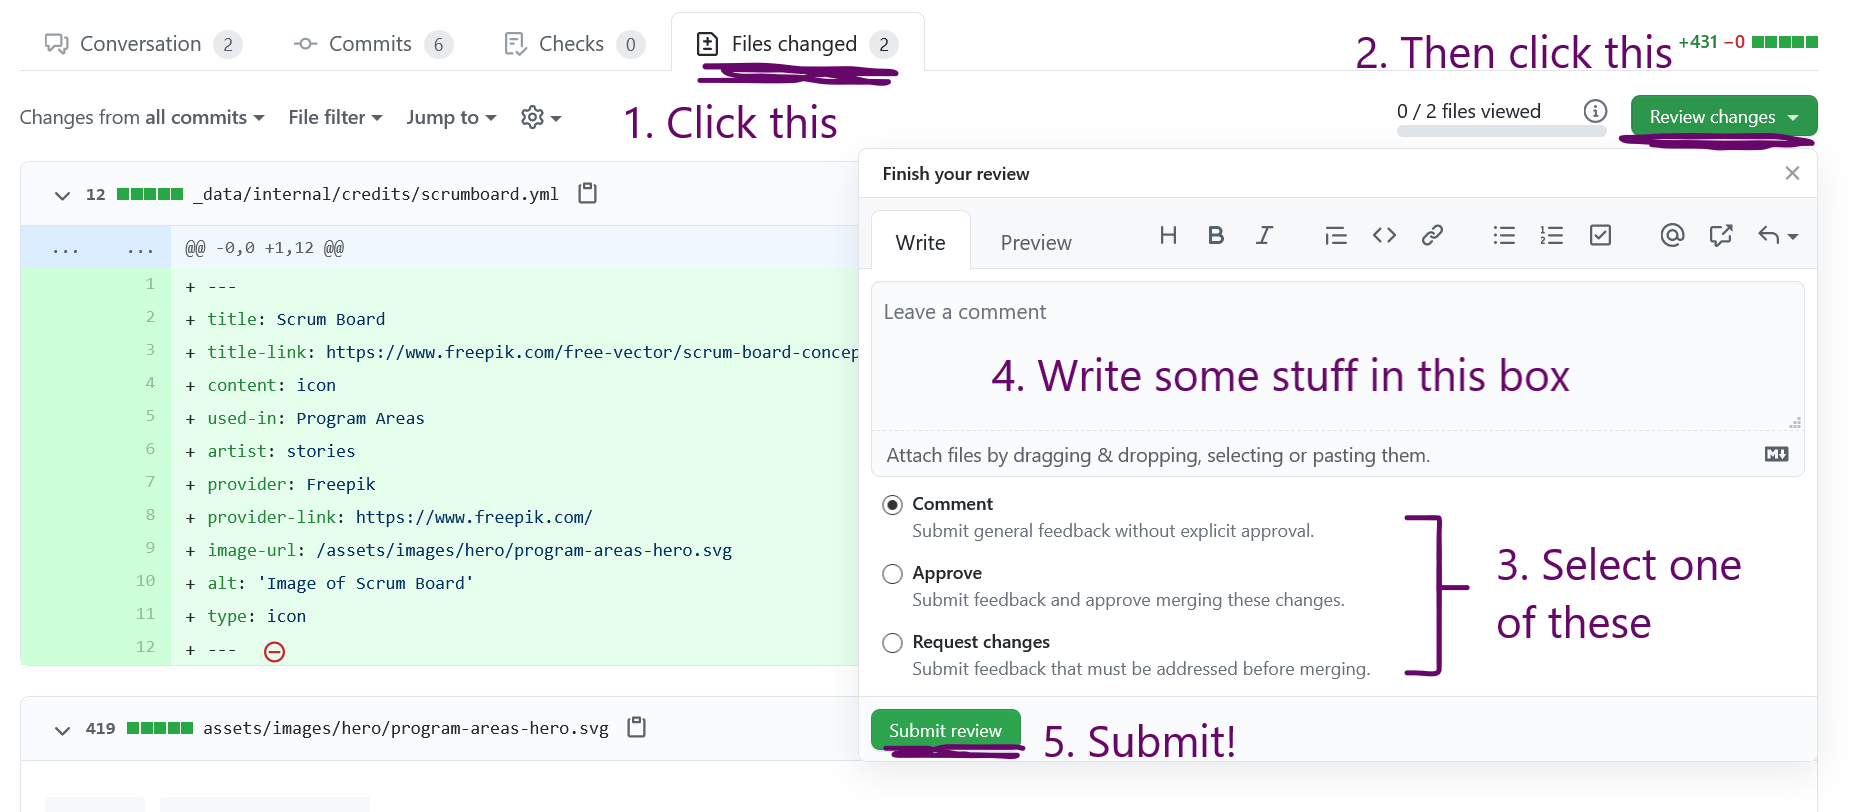
This is usually reserved for clarification purposes. To leave a comment, go to the Files changed tab, if not already there. Then click the green button labeled, "Review Changes". In the pop-up, leave a comment, and be sure to select the "Comment" radio button before you submit. You can also use the @ shortcut to notify others to your comment.
When changes fail at least one of the ABCs criteria, the best way to leave feedback is to request changes. As the name implies, when you request changes, you detail additional steps the collaborator must take before their changes passes the ABC's. To request changes from a collaborator, select the "Request Changes" radio button rather than "Comment" radio button. This flags the pull request, preventing merges until a reviewer approve the additional changes. When requesting changes, be sure that they are specific and actionable!
How to leave feedback directly on code changes

When leaving a comment or requesting changes, you also have the option of commenting directly on the source code, through Github's line comments feature. If you have the time, I would encourage you to use inline comments as often as possible as they improve communication between reviewer and collaborator and minimize development time.
- Do: Be specific when requesting changes. This helps the collaborator locate the necessary changes.
- Do: Be specific when giving praise. This reinforces excellence from one another and creates a positive environment. A "I like how readable your code is!" gives a lot more oxytocin than "Great job!"
- Do: Use language that you would use with a team member and a peer. That is, be courteous, be positive/encouraging, be clear, and be open/approachable.
- Do: Ask for input or help from other members of the team when relevant.
- Don't: Do the collaborator's work for them. Everyone is here to learn!
Pull requests for the website project can be found here: https://github.com/hackforla/website/pulls! When you are picking a pull request, the labels can help you decide which request to review. If this is your first review, pick a Good: First Issue before moving into Small, Medium, and Large.* That said, there is no wrong way to pick a pull request to review. The most important thing is to try your best!
After picking a pull request to review and assigning yourself as a reviewer, add your review ETA and availability. Type this into the text field as a comment, then click the Comment button. The following is a sample comment to be added by a reviewer:
Review ETA: 6 PM 3/4/22
Availability: 5-8 PM Monday
When you have added your review ETA and availability, continue to Step 0.
Parts of a pull request's branch

Before anything else, check that the pull request contains the correct branch. In other words, it must pass the following two checks:
- The commit into must be "hackforla:gh-pages"
- The commit from must be from the collaborator who opened the pulled request
If neither of the two criteria are met, then the collaborator might have made a mistake when making their pull request. Leave a comment stating that they have made the request with the incorrect branch and to redo the pull request with the correct branch.
Example of a linked issue
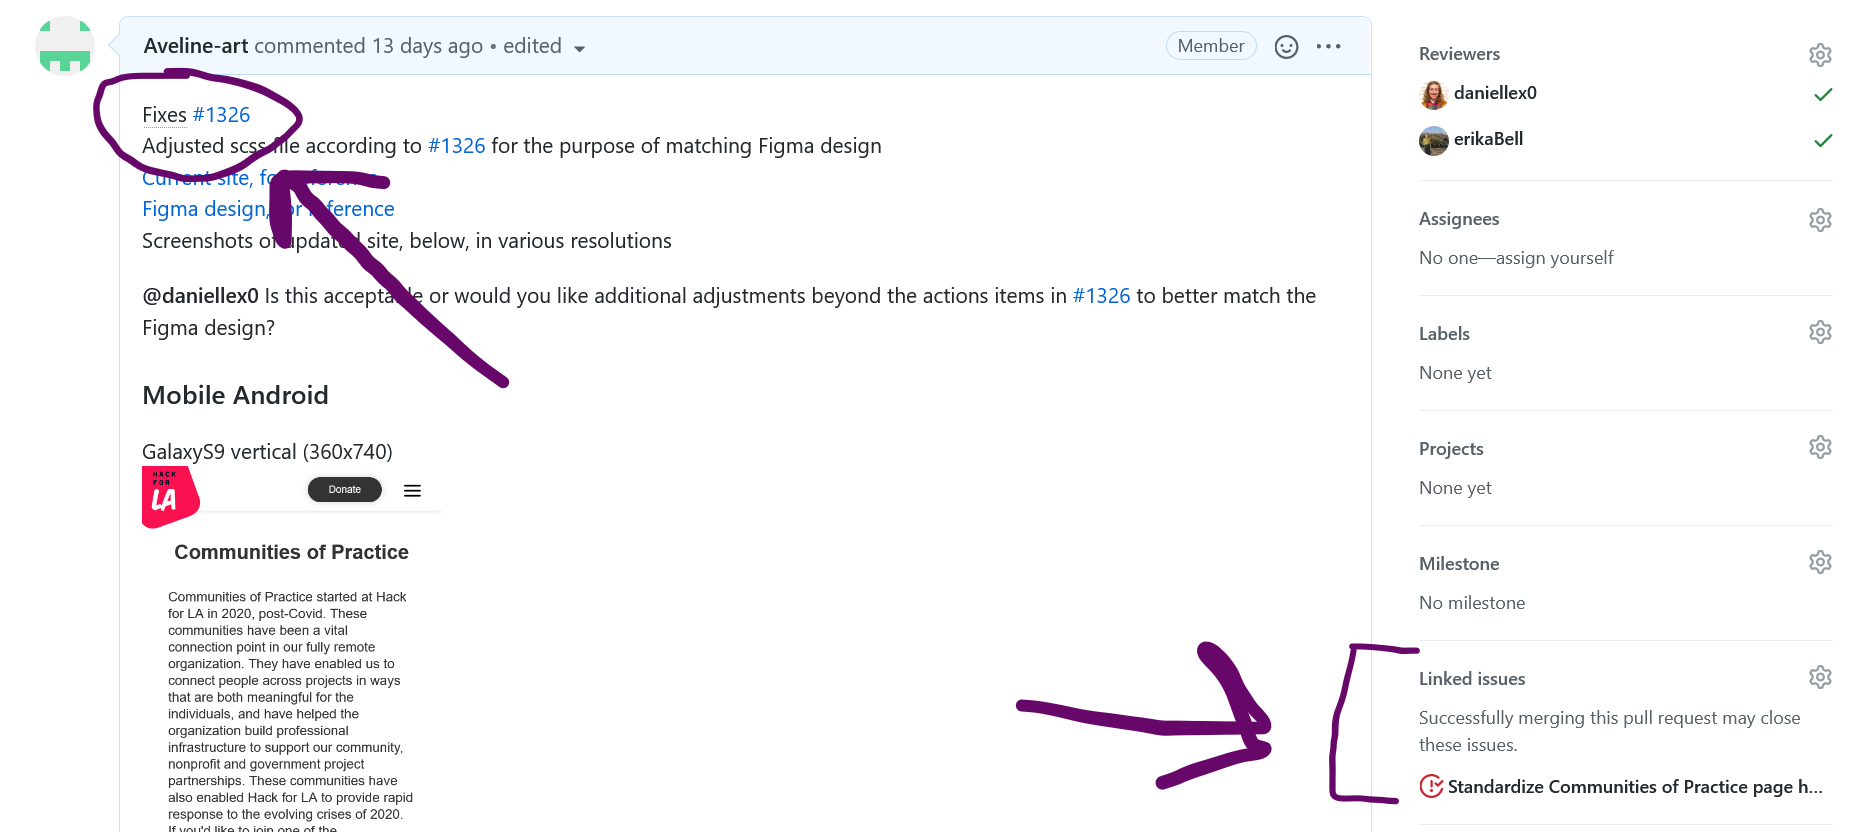
Every pull request comes with a post by the collaborator. Usually, a post contains: 1) a linked issue, 2) comments on the changes, and 3) screenshots of the changes. For this step, we will focus on the linked issue.
When a collaborator makes changes, they implement them based on issues with the website. These issues are outlined in a separate post called a linked issue. Therefore, the linked issue provides important context that frames the collaborator's changes. Without it, there would be no way to tell whether changes are applicable!
Linked issues are usually in a Word #number (or in regex: [A-Za-z]* #\d*) format. They always link to a different post. Here are some, but not all, examples of a properly-formatted linked issue: Fixes #940, Fixed #1151, Resolves #1326, Closes #1444.
If the linked issue is not in the correct format, the review can still proceed, but do leave a comment on how to properly add a linked issue. However, if the linked issue is missing, the review cannot proceed. Leave a comment for the collaborator to add a linked issue.
As an aside, we also ask that collaborators include before and after screenshots of their changes as part of the post. These images are there to help visualize the changes. If the images are not there, please gently remind the collaborator to include images before continuing with Step 2 of the review.
Example of an issue
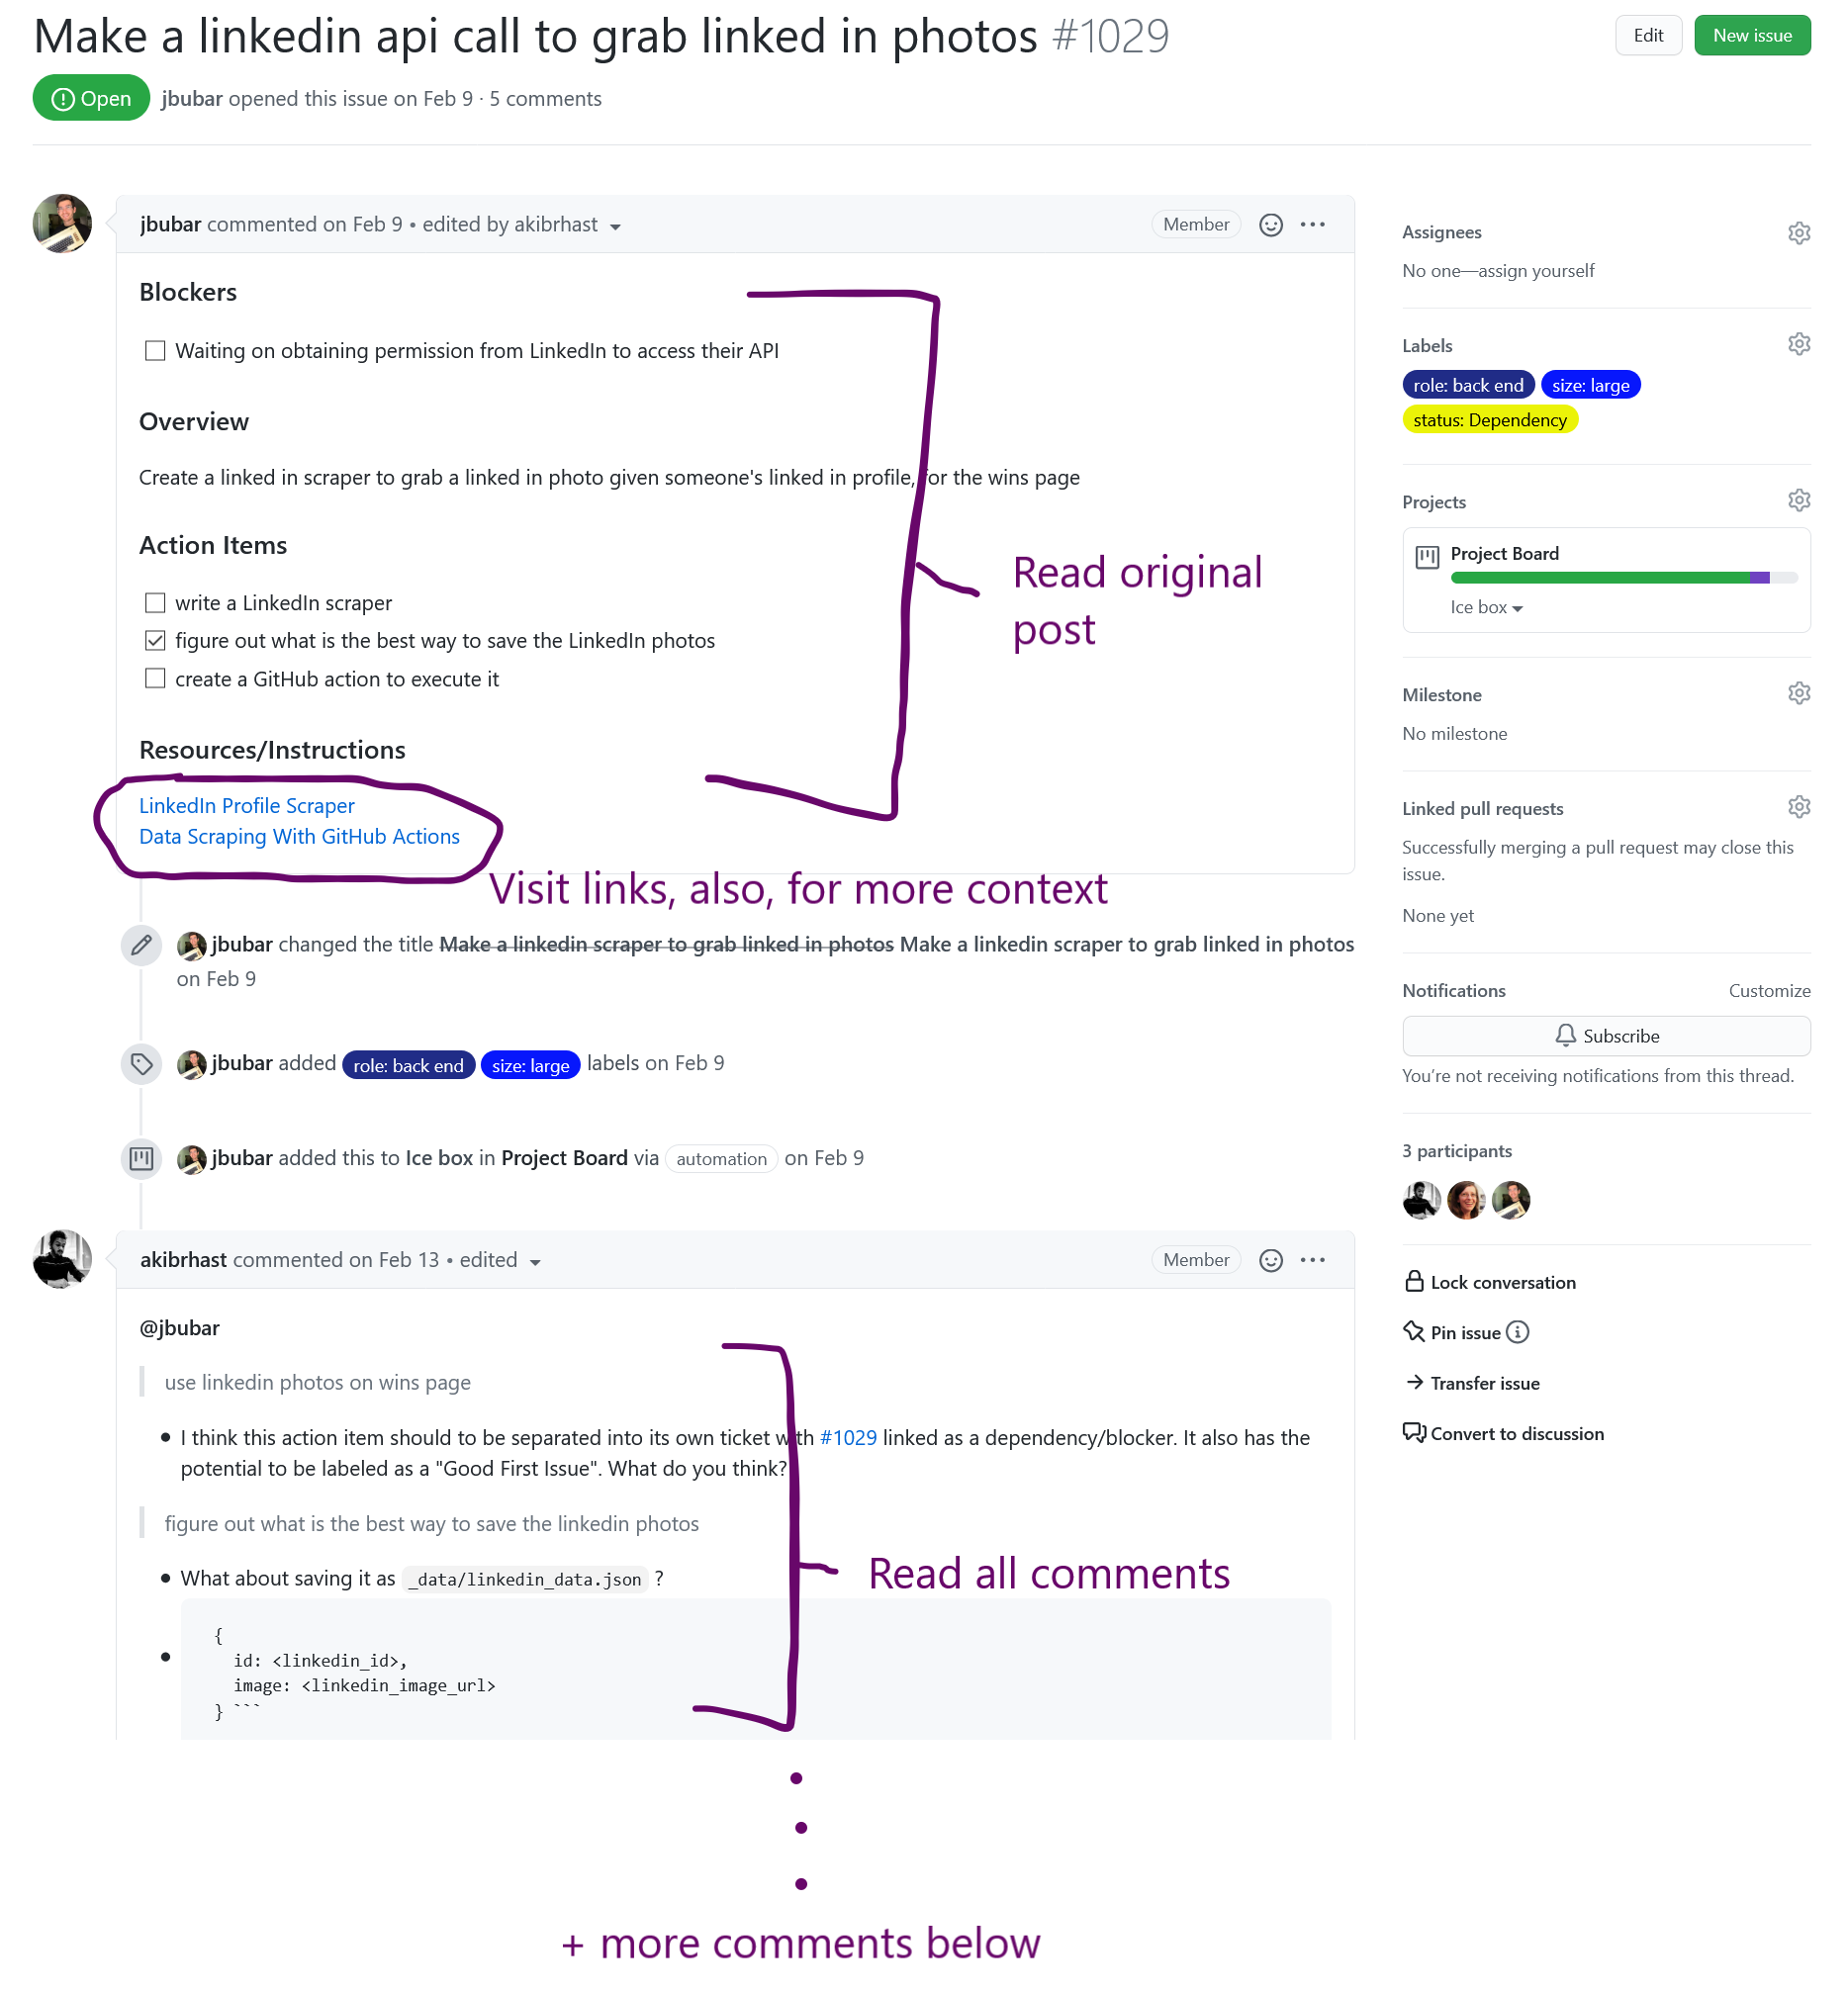
Before a reviewer can understand the collaborator's changes, they must first have an firm grasp on the linked issue. Visit the linked issue. Read the post and the comments below, visit all relevant links, and click on any dropdowns. Approach the issue with the goal of understanding the issue, so that, later, you may accurately assess the collaborator's changes.
A good way to test your understanding is to restate or summarize the issue in your own words (or to your rubber duck, if desired). This helps you find gaps in your knowledge and prevents you from blindly reviewing changes you might not firmly understand.
If after reading the linked issue, you find yourself confused, do not panic! This can arise from unclear wording, or unfamiliar jargon. At this point you have several options:
- Research some of the unclear terms on your own
- Consult the person who brought up the issue (through a comment or our slack)
- Or, call on someone with more expertise (such as the person who wrote the issue) to review the issue with you
The easiest way to view the collaborator's changes is to see them for yourself! Outlined below are steps to download the collaborator's branch into your own version of the website. Before creating a new branch in your repository, always sync your forked repo to the main repo. From your personal website fork on GitHub, click "Sync fork" at the right of the screen, then click "Update branch." You can also update your gh-pages branch by running git pull from the command line.
Example of how to sync your forked repo to the main repo

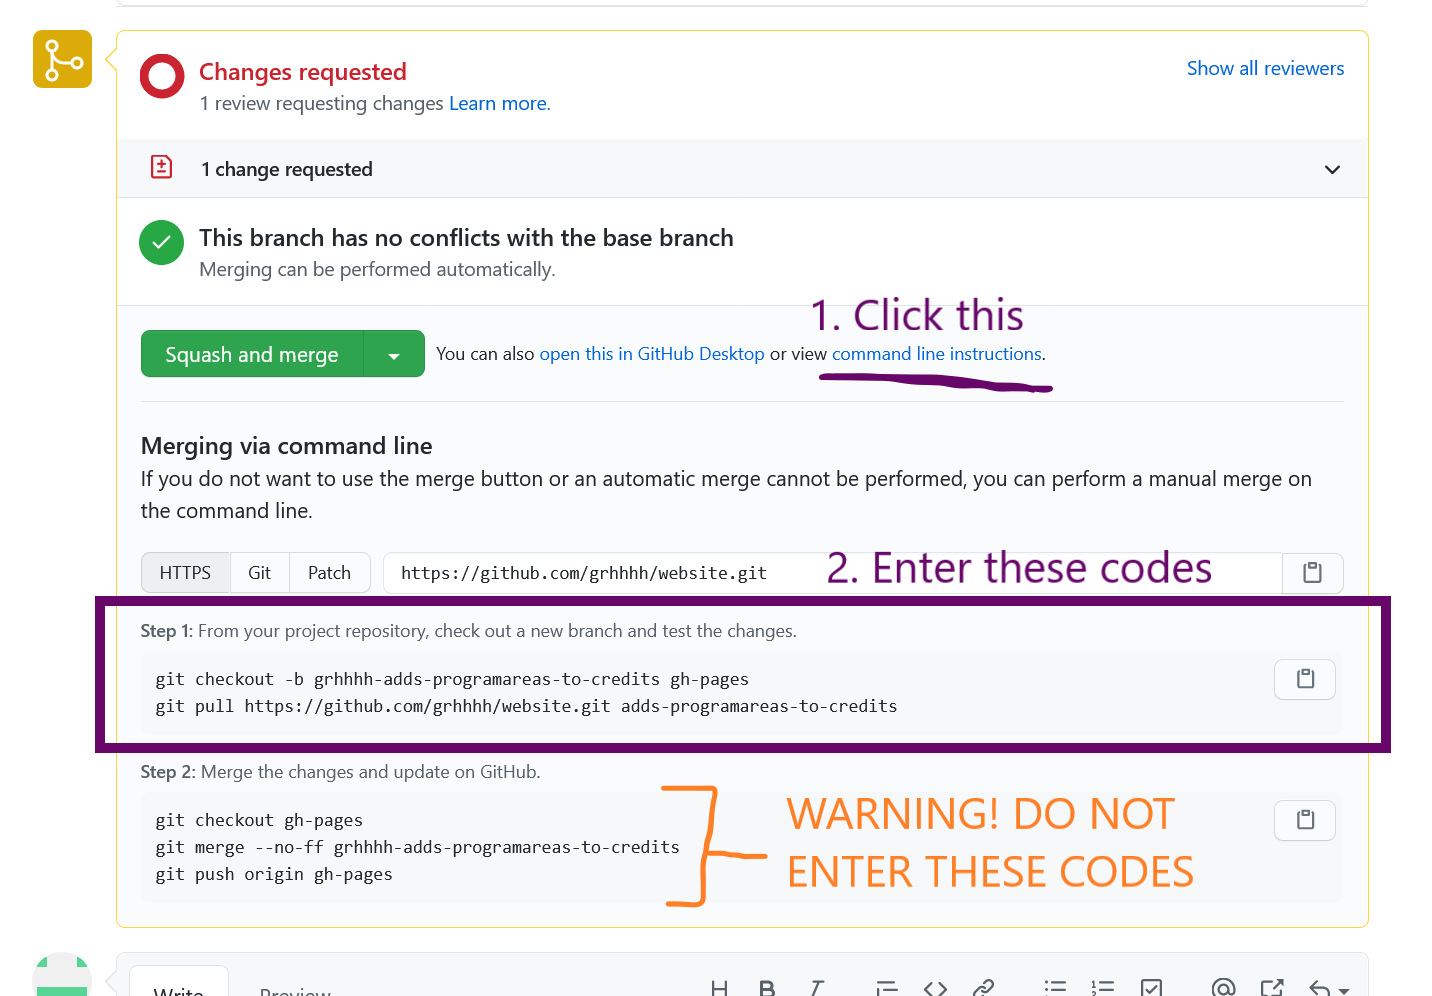
Commandline instructions for Development Team
Type in these two commands into the repository, filling in for the variables inside of square brackets([ ]).
git checkout -b [nameOfCollaborator]-[nameOfFromBranch] [nameOfIntoBranch]
git pull https://github.com/[nameOfCollaborator]/website.git [nameOfFromBranch]
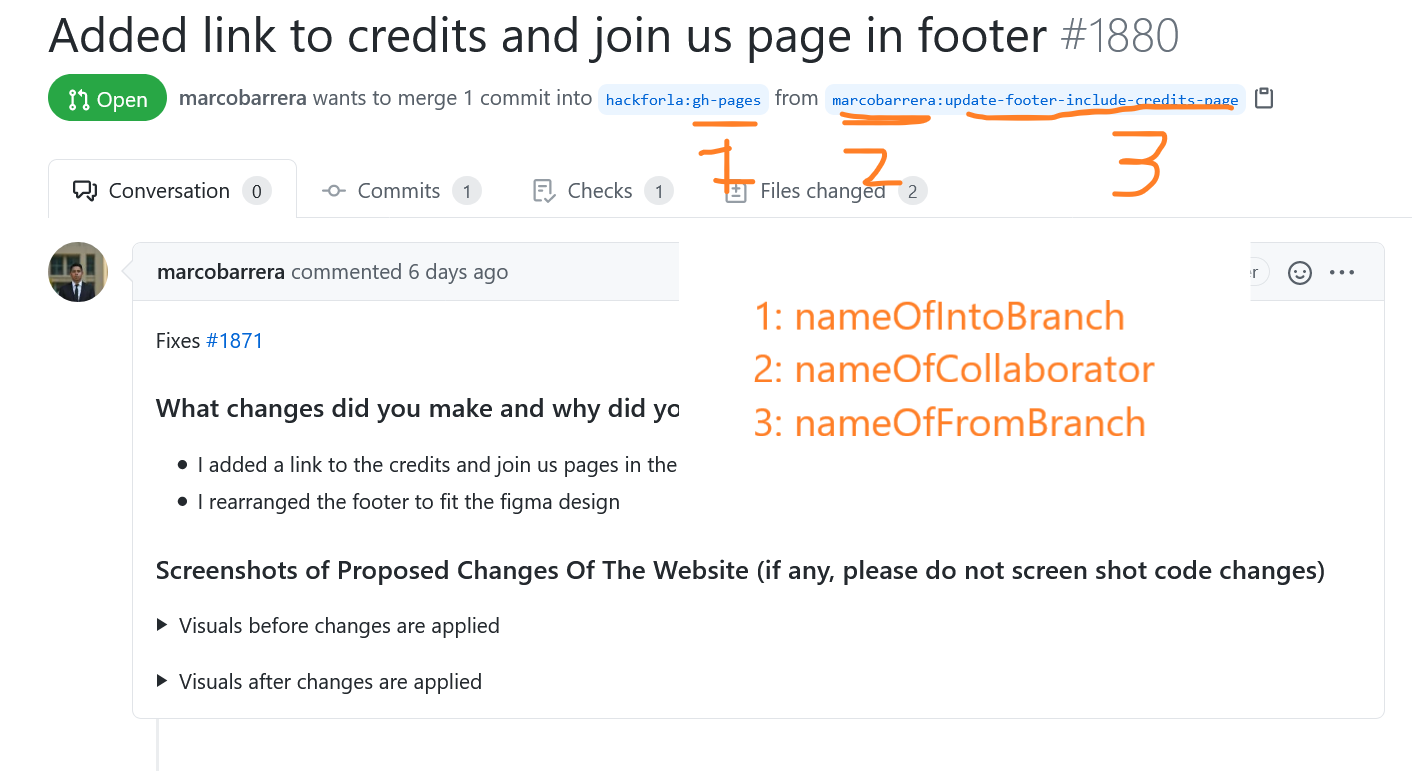
nameOfIntoBranch: name of the branch from the website's repository (above sample is gh-pages)
nameOfCollaborator: the GitHub handle of the person doing the pull request (above sample is marcobarrera)
nameOfFromBranch: name of the branch that that belongs to the collaborator (above sample is update-footer-include-credits-page)
Commandline instructions for Merge Team
Once the branch is installed, run the website and view it in the browser. You will also want to open our website in a new tab. Locate the collaborator's changes on both sites and consider whether these changes address the issue. Some important questions to ask are:
- Are the changes applicable to the issue?
- Are there changes beyond those applicable to the issue?
- Does the website appear less user-friendly?
- Do the links and components on the page still work as intended?
In addition to viewing changes on your desktop browser, you must also assess these changes in multiple viewports (such as mobile or tablet), through your browser's developer mode.
An example of developer mode in Microsoft Edge (90.0.818.51)
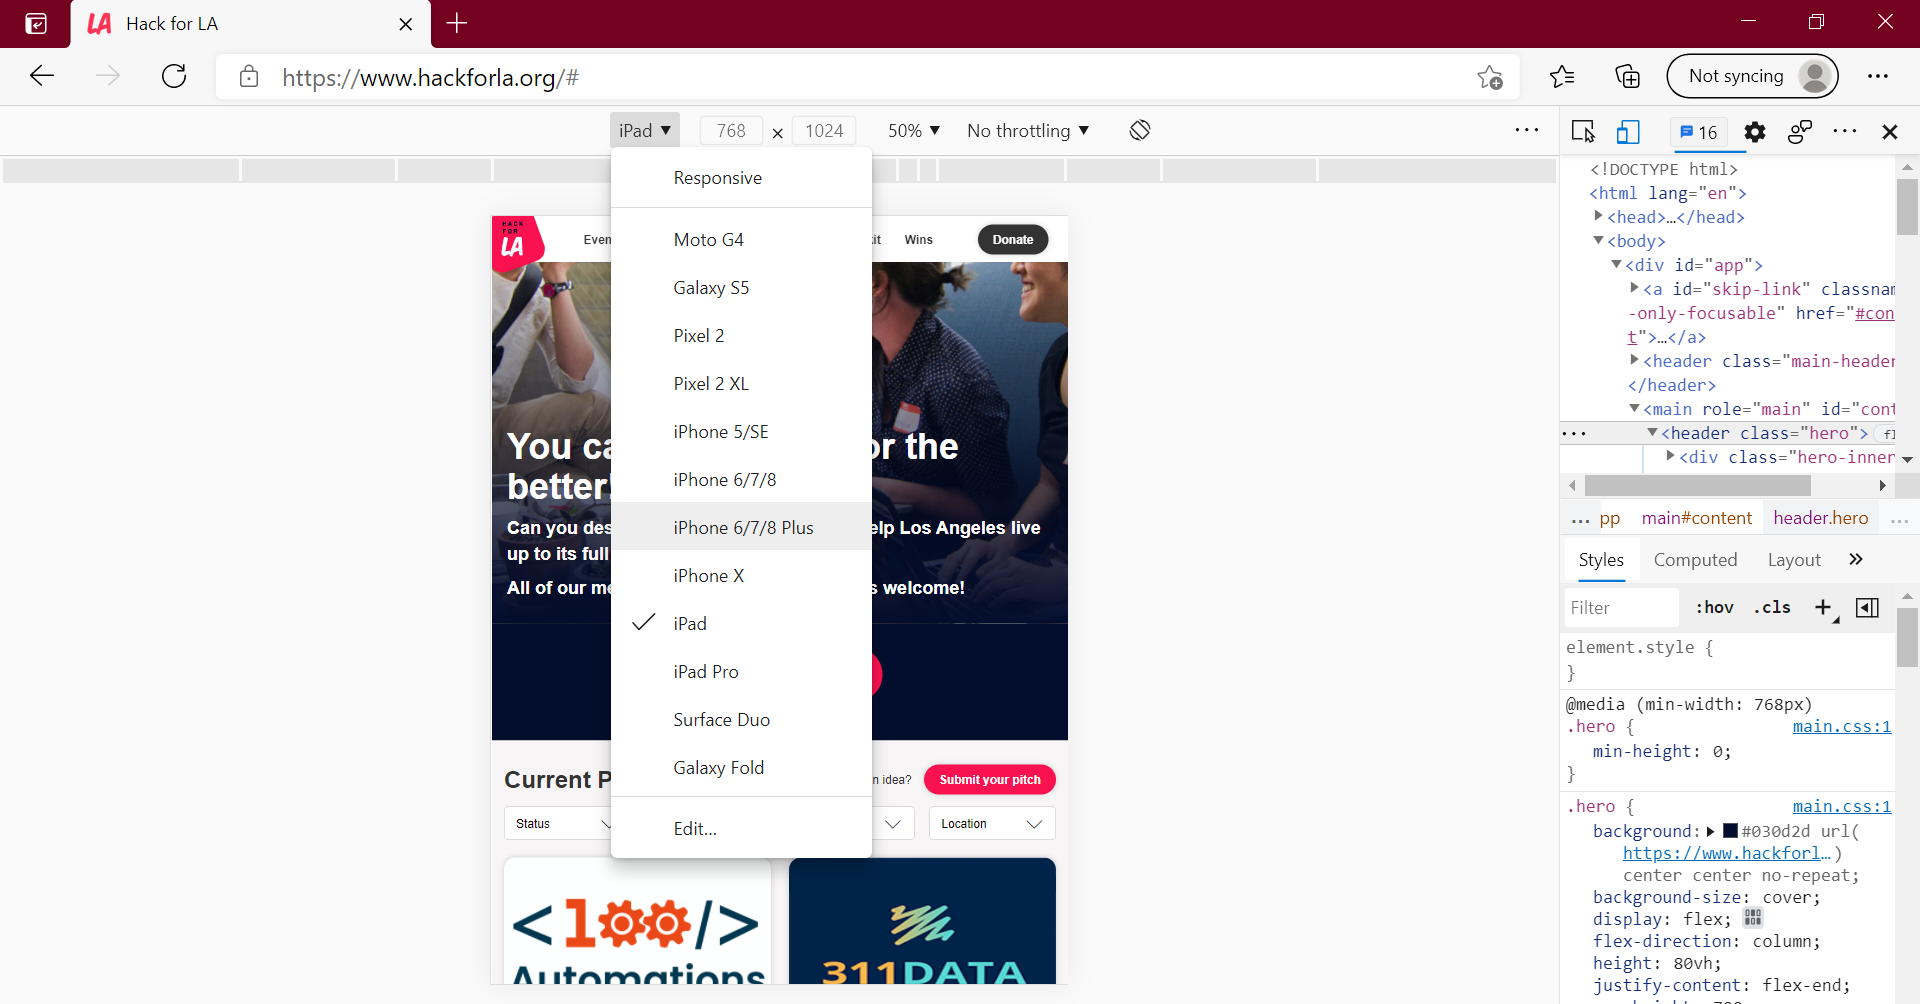
Links to developer mode documentation in popular browsers (bookmark this for future reference 😊)
After viewing these changes in your browser, you might discover that the changes are not applicable or breaks the website. In that case, you must request changes, and detail what exactly went wrong. If everything seems fine, you may proceed to Step 4.
Changes in source code are marked in green/red or plus/minus
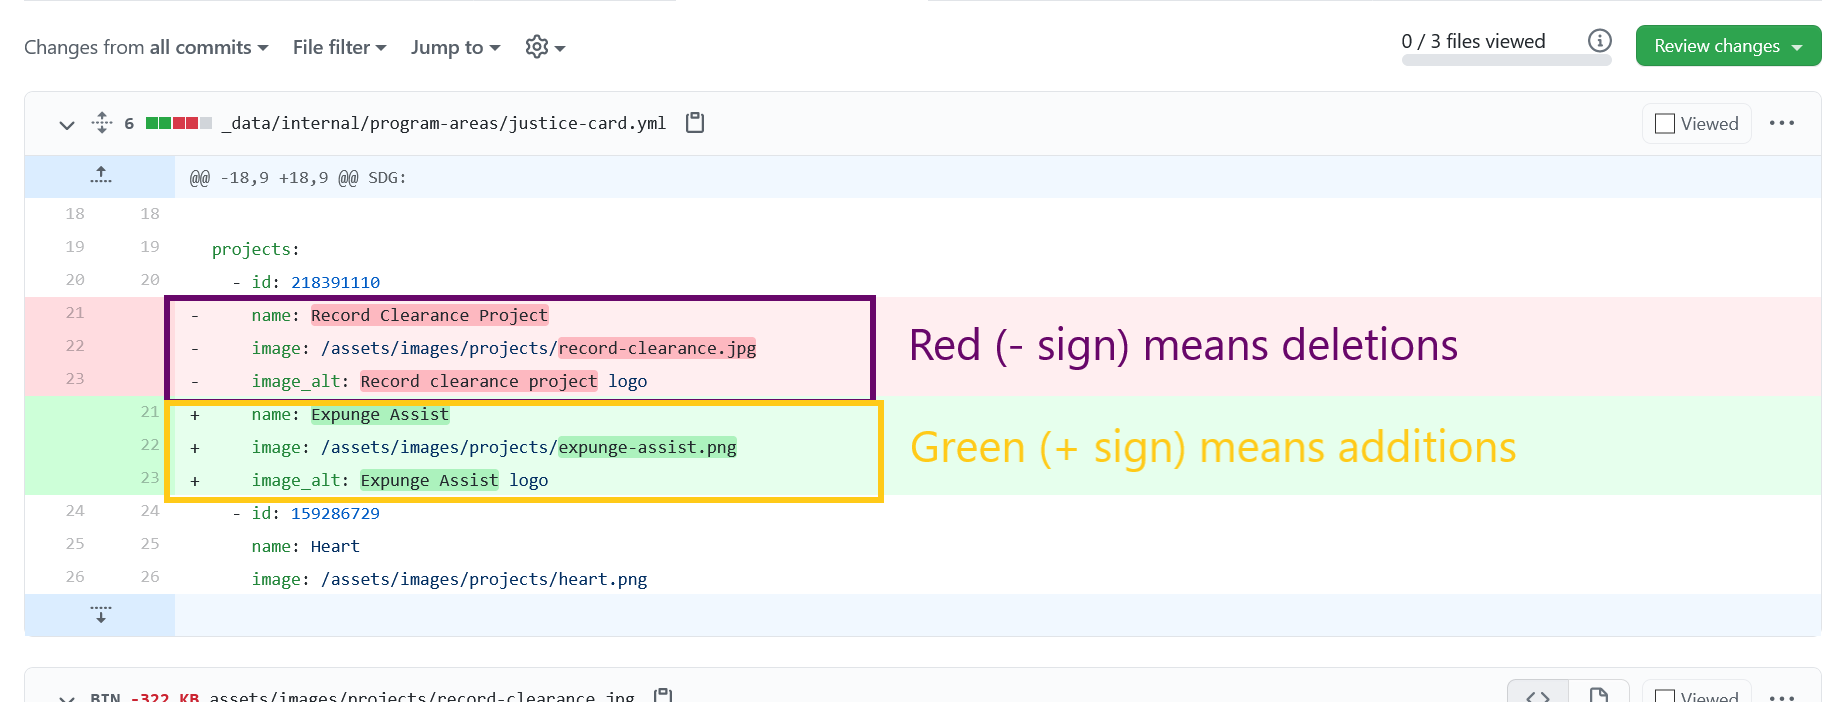
At this step, you assess whether the changes are applicable and clean. Click the Files changed tab on the pull request page and examine the code. Green highlights (or lines with a plus sign) represent additions to the base website's code while red (or lines with a - sign) are deletions. Although clean is a subjective term, do make sure that the changes follow typical coding style guidelines. Good questions to ask are:
- Can the changes be condensed?
- Can the collaborator add comments to clarify any complex changes made?
- Are there any drastic changes that seems like they do not belong?
- Are there changes that are missing?
If something about the code is off, leave an inline comment and request changes.
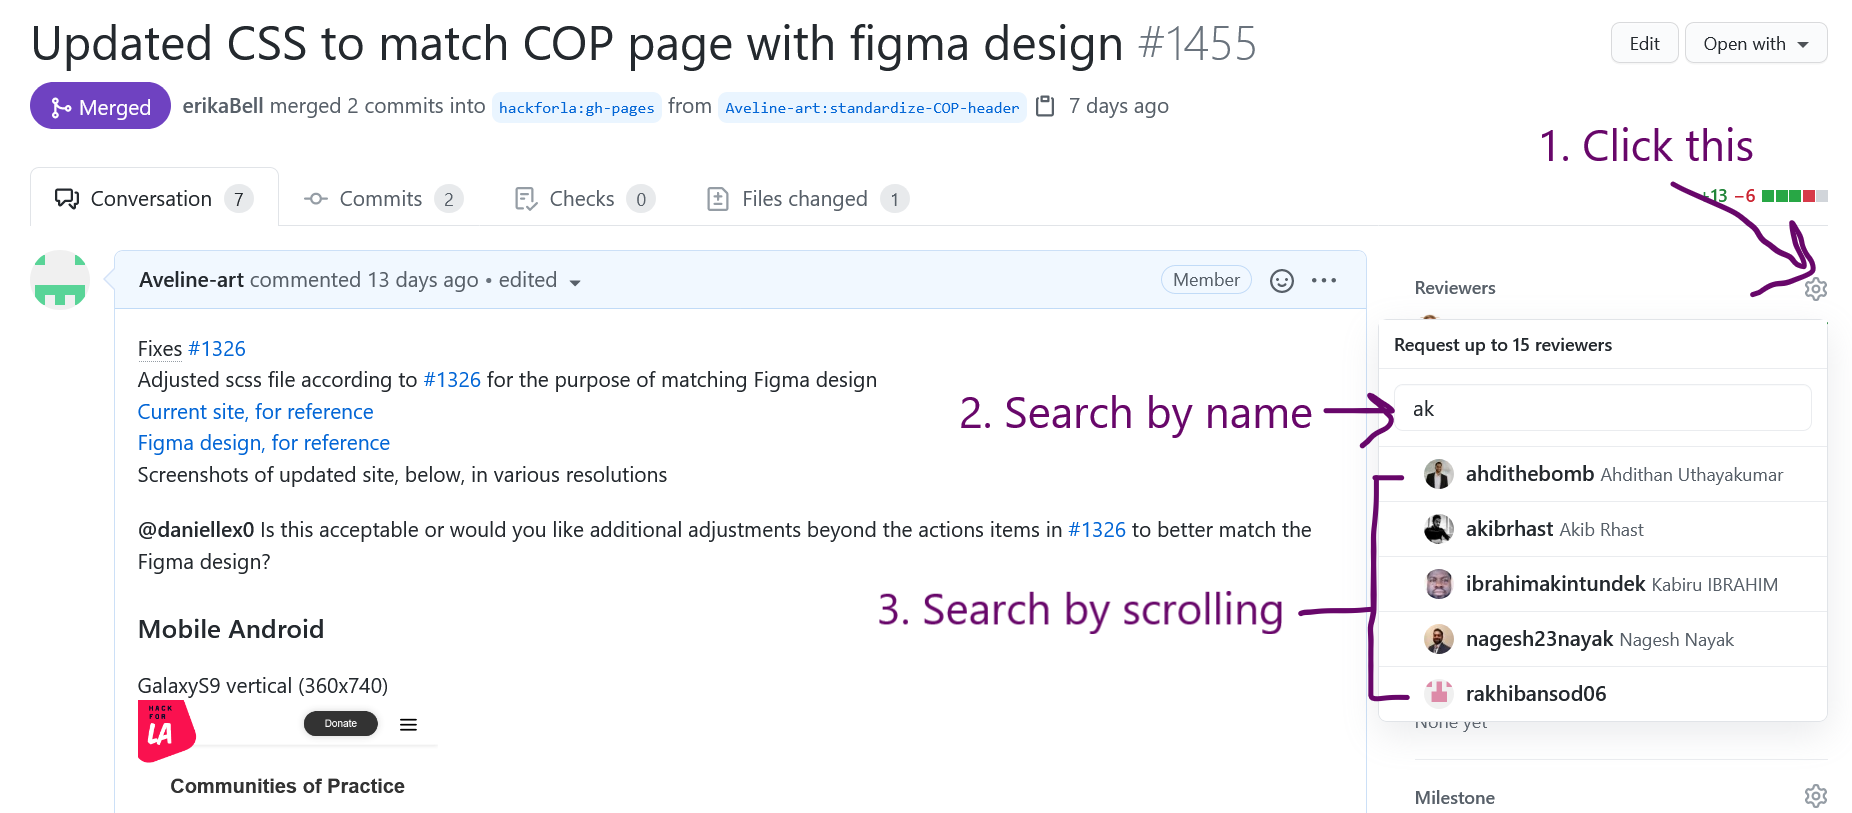
After viewing the changes in your browser and in the source code, the changes might still appear inadequate, erroneous, or incomplete. For example, the changes might have created an entirely new, unforeseen issue. Or there might have been a mistake in the original issue's wording which the collaborator did not catch. In such cases, leave a comment to discuss your concerns with the creator of the issue. In some cases, you might also want the creator of the issue to review the pull request with you. Open the image below to see how to add them as a reviewer.
Manually adding another reviewer
How to approve a pull request

If after going through all the steps, and you find all the changes passes the ABC's, then congratulations! We are ready to approve of these changes. To approve, visit the Files changed tab and click the green "Review changes" button on the top right. Select "Approve" and leave something nice for the collaborator. Something as simple as a, "Great job! I love what you have done, insert name!", will really make someone's day.
In order to keep your working repo as clean as possible, it is best practice to delete the collaborator's branch after you submit your review. If you haven't already, return to your local branch using git checkout gh-pages, then run:
git branch -D name-of-collaborators-branch
This will help to reduce the likelihood of unwanted commits appearing in the future. Always delete the collaborator's branch as soon as your review is submitted. If you need to re-review the same PR later, create a new branch at that time.
- Do: Check all files in the changed files tab.
- Do: Make sure all added/changed files are relevant to the issue.
- Do: When CSS changes, check a couple of pages rather than just the target page.
- Do: If changes are not apparent, try clearing the metadata first.
- Do: Leave encouraging, straightforward feedback.
- Do: Reward yourself! Reviewing code is not the easiest thing, so grab yourself a snack and try your best!
- Don't: Avoid reviewing pull requests.
- Don't: Be afraid to ask questions.
- Don't: Miss a step in this guide They are there for a reason!
- Don't: Merge the pull request, whether by accident (or malice, for that matter).
1. Do I review a pull request if someone has already made a review?
Yes! In fact, all pull requests require review by either 1 senior developer or 2 junior developers to merge. When reviewing a pull request with an existing review, be sure to check the previous review, so that you do not end up asking for the same changes.
2. After I request changes, do I need to review the pull request again after changes are made?
As people lead busy lives, it can be difficult to keep track of and re-review a pull request, although we recommend you do so. It helps with our workflow, since, as the person who requested changes, you understand, more than others, the changes needed to be made.
3. Are there any limits to what pull requests I can review?
Yes, we do have recommended guidelines for contributors when choosing which request to review. First, we recommend reviewing older rather than younger pull requests. Other than that, we recommend reviewing pull requests that come from
good first issueissues to start, before moving intoComplexity: Small, thenComplexity: Mediumissues, and finallyComplexity: Largeissues.
- Step 0: Is the pull request done with the correct branch?
- Step 1: Is there a linked issue?
- Step 2: Understand the linked issue.
- Step 3: View the changes in the browser.
- Step 4: Take a look at files changed tab.
- Step 5: Check for anything else.
- Step 6: Approve the pull request.
- Step 7: Clean up your working repo.
Sample Feedback 1
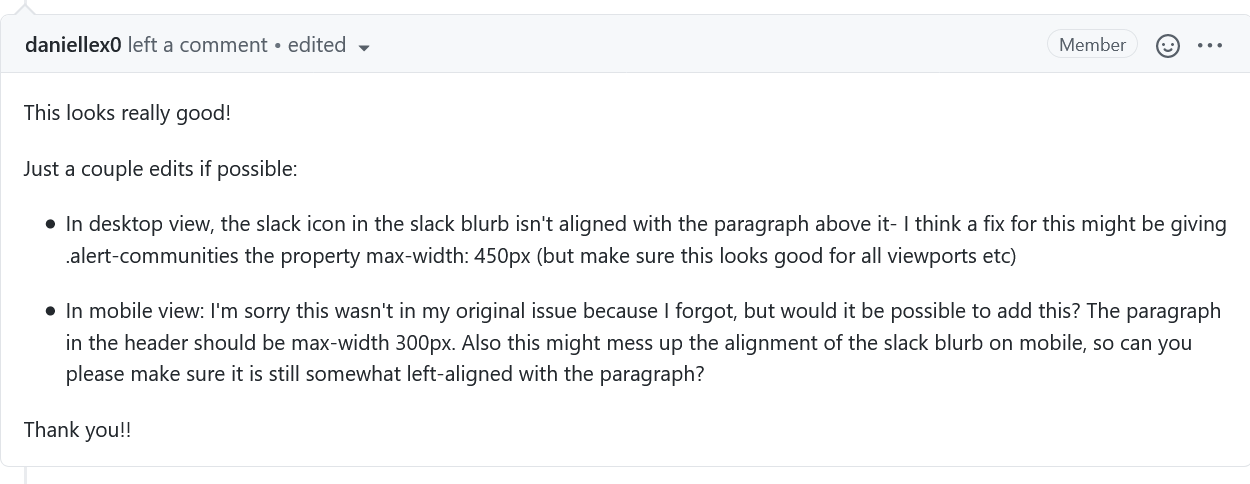
- Positive tone.
- Specific when requesting changes.
- Courteous.
- Appropriate language.
Sample Feedback 2
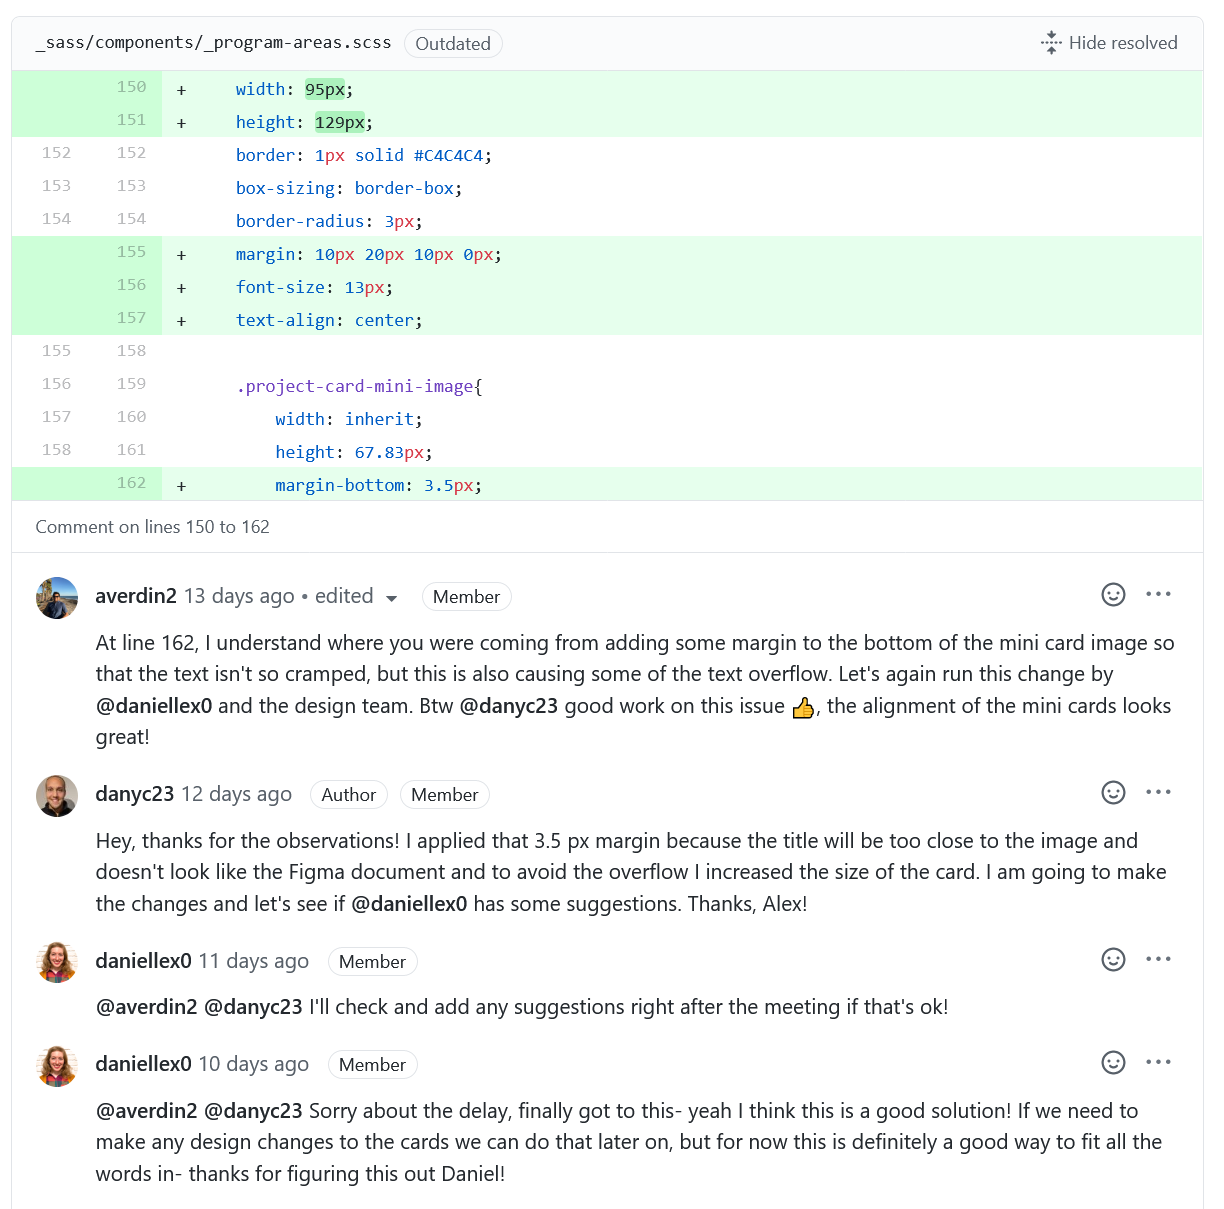
- Encouraging tone.
- Specific when giving praise.
- Specific when requesting changes.
- Appropriate language.
- Ask for input from a member of the design team.
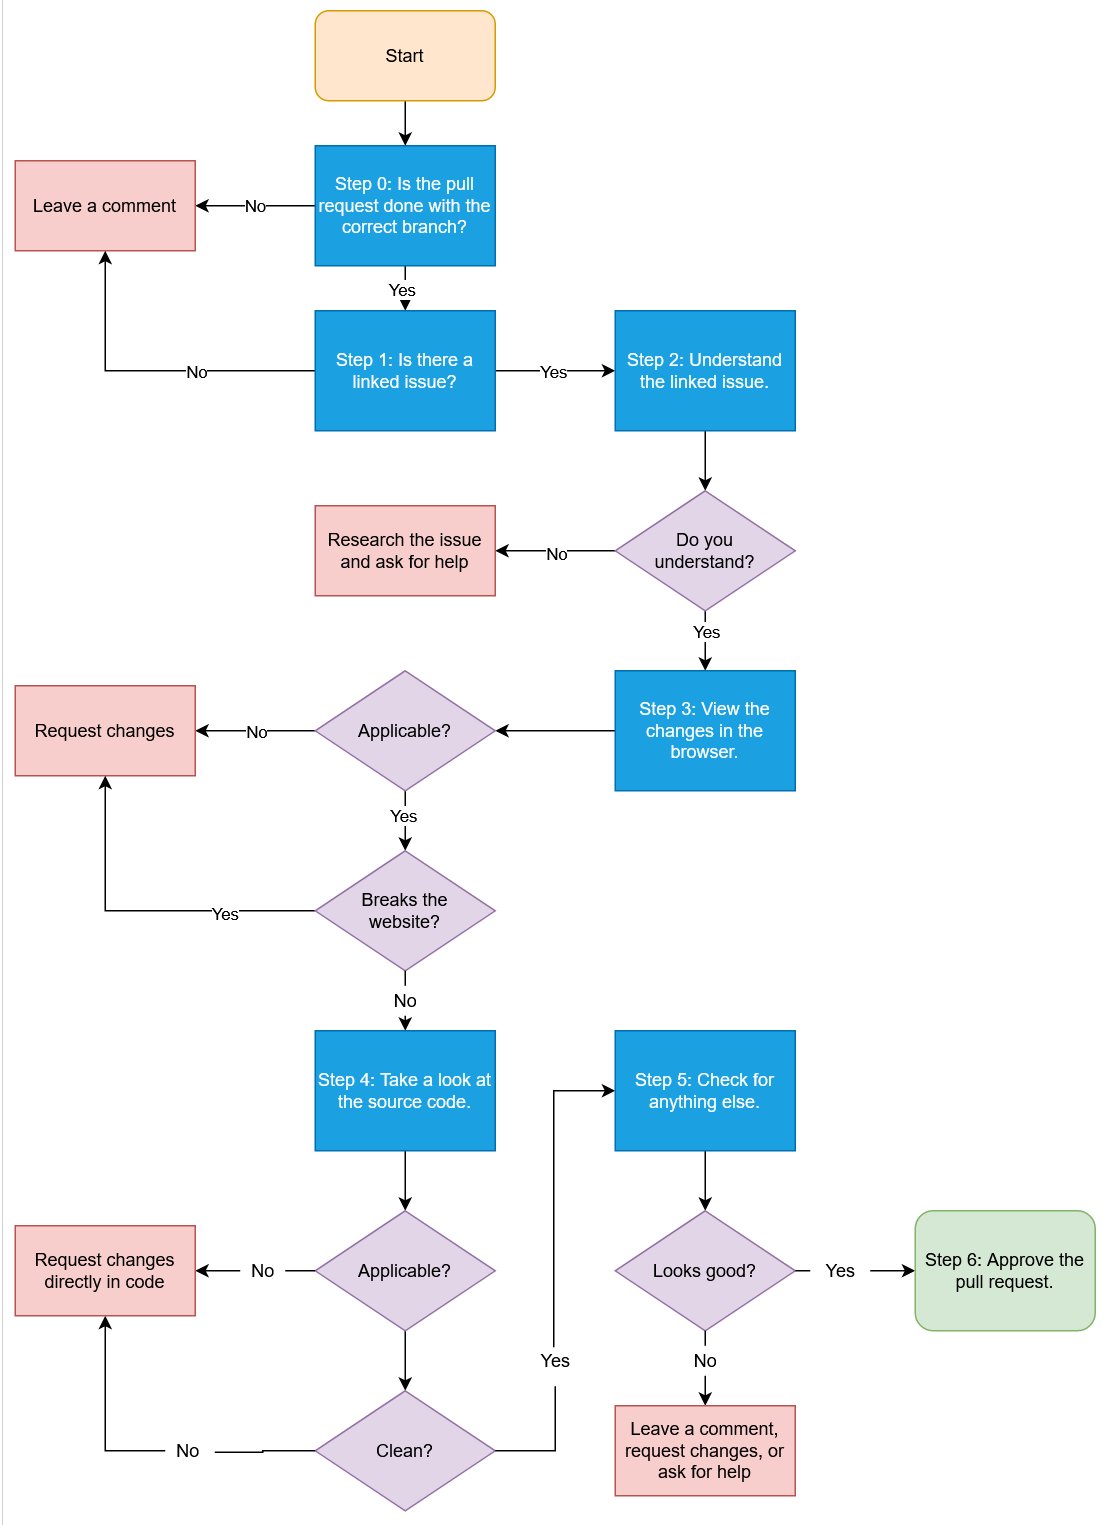
Flowchart of Steps
Github: Reviewing changes in pull requests
HackForLA: Figma
*additions after the wiki was moved.