Hack for LA's GitHub Actions - hackforla/website GitHub Wiki
There is an updated version of this file at Hack for LA's GitHub Actions (updated)
Is this guide outdated? Feel free to open a new issue so that a developer can work on updating it!
GitHub Actions (GHAs) are pieces of code that run once a trigger...triggers. These triggers can be nearly anything that can happen on GitHub, such as when a pull request is created, or a comment is made on an issue. Traditionally, GitHub Actions is used to perform unit tests whenever a pull request is created. The GHA would ensure that the new code does not break the website. However, with a bit of creativity, GitHub Actions can do so much more! This wiki outlines the way we organize our GitHub actions, provides a mini-guide to get started on your own and some tips if you ever need help.
- Introduction
- GitHub Actions Architecture
- HfLA GitHub Actions
- Mini-guide
-
Tips
- Tip 1: Make sure to add proper indentation and spacing
- Tip 2: Bookmark these helpful references
- Tip 3: Remember to use the relative path and not the absolute path
- Tip 4: Use dummy data to feed your GHAs and test them locally
- Tip 5: Make your own API calls to test GHAs
- Tip 6: Creating your own Project Board
- Tip 7: Using Personal Access Tokens to test in your own Project Board
GitHub Actions at HackForLA lives in two main directories, the .github/workflows directory and the github-actions directory. Much like how our project has a folder for overall pages, and a folder for pieces that we include into those layouts, the two github actions folder follow a frame-details relationship. That is, the .github/workflows directory frames the conditioned in which the action would activate and the github-actions directory details how those actions are performed.
This is a summary of our file structure. Please refer back to this often if you are ever confused!
├── .github
│   └── workflows
|       ├── issue-trigger.yml
|       ├── lint-scss.yml
|       └── pull-request-trigger.yml
├── github-actions
│   ├── trigger-issue    # Named after a trigger
|       ├── job1         # Named after a job
|           ├── *.js     # Named after a step
|           └── *.js     # Named after another step
|       └── job2
|           ├── *.js
|           └── *.js
|   ├── trigger-pr
|       ├── ...
|       └── ...
|   ├── trigger-schedule
|       ├── ...
|       └── ...
│   └── utils
| └── *.jsThe .github/workflows directory contains 3 overarching framing files: issue-trigger.yml, lint-scss.yml, and pull-request-trigger.yml. These files are named after their triggers. For example, in the below snippet, the GHA triggers on a pull request that is either opened, closed, or edited.
Note on wr-pull-request-trigger.yml
The wr-pull-request-trigger.yml file is based on a workflow run trigger. This trigger basically means "run this after this GHA finished running". Sometimes this is used if the results of one or more past actions can be further used to perform an additional task. For example, pull request triggers can often be dangerous since it runs in the context of the repository that made the pull request, a context that a user have limited controlled. The workflow run trigger moves the context into the repository that the pull request is trying to merge into. For more information on security, take a look at the tips below for articles on security!
Note on the other files
The other files in that folder are GHAs that has not yet been incorporated into issue-trigger.yml, lint-scss.yml, or pull-request-trigger.yml. These files, depending on their triggering condition, should eventually be refactored into them (in fact, there are probably issues on them if you type in 'refactoring ghas' in the issue search bar.
Note on the scheduled triggers
Based on our naming scheme, you might be wondering about how we name scheduled triggers. Although there are currently files that work on a scheduled trigger, they had not been renamed yet. For those files, they should be named based on when they activate, such as "Schedule Daily 1300", "Scheduled Monthly", or "Scheduled Friday 0700".
pull-request-trigger.yml
name: Pull Request Trigger
on:
  pull_request:
    types: [opened, closed, edited]
    branches:
      - 'gh-pages'
Further more, these triggers are further subdivided through if-else clauses into different jobs, or actions that are taken when the trigger condition is fulfilled. In the below snippet, there are two overarching jobs: Add-Issue-Labels-To-PR and Add-Reviewers-To-New-PR. These jobs only activate when a pull request is opened. Once activated, they perform a series of instructions, called steps (which is not written out here to conserve space).
These steps are usually written in ubuntu commandline code, which is a powerful language for file maintenance and manipulation (those familiar with commandline code will realize that GHAs are a lot like cron jobs).
pull-request-trigger.yml
jobs:
  Add-Issue-Labels-To-PR:
    runs-on: ubuntu-latest
    # Only trigger when a new PR is created
    if: ${{ github.event_name == 'pull-request' && github.event.action == 'opened'}}
    steps:
      - run: echo "Hello World! 🎉"
      ...
  Add-Reviewers-To-New-PR:
    runs-on: ubuntu-latest
    # Only trigger when a new PR is created
    if: ${{ github.event_name == 'pull-request' && github.event.action == 'opened'}}
    steps:
      - run: echo "Hello World! 🎉"
      ...
To summarize, the thing to remember about these files are that they are named after triggers, and that each job uses if/else clauses to specify the specific trigger that causes the GHA to run.
For most developers, the ubuntu shell is either too arcane or too lacking to perform very tailored actions. Therefore, we often abstract away the ubuntu code by running an external JS file instead. This external file, and all files that support it, lives in the second GHA directory: the github-actions directory.
The github-actions directory houses all the JS files that are called or used by the .yml files in the .github/workflows. These files are usually called via two external modules called actions/checkout@v2 and actions/github-script@v4. Their functions will not be detailed here, as that can be found in their documentation. However, I will say that these two work in tandem to allow GHAs to call our JS files.
issue-trigger.yml
steps:
  - uses: actions/checkout@v2
  - name: Check Labels
    uses: actions/github-script@v4
    id: check-labels
    with:
      script: |
        const script = require('./github-actions/trigger-issue/add-missing-labels-to-issues/check-labels.js')
        const checkLabels = script({g: github, c: context})
        return checkLabels
  - name: Post Comment
    uses: actions/github-script@v4
    with:
       script: |
         const results = ${{ steps.check-labels.outputs.result }}
         const script = require('./github-actions/trigger-issue/add-missing-labels-to-issues/post-labels-comment.js')
         script({g: github, c:context}, results)
In the above sample, you will notice that the script is called by giving it a github and context object. These two objects are provided by the actions/github-script@v4 module, respectively serving as an entryway into the GitHub API and the data containing the context of the trigger.
Note how every step in the GHA has a name (above, the names are Check Labels and Post Comment). These names are there to broadly define the steps of that particular action.
Also, note the path of the called JS files, trigger-issue/add-missing-labels-to-issues/check-labels.js and trigger-issue/add-missing-labels-to-issues/check-labels.js. These paths follow the pattern of trigger/jobname/stepname.js. This organization allows us to very quickly locate the JS file that is associated with some action, and quickly surmise its purpose. This helps us edit the files quickly, since most GHAs involves very similar tasks, and so a very nested structure is needed to not confuse files such as add-update-label-weekly.js vs add-label-on-issue-creation.js.
Jumping into the github-actions directory, you will see four main directories: trigger-issue, trigger-pr, trigger-schedule, and utils. The first three are related to the aforementioned triggers, while utils contains code that can be reused by multiple JS files in the trigger-* directories.
Note
The other folders have not yet been incorporated into the trigger-issue, trigger-pr, and trigger-schedule directories. These files, depending on their triggering condition, should eventually be refactored into them (in fact, there are probably issues on them if you type in 'refactoring ghas' in the issue search bar.
To summarize, the important things to know about the github-actions directory is that they house the js and other files involving GHAs in a nested pattern, trigger/jobname/stepname.js, and that the js file is called by the yml files in the .github/workflows directory.
Also, for those who are curious as to why the directory does not live inside .github: the .github folder is hidden, and so cannot be found when checkout is used.

This mini-guide details a very hacky way for making GHAs. The reason why this is hacky is because it is a very specific way of making GHAs, but not the only way. This way often provides the quickest results by abstracting a lot of the arcane language and nuance, making it very friendly for web developers. In other words, this method uses a very specific boilerplate that simplifies GHAs. Note that this guide assumes you are familiar with the architecture outlines above, so I will not discuss about files and naming convention here.
Without further ado, let's begin.
To start, in the correct .yml file (remember, the .yml files are named based on triggers), paste the below snippet in the correct spot. Change the name of the job and the if/else clause as needed. Every GHA should only have one of this snippet.
jobs:
  Add-Missing-Labels-To-Issues:      # Replace this with the name of your job
    runs-on: ubuntu-latest
if: ${{ github.event_name == 'issues' && github.event.action == 'opened'}} # Use as many && statements as needed to isolate your triggerjobs:
Add-Missing-Labels-To-Issues:
runs-on: ubuntu-latest
if: ${{ github.event_name == 'issues' && github.event.action == 'opened'}}After defining the job, below it, copy and paste the below step, and replace text as needed. Most GHAs should only need one or two of these, depending on how you want to subdivide the steps. As a rule of thumb, a step should do one overarching thing. A naive reader reading the file should be able to understand your GHA's function just by reading the steps.
steps:
  - uses: actions/checkout@v2
  - name:      # Put the name of the step
    uses: actions/github-script@v4
    id:        # Optional field, see docs for [actions/checkout@v2][#actionscheckout] for details
    with:
      script: |
        const script = require('')    // Put the relative path to the JS file, because the root is not what you think it is, trust
        const checkLabels = script({g: github, c: context})    // Rename the const variable, but do NOT change anything else
return checkLabels // Optional return, see docs for [actions/checkout@v2][#actionscheckout] for details on how to use return statementssteps:
- uses: actions/checkout@v2
- name:
uses: actions/github-script@v4
id:
with:
script: |
const script = require('')
const checkLabels = script({g: github, c: context})
return checkLabelsFor every step you have, create the correct directories (remember, the pattern is trigger/jobname/stepname.js) for where your js files should reside. For your js file, copy and paste the below boilerplate to get started.
// Import modules        // Import whatever files or modules you need

// Global variables      // Add whatever global variables you need
var github;
var context;

async function main({ g, c }) {       // Add other variables as needed, but keep { g, c }
  github = g;                         // DO NOT EDIT
  context = c;                        // DO NOT EDIT

  // TODO
  // Write your code here.
}


module.exports = main // DO NOT EDIT// Import modules
// Global variables
var github;
var context;
async function main({ g, c }) {
github = g;
context = c;
// TODO
// Write your code here.
}
module.exports = mainIn yml, much like with Python, spaces have meaning! If something does not work, it is often because your indentation was improper. The below snippet is from GHA's documentation. Examine it carefully, and make sure that your GHAs follow the same indentation levels.
name: GitHub Actions Demo    # GHA name
on: [push]                   # Trigger
jobs:
  Explore-GitHub-Actions:    # Job name
    runs-on: ubuntu-latest
    steps:
      - run: echo "🎉 The job was automatically triggered by a ${{ github.event_name }} event."       # Steps
      - run: echo "🐧 This job is now running on a ${{ runner.os }} server hosted by GitHub!"
      - run: echo "🔎 The name of your branch is ${{ github.ref }} and your repository is ${{ github.repository }}."
      - name: Check out repository code
        uses: actions/checkout@v2                                                                      # Module
      - run: echo "💡 The ${{ github.repository }} repository has been cloned to the runner."
      - run: echo "🖥️ The workflow is now ready to test your code on the runner."
      - name: List files in the repository
        run: |
          ls ${{ github.workspace }}                                                                   # multi-line ubuntu code
echo "🍏 This job's status is ${{ job.status }}."Before writing any GHAs, make sure you skim through these references to make sure you understand the ins and outs of GHAs.
Quickstart for GitHub Actions
Learn GitHub Actions
Learn GitHub Actions/Events that trigger workflows
Learn GitHub Actions/Expressions
REST API/Reference
octokit/rest.js
actions/checkout
actions/github-script
Security guides
Keeping your GitHub Actions and workflows secure Part 1: Preventing pwn requests
Keeping your GitHub Actions and workflows secure Part 2: Untrusted input
Keeping your GitHub Actions and workflows secure Part 3: How to trust your building blocks
steps:
  - uses: actions/checkout@v2
  - name:
    uses: actions/github-script@v4
    id:
    with:
      script: |
const script = require('') <-- relative path only!!!Testing GHAs on GitHub itself is a very slow process since you need to upload it to GitHub and trigger it yourself by making a pull request or issue or something else on your own repository. The better thing to do would be to break your code into small functions and test the code by feeding it dummy data.
Also, if you must run it on GitHub to test, use the workflow_dispatch trigger. If a certain context is needed, such as a PR number, you can always use dummy data again.
In addition to using dummy data, you can also use GitHub's API to programmatically create issues, pull requests, and other tasks. This will trigger your GHAs, dramatically lowering the work required to check how your GHAs behaves "in the field". Below are sample gists of GHAs that you can borrow. If you want to contribute other gists, feel free to add them here!
Some actions require local testing, and a good way to do that is to creat a copy of the HfLA Project Board into your own repo. Follow the steps below to make your very own copy of the Project Board.
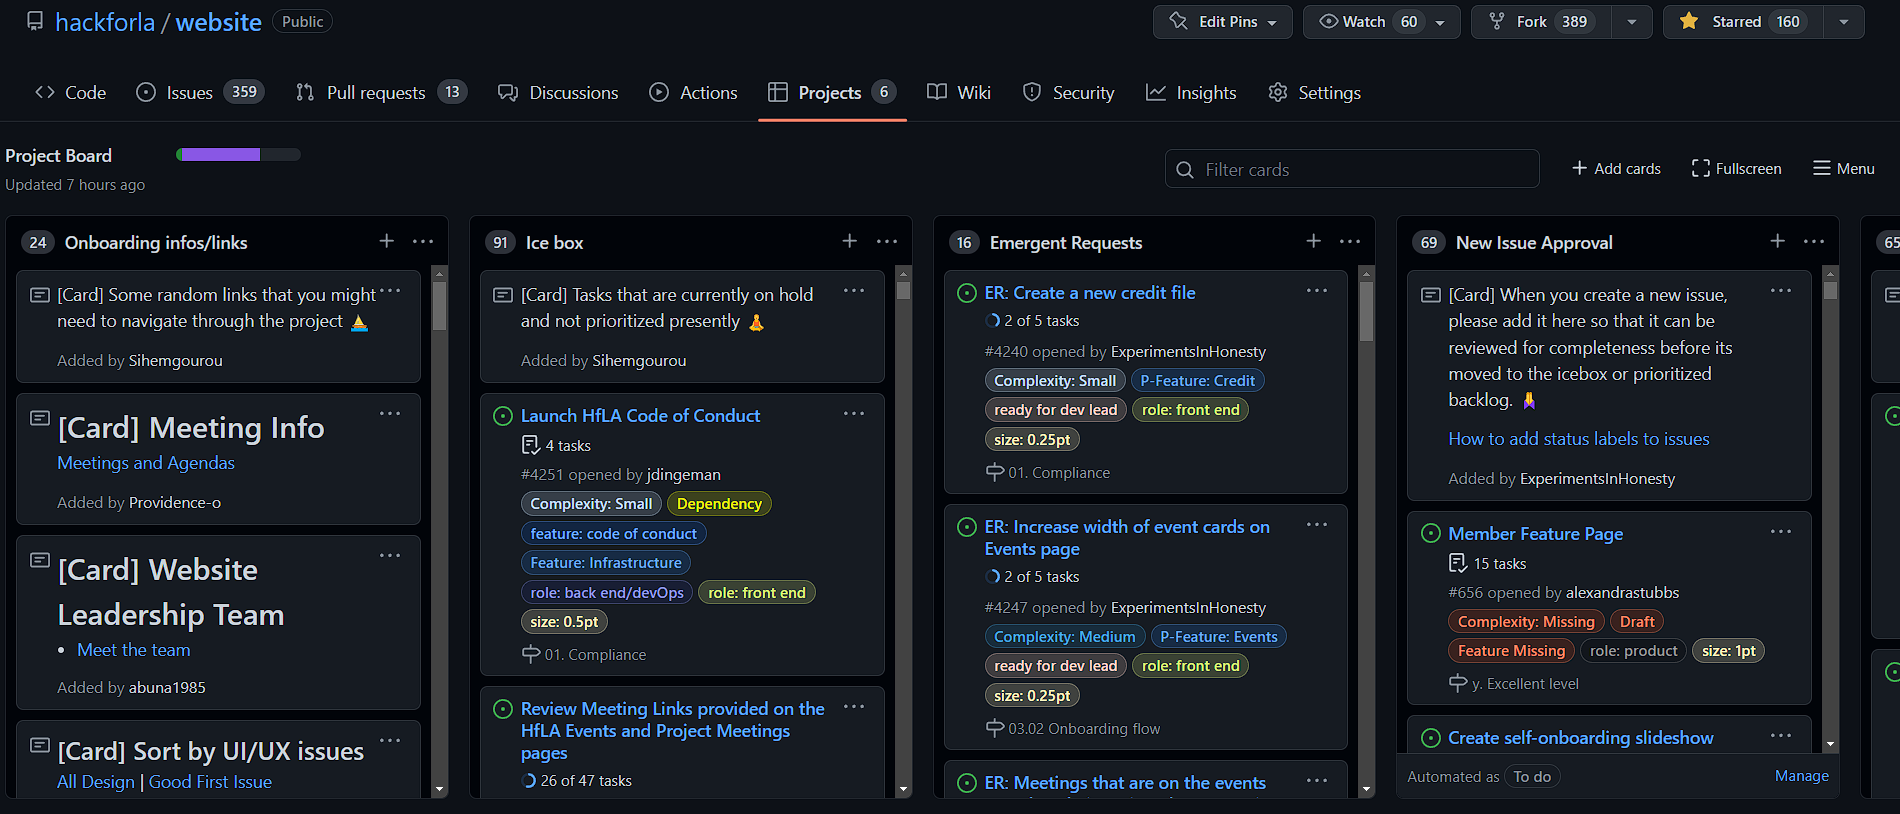
1. Go to the HfLA Project Board
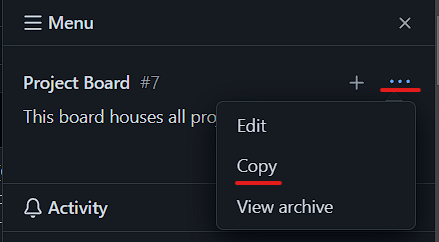
2. Click the hamburger Menu

3. Click the "..." and then click "Copy"
4. Apply these Settings, and create your copy
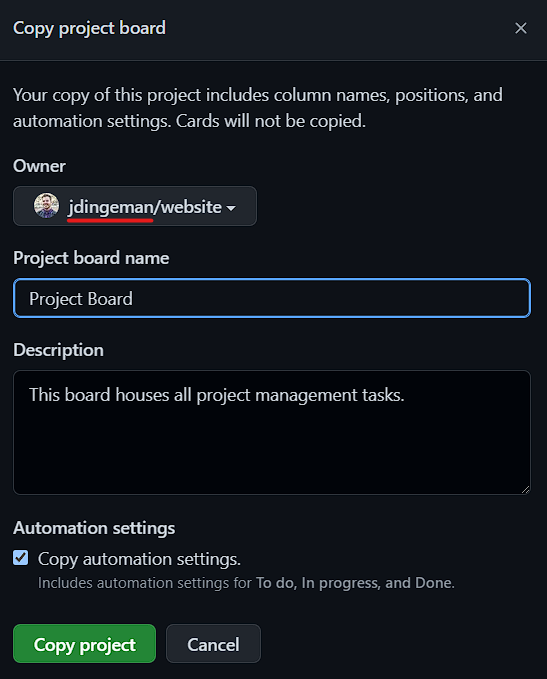
Be sure to replace the underlined portion with your own GitHub handle and select it from the dropdown menu. This will ensure the new Project Board is placed into your forked HfLA repo.
Now you should have your very own copy of the HfLA Project Board! To confirm, just navigate to your repo in GitHub, and go to the Project Board just as you would do for the HfLA Project Board. You should now see your own Project Board
See new Project Board
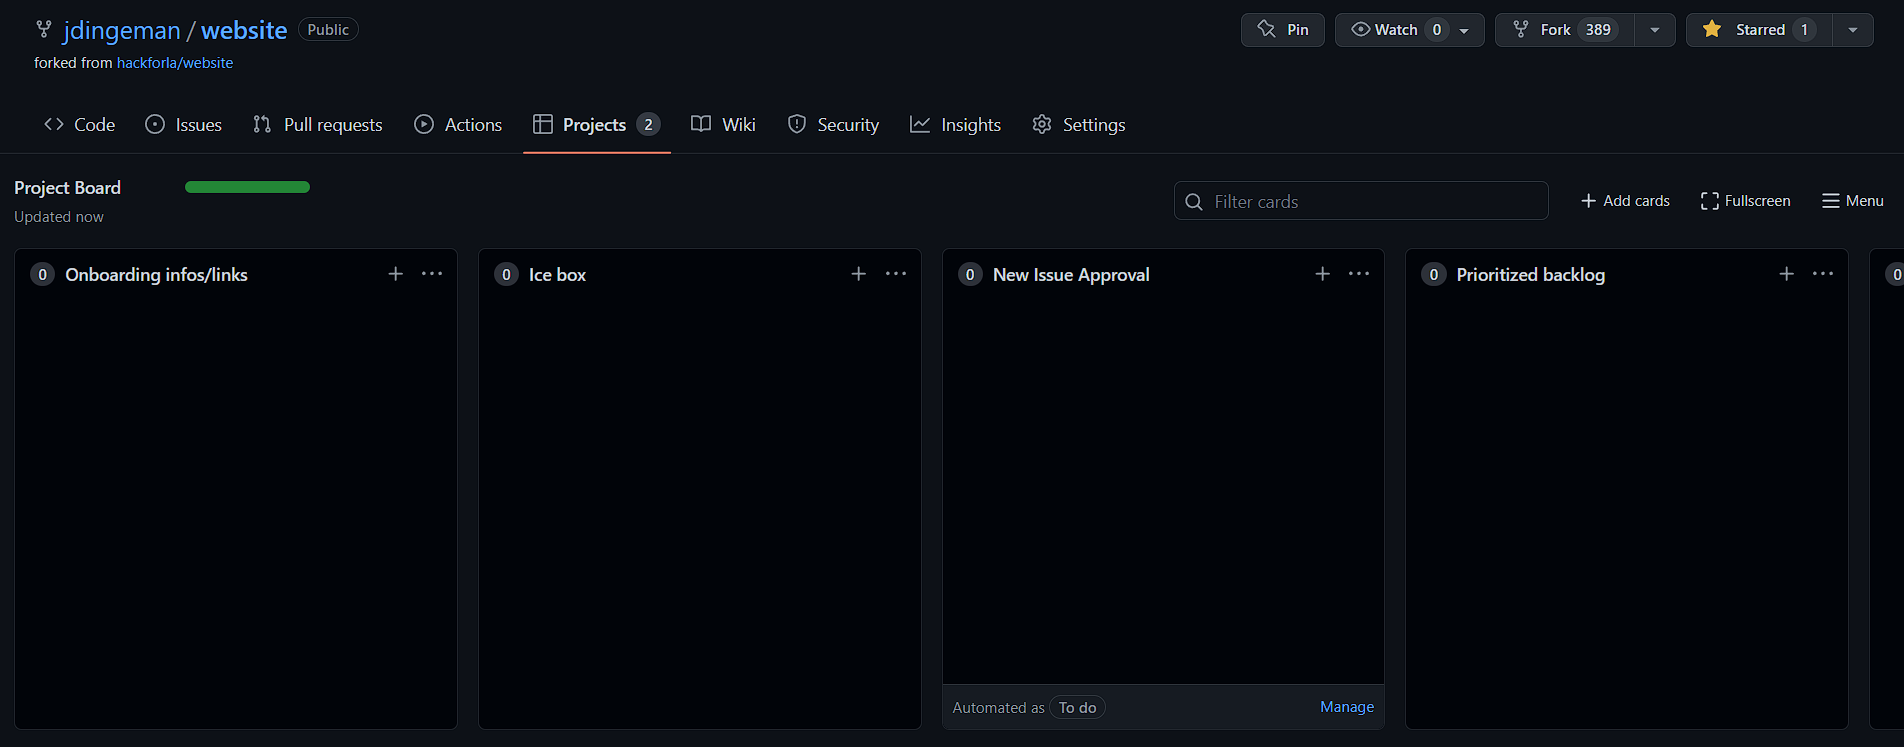
The copy won't have all of the content of the HfLA Project Board, but it should retain all of the columns and most automations. Some automations will not work in your repo unless the tokens in the GHAs are replaced with tokens that point to your repo. See Tip 7 below.
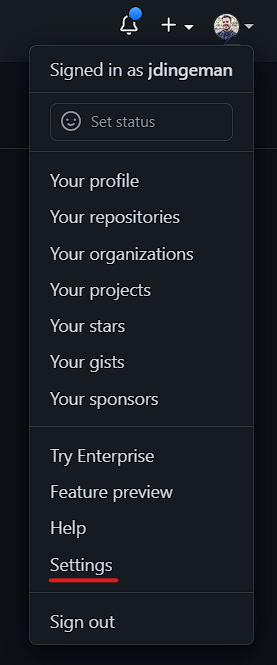
You may find your GitHub Action accessing secrets.HACK_FOR_LA_BOT. If you are testing a GHA in your own copy of the HfLA Project Board, you will need to replace references to secrets.[hfla-token] with your own secret tokens. To do so, follow these steps:
1. Go to your "Settings"
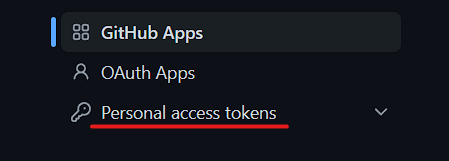
2. Click on "Developer settings"

3. Click on "Personal access tokens" and then "Tokens (classic)"
4. Click "Generate new token" and then "Generate new token (classic)"
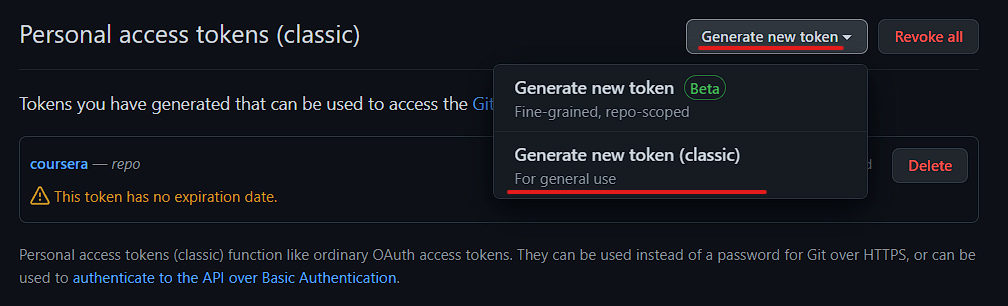
5. Now you can create a new personal access token
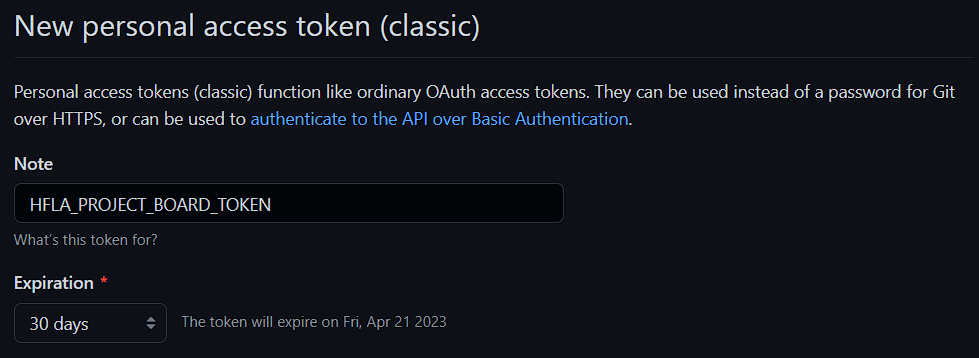
Select the following scopes:
- workflow
- admin:org
- user
- project
When the token is generated, copy it and place it somewhere safe so you don't lose it. The token will not be available again when you leave the page!!
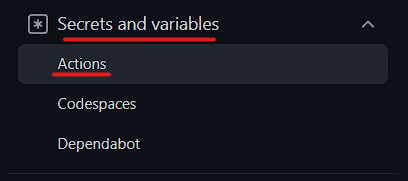
6. Go to your repository and click "Settings"

7. Scroll down and click the "Secrets and variables" dropdown and click on "Actions"
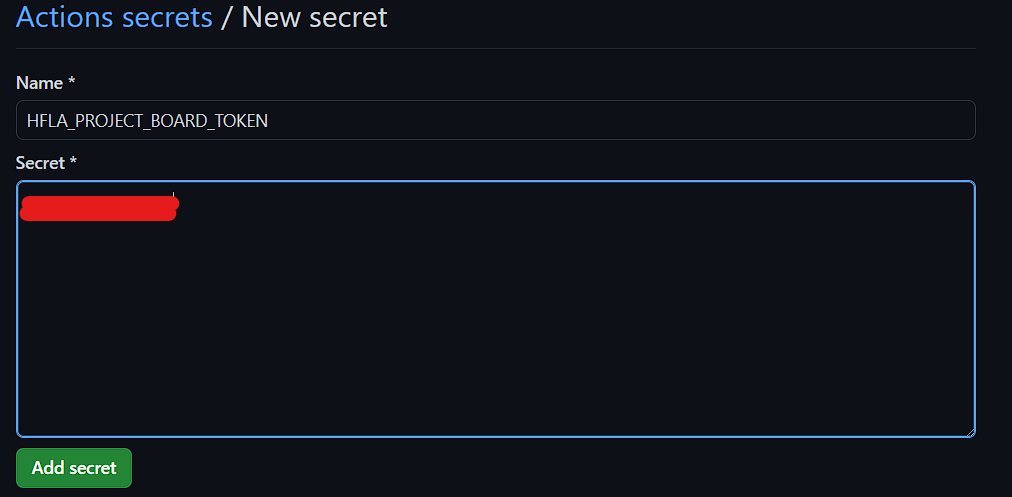
8. Click on "New repository secret"

9. Name the secret and paste the secret token into the textbox
Now, when you are testing the GitHub Action in your own Project Board, you will replace secrets.HACKFORLA_BOT_PA_TOKEN with secrets.[your new token]. Once you are satisfied with the changes in your own system, change it back to secrets.HACKFORLA_BOT_PA_TOKEN before making your pull request so that token for the HfLA Project Board is not pointing to a secret that doesn't exist.
Python: https://gist.github.com/Aveline-art/fa5e50998e5dbaa11f0bdc11be010229