Homelab Proxmox VE Configuration - h8pewou/homelab GitHub Wiki
Use the official image. For best results, install root on a separate disk (a small SSD will do).
Note: LVM may perform better than ZFS.
After the installation, login to your new PVE host via ssh and update the apt sources:
vi /etc/apt/sources.listAdd:
deb http://download.proxmox.com/debian buster pve-no-subscriptionVisitors from the future: you have to update the repository to your Debian version (e.g.,
deb http://download.proxmox.com/debian bullseye pve-no-subscription").
Save and quit.
Comment out the only line in the following file
vi /etc/apt/sources.list.d/pve-enterprise.listUpdate repositories and upgrade:
apt-get update && apt-get dist-upgradeReboot if there was a new kernel installed.
Install further packages:
apt install apcupsd lm-sensors fancontrol glusterfs-server glusterfs-client sudo \
unattended-upgrades apt-listchanges libelf-dev build-essential pve-headers-`uname -r`
Many of these may be optional for you, the following descriptions may help:
- apcupsd: APC UPS management daemon. This can ensure that a controlled shutdown is executed in case if you have prolonged power outage. Additionally we can also pull some power related metrics that can help with alerting and monitoring.
- lm-sensors: read thermal metrics (e.g., temperature and fan speed).
- fancontrol: utility to manually control fan speeds.
- glusterfs-server glusterfs-client: clustered filesystem server and client packages. It's a must have if you plan to use glusterfs.
- unattended-upgrades: automatic installation of security upgrades.
- apt-listchanges: package change history notification tool
- libelf-dev build-essential pve-headers-`uname -r`: required to build new kernel modules. You can skip these if all your hardware is supported out of the box.
Skip this step if you do not use this hardware.
If you are using anything other than r8156 (Vendor ID 0bda and Product ID 8156) please follow instructions from here.
Install packages required to build the kernel if you have not done so already in the previous step:
apt-get install libelf-dev build-essential pve-headers-`uname -r`Get the latest driver from Realtek.
wget https://realtek-download.com/wp-content/uploads/2020/10/r8152.53.56-2.14.0.tar
tar xvf r8152.53.56-2.14.0.tar
cd r8152-2.14.0/
Note: version numbers may differ.
Build the kernel module:
make -j2Verify the new module:
modinfo ./r8152.koIf everything looks fine, install the module:
make installUpdate the kernel module dependency file:
depmod -aCreate a new file in modeprobe.d:
vi /etc/modprobe.d/rtl_usb.confAdd this line and save it:
alias usb:v0bdap8156d*dc*dsc*dp*ic*isc*ip*in* r8152
Vendor ID and Product ID may differ if using a different Realtek device.
Update the kernel module dependency file:
depmod -aBlacklist the cdc_ether module by editing the following file:
vi /etc/modprobe.d/blacklist.confAnd adding this line:
blacklist cdc_ether
Disable USB autosuspend using Grub by editing the following file:
vi /etc/default/grubEnsure that the GRUB_CMDLINE_LINUX_DEFAULT value contains usbcore.autosuspend=-1. As an example:
GRUB_CMDLINE_LINUX_DEFAULT="usbcore.autosuspend=-1 quiet"
Update grub and initramfs and if everything went well, reboot the machine:
update-grub
update-initramfs -v -u
shutdown -r nowSkip these steps if you do not plan to use Grafana and the TICK stack.
You need an existing InfluxDB instance for this to work.
apt-get install apt-transport-https
wget -qO- https://repos.influxdata.com/influxdb.key | apt-key add -
source /etc/os-release
test $VERSION_ID = "10" && echo "deb https://repos.influxdata.com/debian buster stable" | tee /etc/apt/sources.list.d/influxdb.list
apt-get update
Visitors from the future: you have to update the repository to your Debian version (e.g.,
test $VERSION_ID = "11" && echo "deb https://repos.influxdata.com/debian bullseye stable" | tee /etc/apt/sources.list.d/influxdb.list).
apt-get install telegraf
systemctl enable telegrafEdit the telegraf configuration file:
vi /etc/telegraf/telegraf.confExample configuration:
[global_tags]
  host = "$HOSTNAME"
[agent]
  interval = "5m"
[[outputs.influxdb]]
# InfluxDB URL and port
  urls = ["http://192.168.1.6:8086"]
# InfluxDB database name
  database = "servermonitor"
# InfluxDB user name
  username = "telegraf"
# The user's password
  password = "<your secret password>"
# Use lm-sensors to obtain temperature readings.
[[inputs.temp]]
# Use smartctl to obtain smart metrics (e.g., HDD status, temperature)
[[inputs.smart]]
# You will need to update your sudoers file to make this work
  use_sudo = true
# Use ping to measure network latency
[[inputs.ping]]
# This example contains the network addresses of the other PVE host
  urls = ["pve-storage","pve","192.168.1.2"]
  count = 4
Edit the sudoers to enable the smart module
vi /etc/sudoersAdd the following lines:
Cmnd_Alias SMARTCTL = /usr/sbin/smartctl
telegraf  ALL=(ALL) NOPASSWD: SMARTCTL
Defaults!SMARTCTL !logfile, !syslog, !pam_session
systemctl restart telegraf You may want to verify if everything went well:
systemctl status telegrafSkip these steps if you do not plan to use InfluxDB.
You need an existing InfluxDB instance for this to work.
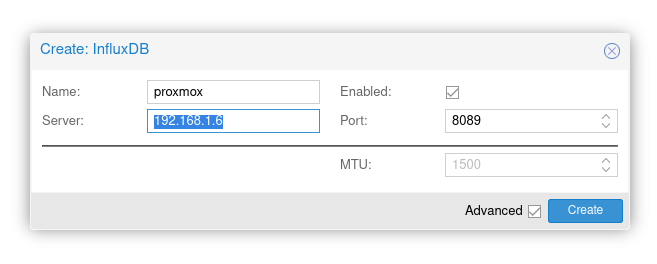
Login to a PVE cluster node (i.e. the PVE instance which you will use to create the cluster). Click on Datacenter on the left and then click Metric Server. Click Add and then select InfluxDB.
- Name: proxmox
- Server:
- Enabled: True
- Port: 8089

PVE InfluxDB Metric Server Setup