Homelab Cluster Configuration - h8pewou/homelab GitHub Wiki
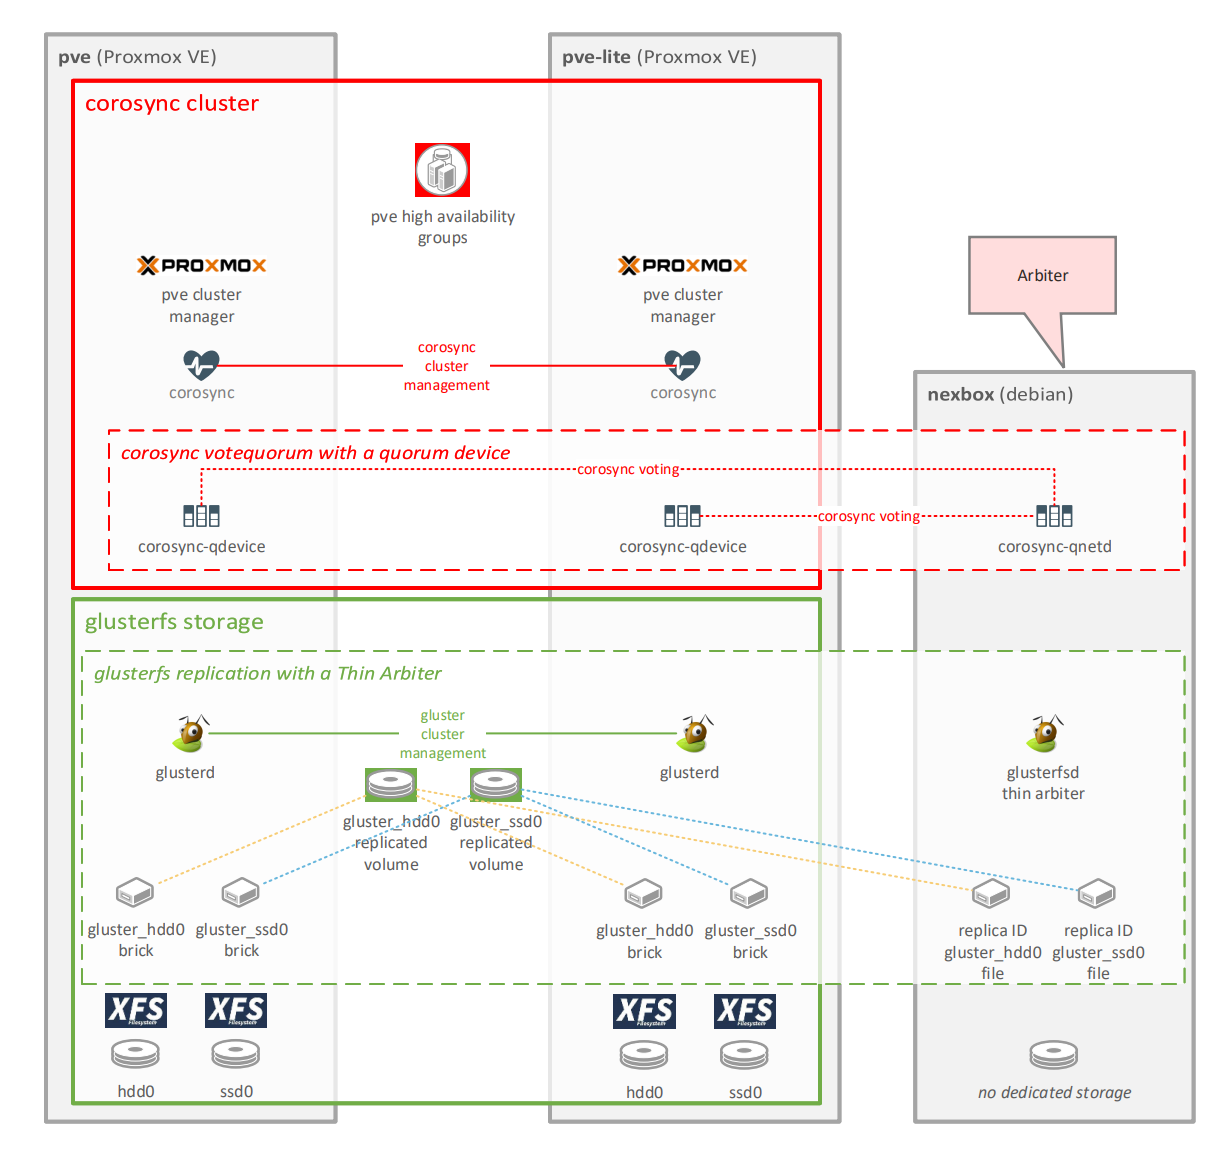
- High level design
- Corosync configuration steps
- Gluster configuration steps
- Create Highly Available Virtual Machines
Use one of the following URLs to create a two node cluster:
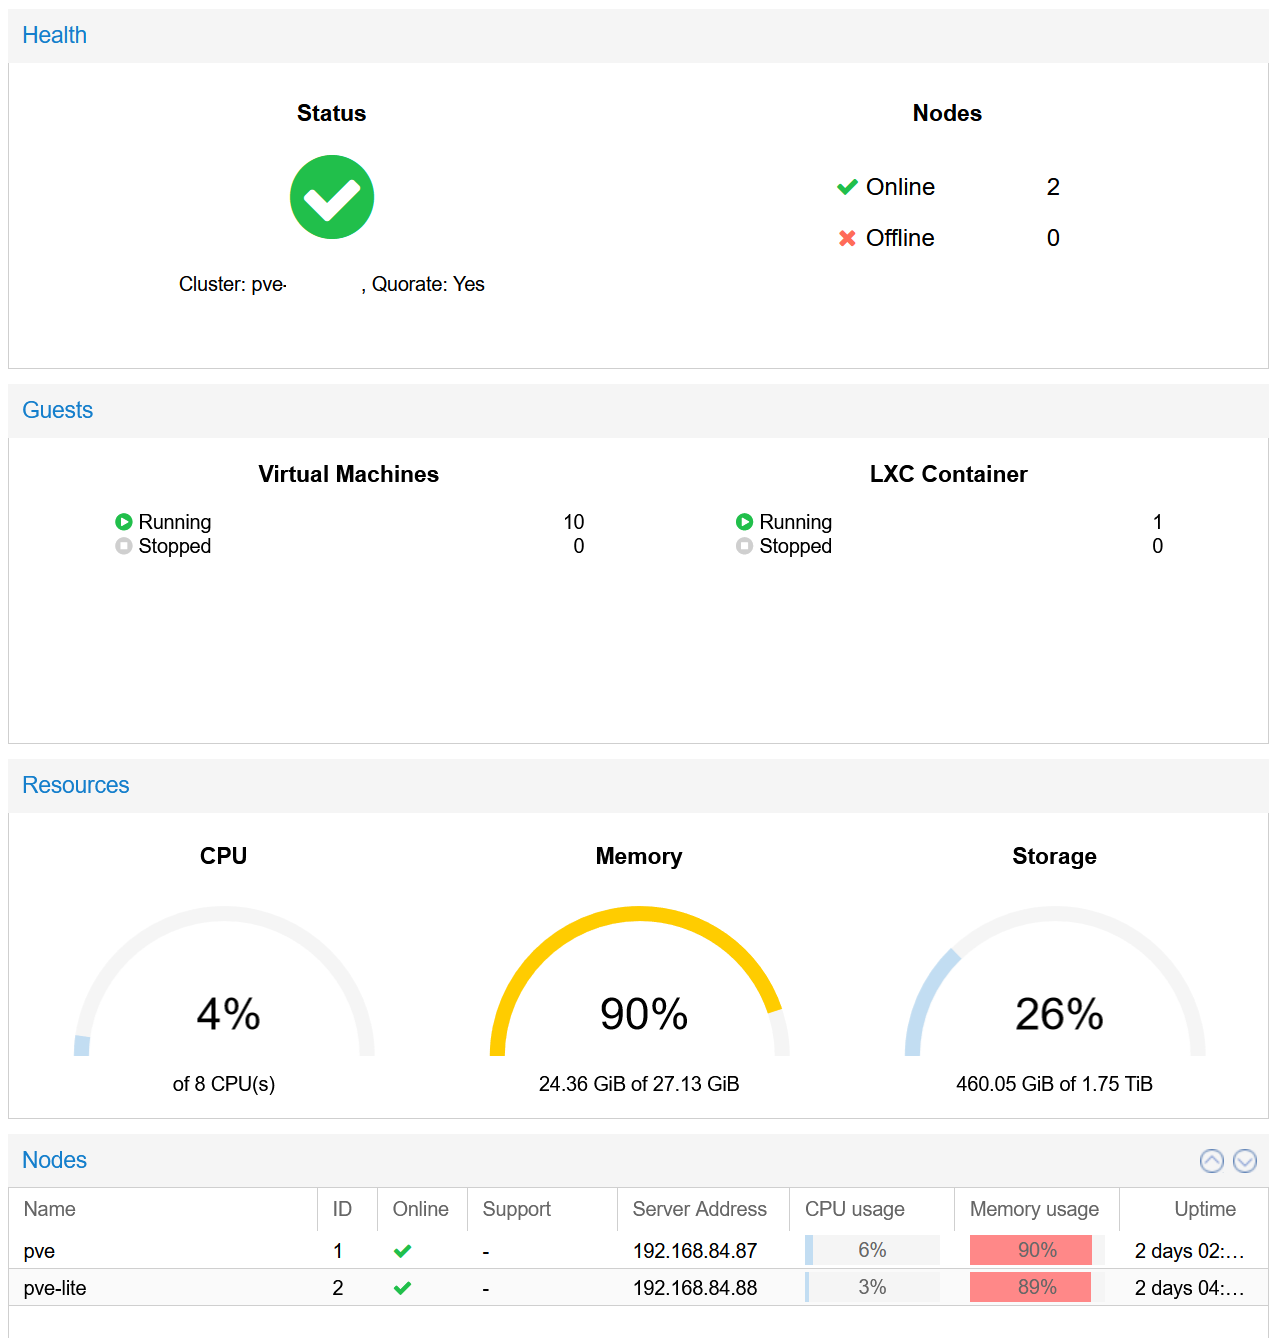
PVE Cluster Dashboard
A two node cluster is not highly available. Simple glitches could lead to losing quorum a.k.a. a split brain situation. You want to have an uneven number of nodes. A cost effective solution is to use a corosync quorum device. Once your two node cluster is up and running, follow these instructions:
TLDR version:
Reading the documentation and understanding the quorum device limitations can save you from a lot of headache.
On the Arbiter device:
apt install corosync-qnetdOn all cluster nodes:
apt install corosync-qdeviceOn one of the cluster nodes:
pvecm qdevice setup <QDEVICE IP ADDRESS>Setting up gluster for home use is very simple as long as you understand the following limitations:
- Gigabit shared connections may compromise the performance of your cluster file system. Dedicated multigig netowrking is strongly recommended. I've used a dedicated 2.5Gbe connection. To stay within the budget this had to be connected via USB 3. This is generally not recommended. Having that said, this still provides acceptable performance for home use, peaking around 300 MB/s.
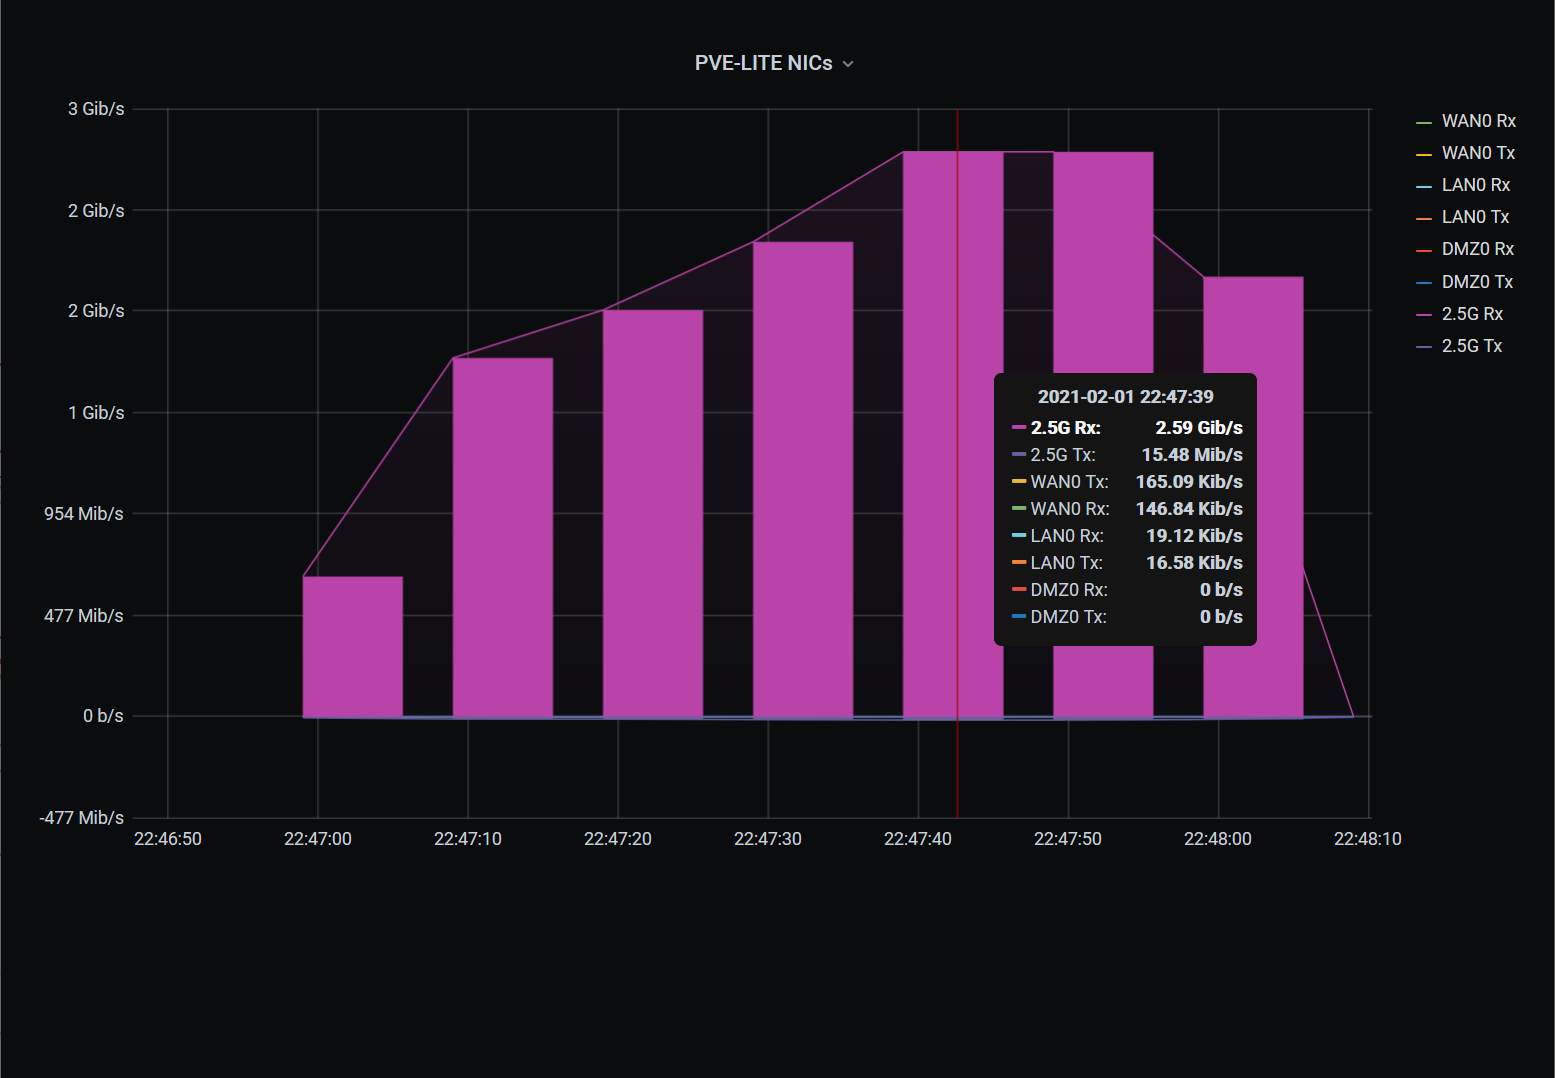
Peak bandwidth during VM disk migration to GlusterFS
- Self healing will take a long time, even if you use multiple threads (see instructions below).
- The instructions below will not setup any redundancy besides the replication in GlusterFS. In this configuration, two failing disks in the same volume will lead to data loss. You can tackle this by adding more disks and using RAID as an example.
- Alternatively you can also add more cluster nodes (with more disks) to further improve availability and reduce the chance of data loss. Having three nodes also negates the need of an arbiter machine, thus making the setup more straightforward for both PVE and Gluster.
- These setups can be wildly different from the one described below. I strongly recommend you to read and understand the Setting up GlusterFS Volumes page.
Use fdisk -l to pick the right disk. This tutorial will use /dev/sda, you may need to change that.
fdisk -lFailing to select the right disk may lead to sad results.
Use fdisk to delete all partitions from the disk:
fdisk /dev/sdaEnter d until you get rid of all existing partitions and then enter w.
Alternatively, zero the first 40M of the disk for good measure:
dd if=/dev/zero of=/dev/sda bs=4M count=10Create a new partition on your disk:
fdisk /dev/sdaEnter g to create a GPT partion table. Enter n for new partion and accept the default values for size to use the entire disk. Enter w to writhe changes.
Example:
# fdisk /dev/sda

Welcome to fdisk (util-linux 2.34).
Changes will remain in memory only, until you decide to write them.
Be careful before using the write command.

Device does not contain a recognized partition table.
The size of this disk is 3.7 TiB (4000787030016 bytes). DOS partition table format cannot be used on drives for volumes larger than 2199023255040 bytes for 512-byte sectors. Use GUID partition table format (GPT).

Created a new DOS disklabel with disk identifier 0x6dad69de.

Command (m for help): gpt
Created a new GPT disklabel (GUID: 18443CD6-BB93-8943-A712-3FE35D21A6C8).

Command (m for help): n
Partition number (1-128, default 1):
First sector (2048-7814037134, default 2048):
Last sector, +/-sectors or +/-size{K,M,G,T,P} (2048-7814037134, default 7814037134):

Created a new partition 1 of type 'Linux filesystem' and of size 3.7 TiB.

Command (m for help): w
The partition table has been altered.
Calling ioctl() to re-read partition table.
If everything goes well fdisk -l /dev/sda should display something like this:
Disk /dev/sda: 447.1 GiB, 480103981056 bytes, 937703088 sectors
Disk model: SPCC Solid State
Units: sectors of 1 * 512 = 512 bytes
Sector size (logical/physical): 512 bytes / 512 bytes
I/O size (minimum/optimal): 512 bytes / 512 bytes
Disklabel type: gpt
Disk identifier: C79CBFF2-F76E-FF42-A06D-3D608F2E3A1F

Device     Start       End   Sectors   Size Type
/dev/sda1   2048 937703054 937701007 447.1G Linux filesystem
Once you have your new partition, use mkfs.xfs to create a new filesystem:
mkfs.xfs -f -i size=512 -L gluster_ssd0 /dev/sda1Now that you have your new filesystem, add a new entry to your fstab and get it mounted.
Get your partition's UUID:
blkid /dev/sda1The output will look something like this:
/dev/sda1: LABEL="gluster_ssd0" UUID="28b3506c-ebe4-4327-b1a4-61e76693cb9e" TYPE="xfs" PARTUUID="4e0fd8df-4f93-af4e-84a0-35e5159b0831"
Copy the UUID value and add a new line to your fstab:
vi /etc/fstab It should look similar to this:
UUID=28b3506c-ebe4-4327-b1a4-61e76693cb9e /gluster/ssd0 xfs defaults 0 2
Create a directory for your new mount point and then mount it:
mkdir -p /gluster/ssd0
mount /gluster/ssd0Add your storage network IP addresses with unique host names to your hosts file:
vi /etc/hostsExample:
# Proxmox VE storage IPs
192.168.99.1 pve-storage
192.168.99.2 pve-lite-storage
# Thin arbiter and Quorum device
# this host may not need to be on your storage network
192.168.84.86 nexbox
systemctl start glusterd
systemctl enable glusterdTODO: Add thin arbiter instructions. Further reading: A 'Thin Arbiter' for glusterfs replication by Ravishankar N.
Run peer probe:
gluster peer probe pve-lite-storage
gluster peer probe pve-storage
Make sure that you have your new filesystem mounted on both of the nodes and execute the following commands on one of them:
gluster volume create gluster_ssd0 transport tcp replica 2 pve-storage:/gluster/ssd0 pve-lite-storage:/gluster/ssd0 force
gluster volume start gluster_ssd0
gluster volume status
If everything went well, you will see something similar to this:
Status of volume: gluster_ssd0
Gluster process                             TCP Port  RDMA Port  Online  Pid
------------------------------------------------------------------------------
Brick pve-storage:/gluster/ssd0             49153     0          Y       1186
Brick pve-lite-storage:/gluster/ssd0        49153     0          Y       3217
Self-heal Daemon on localhost               N/A       N/A        Y       1206
Self-heal Daemon on 192.168.99.2            N/A       N/A        Y       3241

Task Status of Volume gluster_ssd0
------------------------------------------------------------------------------
There are no active volume tasks
You may also want to set the self healing daemon max threads to more than 1. Running self healing on a single thread may result in significant performance penalties. Here is an example for 4 threads:
gluster volume set gluster_ssd0 cluster.shd-max-threads 4If you need further tuning to speed up self healing, head over to: What is the best method to improve self heal performance on replicated or disperse volumes on Red Hat Gluster Storage?
Repeat these steps if you want to create further GlusterFS volumes: Create a GlusterFS volume
Login to a PVE cluster node. Click on Datacenter on the left. Select Storage under Datacenter. Click Add and select GlusterFS. Populate the following fields, then click Add:
- ID: gluster_ssd0 <-- this is how its going to be referenced under PVE storage, it does not have to match the volume name
- Server: pve-storage <-- one of the cluster node's storage hostname
- Second Server: pve-lite-storage <-- the other cluster node's storage hostname
- Volume name: gluster_ssd0 <-- GlusterFS volume name
- Content: select all relevant entries (select all if unsure)
- Nodes: All (no restrictions)
- Enable: Checked
Example:
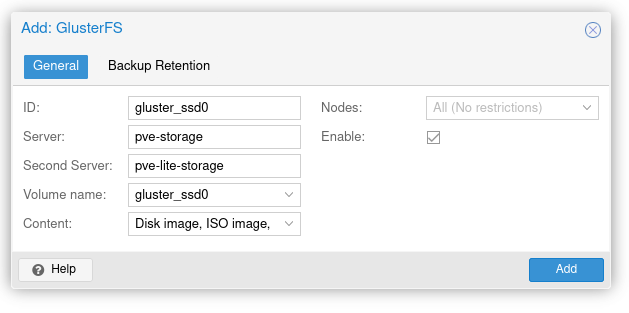
GlusterFS Volume Setup in PVE
Once completed, you should see your first GlusterFS volume added to your PVE cluster.
Creating a VM using GlusterFS is fairly straightforward, just select a GlusterFS volume during the initial VM creation wizard.
Migrating an existing VM to GlusterFS is very simple as well, select the disk under Hardware and click Move disk, then select your GlusterFS volume.
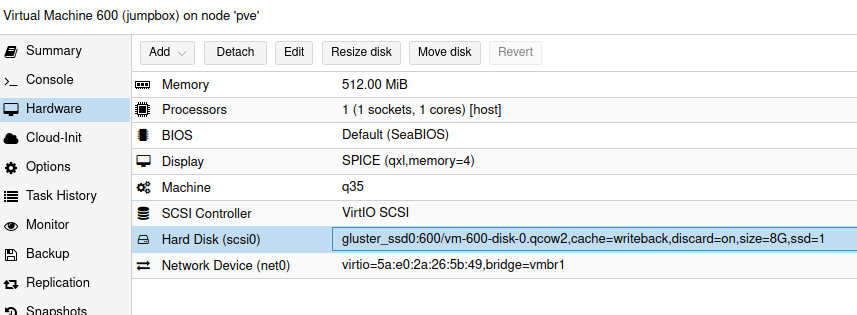
GlusterFS disk setup in a PVE VM
Login to a PVE cluster node. Click on Datacenter on the left. Expand HA and click on Groups. Click Create in Groups and then name your HA group in ID. You will need to select your PVE nodes (at least two).
Official description for the remaining options:
- nofailback: (default = 0
- The CRM tries to run services on the node with the highest priority. If a node with higher priority comes online, the CRM migrates the service to that node. Enabling nofailback prevents that behavior.
- restricted: (default = 0)
- Resources bound to restricted groups may only run on nodes defined by the group. The resource will be placed in the stopped state if no group node member is online. Resources on unrestricted groups may run on any cluster node if all group members are offline, but they will migrate back as soon as a group member comes online. One can implement a preferred node behavior using an unrestricted group with only one member.
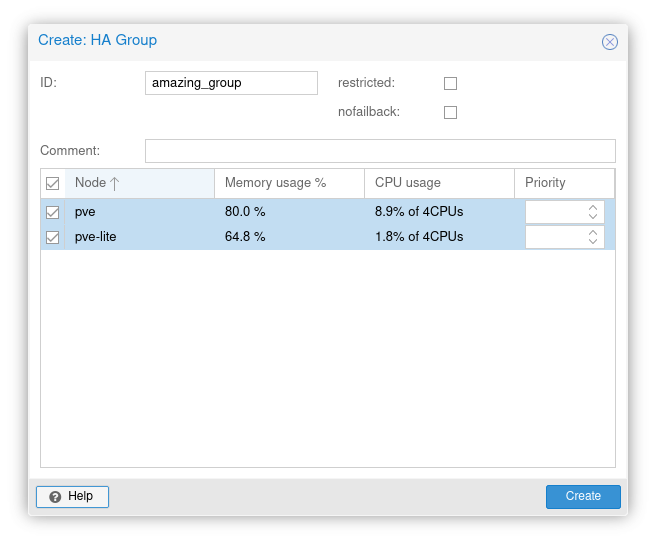
PVE High Availability Group Setup
Login to a PVE cluster node. Click on Datacenter on the left. Select HA and click Add under Resources.
- VM: <-- typically 3 digits (e.g., 100)
- Group: amazing_group <-- name of the HA group you just created
- Comments: <-- it's a good practice to add the hostname of your VM here, thank me later
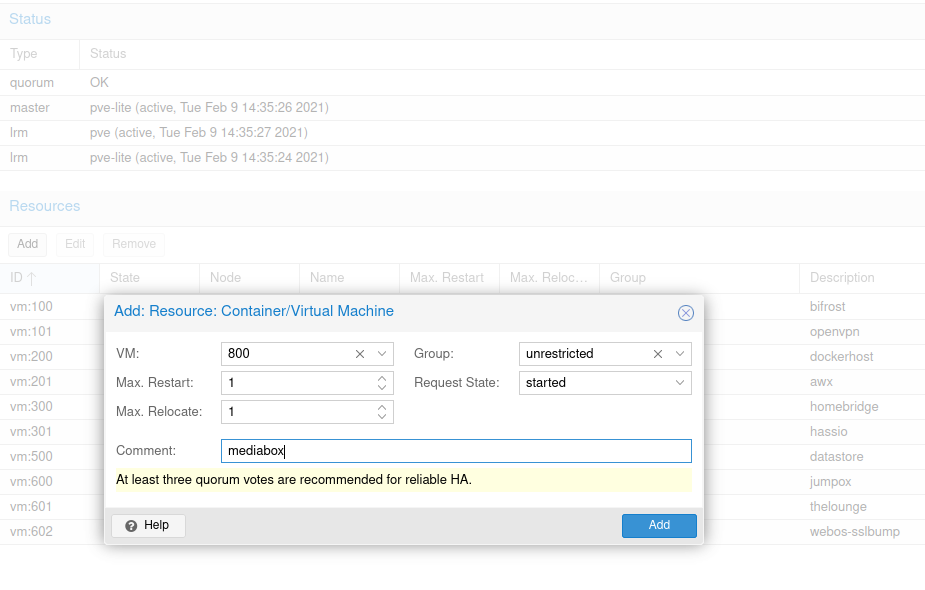
Adding a VM to a PVE High Availability Group
At this point you will want to learn more about the remainder of the options here.
Understanding the states will be important when operating your cluster:
- started
- The CRM tries to start the resource. Service state is set to started after successful start. On node failures, or when start fails, it tries to recover the resource. If everything fails, service state it set to error.
- stopped
- The CRM tries to keep the resource in stopped state, but it still tries to relocate the resources on node failures.
- disabled
- The CRM tries to put the resource in stopped state, but does not try to relocate the resources on node failures. The main purpose of this state is error recovery, because it is the only way to move a resource out of the error state.
- ignored
- The resource gets removed from the manager status and so the CRM and the LRM do not touch the resource anymore. All Proxmox VE API calls affecting this resource will be executed, directly bypassing the HA stack. CRM commands will be thrown away while there source is in this state. The resource will not get relocated on node failures.
