Desktop Application User Guide - gs1/gs1-barcode-engine GitHub Wiki
This guide provides basic instructions for getting started with the demonstration desktop application that comes with the GS1 Barcode Engine.
A description of the GS1 Barcode Engine is provided on the project homepage.
Launching the application
Once the application has been downloaded to a location of your choice (or built from source) as described on the project homepage, you can launch it by double-clicking on the program icon.
Note: The first time that you attempt to run the application your antivirus software may block the attempt because the application or publisher isn't recognised. You should be able to click "more info" (or similar), read the information provided, and you may then decide to "run anyway". If you are in a managed environment and are unable to proceed with running the application then it is likely that a local policy is deliberately blocking all unrecognised applications and you may then need to ask your system administrator to whitelist the application.
Quick start
Upon launch, the main window will be displayed:
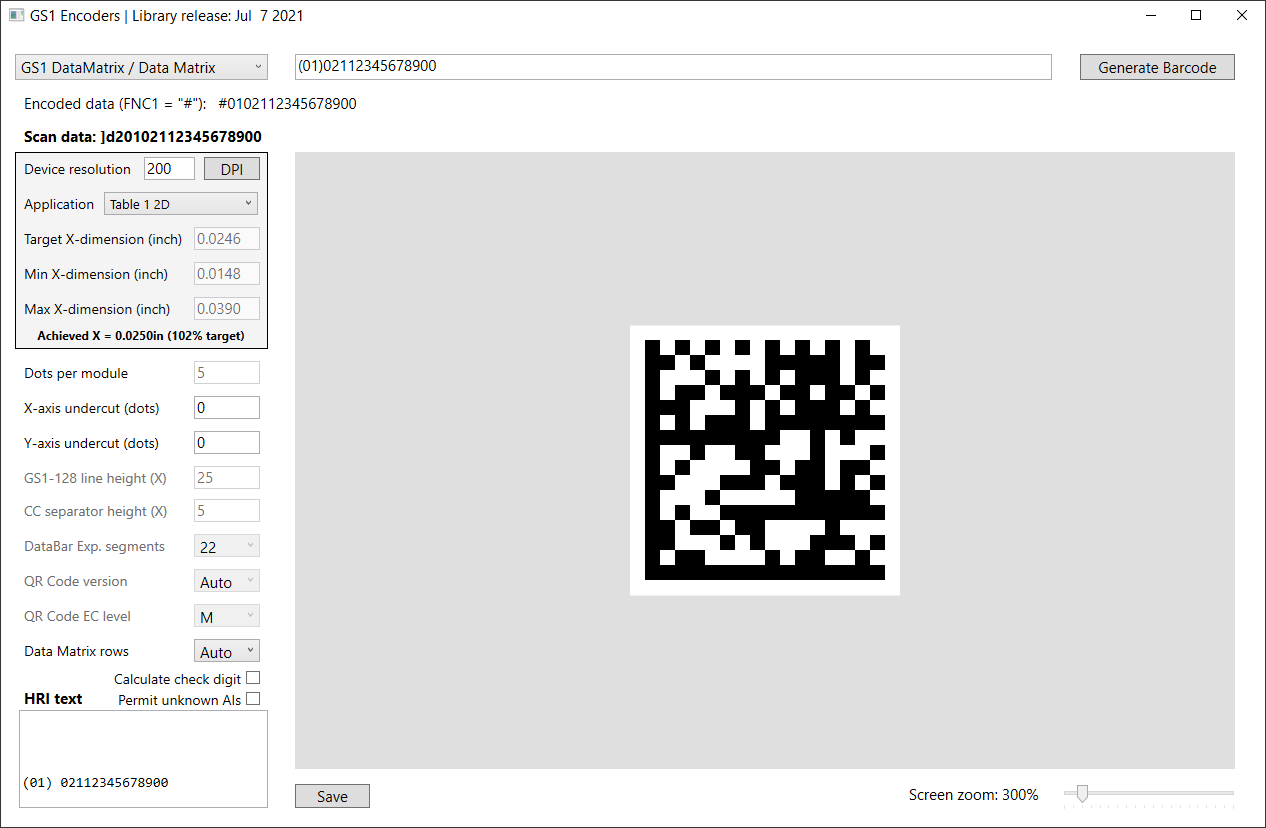
From here you can immediately start to generate barcode symbols for GS1 data formats, including Application Identifier element strings and Digital Link URIs.
Firstly, select the barcode format that you require from the symbologies dropdown:

Enter the barcode data into the content fields to the right of the symbologies menu in the format required by the selected symbology.
The acceptable contents for each symbology is described below. Note that just because input is accepted does not necessarily indicate that it is meaningful or correct to use within the intended application. Refer to the GS1 General Specifications and applicable application-specific specifications to determine what is acceptable.
Finally, click the "Generate Barcode" button at the top right.
If the content field is well-formed then the generated barcode symbol will be displayed. Otherwise a descriptive error message will be shown. Correct the barcode contents and click the "Generate Barcode" button to try again.
If the resulting barcode image is too large or too small to be rendered in the display window then it can be zoomed in or out using the screen zoom control at the bottom right. This affects the scale of the image as presented on screen without affecting the image itself.

Clicking anywhere on the barcode image will copy it to the clipboard, allowing it to be pasted directly into label design or desktop publishing software.
The barcode image can also be saved as either a BMP or PNG file by clicking the "Save" button, selecting a file format (either "Bitmap Image" or "Portable Network Graphic") and specifying the location and filename in the ensuing save dialogue box.

Refer to the GS1 General Specifications and any applicable application specifications for guidance on how to size and position the barcode symbol correctly for the intended application.
Graphical robustness
It is the user's responsibility to exercise control over the design and printing process all the way through to the end device.
The user must ensure that the graphical integrity of the bitmap symbols generated by this program is preserved by:
- only scaling the bitmap such that each pixel is represented by an exact integer multiple of output device dots, and
- reducing dark module widths as necessary to compensate for any print gain introduced due to imperfections in the printing process, such as ink bleed.
Observing this will ensure that the relative module widths (bars/spaces, square elements) remain consistent throughout the printed output.
This program has features to assist with standards-compliant production of barcode symbols, which are discussed below.
Human Readable Interpretation text
All content extracted from the Application Identifiers within the provided barcode content will be rendered in the HRI text box at the bottom left.

Clicking anywhere within this text box will copy the content verbatim to the clipboard from where it can be pasted into your label design or desktop publishing software.
Refer to the GS1 General Specifications and any applicable application specifications for guidance on how to correctly apply this text to your labels, including which components must be included, where they must be positioned relative to the barcode symbol, and which font faces and sizes are permissible for your application.
Accepted contents for each symbology
Depending upon the symbology, input may be provided in one or more different formats:
- Plain data, for example
2112345678900for EAN-13. - Bracketed AI element string, for example
(01)02112345678900(98)TEST(99)ABC123 - Unbracketed AI element string (where
^denotes FNC1), for example^010211234567890098TEST^99ABC123 - Digital Link URI, for example
https://id.gs1.org/01/2112345678900?98=TEST&99=ABC123
The acceptable barcode contents varies between symbologies, as follows:
- EAN-13:
- 13 digits, including check digit (preferred)
- 12 digits, excluding check digit when "Calculate check-digit" is selected (deprecated)
- Bracketed AI element string with sole
(01)0...AI - Unbracketed AI element string with sole
^010...AI (deprecated)
- EAN-8:
- 8 digits, including check digit (preferred)
- 7 digits, excluding check digit when "Calculate check-digit" is selected (deprecated)
- Bracketed AI element string with sole
(01)000000...AI - Unbracketed AI element string with sole
^01000000...AI (deprecated)
- UPC-A:
- 12 digits, including check digit (preferred)
- 11 digits, excluding check digit when "Calculate check-digit" is selected (deprecated)
- Bracketed AI element string with sole
(01)00...AI - Unbracketed AI element string with sole
^0100...AI (deprecated)
- UPC-E:
- 12 digits (not zero-suppressed), including check digit (preferred)
- 11 digits (not zero-suppressed), excluding check digit when "Calculate check-digit" is selected (deprecated)
- Bracketed AI element string with sole
(01)00...AI - Unbracketed AI element string with sole
^0100...AI (deprecated)
- GS1 DataBar Omnidirectional:
- 14 digits, including check digit
- 13 digits, excluding check digit when "Calculate check-digit" is selected (deprecated)
- Bracketed AI element string with sole
(01)...AI - Unbracketed AI element string with sole
^01...AI (deprecated)
- GS1 DataBar Truncated:
- 14 digits, including check digit
- 13 digits, excluding check digit when "Calculate check-digit" is selected (deprecated)
- Bracketed AI element string with sole
(01)...AI - Unbracketed AI element string with sole
^01...AI (deprecated)
- GS1 DataBar Stacked:
- 14 digits, including check digit
- 13 digits, excluding check digit when "Calculate check-digit" is selected (deprecated)
- Bracketed AI element string with sole
(01)...AI - Unbracketed AI element string with sole
^01...AI (deprecated)
- GS1 DataBar Stacked Omnidirectional:
- 14 digits, including check digit
- 13 digits, excluding check digit when "Calculate check-digit" is selected (deprecated)
- Bracketed AI element string with sole
(01)...AI - Unbracketed AI element string with sole
^01...AI (deprecated)
- GS1 DataBar Limited:
- 14 digits beginning 0 or 1, including check digit
- 13 digits beginning 0 or 1, excluding check digit when "Calculate check-digit" is selected (deprecated)
- Bracketed AI element string with sole
(01)0...or(01)1...AI - Unbracketed AI element string with sole
^010...or^011...AI (deprecated)
- GS1 DataBar Expanded (Stacked):
- Bracketed AI element string
- Unbracketed AI element string (deprecated)
- GS1-128:
- Bracketed AI element string
- Unbracketed AI element string (deprecated)
- GS1 DataMatrix / Data Matrix:
- Bracketed AI element string
- Unbracketed AI element string (deprecated)
- Digital Link URI
- GS1 QR Code / QR Code:
- Bracketed AI element string
- Unbracketed AI element string (deprecated)
- Digital Link URI
Any "(" characters in AI element values must be escaped as "(" to avoid conflating them with the start of the next AI.
- Composite Components (valid for EAN/UPC, GS1 DataBar family and GS1-128)
- Linear component:
- Bracketed AI element string
- Unbracketed AI element string (deprecated)
- 2D component:
- Must be same format as format as linear component
- Both components separated by a "|" character, for example:
- (01)12345678901231|(10)ABC123(11)210630
- ^0112345678901231|10ABC123^11210630
- Linear component:
Avoiding data input errors
Plain data inputs to EAN/UPC and GS1 DataBar should normally include the check digit character. In case the check digit character is unknown it can be omitted and the "Calculate check digit" option selected, in which case it will be calculated and included automatically. This option should not be used when the check digit is known by the user since doing so will defeat its entire purpose: To guard against manual data input errors.
When entering AI element string data it is simpler and less error prone to specify the input in human-friendly, bracketed format so that the encoding of data, including placing the required FNC1 separator characters in the correct locations, is taken care of automatically.
Within bracketed AI element strings, a literal "(" character in an AI's data
value must be escaped with a backslash character as \(.
EAN/UPC, GS1 DataBar and GS1-128 symbols support using a Composite Component. The 2D component must be specified in the same syntax as the linear component, either as a bracketed or unbracketed AI element string.
As a form of visual validation, the user input will be echoed back in an alternative format allowing the user to cross-check their intention.
If the user enters a bracketed AI element string then the unbracketed message data will be shown:

If the user enters an unbracketed AI element string then this will be decoded into bracketed format and displayed:

If the user provides a Digital Link URI then the equivalent bracketed AI string will be displayed:

The user should carefully examine the alternative representation that is being shown to ensure that it reflects their intention.
Application Identifier validation
AI-value pairs will be extracted from element strings and Digital Link URIs and validation of their type, length and other basic properties will be performed.
If the data value provided for an AI is non-conforming then a descriptive error will be displayed. Note that just because the contents of an AI is accepted does not necessarily indicate that it is meaningful or correct to use within your intended application. Refer to the GS1 General Specifications and applicable application-specific specifications to determine what is the acceptable contents of the barcode.
If your instance of the GS1 Barcode Engine is out of date with respect to the current specification then it may be necessary to encode an AI that it knows nothing about. The application will prevent you from specifying unknown AIs unless the "Permit unknown AIs" option is checked. Bespoke AIs that are incompatible with the GS1 system will still be rejected if they are specified.
The optional feature for accepting unknown AIs is intended to increase the durability of the library in circumstances that necessitate a protracted software update lifecycle. Using this feature increases the risk that bad data is accepted into the barcodes that you generate, so you should always endeavour to keep this application and the library up to date.
Symbology settings
This program presents a number of settings specific to the options available for each symbology.

The options are as follows:
- "GS1-128 line height (X)": The height of the linear component of a GS1-128 symbol as a multiple of the X-dimension.
- "CC separator height (X)": For Composite Component symbols, this specifies the height of the separator between the linear component and the 2D component as a multiple of the X-dimension.
- "DataBar Exp. segments": Specifies the maximum number of segments per row in a GS1 DataBar Expanded symbol before each row is wrapped, resulting in a GS1 DataBar Expanded Stacked symbol.
- "QR Code version": Specifies a fixed version for a QR Code symbol irrespective of the contents, which determines its exact symbol size.
- "Data Matrix rows": Specifies a fixed number of rows in a Data Matrix symbol irrespective of the contents, which determines its exact symbol size.
Options that are not available for the currently selected symbology are grayed out.
Controlling image output
This program presents three settings that are used to specify the scale of the bitmaps and apply pixel shaving to compensate for print growth.

The options are as follows:
- "Dots per module": Specifies the number of pixels that will be dedicated to each barcode module (narrowest bar/space or smallest square).
- X-axis undercut (dots): The number of pixels that are removed from the left and right of all dark modules to compensate for horizontal print growth.
- Y-axis undercut (dots): The number of pixels that are removed from the top and bottom of all dark modules to compensate for vertical print growth.
Application-specific sizing
This program does not integrate directly with specific printing technologies, however it provides settings to optimise the generated barcode image bitmaps for printing at specific real world dimensions.

The options are as follows:
- "Device resolution": The real world resolution of the output device in units of either DPI or d/mm.
- "Target X-dimension": The ideal X-dimension width in units corresponding to the device resolution.
- "Min X-dimension": The minimum permissible X-dimension width in units corresponding to the device resolution.
- "Max X-dimension": The maximum permissible X-dimension width in units corresponding to the device resolution.
Populating these settings will cause this program to automatically set the "Dots per module" to the value that most closely achieves the ideal X-dimension, within the specified constraints, provided that the bitmap is printed at a scale of one pixel per device dot on a device with the specified resolution.
The program will report the actual X-dimension that can be achieved on the device in real world units and as a percentage of the target, unless it is not possible to meet the specified constraints.
These settings require that the user provides the device resolution accurately and controls the end-to-end print process so that the bitmap is printed at a scale where exactly one device dot will be used to represent each bitmap pixel.
These settings include an "Application" dropdown that allows the user to select their particular application based on the tables of symbol dimensions provided in the GS1 General Specifications.

Selecting an application will populate the target, minimum and maximum X-dimension using values for the current unit system (DPI or d/mm). It will also restrict the range of available symbologies to those applicable to the application.