Console Application User Guide - gs1/gs1-barcode-engine GitHub Wiki
This guide provides basic instructions for getting started with the demonstration console application that comes with the GS1 Barcode Engine.
An overview of the features of the application is provided on the project homepage.
Once the application has been downloaded to a location of your choice (or built from source) as described on the project homepage, you can launch it by either double-clicking on the program icon (typical for Windows) or by entering the following at the command prompt (typical for Linux):
cd [location that you placed the binary]
./gs1encoders-linux.bin
Note: The first time that you attempt to run the application your antivirus software may block the attempt because the application or publisher isn't recognised. You should be able to click "more info" (or similar), read the information provided, and you may then decide to "run anyway". If you are in a managed environment and are unable to proceed with running the application then it is likely that a local policy is deliberately blocking all unrecognised applications and you may then need to ask your system administrator to whitelist the application.
Upon launch, the application will display the screen shown below:
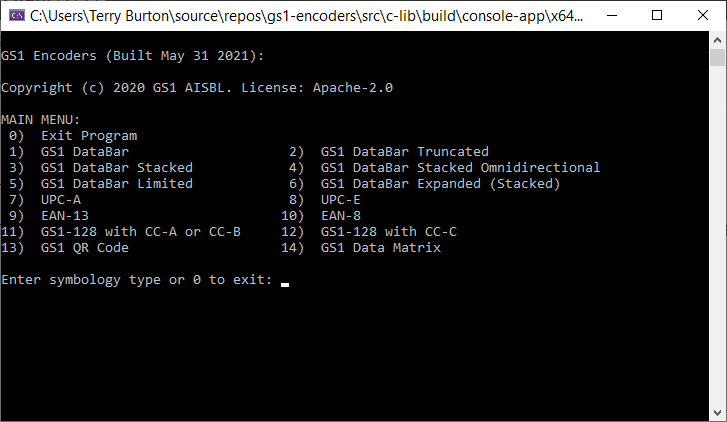
You must select option corresponding to the type of barcode whose image you wish to create. If instead you wish to exit the application then you should choose option 0 (Exit Program).
TIP: To select an option you must type its number and then press the <ENTER> key.
After selecting the symbology you will be presented with a menu that is specific to the type of barcode chosen. For example, after choosing main menu item 4 (GS1 DataBar Stacked Omnidirectional) the following screen will be displayed:

From here you must select each of the menu items in turn that set the properties of the required image, the source of the barcode data (keyboard or file) and the type (BMP or TIFF) and location of the barcode image file.
Finally you use menu option 5 to provide the input filename or the barcode data in the format specified by the Data input string or file format description. After this the image file is written to the location you specified.
After the image has been created you will remain at the symbology-specific menu and your existing settings will be preserved. You can now generate additional symbols in the same manner as before.
If you wish to exit the application or generates symbols of some other symbology then you can return to the main menu using option 9 (Select another symbology or exit program).
The following example illustrates the steps taken to create a six-segment wide GS1 DataBar Expanded Stacked image at 1 pixel per X-dimension that is stored in a user-defined TIFF file.
The symbol shall encode the following GS1 AI-formatted data:
- (01) 95011010209176 (GTIN-14)
- (17) 080508 (Expiration date YYMMDD)
- (10) ABCD1234 (Batch or lot number)
- (90) XYZ (Custom data between trade partners. For demonstration purposes, only)
Launch the application and at the main menu (refer to the first screenshot) choose option 6 (GS1 DataBar Expanded (Stacked)).
At the GS1 DataBar Expanded (Stacked) menu (refer to the last screenshot) configure the image properties as follows:
- Choose option
7and enter6to set themaximum segments per row = 6. - Choose option
3then enterO:\JamesC\database-expanded.tifto set the TIFF output file name. (Note: This is a user selectable file and the one used in this example is for demonstration purposes only.) - Finally, choose option
5then enter(01)95011010209176(17)080508(10)ABCD1234(90)XYZ.
As described in the data formatting text for GS1 DataBar Expanded Stacked, when entering the data for the barcode in option 5:
- The data is provided as a list of AI values pairs, with the AIs surrounded by parentheses.
- It is not necessary to include FNC1 characters either at the start of the data or to separate AIs since the application will encode these automatically, as necessary.
NOTE: The data syntax rules differ between symbologies. Always read the text provided above the symbology-specific menu carefully.
The following image was created from the steps above and would be located in the file specified by option 3:

The following example illustrates the steps taken to create a GS1 DataBar Stacked Omnidirectional with Composite Component image, at 2 pixels per X-dimension with a one-pixel undercut in both X and Y, that is stored in a user-defined BMP file.
The symbol shall encode the following GS1 AI-formatted data:
Primary Component:
- (01) 00614141000016 (GTIN-14)
Composite Component:
- (17) 010101 (Expiration date YYMMDD)
- (10) A1B2C3 (Batch or lot number)
Launch the application and at the main menu (refer to the first screenshot) choose option 4 (GS1 DataBar Stacked Omnidirectional).
At the GS1 DataBar Stacked Omnidirectional menu configure the image properties as follows:
- Choose option
0then enter2to set thepixels per X = 2. - Choose option
1then enter1to set theX pixels to undercut = 1. - Choose option
2then enter2to set theY pixels to undercut = 1. - Choose option
6then enter1to selectBMP formatfor the image file. - Choose option
3then enterO:\JamesC\databar-so.bmpto set the BMP output file name. (Note: This is a user selectable file and the one used in this example is for demonstration purposes only.) - Finally, choose option
5then enter(01)00614141000016|(17)010101(10)A1B2C3for the|-seperated linear and 2D barcode component data.
As described in the data formatting text for GS1 DataBar Stacked Omnidirectional, when entering the data for the barcode in option 5:
- The data for both components is provided as a list of AI values pairs, with the AIs surrounded by parentheses.
- A
|character separates the primary component and secondary component - It is not necessary to include FNC1 characters either at the start of the data or to separate AIs since the application will encode these automatically, as necessary.
NOTE: The data syntax rules differ between symbologies. Always read the text provided above the symbology-specific menu carefully.
The following image was created from the steps above and would be located in the file specified by option 3:

The following example illustrates the steps taken to create a GS1-128 image at 1 pixel per X-dimension that is stored in a user-defined BMP file.
The symbol shall encode the following GS1 AI-formatted data:
- (01) 95011010209176 (GTIN-14)
- (10) ABCD1234 (Batch or lot number)
- (90) XYZ (Custom data between trade partners. For demonstration purposes, only)
Launch the application and at the main menu (refer to the first screenshot) choose option 11 (GS1-128 with CC-A or CC-B).
NOTE: Since we are not adding a Composite Component in this example we could in fact also choose option 12 (GS1-128 with CC-C) which would result in identical results.
At the GS1-128 menu configure the image properties as follows:
- Choose option
6then enter1to selectBMP formatfor the image file. - Choose option
3then enterO:\JamesC\gs1-128.bmpto set the BMP output file name. (Note: This is a user selectable file and the one used in this example is for demonstration purposes only.) - Finally, choose option
5then enter(01)95011010209176(10)ABCD1234(90)XYZ.
As described in the data formatting text for GS1-128, when entering the data for the barcode in option 5:
- The data for both components is provided as a list of AI values pairs, with the AIs surrounded by parentheses.
- It is not necessary to include FNC1 characters either at the start of the data or to separate AIs since the application will encode these automatically, as necessary.
NOTE: The data syntax rules differ between symbologies. Always read the text provided above the symbology-specific menu carefully.
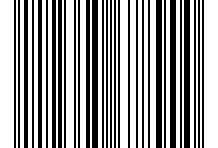
The following image was created from the steps above and would be located in the file specified by option 3:

The following example illustrates the steps taken to create an EAN-13 image at 2 pixels per X-dimension that is stored in a user-defined TIFF file.
The symbol shall encode the following GTIN-13: 2112345678900
Launch the application and at the main menu (refer to the first screenshot) choose option 9 (EAN-13).
At the EAN-13 menu configure the image properties as follows:
- Choose option
0then enter2to set thepixels per X = 2. - Choose option
3then enterO:\JamesC\ean13.tifto set the TIFF output file name. (Note: This is a user selectable file and the one used in this example is for demonstration purposes only.) - Finally, choose option
5then enter2112345678900.
As described in the data formatting text for EAN-13, when entering the data for the barcode in option 5:
- The data is entered as the full 13-digit GTIN, which includes the check digit.
NOTE: The data syntax rules differ between symbologies. Always read the text provided above the symbology-specific menu carefully.
The following image was created from the steps above and would be located in the file specified by option 3: