09. Plate Solving - gordtulloch/Galileo GitHub Wiki
09. Plate Solving
Overview. Every control on this screen has detailed built-in help: hover it, press F1, or click the ? beside the title. See Built-in Help.
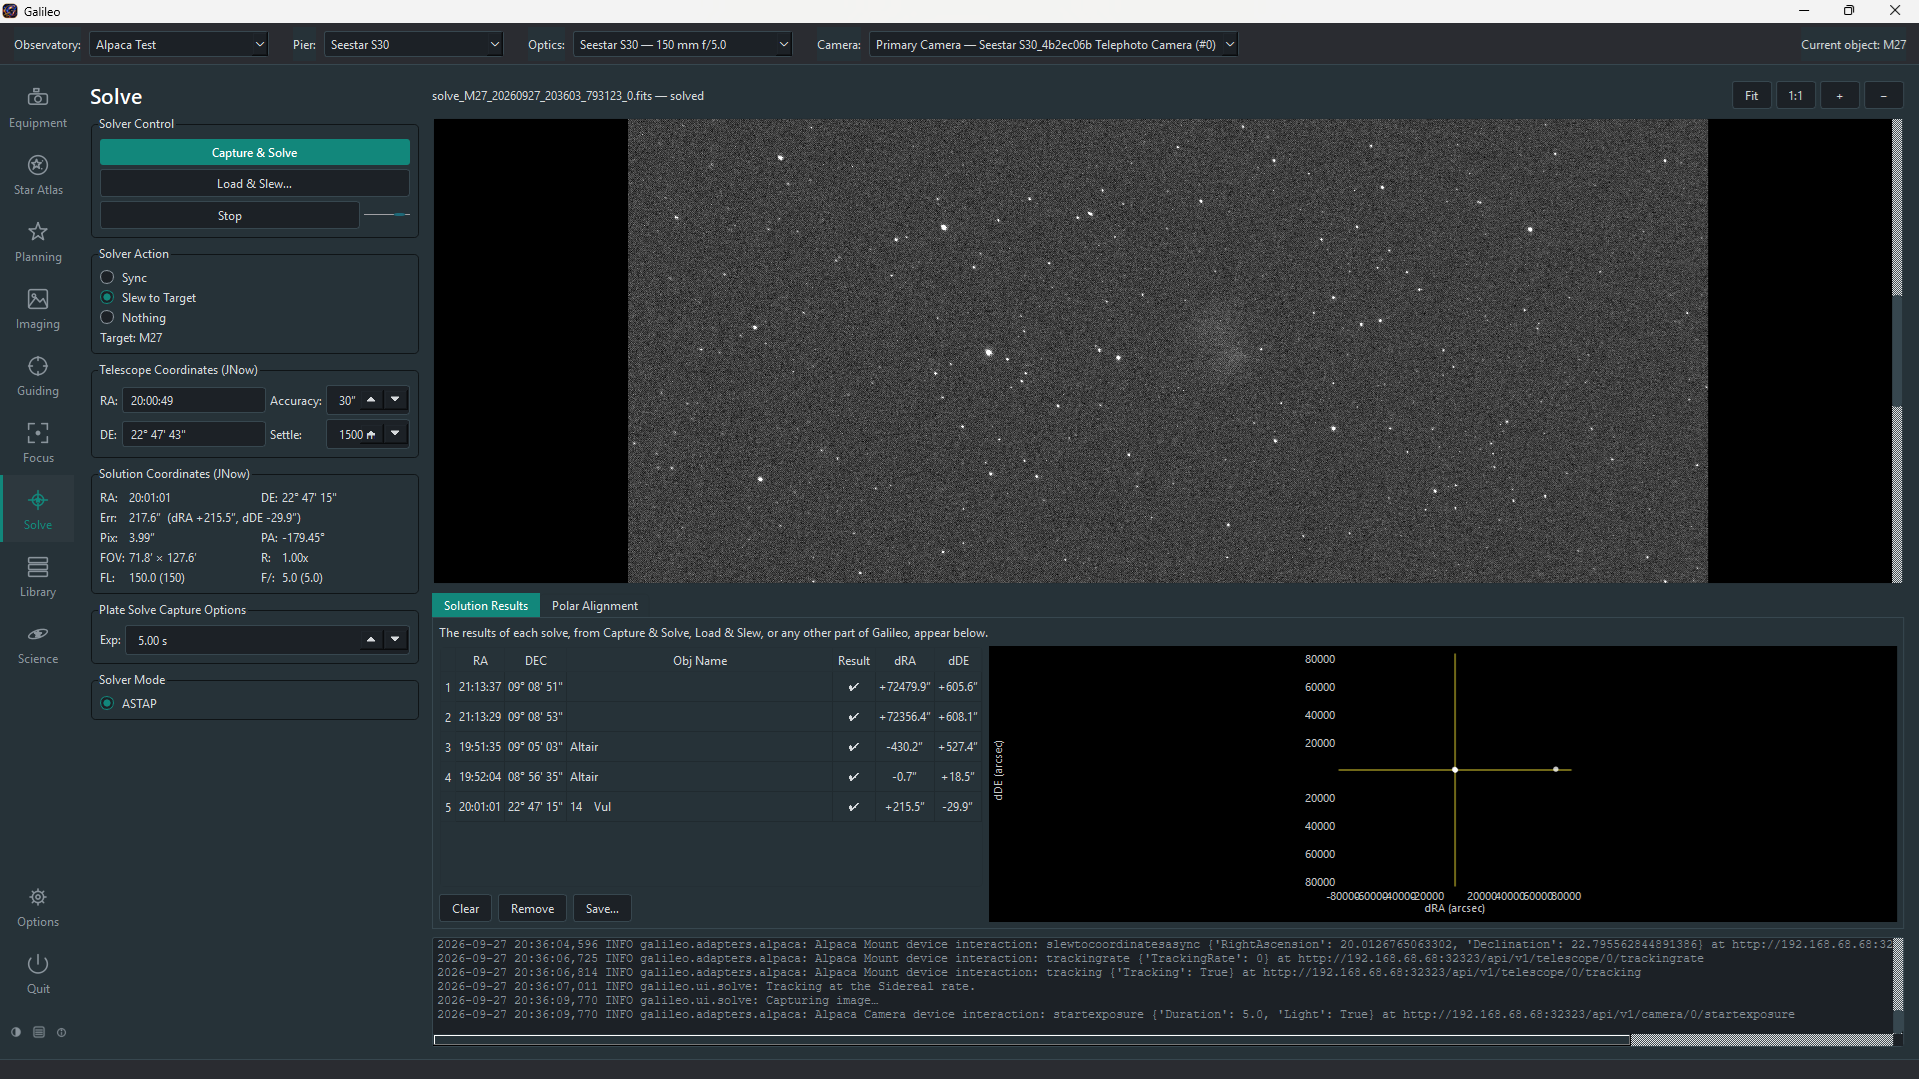
The Solve screen takes an exposure from the camera and determines exactly where the telescope is pointing by comparing stars in the frame to a catalog — a process called plate solving. Once solved, it can sync the mount's coordinate system or slew back to a target until pointing is within a chosen accuracy.
Contents
- Prerequisites
- Using tetra3
- Capture and Solve
- Load and Solve
- Solver actions
- Solve results
- Polar alignment
- Troubleshooting
Prerequisites
- ASTAP (download) installed on the same machine as Galileo, or on your
PATH. - An ASTAP star database (e.g. D50, H17, G17) downloaded and placed in ASTAP's database folder.
- A connected camera to take the exposure from.
No mount is needed to plate-solve, but the Sync and Slew to Target actions require one.
Other solvers
Besides ASTAP, Options > Solve can use a local astrometry.net (solve-field and its index files, mainly Linux and macOS; works offline), ESA's tetra3 (fast and offline, run inside Galileo; see Using tetra3) or the nova.astrometry.net web service (needs an internet connection and your API key; the frame is uploaded). The choice is saved per Pier and the Solve screen's Solver Mode can override it for one run. Plate Solve Capture Options also lets you set binning, gain/ISO, the filter and a dark subtraction for the solve exposure. Every control has built-in help.
Where Galileo looks for ASTAP
Galileo searches these locations in order:
| Platform | Locations checked |
|---|---|
| Windows | C:\Program Files\astap\astap.exe, PATH |
| macOS | /Applications/ASTAP.app/Contents/MacOS/astap, PATH |
| Linux | ~/.local/bin/astap, /usr/local/bin/astap, PATH |
If ASTAP is installed elsewhere, add its folder to your PATH before starting Galileo.
Using tetra3
tetra3 is ESA's offline "lost in space" solver. It ships with Galileo (the prebuilt installers and the source-install scripts both include it), so there is nothing to download.
- In Options > Solve, choose tetra3 (ESA, local) as the solver and press Save (or pick Tetra3 under Solver Mode on the Solve screen for a single run).
- Star database. Leave tetra3 database blank to use the one bundled with tetra3. That database is built for fields of 10–30°, which is far wider than most telescope-and-camera combinations, so with a typical imaging setup it will not solve. Instead, press Generate tetra3 databases in Options > Solve:
- Choose Generate for: the Current Pier, or All Piers in all Observatories.
- Galileo works out each Pier's field of view from its optical tubes (focal length) and cameras (pixel size and sensor width), so those need to be filled in on the Equipment pages first. A Pier whose optics are incomplete is skipped and listed. Piers with the same field share one database.
- It lists what it will build and asks you to confirm. The first build downloads a star catalogue (about 51 MB for fields of 3° and wider, about 354 MB for narrower ones) and keeps it for later.
- The build runs in the background, so you can carry on using Galileo, and Cancel build stops it. A narrow field can take hours. Each finished database is selected automatically as that Pier's tetra3 database.
You can also point tetra3 database at a
.npzfile you built yourself.
- tetra3 does not use the mount's position, so set the Field-of-view hint in Options > Solve (or leave it on Auto, derived from your optics). The first solve is slow while the database loads; later ones reuse it.
If you installed Galileo into your own Python environment and Galileo says "tetra3 not installed", run python -m pip install "tetra3 @ git+https://github.com/esa/tetra3.git" in that environment and restart.
Capture and Solve
- Open Solve in the sidebar. Make sure the correct optical tube is selected in the top bar.
- Set the exposure time (short, 2–5 s is usually enough for bright stars).
- Choose a Solver action (see below) — it defaults to Nothing so a click never moves your mount unasked.
- Click Capture & Solve. Galileo takes the frame, runs ASTAP, and shows the result.
Load and Solve
Click Load & Solve… to solve an existing FITS file from disk without taking a new exposure. This is useful for diagnosing a pointing problem from a saved frame or for solving a frame taken on the Imaging screen.
Solver actions
After a successful solve, the selected action runs automatically:
| Action | What it does |
|---|---|
| Nothing | Shows results only. Does not touch the mount. |
| Sync | Syncs the mount's internal coordinate model to the solved position. One-time improvement. |
| Slew to Target | Slews to the Pier's current object (set in Star Atlas), solves again, and repeats until the pointing error is within the Accuracy threshold. If no current object is set, slews to wherever the mount was pointing before the solve. |
Load & Slew… also makes its destination the Pier's current object (named from the file's OBJECT card, else its coordinates), so a following Slew to Target returns to that field rather than an earlier target.
The Accuracy field (arcseconds) sets the threshold for the "Slew to Target" convergence loop. 30″–60″ is typical for visual work; 10″–20″ for tight framing.
Solve results
A successful solve shows:
| Result field | Meaning |
|---|---|
| RA / Dec (J2000) | The centre of the solved field in equatorial coordinates |
| Field of view | Solved angular size of the frame (width × height in arcminutes or degrees) |
| Pixel scale | Arcseconds per pixel as measured from the solve |
| Rotation | Position angle of the field (north through east, degrees) |
| Pointing error | Angular distance between the mount's reported position and the solved position (if a mount is connected) |
| Solve time | How long ASTAP took |
A failed solve shows the reason (too few stars detected, no match found, solver not found) in the log pane at the bottom.
Polar alignment
The Polar Alignment tab helps you point the mount's polar axis at the celestial pole. Point it roughly first, then press Start Polar Alignment: Galileo solves three frames while turning the mount in RA (30° by default, east or west) to find where the axis really points, then keeps solving so the error updates live as you turn the altitude and azimuth adjusters. It reports the total error and tells you in words which way to move each adjuster. The mount must be level and clear of the meridian, and Galileo needs a camera, a mount and the Observatory's latitude and longitude.
Troubleshooting
| Symptom | Try this |
|---|---|
| "ASTAP not found" | Install ASTAP and ensure its folder is on your PATH, or that ASTAP is in one of the locations Galileo checks (see above). |
| "tetra3 not installed" | Only seen in a hand-built Python environment; see Using tetra3. |
| "No star database" | Download a database in the ASTAP interface (File > Download star catalog). The D50 or H17 databases cover all magnitudes Galileo needs. |
| Solve fails with "too few stars" | Use a longer exposure, choose a less crowded area of sky, or reduce the minimum magnitude in Options > Solve. |
| Solve succeeds but sync does not improve pointing | The mount may need a multi-point pointing model. Solve and sync from several positions across the sky. |
| Pixel scale in the result disagrees with your optics | Check the focal length and aperture entered under Equipment > Optics for this optical tube. |