01. Getting Started Guide - gordtulloch/Galileo GitHub Wiki
This guide takes you from a fresh download to your first exposure in Galileo: installing it, describing your observatory, connecting a camera, and taking a frame.
Galileo is pre-alpha. It runs and much of it works, but some screens (Sequencer, Scheduler, Variable Stars and most Options pages) are still placeholders that say "not implemented yet". See the README status section for what is built today. Expect rough edges, and please report them as issues. Need help? Join us on Discord.
- 01. Getting Started Guide
| Requirement | Notes |
|---|---|
| An INDI server or an ASCOM Alpaca device | Galileo talks to hardware only through these two protocols. It does not use Windows ASCOM/COM drivers. See Connect your equipment. |
| Optional: ASTAP plus a star database | Needed for plate solving (the Solve screen). |
| Optional: PHD2 | Needed for the Guiding screen. |
You do not need any hardware to look around. The Star Atlas, Planning, Framing and Library screens work without a single device connected.
-
INDI: usually Linux/macOS/Raspberry Pi setups running an
indiserver. Default port 7624. -
Alpaca: ASCOM's network protocol. Examples are a ZWO Seestar (via its Alpaca bridge, e.g.
seestar.local, port 32323), ASCOM Remote, or the ASCOM simulators (commonly port 11111).
You can mix INDI and Alpaca devices freely within one setup.
There are two ways to install, and you only need one:
| Option | Best for | Updates |
|---|---|---|
| Prebuilt installer — one download per platform | Most users. Nothing else to install: no Python, no Git. | Download the new installer from the Releases page and run it over the old one. |
| Install from source — a small script that clones the repo | Developers, testers following main, or platforms with no prebuilt installer. |
Automatic: checks for updates on every launch. |
Download the file for your system from the Releases page:
| System | File | How to install |
|---|---|---|
| Windows 10/11 (64-bit) | Galileo-Setup-<version>-win-x64.exe |
Double-click and follow the wizard. Installs to Program Files (or your user folder if you decline admin rights) and offers a desktop shortcut. |
| macOS, Apple Silicon (M1 and later) | Galileo-<version>-macos-arm64.dmg |
Open the disk image and drag Galileo onto Applications. |
| macOS, Intel | Galileo-<version>-macos-x86_64.dmg |
Same as above. |
| Linux, 64-bit Intel/AMD | Galileo-<version>-linux-x86_64.AppImage |
chmod +x Galileo-*.AppImage, then double-click it or run ./Galileo-*.AppImage. |
| Raspberry Pi 5 (and other 64-bit ARM Linux) | Galileo-<version>-linux-aarch64.AppImage |
Same as the x86_64 AppImage. Needs a 64-bit OS such as Raspberry Pi OS Bookworm 64-bit. |
Notes:
- macOS security prompt. Until the builds are notarized with an Apple Developer ID, macOS may say the app "cannot be opened because the developer cannot be verified". Right-click (or Control-click) Galileo in Applications, choose Open, then confirm. You only need to do this once.
- Windows SmartScreen. The installer is not code-signed yet, so Windows may show "Windows protected your PC". Choose More info, then Run anyway.
-
Linux AppImage. If it won't start, your system may lack FUSE 2: install it with
sudo apt install libfuse2(Debian/Ubuntu), or run the AppImage with--appimage-extract-and-run. - Your data is kept separately. Settings, logs and the image library database live in your user folders (see Where Galileo keeps its files), so upgrading or uninstalling never touches them.
- Uninstall. Windows: Settings > Apps. macOS: drag Galileo to the Trash. Linux: delete the AppImage.
- Plugins are not bundled; install them from the in-app Plugin Marketplace.
These scripts clone Galileo into your home folder, set up a Python virtual environment and keep it up to date on every launch.
Right click on this link and select Save Link As... to download Install-Galileo-Windows.bat and double-click it. That's the only file you need — it downloads the real installer (install/install.ps1) from GitHub and runs it for you. It doesn't matter where you download it to as long as you can find it to click on it.
The installer finds (or installs) Git and Python 3.11, clones Galileo into %USERPROFILE%\Galileo, creates the virtual environment, installs dependencies, and adds a Galileo shortcut to your Desktop — no admin rights needed. It's a source-checkout installer, not a bundled executable, and updating later needs no re-download: the desktop shortcut checks for updates (git-based) every time you start Galileo from it, pulling in the latest version automatically before the app opens. See install/README.md for exactly how that works, and how to update without starting the app (install/upgrade.ps1).
To install somewhere other than the default folder, download and run install/install.ps1 directly instead of the .bat:
irm https://raw.githubusercontent.com/gordtulloch/Galileo/main/install/install.ps1 -OutFile install.ps1
.\install.ps1 -InstallDir D:\Galileo
.\install.ps1 -InstallDir D:\GalileoOpen Terminal and run:
curl -fsSL https://raw.githubusercontent.com/gordtulloch/Galileo/main/Install-Galileo-MacOS.sh -o Install-Galileo-MacOS.sh
chmod +x Install-Galileo-MacOS.sh
./Install-Galileo-MacOS.sh
That single script downloads the real installer (install/install.sh) from GitHub and runs it. It will offer to install Xcode Command Line Tools (if missing, provides git and compilers), then Homebrew and Python 3.11 if they are not already present. It clones Galileo into ~/Galileo, creates the virtual environment, installs dependencies, and adds a Galileo.app bundle to your Desktop — double-click it to start Galileo from that point on. The app bundle checks for updates (git-based) on every launch, so you are always on the latest version automatically. See install/README.md for exactly how that works, and how to update without starting the app (install/upgrade.sh).
To install somewhere other than the default folder, pass --install-dir:
./Install-Galileo-MacOS.sh --install-dir /opt/GalileoOpen a terminal and run:
curl -fsSL https://raw.githubusercontent.com/gordtulloch/Galileo/main/Install-Galileo-Linux.sh -o Install-Galileo-Linux.sh
chmod +x Install-Galileo-Linux.sh
./Install-Galileo-Linux.sh
The script will use apt to install any missing system packages. It detects your exact distro from /etc/os-release and resolves Python 3.11 automatically using the best available method:
| Situation | What the installer does |
|---|---|
| Python 3.11+ already in apt (Ubuntu 23.04+, Raspberry Pi OS Bookworm, Debian 12) | apt-get install python3.11 |
| Ubuntu family without 3.11 in apt — Ubuntu 20.04/22.04, Stellarmate, Linux Mint, Pop!_OS … | Adds the deadsnakes PPA and installs via apt |
| Raspberry Pi OS Bullseye or other old Debian release | Warns you to upgrade to Bookworm, or offers to build Python 3.11 from source via pyenv (~5 min on RPi 5, ~15 min on RPi 4) |
| Any other distro where apt can't supply 3.11 | Builds from source via pyenv |
It then clones Galileo into ~/Galileo, creates the virtual environment, installs Python dependencies, and writes a Galileo.desktop file to your Desktop and to ~/.local/share/applications (so it appears in your app menu). The launcher checks for updates (git-based) on every start. See install/README.md for details, and how to update without launching the app (install/upgrade-linux.sh).
To install somewhere other than the default folder, pass --install-dir:
./Install-Galileo-Linux.sh --install-dir /opt/Galileosudo required for apt packages only. The installer calls
sudo apt-getsolely to install missing system packages. The virtualenv and all Python dependencies are installed in your home directory without elevated privileges.
Open a terminal (PowerShell on Windows) and run:
git clone https://github.com/gordtulloch/Galileo.git
cd Galileo
python -m venv .venv
Install the dependencies into the virtual environment:
# Windows
.venv\Scripts\pip install -r requirements.txt

# macOS / Linux
.venv/bin/pip install -r requirements.txt
The first install downloads a fair number of scientific packages (numpy, astropy, scipy, PySide6 and others), so allow a few minutes.
On MacOS and Linux run chmod 700 run.sh to set the program as executable or you'll get Permission denied errors.
Developers:
pip install -r requirements-dev.txtaddspytest,ruffandmypy. See CONTRIBUTING.md for the development setup.
The launch scripts find the project's .venv automatically and start the app maximized.
| Platform | Command (run from the repository folder) |
|---|---|
| Windows PowerShell | .\run.ps1 |
| macOS / Linux, or Git Bash on Windows | ./run.sh |
| Any platform, without the scripts |
.venv/bin/python -m galileo.app (Windows: .venv\Scripts\python -m galileo.app) |
A splash screen shows while Galileo starts, with a progress bar and the list of operations being run (database, plugins, each screen), then the main window opens. The database is created automatically on first launch, so there is nothing to configure beforehand.
Windows PowerShell blocked the script? Run
powershell -ExecutionPolicy Bypass -File .\run.ps1once, or use thepython -m galileo.appform above.
Windows, macOS and Linux (Debian/Ubuntu) all have one-file installers above whose desktop shortcuts/launchers start Galileo directly (and check for updates first). Other Linux distributions can use the manual steps below.
- Sidebar (left): one icon per section: Star Atlas, Planning, Imaging, Guiding, Focus, Solve, Library, Science, then Equipment and Options at the bottom. Some sections open a second panel with more choices (Planning opens onto What's Up Tonight, Targets, Sessions and Schedule; Library onto Images, Sessions, Mappings, Dedup, Merge Objects and Cloud; Equipment onto one page per device). Small buttons at the very bottom cycle the theme (light, dark, red night-vision), open Help, open the online manual and show the About box.
- Top bar: the Observatory and Pier selectors, plus Optics and Camera selectors on the screens that use them, and a current object note at the right-hand end (e.g. "Current object: M 31") once you have picked a target in the Star Atlas — see Pick a target. Everything you configure is saved per Pier.
- Status bar (bottom): short messages such as "Connected to Mount 'EQ6'" or "Capture complete."
- Help: every screen has a round ? beside its title, F1 shows help for the control you are in, and hovering any control explains it. This guide and the other articles are the overview; the built-in help is the detail. See Built-in Help.
- Log pane: each Equipment screen has a live scrolling log at the bottom. When something fails, look here first.
Galileo organises your gear the way an observatory is actually laid out:
- An Observatory is a site: name, latitude and longitude, timezone, address and owner.
- A Pier is one mount plus one or more optical tubes (each tube can have its own camera, filter wheel, focuser and rotator).
One Observatory can hold several Piers, so one Galileo instance can run several independent telescopes. If you have one telescope, you need one Observatory with one Pier.
Equipment settings are saved under the selected Pier, so do this first.
-
In the top bar, open the Observatory drop-down and choose New Observatory…
-
Fill in the dialog and click OK:
Field What to enter Name Required. Anything you like, e.g. "Backyard". Latitude / Longitude Decimal degrees. North and east are positive (latitude −90 to 90, longitude −180 to 180). The Star Atlas, Planning and the horizon check all use these, so set them accurately. Timezone An IANA name such as America/Toronto.Physical Address, Owner Optional. -
Open the Pier drop-down and choose New Pier…, then give it a name (e.g. "Pier 1").
Use the pencil buttons beside the Observatory and Pier selectors to edit them later (rename a Pier, correct a latitude), and the bin buttons to delete. Both are stored in Galileo's local database and are still there after a restart. Now that a Pier is selected, you can save equipment settings.
Open Equipment in the sidebar. It has one screen for each device category: Camera, Mount, Filter Wheel, Focuser, Rotator, Switches, Flat Panel, Weather, Dome and Safety Monitor, plus Optics, which ties the devices together into optical tubes.
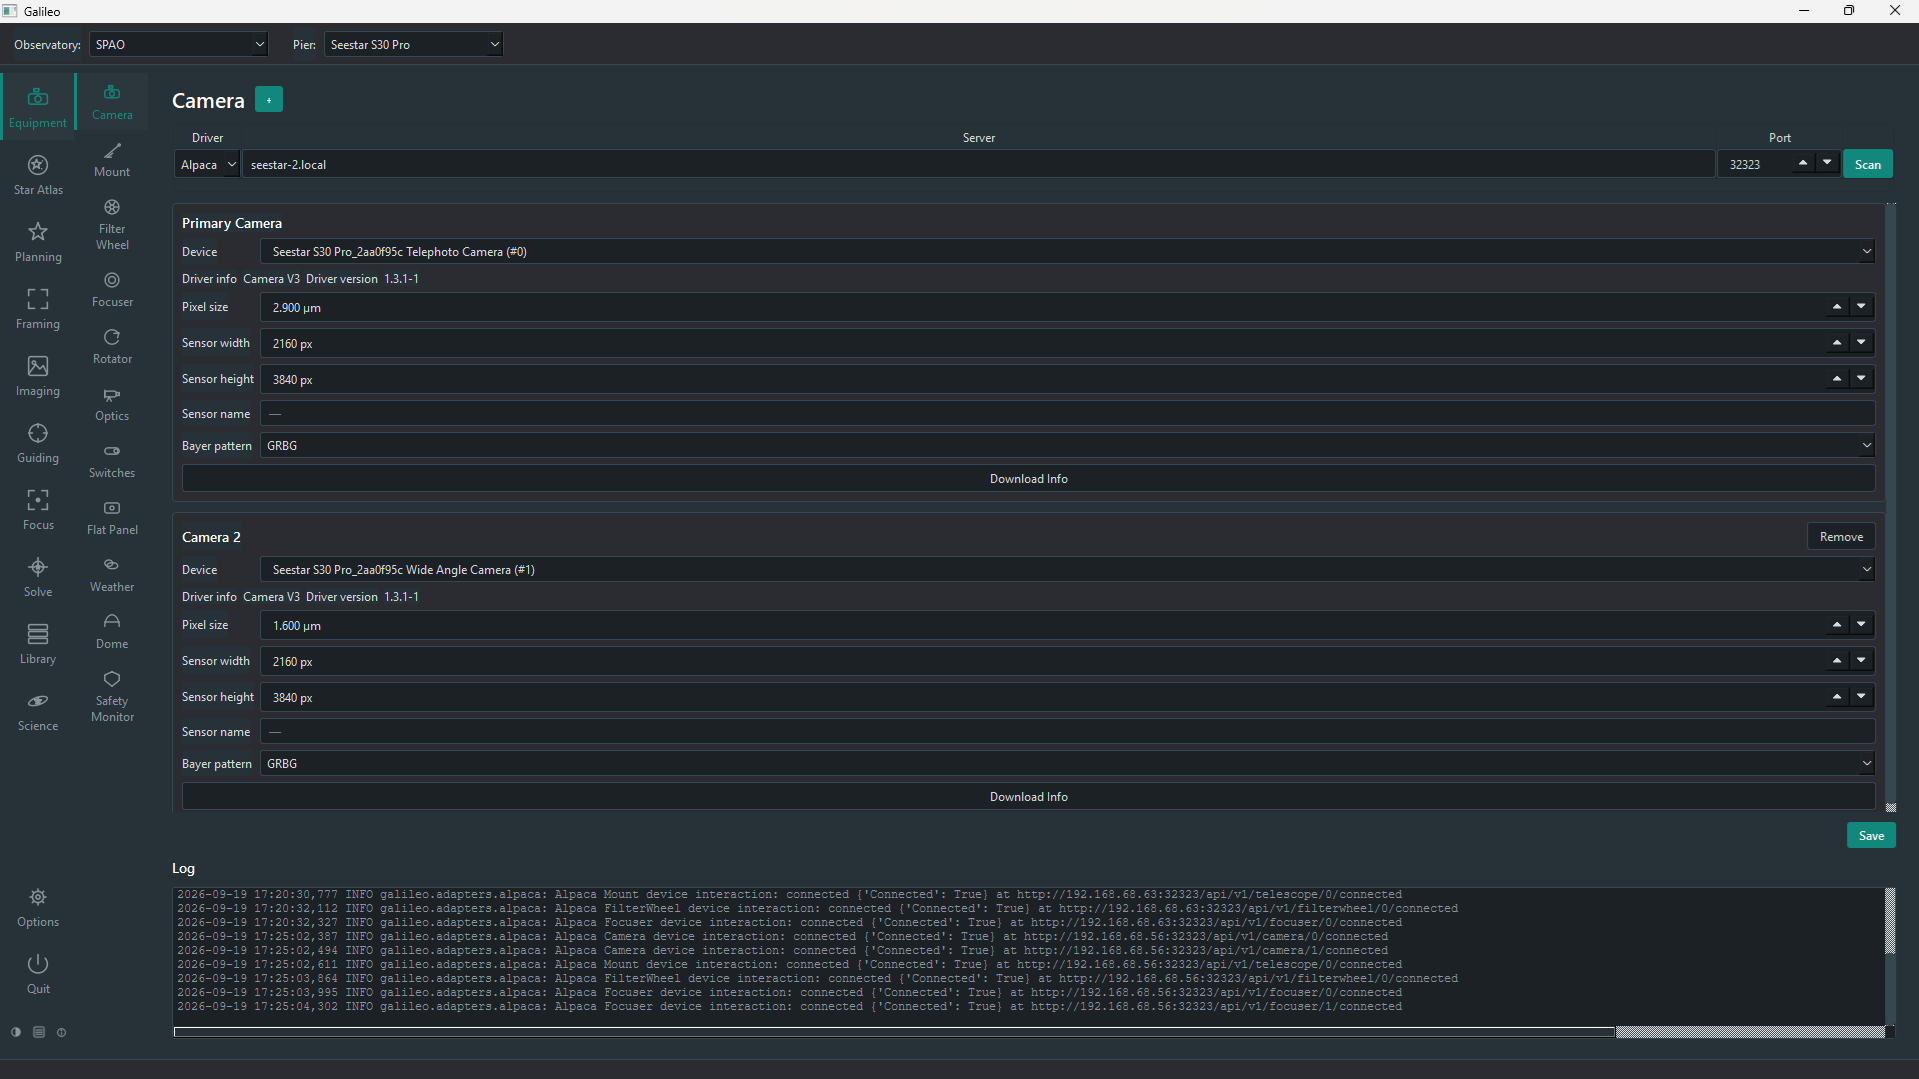
Every device screen starts with the same three-part connection row:
| Setting | Meaning |
|---|---|
| Driver | Alpaca or INDI: the protocol your device speaks. |
| Server | Host name or IP address of the machine the device or indiserver is on, e.g. 192.168.1.50, seestar.local or localhost. .local mDNS names work, including on Windows. |
| Port | Changes to the usual default when you switch driver: 32323 for Alpaca, 7624 for INDI. Alpaca has no single standard port, so use whatever your device documents (11111 is common for ASCOM Remote and simulators). |
- Open Equipment > Camera.
- Choose the Driver, type the Server and check the Port.
- Click Scan. Galileo queries the server and lists what it finds in the log pane and in each camera's Device drop-down. A status-bar message tells you how many devices were found.
- Pick your camera from the Device drop-down.
- Optional but useful: click Download Info to read the pixel size and sensor dimensions from the camera, or enter them yourself. If it is a one-shot-colour camera, set the Bayer pattern (RGGB is the usual one).
- Click Save to store the settings under the selected Pier.
Need a second camera on the same connection? Use the + button on the page; extra cameras share the connection row but are separate devices.
Saved cameras and focusers connect automatically whenever a Pier is selected, and again at start-up. The status bar confirms with "Connected to primary camera '…'."
The Mount, Filter Wheel, Focuser and Rotator screens work the same way (Driver, Server, Port, Scan, pick the device, Save) and have a Connect button. The Mount page also has slew, park and jog controls once connected. Weather, Dome, Switches, Flat Panel and Safety Monitor use the same connection row.
Open Equipment > Optics. Each optical tube is one telescope. Use the + by the page title to add a tube for each telescope on the Pier, fill in its focal length, aperture and optical design, then use the + next to the tube's Associated: label to attach the devices you saved on the other Equipment pages (camera, filter wheel, focuser and so on). Click Save.
The Associated list only offers devices you have already saved on their own Equipment screens, so do those first.
Optics matters because other screens use it. For example, the Imaging screen's Filter list comes from the filter wheel associated with the selected optics, and plate solving compares the solved pixel scale against the expected one for the chosen tube.
Before you capture, you can open Star Atlas in the sidebar and click (or find by name) an object such as M31. That makes it the selected Pier's current object: the top bar shows "Current object: M 31" on every screen, saved frames are named after it (e.g. M_31_20260101T220000.fits instead of frame_20260101T220000.fits), and it becomes what Solve's Slew to Target action slews to. It is kept only for the running session — it resets after a restart — and is separate per Pier, so two Piers can be working different targets at once.
- Confirm your camera shows as connected (status bar, or the log pane on the Camera page).
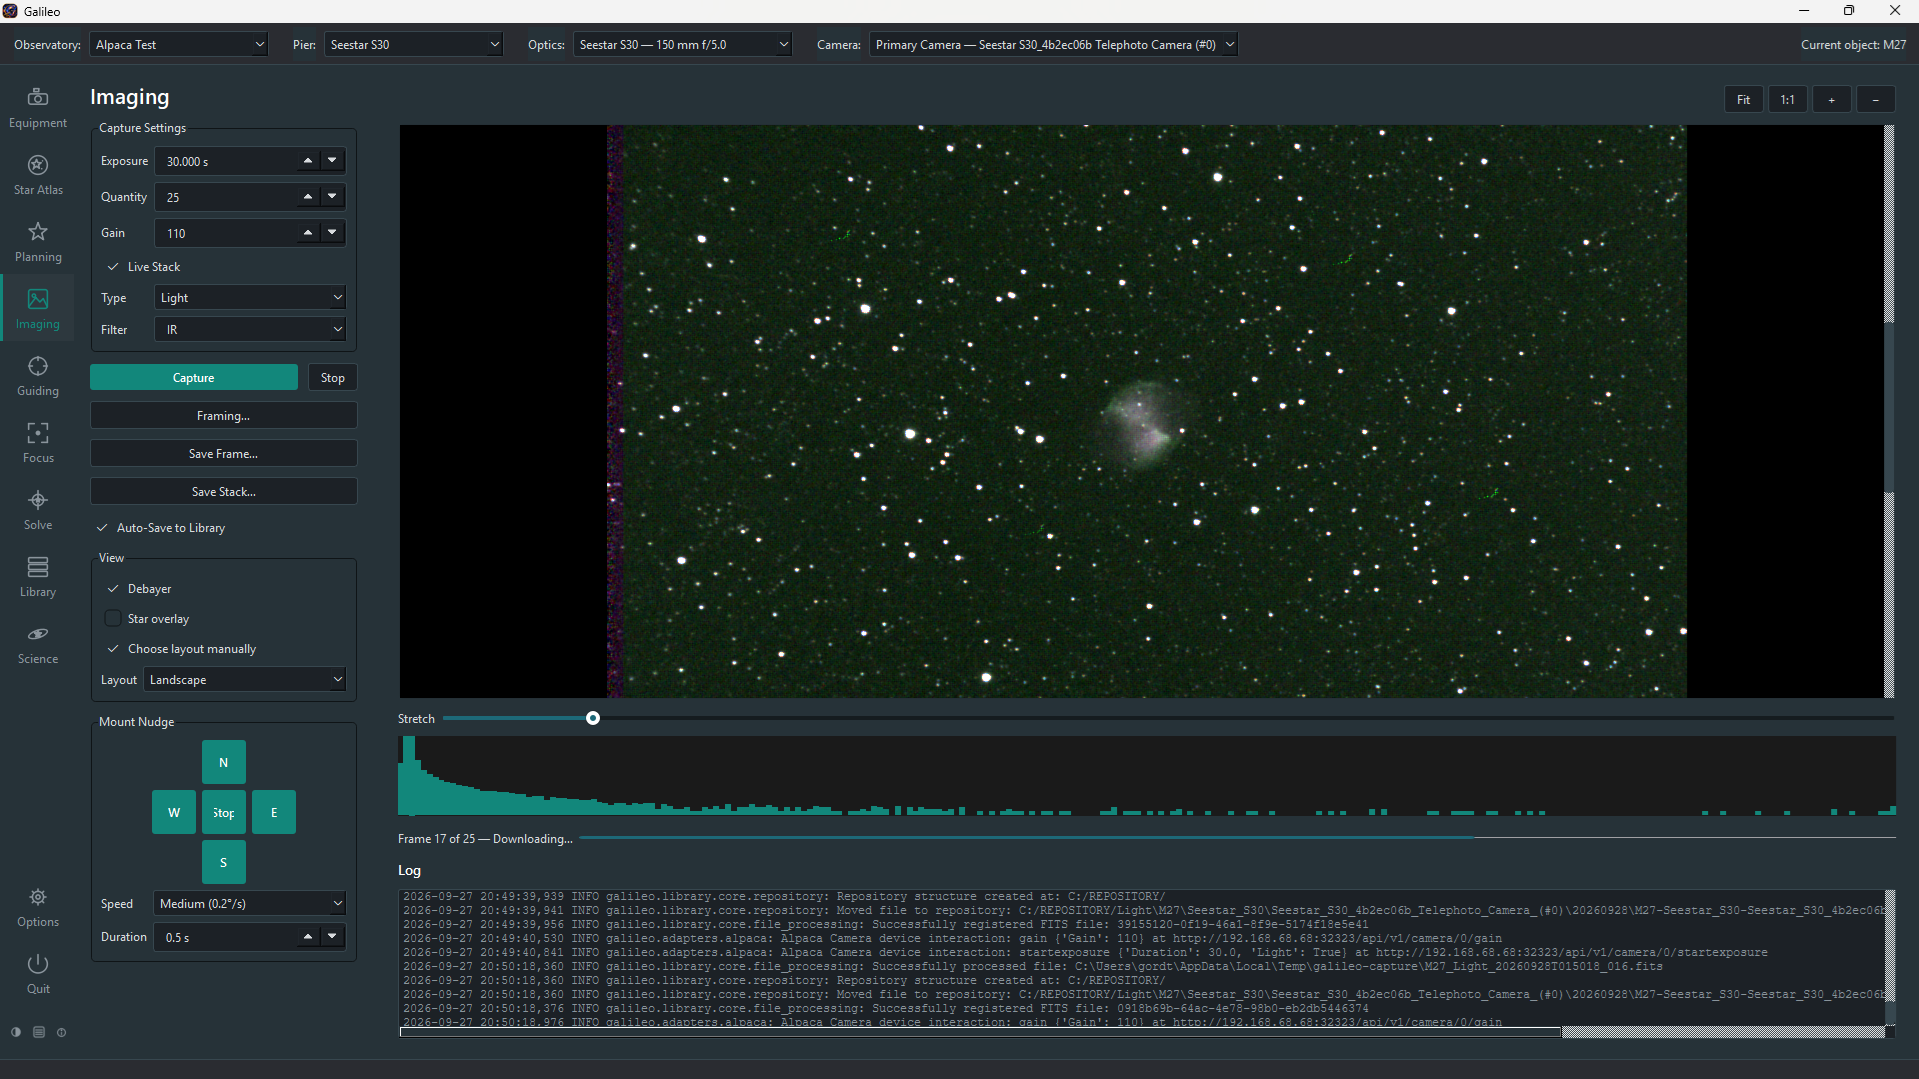
- Open Imaging in the sidebar. If your Pier has more than one optical tube or camera, pick which in the top bar.
- Set Type (Light, Dark, Flat or Bias), exposure time and, if you have a filter wheel, the Filter. Choosing a filter here moves the wheel to that slot (the status bar shows "Moving filter wheel to …"), and Capture waits until the move is done.
- Optional: set Quantity (how many frames to take in a row, default 1) and Gain. With Quantity greater than 1, Capture takes them one after another, showing each as it arrives, and Stop abandons the run after the exposure in progress.
- Click Capture. A progress bar and countdown run while it exposes and downloads, off the UI thread, so the window stays responsive.
- The frame appears as an auto-stretched preview you can pan and zoom, with a histogram and per-frame statistics (mean, median, min, max, star count, HFR).
The Imaging page rearranges itself around the shape of the frame you just captured:
- A landscape or square frame (the usual case, and what you see before your first capture) keeps the layout shown above: the preview sits on the right, with Mount Nudge, the histogram and the log stacked below the statistics on the left.
- A portrait frame (taller than it is wide — for example a camera used in a vertical orientation) switches automatically: the preview becomes a full-height column taking about a third of the window's width, and Mount Nudge, the histogram, progress bar and log move into their own column between the capture settings and the preview, with a taller histogram and a longer log so there's something useful to look at in that space.
This happens on its own after each capture — there's nothing to turn on. If you'd rather it didn't (say, you're viewing a portrait frame but prefer the landscape arrangement), tick View > Choose layout manually, which reveals a Portrait/Landscape selector; it starts on whichever layout is currently showing, so ticking it never moves anything by itself, and unticking it goes back to following the frame automatically.
Galileo has two separate, independent ways to keep a captured frame — you can use either, both, or neither for a given run:
| Save Frame… | Auto-Save to Library | |
|---|---|---|
| How it happens | Manual — click the button after (or between) captures. | Automatic — a checkbox under Save Frame, ticked by default. Every frame in the run is saved as it is taken, with no extra click. |
| What it does | Prompts for a path and writes exactly that one FITS file there. Galileo does not track it afterwards. | Writes the frame to a scratch folder and registers it with the Library, which moves and renames it into your repository — so it appears on Library > Images without a separate scan, catalogued by object, session, filter, etc. If you have chosen to compress images in the Library Setup it will also compress them as it is stored in the Library to save disk space. |
| What you need | Nothing extra. | A repository folder set under Options > Library. Without one, nothing is written and the log pane says so. |
| Naming | You choose the file name (pre-filled from the current object and the time, if one is picked). | Named and filed by the Library's own rules. A light frame with no current object picked is filed under "Unknown". |
A common setup is to leave Auto-Save to Library on so every session lands in the catalog automatically, and use Save Frame… only for the occasional frame you want a personal copy of somewhere else. Turning Auto-Save off stops the Library copy but does not affect Save Frame.
Notes:
- Live Stack, off by default, registers and combines a run of three or more frames into one improving image as it is taken (using astroalign where available). Unlike the two saves above, the stack itself is not saved automatically — a separate Save Stack… button offers Save to Library or Save to File…, and the stack is lost if you start a new run or close Galileo without using it.
- The Mount Nudge panel (N/S/E/W, a speed and a duration) jogs the connected mount without leaving the Imaging screen — handy for centring a target between exposures.
- Debayer (in the View panel) shows a one-shot-colour frame in colour. It changes only the preview; statistics and saved files keep the camera's raw data. If the colours look wrong, change the Bayer pattern on Equipment > Camera.
- If you see "No camera connected", go back to Equipment > Camera and make sure a device is selected and saved.
These sections follow the equipment you have already set up.
| Section | What it does | What you need |
|---|---|---|
| Focus | Runs and displays autofocus: the frame being measured, star count / HFR / FWHM and the HFR V-curve with its fit. Use Auto Focus and Stop. | A connected camera and focuser. |
| Guiding | Shows PHD2's live state: guide-star image, guide graph, drift and calibration plots, and statistics, with Loop / Guide / Stop / Dither controls. | A running PHD2. Enter its host and port on the Guiding screen. |
| Solve | Capture & Solve takes an exposure and plate-solves it, then optionally syncs the mount or slews back to the target — your current object, or wherever the mount was pointing if you haven't picked one — until it is within your accuracy. Load & Slew… solves an existing FITS file, slews to where it points and makes that your current object. |
ASTAP and a star database, installed on your PATH or in ASTAP's usual install folder. |
The Solve screen's Solver Action defaults to Nothing, so a click never moves your mount unasked.
Not everything on these screens is built yet. Buttons for unfinished features are greyed out with a "Not implemented yet" tooltip.
| What | Windows | macOS | Linux |
|---|---|---|---|
Database (galileo.db: observatories, piers, equipment, image catalog, and all your settings) |
%APPDATA%\Galileo\galileo.db (typically C:\Users\<you>\AppData\Roaming\Galileo\galileo.db) |
~/Library/Application Support/Galileo/galileo.db |
$XDG_DATA_HOME/galileo/galileo.db (typically ~/.local/share/galileo/galileo.db) |
Logs (logs/) |
%APPDATA%\Galileo\logs |
~/Library/Logs/Galileo |
~/.local/share/galileo/logs |
| Settings (everything under Options, layouts, equipment profiles) | Stored in the database above, in its app_settings table |
All settings live in that one database. If you upgrade from an older version that kept them in separate files (library.ini, guiding.json, ...), Galileo imports them automatically the first time they are needed and renames the old files to *.migrated; nothing is deleted.
Logging captures all application output to a datestamped file that is reset on each run. It is the best thing to attach to a bug report.
The Library is built from the author's AstroFiler tool and is worth configuring early. Under Options > Library, set your repository folder (where your FITS files live) and your incoming folder. Then use Library > Images > Load New to catalog any images you want to add to the Library from your incoming folder.
The Library consists of an Images view which lists all images in the Library using a variety of sort criteria, and Sessions which tie together lights and calibration frames by date. Right clicking on a session allows you to export an entire session (perhaps to load into your favorite image processing application) as well as do calibration runs and create sample stacks and thumbnails. See the Library documentation when it is produced for more info.
If you already use AstroFiler, you can't use it's database directly but you can reconstruct it just by hitting Regenerate on the Images screen. This will look at all FITS files in your Repository folder and read in their headers to the database. You should also Regenerate the Sessions table to link all of your lights and calibration frames.
Library can also load files from remote telescopes and sites as well as store your precious files in the Cloud for backup. See the Library documentation for more details.
Note: if you configure iTelescope credentials there, the password is stored in the OS keychain (not in the database), so it does not appear in plain text anywhere in Galileo's files.
| Symptom | Try this |
|---|---|
PySide6 is required to run Galileo |
You are not using the virtual environment's Python. Use run.ps1 / run.sh, or re-run the pip install -r requirements.txt step. |
pip install fails building a package |
Check python --version (needs 3.11+), and upgrade pip: python -m pip install --upgrade pip. |
| Scan finds no devices | Check the server address and port, that indiserver (or the Alpaca bridge) is running, and that no firewall blocks the port. Try the IP address instead of a .local name. The log pane shows the details. |
| Scan says "failed — see log" | The log pane and the log file name the exact error, such as a refused connection or a name that does not resolve. |
| "Select (or create) an Observatory and Pier before saving" | Create both in the top bar first. See Create your Observatory and Pier. |
| "No camera connected" when capturing | Open Equipment > Camera, pick the device, and click Save. Re-select the Pier to trigger the auto-connect, then check the log pane. |
| The Solve screen cannot solve | Install ASTAP and a star database (for example D50), and make sure ASTAP is on your PATH. |
| A screen says "not implemented yet" | It is a placeholder. See the README status section for what exists. |
If Galileo hits an unexpected error it shows an error dialog and saves a crash report (traceback, version, platform and recent log lines, with passwords and tokens removed) in the reports/crash folder of your Galileo data directory; native crashes are recorded in logs/faulthandler.log. Attach these to a bug report.
If you are still stuck, open an issue and include your OS, Python version, the device protocol (INDI or Alpaca) and the relevant part of the log file.
- Browse the Star Atlas (stars, Messier / Caldwell / NGC objects, Sun, Moon and planets for your Observatory's location and time). Upload a horizon file under Options > Star Atlas to shade trees and buildings and, with Options > Planning, refuse slews into them.
- Use Planning to search the catalogs and Framing to plan a target or mosaic against your optics.
- Read the design documents in
docs/if you want to know where Galileo is headed. The SDD is the architecture reference. - Want to contribute? See CONTRIBUTING.md.