EVSE LORDSn1per - gorawen/open_evse GitHub Wiki
| Part | Source | Cost | Postage | Quantity | Link |
|---|---|---|---|---|---|
| Arduino UNO | eBay | $35 | $0 | 1 | http://www.ebay.com.au |
| Open EVSE Shield | Open EVSE | $45 | $10 | 1 | http://code.google.com/p/open-evse/wiki/Ordering |
| EV Simulator | Open EVSE | $15 | $10 | 1 | http://code.google.com/p/open-evse/wiki/Ordering |
| 240v 30A Relay with 12v coil | RS Components | $35.31 | $0 | 1 | http://australia.rs-online.com Part: 235-5469 |
| RGB LCD Shield 16x2 Positive Display | Adafruit | $23.95 | $45.55 | 1 | http://adafruit.com/products/716 |
| J-1772 with 3m Cable - 30A | EV Power | $161.80 | $23 | 1 | http://ev-power.com.au/webstore/index.php/sae-charging-plugs-sockets/ev-charging-plug-sae-j1772.html |
| CR8420-1000-G Current Transformer | Amazon | $10.67 | $6.12 | 1 | http://www.amazon.com/gp/product/B005CWO4X0/ref=ox_ya_os_product |
| 12v DC 400mA power supply | Jaycar | $15.95 | $0 | 1 | http://www.jaycar.com.au/productView.asp?ID=MP3147 |
| Chrome push button with Green LED circle | Jaycar | $10.95 | $0 | 1 | http://www.jaycar.com.au/productView.asp?ID=SP0797 |
| 8-13mm Cable Gland | TLE Electrical | $2.84 | $0 | 1 | |
| 11-17mm Cable Gland | TLE Electrical | $3.73 | $0 | 1 | |
| 15A power plug | TLE Electrical | $8.00 | $0 | 1 | |
| 1 meter - 4mm power cable | TLE Electrical | $4.21 | $0 | 1 | |
| IP55 150x220x75mm modular box | TLE Electrical | $38.42 | $0 | 1 | |
| TOTAL | $414.72 | $94.67 | TOTAL $509.39 |
The Following photos illustrate installation of an Arduino UNO, Arduino Shield, an Adafruit RGB LCD open EVSE.
My primary goal was to build an EVSE for under $1000. Living here in Australia a simple EVSE was $4999 and a CHEAP one was $1899! In Australia our electricity is 240v in either 10A or 15A. The supplied EVSE for my Nissan Leaf was 240v 10A but I'd like to have a permanent EVSE on the wall in my garage that can supply 15A.
I plan that my EVSE will be of high commercial standards,offering good weather protection ,and incorporating latest firmware. The adafruit RGB display was utililised as well as a MENU button.
A BIG THANKS must go out to Chris Howell for all his help and email support. What a big help he has been.
No Pilot On the open EVSE Arduino shield the word PILOT is next to the ground pin, not the PILOT pin. There's no information that I could find to tell you this. So use the ROUND pin, not the square one as pictured. This was made difficult because once you solder on the screw terminal, you can't see the word pilot or the tracks. THANKS CHRIS for helping me out with this problem!!

Proximity circuit not working Inside the handle is a microswitch under the button. The proximity circuit should read 150 ohms between ground and blue wire (normally) when the button is NOT pressed, and 480 Ohms when PRESSED. If it reads 480 Ohms the EVSE will NOT start charging. In mu case, my brand new J1772 handle was assembled in a way that kept the switch push ON all the time, reading 480 Ohms. The microswitch in my handle had the metal bent up too high so when the button was installed, it would press the switch, so I had to bend the metal downwards. THANKS CHRIS for helping me out with this problem!!

Ground After fixing the pilot as above, I had to rund the ground wire to EARTH. There was little information showing this, without it, the pilot has no ground reference. THANKS CHRIS for helping me out with this problem!!!!
Starting to build the RGB LCD from Adafruit.

Finished assembling the RGB LCD screen from Adafruit.

My first Arduino program to test LCD.

Modified v1.0.0 to add my name and KW power display next to timer.

J-1772 with a 3m cable.

v1.0.3 now displays cost instead of KW.

Finished building the Open EVSE Arduino Shield. Note I have put R1 (on Google Code) in R20 (on Google Code). That will be removed and R20 (on Google Code) and R1 (on Google Code)'s position by accident. I have now replaced both of them with blue metal film 1Kohm 1% resistors.

Finally received the CR-8420 current sensor from America. Now I have all the parts to assemble my open EVSE

Now I have bought a box

Added the 240v in and J-1772 cord out

Placed the relay and earth terminal block

Placing the Arduino, Open EVSE shield and 12v power pack
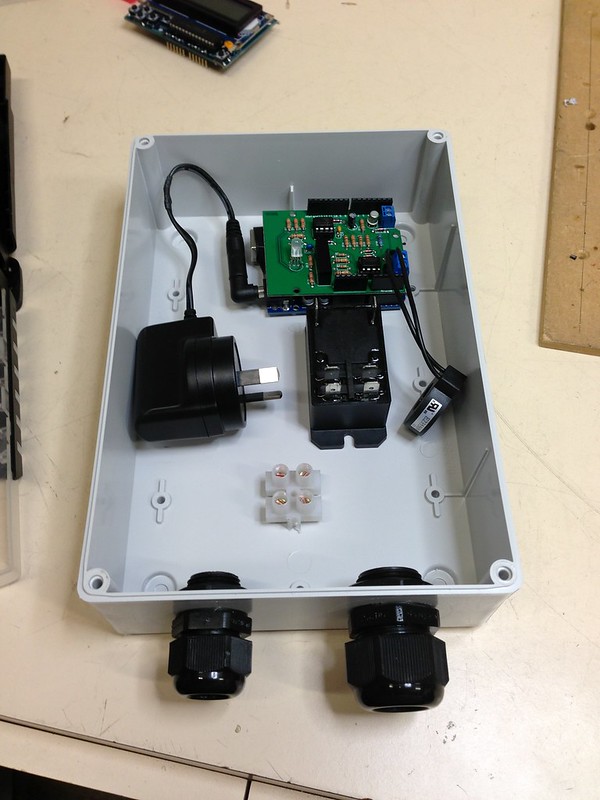
Wired up and added the LCD screen too

Just need to add the J-1772 wires now

All wired up now. I have now connected cable to earth.

When I plugged into my Leaf it would change to EV CONNECTED but would not start charging. BIG THANKS to Chris Howell for his help. It turned out to be the switch inside the charging connector was stuck DOWN. I pulled apart the handle and fixed the switch. Now it correctly has 150 ohm from blue wire to ground when the button is NOT pressed, and 480 Ohn when the button IS pressed. Now to try it out tonight. If everything works then I can work on cleaning up the wiring and making a label to go on the INSIDE of the lid to hide all the electronics.

Just a photo to show the inner workings a bit clearer. I still have to clamp down that 12v transformer.

My first CHARGE!!! Charging my nissan Leaf at 10A (2391 watts)

Charging in the dark. I am not a fan of the clear lid so I will work on a way to cover that up.

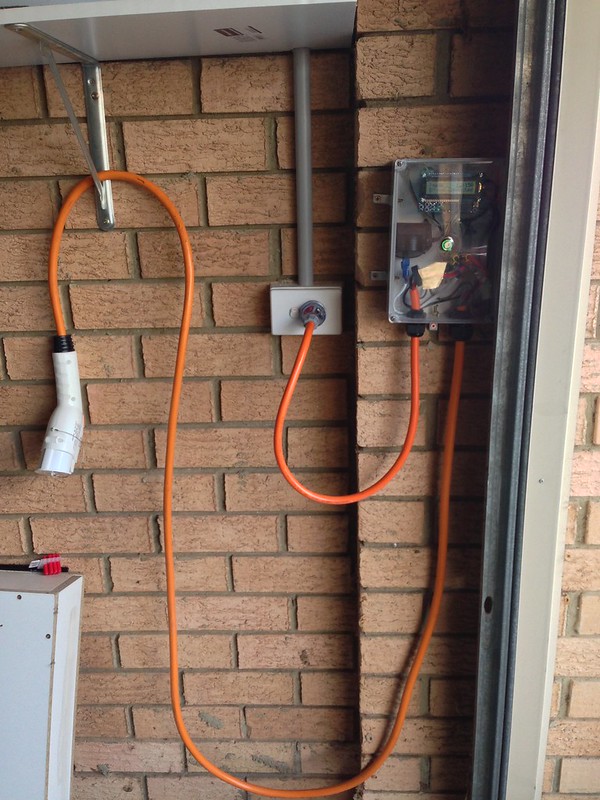
Today, December 11th 2012 I got the power point installed to my garage. I wasted no time installing the EVSE

Here is the EVSE installed with the charging cable hanging on the wall.
My first charge at 15 Amps!

Charging my car from my garage using open EVSE.

Car is just about full. There was 37km left in the battery when I started charging.

Here is the EVSE mounted again

Here is the little power sensing board I made to measure REAL current being drawn from the power point.

First boot up of arduino UNO
http://www.youtube.com/watch?nomobile=1&v=DShKkW-Ruao
Booting up v1.0.3 of my customised evse Includes my name with animation Includes the price being drawn next to timer. The cents per kwh has to be manually programmed in but I'm working on creating a new menu so you can change it using the button and LCD screen. http://www.youtube.com/watch?v=jZVIEaFd99M
Here is a video of me testing the Arduino based open EVSE with a relay connected. http://www.youtube.com/watch?nomobile=1&v=v795UG82kxM
Add your content here. Format your content with:
- Text in bold or italic
- Headings, paragraphs, and lists
- Automatic links to other wiki pages