DevOps ‐ Complete CICD Pipeline With AWS CodePipeline - git-muhammad-sadique-i987/projects GitHub Wiki
Welcome to this 6 parts DevOps challenge.
In upcoming 6 parts, you'll build a complete CI/CD pipeline that takes code from commit to production, gaining practical DevOps skills that are in high demand across the tech and cloud industry.
By the end of this challenge, you'll have:
-
Built a complete CI/CD pipeline using AWS tools
-
Automated the testing and deployment of a real application
Credits
This project structure and learning methodology comes from NextWork.org - an exceptional platform for DevOps practitioners who believe in learning through building. Their project-based AWS/Kubernetes track provided the foundation for this implementation.
-
Building a CI/CD pipeline in 6 parts
-
What to Expect
-
Roadmap (Overall Project)
-
What is DevOps?
-
What is CI/CD?
-
Part-1. Set Up a Web App in the Cloud
-
What You'll Need
-
Key Concepts
-
Roadmap (Part-1)
-
Step-1 Launching an EC2 instance
-
Step-2 Set up VS Code
-
Step-3 SSH connection to EC2 instance
-
Step-4 Install Apache Maven on EC2 Instance
-
Step-5 Install Amazon Correto 8 (Java 8)
-
Step-6 Create the Application
-
Step-7 Connect VS Code with your EC2 Instance
-
Summary (Part-1)
-
-
Part-2 Connect a GitHub Repo with AWS
-
What You'll Need
-
Key Concepts
-
Before We Start
-
Roadmap (Part-2)
-
Step-1 Install Git
-
Step-2 Set up GitHub
-
Step-3 Commit and Push Your Changes to GithHub
-
Summary (Part-2)
-
-
Part-3 Secure Packages with CodeArtifact
-
What You'll Need
-
Key Concepts
-
Before We Start
-
Roadmap (Part-3)
-
Step-1 Set up CodeArtifact
-
Step-2 Configure your EC2 instance for CodeArtifact
-
Step-3 Verify Maven is using CodeArtifact
-
Step-4 (Optional for Experts) Publish a package to CodeArtifact
-
Summary (Part-3)
-
-
Part-4 Continuous Integration with CodeBuild
-
What You'll Need
-
Key Concepts
-
Before We Start
-
Roadmap (Part-4)
-
Step-1 Set up a CodeBuild project
-
Step-2 Connect CodeBuild to your GitHub repo
-
Step-3 Set up an S3 bucket for build artifacts
-
Step-4 Configure buildspec.yml
-
Step-5 Verify Successful Build and Artifacts
-
Summary (Part-4)
-
-
Part-5 Deploy a Web App with CodeDeploy
-
What You'll Need
-
Key Concepts
-
Before We Start
-
Roadmap (Part-5)
-
Step-1 Set up deployment architecture with CloudFormation
-
Step-2 Prepare deployment scripts and appspec.yml
-
Step-3 Set up a CodeDeploy application and deployment group
-
Step-4 Deploy your web app with CodeDeploy
-
Step-5 (Optional for Experts) Roll back a deployment!
-
Summary (Part-5)
-
-
Part-6 Build a CI/CD Pipeline with AWS
-
What You'll Need
-
Key Concepts
-
Before We Start
-
Roadmap (Part-6)
-
Step-1 Configuring the Source, Build and Deploy Stages
-
Summary (Part-6)
-
-
Clean Up Your Resources
This is a 100% hands-on challenge. You'll be working in the AWS console from day one.
Don't worry if you're new to AWS or DevOps—we've designed this challenge to be beginner-friendly:
-
🤝 Step-by-step instructions guide you through each project.
-
🎥 Live demos of every project on YouTube.
-
📖 Clear explanations of DevOps concepts as we go.
-
📝 Line-by-line explanations of any code (no coding experience required).
-
🔍 Troubleshooting tips to help you solve common errors.
-
🔥 A supportive community to answer your questions and help you out.
-
Set Up a Web App in the Cloud
-
Connect a GitHub Repo with AWS
-
Secure Packages with CodeArtifact
-
Continuous Integration with CodeBuild
-
Deploy a Web App with CodeDeploy
-
Build a CI/CD Pipeline with AWS
Here are the tools and technologies used in this project:
-
AWS (Amazon Web Services)
-
Amazon EC2
-
VS Code (Visual Studio Code)
-
Maven (Apache Maven)
-
Java (Amazon Corretto 8)
-
Git
-
GitHub
-
AWS CodeArtifact
-
AWS CodeBuild
-
AWS CodeDeploy
-
AWS CodePipeline
-
Amazon S3
-
AWS IAM
-
AWS CloudFormation
- AWS Cloud - basic knowledge
- Version control
- Software development lifecycle
- Networking - basic knowledge
- Linux bash scripting
DevOps is all about getting teams to build and deploy code faster without sacrificing reliability. Think of it as a blend of automating tasks, making sure apps are running consistently everywhere, and smart monitoring to catch issues early.
Before DevOps, development and operations teams worked separately with minimal communication. Developers would build software in their own environment, then hand it off to operations to deploy it to users.
But operations couldn't immediately deploy the code. They needed to carefully test it first, make sure it wouldn't break existing systems, and prepare the infrastructure - all without knowing how the code was written.
This created delays, misunderstandings, and frustration on both sides: developers wanted to ship features quickly, while operations wanted to make sure the code is stable before it's deployed.

To address this conflict, DevOps is a set of practices that combines development (writing code) and operations (deploying and maintaining code) to shorten development cycles and deliver reliable software.
💡 If DevOps is a set of practices, what is a DevOps engineer?
DevOps engineers implement DevOps practices in their organization. They...
Build automated pipelines (e.g. using AWS CodePipeline, Jenkins, GitHub Actions) that test, package, and deploy software, so releases become faster and more reliable.
Containerize applications using tools like Docker and Kubernetes, which helps applications scale.
Turn cloud infrastructure into code (e.g. AWS CloudFormation, Terraform), so teams can create and manage resources more efficiently than manually configuring them.

At the heart of DevOps is CI/CD - Continuous Integration and Continuous Delivery/Deployment.
CI/CD stands for Continuous Integration/ Continuous Development. This process helps teams shortening Development life cycle by deploying small and frequent code changes after series of automated tests are being applied to the code using different tools.
The goal of CI/CD is to make the flow from code changes to a live application as efficient and reliable as possible. To do this, automations are set up across the software development and deployment process.
-
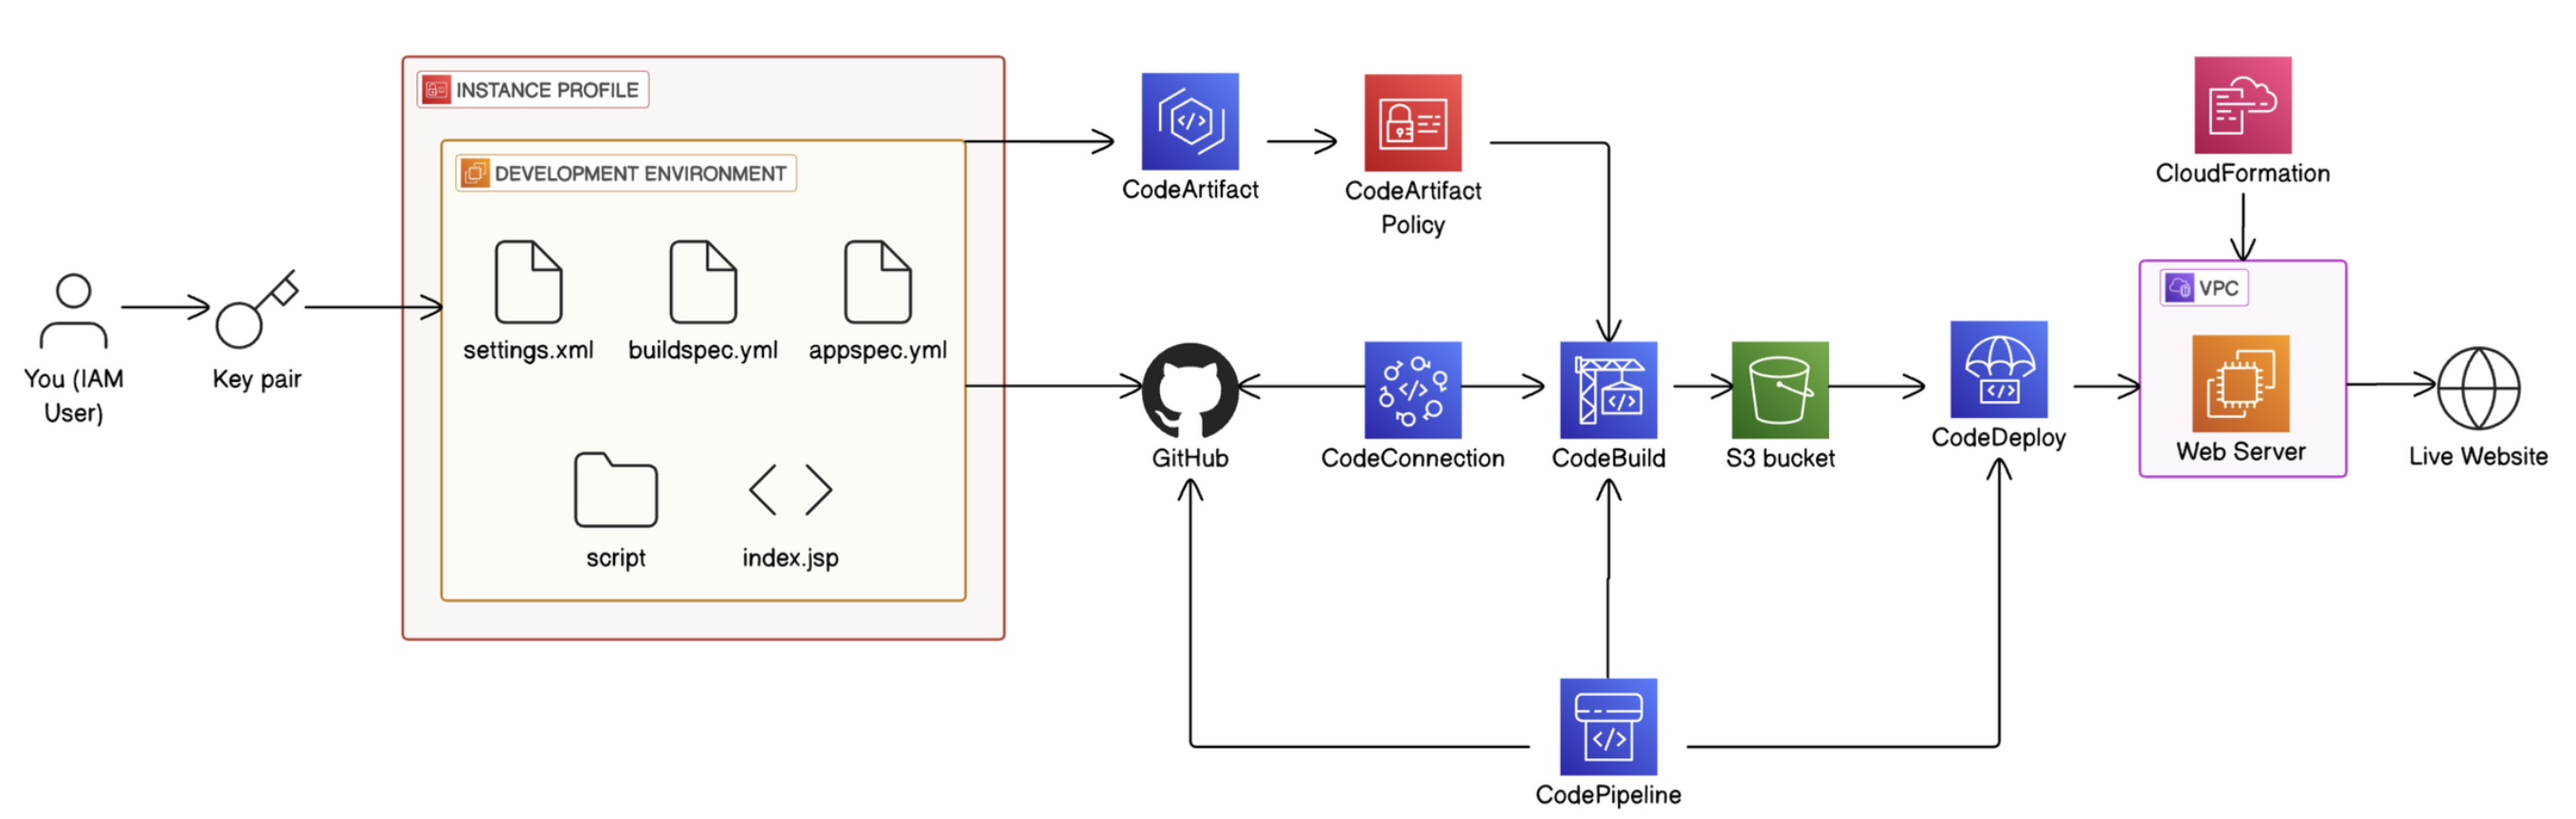
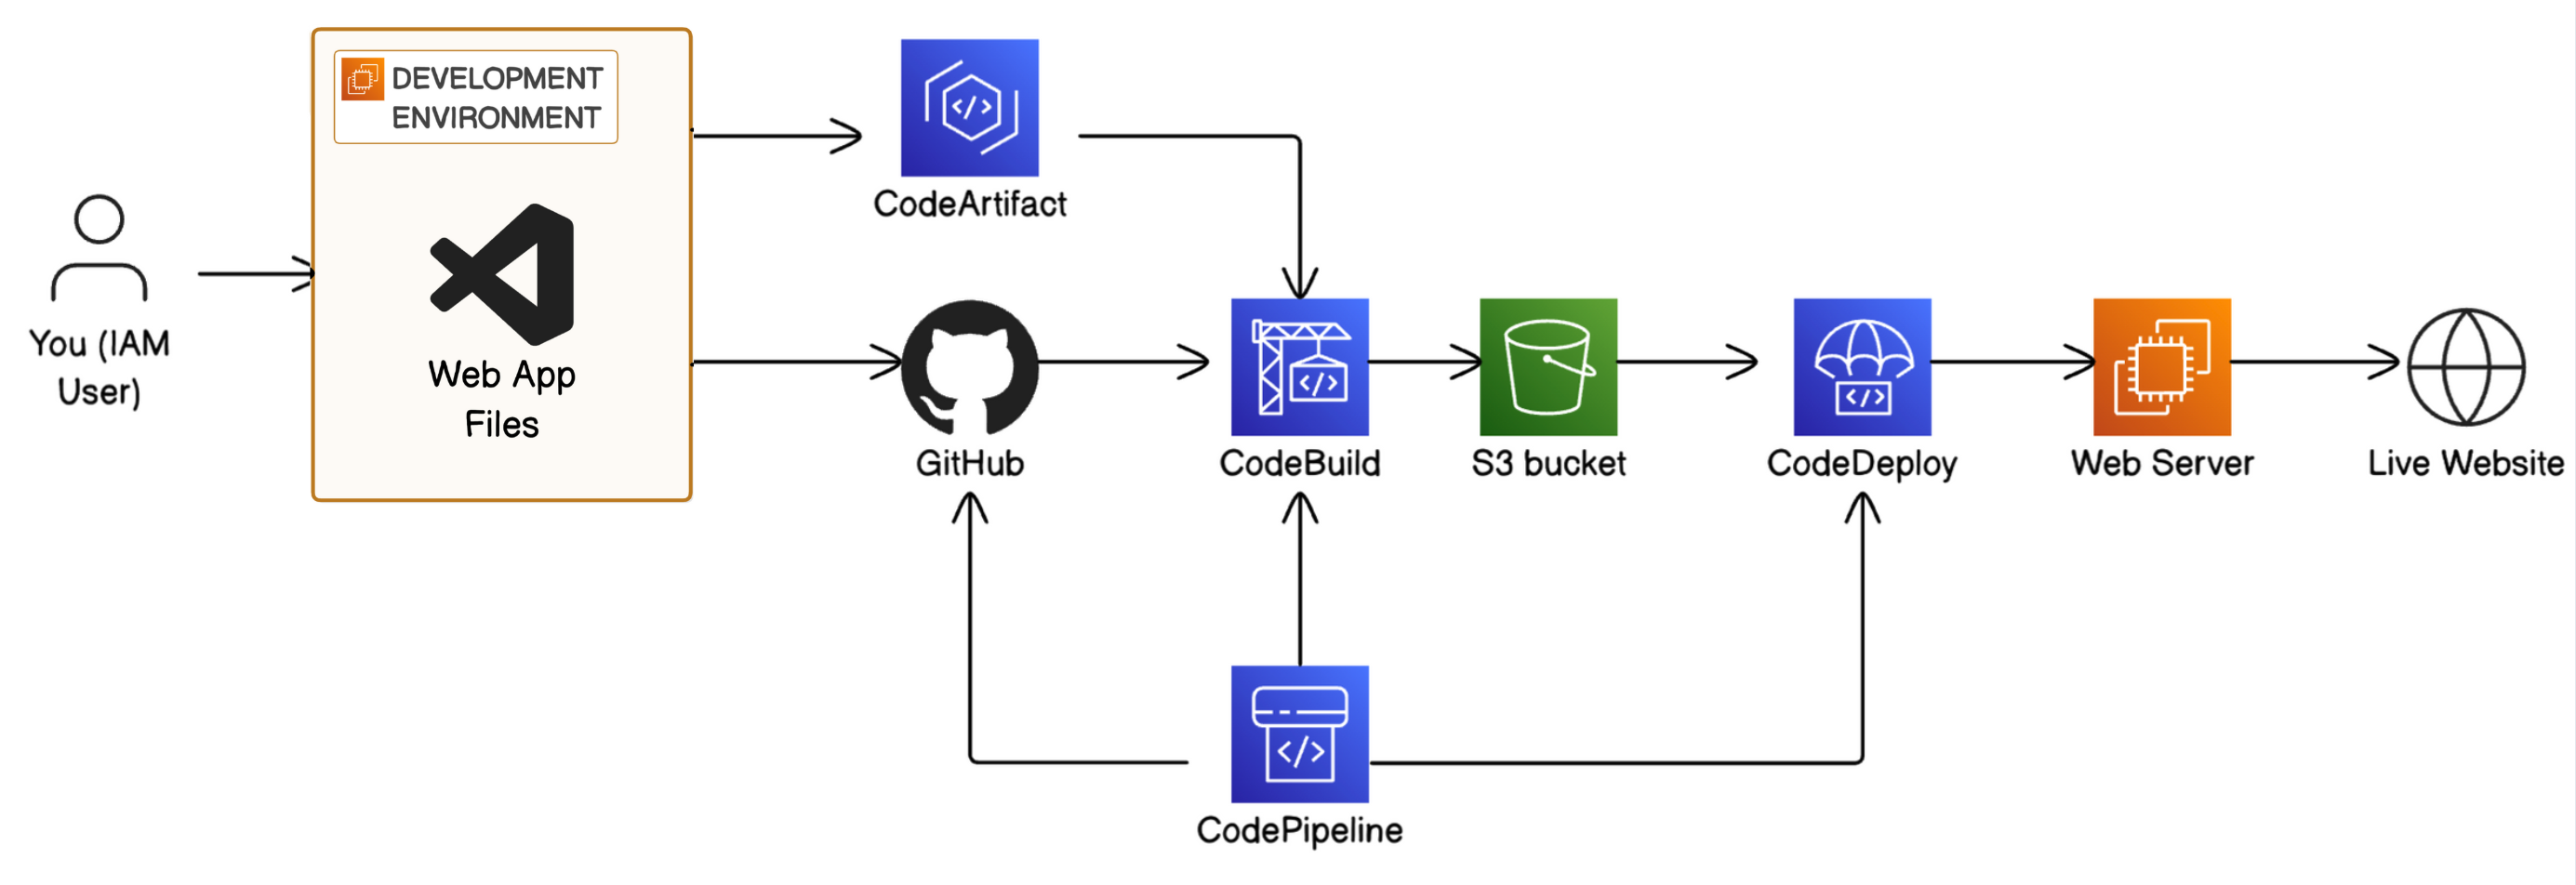
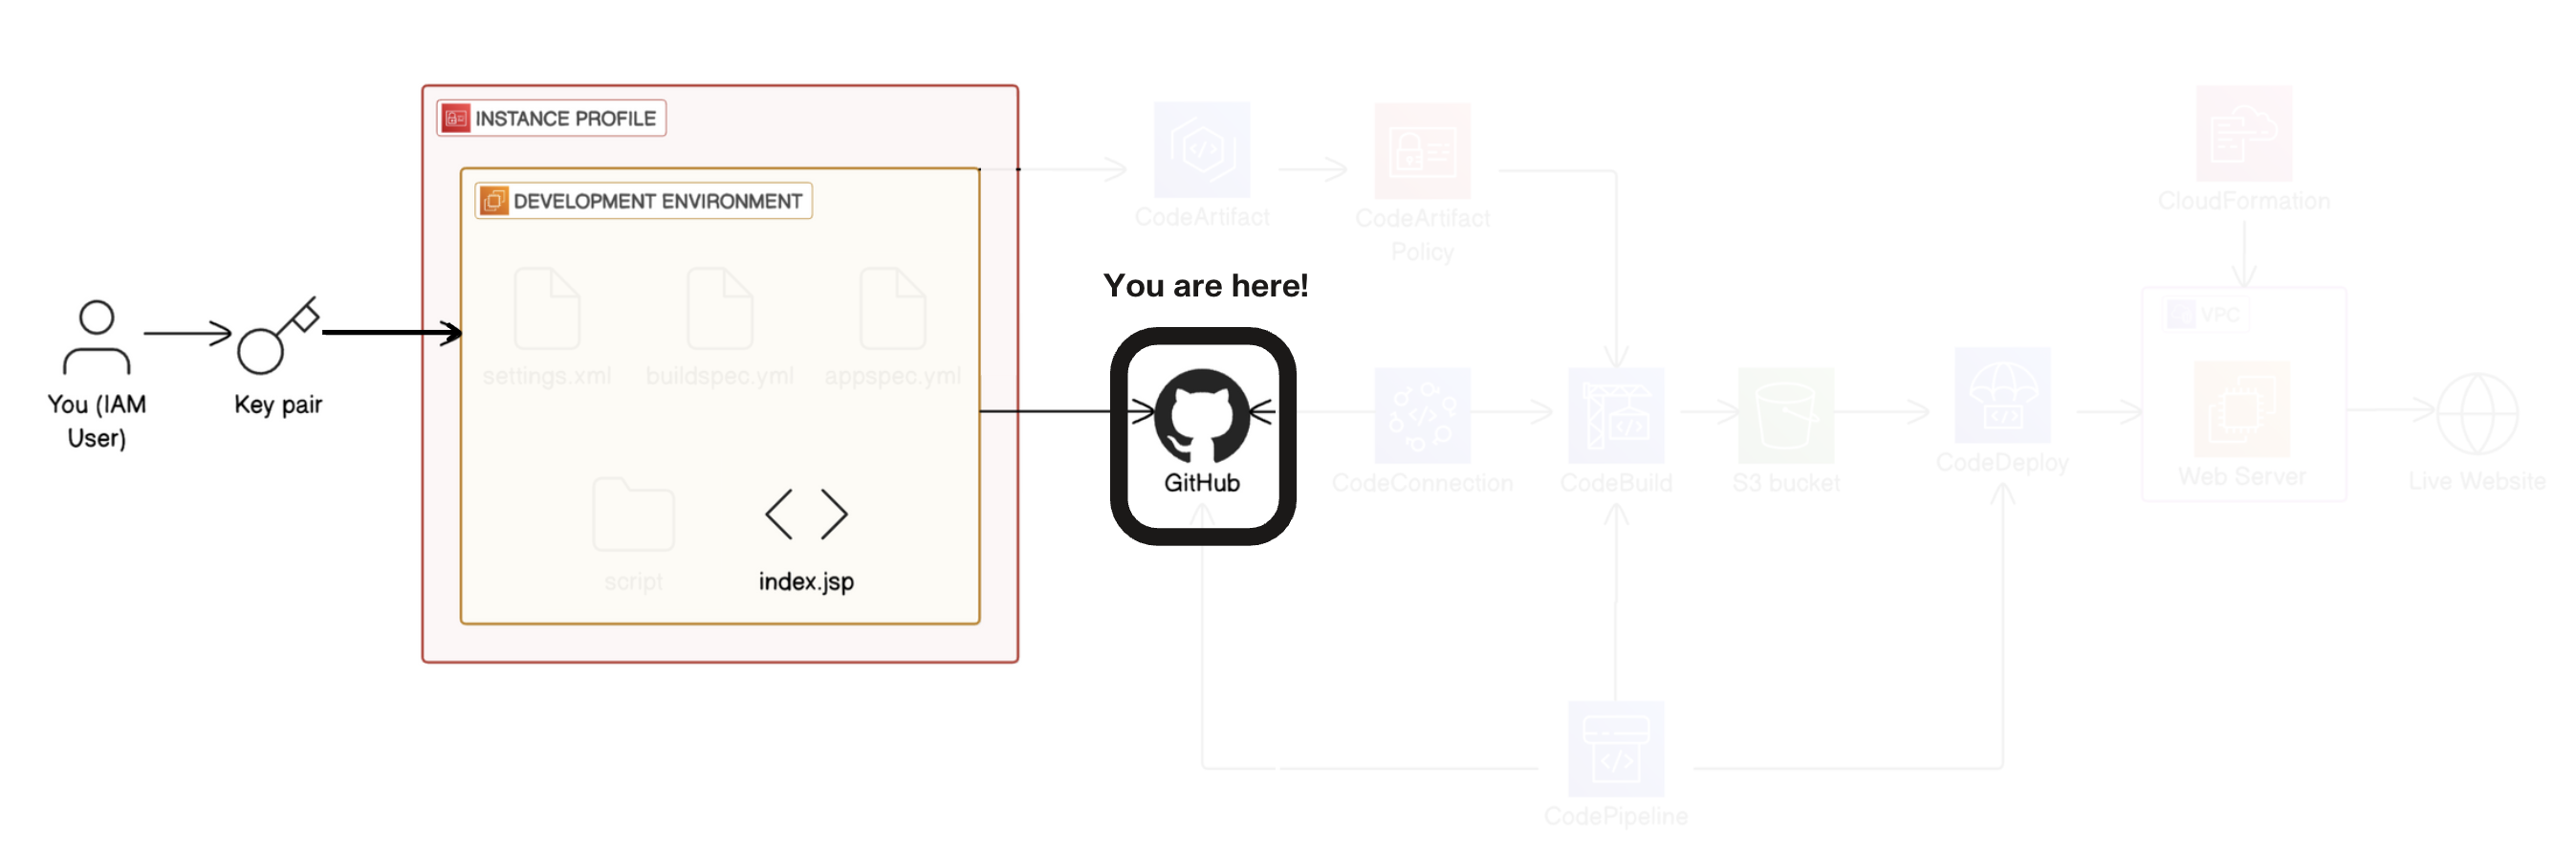
In project 1 of this challenge, you'll start by setting up a Development environment i.e. the test environment where developers write code.
-
In project 2, you'll connect your development environment to GitHub i.e. the repository storing different versions of the code.
-
In project 3, you'll store dependencies in CodeArtifact i.e. the pantry for pre-built code your app needs to function.
-
In project 4, you'll build your code with CodeBuild i.e. the process that prepares code for deployment.
💡 CI (continuous integration) means the build process starts automatically - whenever developers update the code in GitHub (i.e. a new code is added), CodeBuild will automatically build the updated code.
- In project 5, you'll use CodeDeploy to deploy your code to a Web server/Live application i.e. servers that deliver code to users.
💡 CD (continuous delivery) means deployment happens automatically whenever a new build is successful.
- Finally, in project 6, you'll set up the CI/CD pipeline with CodePipeline i.e. the automated workflow that makes sure code is automatically flowing from one stage to the next.
# Part-1. Set Up a Web App in the Cloud
Welcome to Part-1 of the 6 Parts DevOps Challenge!
Today, you'll learn the basics of building a web app using AWS and another tool called VS Code. This will lay the foundation for your DevOps work for the rest of this challenge.

- An AWS account - Create one here!
Get ready to:
-
💻 Launch an EC2 instance.
-
🔌 Use VS Code to set up a remote SSH connection to your EC2 instance.
-
☕️ Install Maven and Java and generate a basic web app.
-
💎 Edit code without VS Code - you'll see why IDEs are so well loved after this!
I started this project by launching an EC2 instance because we would like to deploy our code onto it. EC2 is a compute resource (CPU & RAM) when combined with storage, it works like a VM.
- Switch your Region to the one closest to you.

- Head to Amazon EC2 in your AWS Management Console.

- In your EC2 console, select Instances from the left hand navigation panel.
- Choose Launch instances.

-
Let's set up our EC2 instance.
-
In Name, enter the value
nextwork-devops-siddique. -
Choose Amazon Linux 2023 AMI under Amazon Machine Image(AMI).

- Leave t2.micro under Instance type.
- Under Key pair (login), choose Create a new key pair.

The key pair type specifies the algorithm for generating cryptographic keys.
We use RSA (Rivest-Shamir-Adleman), a widely trusted and supported algorithm known for its strength in digital signatures and encryption.
After setting up my key pair, AWS automatically downloaded my private key in .pem (Privacy Enhanced Mail) format, which is now the standard for cryptographic keys and compatible with many servers like EC2 instances.
- Use
nextwork-keypairas your key pair's name. - Keep the Key pair type as RSA, and the Private key file format as .pem
- Select create key pair.

- A new file will automatically download to our local computer - nice! This is our private key.
- Before we lose track of our .pem file, let's organize it in our computer.
- Head to our local computer's desktop.
- Create a new folder in your desktop called DevOps.
- Move your .pem file from your Downloads folder into your DevOps folder.

SSH (Secure Shell) is a protocol ensuring only authorized users access a remote server. When connecting to your EC2 instance, SSH checks your private key against the server’s public key.
After authorization, SSH establishes a secure, encrypted connection between you and the EC2 instance, protecting all transferred data. This makes SSH ideal for working with virtual servers.
- Back to our EC2 instance setup, head to the Network settings section.
- For Allow SSH traffic from, select the dropdown and choose My IP. This makes sure only I can access my EC2 instance.
- Double check that the IP address under My IP is correct - you can check your Public IP by clicking here.
- Your IP address would be different from what's under My IP, select Custom from the dropdown instead. Enter your IP and make sure to add a /32 to the end e.g.
192.140.151.176/32 - Leave the default values for the remaining sections.

- Choose Launch Instance.
- The EC2 instance has been launched successfully.
VS Code is a free, lightweight, and powerful source code editor designed and maintained by Microsoft. It's widely used for writing and editing code, offering features like syntax highlighting, auto-indentation, and debugging tools.
To install VS Code:
- Head to the Visual Studio Code website.
- Install VS Code by following the installation instructions for your OS e.g. Linux, Mac, Windows.
💡 How can I decide which setting/chip option I should pick?
If you're unsure of which chip/settings option to pick for your device:
- Mac: Select the Apple icon from the top left hand corner of your computer's menu bar. Select About this Mac, and note whether your Chip says Apple or Intel.
- Windows: Click the Start button and search for System Information. Note whether your System Type says x64-based or ARM-based PC.
- Linux: Open a terminal and run uname -m. Note whether the output says x86_64 or aarch64/arm64.

- Once downloaded, you might need to unzip a zip file to access VS Code.

- Open VS Code in your local computer (you'll find it in your Downloads folder).
- If a popup asks you to confirm opening VS Code, select Open.

- Welcome to VS Code!

- Select Terminal from the top menu bar.
- Select New Terminal from the dropdown.

A terminal lets you control your computer with text commands instead of clicks—for example, creating a folder by typing a command rather than right-clicking. It's like texting instructions to your operating system.
All computers have a terminal: Windows uses Command Prompt or PowerShell, while macOS and Linux use Terminal.
For this project, I first ran:
- cd C:\users\siddique\7 Days DevOps challenge\ to navigate to the DevOps folder.
- I also set my private key's permissions by running:
chmod 400 nextwork-keypair.pem
- For windows - use following code block to set permissions on .pem private key file.
icacls "nextwork-keypair.pem" /reset
icacls "nextwork-keypair.pem" /grant:r "USERNAME:R"
icacls "nextwork-keypair.pem" /inheritance:r
💡 What is icacls?
Icacls (which stands for Integrity Control Access Control Lists) is a tool for Windows that lets you decide who can open or change the files on your system. In these icacls commands, you're using:
- /reset to remove default permission settings on the file
- /grant:r "USERNAME:R" to give the current user (that's you!) read access to your secret key
- /inheritance:r to make sure changes in the permissions of other files and the DevOps folder won't change the permission settings for this file.
To connect to my EC2 instance, I ran the command:
ssh -i C:\users\siddique\7 Days DevOps challenge\nextwork-keypair.pem ec2-user@MyEC2IP💡 What does this command do?
ssh starts a secure shell connection to your EC2 instance.
-i specifies the identity file (your .pem file) you're using to authenticate a connection.
ec2-user@[YOUR PUBLIC IPV4 DNS] specifies the username (ec2-user) and the address of the EC2 instance (Public DNS) to connect to.
A server's IPV4 DNS is its public URL which translates into public IP of that EC2 instance.

Apache Maven helps developers build and organize Java projects, and acts as a package manager by automatically downloading needed dependencies.
We're using Maven because it kick-starts web projects with archetypes—templates that set up project foundations, like web apps.
Later, we'll use Maven to quickly set up the web app structure, letting us start developing the app sooner.
- Install Apache Maven using the commands below. We can copy and paste all of these lines into the terminal together, no need to run them line by line.
wget https://archive.apache.org/dist/maven/maven-3/3.5.2/binaries/apache-maven-3.5.2-bin.tar.gz

sudo tar -xzf apache-maven-3.5.2-bin.tar.gz -C /opt

echo "export PATH=/opt/apache-maven-3.5.2/bin:$PATH" >> ~/.bashrc

source ~/.bashrc
💡 What do these commands do?
The first command downloads a setup file that tells your computer where to find Apache Maven. Then, the second command extracts the downloaded package and saves it in a folder called opt. Then, the last two commands save a path to the extracted package, so that you can run Maven commands from any directory after this!
- Alternatively, you can run following command to install apache maven
sudo yum install maven -y- To verify that Maven is installed correctly, run the following command next:
mvn -vNow I am going to install Java 8, or more specifically, Amazon Correto 8.
Java is a popular programming language used to build different types of applications, from mobile apps to large enterprise systems.
Maven, which we just downloaded, is a tool that NEEDS Java to operate. So if we don't install Java, we won't be able to use Maven to generate/build our web app today.
To install Amazon Correto:
- Run following commands:
sudo dnf install -y java-1.8.0-amazon-corretto-devel

export JAVA_HOME=/usr/lib/jvm/java-1.8.0-amazon-corretto.x86_64

export PATH=/usr/lib/jvm/java-1.8.0-amazon-corretto.x86_64/jre/bin/:$PATH
💡 What do these commands do?
The first command installs Java Amazon Corretto 8. Then, the second command tells your EC2 instance how it can find Java, because it'll need to know Java's location to run Java commands! The last command is a time saver - you're saving Java's location so you can run Java commands from anywhere in your EC2 instance without needing to type out the full location each time.
- To verify that Java is installed correctly, run the following command next:
java -version
💡 Important
If the command above doesn't return openjdk version 1.8 (=> Java 8), run the following command that allows you to choose the correct Java version:sudo alternatives --config java
I generated a Java web app using the command:
mvn archetype:generate \
   -DgroupId=com.nextwork.app \
   -DartifactId=nextwork-web-project \
   -DarchetypeArtifactId=maven-archetype-webapp \
   -DinteractiveMode=false
💡 Break down these commands for me... What is mvn?
When you run mvn commands, you're asking Maven to perform tasks (like creating a new project or building an existing one).The mvn archetype:generate command specifically tells Maven to create a new project from a template (which Maven calls an archetype). This command sets up a basic structure for your project, so you don't have to start from scratch.
💡 Extra for Experts: Some of the details we've specified in this command are...
-DartifactId=nextwork-web-project names your project
-DarchetypeArtifactId=maven-archetype-webapp specifies that you're creating a web application.
-DinteractiveMode=false runs the command without pausing for user input, so Maven will go ahead and install everything without waiting for your confirmation.
- Watch out for a BUILD SUCCESS message in your terminal once your application is all set up.

The Remote - SSH extension in VS Code lets us connect directly via SSH to another computer securely over the internet. This lets us use VS Code to work on files or run programs on that server as if we were doing it on our own computer, which will come in handy when we edit the web app in our EC2 instance!
In this step, we're going to:
- Install an extension in VS Code.
- Use the extension to set up a connection between VS Code and your EC2 instance.
- Explore and edit your Java web app's files using VS Code.
💡 Wait...aren't I already connected to my EC2 instance with SSH?
Yes, connecting with SSH in the terminal lets you send text commands to your EC2 instance, but you don't get all the benefits of having an IDE like VS Code.When you connect VS Code itself to your EC2 instance (not just your terminal), you unlock VS Code’s IDE features (like file navigation and code editing) directly on your EC2 instance. This will make it so much easier for you to edit and manage your web app for the rest of this DevOps series.
- Click on the Extensions icon at the side of your VS Code window.

- In the search bar, type Remote - SSH and click Install for the extension.

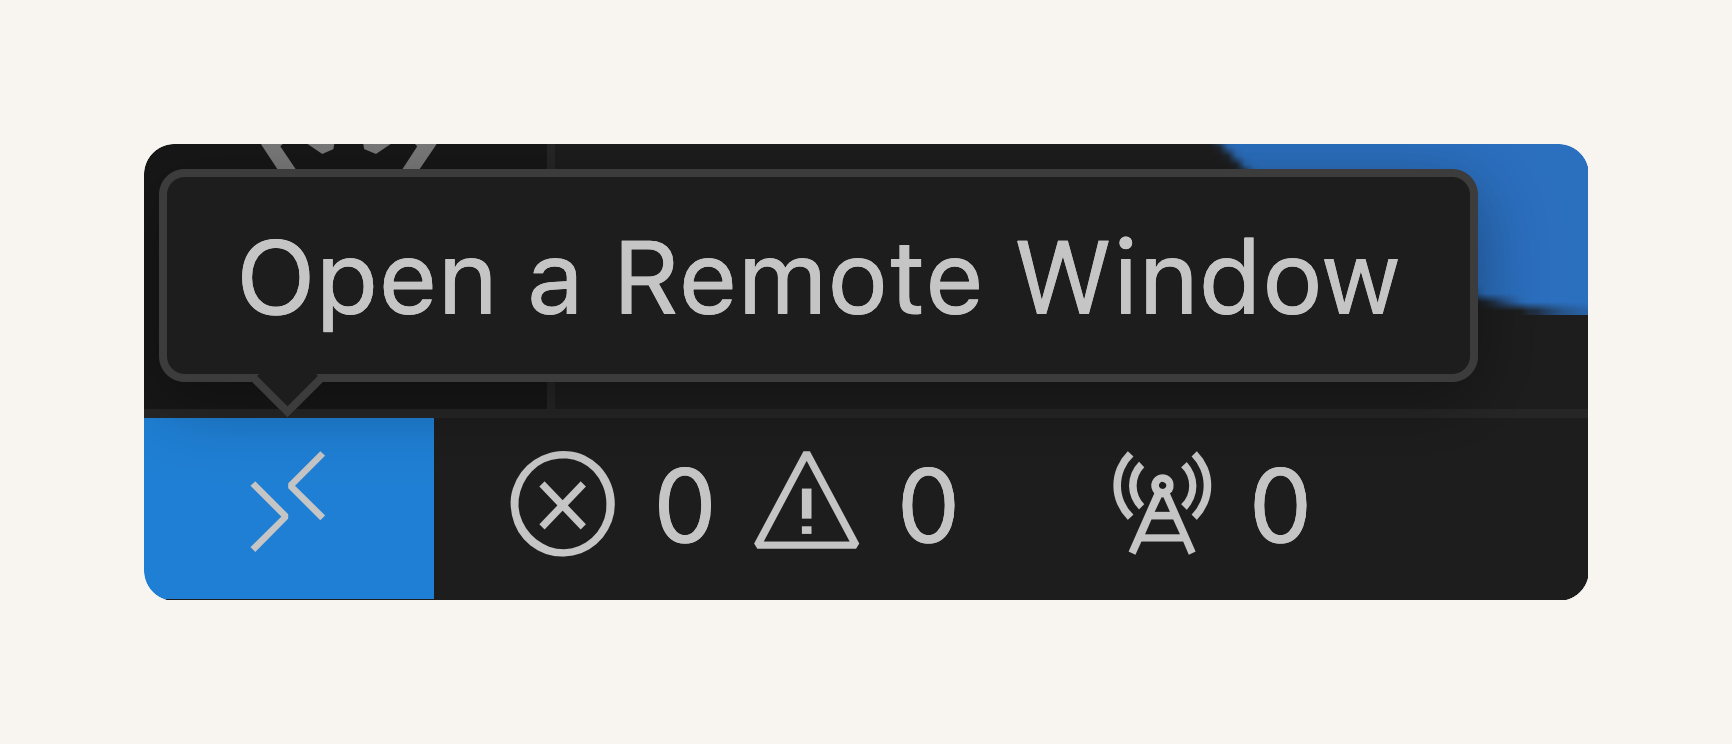
- Click on the double arrow icon at the bottom left corner of your VS Code window. This button is a shortcut to use Remote - SSH.
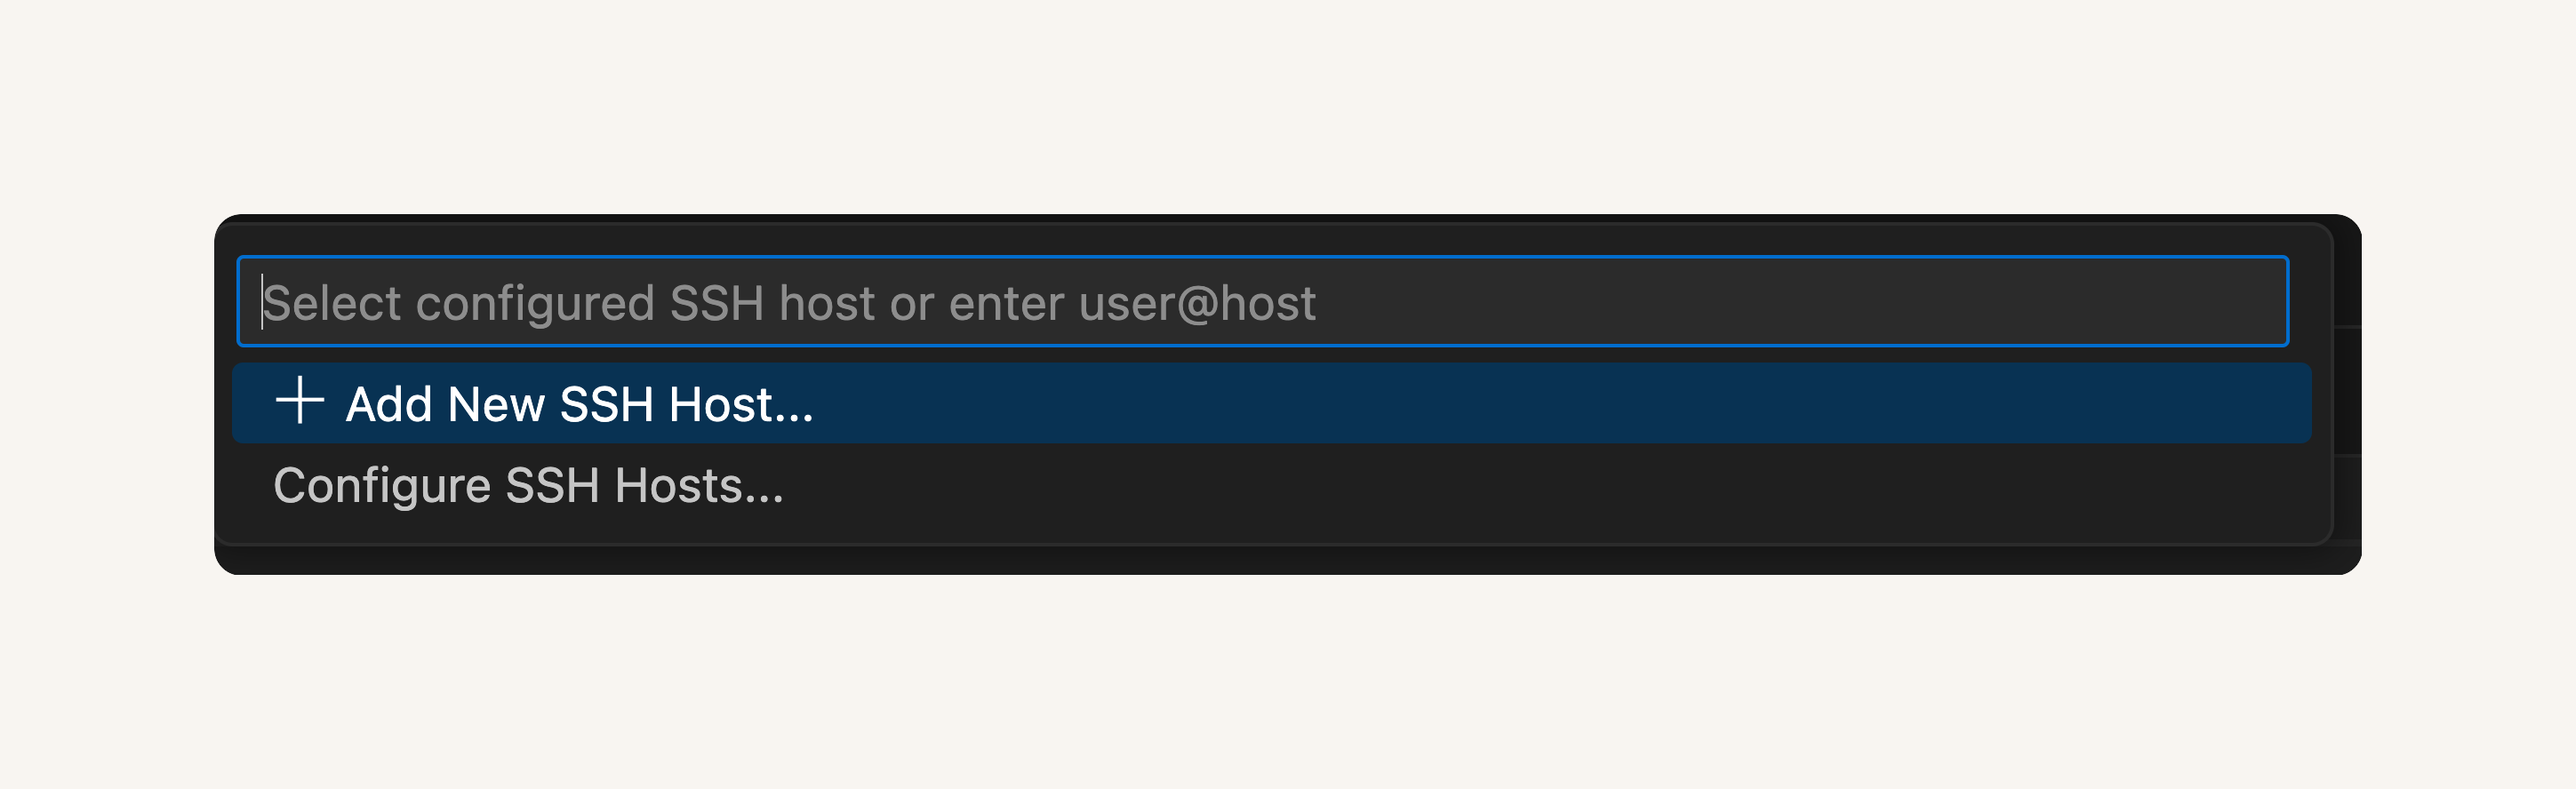
- Select Connect to Host...
- Select + Add New SSH Host
💡 What is an SSH Host?
An SSH Host is the computer or server you're connecting to using SSH. It's the target location where you want to run commands or manage files; in our case, the SSH Host is the EC2 instance we created.
-
Enter the SSH command you used to connect to your EC2 instance: ssh -i
[PATH TO YOUR .PEM FILE]ec2-user@[YOUR PUBLIC IPV4 DNS]- Replace
**[PATH TO YOUR .PEM FILE]**with the actual path to your private key file (e.g.,~/Desktop/DevOps/nextwork-keypair.pem). Delete the square brackets! - Replace
**[YOUR PUBLIC IPV4 DNS]**with the Public DNS you just found. Delete the square brackets!
- Replace
-
Select the configuration file at the top of your window. It should look similar to
/Users/username/.ssh/config

- A Host added! popup will confirm that you've set up your SSH Host
- Select the blue Open Config button on that popup.
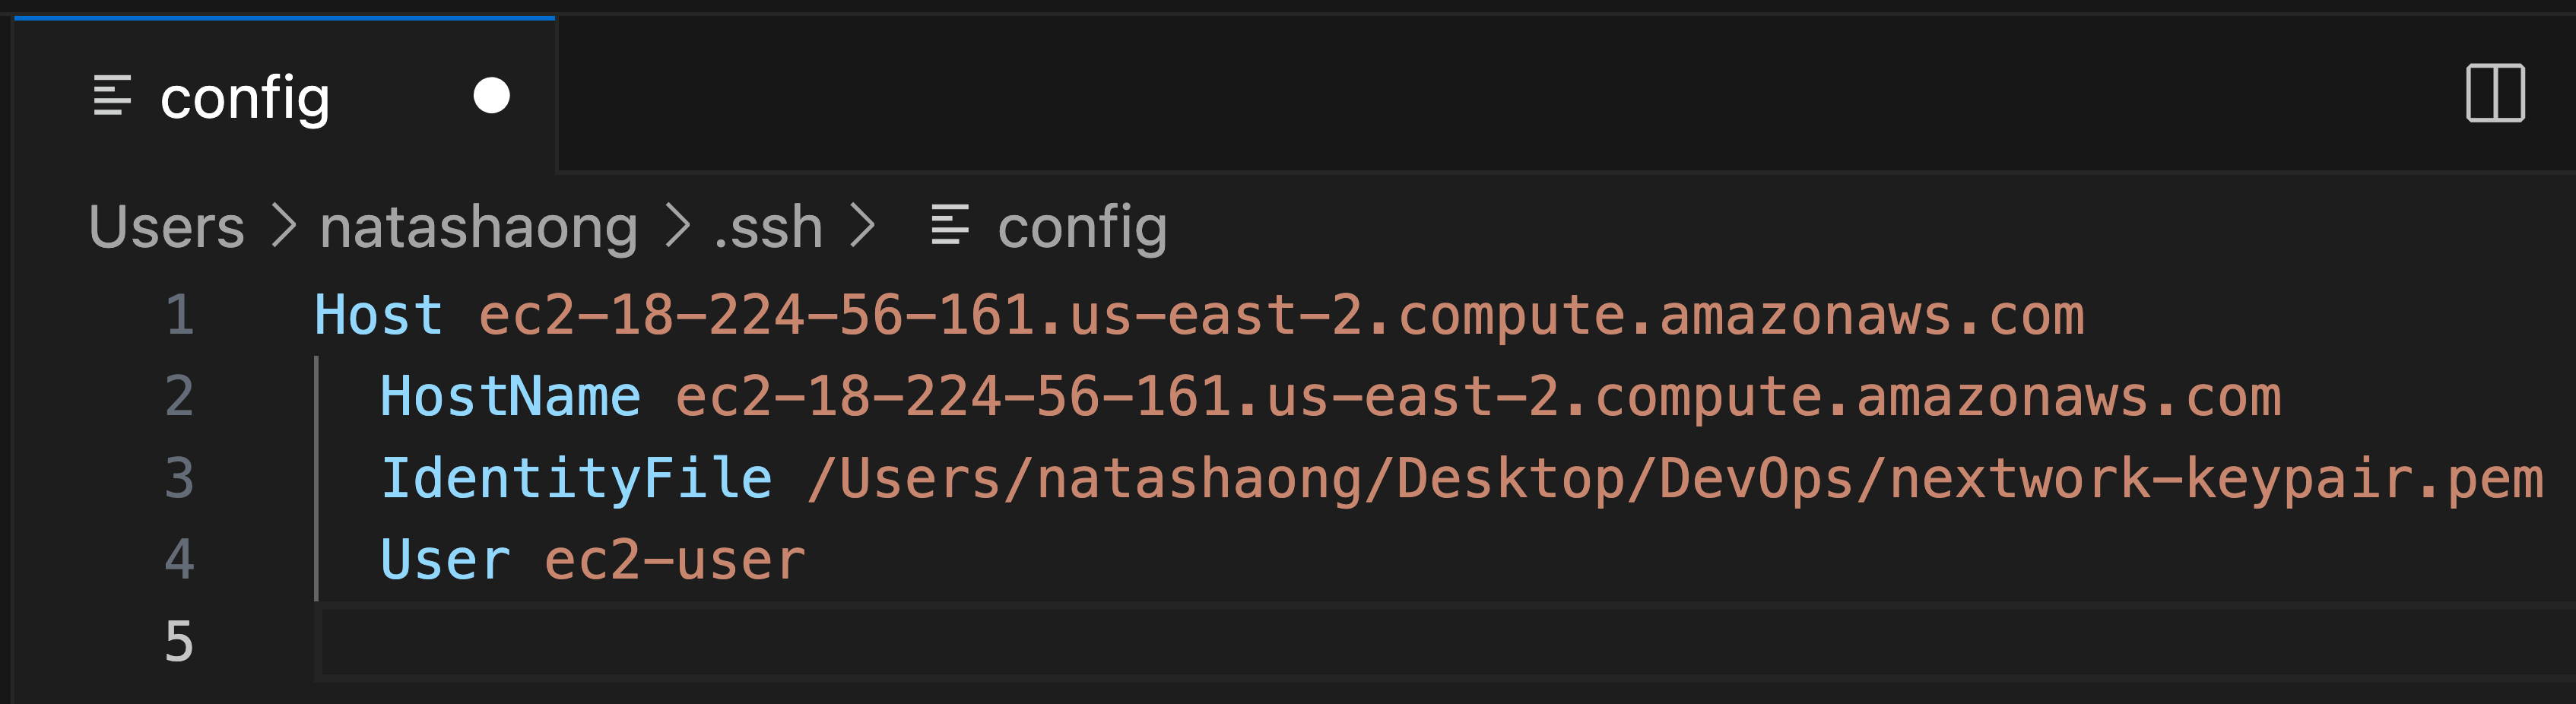
- Confirm that all the details in your configuration file look correct:
- Host should match up with your EC2 instance's IPv4 DNS.
- IdentityFile should match up to nextwork-keypair.pem's location in your local computer.
- User should say ec2-user
- Now you’re ready to connect VS Code with your EC2 instance!
- Click on the double arrow button on the bottom left corner and select Connect to Host again.
- You should now see your EC2 instance listed at the top.
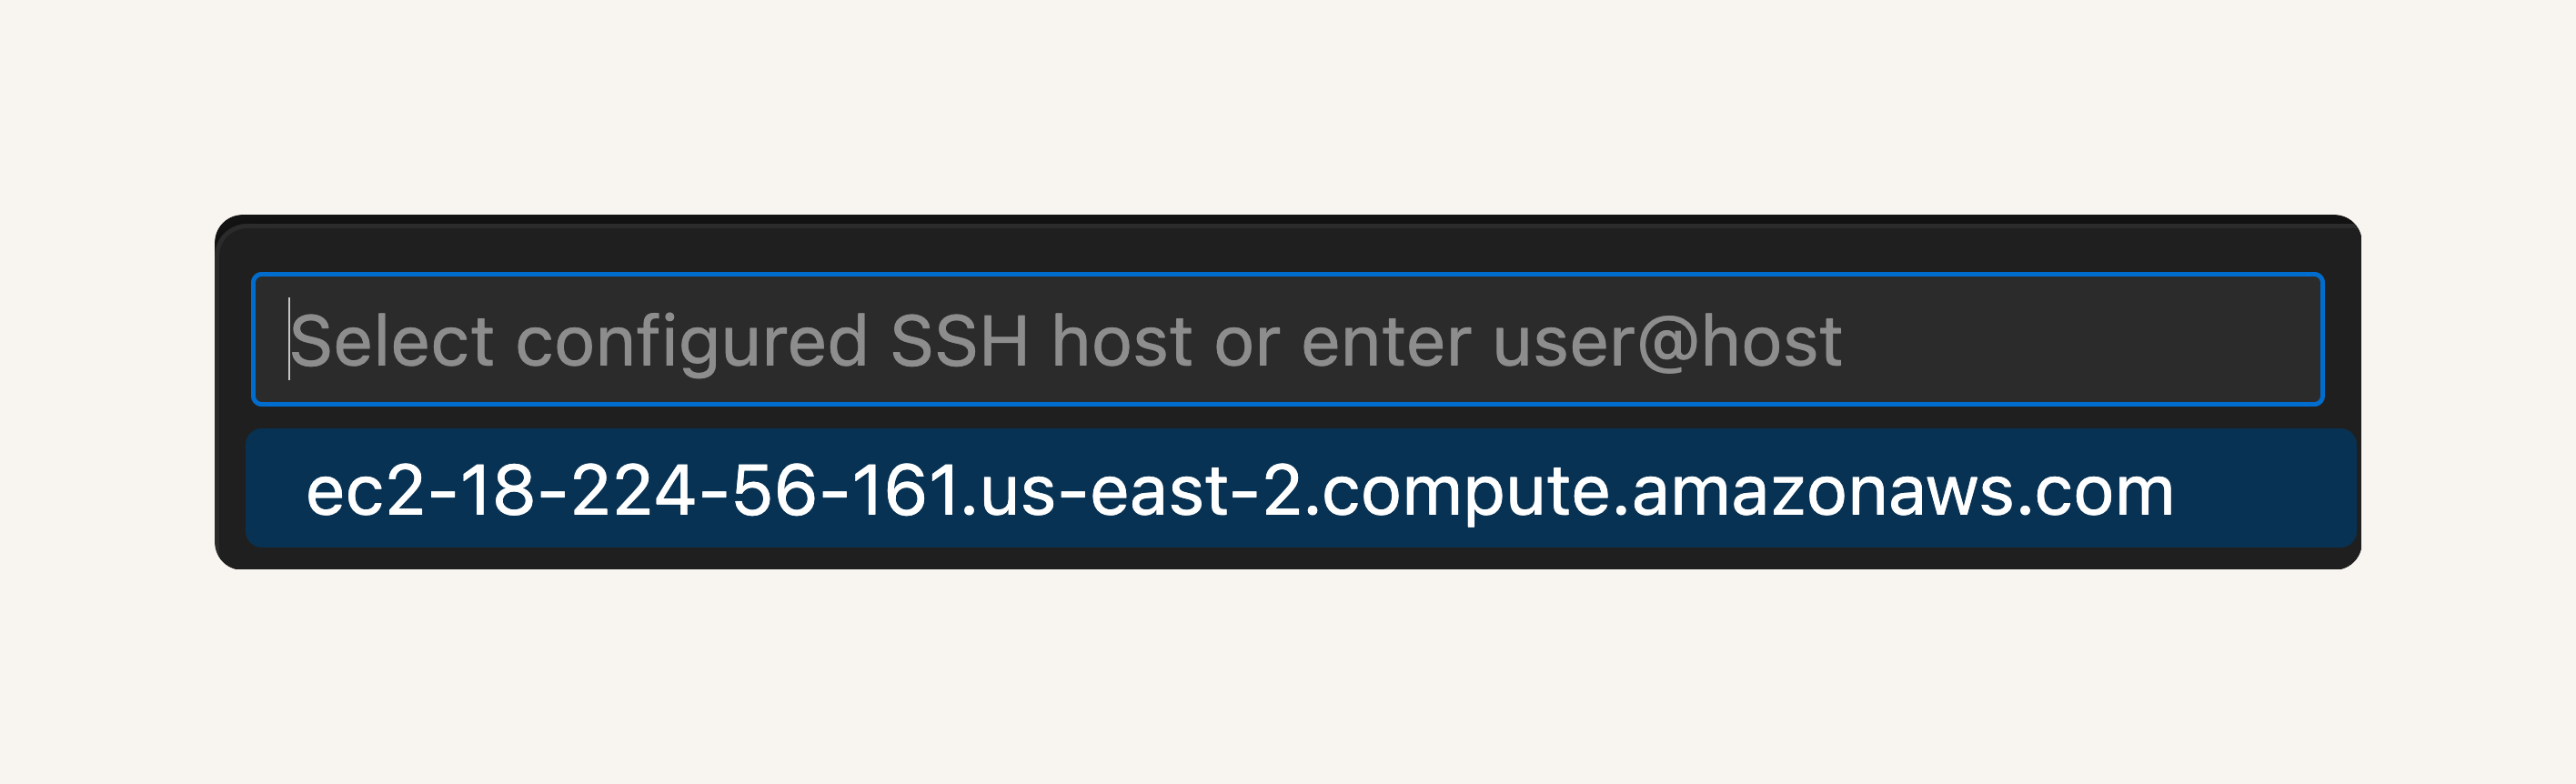
- Select the EC2 instance and off we gooooooooooo to a new VS Code window
✈️ - Check the bottom right hand corner of your new VS Code window - it should show your EC2 instance's IPV4 DNS.

Nice work - we've connected VS Code with your EC2 instance! 🥳
Now let's open up your web app's files.
- From VS Code's left hand navigation bar, select the Explorer icon.

- Select Open folder.
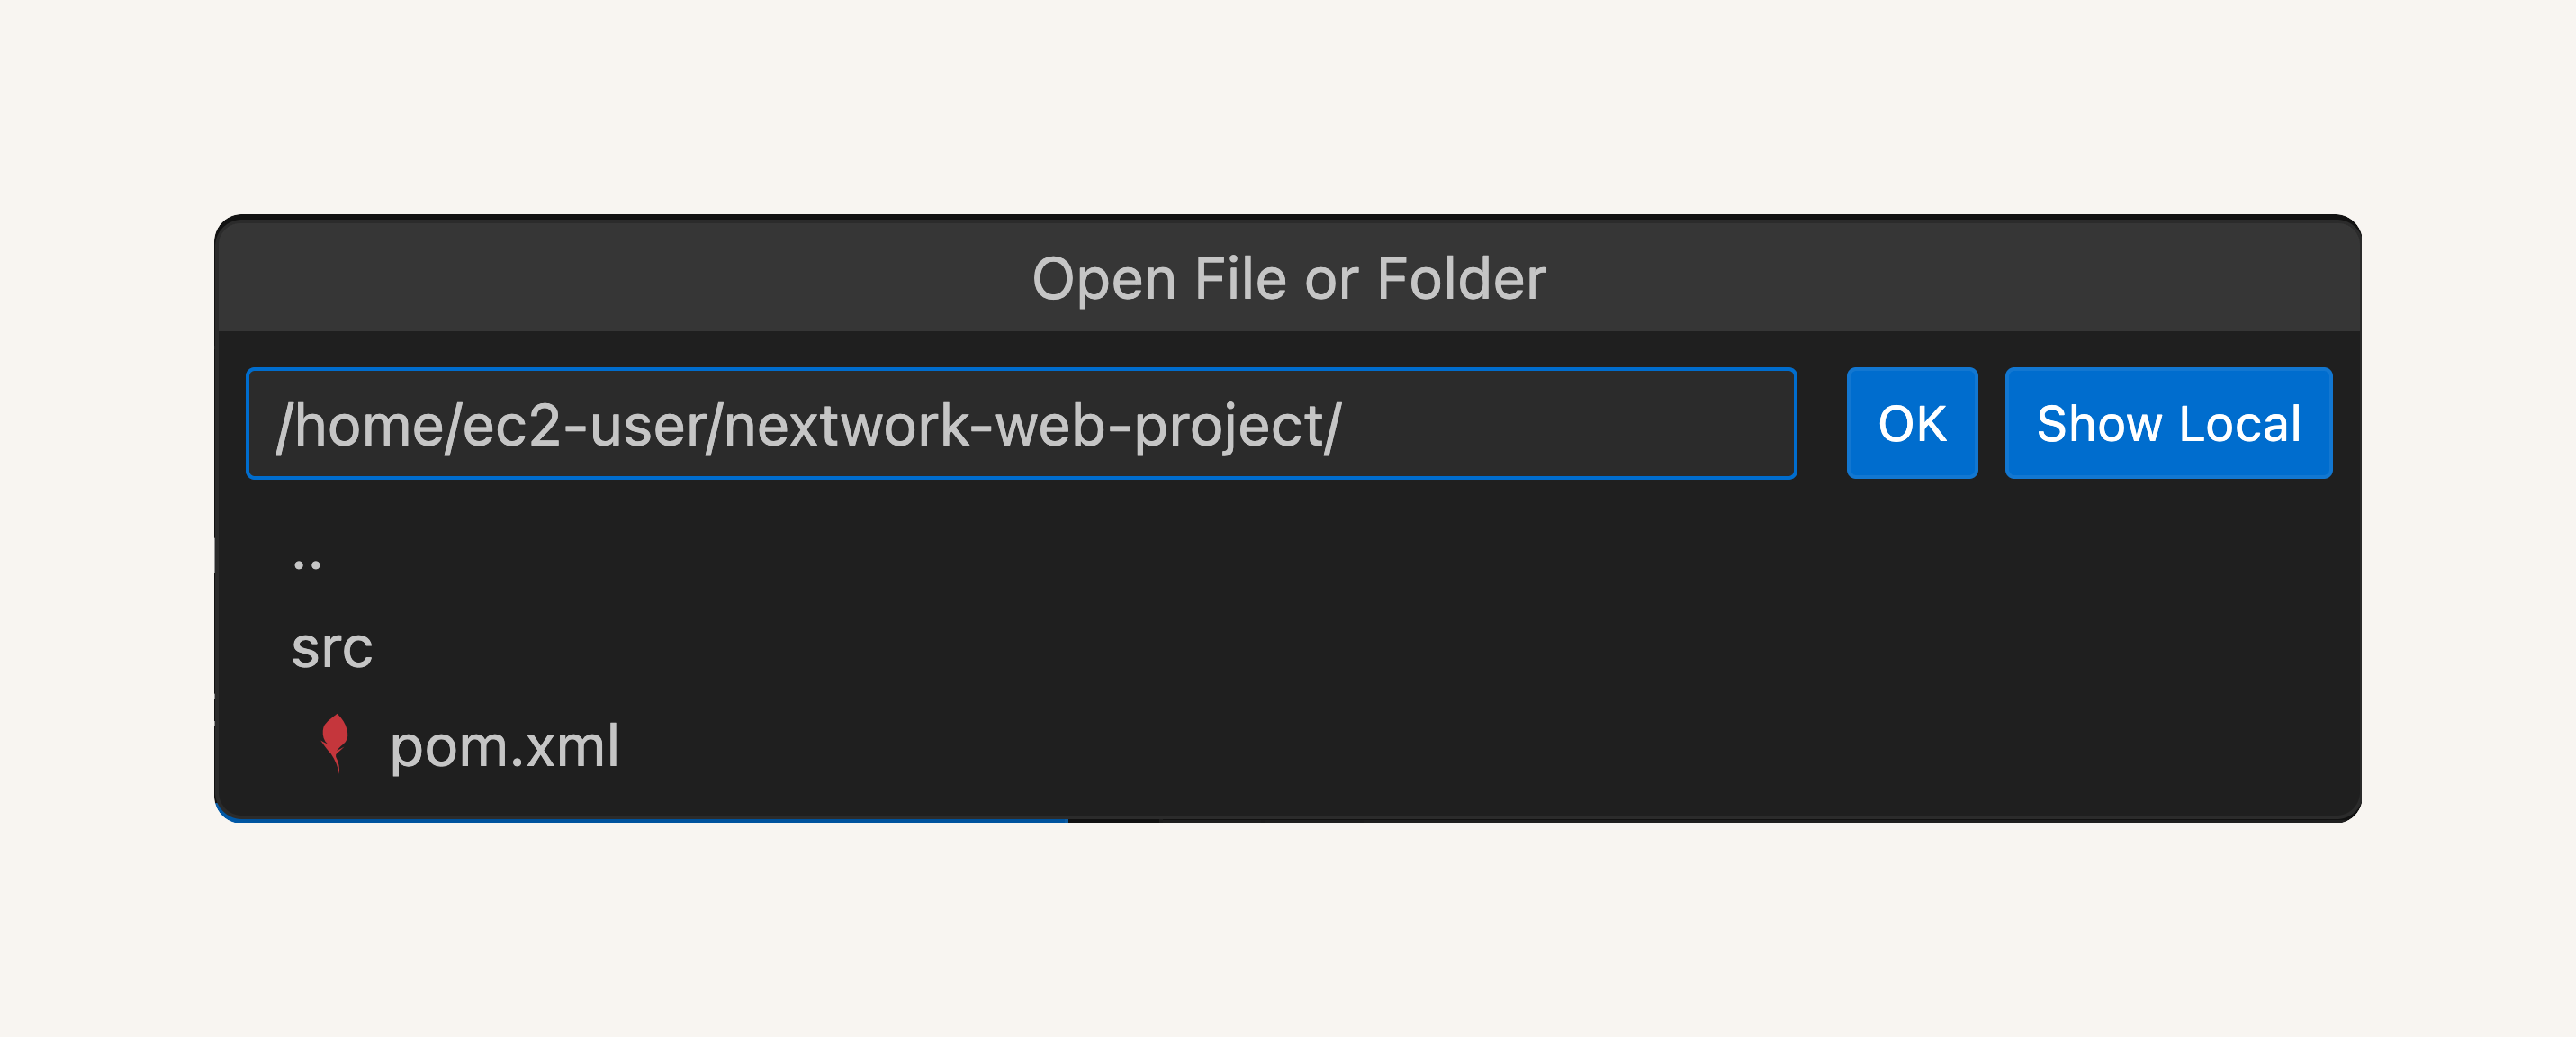
- At the top of your VS Code window, you should see a drop down of different file and folder names. Ooooo, this is VS Code asking you which specific file/folder you'd like to open!
- Enter /home/ec2-user/nextwork-web-project.
- Press OK.
- VS Code might show you a popup asking if you trust the authors of the files in this folder. If you see this popup, select Yes, I trust the authors.
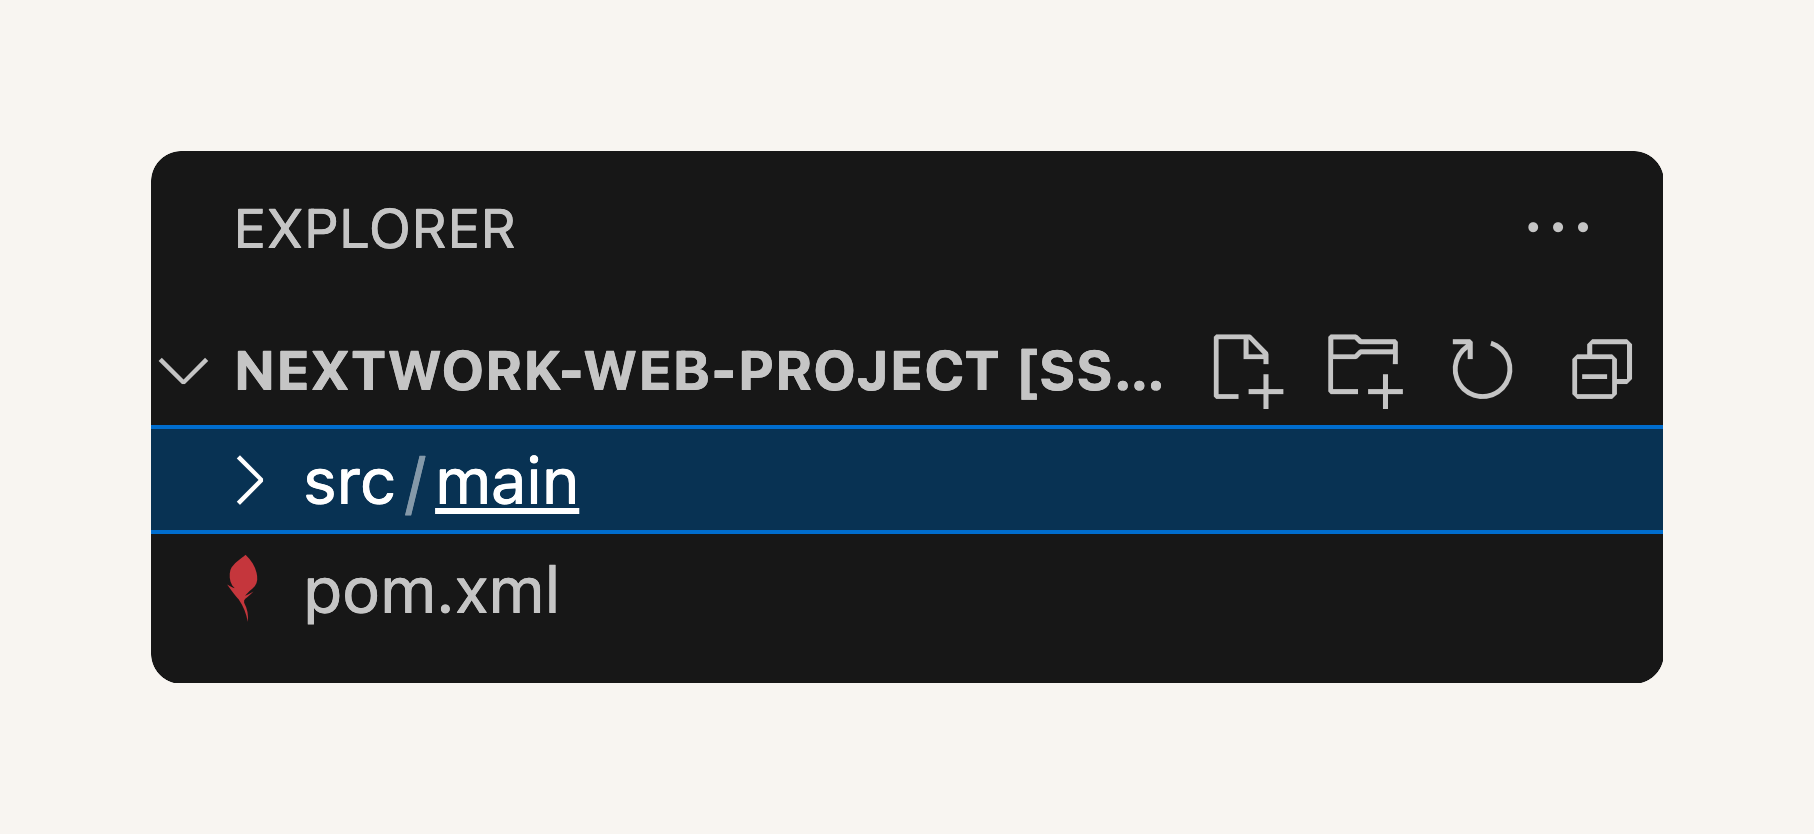
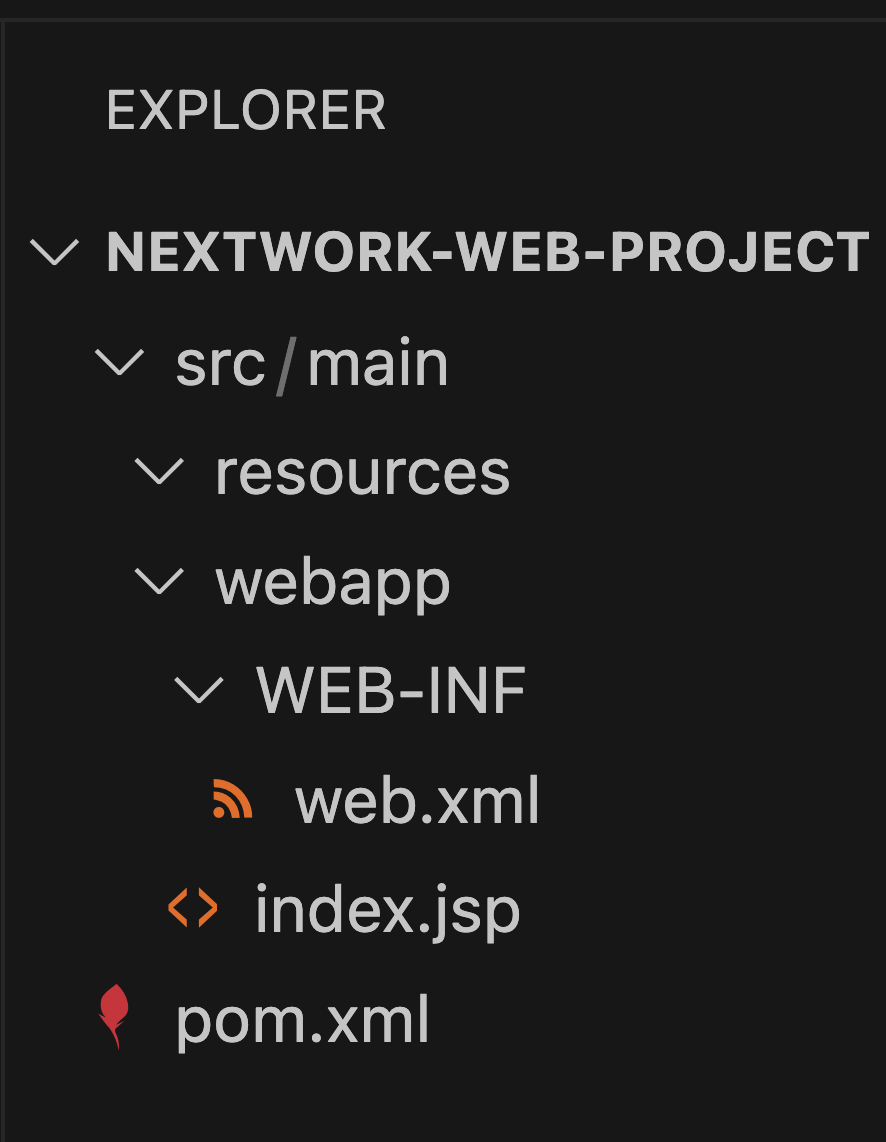
- Check your VS Code window's file explorer again - a folder called nextwork-web-project is here!
💡 What are all these files and subfolders?
All the files and subfolders you see under nextwork-web-project are parts of a web app! You can start working right away on the content you want to display on your web app, since Maven's taken care of the basic structuring and setup.Let's get to know some of these web app files/folders:
The src (source) folder holds all the source code files that define how your web app looks and works.
src is further divided into webapp, which are the web app's files e.g. HTML, CSS, JavaScript, and JSP files, and resources, which are the configuration files a web app might need e.g. connection settings to a database.
pom.xml is a Maven Project Object Model file. It stores information and configuration details that Maven will use to build the project. We'll use pom.xml later in this project series!
- Exploring done! So how can VS Code help you edit your application files? Let's find out.
- From your file explorer, click into index.jsp.

💡 What is index.jsp? What's the difference from HTML?
index.jsp is a file used in Java web apps. It's similar to an HTML file because it contains markup to display web pages.However, index.jsp can also include Java code, which lets it generate dynamic content.
This means content can change depending on things like user input or data from a database. Social media apps are great examples of web apps because the content you see is always changing, updating and personalised to you. HTML files are static and can’t include Java code. That's why it's so important to install Java in your EC2 instance - so you can run the Java code in your web app!
-
Welcome to editor view of
index.jsp. Now we're really using VS Code's IDE abilities - editing code is much easier here than in the terminal. -
Let's try modifying
index.jspby changing the placeholder code to the code snippet below. Don't forget to replace{YOUR NAME}from the following code with your name:
<html>

<body>

<h2>Hello {YOUR NAME}!</h2>

<p>This is my NextWork web application working!</p>

</body>

</html>
- Save the changes you've made to index.jsp by selecting Command/Ctrl + S on your keyboard.
💡 How will I know I've saved my work?
Look at the name of the open index.jsp tab at the top of your editor 🔍 The dot next to the name should go away once your changes are saved.

We've just learnt how to set up a web app on an EC2 instance AND connect it with VS Code, one of the most popular and practical IDEs out there.
We'll be building on the foundation we've set up here over the rest of the DevOps series, more exciting learnings are ahead.
Welcome to Part-2 of the 6 Parts DevOps Challenge!
Today, you'll learn how to store your web application's code in a Git repository.
🙋♀️ I'm a complete beginner - what does a Git repository mean?
No worries if you're new to repositories, you'll learn what they mean and why they're important as you go in this project.In short, Git repositories are essential in a CI/CD pipeline because they store your code safely in the cloud, and tracks every change your team makes to the code! Using a shared repository makes it much easier for engineering teams to hand off code, collaborate and update each other on changes they've made.
- An AWS account - Create one here!
If you are following along since part-1 of this project, you may proceed further. However if at any point you deleted your resources, make sure to go back and set up every thing need for this project from DevOps - Complete CICD Pipeline With AWS CodePipeline#Part-1. Set Up a Web App in the Cloud till this part of the project. Good Luck!
Get ready to:
- 🐱 Set up Git and GitHub.
- 🤝 Connect your web app project to a GitHub repo.
- 🪄 Make changes to your web app code - and watch your GitHub repo update too.
- 💎 Set up a README file for your repo.
Now that your development environment is ready, the next step is to set up Git on your EC2 instance.
In this step, you're going to:
- Install Git on your EC2 instance.
💡 What is Git?
Git is like a time machine and filing system for your code. It tracks every change you make, which lets you go back to an earlier version of your work if something breaks. You can also see who made specific changes and when they were made, which makes teamwork/collaboration a lot easier.Extra for Experts: Git is often called a version control system since it tracks your changes by taking snapshots of what your files look like at specific moments, and each snapshot is considered a 'version'.
- In the EC2 instance's terminal, install Git:
sudo dnf update -y
sudo dnf install git -y
💡 What do these commands do?
sudo dnf update -ytells your EC2 instance to find all the latest updates of software it has (e.g. Java, Maven) and install them straight away.
sudo dnf install git -yinstalls Git on your EC2 instance.
It's best practice to update your existing software before installing new ones, just in case there are compatibility issues between new and old software.Extra for Experts:
-yis a shortcut for "yes," meaning you're giving your EC2 instance your approval in advance for any time the system might ask questions like "should I proceed with the installation?"
- Verifiy the installation:
git --version
Git is installed woohoo! Next up, we'll set you up with GitHub.
In this step, you're going to:
- Set up a GitHub account.
- Create a GitHub repository.
If you already have a GitHub account:
- Sign in to GitHub.
- Scroll to the heading 🗂️ Set up a new repository in this step.
If you don't have a GitHub account:
- Head to GitHub's signup page.
💡 What is Github?
GitHub is a place for engineers to store and share their code and projects online. It's called GitHub because it uses Git to manage your projects' version history.
- Log into your GitHub account once you've verified your email.

💡 What is the difference between Git & Github?
If Git is the tool for tracking changes, think of GitHub as a storage space for different version of your project that Git tracks. Since GitHub is a cloud service, it also lets you access your work from anywehere and collaborate with other developers over the internet.💡 Why would I use Github? Isn't the code in my EC2 instance already in the cloud?
Even though your code is on a cloud server like EC2, GitHub helps you use Git and see your file changes in a more user-friendly way. It's just like how using an IDE (VS Code) makes editing code easy.GitHub is also especially useful in situation where you're working in teams and need to share your updates and reviews to a shared code base.
🗂️ Set up a new repository
Nice, you're ready to set up a new repository on GitHub!
💡 What is a repository?
To store your code using Git, you create repositories (aka 'repos'), which are folders that contain all your project files and their entire version history. Hosting a repo in the cloud, like on GitHub, means you can also collaborate with other engineers and access your work from anywhere.
- After signing in to GitHub, click on the + icon next to your GitHub profile icon at the top right hand corner.
- Select New repository.

- Select Create repository.
- This loads up a new page where you can create a repository.
- Under Owner, click on the Choose an owner dropdown and select your GitHub username.
- Under Repository name, enter
nextwork-web-project - For the Description, enter
Java web app set up on an EC2 instance. - Choose your visibility settings. We'd recommend selecting Public to make your repository available for the world to see.
- Select the checkbox next to Add a README file.
💡 What is a README?
A README is a piece of text that introduces and explains your project, like what the project does, how to set it up, and how to use it. Having a README is super common practice in software development (not just on GitHub) and helps anyone get up to speed on your project's purpose and function quickly.

Select Create repository.

So we now have a place in the cloud that will store our code and track the changes we make.
But... this storage folder (your GitHub repo) still doesn't know where your web app files are.
Lets connect our GitHub repo with our web app project stored in your EC2 instance.
In this step, you're going to:
- Set up a local git repo in your web app folder.
- Connect your local repo with your GitHub repo.
- Check that you are in the right folder by running this command in your terminal:
pwd

💡 What does pwd do?
pwd stands for print working directory, and this command asks your server "where am I right now?" The terminal will show you the exact location of the directory (folder) you're in.
- If you're not in nextwork-web-project, use cd to navigate your terminal into your web app project.
- Now let's tell Git that we'd like to track changes made inside this project folder.
git init💡 What does git init do?
To start using Git for your project, you need to create a local repository on your computer.When you run
git initinside a directory e.g. nextwork-web-project, it sets up the directory as a local Git repository which means changes are now tracked for version control.💡 What's a local repository?
The local repository is where you use Git directly on your own EC2 instance. The edits you make in your local repo is only visible to you and isn't shared with anyone else yet.This is different to the GitHub repository, which is the remote/cloud version of your repo that others can see.

💡 WOAH! I got a bunch of yellow text when I ran this command
This yellow text is just Git giving you a heads-up about naming your main branch master and suggesting that you can choose a different name like 'main' or 'development' if you want.💡 What is a main branch?
You can think of Git branches as parallel versions or 'alternate universes' of the same project. For example, if you wanted to test a change to your code, you can set up a new branch that lets you diverge from the original/main version of your code (called master) so you can experiment with new features or test bug fixes safely.We won't create new branches in this project and we'll save all new changes directly to master, but it's best practice to make all changes in a separate branch and then merge them into master when they're ready.
- Head back to your GitHub repository's page.
- In the blue section of the page titled Quick setup — if you’ve done this kind of thing before, copy the HTTPS URL to your repository page.

Now let's connect your local project folder with your Github repo!
- Run this command. Don't forget to replace
[YOUR GITHUB REPO LINK]with the link you've just copied.
git remote add origin [YOUR GITHUB REPO LINK]

#Example

git remote add origin https://github.com/git-muhammad-sadique-i987/nextwork-web-project.git
💡 What does 'remote add origin' mean?
Your local and GitHub repositories aren't automatically linked, so you'll need to connect the two so that updates made in your local repo can also reflect in your GitHub repo.When you set
remote add origin, you're telling Git where your GitHub repository is located. Think of origin as a bookmark for your GitHub project's URL, so you don't have to type it out every time you want to send your changes there.
Next, we'll save our changes and push them into GitHub.
- Run this command in your terminal:
git add . 💡 What does this command do?
git add .stages all (marked by the '.') files in nextwork-web-project to be saved in the next version of your project.💡 What does staging mean?
When you stage changes, you're telling Git to put together all your modified files for a final review before you commit them. This is incredibly handy because you get to see all your edits in one spot, which means its much easier to check if there were are mistakes or unwanted changes before you commit.
- Run this command next in your terminal:
git commit -m "Updated index.jsp with new content"💡 What does this command do?
git commit -m "Updated index.jsp with new content"saves the staged changes as a snapshot in your project’s history. This means your project's version control history has just saved your latest changes in a new version.
-mflag lets you leave a message describing what the commit is about, making it easier to review what changed in this version.
- Finally, run this command:
git push -u origin master # Replace master with main if your production branch is called `main`
💡 What does this command do?
git push -u origin masteruploads i.e. 'pushes' your committed changes to origin, which you've bookmarked as your GitHub repo. 'master' tells Git that these updates should be pushed to the master branch of your GitHub repo.By using
-uyou're also setting an upstream for your local branch, which means you're telling Git to remember to push to master by default. Next time, you can simply rungit pushwithout needing to define origin and master.
- Ah we're so close, but Git can't push your work to the Github repository yet. It's now asking for a username!

💡 Why is Git asking for my username?
Git needs to double check that you have the right to push any changes to the remote origin your local repo is connected with. To do this, Git is now authenticating your identity by asking for your GitHub credentials.
- Enter your Github username, and press Enter on your keyboard.
- Next, enter your password. You'll notice that as you type this out, nothing shows on your terminal. This is totally expected - your terminal is hiding your input for your privacy. Press Enter on your keyboard when you've typed out your password, even if you don't see it printed out in your terminal.
- Hmmmm, now Git is letting us know that it can't actually accept our password.

💡 What does this mean?
GitHub phased out password authentication to connect with repositories over HTTPS - there are too many security risks and passwords can get intercepted over the internet 🤺 You need to use a personal access token instead, which is a more secure method for logging in and interacting with your repos.💡 What is a token?
A token in GitHub is a unique string of characters that looks like a random password. For example, a GitHub token might look likeghp_xHJNmL16GHSZSV88hjP5bQ24PRTg2s3Xk9ll. As you can imagine, tokens are great for security because they're unique and would be very hard to guess.
Now that we know passwords won't work for authentication, we'll have to find a replacement.
Let's generate an authentication token on GitHub!
In this step, you're going to:
- Set up a token on GitHub.
- Use the generated token to access your GitHub repo from your local repo.
- Find the Generate new token (classic) option in your GitHub settings.

- Give your token a descriptive note, like
Generated for EC2 Instance Access. This is a part of NextWork's 6 Parts DevOps Challenge. - Lower the token expiration limit to 7 days.
💡 What is a token expiration limit?
A token expiration limit is how long your personal access token would work for. After this time period, the token expires and no longer grants access, so you'll need to generate a new token.
- Select the checkbox next to repo.
💡 What do all these scopes mean?
We use scopes to decide what kind of permissions your token will grant. Each scope you pick gives the token the ability to do even more things with your GitHub account. In our case, we picked the repo scope, which means the token can even access and control private repositories in your account.

- Nice, a new token (a long string of random letters) is generated!
💡 I also see a banner at the top of the screen... what does this mean?
You might see a banner at the top of the page that says "Some of the scopes you've selected are included in other scopes. Only the minimum set of necessary scopes has been saved."This simply means the scope
repois the overarching scope for a broad range of permissions, so some of the smaller scopes you'be checked underrepooverlaps with the main one.
- Make sure to copy your token now. Keep it safe somewhere else, you won't be able to see your token once you close this tab.
- Switch back to your VS Code terminal.
- Run
git push -u origin masteragain, which will trigger Git to ask for your GitHub username and password.

💡 What does the message in the terminal mean?
This message appears when you successfully push changes to a GitHub repository - nice work. It shows the progress of transferring objects (like files and commits), how many objects were processed, and tells you that your local branch is now tracking the remote branch after the push.
- Head to your GitHub repository in your web browser.
- Refresh the page, and you’ll see your web app files in the repository, along with the commit message you wrote.

When you add, commit and push your changes, you might notice the terminal automatically sets two other things - your name and email address - before it asks for your GitHub username.

💡 Why does my terminal need my name and email?
Git needs author information for commits to track who made what change. If you don't set it manually, Git uses the system's default username, which might not accurately represent your identity in your project's version history.
- Run
git logto see your history of commits, which also mentions the commit author's name.

- Hmmm EC2 Default User isn't really your name, and the EC2 instance's IPv4 DNS is not your email. Let's configure your local Git identity so Git isn't using these default values.
- Run these commands in your terminal to manually set your name and email. Don't forget to replace "Your name" with your name (keep the quote marks), and
[email protected]with your email address.
git config --global user.name "Your Name"
git config --global user.email [email protected]
Nice work! You've set up your local Git identity, which means Git can associate your changes in the local repo to your name and email.
This setup is best practice for keeping a clear history of who made which changes ✅
Great success with getting your GitHub connection all set up.
So we've learnt how to link your EC2 instance's files with a cloud repo, now let's see what happens when you make new changes to your web app files.
In this step, we'll edit index.jsp again using VS Code, and run commands that pushes those changes to your GitHub repository too.
In this step, you're going to:
- Make changes to your web app.
- Commit and push those changes.
- Keep your GitHub page open, and switch back to your EC2 instance's VS Code window.
- Find index.jsp in your file navigator on the left hand panel.
- Find the line that says This is my NextWork web application working! and add this line below:
<p>If you see this line in Github, that means your latest changes are getting pushed to your cloud repo :o</p>
- Save your changes by pressing Command/Ctrl + S on your keyboard while keeping your index.jsp editor open.
- Head back to your GitHub tab and click into the src/main/webapp folders to find index.jsp.
- Click into index.jsp - have there been any updates to index.jsp in your GitHub repo?

💡 Hmmm it's still looking the same...
You won't see your changes in GitHub yet, because saving changes in your VS Code environment only updates your local repository. Remember that the local repository in VS Code is separate from your GitHub repository in the cloud.To make your changes visible in GitHub, you need to write commands that send (push) them from your local repository into your origin.
- Head back to your VS Code window.
- In the terminal, let's stage our changes:
git add. - Ready to see what changes are staged? Run
git diff --stagednext.

💡 What does this command do?
git diff --stagedshows you the exact changes that have been staged compared to the last commit. Now you get to review your modifications in your code that you are about to save into your local repo's version history!💡 Extra for Experts: Did you know you can view these changes using VS Code too?
- Select the Source Control icon on the side of your VS Code window.
- Under the Saved Changes heading, select index.jsp.
- You'll see your change in a new window that hightlights the new line you've added to index.jsp!


- Nice, these changes are what we want to save and send to GitHub, lets do that with these commands:
git commit -m "Add new line to index.jsp"
git push🙋♀️ Help! My terminal isn't letting me enter commands!
This doesn't apply to everyone, but your terminal might stay stuck in the previous step to show you your staged changes. Enter q into the terminal to quit this view and return to running commands.Extra for Experts: Interesting, why would by terminal stay stuck?
When you run certain Git commands like git status, Git uses a pager to handle the output (by default, this is usually on most Unix-like systems so other operating systems might now show this).The pager lets you scroll through information that can't fit on a single terminal window, and the terminal will look like it's "stuck" because it's waiting for you to finish reviewing the output. While in this mode, you can't enter new commands until you quit pager view.
- You might need to enter your username and token again to complete your push.

💡 I have to enter my username and password AGAIN?!
This is because we set up the connection to our GitHub repo using its HTTPS URL. Using HTTPS is straightforward compared to other options e.g. SSH, but it's also stateless, which means Git doesn't remember your credentials for security reasons. That's why Git asks for your GitHub credentials 👏 every time 👏 you pull from or push to your GitHub repo.Top tip: right after you enter your username and token again, you can run
git config --global credential.helper storeto ask Git to remember your credential details for next time!
- Head back to your GitHub tab - do you see your changes now?

In this optional section we will add shiny cherry on top to your GitHub repository - a README file.
- Set up a
README.mdfile in your project directory.
💡 What is a README file?
A README is a document that introduces and explains your project, like what the project does, how to set it up, and how to use it.Having a README is super common practice in software development (not just on GitHub).
When recruiters or potential collaborators look at your project, a well-organized README can really boost their impression of your work and showcase your documentation skills!
- Write your README using the following template:
# Java Web App Deployment with AWS CI/CD

Welcome to this project combining Java web app development and AWS CI/CD tools!

<br>

## Table of Contents
- [Introduction](#introduction)
- [Technologies](#technologies)
- [Setup](#setup)
- [Contact](#contact)
- [Conclusion](#conclusion)

<br>

## Introduction
This project is used for an introduction to creating and deploying a Java-based web app using AWS, especially their CI/CD tools.

The deployment pipeline I'm building around the Java web app in this repository is invisible to the end-user, but makes a big impact by automating the software release processes.

<br>

## Technologies
Here’s what I’m using for this project:

- **Amazon EC2**: I'm developing my web app on Amazon EC2 virtual servers, so that software development and deployment happens entirely on the cloud.
- **VS Code**: For my IDE, I chose Visual Studio Code. It connects directly to my development EC2 instance, making it easy to edit code and manage files in the cloud.
- **GitHub**: All my web app code is stored and versioned in this GitHub repository.
- **[COMING SOON] AWS CodeArtifact**: Once it's rolled out, CodeArtifact will store my artifacts and dependencies, which is great for high availability and speeding up my project's build process.
- **[COMING SOON] AWS CodeBuild**: Once it's rolled out, CodeBuild will take over my build process. It'll compile the source code, run tests, and produce ready-to-deploy software packages automatically.
- **[COMING SOON] AWS CodeDeploy**: Once it's rolled out, CodeDeploy will automate my deployment process across EC2 instances.
- **[COMING SOON] AWS CodePipeline**: Once it's rolled out, CodePipeline will automate the entire process from GitHub to CodeDeploy, integrating build, test, and deployment steps into one efficient workflow.


<br>

## Setup
To get this project up and running on your local machine, follow these steps:

1. Clone the repository:
    ```bash
    git clone https://github.com/yourusername/nextwork-web-project.git
    ```
2. Navigate to the project directory:
    ```bash
    cd nextwork-web-project
    ```
3. Install dependencies:
    ```bash
    mvn install
    ```

<br>

## Contact
If you have any questions or comments about the NextWork Web Project, please contact:
Your Name - [Your Email](mailto:[email protected])

<br>

## Conclusion
Thank you for exploring this project! I'll continue to build this pipeline and apply my learnings to future projects.

A big shoutout to **[NextWork](https://learn.nextwork.org/app)** for their project guide and support. [You can get started with this DevOps series project too by clicking here.](https://learn.nextwork.org/projects/aws-devops-vscode?track=high)
💡 Woah! Is this... code?
Nope! Instead of code, this is Markdown, a text language that lets you format text that you'll display on a webpage. With Markdown, you can make words bold, create headers, add links, and use bullet points—all with simple symbols added to your text.It’s useful for creating documents like README files that need to look clean and easy to read without complex software, making it a favorite for writing on platforms like GitHub.

💡 What do the different symbols mean?
Here's a quick Markdown cheatsheet!Headers
Text styling
text to make text bold
text to make text italic
texttostrike throughtextLists
- or * for unordered bullet lists
1., 2., etc., for ordered lists
Links
Images
to embed an imageCode
Put text inbetween
backticksfor inline code like thisUse triple backticks ``` for multi-line code blocks
Like this!
Blockquotes
- Use > for block quotes
Like this one!
-
Complete this README file:
- In the ## Contact section, replace Your Name with your name.
- Replace Your Email and
[email protected]with your email.

-
Make this README file your own by adding a few extra details. Here are a few ideas on what you could add...
-
## Introduction:Add two bulletpoints on why you're doing this project or how it fits into your career or personal growth goals. -
## Technologies:Add any challenges you've faced and the solutions you've found while using these tools. -
## Setup:Add troubleshooting tips for common setup issues. -
## Contact:Add a link to your LinkedIn profile or professional websites, and add your professional profile photo.
-
-
Push the README into your GitHub repo.

- You should see a shiny new README file displayed in your GitHub repository.

We have learnt how to:
- Set up a GitHub repository: You created a new repository in AWS GitHub to securely store and manage the source code for your Java web app.
- ☁️ Configure Git and a local repository: You established your Git identity with your username and email. You also initialized a local repo with your GitHub repo as the remote origin.
- 🫸 Make Your first commit and push: You added all your files to the staging area, committed them, and pushed these changes to the master branch of your GitHub repository, making your code available in the cloud.
- 💎 **Set up a README file for your repo:**You gave your GitHub repo the ultimate cherry on top - an informative and welcoming README file that introduces your project and offers tips on how to use the code.
Next up, we need to find a way to store our web app's packages and dependencies, which are pieces of code your web app relies on in order to work. This is where AWS CodeArtifact comes into play 👀

Welcome to Part-3 of the 6 Parts DevOps Challenge!
Today, we're working with AWS CodeArtifact to secure your web app's packages.
- An AWS account - Create one here!
If you are following along since part-1 of this project, you may proceed further. However if at any point you deleted your resources, make sure to go back and set up every thing need for this project from DevOps - Complete CICD Pipeline With AWS CodePipeline#Part-1. Set Up a Web App in the Cloud till this part of the project. Good Luck!
💡 Why am I learning about AWS CodeArtifact?
When building apps, you don't create everything from scratch. Instead, you often use pre-made "packages" (chunks of code) that other developers have already created. It's just like making pasta with pre-made pasta sauce, instead of making everything from scratch.CodeArtifact is an artifact repository, which means you use it to store all of your app's packages in one place. It's an important part of a CI/CD pipeline because it makes sure an engineering team is always using the same, verified versions of packages when building and deploying the app, which reduces errors and security risks!
Get ready to:
- 🗂️ Set up CodeArtifact as a repository for your project's dependencies.
- 🛡️ Use IAM roles and policies to give your web app access to CodeArtifact.
- ✅ Verify your web app's connection to CodeArtifact!
- 💎 Become a package uploader - create and add your own packages to your CodeArtifact repository!
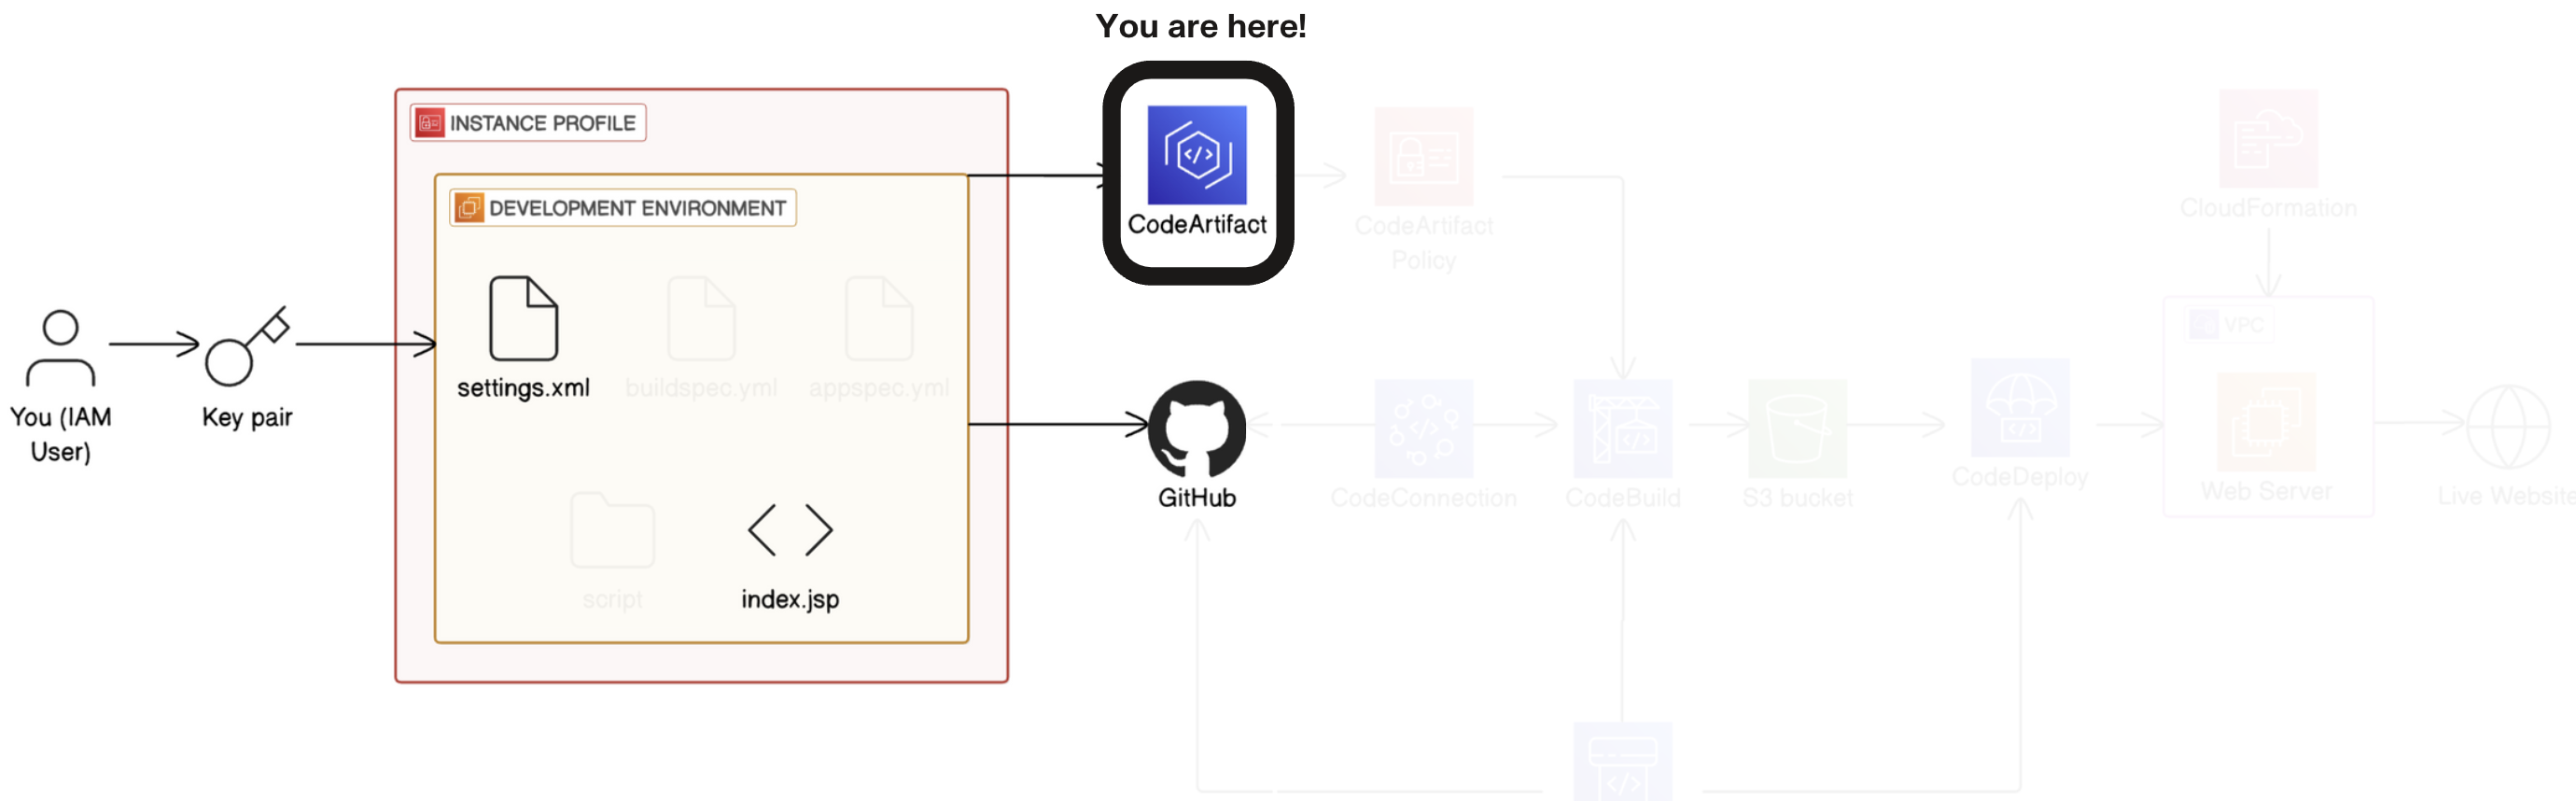
Now, let's set up AWS CodeArtifact, a fully managed artifact repository service. We'll use it to store and manage our project's dependencies, ensuring secure and reliable access to Java packages.
This is important because CodeArtifact provides a centralized, secure, and scalable way to manage dependencies for our Java projects, improving build consistency and security.
In this step, you're going to:
- Create and configure a new CodeArtifact repository.
- In the AWS Management Console, head to
CodeArtifact - In the CodeArtifact console, in the left-hand menu, click on Repositories.
- Click the Create repository button to start creating a new repository.

💡 What is AWS CodeArtifact?
CodeArtifact is a secure, central place to store all your software packages. When you're building an application, you typically use dozens of external packages or libraries - things other developers have created that you don't want to build from scratch.An artifact repository gives you a consistent, reliable place to store and retrieve these components. This gives you three big benefits:
- 1️⃣ Security: Everyone in a team retrieves packages from a secure repository (CodeArtifact), instead of downloading from unsafe sources on the internet (hello, security risks)!
- 2️⃣ Reliability: If public package websites go down, you have backups in your CodeArtifact repository.
- 3️⃣ Control: Your team can easily share and use the same versions of packages, instead of everyone working with a different version of the same package.
- Create a new CodeArtifact repository
nextwork-devops-cicd. - In the Repository description - optional field, enter:
This repository stores packages related to a Java web app created as a part of NextWork's CI/CD Pipeline series.

Configure Maven Central as an upstream repository for your CodeArtifact repository.
-
Under Public upstream repositories - optional, select the checkbox next to maven-central-store.
-
This will configure Maven Central as an upstream repository for your CodeArtifact repository.
💡 What are upstream repositories?
Upstream repositories are like backup libraries that your primary repository can access when it doesn't have what you need. If you didn't set up CodeArtifact or have an upstream repository, your build would fail because a package is missing!When your application looks for a package that isn't in your CodeArtifact repository, CodeArtifact will check its upstream repositories (like Maven Central in our case) to find it.
Once found, Maven will then store a copy in your CodeArtifact repository for future use. This gives you three major benefits that you'll appreciate as your projects grow:
- Speed - After the first download from Maven Central, retrieving packages directly from CodeArtifact will speed up how quickly your app starts up and runs.
- Reliability - If Maven Central goes down (which happens more often than you'd think!), your builds keep working because you've got local copies
- Control - You can audit which external packages are being used in your organization and even block problematic ones if needed.

💡 What is Maven Central?
Maven Central is essentially the App Store of the Java world - it's the most popular public repository where developers publish and share Java libraries. When you're building Java applications, chances are you'll need packages from Maven Central. It contains virtually every popular open-source Java library out there, from database connectors to testing frameworks and UI components.By connecting our CodeArtifact repository to Maven Central, we're setting up a system where we get the best of both worlds: access to all these public libraries, but with the added benefits of caching, control, and consistency that come with our private CodeArtifact repository.
- Set up nextwork as your CodeArtifact domain.
💡 What is a CodeArtifact domain?
A CodeArtifact domain is like a folder that holds multiple repositories belonging to the same project or organization. We like using domains because they give you a single place to manage permissions and security settings that apply to all repositories inside it. This is much more convenient than setting up permissions for each repository separately, especially in large companies where many teams need access to different repositories.With domains, you can ensure consistent security controls across all your package repositories in an efficient way.

- Under Domain selection, choose This AWS account.

- Under Domain name, enter
nextwork.

- Click Next to proceed.

-
Now we're on the last page! Let's Review and create.
-
Review the details of your repository configuration, including the package flow at the top.
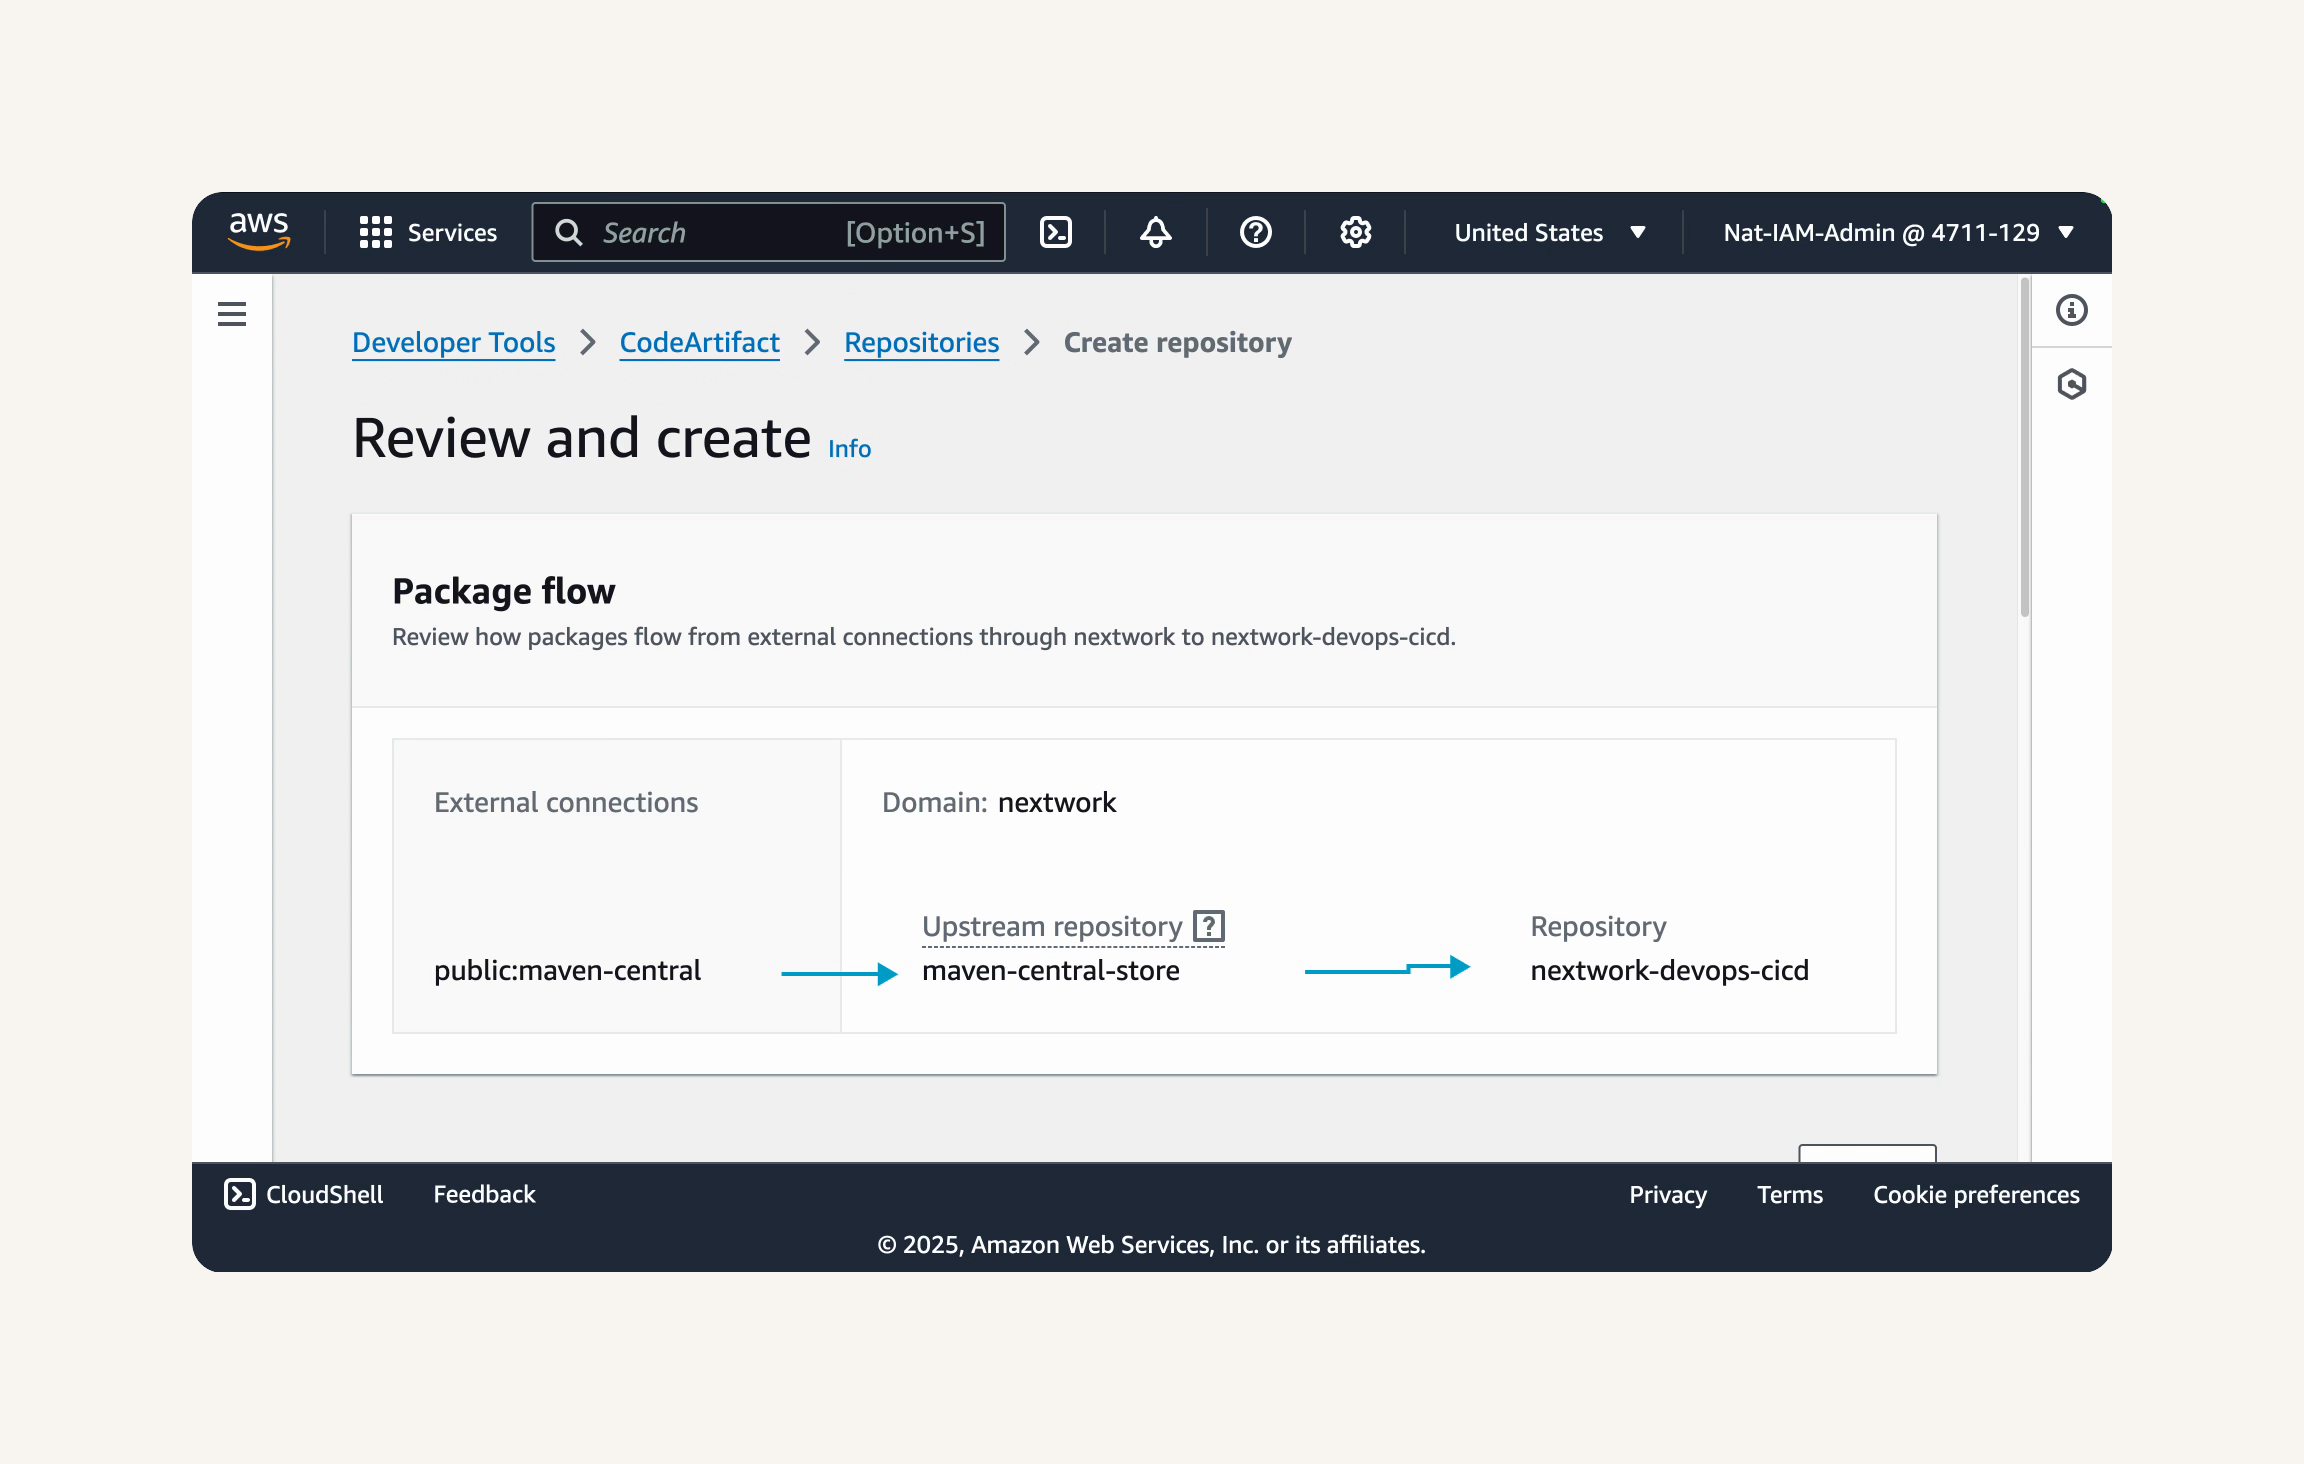
💡 What is this package flow diagram?
The package flow diagram shows you exactly how dependencies will travel to your application. When your project needs a dependency, it first looks in your CodeArtifact repository. If the package is already there, great! It uses that version. If not, CodeArtifact automatically reaches out to Maven Central to fetch it.This is important to understand because it affects how quickly your builds run and how resilient they are to network issues. The first time you request a package, it might take a moment longer as CodeArtifact fetches it from Maven Central. But every build afterwards will be faster because the package is now cached in your repository. It's like the difference between ordering groceries for delivery versus already having them in your fridge!
- Finish creating the repository.

-
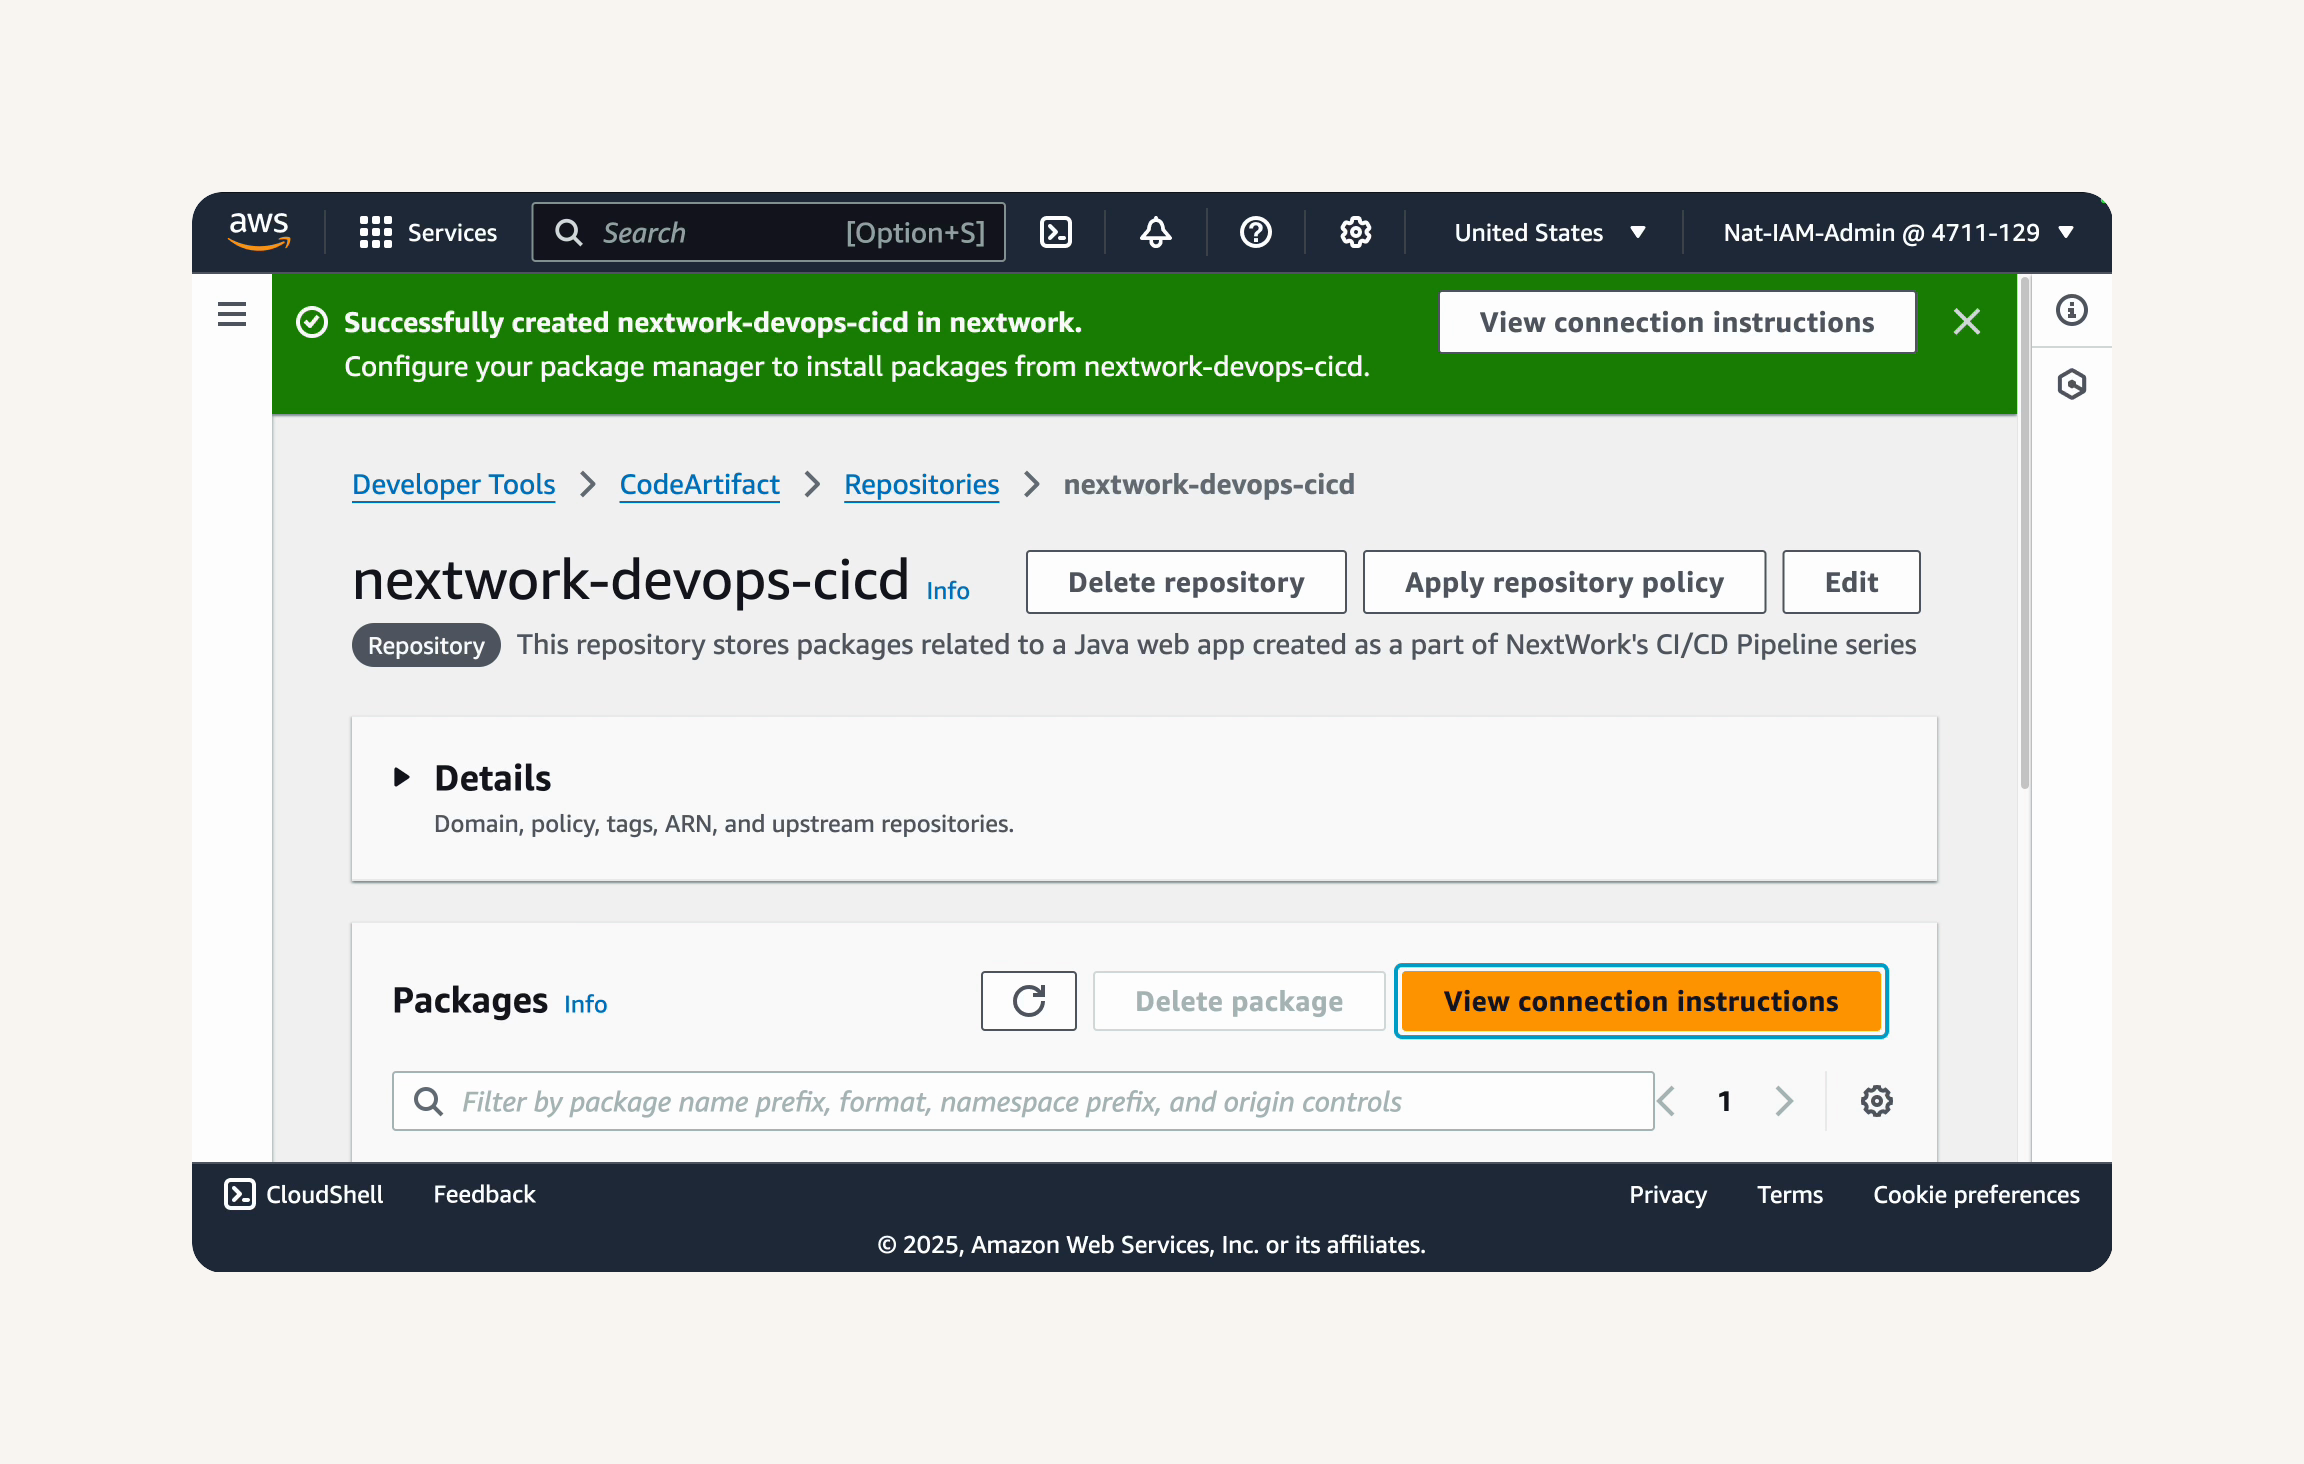
You'll be taken to the repository's details page.
-
You should see a success message at the top of the page, telling us that the CodeArtifact repository
nextwork-devops-cicdhas been successfully created.

Great job! You've set up your AWS CodeArtifact repository.
In the next step, we'll start connecting our web app's package manager, Maven, to this repository.
For Maven to start working with CodeArtifact, we need to create an IAM role that grants our EC2 instance the permission it needs to access CodeArtifact.
Otherwise, Maven can try all it wants to command your EC2 instance to store and retrieve packages from CodeArtifact, but your EC2 instance simple wouldn't be able to do anything! And going another layer deeper, IAM roles are made of policies; so we need to create policies first before setting up the role.
In this step, you're going to:
-
Try connecting Maven with CodeArtifact (error!)
-
Create a new IAM policy.
-
Set up the policy to grant an EC2 instance access to CodeArtifact.

- On your newly created repository's page, click the View connection instructions button at the top right corner.
-
In the Connection instructions page, we're configuring how Maven will connect to your CodeArtifact repository.
-
For Operating system, select Mac and Linux.
-
For Package manager client, select mvn (Maven).
💡 How did we know to choose Mac & Linux for operating system, mvn as package manager?
Even if you're doing this project on a Windows computer, don't forget that the EC2 instance we're using was launched with Amazon Linux 2023 as its AMI!
mvnis short for Maven, which is the tool we installed to manage the building process for our Java web app. This also makes Maven our package manager, i.e. the tool that helps us install, update and manage the external packages our web app uses.

-
🚨 Double check that you're using Mac and Linux as the operating system. Even if you're doing this project on a Windows computer, Mac and Linux is the right choice - your EC2 instance is an Amazon Linux 2023 instance!
-
Make sure that Configuration method is set to Pull from your repository.
-
Nice! The menu will now show you the steps and commands needed to connect Maven to your CodeArtifact repository.
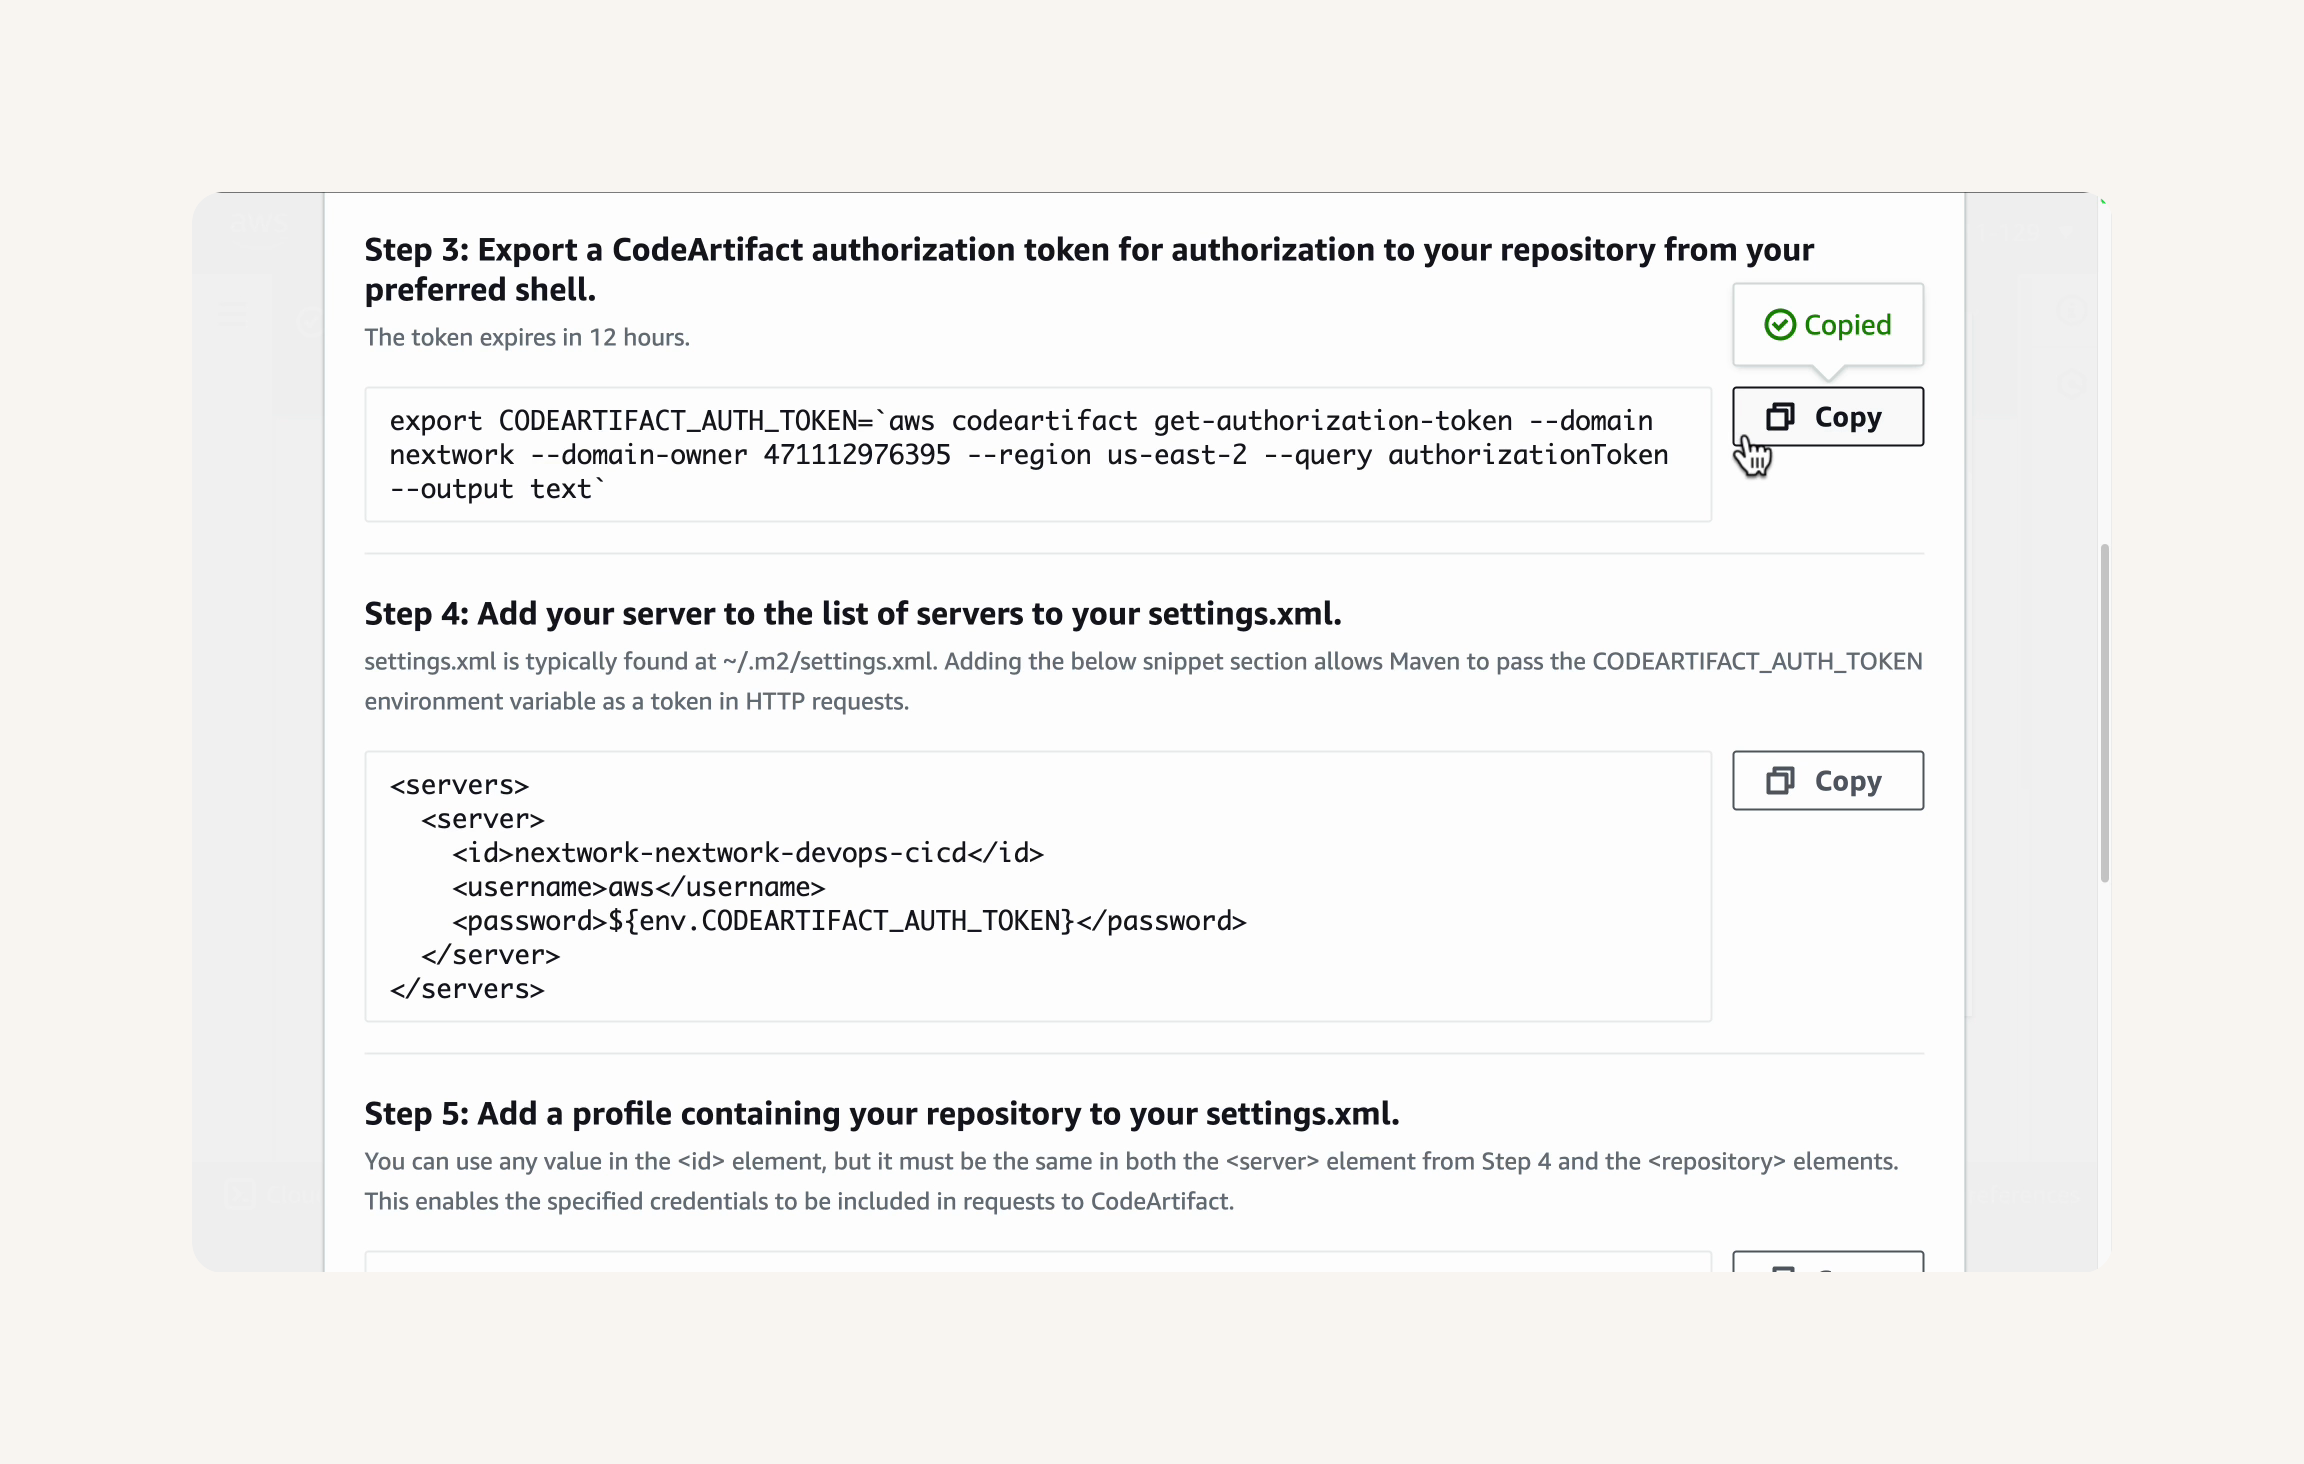
- In the Connection instructions dialog, find Step 3: Export a CodeArtifact authorization token....
💡 What is this step for?
😳 "Export a CodeArtifact authorization token for authorization to your repository from your preferred shell" sounds a little technical!It actually just means you need to run the command in Step 3 to give your terminal a temporary password. That password will grant your development tools (i.e. Maven) access to your repositories in CodeArtifact.
Maven uses this token whenever it needs to fetch something from your CodeArtifact repository.
- Copy the entire command in Step 3.
-
Go back to your VS Code terminal, which is connected to your EC2 instance.
-
Paste the copied command into the terminal and press Enter to run it.

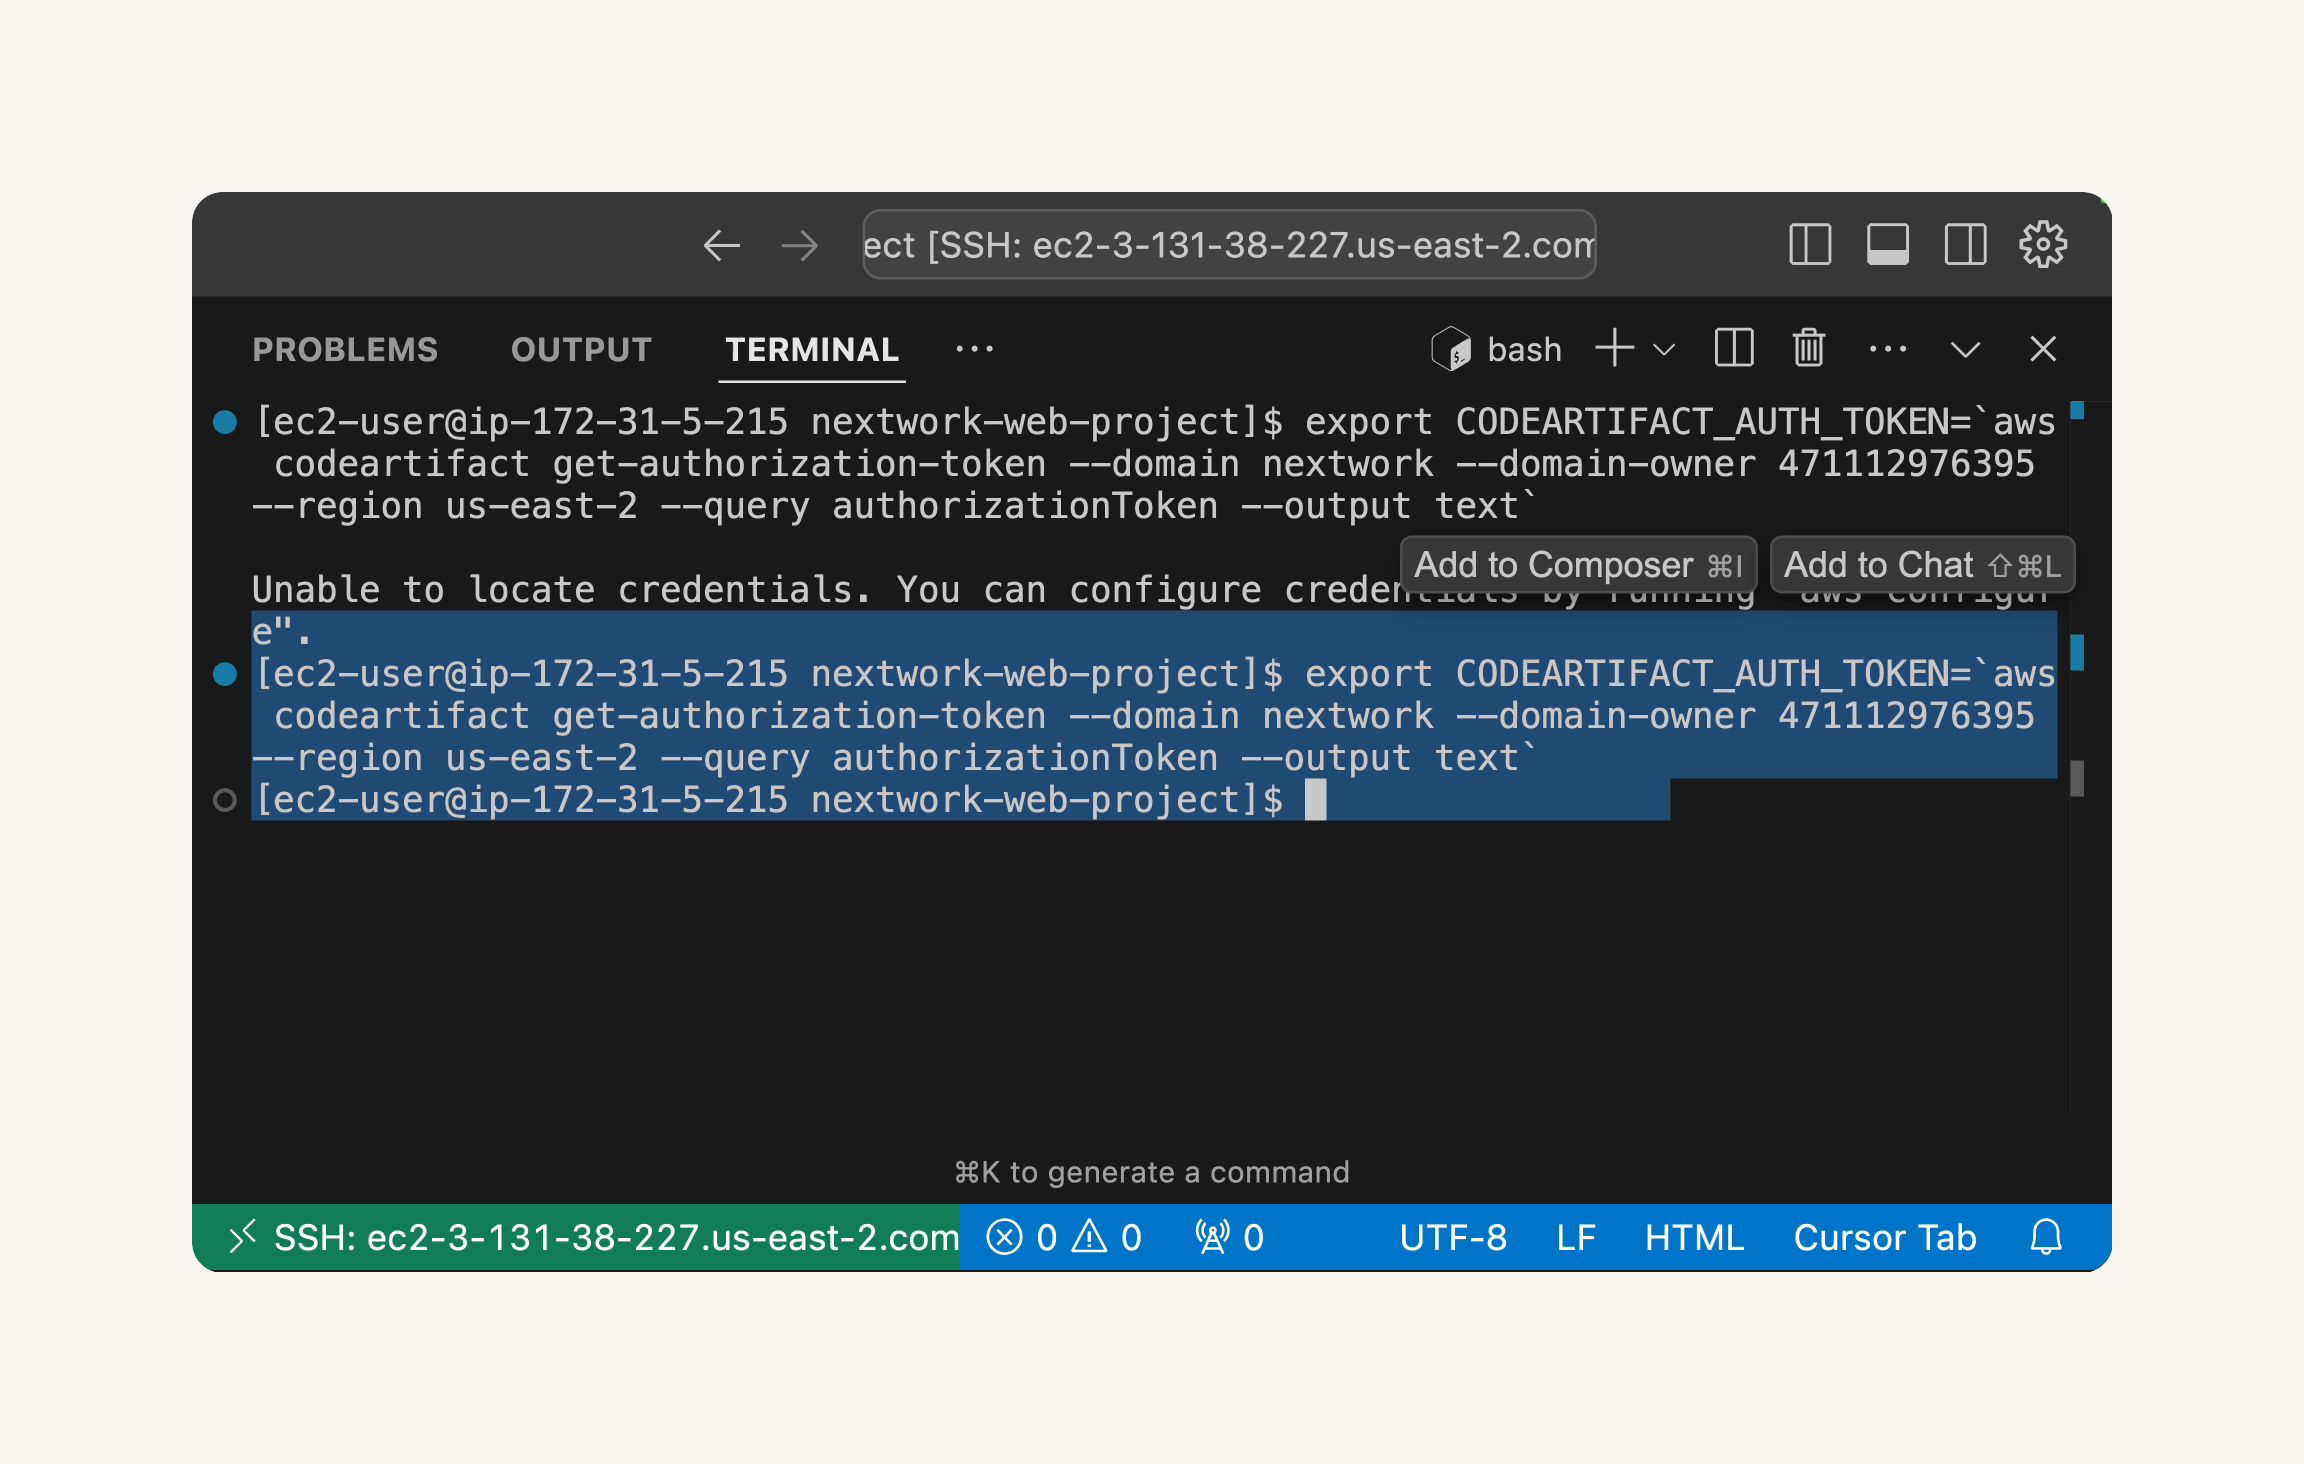
- Looks like we got an error!
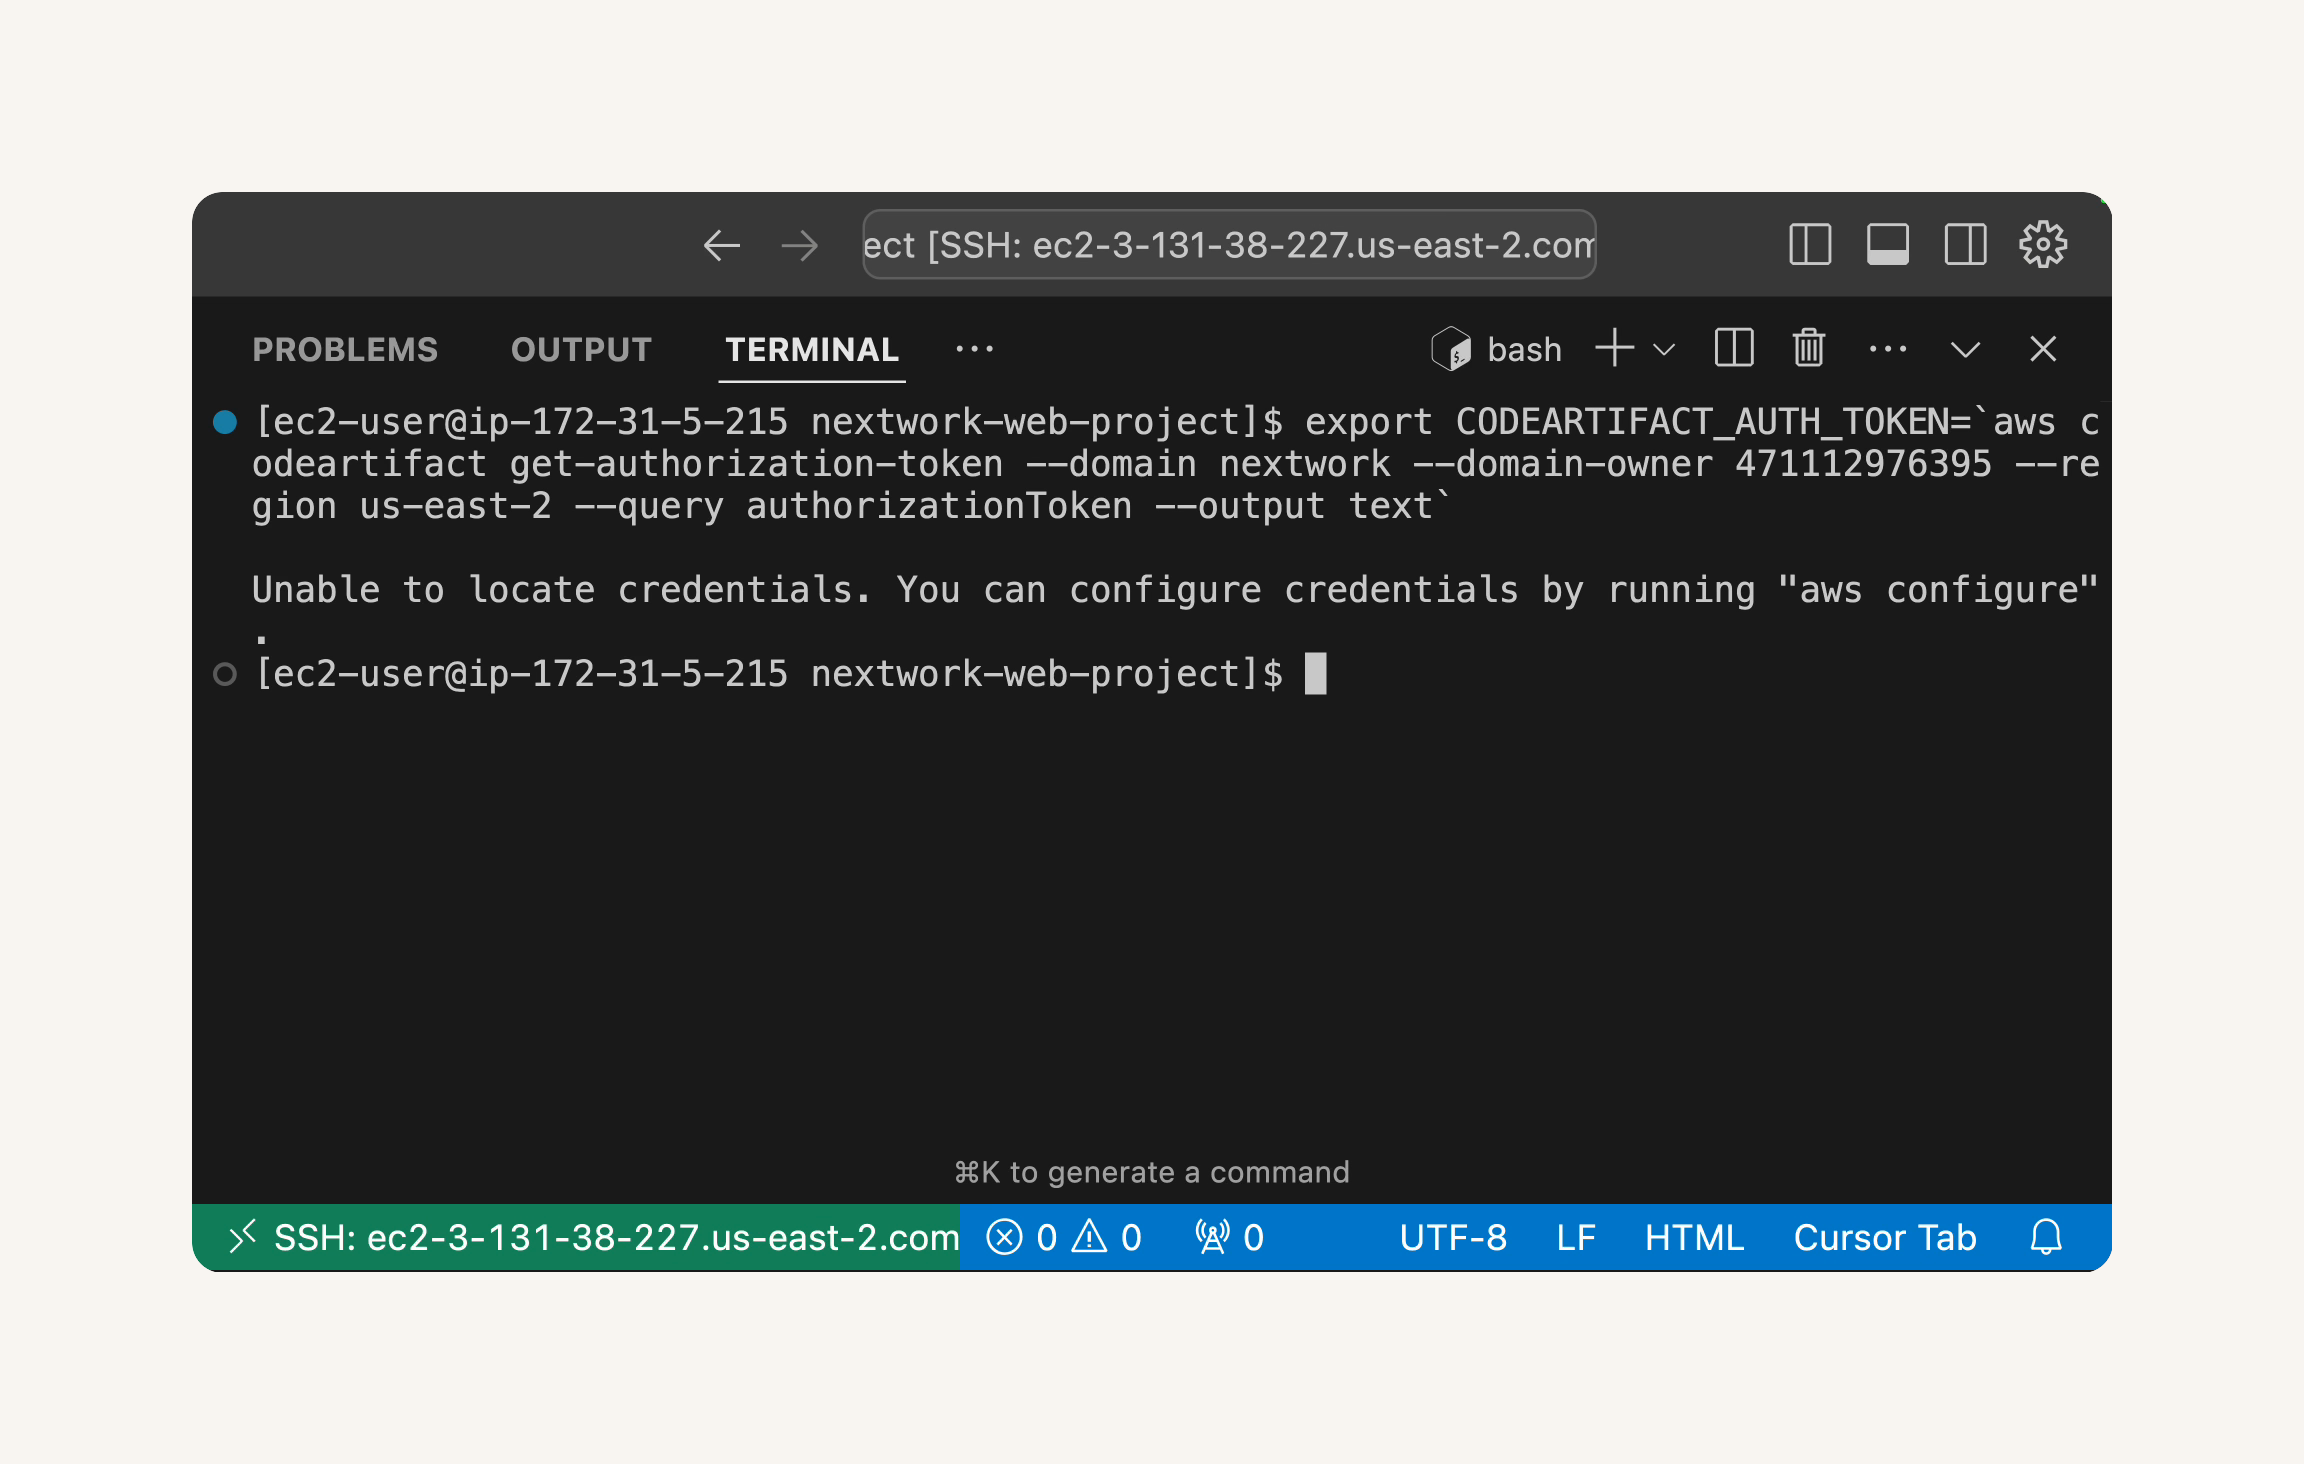
💡 Why did we get this error?
ThatUnable to locate credentialserror is actually a good security feature in action! Your EC2 instance is essentially saying, "I don't know who you are, so I can't let you access CodeArtifact."This happens because, by default, your EC2 instance doesn't have permission to access your other AWS services (including CodeArtifact). This is intentional - AWS follows the "principle of least privilege," meaning resources only get the minimum permissions they need to function.

- In the AWS Management Console, head to the the IAM console.
💡 What is IAM?
IAM stands for Identity and Access Management. You'll use AWS IAM to manage the access level that other users and services have to your resources.

- In the IAM console, in the left-hand menu, click on Policies.

- Click the Create policy button to start creating a new IAM policy.

- On the Create policy page, select the JSON tab.
- Replace the default content in the text editor with the following JSON policy document. Copy and paste the entire JSON code block:
{
    "Version": "2012-10-17",
    "Statement": [
        {
            "Effect": "Allow",
            "Action": [
                "codeartifact:GetAuthorizationToken",
                "codeartifact:GetRepositoryEndpoint",
                "codeartifact:ReadFromRepository"
            ],
            "Resource": "*"
        },
        {
            "Effect": "Allow",
            "Action": "sts:GetServiceBearerToken",
            "Resource": "*",
            "Condition": {
                "StringEquals": {
                    "sts:AWSServiceName": "codeartifact.amazonaws.com"
                }
            }
        }
    ]
}
💡 What's in this policy?
This JSON document is like a security rulebook. It's written in a specific format that AWS understands, with two main parts:
The first part (
codeartifact:*actions) gives permission to get authentication tokens, find repository locations, and read packages from repositories.The second part (
sts:GetServiceBearerToken) allows temporarily elevated access specifically for CodeArtifact operations.The
"Resource": "*"means these permissions apply to all relevant resources, while the Condition narrows the second permission to only work with CodeArtifact.This follows the "principle of least privilege" - granting only the minimum permissions needed to perform the required tasks, enhancing your security posture.

- After pasting the JSON policy document, click the Next button at the bottom right.

-
On the Review policy page, in the Policy name field, enter
codeartifact-nextwork-consumer-policy. -
In the Description - optional field, add a description like:
Provides permissions to read from CodeArtifact. Created as a part of NextWork CICD Pipeline series.

- Review the Summary of your policy to ensure the permissions and details are correct.

- Click the Create policy button to create the IAM policy.

- After clicking Create policy, you should see a success message at the top of the IAM Policies page, telling us that the policy
codeartifact-nextwork-consumer-policyhas been successfully created.

Well done! You've created an IAM policy that will allow EC2 instances to access CodeArtifact.
Now that we've created the IAM policy for CodeArtifact access, let's attach it to an IAM role and then associate that role with our EC2 instance. This will grant our EC2 instance the permissions it needs to securely access CodeArtifact. Finally, we'll verify the connection to CodeArtifact from our EC2 instance.
This is important because attaching the IAM role to our EC2 instance is what actually grants the instance the permissions defined in the policy, enabling secure access to CodeArtifact.
In this step, you're going to:
-
Create a new IAM role for EC2 that has your new policy attached.
-
Attach the IAM role to your EC2 instance.
-
Re-run the export token command, this time seeing a successful response 🙏

- In the IAM console, in the left-hand menu, click on Roles.
💡 What's the difference between a policy and a role?
Think of a policy as the actual list of permissions - it's a document that specifies exactly what actions are allowed or denied on which AWS resources. For example, "allow reading from this S3 bucket" or "allow publishing to CodeArtifact."A role is the container that holds these policies and can be assumed by users, applications, or AWS services. You attach policies to roles, then assign the role to whoever needs those permissions.
This separation is powerful because:
You can attach the same policy to multiple roles
A role can have multiple policies attached
You can modify a policy once and affect all roles using it
Roles can be assumed temporarily, while policies define the permanent permission boundaries
It's like the difference between writing down rules (policies) and creating a job position (role) that follows those rules. The position can be filled by different people or services, but the rules remain consistent.

- Click the Create role button to start creating a new IAM role.
- For Select entity type, choose AWS service.

- Under Choose a use case, select EC2 from the list of services.

- Click Next to proceed to the Add permissions step.

-
In the Add permissions step, in the Filter policies search box, type
codeartifact-nextwork-consumer-policy. -
Select the checkbox next to the
codeartifact-nextwork-consumer-policythat you created in the previous step. -
Click Next to head to the Name, review, and create step.

-
In the Name, review, and create step:
-
In the Role name field, enter
EC2-instance-nextwork-cicd. -
In the Description - optional field, enter:
`Allows EC2 instances to access services related to the NextWork CI/CD pipeline series.
-

- Next, in the review page, click the Create role button to create the IAM role.

- After clicking Create role, you should see a success message at the top of the IAM Roles page, telling us that the IAM role
EC2-instance-nextwork-cicdhas been successfully created. Your new role will be listed in the roles table.

-
Now, we need to associate this IAM role with your EC2 instance.
-
Head back to the EC2 console.

- Head to the Instances tab.

- Select your running EC2 instance (
nextwork-devops-yourname).

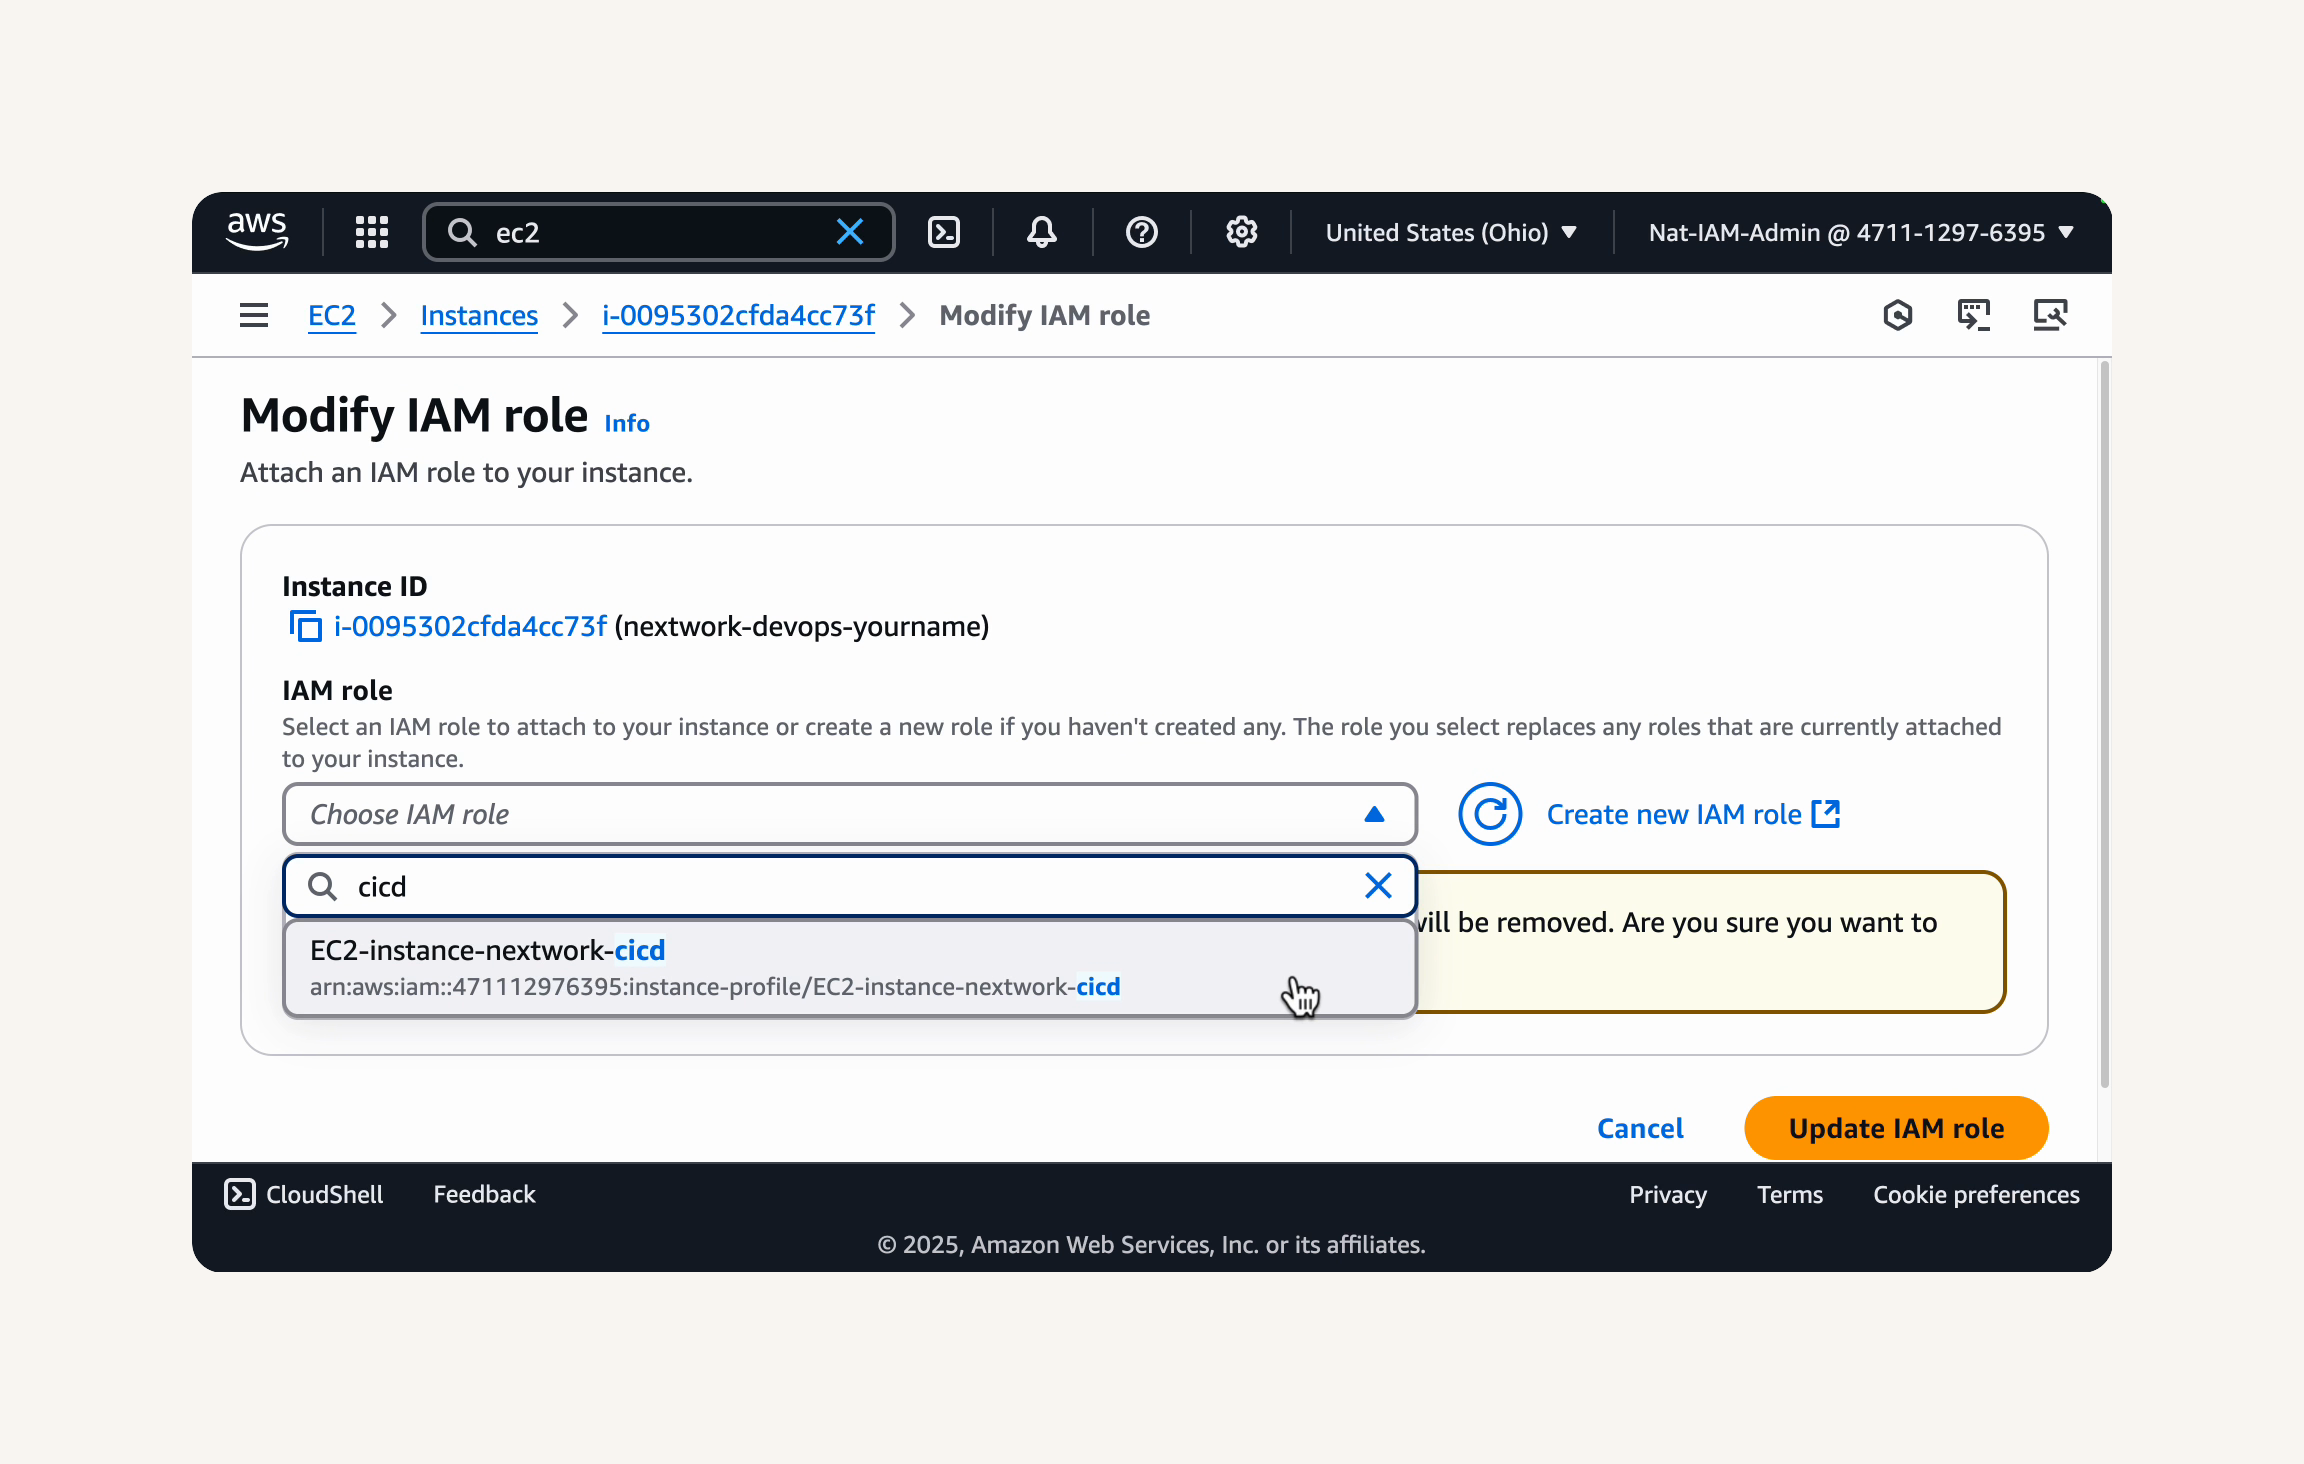
- Click on Actions in the menu bar, then select Security, and then Modify IAM role.
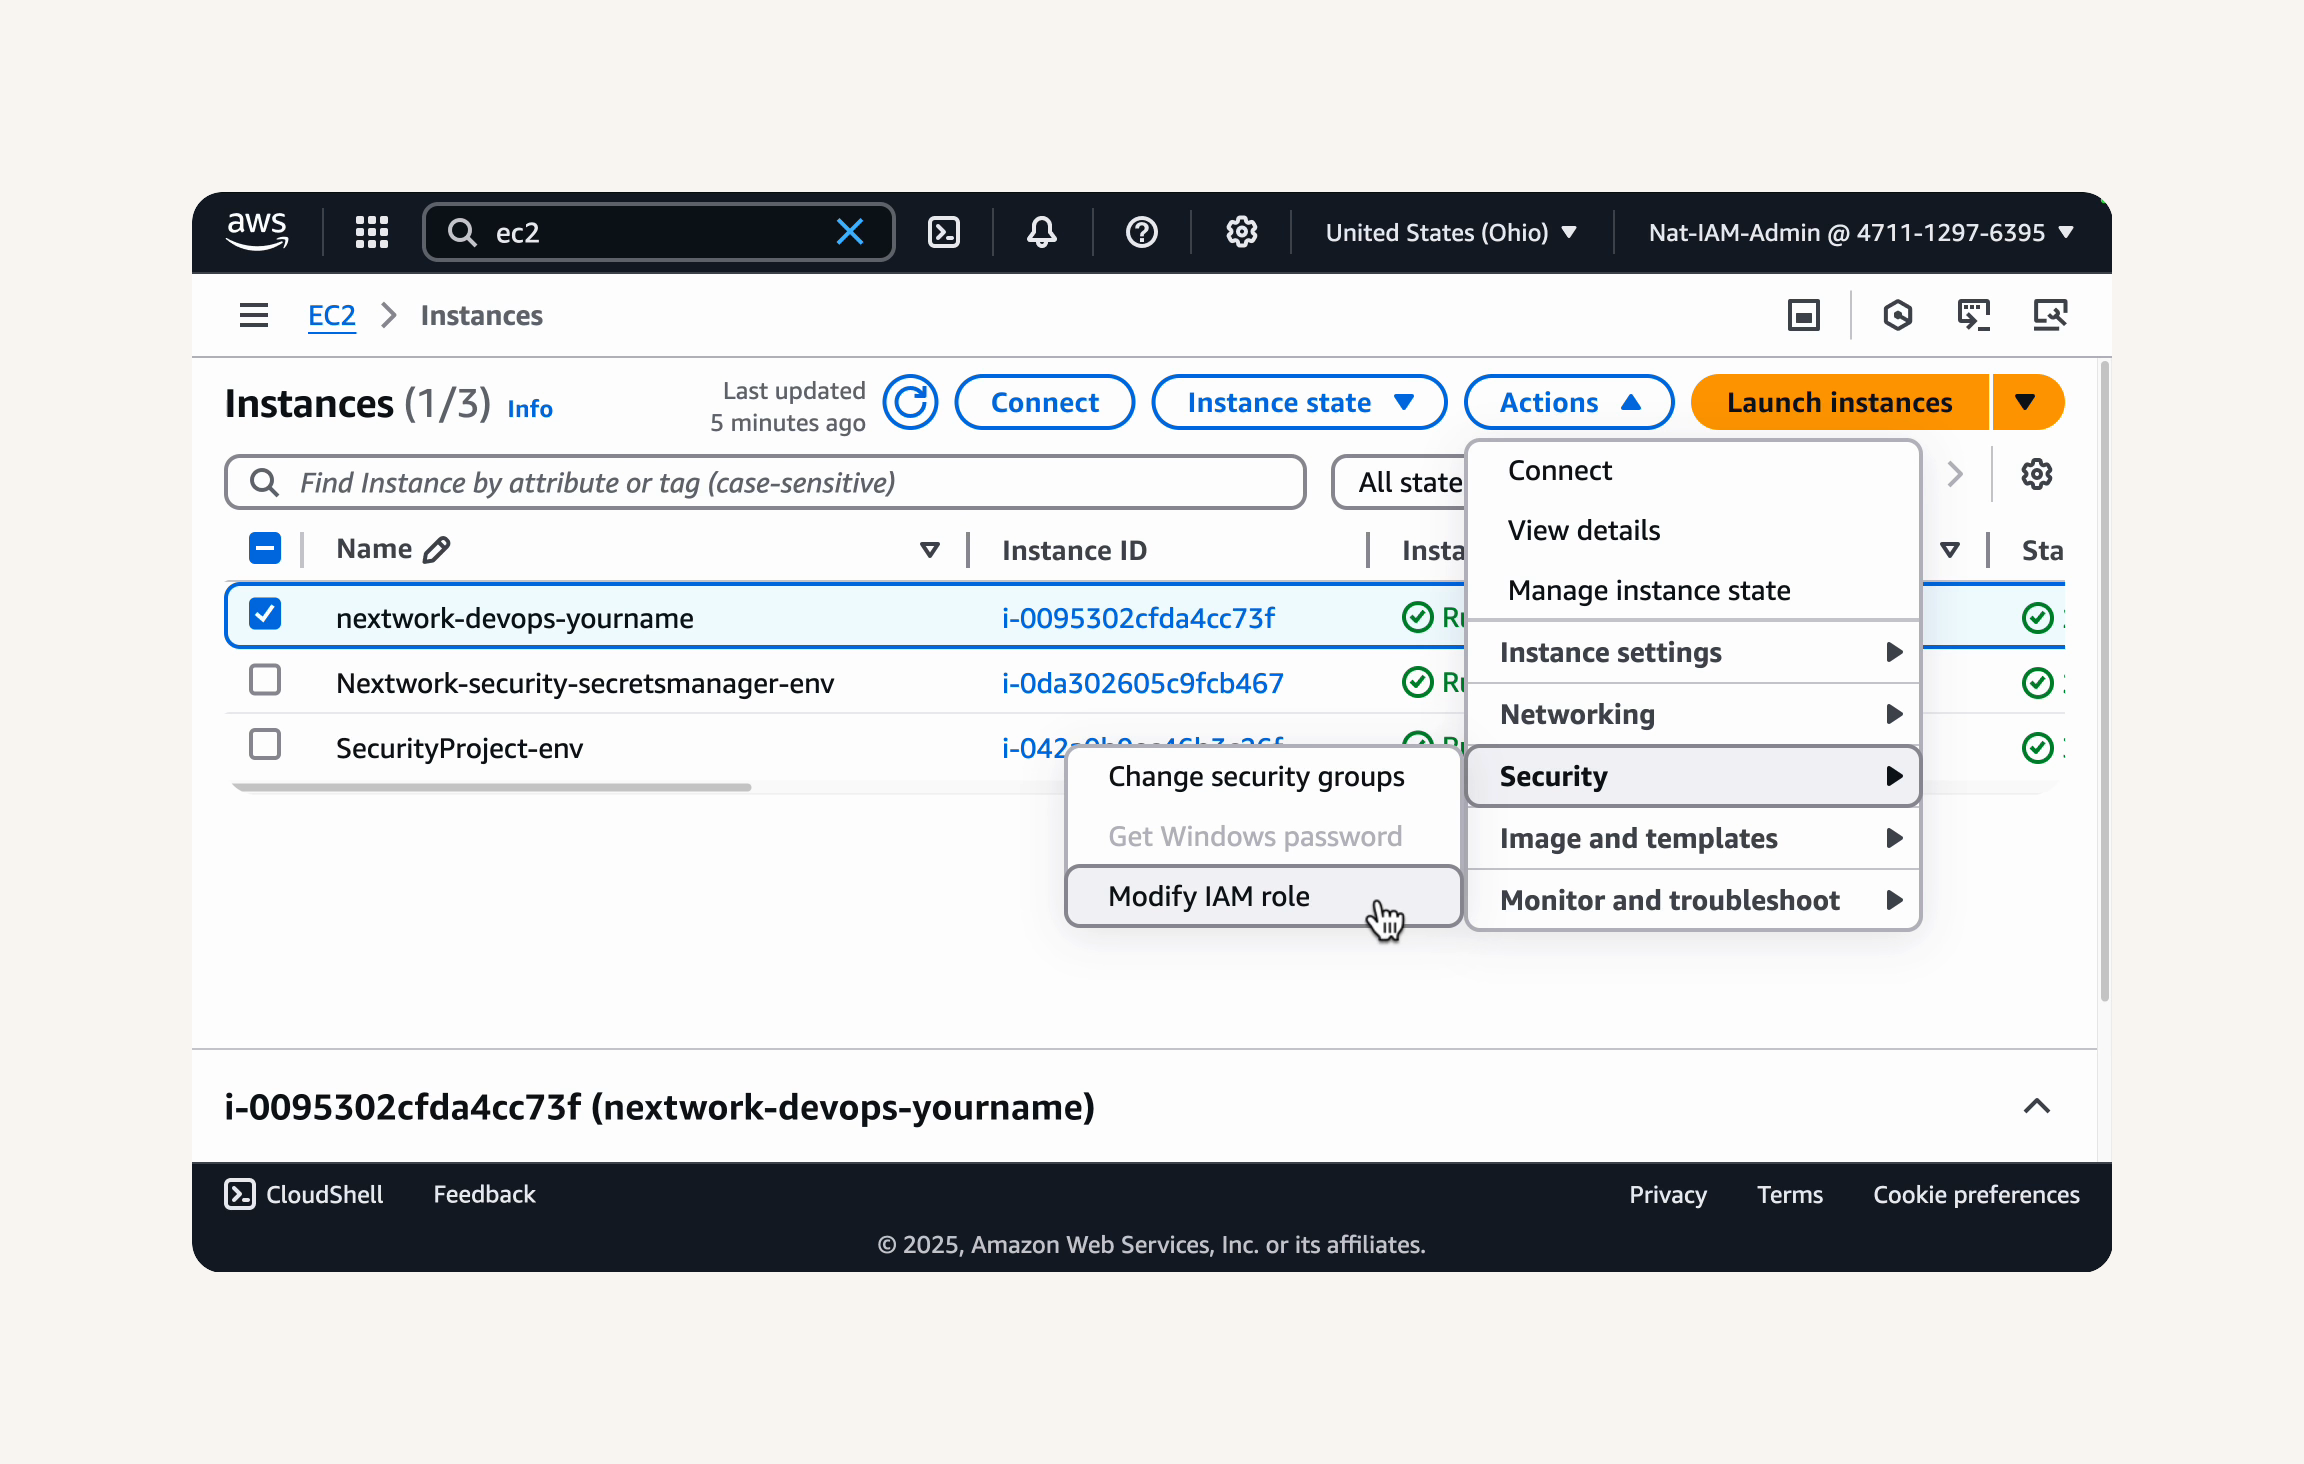
- In the Modify IAM role dialog box, select Refresh to load the IAM roles available for your EC2 instance.

-
Under IAM role, select the IAM role you just created,
EC2-instance-nextwork-cicd, from the dropdown menu. ` -
Select Update IAM role to attach the role to your EC2 instance.
-
After attaching the IAM role, you should see a green banner at the top of the EC2 Instances dashboard confirming that the IAM role was successfully modified for your instance.


💡 Extra for Experts: How do IAM roles work with EC2 instances?
When you attach an IAM role to an EC2 instance, AWS automatically provides and rotates temporary security credentials for that instance. This means that applications running on the instance, like our Maven build, can automatically use these temporary credentials to make AWS API calls without you having to handle credential management.That's why attaching an instance profile is considered a best practice compared to using hardcoded credentials (i.e. running commands in your EC2 terminal to manually assign it permanent credentials)!
Now that your EC2 instance has the necessary IAM role attached, let's re-run the command to export the CodeArtifact authorization token.
This time, your EC2 instance should be able to retrieve the token, since it has the necessary permissions from the IAM role.
-
Head back to your VS Code terminal connected to your EC2 instance.
-
Re-run the same export token command from Step 3.
💡 Recap: What is a CodeArtifact authorization token?
The authorization token is like a temporary ID badge for your build tools to access CodeArtifact. When you run that token command, AWS checks your identity and issues this digital badge that's valid for 12 hours. Your build tools (like Maven) then present this token whenever they need to grab something from your CodeArtifact repository.Why use temporary tokens instead of permanent credentials? It's all about security! If a token is ever compromised, it automatically expires in hours instead of giving permanent access. Plus, you don't have to worry about storing sensitive credentials in your build configuration files. The system automatically handles the authentication process behind the scenes, making your life easier while keeping your repositories secure. Just remember that you'll need to refresh this token if you come back to the project after more than 12 hours!
- This command will retrieve a temporary authorization token for CodeArtifact and store it in an environment variable named
CODEARTIFACT_AUTH_TOKEN.
🙋♀️ Still getting "Unable to locate credentials" after attaching the IAM role?
This happens sometimes! There can be a delay before your EC2 instance recognizes its new IAM role.Let's get this fixed:
Wait 2-3 minutes for the IAM role to fully propagate to your EC2 instance
Double-check in the EC2 console that the IAM role
EC2-instance-nextwork-cicdis showing as attached to your instanceReview your IAM policy to make sure it has the correct permissions and no syntax errors
If nothing else works, you can try rebooting your EC2 instance as a last resort - but only do this if you're comfortable with the restart process
Fantastic! You've successfully attached the IAM policy and role to your EC2 instance. Your instance now has the permissions to access your CodeArtifact repository securely. Let's verify the connection in the next step.
Let's make sure everything is set up correctly by verifying the connection to our CodeArtifact repository from our EC2 instance. We'll configure Maven to use CodeArtifact and then try to compile our web app, which should now download dependencies from CodeArtifact.
In this step, you're going to:
-
Finish setting up the connection between Maven and CodeArtifact.
-
Compile your Maven project using the
settings.xmlfile. -
See your CodeArtifact repository automatically store your project's dependencies!
- You might notice that we still have a few steps left in CodeArtifact's connection settings panel!
💡 What are the code in Steps 4, 5, and 6 saying?
The code snippets define repository URLs, authentication details, and other settings so that Maven knows how to connect with CodeArtifact to fetch and store your project's dependencies.Let's break each section down:
The servers section is where your store your access details to the repositories you're connecting with your web app project. In this example, you've added your authentication token to access your local CodeArtifact repository.
The profiles section is where you write a rulebook on when Maven should use which repository. We only have one package repository in this project, so our profiles section is more straightforward than other projects that might be pulling from multiple repositories! Our profiles section is telling Maven to go to the nextwork-packages repository to find the tools / packages needed to build your Java web app.
The mirrors section sets up backup locations that Maven can check if it can't find what it needs in the first local repository it goes to. The backup location that we'll set by default is... our CodeArtifact repository again. This means that for any repository requests (denoted by the asterisk * in the * line), Maven will redirect those requests to the same CodeArtifact repository since it's our only local repository. It might seem unnecessary now, but mirrors are great in complex scenarios and is a great fallback option to set up from the start!
-
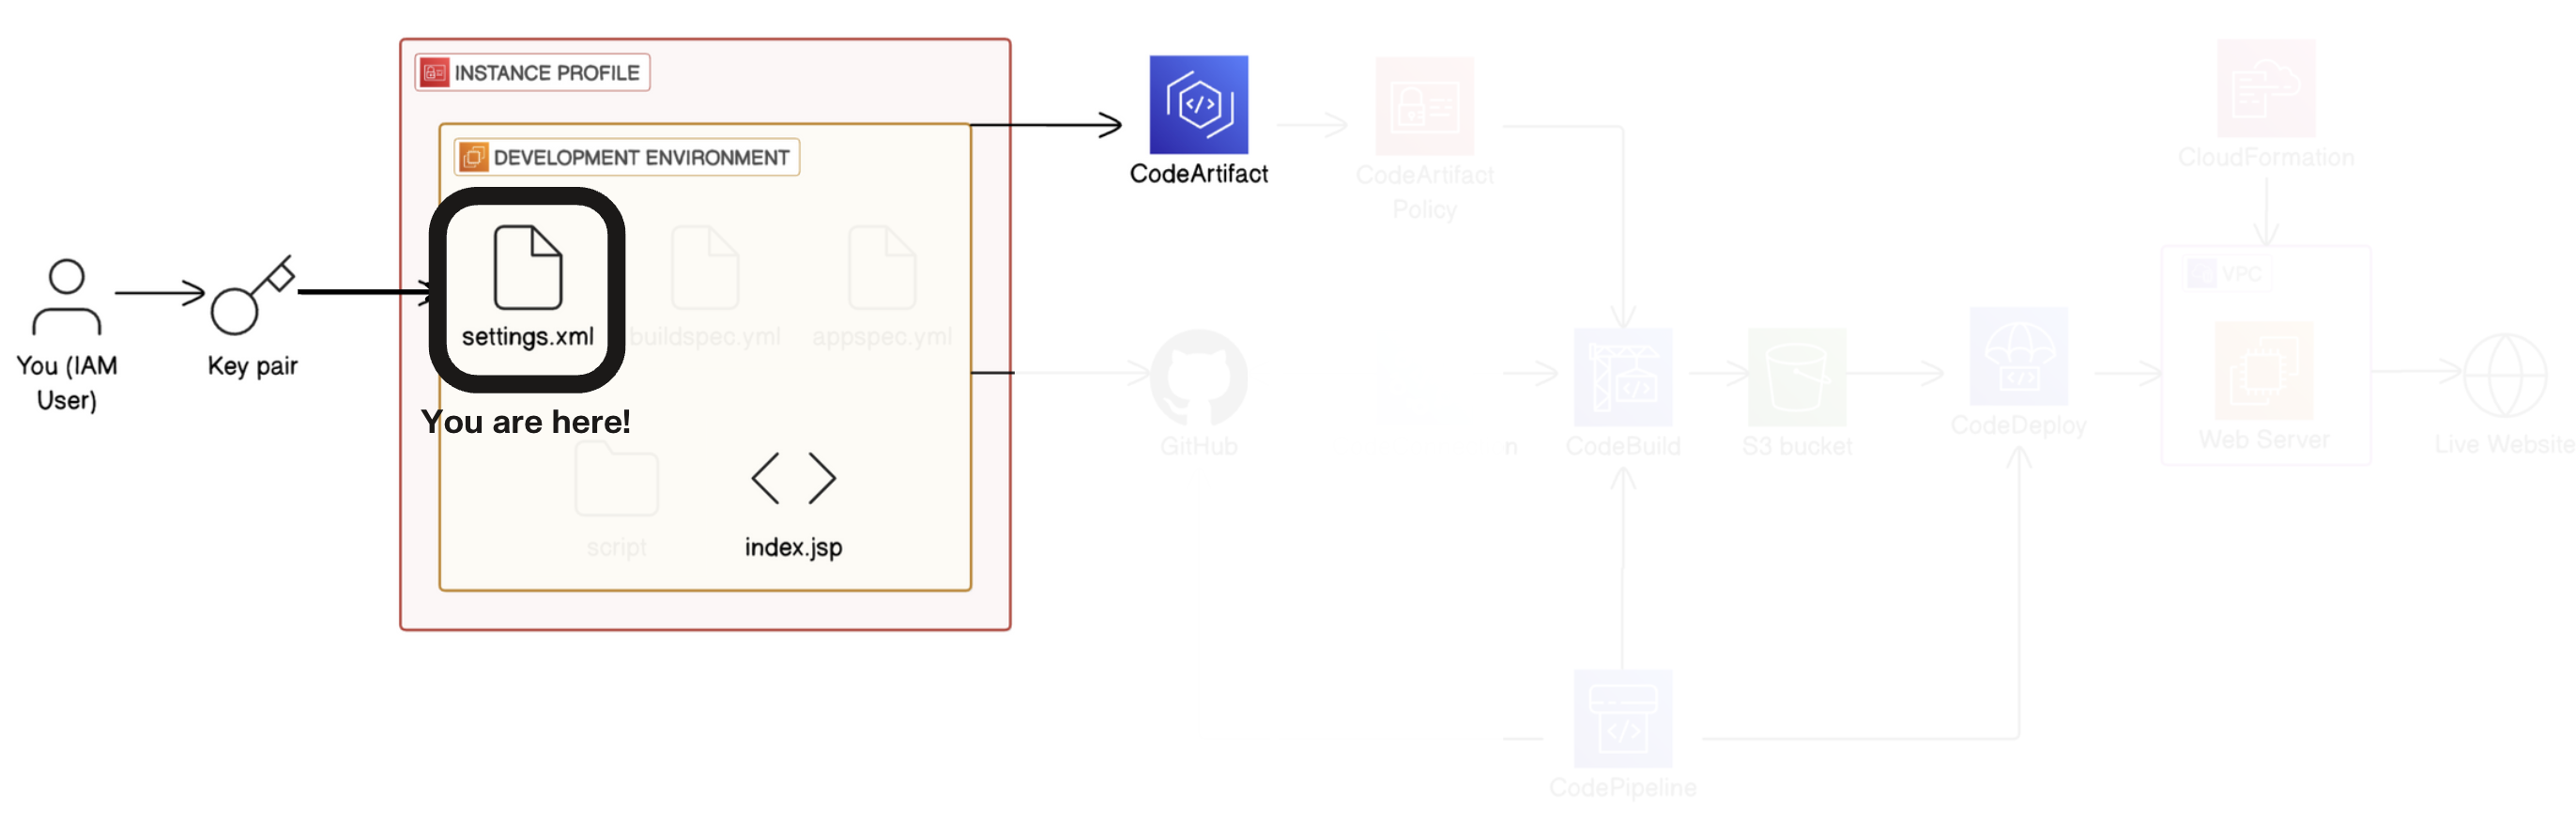
We'll use the code in each step in a minute, but we'll have to set up a special file called settings.xml first.
-
In VS Code, in your left hand file explorer, head to the root directory of your
nextwork-web-project. -
Create a new file at the root of your
nextwork-web-projectdirectory.

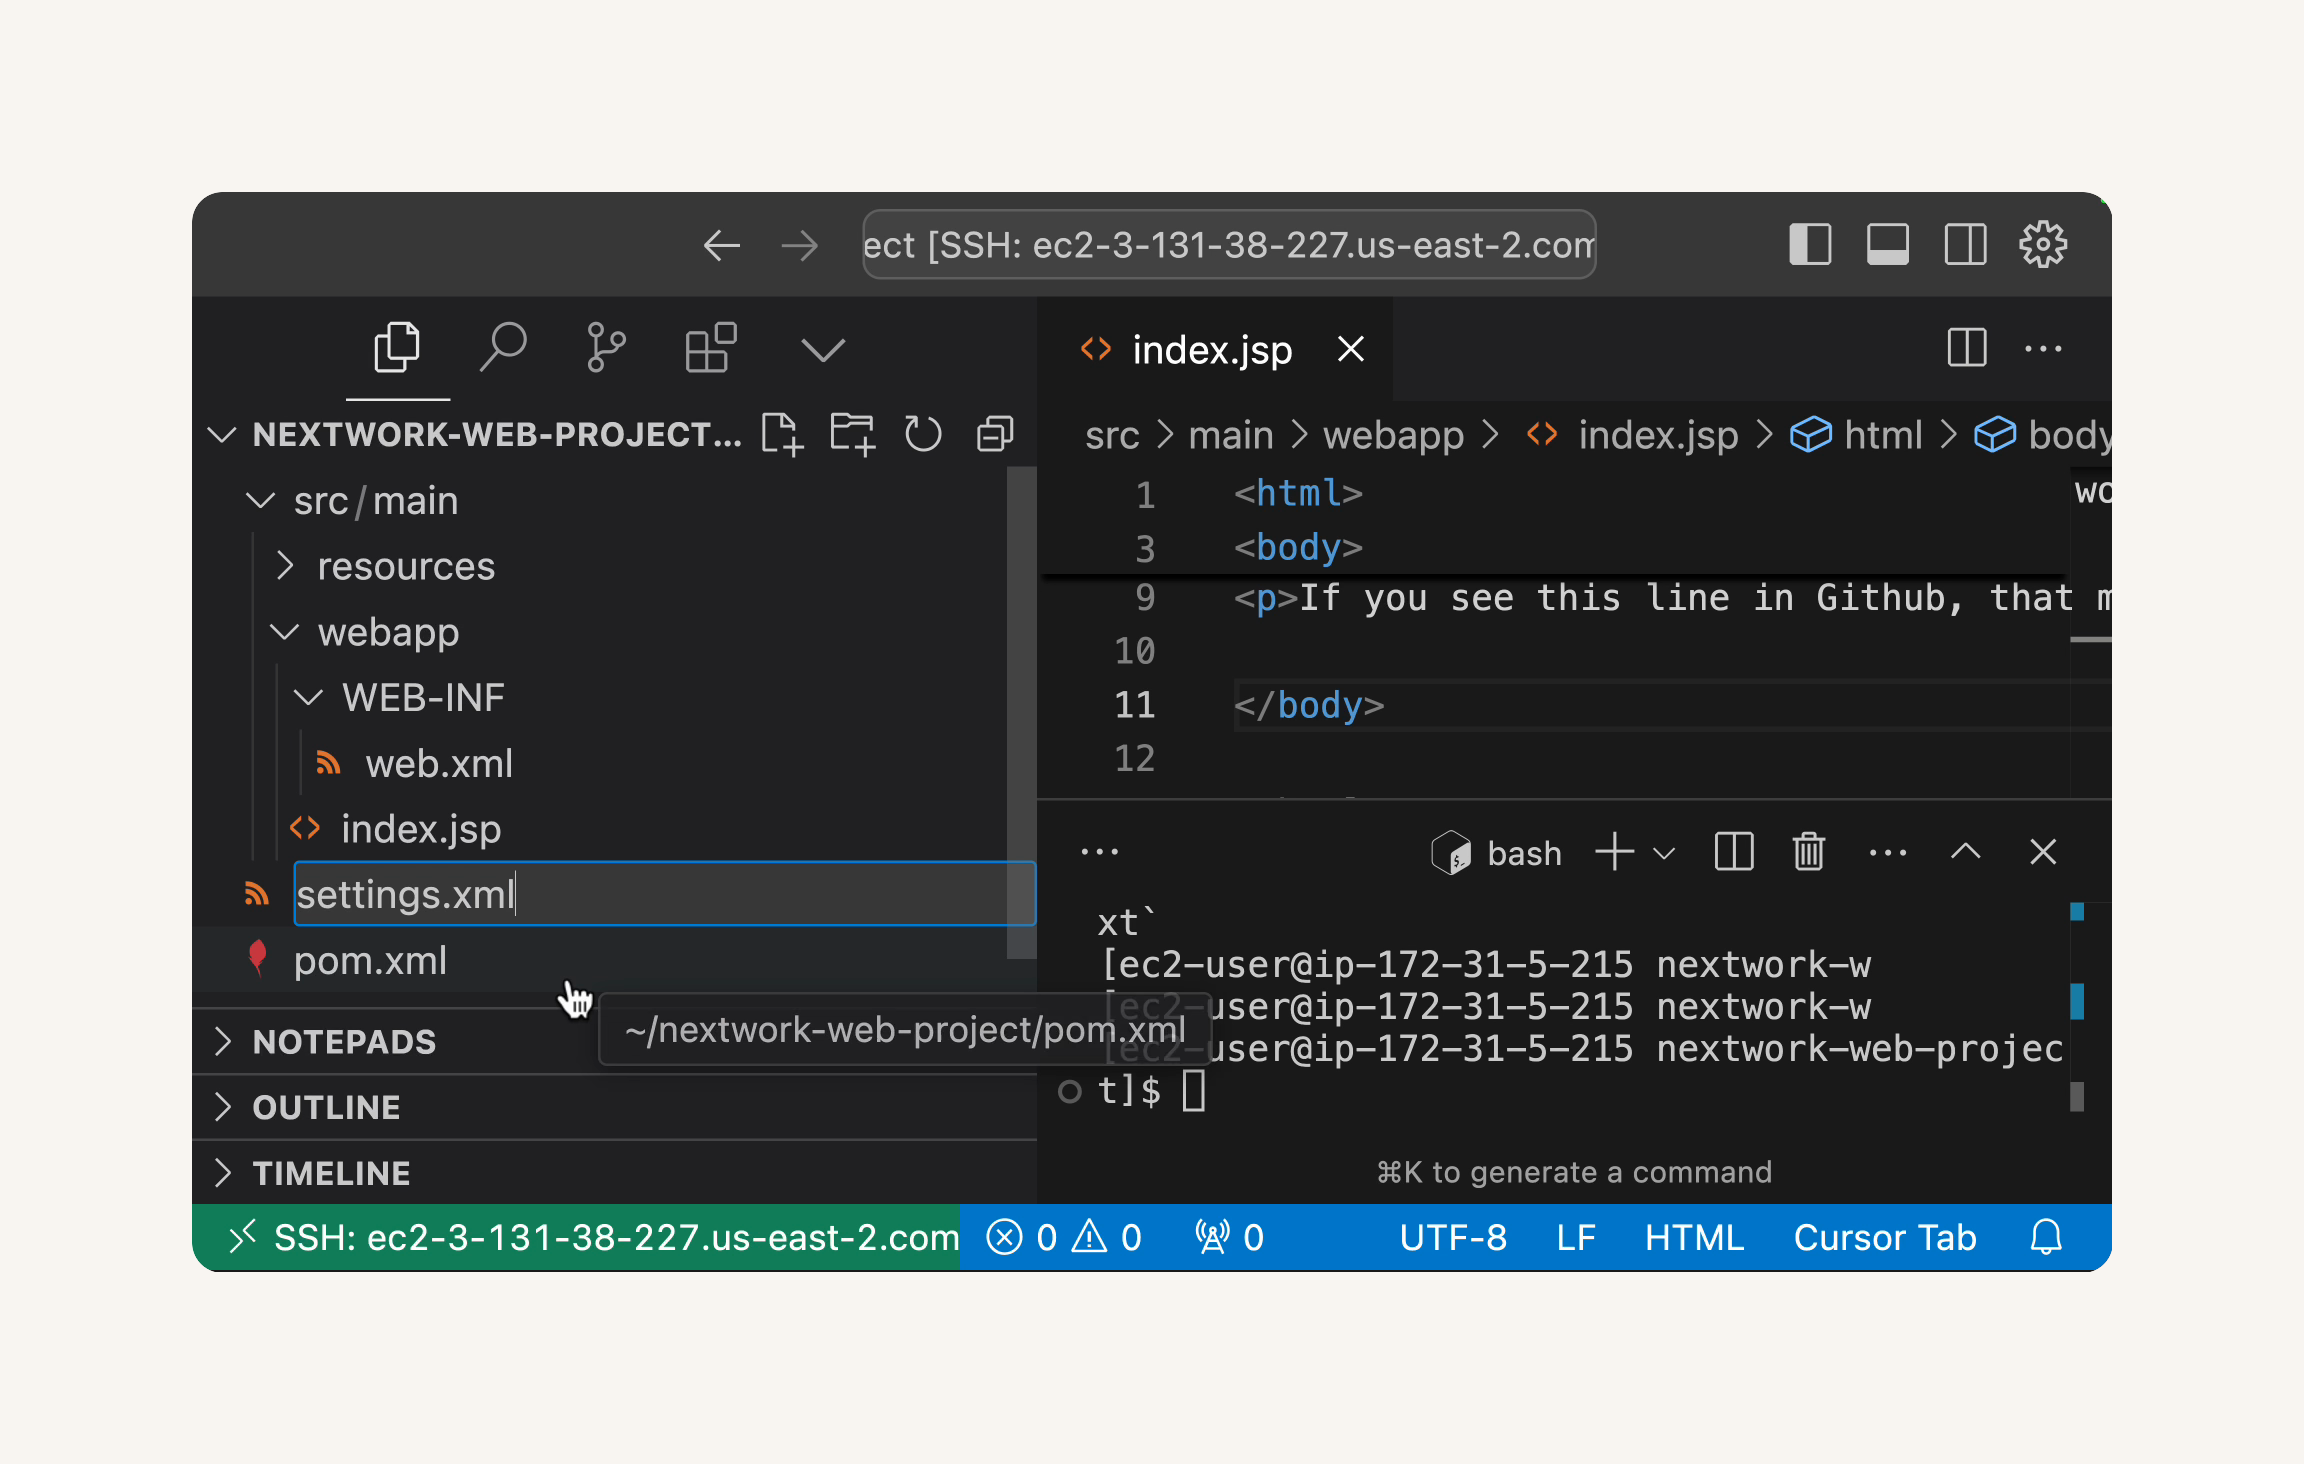
- Name the new file
settings.xml.
💡 What is settings.xml?
settings.xml is like a settings page for Maven - it stores all the settings we saw in Steps 4-6 of the connection window. It tells Maven how to behave across all your projects. In our case, we need a settings.xml file to tell Maven where to find the dependencies and how to get access to the right repositories (e.g. the ones in CodeArtifact).💡 Extra for Experts: What's xml?
xml is a markup language that lets you structure data and write instructions for a server. It's just like how html is a markup language that lets you structure data and write instructions for a web browser to display a web page.You might also notice pom.xml, which is a file that was automatically created in your repository's root directory when you set up your web app for the first time.
pom.xml tells Maven the ingredients list (i.e. dependencies) for your web app and how to put them together to build the app. Then, once Maven knows what dependencies to look for, settings.xml tells Maven where to find the dependencies and how to get access to the right repositories (e.g. the ones in CodeArtifact).
- Open the settings.xml file. If you created a new file, it will be empty.
- In your settings.xml file, add the
<settings>root tag if it's not already there:
<settings>
</settings>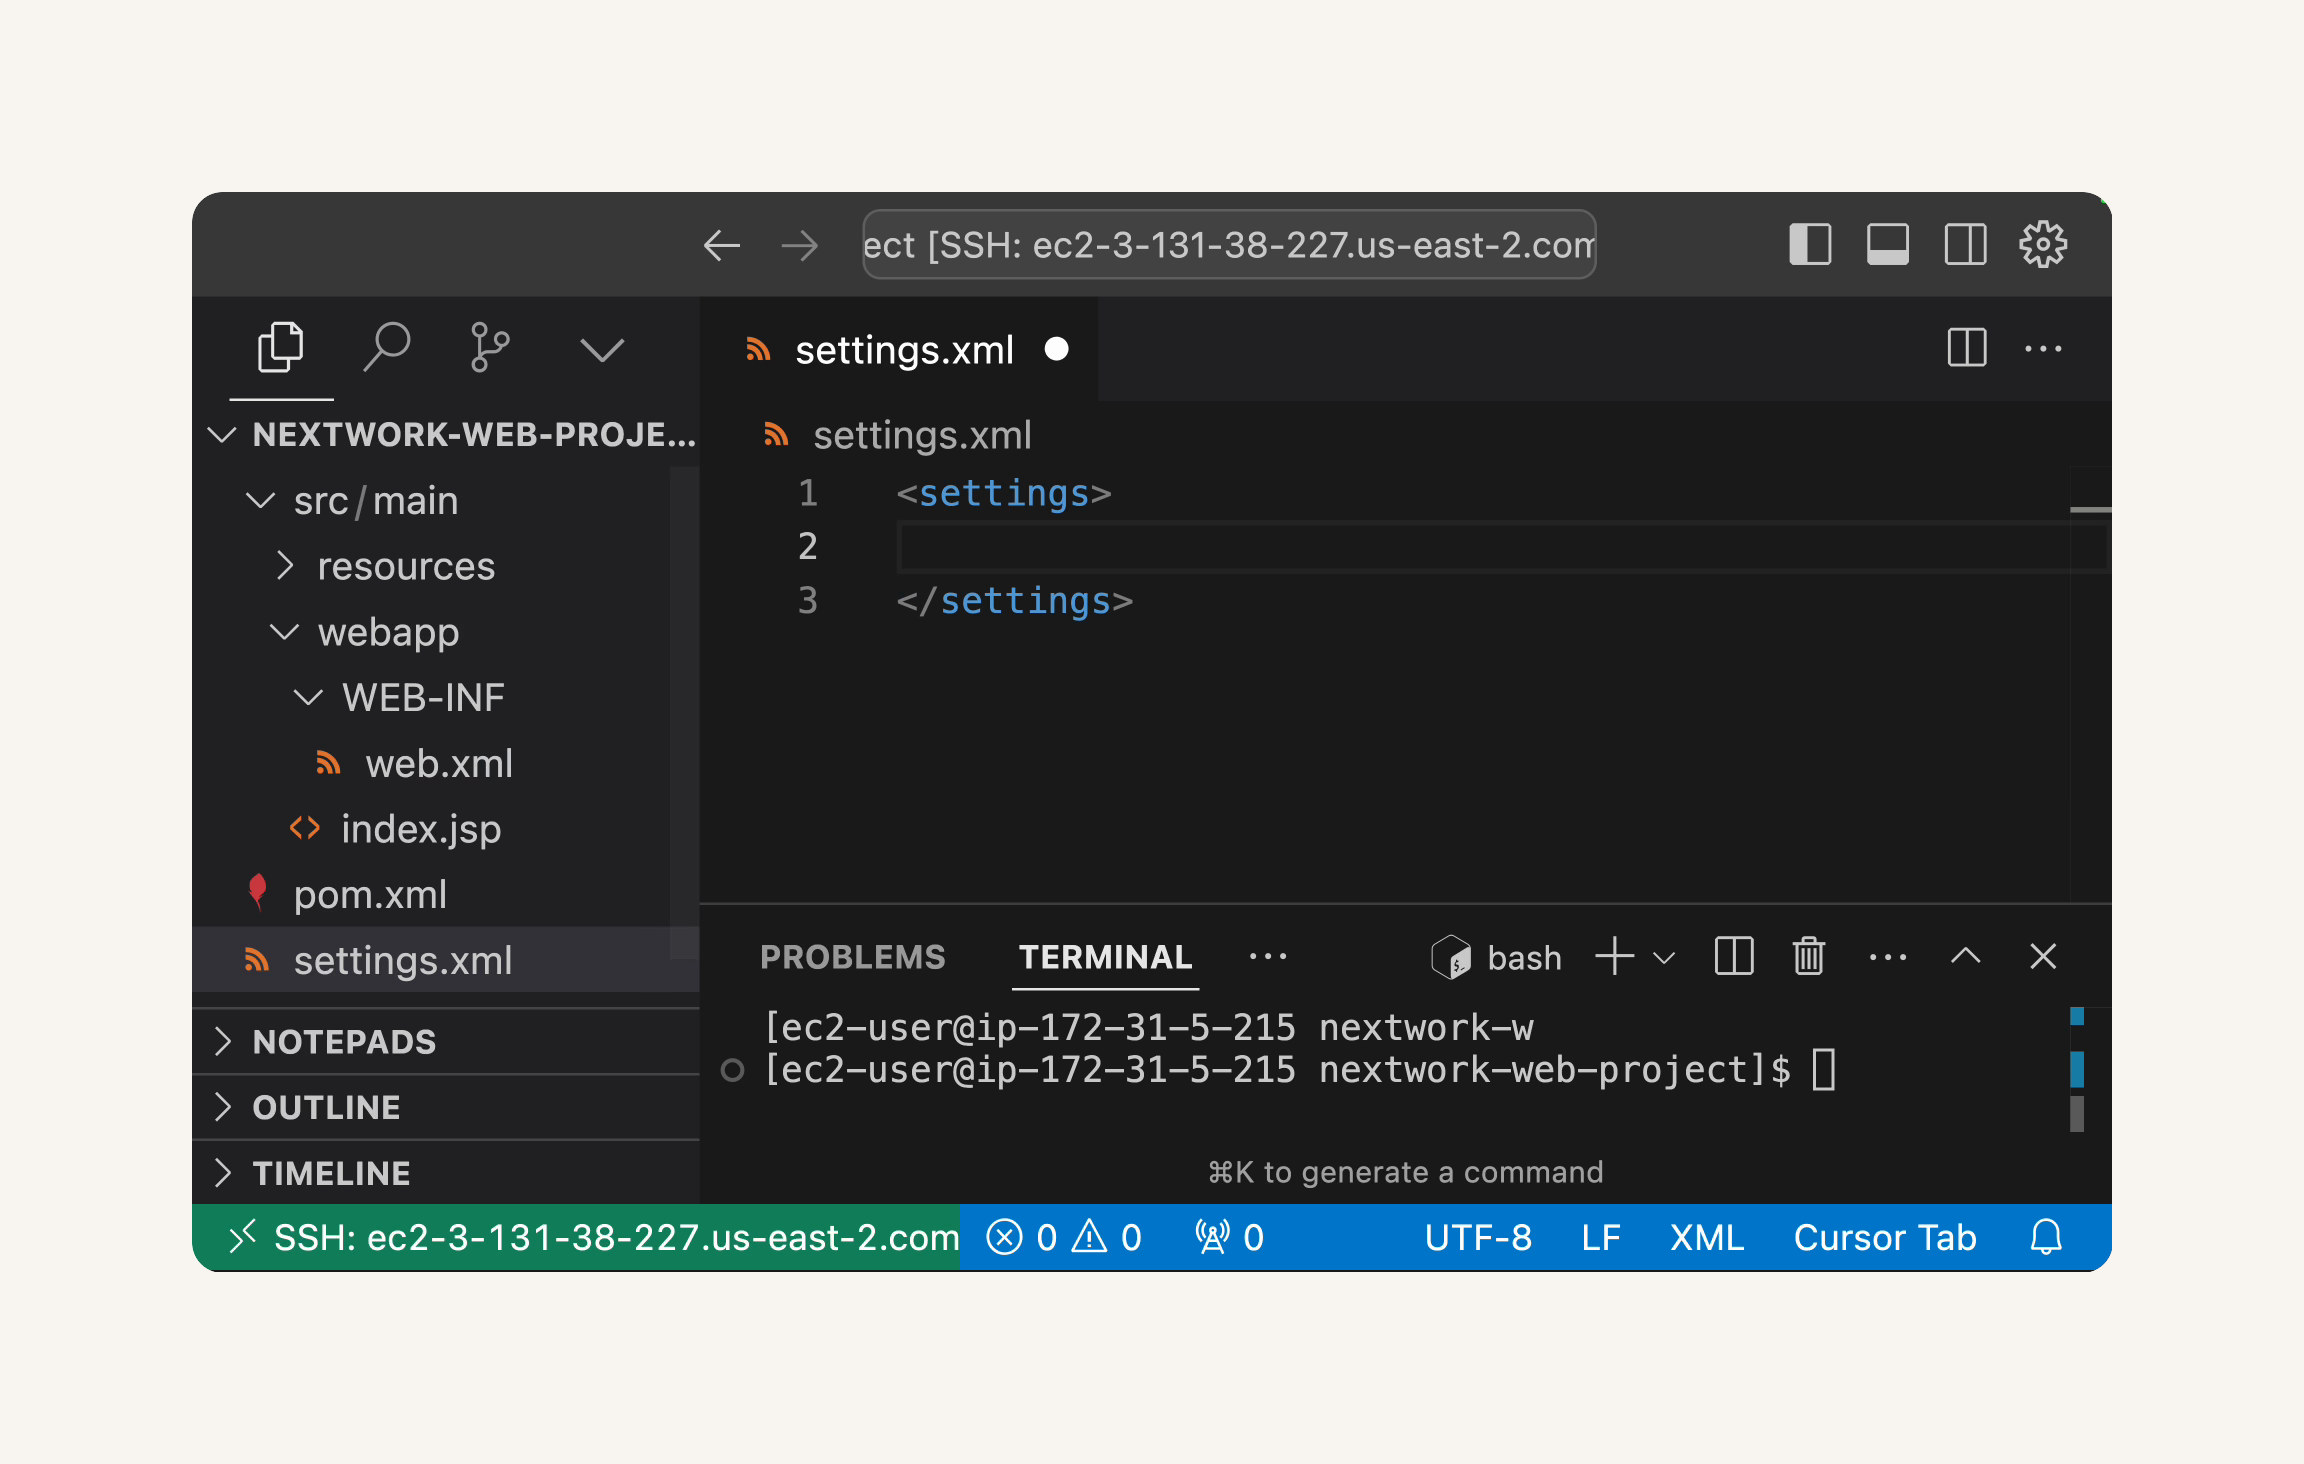
-
Go back to the CodeArtifact connection settings panel.
-
From the Connection instructions dialog, copy the XML code snippet from Step 4: Add your server to the list of servers in your settings.xml.
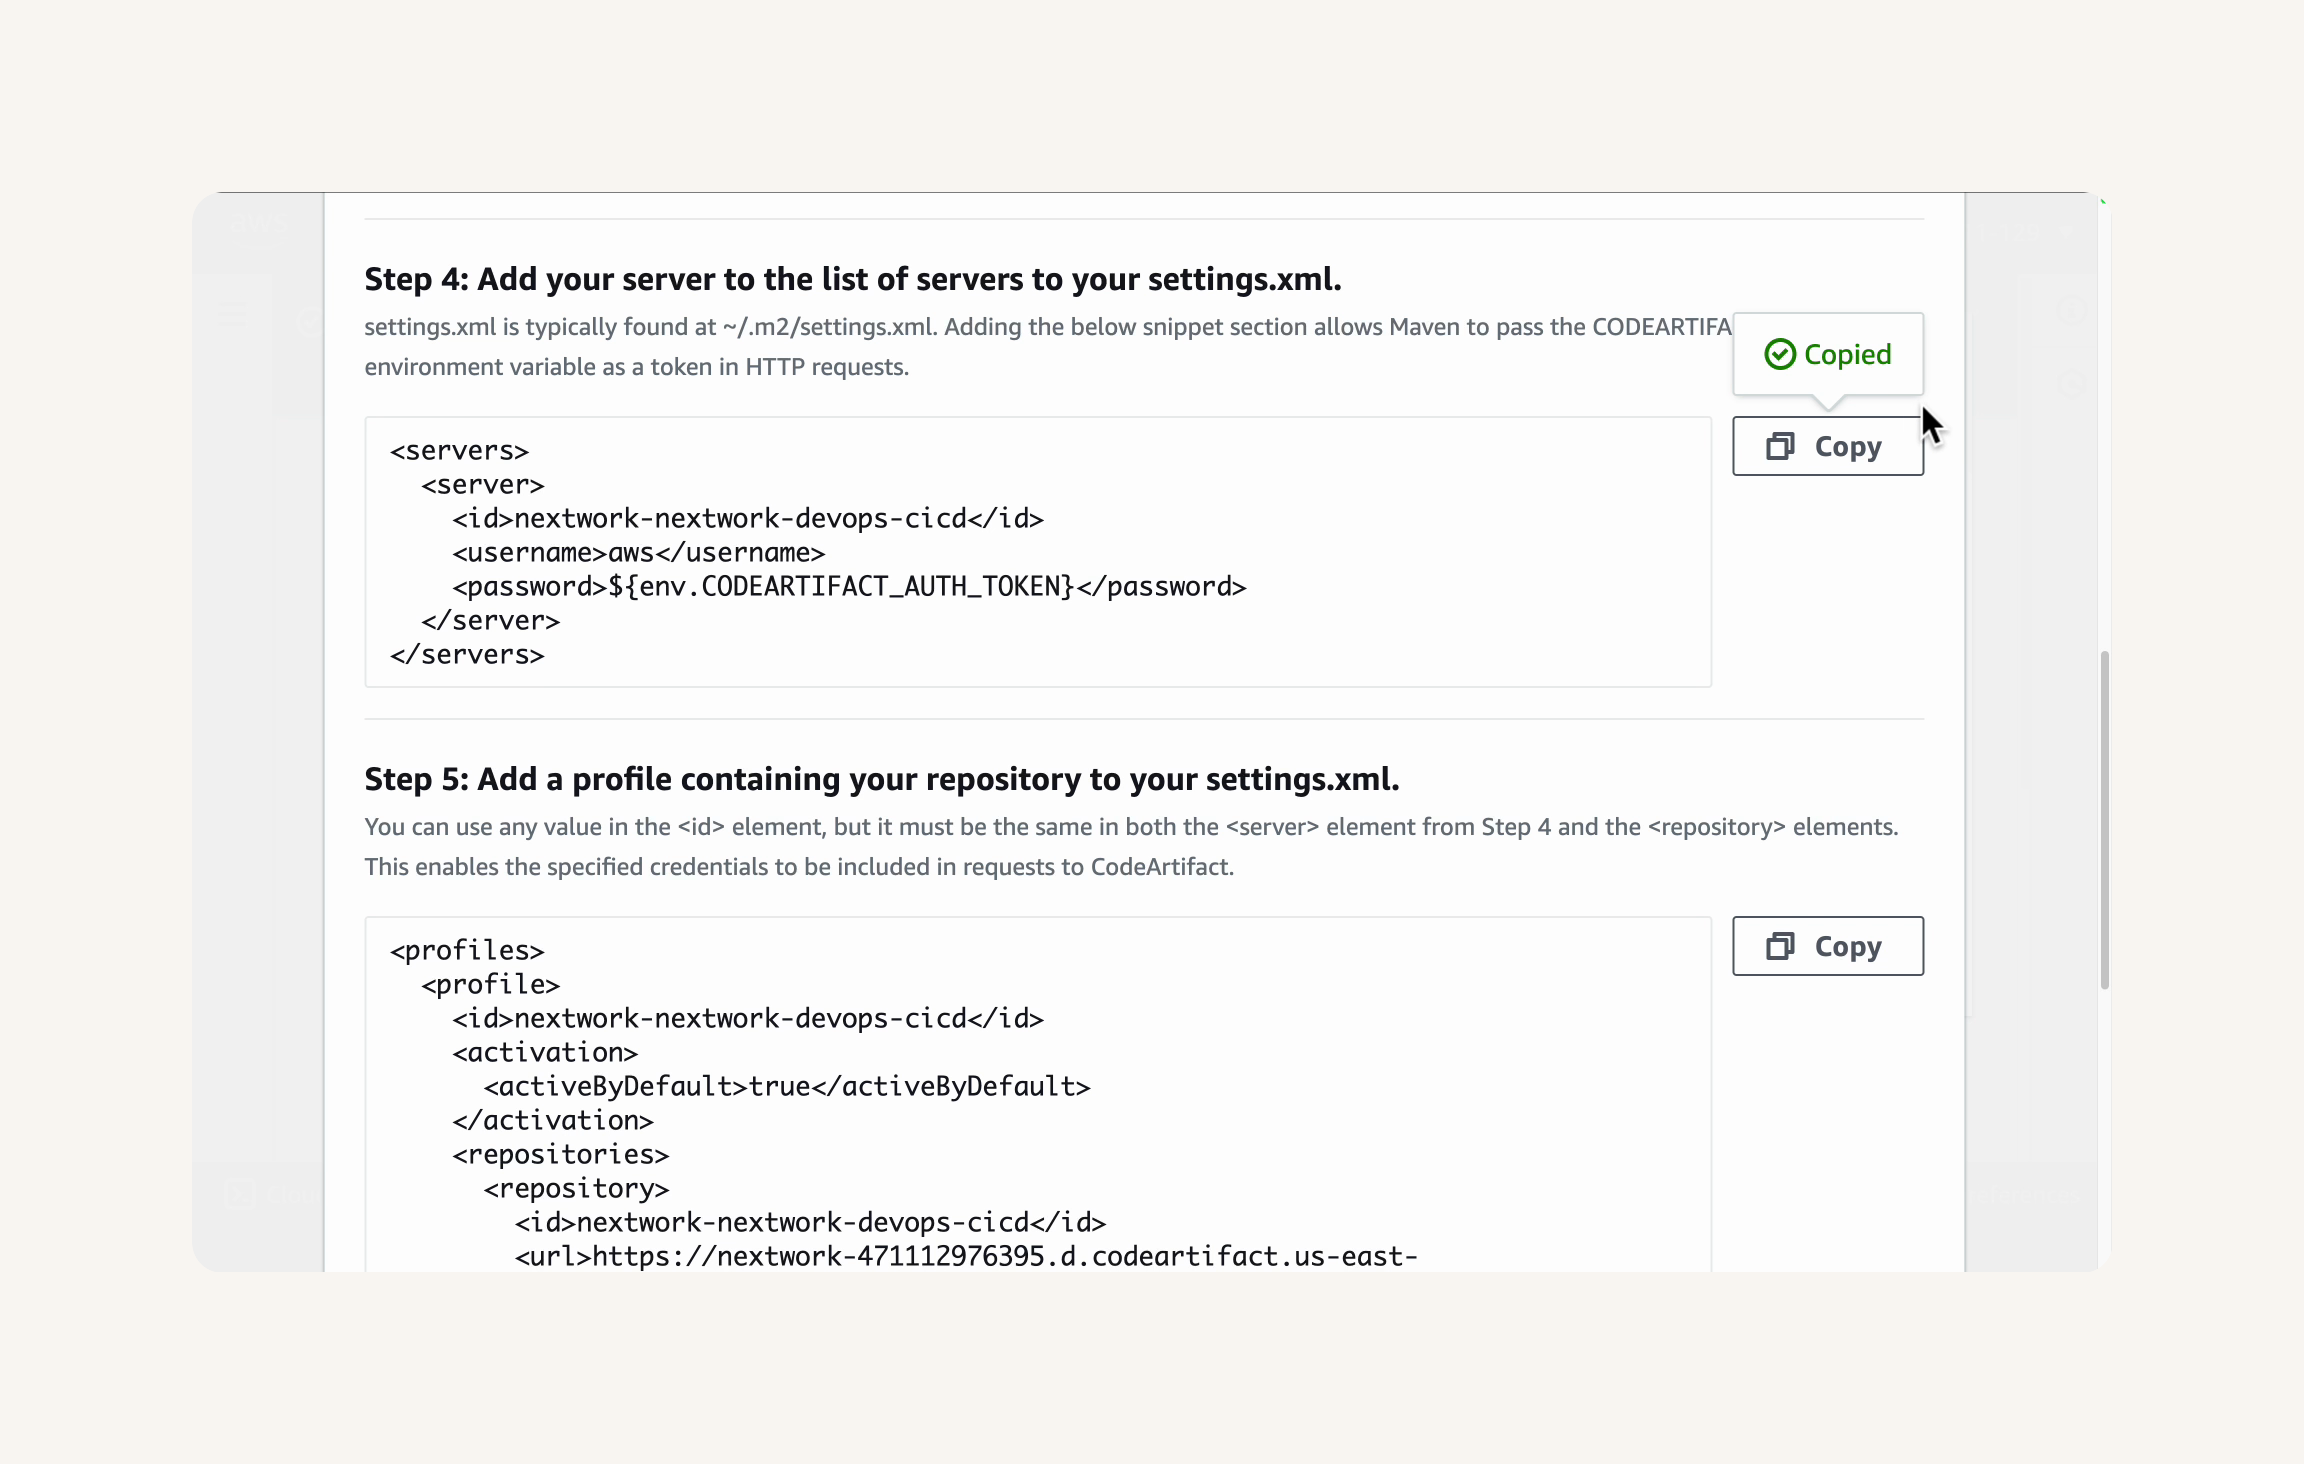
- Paste the code in the settings.xml file, in between the
<settings>tags.

- Let's copy the XML code snippet from Step 5: Add a profile containing your repository to your settings.xml.

- Paste the code snippet you copied right underneath the
<servers>tags. Make sure the<profiles>tags are also nested inside the<settings>tags.

- Finally, paste the XML code snippet from Step 6: (Optional) Set a mirror in your settings.xml... right underneath the
<profiles>tags.

- Save the
settings.xmlfile.
💡 Recap: What is settings.xml?
Thesettings.xmlfile is Maven's control center - it's where you tell Maven how to behave across all your projects.When we add CodeArtifact information to this file, we're essentially telling Maven: "Hey Maven, whenever you need to download a dependency, look in this CodeArtifact repository first, and here's how to authenticate yourself."
By configuring settings.xml properly, we're creating a seamless connection between Maven and CodeArtifact. Your builds will automatically authenticate and pull dependencies from the right place without you having to think about it again. It's one of those "set it up once, benefit forever" kinds of configurations that make a developer's life much easier.
-
In your VS Code terminal, run
pwdto check that you're in the root directory of yournextwork-web-project -
If you're not at the root directory, run
cd nextwork-web-projectto get there! -
Next, we'll compile your project.
💡 What does compiling mean?
Compiling is like translating your project's code into a language that computers can understand and run. When you compile your project, you're making sure everything is correctly set up and ready to turn into a working app.
- Run the Maven compile command, which uses the
settings.xmlfile we just configured:
mvn -s settings.xml compile
- Press Enter to execute the command.
🙋♀️ Getting a "401 Unauthorized" error when running Maven?
This is a common authentication issue with CodeArtifact. Let's troubleshoot it together!Try these steps:
Double check that your connection window is using the MacOS and Linux instructions - you should not be using the Windows instructions, even if you're doing this project on a Windows computer.
Verify your token exists by running:
echo $CODEARTIFACT_AUTH_TOKEN- you should see a long string of charactersDouble-check your
settings.xmlfile against the CodeArtifact connection instructions - make sure server IDs, repository URLs, and profile settings are all correctCheck that your IAM role and policy are properly set up and attached to your EC2 instance
If all else fails, try clearing your Maven cache:
rm -rf ~/.m2/repositoryand runmvn -s settings.xml compileagain

- As Maven compiles your project, observe the terminal output.
-
You should see messages like
Downloading from nextwork-devops-cicdtelling us that Maven is downloading dependencies from your CodeArtifact repository. This is a good sign that Maven is using CodeArtifact to manage dependencies! -
If the compilation is successful and dependencies are downloaded from CodeArtifact, you'll see a
BUILD SUCCESSmessage at the end of the Maven output.
💡 Recap: What happens when Maven compiles with CodeArtifact?
When you runmvn -s settings.xml compile, Maven first looks at your project's dependencies in thepom.xmlfile. Then, instead of downloading them directly from public repositories, it checks your CodeArtifact repository. If the dependency isn't already in CodeArtifact, it will fetch it from the upstream repository (Maven Central in our case), cache it in CodeArtifact, and then deliver it to your project. This process happens for each required dependency, ensuring that your build process is secure, controlled, and faster for subsequent builds when dependencies are already cached in CodeArtifact.
-
See it to believe it! Let's head back to the CodeArtifact console in your browser.
-
Close the connection instructions window.

- If you don't see any packages in your repository listed yet, click the refresh button in the top right corner of the Packages pane.

- After refreshing, you should now see a list of Maven packages in your CodeArtifact repository.
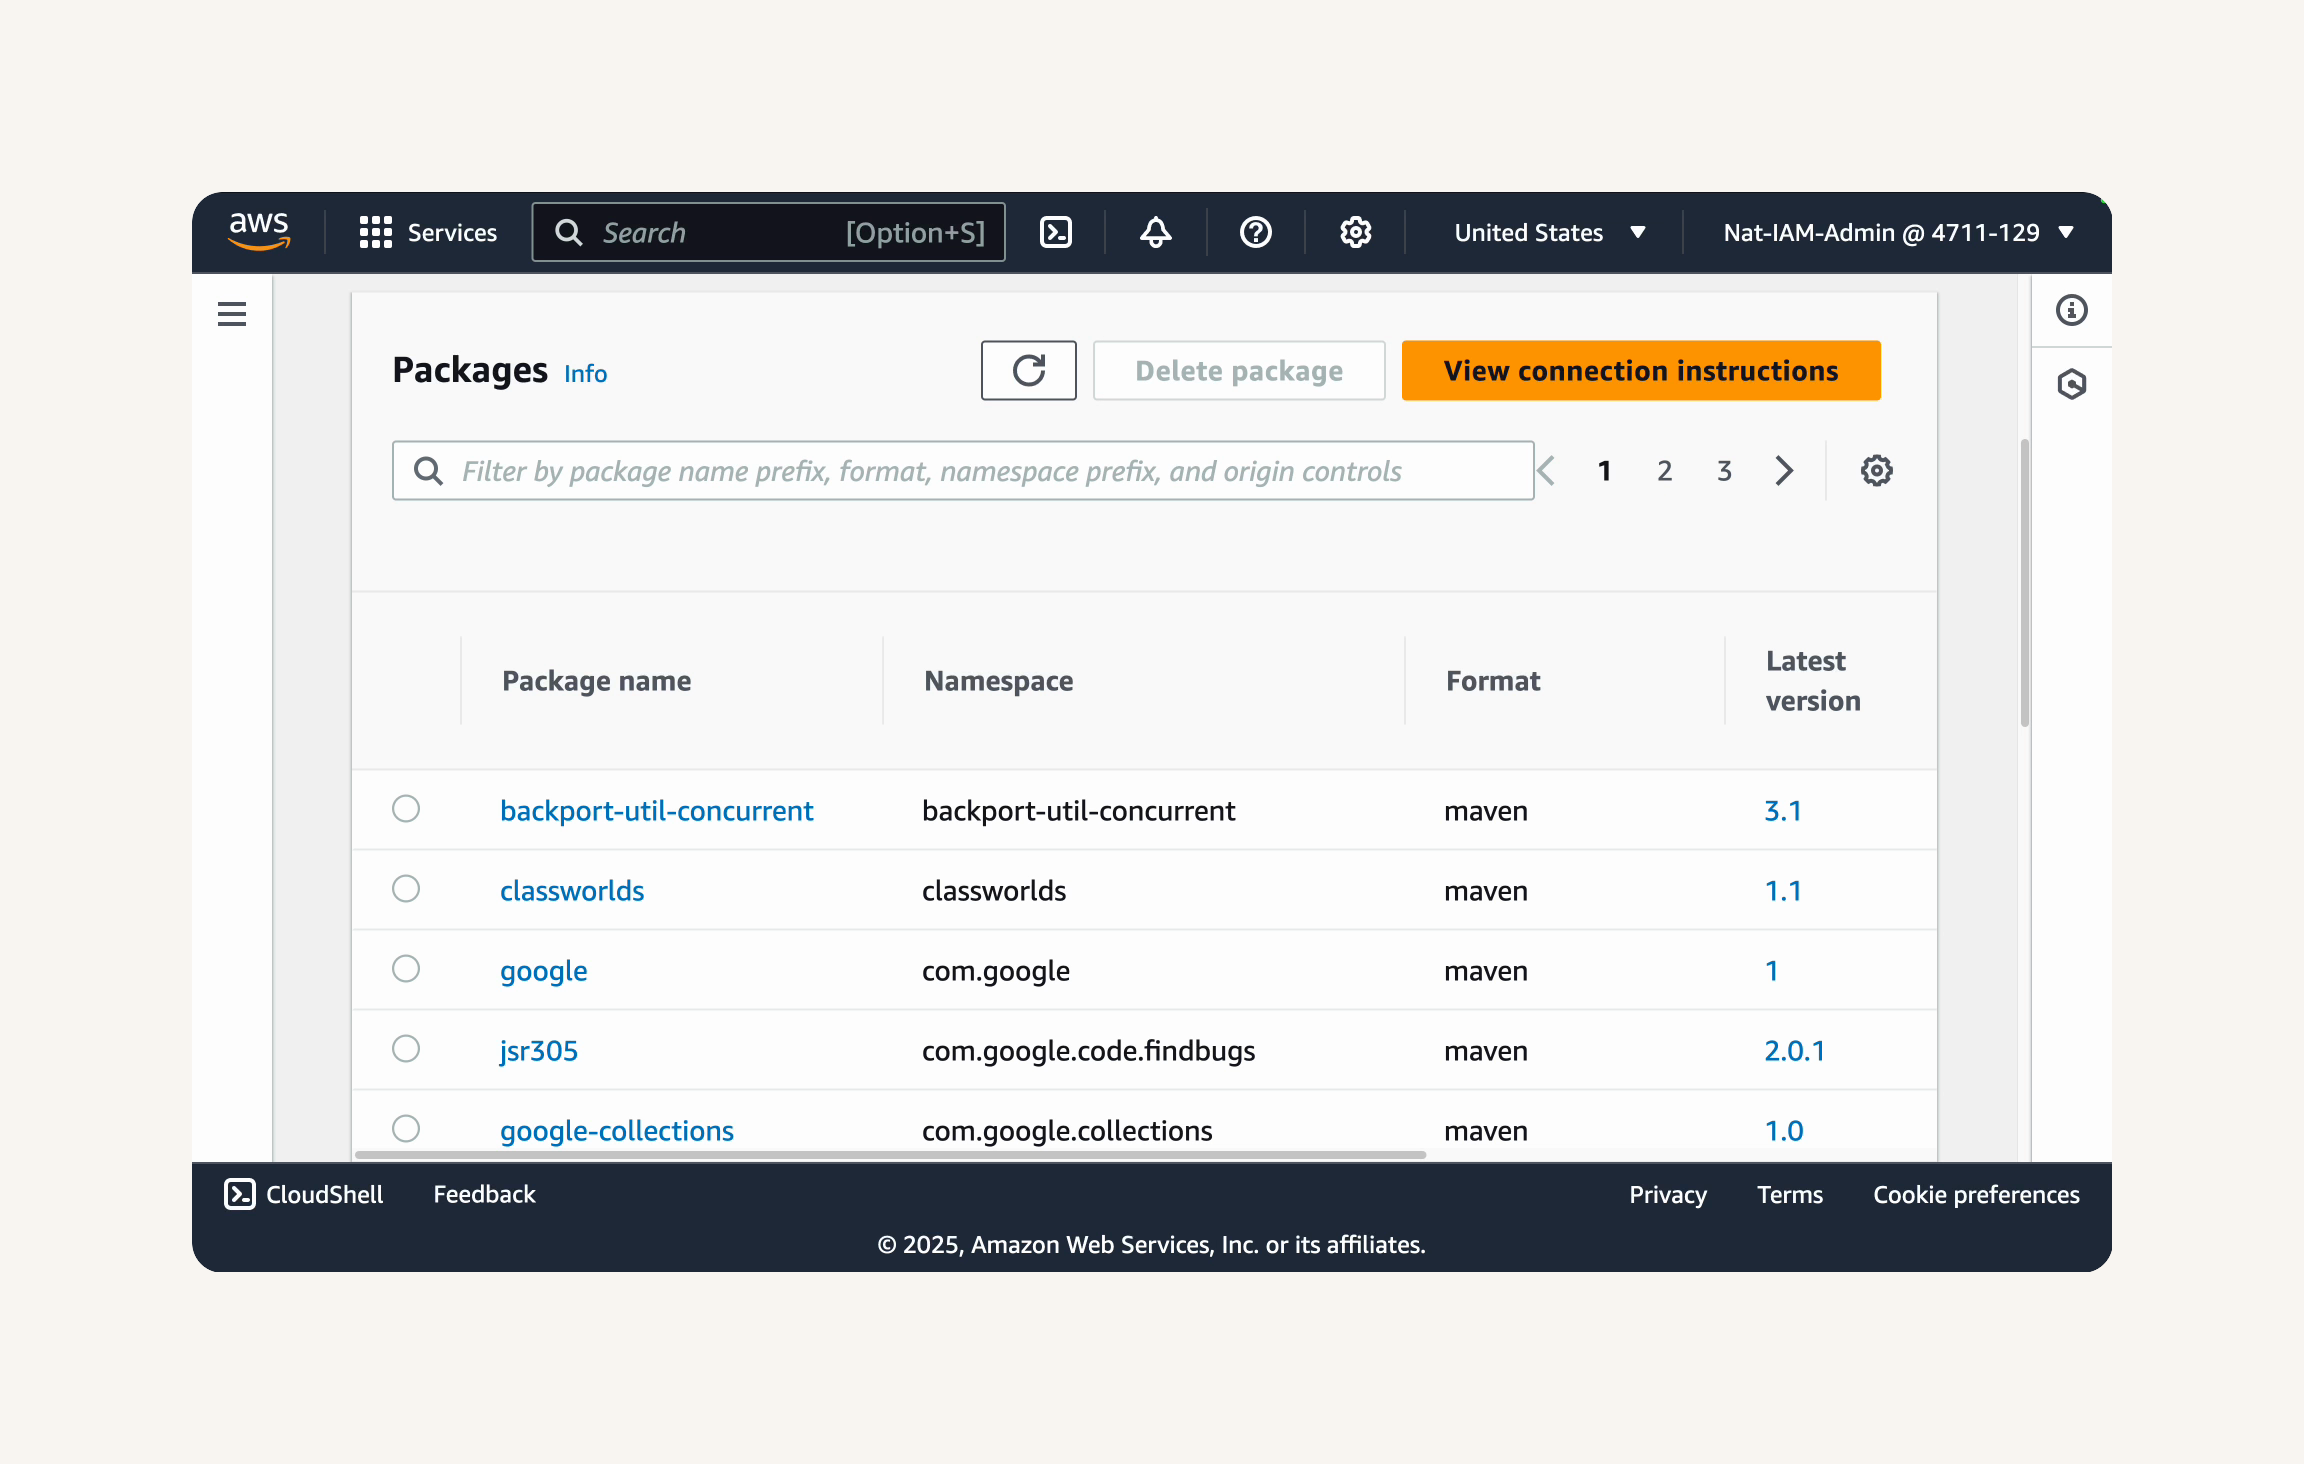
💡 Why are packages showing up in CodeArtifact?
Those packages appearing in your CodeArtifact repository are proof that the entire system is working! Here's what happened behind the scenes: when you ran the Maven compile command, Maven checked your project's pom.xml file and determined which dependencies your application needs. It then requested these dependencies through CodeArtifact.Since this was the first time these dependencies were requested, CodeArtifact didn't have them yet. So it reached out to Maven Central (the upstream repository we configured), downloaded the packages, stored copies in your repository, and then provided them to Maven. It's like ordering groceries online - the store delivers what you need and keeps a record of your order.
Now that these packages are stored in your CodeArtifact repository, anyone else in your organization who needs the same dependencies will get them directly from your repository instead of from Maven Central. This gives you faster builds, more reliability, and the ability to control exactly which package versions your organization uses. Pretty powerful stuff!
- These are the dependencies that Maven downloaded from Maven Central via CodeArtifact when you compiled your project.
Congrats! This confirms that your CodeArtifact setup is working correctly and that Maven is using it to manage dependencies 💪
Want to experience the full power of CodeArtifact?
In this section our goal is to become a package publisher and add our very own custom package to our CodeArtifact repository. This mission will give you a deeper understanding of how companies manage their custom code libraries.
In this secret mission, you're going to:
-
Create your own custom package
-
Publish it directly to your CodeArtifact repository
-
Experience the full package lifecycle by downloading your own package
-
Showcase advanced package management skills in your documentation!
Open your CloudShell terminal from the top of your AWS Management Console.

- Create a message file:
echo "Hellooooo this is a test package!" > secret-mission.txt
- Now bundle the file into a package:
tar -czvf secret-mission.tar.gz secret-mission.txt💡 What is a tar.gz file?
A tar.gz file is a way to package multiple files into a single archive, similar to a zip file. It's commonly used, especially in Linux environments, for bundling and compressing files to save space and make them easier to distribute.Here's a more detailed breakdown of
tar.gzfiles:
Bundling: The "tar" part of
tar.gzstands for "tape archive." It combines multiple files and directories into a single archive file. This makes it easier to manage and move around related files.Compression: The "gz" part indicates that the archive is compressed using gzip, a popular compression algorithm. This reduces the overall file size, saving storage space and bandwidth during transfer.
File Permissions:
tar.gzfiles preserve file permissions and ownership information, which is important in Linux systems where these attributes control access and security.Generic Format: While we are using
tar.gzfor this example, CodeArtifact supports many package formats, including JAR files for Java and npm packages for JavaScript. The generic format allows publishing of any file type.Real-world examples of
tar.gzfiles and their applications include:
Software Distribution: Many open-source software projects distribute their source code as
tar.gzarchives.Backup and Archiving: System administrators use
tar.gzto create backups of important data and archive old files.Package Management: Some package managers, like those in Linux distributions, use
tar.gzfiles to distribute software packages.Internal Tool Distribution: Companies use the generic format to distribute internal tools, documentation, or even machine learning models alongside their code libraries.
- You should see output confirming the file was created.

- Every package published to CodeArtifact requires a security hash to verify its integrity - let's set up your file's security hash:
export ASSET_SHA256=$(sha256sum secret-mission.tar.gz | awk '{print $1;}')💡 What is a security hash?
A security hash is like a digital fingerprint for your file. The SHA256 algorithm processes your entire file and generates a unique 64-character string. Even changing a single character in your file would produce a completely different hash!When CodeArtifact receives your package, it calculates its own SHA256 hash and compares it with the one you provided. If they match, it confirms your file wasn't corrupted or tampered with during transfer. This is crucial for security - imagine if someone intercepted your package and injected malicious code before it reached the repository!

- Confirm your hash was generated:
echo $ASSET_SHA256- You should see a long string of characters - that's your package's unique cryptographic fingerprint!

- Time to deploy your package to CodeArtifact:
aws codeartifact publish-package-version \
  --domain nextwork \
  --repository nextwork-devops-cicd \
  --format generic \
  --namespace secret-mission \
  --package secret-mission \
  --package-version 1.0.0 \
  --asset-content secret-mission.tar.gz \
  --asset-name secret-mission.tar.gz \
  --asset-sha256 $ASSET_SHA256
💡 What is the command I'm running? What language is this?
You're using the AWS Command Line Interface (AWS CLI), which lets you control AWS services directly from your terminal instead of clicking through the AWS Management console!In our case, we're telling the AWS CLI to talk to the CodeArtifact service and do the "publish-package-version" action i.e. publish a package.
The CLI isn't a programming language, but rather a command-line tool that developers use to automate AWS tasks. It's much faster than using the web console once you get the hang of it!
💡 What do these parameters mean?
domain/repository: Where your package will be stored in CodeArtifact
format: "generic" means it's not a specific package type like Maven or npm
namespace/package: How your package will be organized and identified
package-version: The version number of your package
asset-content/name: The actual file being uploaded and what to name it
asset-sha256: The integrity hash we generated earlier

- You should see a JSON response with details about your published package.

-
Head back to the CodeArtifact console.
-
Navigate to your repository.
-
Refresh the list of packages.
-
Look for your secret-mission package in the packages list!

-
Click Refresh again if you don't see it immediately.
-
Click into your package to view its details.
💡 What am I looking at?
The package details page shows you important metadata about your package:
When it was published (should be just now)
The version information
The origin (this is an original package, so the origin is this exact repository - no upstream repos here!)
The security hashes calculated for the package (click into a version number, and check the Assets section at the bottom of the page)

Let's go full circle in this mission by retrieving your package from the repository!
- Head back to your CloudShell terminal, and run the following code for retrieving a package:
aws codeartifact get-package-version-asset \
  --domain nextwork \
  --repository nextwork-devops-cicd \
  --format generic \
  --namespace secret-mission \
  --package secret-mission \
  --package-version 1.0.0 \
  --asset secret-mission.tar.gz \
  secret-mission.tar.gz
💡 Why download what I just uploaded?
This completes the full lifecycle of a package in CodeArtifact - publish and consume. In real enterprise environments, one team might publish a package, while different teams across the organization consume it. This ensures everyone is using the same verified, secured components.
-
You should see a JSON terminal response that confirms you've downloaded a package.
-
Shall we check what's inside that package?
-
Verify our secret mission is a (super cool) success by checking the contents inside:
tar -xzvf secret-mission.tar.gz
cat secret-mission.txt- You should see your original secret message!

Well done! You've now experienced the full power of CodeArtifact from both sides - as a consumer and a publisher.
This is exactly how companies manage their internal libraries, making sure all developers have access to the right code packages while maintaining security and version control 👏
A bonus note for the experts
💡 Automatic vs. Manual publishing - what's the difference?
In today's project, Maven handled package publishing automatically. When you ran themvn compilecommand, Maven searched for dependencies in your CodeArtifact repository. If a dependency wasn't already there, Maven would fetch it from Maven Central and CodeArtifact would automatically store a copy in your repository. This was all happening behind the scenes - you saw it working when packages appeared in your repository without you explicitly uploading them.In this secret mission, you're publishing packages manually using the AWS CLI. You're creating the file, calculating its hash, and explicitly telling CodeArtifact to store it using the publish-package-version command. This gives you full control over what gets published, when, and with what metadata.
While manual publishing is great for understanding the entire journey of creating and publishing a package to CodeArtifact, most companies don't do this by hand. In real-world environments, companies also automate this manual publishing process within the CI/CD pipeline.
Developers typically include these publishing commands in their buildspec.yml file (while you'll learn more about in the next project - AWS CodeBuild) or in shell scripts that run during the build phase. This means calculating the hash and publishing custom, internal packages also happens automatically whenever a new version of the code is pushed to the repository. This makes sure consistent, reliable, and secure package publishing as part of their development workflow.
Congratulations! Your project is now set up to use CodeArtifact for dependency management, which is a crucial step for setting up a robust CI/CD pipeline.
In this project, you've learned how to:
-
🗂️ Set up and configure AWS CodeArtifact as a private Maven repository for managing dependencies.
-
🛡️ Use IAM roles and policies to let your EC2 instance access CodeArtifact.
-
✅ Verify your web app's connection to CodeArtifact and ensure Maven can download dependencies from it.
-
💎 Create and add your own packages to your CodeArtifact repository!
In the next project, you'll learn how to set up CodeBuild to automatically build your web app. No more running commands to get CodeArtifact to compile your project!

Welcome to Part-4 of the 6 Parts DevOps Challenge!
Today, we're working with AWS CodeBuild to automate the build process for your web app.
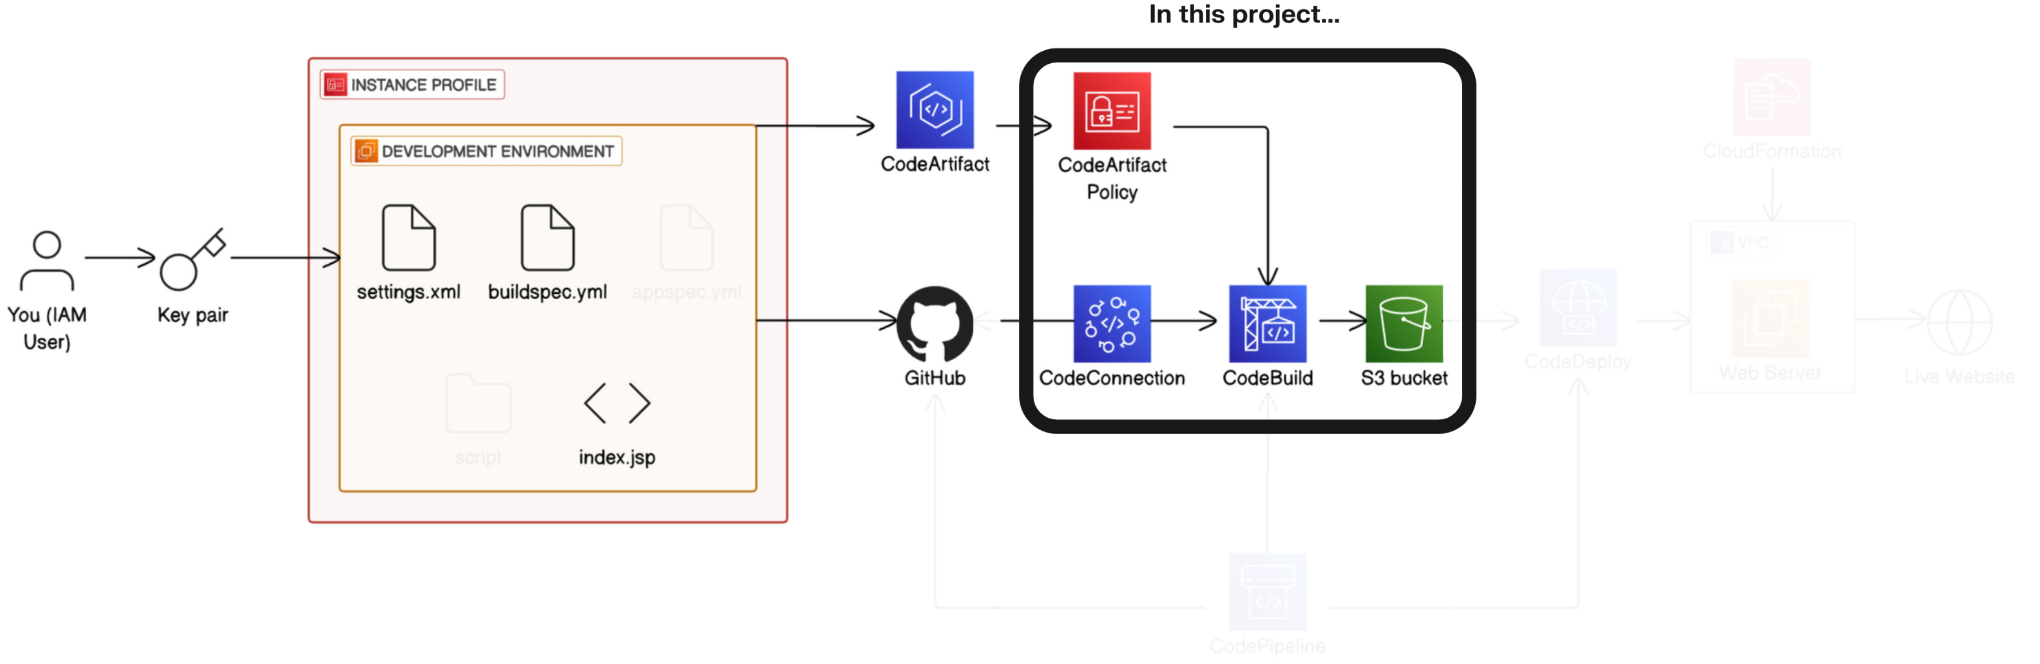
- An AWS account - Create one here!
If you are following along since part-1 of this project, you may proceed further. However if at any point you deleted your resources, make sure to go back and set up every thing need for this project from DevOps - Complete CICD Pipeline With AWS CodePipeline#Part-1. Set Up a Web App in the Cloud till this part of the project. Good Luck!
Get ready to:
-
🛠️ Create and configure a CodeBuild project from scratch.
-
🔗 Connect your CodeBuild project to your GitHub repository.
-
⚙️ Define your build process using a buildspec.yml file.
-
💎 Automate testing using CodeBuild too!
💡 Why am I learning about AWS CodeBuild?
When you're developing software, you need to regularly "build" your code, which is the process of turning the code into a package that can be deployed.AWS CodeBuild is a continuous integration service that automates this entire build process for you. When a developer pushes new code, CodeBuild automatically compiles the code, runs the tests, and packages everything up. This saves enormous time, eliminates human error, and helps you deliver better software faster! That's why CodeBuild is an essential part of a CI/CD pipeline - it automatically makes sure your application is always built consistently and correctly.
Ready to dive in? Let's create our CodeBuild project!
In this step, you're going to:
- Create a new CodeBuild project.

-
Log in to your AWS Management Console.
-
In the top search bar, type CodeBuild.
-
Select CodeBuild from the dropdown menu under Services.

💡 What is AWS CodeBuild?
AWS CodeBuild is a fully build tool for your code. It takes your source code, compiles it, runs tests, and packages it up. Engineers love continuous integration tools like CodeBuild because you don't have to manually set up and manage any build servers yourself, and you only pay for the compute time you use for building your projects (instead of entire servers that are idle most of the time). Think of it as a super-efficient, scalable, and managed service that handles all the heavy lifting of building and testing your applications.Continuous Integration is like having a quality control checkpoint that automatically kicks in whenever anyone on your team makes changes to your code. Instead of waiting until the end of a project to discover that something broke, CI helps you catch and fix issues early and often. CI helps you constantly check that everything still works as expected - running tests, compiling code, and making sure new changes play nicely with the existing codebase.
-
In the CodeBuild dashboard, find the left navigation menu.
-
Select Build projects.
💡 What is a CodeBuild project?
A CodeBuild project is basically the blueprint for your CI process. It's where you tell AWS everything it needs to know about how to build your application. This includes things like where your code lives (like GitHub), what kind of environment you need (Linux or Windows? Java or Python?), exactly what commands to run during the build, and where to store the results when it's done. Think of it as a recipe that CodeBuild follows every time it needs to build your application.

-
On the Create build project page, scroll to the Project configuration section.
-
Under Project name, enter
nextwork-devops-cicd. -
Under Project type, make sure Default project is selected.

💡 What are the CodeBuild project types?
CodeBuild gives you two main types of projects, each designed for different CI/CD needs:
Default project: This is your standard option that most teams use. It's perfect when you want to manage your entire build process within AWS. You get full control over how your build runs, what goes in, and what comes out - all without leaving the AWS ecosystem.
Runner project: This option is for teams who already have CI systems like GitHub Actions or GitLab CI but want to tap into the power of CodeBuild's build environment. It's like having CodeBuild do the heavy lifting while your existing CI system orchestrates the overall process.
For this project, we're using a Default project to directly manage our CI process within CodeBuild.
- Scroll down to the Source section.
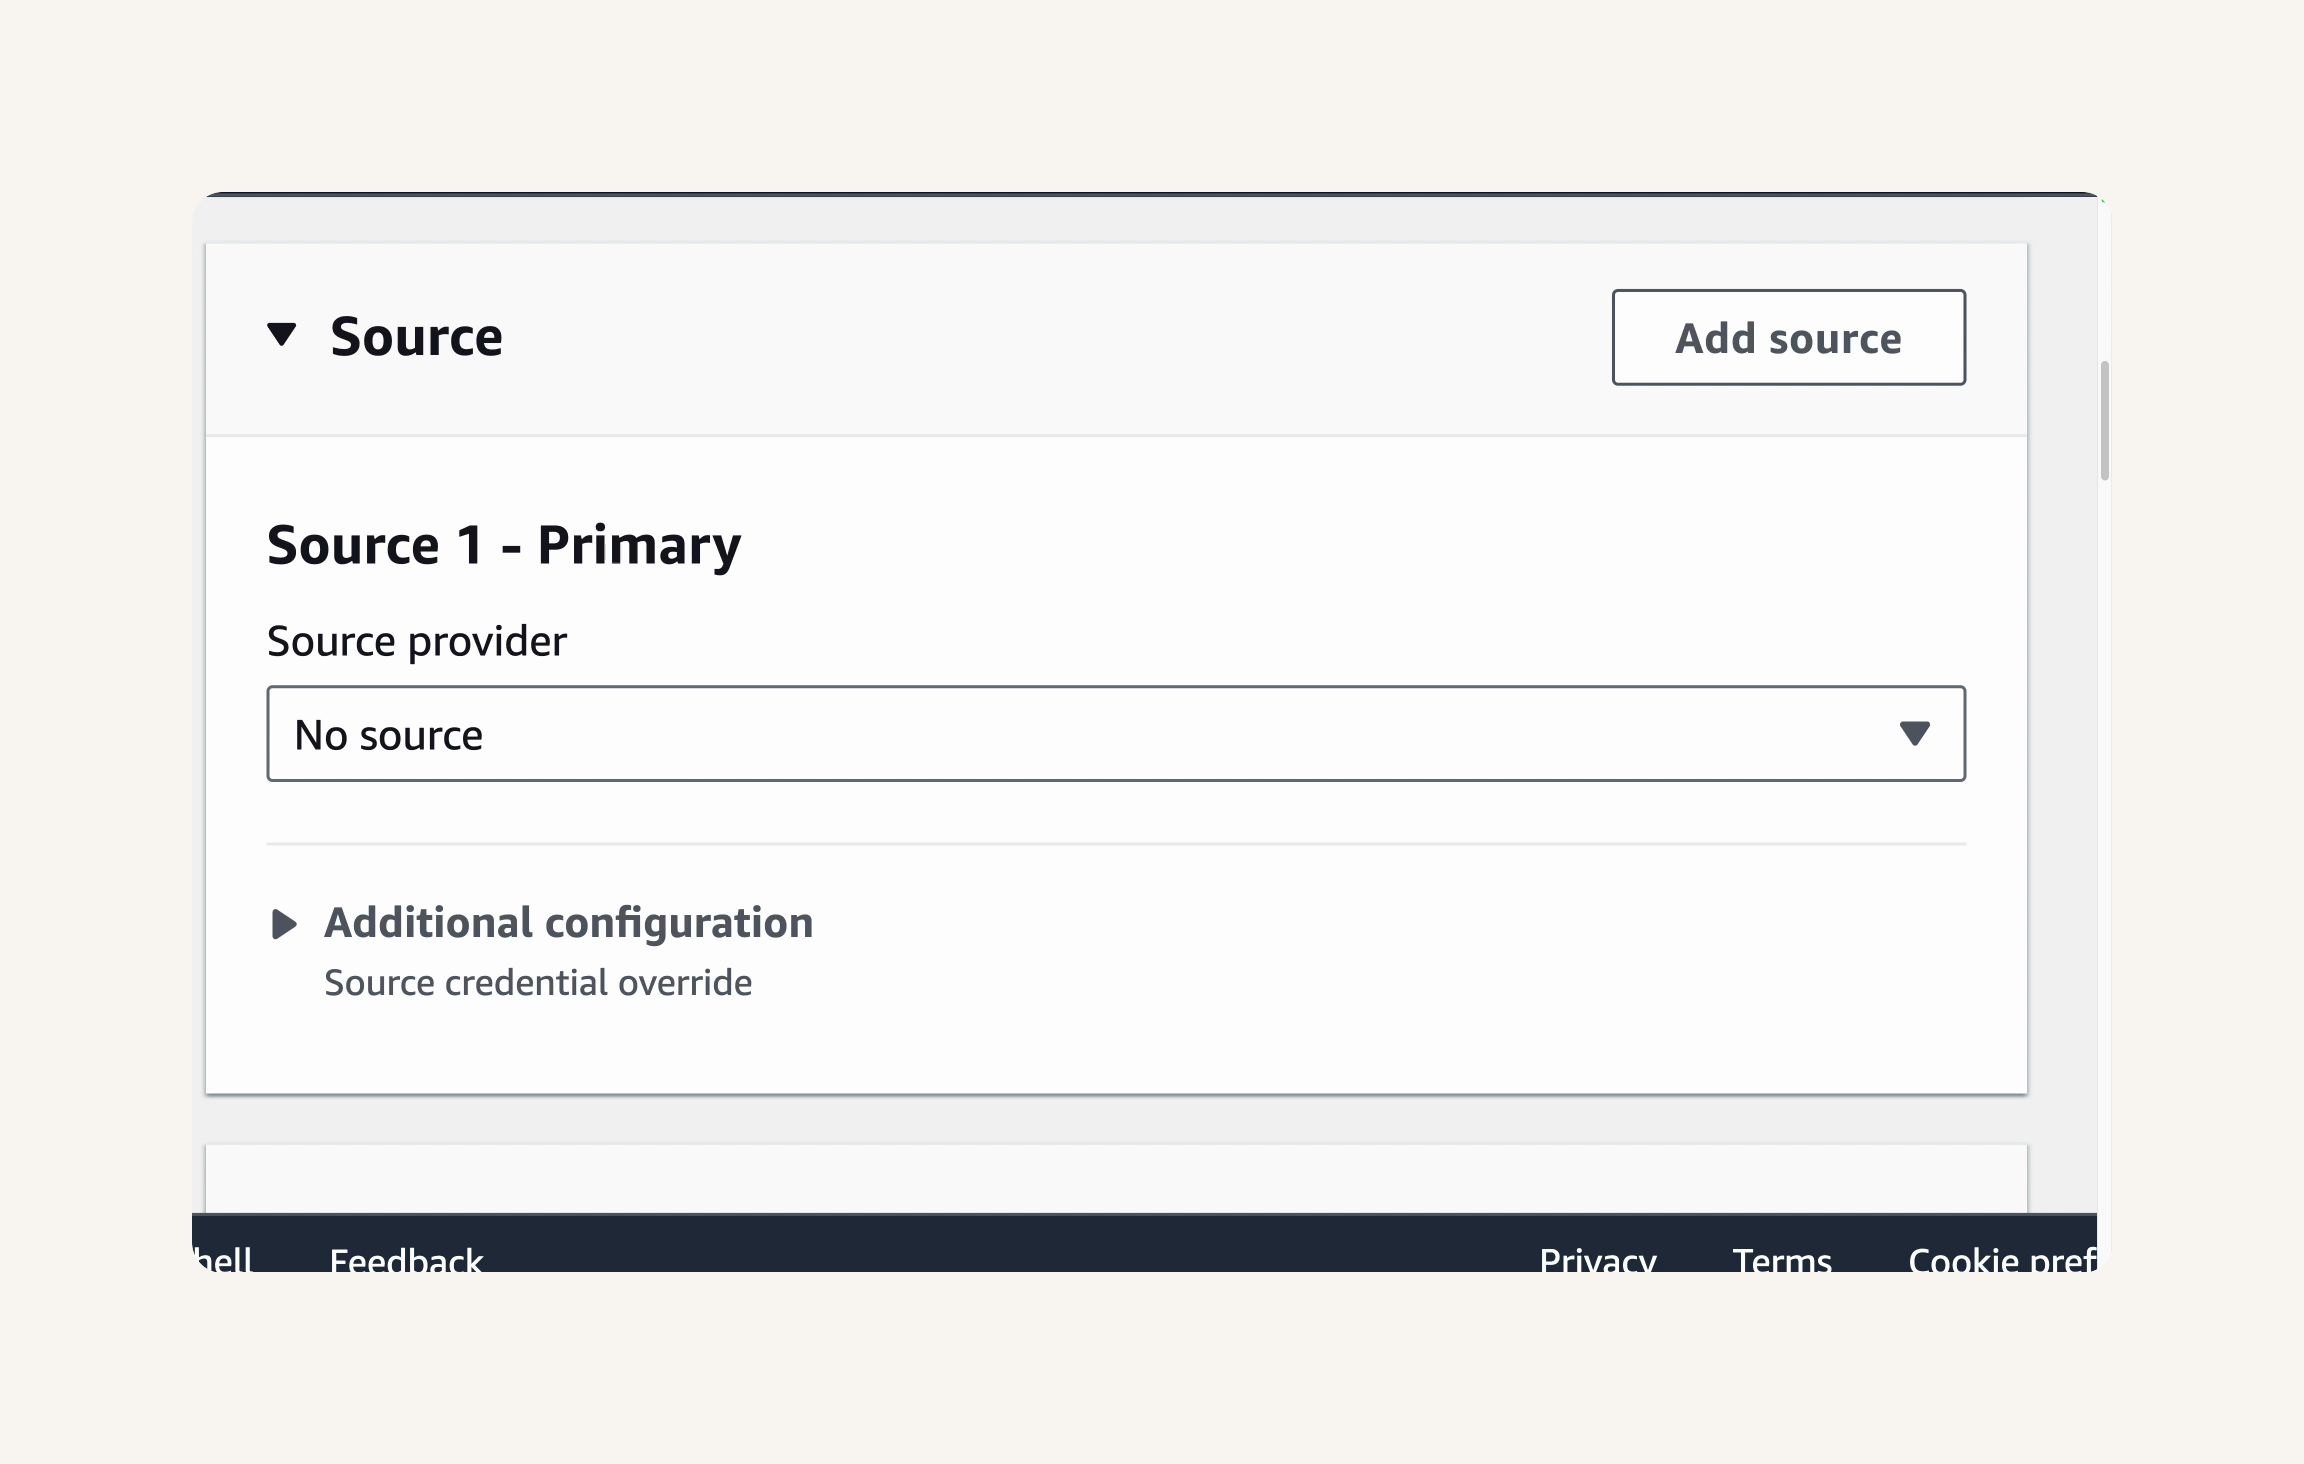
- Under Source provider, select GitHub.
💡 What does source mean?
CodeBuild doesn't know where your web app's code lives! Source means the location of the code that CodeBuild will fetch, compile, and package into a file you can deploy.We're choosing GitHub as our source provider because that's where we've stored our web app's code. By connecting CodeBuild directly to GitHub, we're creating a seamless pipeline where code changes automatically flow into our build process.
CodeBuild plays well with lots of different code repositories - AWS CodeCommit, Bitbucket, GitHub, and even plain S3 buckets. This flexibility lets you keep using whichever code storage system your team prefers while still getting all the benefits of AWS's build capabilities.

Awesome! You're doing great. Next, let's connect CodeBuild to your GitHub repository so it can access your code.
To allow CodeBuild to access your private GitHub repository, we need to establish a connection using AWS CodeConnections.
In this step, you are going to:
- Set up a connection between your AWS account and GitHub using AWS CodeConnections.

Let's get started! Connecting to GitHub is crucial for CodeBuild to access your project's code.
-
In the Source section, under Credential, you might see the message
You have not connected to GitHub. Manage account credentials. -
Click on Manage account credentials.
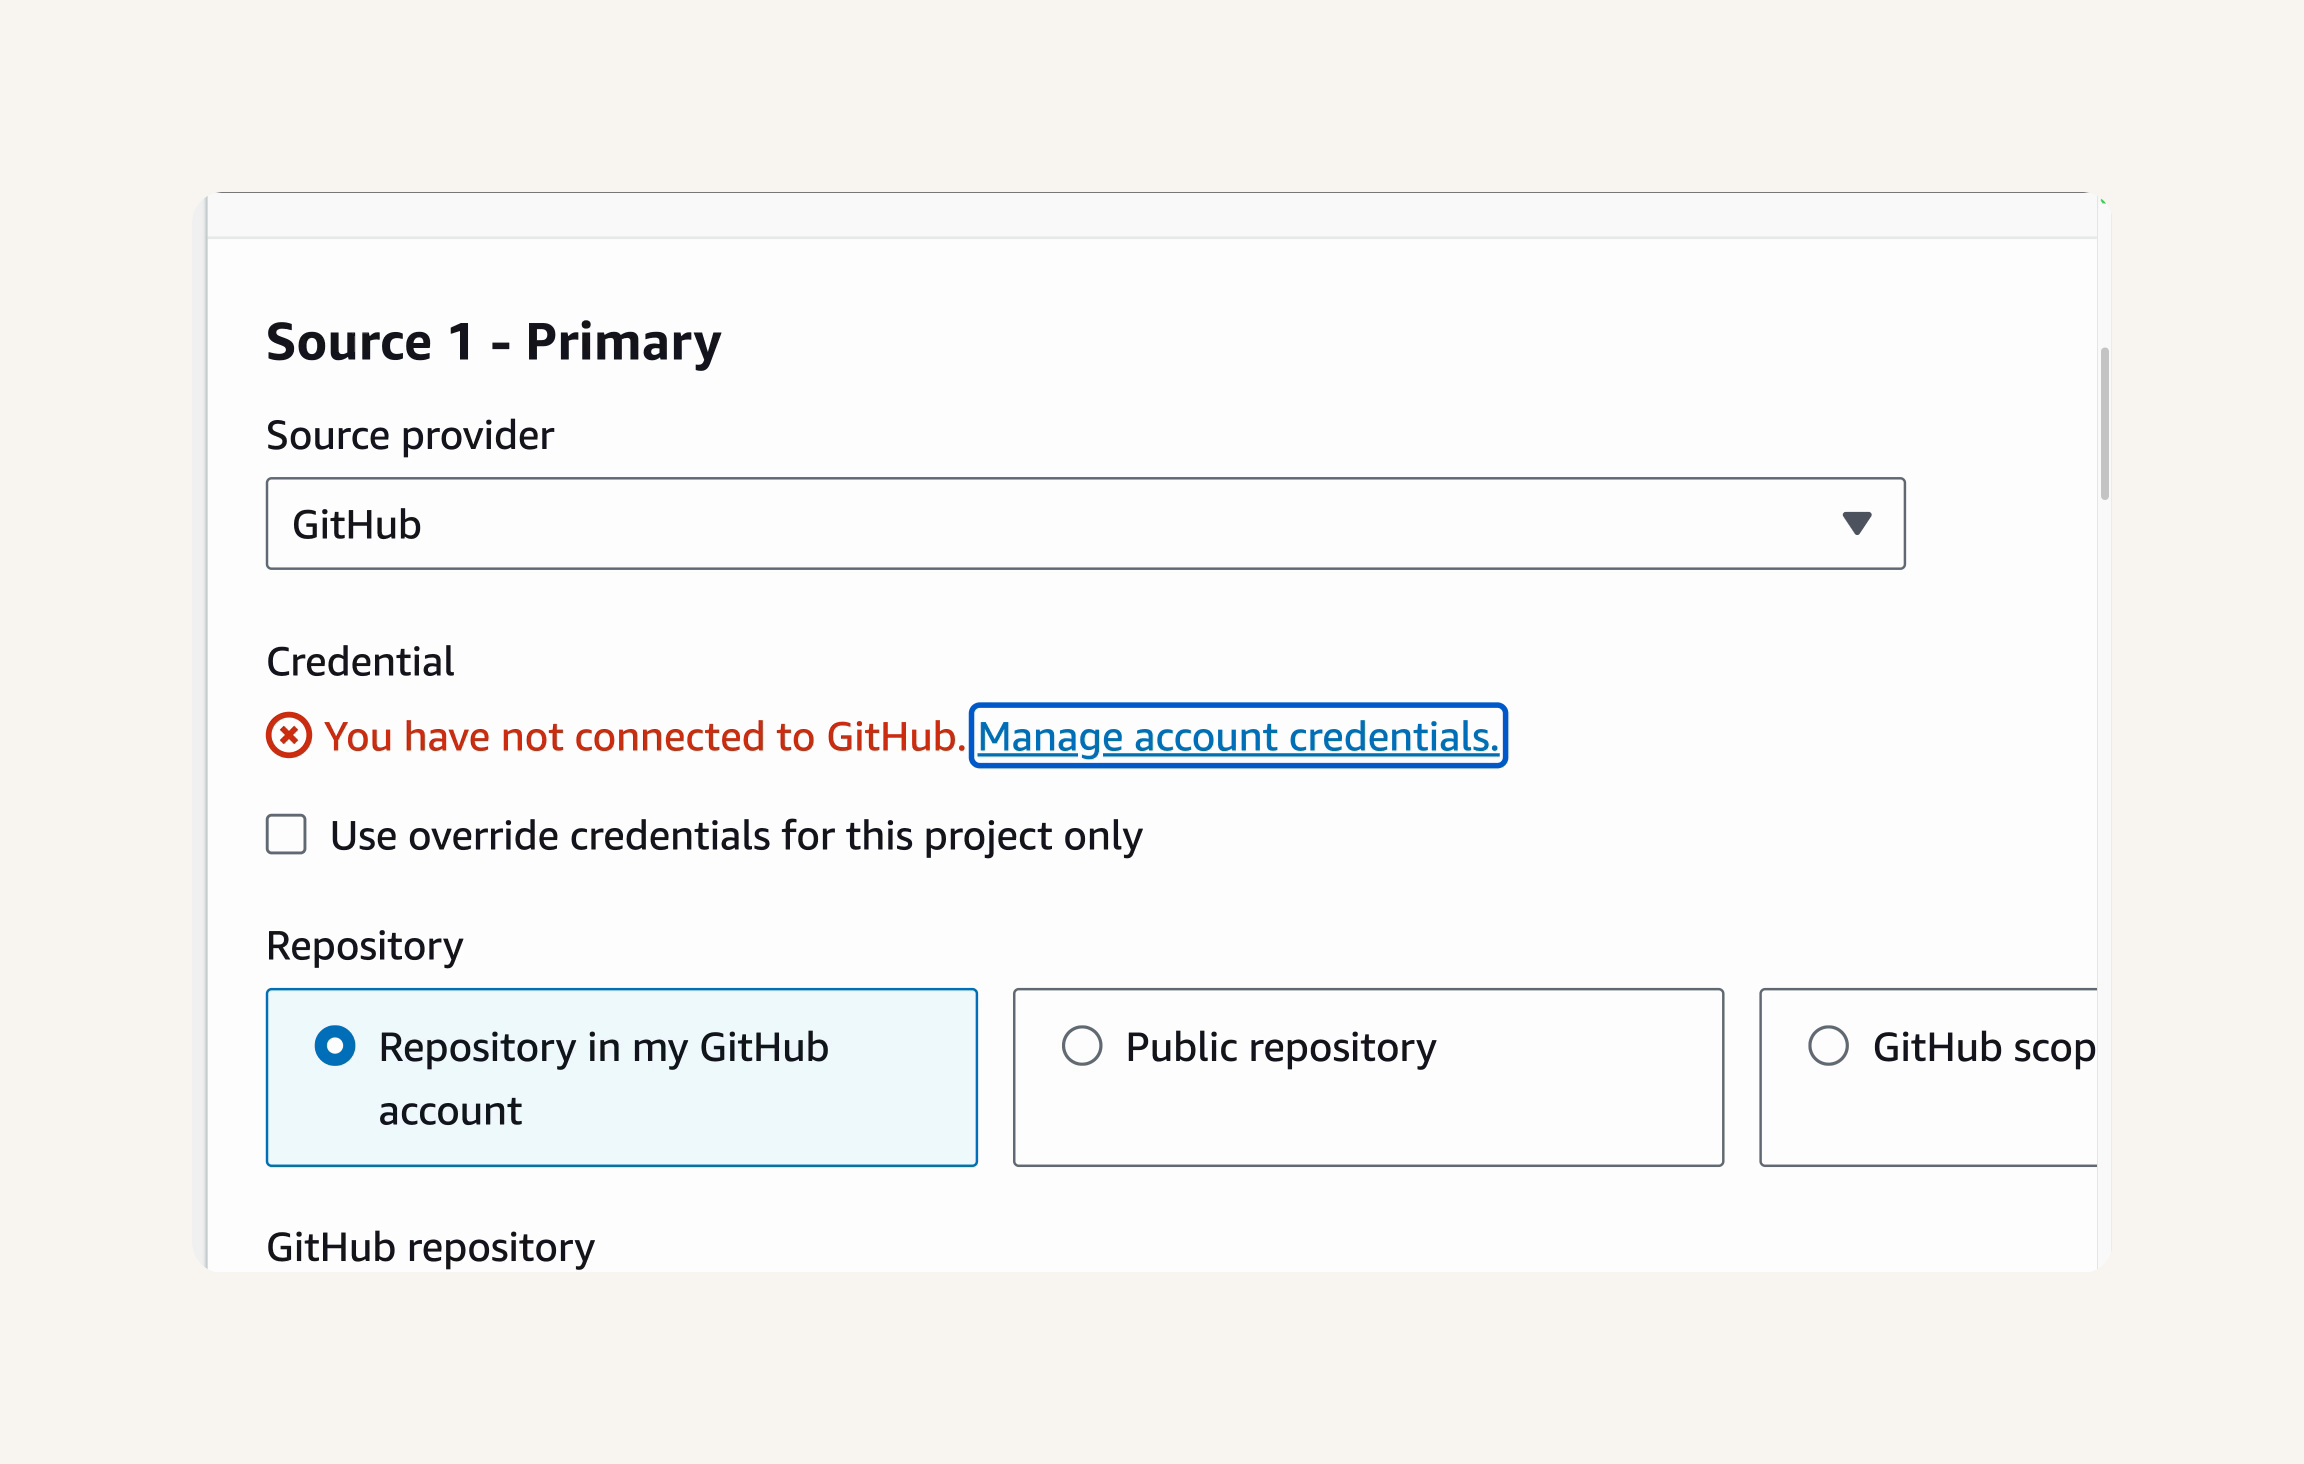
- You will be taken to the Manage default source credential page.
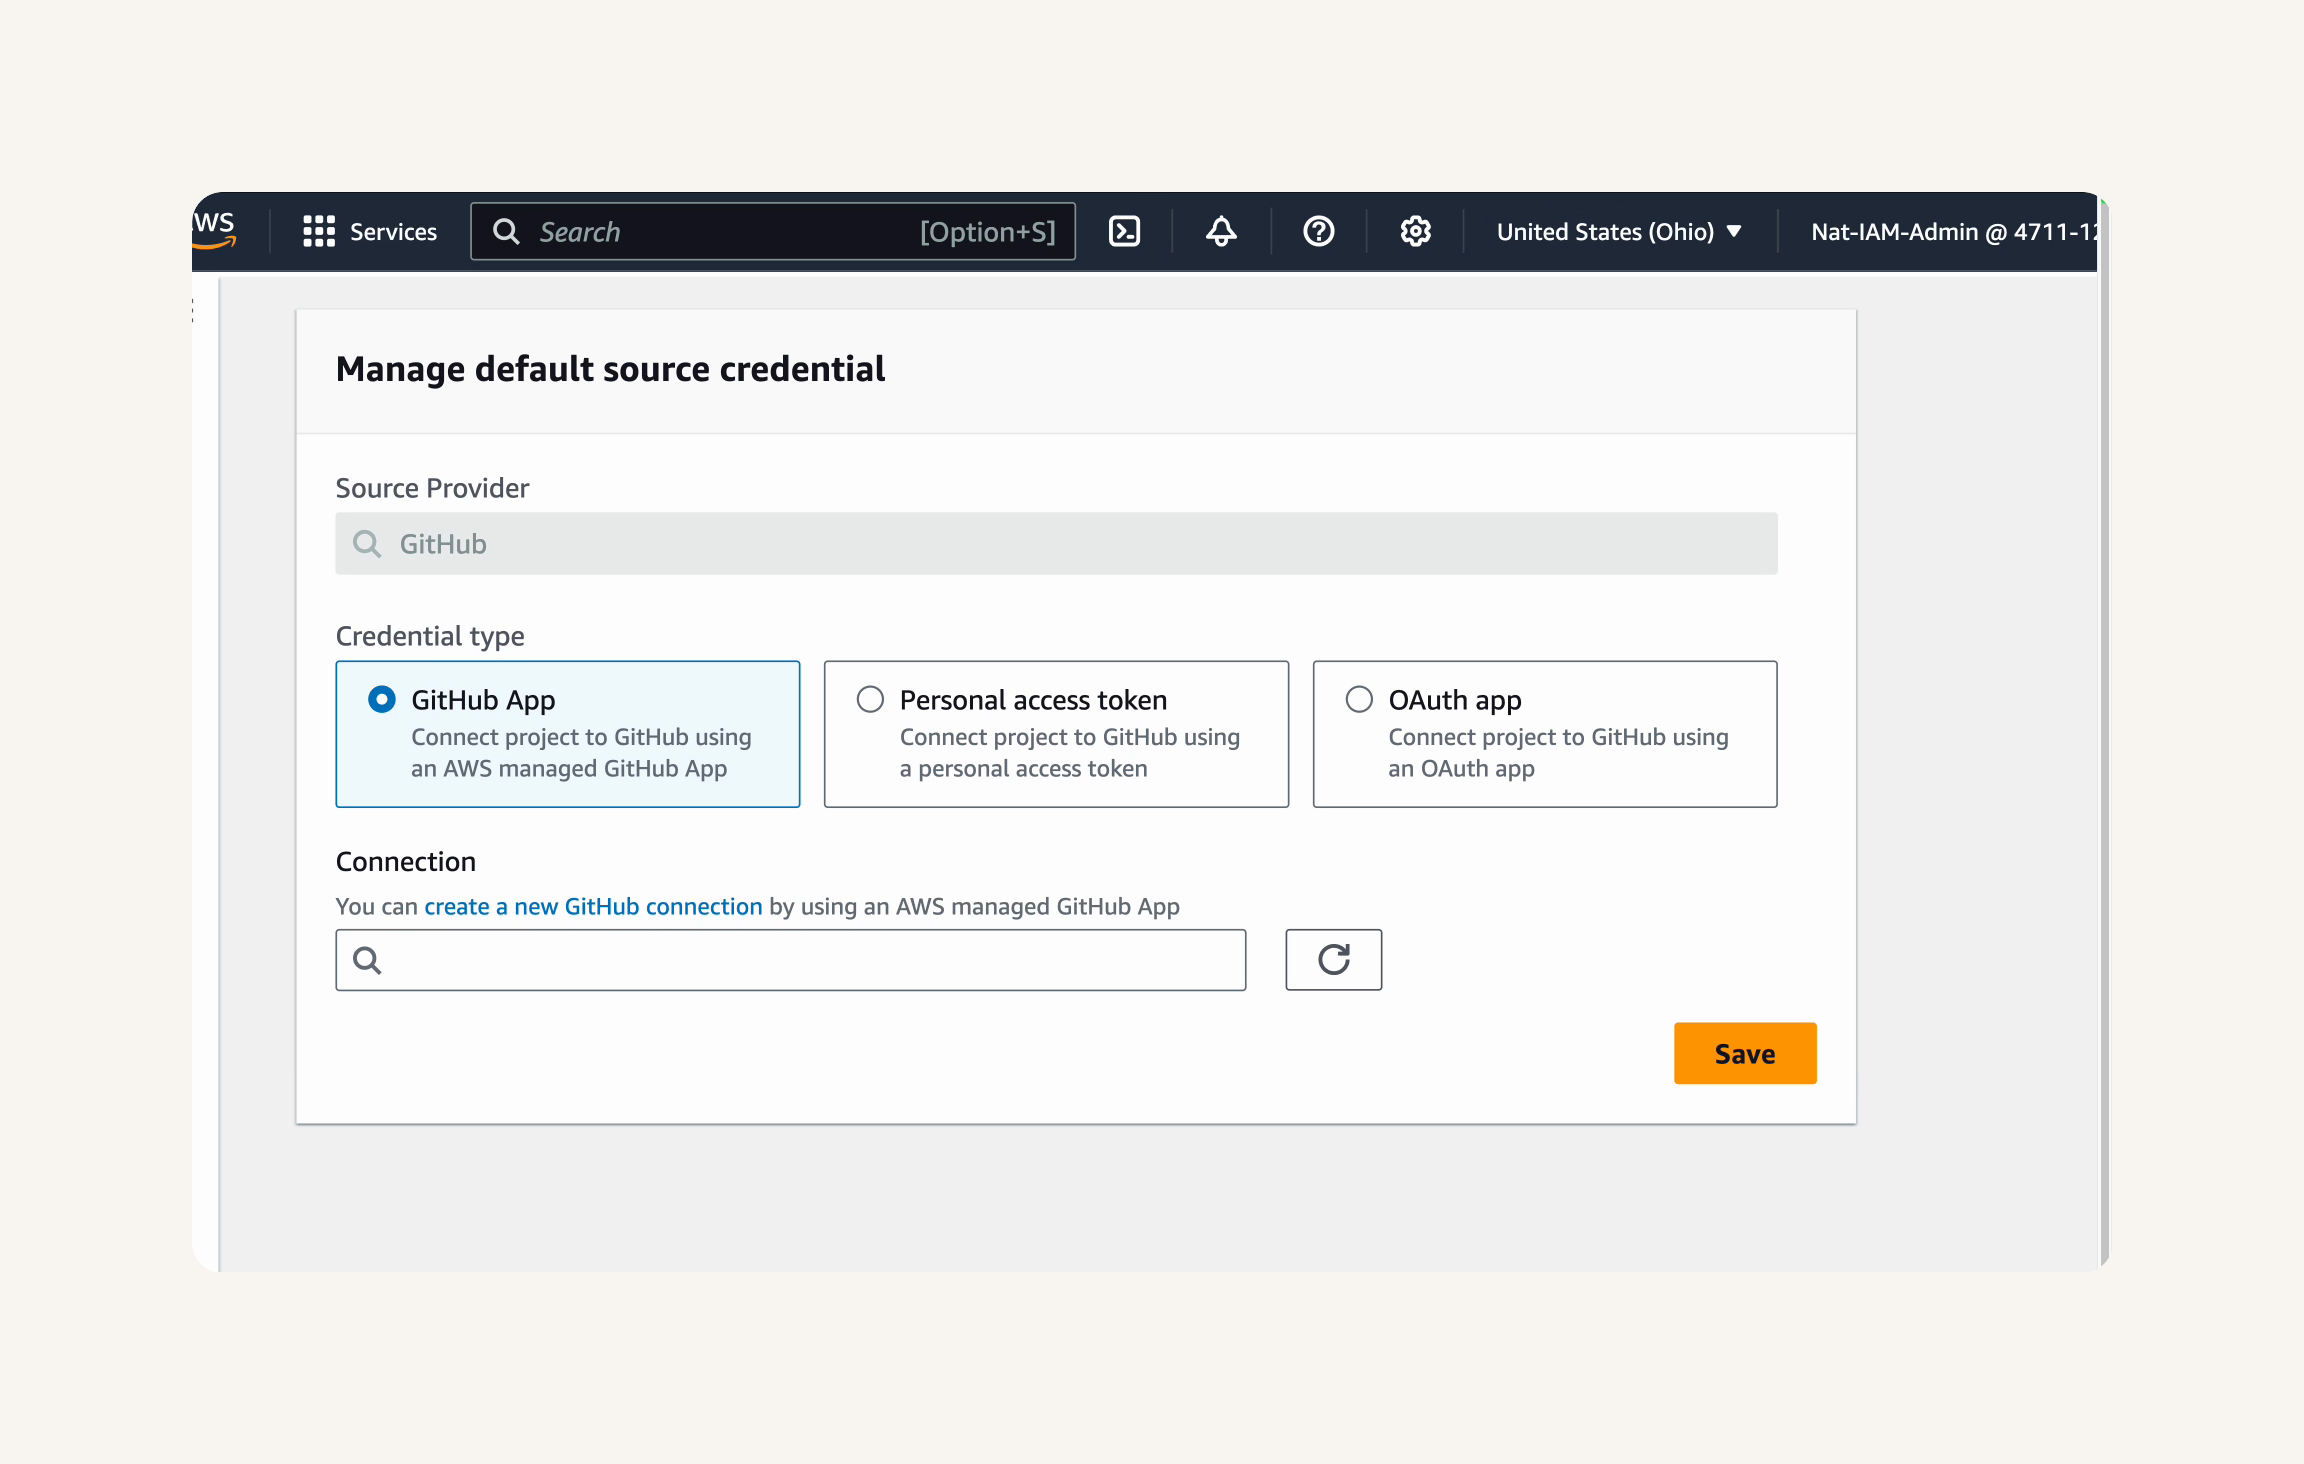
- Ensure GitHub App is selected for Credential type.
💡 What are the Credential types for GitHub?
When connecting to GitHub, CodeConnections gives you a few different options, each with their own trade-offs:
GitHub App: This is generally the simplest and most secure option. AWS manages the application and connection, reducing the need for you to handle tokens or keys directly. It's recommended for most use cases due to its ease of use and enhanced security.
Personal access token: This method uses a personal access token generated from your GitHub account. You might remember using this for authenticating to GitHub from the terminal. While straightforward, it requires you to manage and rotate tokens, which can be less secure and more operationally intensive.
OAuth app: This involves setting up an OAuth application in GitHub and configuring CodeConnections to use it. It provides a more granular control over permissions but is more complex to set up compared to GitHub App.
- Select create a new GitHub connection.

- On the Create connection page, under Connection details, enter
nextwork-devops-cicdas the Connection name.

- Click Connect to GitHub.

-
You will be taken to GitHub to authorize the AWS Connector for GitHub application.
-
Select your GitHub user account where your repository is located.

-
Select Select.
-
After authorization on GitHub, you'll get taken back to the AWS console.

- Under GitHub Apps, you'll see that your GitHub username is an option now!

- Select your GitHub username.

- Click Connect.

💡 Why these steps to connect to GitHub?
You might be wondering why there are so many steps just to connect to GitHub. The multi-step process ensures that AWS can securely access your repositories without needing your GitHub password or storing sensitive credentials. This method is much more secure than manually managing tokens that need to be rotated regularly.
Awesome! You've successfully connected to GitHub. It might seem like a few steps, but this process securely links your AWS account to your GitHub account using the AWS Connector for GitHub.
-
You should get redirected back to CodeBuild's Manage default source credential page after successful connection.
-
On the Manage default source credential page, you should see your newly created connection listed.
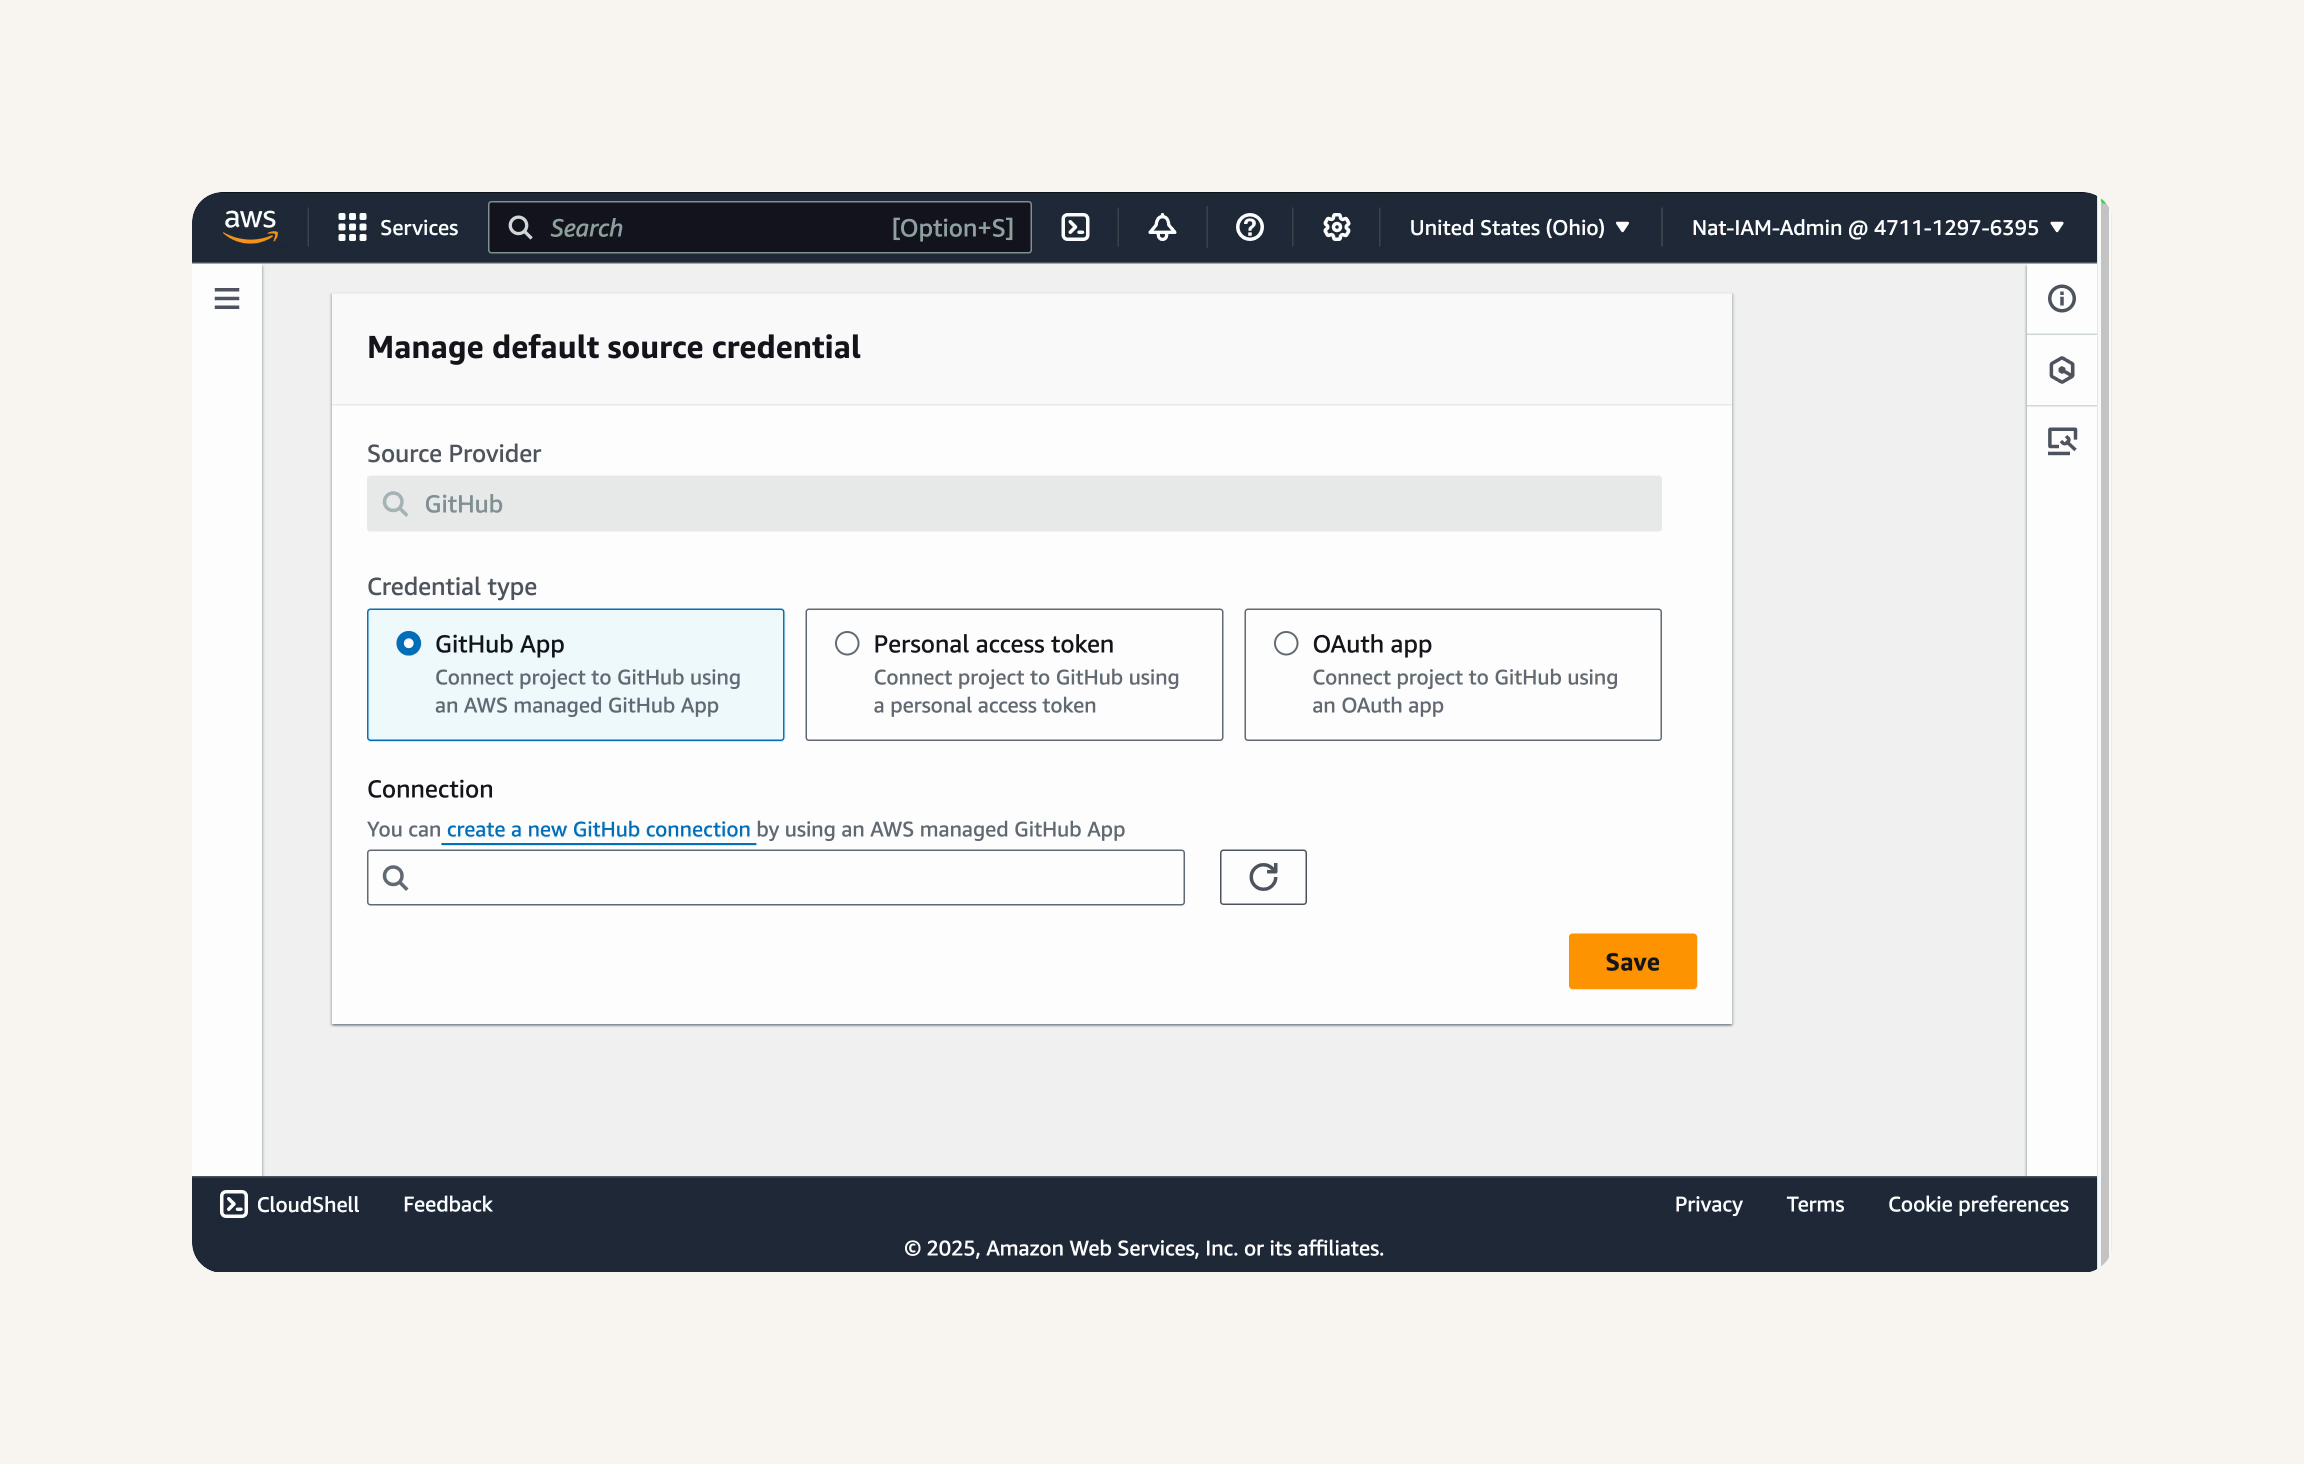
- Click Save at the bottom of the page.

💡 Why save default source credential?
By saving the GitHub App connection as the default credential, you make it easier to reuse this connection for future CodeBuild projects. This avoids the need to repeat the connection setup process each time you create a new project that uses the same GitHub account.
- Now, back in the Create build project page, in the Source section, you should see a success message in green: "Your account is successfully connected by using an AWS managed GitHub App."
🙋♀️ Still seeing "You have not connected to GitHub"?
This happens sometimes! If you still see this error, it might be due to a temporary issue or browser cache.Here's how to fix it:
Try refreshing the page completely
Carefully repeat the steps to create a GitHub App connection
Make sure you authorize the AWS Connector for GitHub in your GitHub account when prompted
If needed, clear your browser cache or try using a different browser
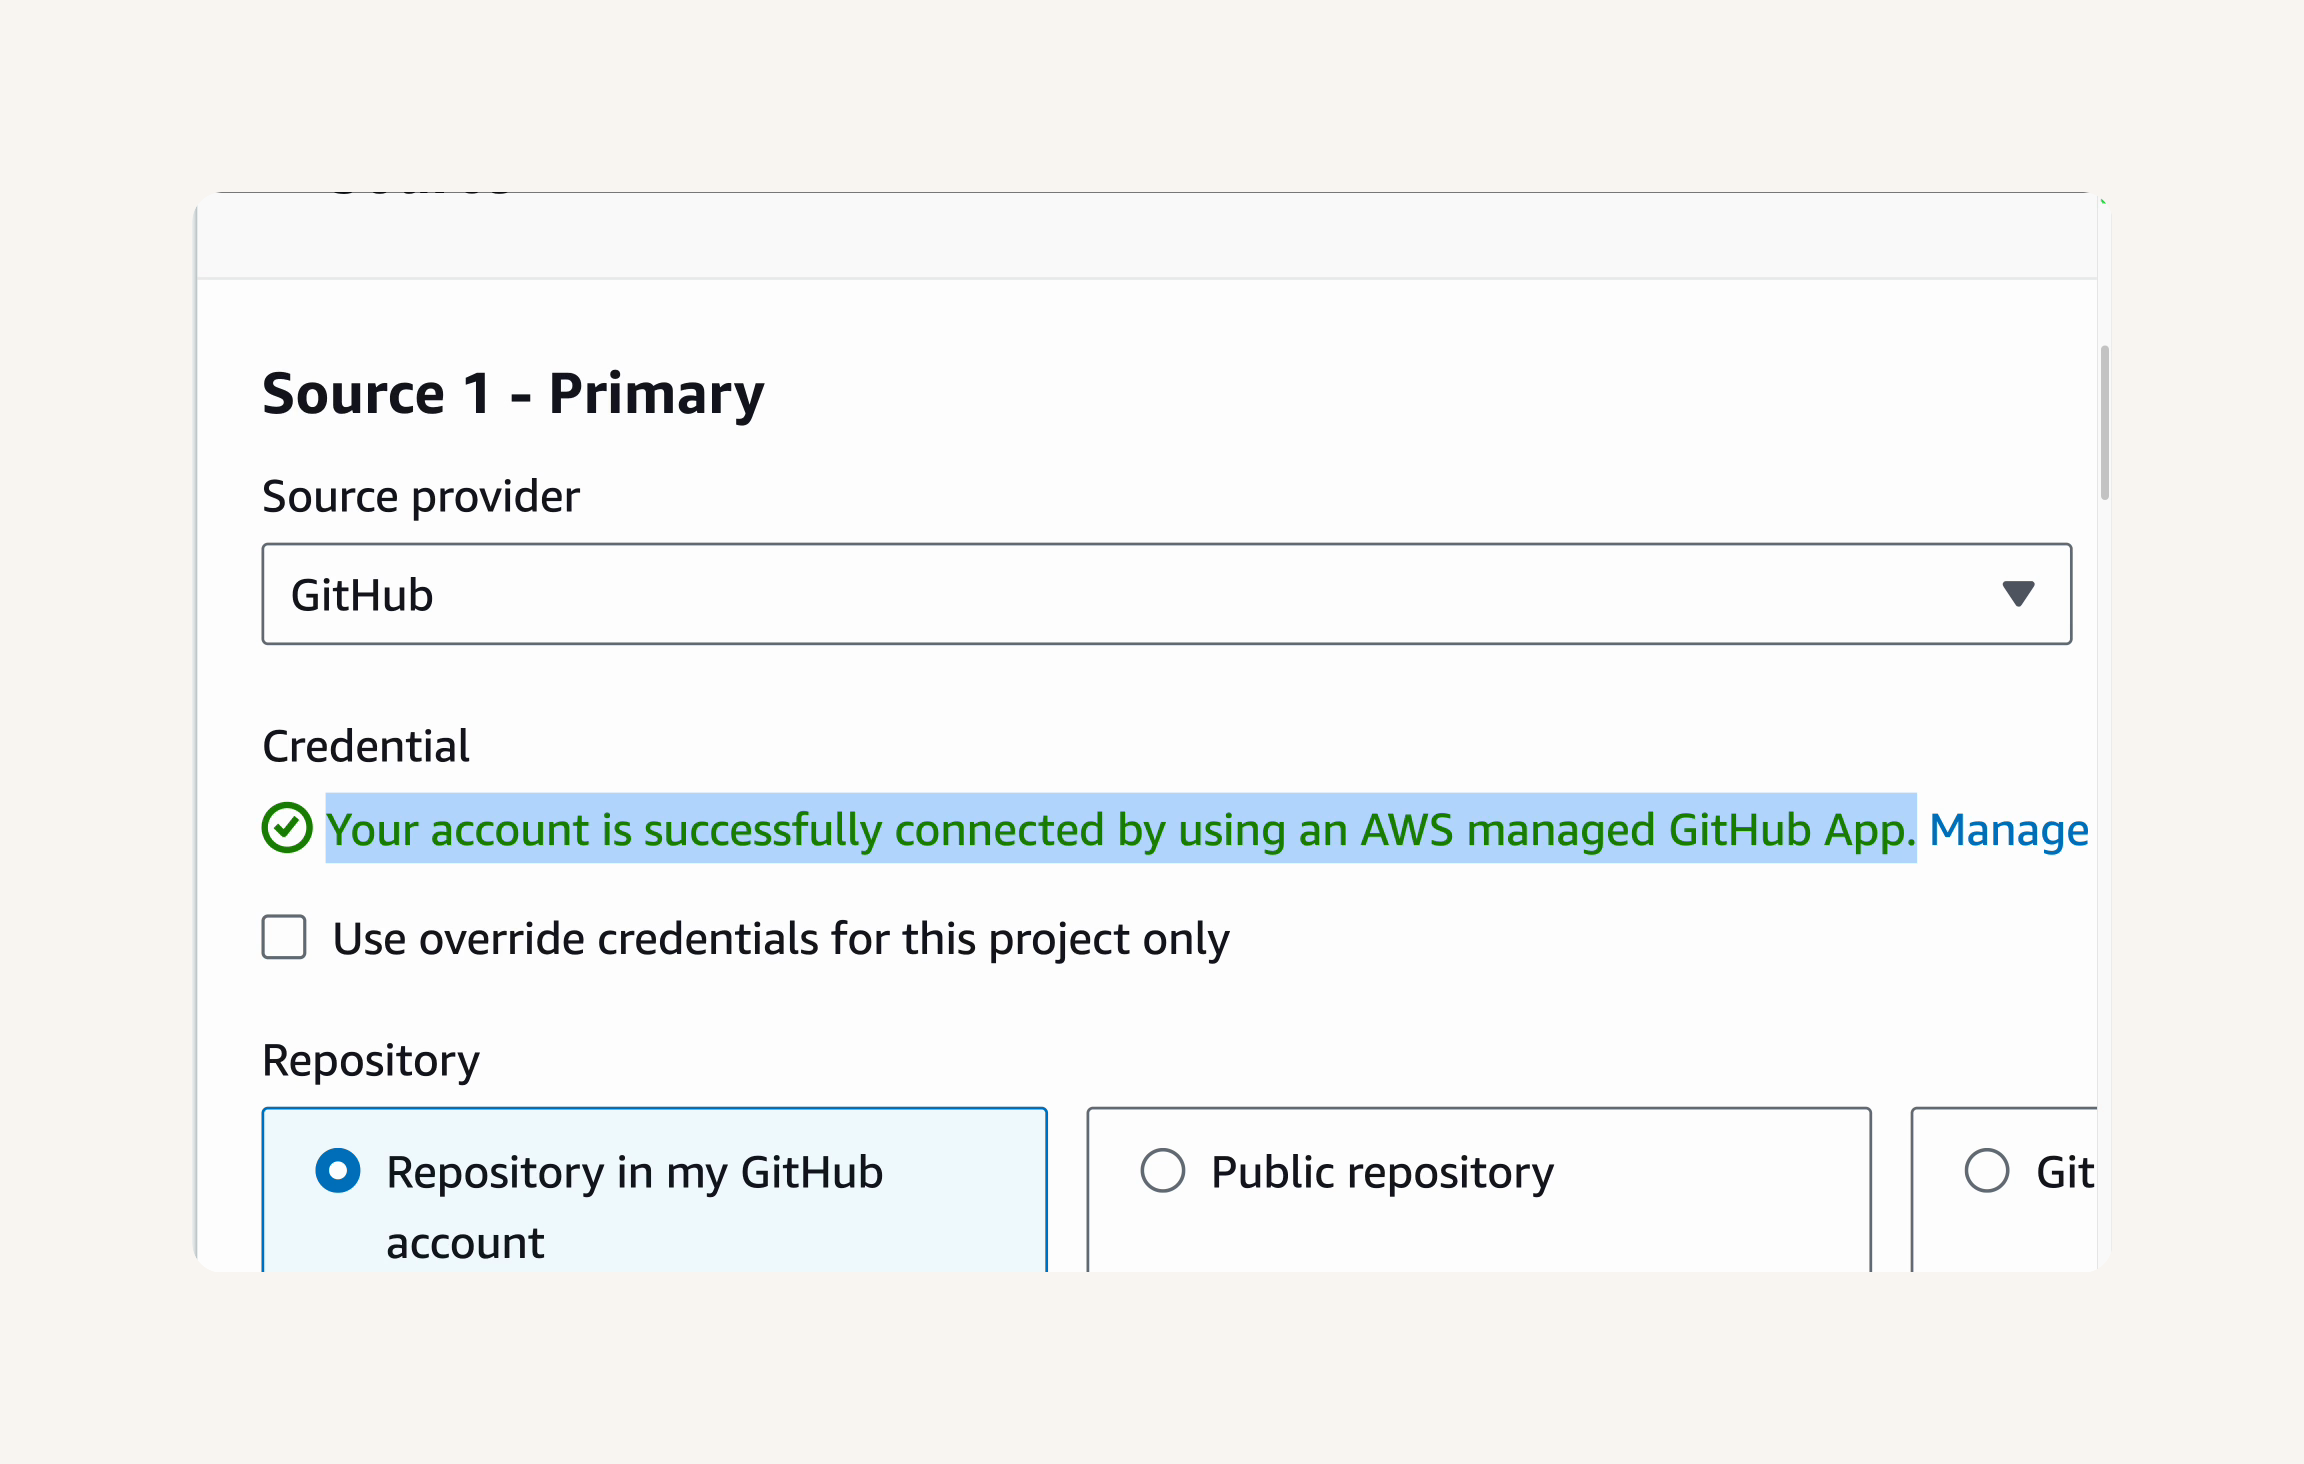
Well done! So... which service do you think connected 🤝 your AWS environment to GitHub? 🤝
When we were taken to different pages to connect to GitHub, that was CodeBuild passing us to another Code service (called AWS CodeConnections) behind the scenes!
💡 What is AWS CodeConnections?
AWS CodeConnections is like a secure bridge between AWS and your external code repositories. Instead of dealing with the headache of managing API keys, tokens (like GitHub's Personal Access Tokens!), or SSH credentials, CodeConnections handles all that authentication complexity for you - so you can focus on building your application.If you'd like, you can open the left hand navigation menu, expand Settings at the bottom of the list, and open the Connections page. You can manage all connections you set up with CodeConnections there!

Let's get itttttt! Just like that, you've connected CodeBuild to your GitHub repository. You're making excellent progress. Let's get back to setting up CodeBuild.
- You can now select your GitHub repository
nextwork-web-projectas the source.

Next, we need to define the environment where our builds will run. This includes the operating system, runtime, and compute resources.
In this step, you are going to:
-
Configure CodeBuild's environment settings.
-
Configure Amazon S3 to store build artifacts.
-
Enable CloudWatch logs for monitoring build processes.
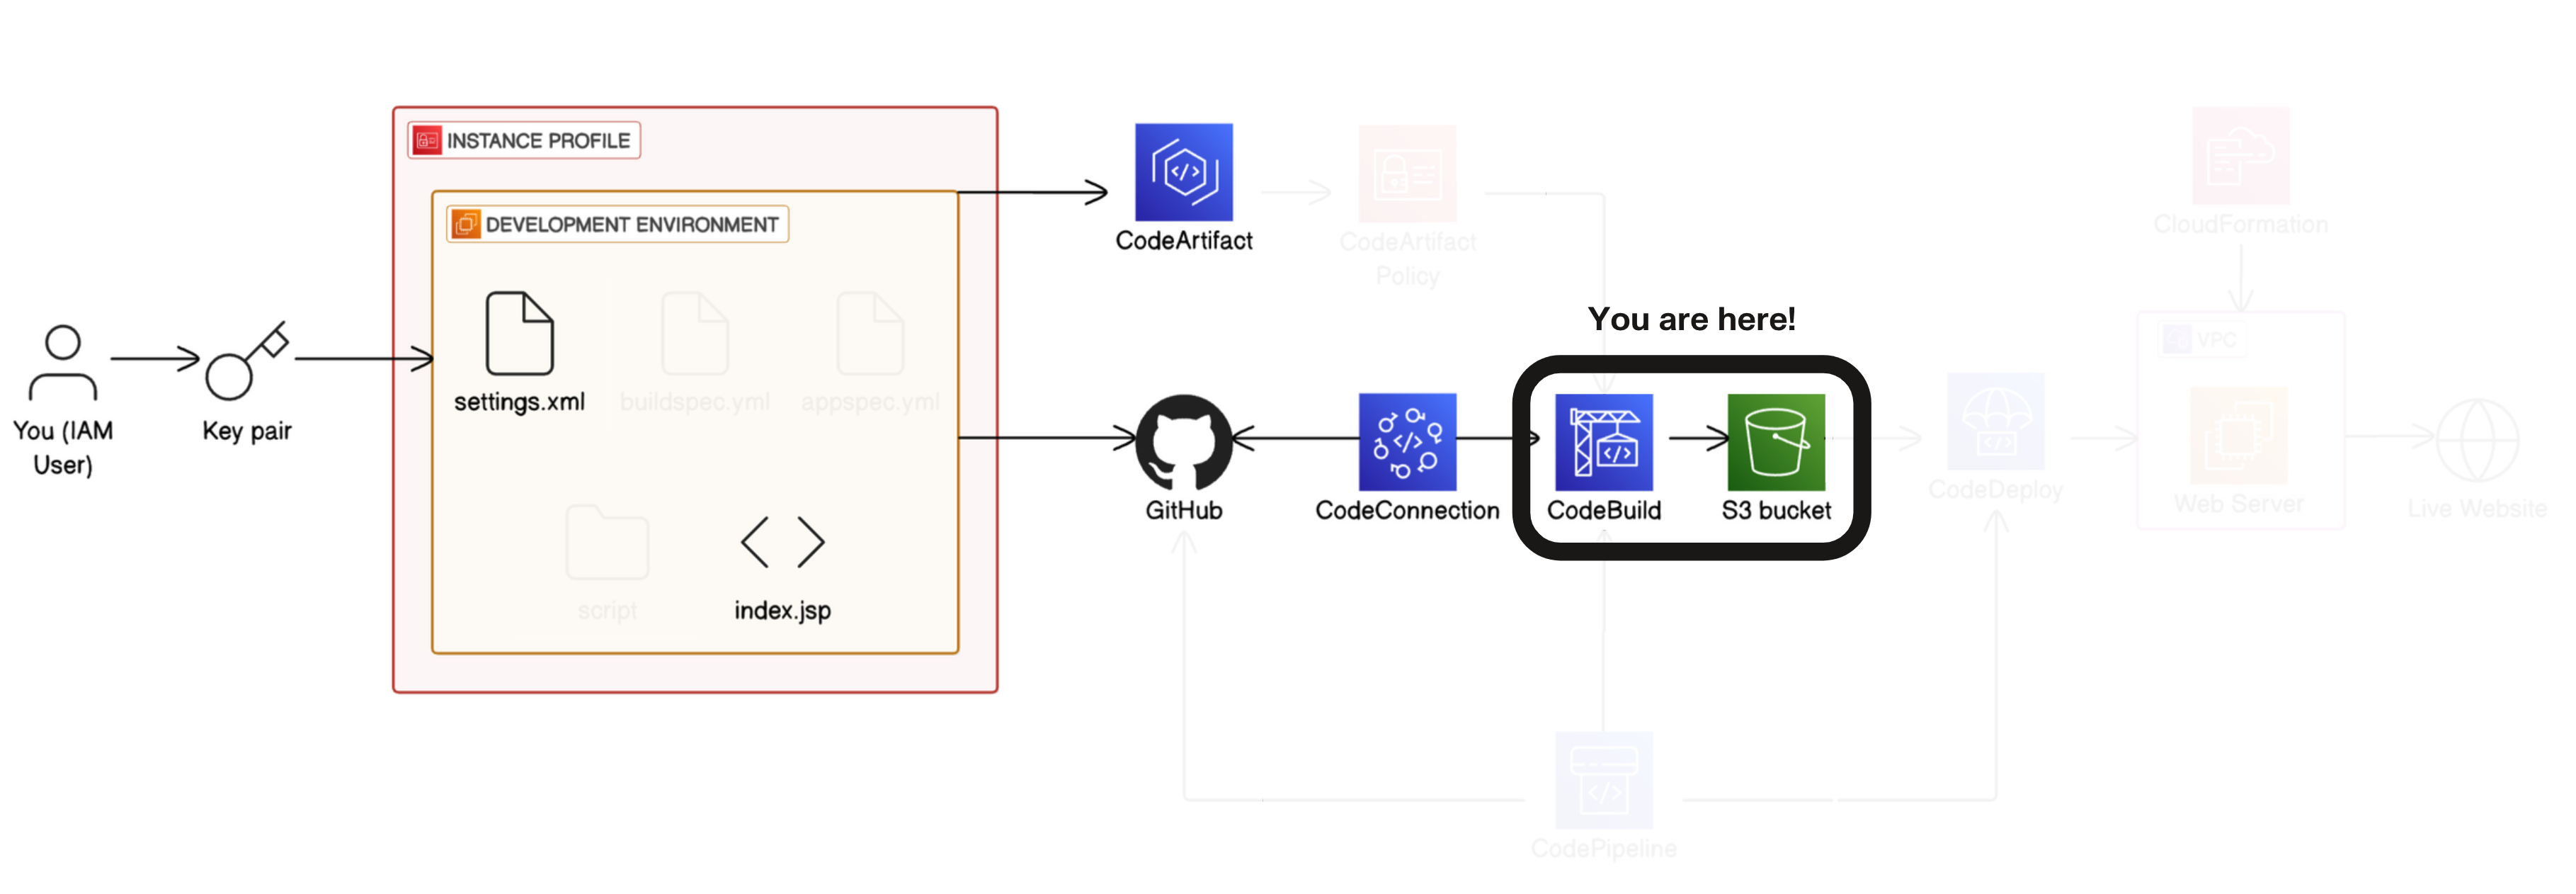
Ready to configure your build environment? Let's dive in!
-
Scroll down to the Primary source webhook events section.
-
Untick the Webhook checkbox that says "Rebuild every time a code change is pushed to this repository."* Scroll down to the Environment section.
-
Under Compute, for Provisioning model, choose On-demand.
💡 Why did we pick on-demand?
Provisioning model determines how AWS will set up and manage everything needed for your build. Choosing On-demand means AWS will create the resources you need for your build only when you start it, and tear them down when the build is done. This is cost-effective and efficient!
- Reserved capacity gives you dedicated build resources always at your disposal. It costs more overall but gives you consistent performance and no wait times. Great for teams that are building constantly throughout the day. If on-demand is like ordering a taxi, reserved capacity is like renting your own car that you can access anytime you need it.
- For Environment image, choose Managed image.
💡 Why did we pick managed image?
Environment image is like a template for your build environment (just like how AMI's are templates for your EC2 instances). In more technical terms, environment images are pre-configured versions of the build environment so you won't need to install all the software/tools/settings required to build a project. We choose Managed image here, which means we're using a template that AWS has already created for us. The next few settings we pick underneath this will then tell CodeBuild what kind of image we're looking for.Custom image lets you bring your own Docker image with exactly the tools and configurations your project needs. It's like designing your own custom workspace from scratch - more work to set up, but perfectly tailored to your specific requirements.
- For Compute type, choose EC2.
💡 Why did we pick EC2?
Compute sets up the servers that will actually run the commands and do the work for your project's build! Your project's build will run on Amazon EC2 instances, which are more flexible and powerful than AWS Lambda functions.Note: Lambda is optimized for speed and faster startup times. Our web app is fairly simple and doesn't require a lot of resources, but it's also built in Java Corretto 8, which is a language that's not supported by Lambda.

-
Under Environment, for Operating system, select Amazon Linux.
-
For Runtime(s), select Standard.
-
For Image, choose
aws/codebuild/amazonlinux-x86_64-standard:corretto8.

- Keep Image version as Always use the latest image for this runtime version.
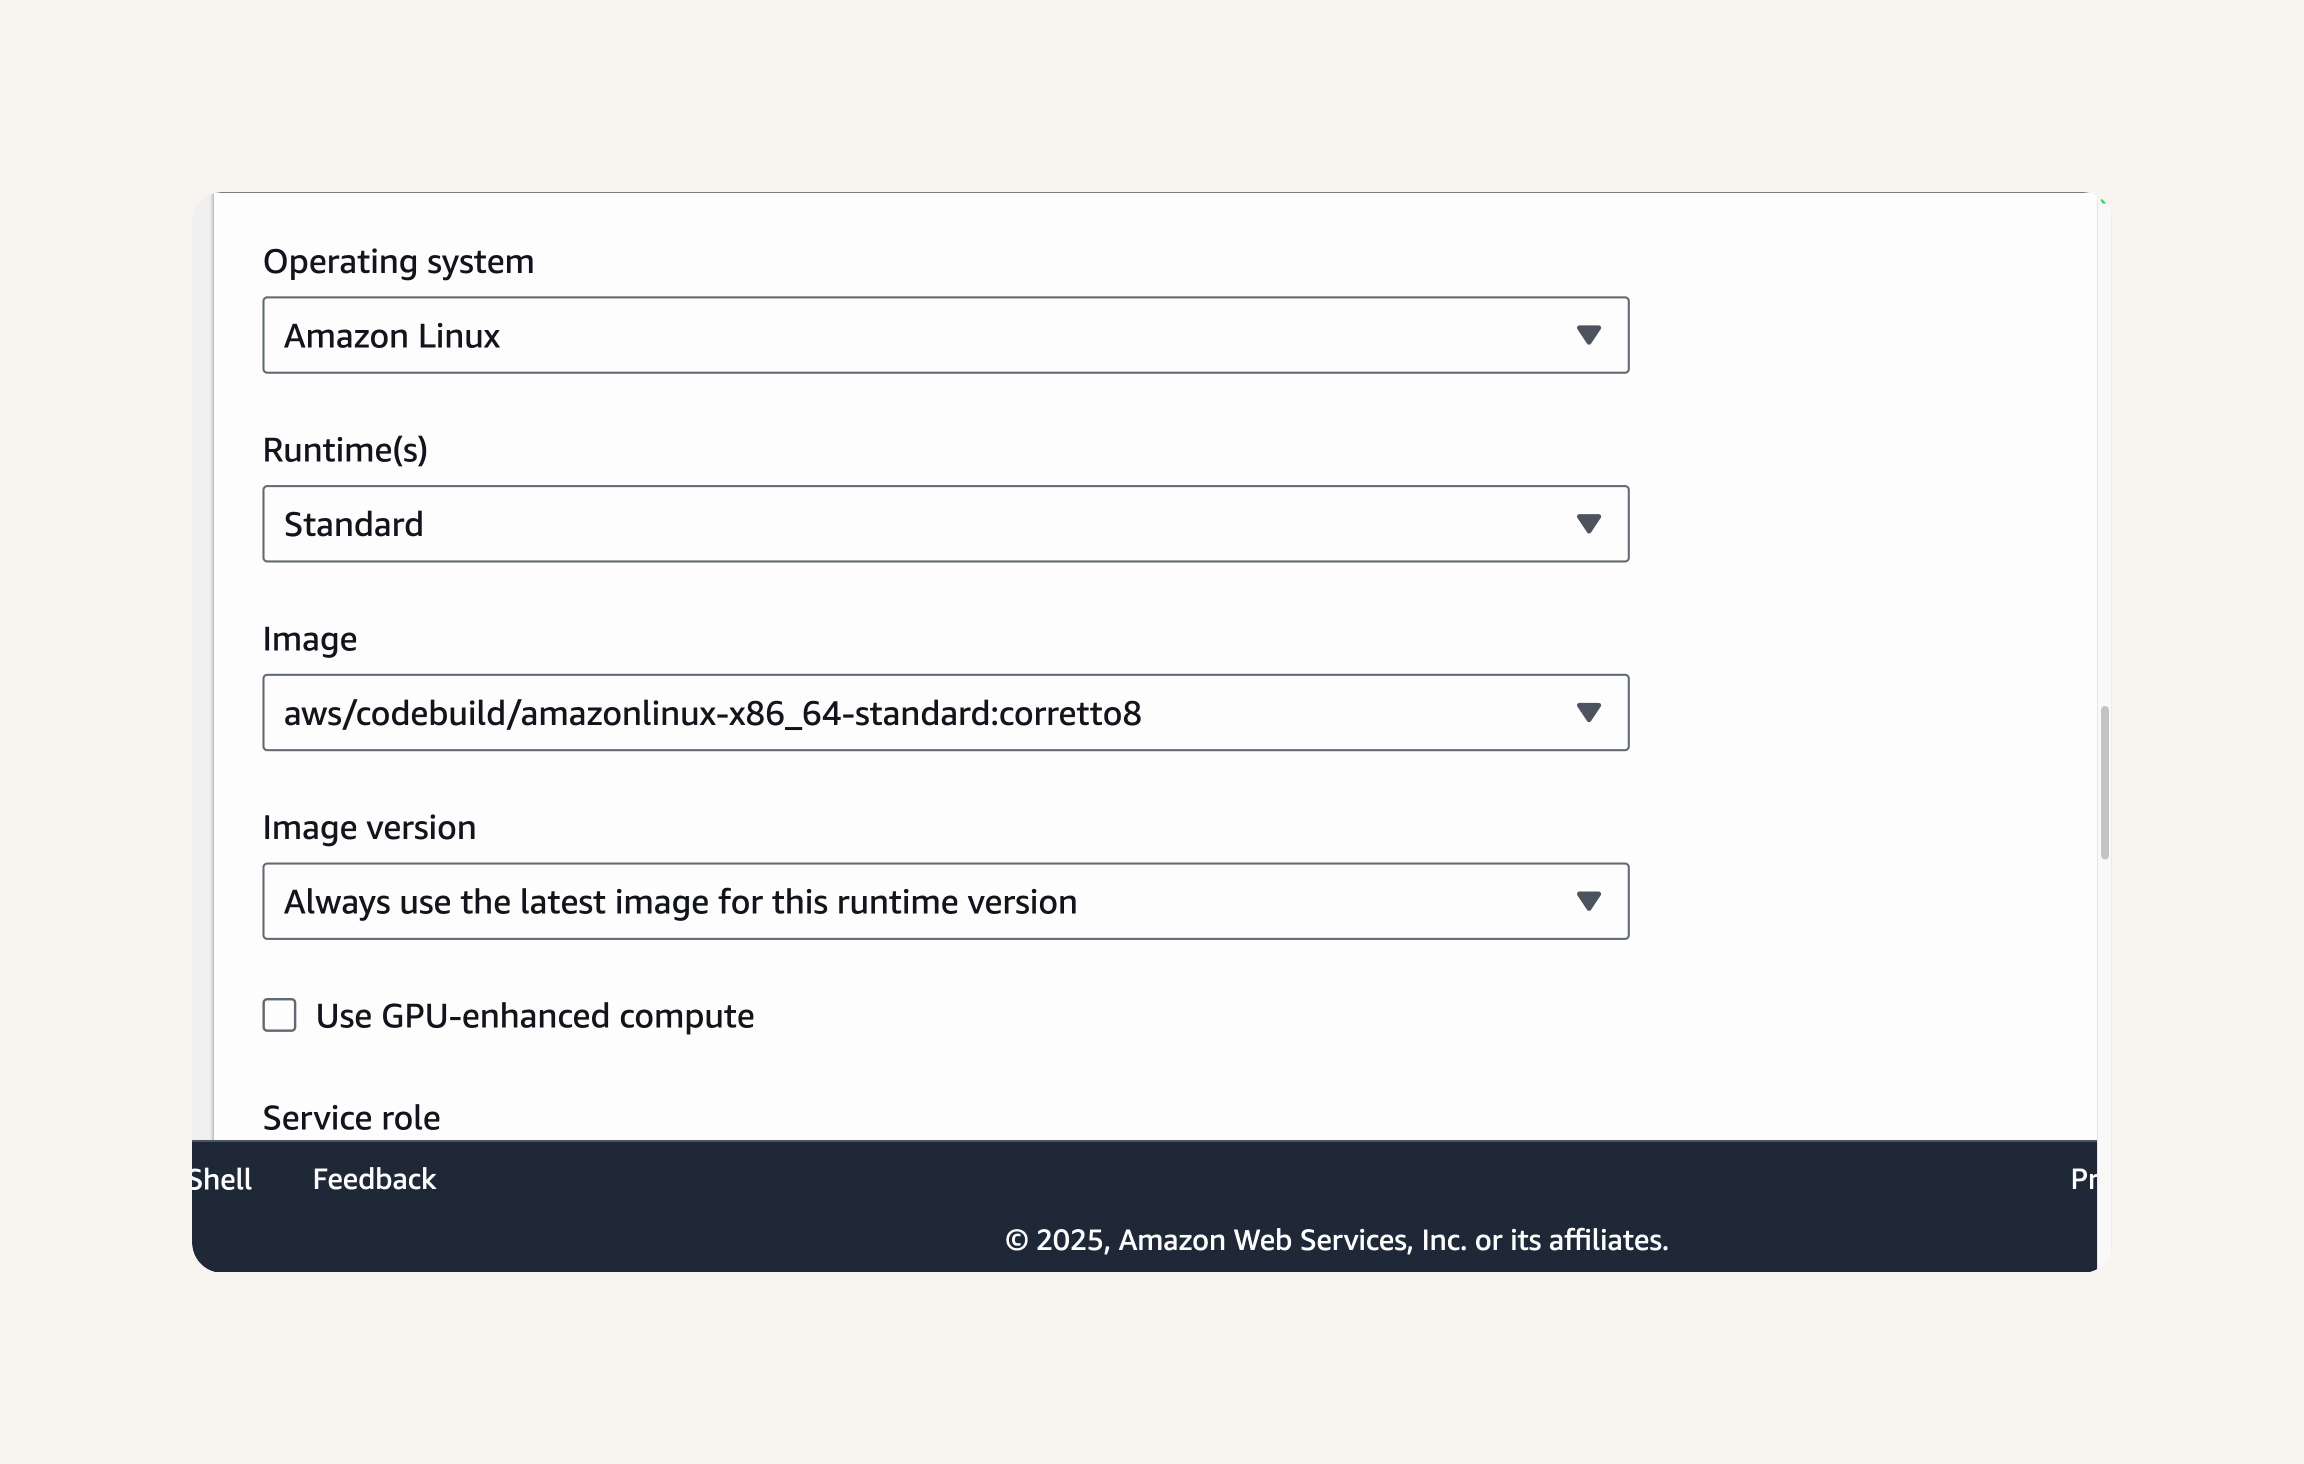
- Under Service role, select New service role.
Excellent! You've configured the build environment. Check that you've configured the environment settings as described, choosing Amazon Linux, Standard runtime, Corretto 8 image, and a new service role.
Now, let's define how CodeBuild will actually build your application using a buildspec.yml file.
-
Scroll down to the Buildspec section.
-
Under Buildspec format, select Use a buildspec file.

- Leave Buildspec name as default
buildspec.yml.

💡 What is buildspec.yml?
Thebuildspec.ymlfile is like a detailed instruction manual for CodeBuild. Placed in the root of your repository, it tells CodeBuild exactly what to do at each stage of the build process - what tools to install, what commands to run, and what files to package up when it's done.CodeBuild automatically looks for a file named
buildspec.ymlin the root directory of your source code. If it finds one, it uses it to execute the build. If not, the build will fail (as we'll see later) 👀
- Scroll down to the Batch configuration section.

💡 What is Batch configuration?
Batch configuration lets you run multiple builds at once as part of a single batch job. It's like being able to cook several dishes simultaneously instead of one after another.This becomes super useful when you need to test your code across different environments (like various operating systems or browser configurations) or when you want to parallelize parts of your build process to save time. While we won't use it in this project, it's a powerful feature for more complex workflows.
- Scroll down to the Artifacts section. We need to configure where CodeBuild will store the build artifacts.
💡 What are build artifacts?
Build artifacts are the tangible outputs of your build process. They're what you'll actually deploy to your servers or distribute to users. That's why storing them properly in S3 is so important - they're the whole reason we're running the build in the first place.For our project, we want our build process to create one build artifact that packages up everything a server could need to host our web app in one neat bundle. This bundle is called a WAR file (which stands for Web Application Archive, or Web Application Resource) and it works just like a zip file - a server will simply "unzip" your WAR file to find a bunch of files and resources (which are also build artifacts, i.e. a WAR file is a build artifact that bundles up other build artifacts) and host your web app straight away. Notice how you haven't been able to view your web app on a web browser so far in this project series - that's because we haven't created and deployed the WAR file yet!
Note: our build process will create a .war file (a packaged Java web application) as the build artifact, but artifacts could be executables, libraries, documentation, or any output your build creates.
- For Type, select Amazon S3.
💡 Why store artifacts in Amazon S3?
Your compiled applications, libraries, or any output files from your build need a safe, accessible home after the build finishes. S3 is perfect for this - it's a highly reliable and scalable storage solution that's also in our AWS environment (which makes the artifact easily accessible for deployment later).

-
Let's head to the
S3console. In the AWS Management Console search bar, typeS3and select S3 from the dropdown menu under Services. -
Make sure you're still in the same region where you set up the CodeBuild build project.
💡 Extra for Experts: Why create S3 bucket in the same AWS region?
Creating your S3 bucket in the same region as your CodeBuild project might seem like a small detail, but it matters for three key reasons:Speed: When data doesn't have to travel across geographic regions, everything happens faster. Your build artifacts upload more quickly, and any services that need those artifacts can access them without delay.
Cost: AWS charges for data transfer between regions, but transfers within the same region are either free or much cheaper. Keeping everything in one region helps your AWS bill stay lower.
Compliance: Some industries have strict rules about where data can be stored geographically. Keeping your resources in a specific region helps you meet these requirements if they apply to your organization.

-
On the Buckets page, click Create bucket.
-
In the Create bucket page, under General configuration, for Bucket name, enter
nextwork-devops-cicd-yourname.

-
Leave all other settings as default.
-
Click Create bucket at the bottom of the page.

-
If you just created the S3 bucket, it might not show as an option in the CodeBuild project configuration.
-
Refresh the build project page in your browser - you might need to configure your build project again. Challenge yourself to re-do the setup with less guidance!
-
In your CodeBuild project, head back to the Artifacts section.
-
For Type, select Amazon S3.
-
For Bucket name, choose your newly created bucket
nextwork-devops-cicdfrom the dropdown.
🙋♀️ S3 bucket not appearing in the dropdown?
This happens to the best of us! When you create a new S3 bucket, AWS sometimes needs a moment to update all its systems. Let's solve it together:
Try refreshing the CodeBuild project creation page to reload the S3 bucket list
Double-check that your S3 bucket and CodeBuild project are in the same AWS region
If it still doesn't appear after refreshing, wait about 30 seconds and try again - AWS is just catching up!

- In Name, enter
nextwork-devops-cicd-artifact. This names our artifact, so it's easy to spot it in the S3 bucket.

- For Artifacts packaging, select Zip.
💡 Why package artifacts as a Zip file?
Packaging artifacts as a Zip file is a small detail that's actually quite useful!
Smaller size: Zip compression can significantly reduce the size of your artifacts, which means faster uploads to S3, less storage costs, and quicker downloads when you need to use them.
Organization: Instead of managing multiple individual files, you get one tidy package. It's like putting all your vacation photos in a single album rather than having them scattered across your phone.
Simplicity: When it comes time to deploy your application or share it with teammates, having a single zip file makes the process much more straightforward - just download one file and you have everything you need.

Look at you go! You've just configured your CodeBuild process' artifact storage.
Finally, let's enable CloudWatch logs to monitor our build process. Logs are essential for tracking build progress, debugging errors, and auditing build activities.
-
Scroll down to the Logs section.
-
Make sure CloudWatch logs is checked.
💡 What are CloudWatch logs?
Amazon CloudWatch Logs is a monitoring service that collects and tracks logs from AWS services. In this project, CloudWatch will record everything that happens during the build process, including the commands that are run, the output of those commands, and any errors that occur. This is incredibly useful for debugging and understanding what went wrong if a build fails.

- n Group name, enter
/aws/codebuild/nextwork-devops-cicd.
💡 Extra for Experts: Why set a custom Group name?
Setting a custom Group name for CloudWatch logs might seem like a small detail, but it's helpful to keep things organized. By using a specific name like/aws/codebuild/nextwork-devops-cicd, you're essentially creating a dedicated folder for all logs related to this project.This becomes super helpful as your AWS environment grows. Imagine having hundreds of projects and services to track! With custom group names, you can instantly filter and find the logs you need with this classic naming convention.

You've configured logs for your CodeBuild project. You're all set to create your project and run your first build!
- Scroll to the bottom of the page and click Create build project.

Now that our CodeBuild project is fully configured, let's initiate our first build and see our CI pipeline in action!
In this step, you are going to:
-
Start your first build in CodeBuild.
-
Troubleshoot a build failure by adding a buildspec.yml file to your web app repository.
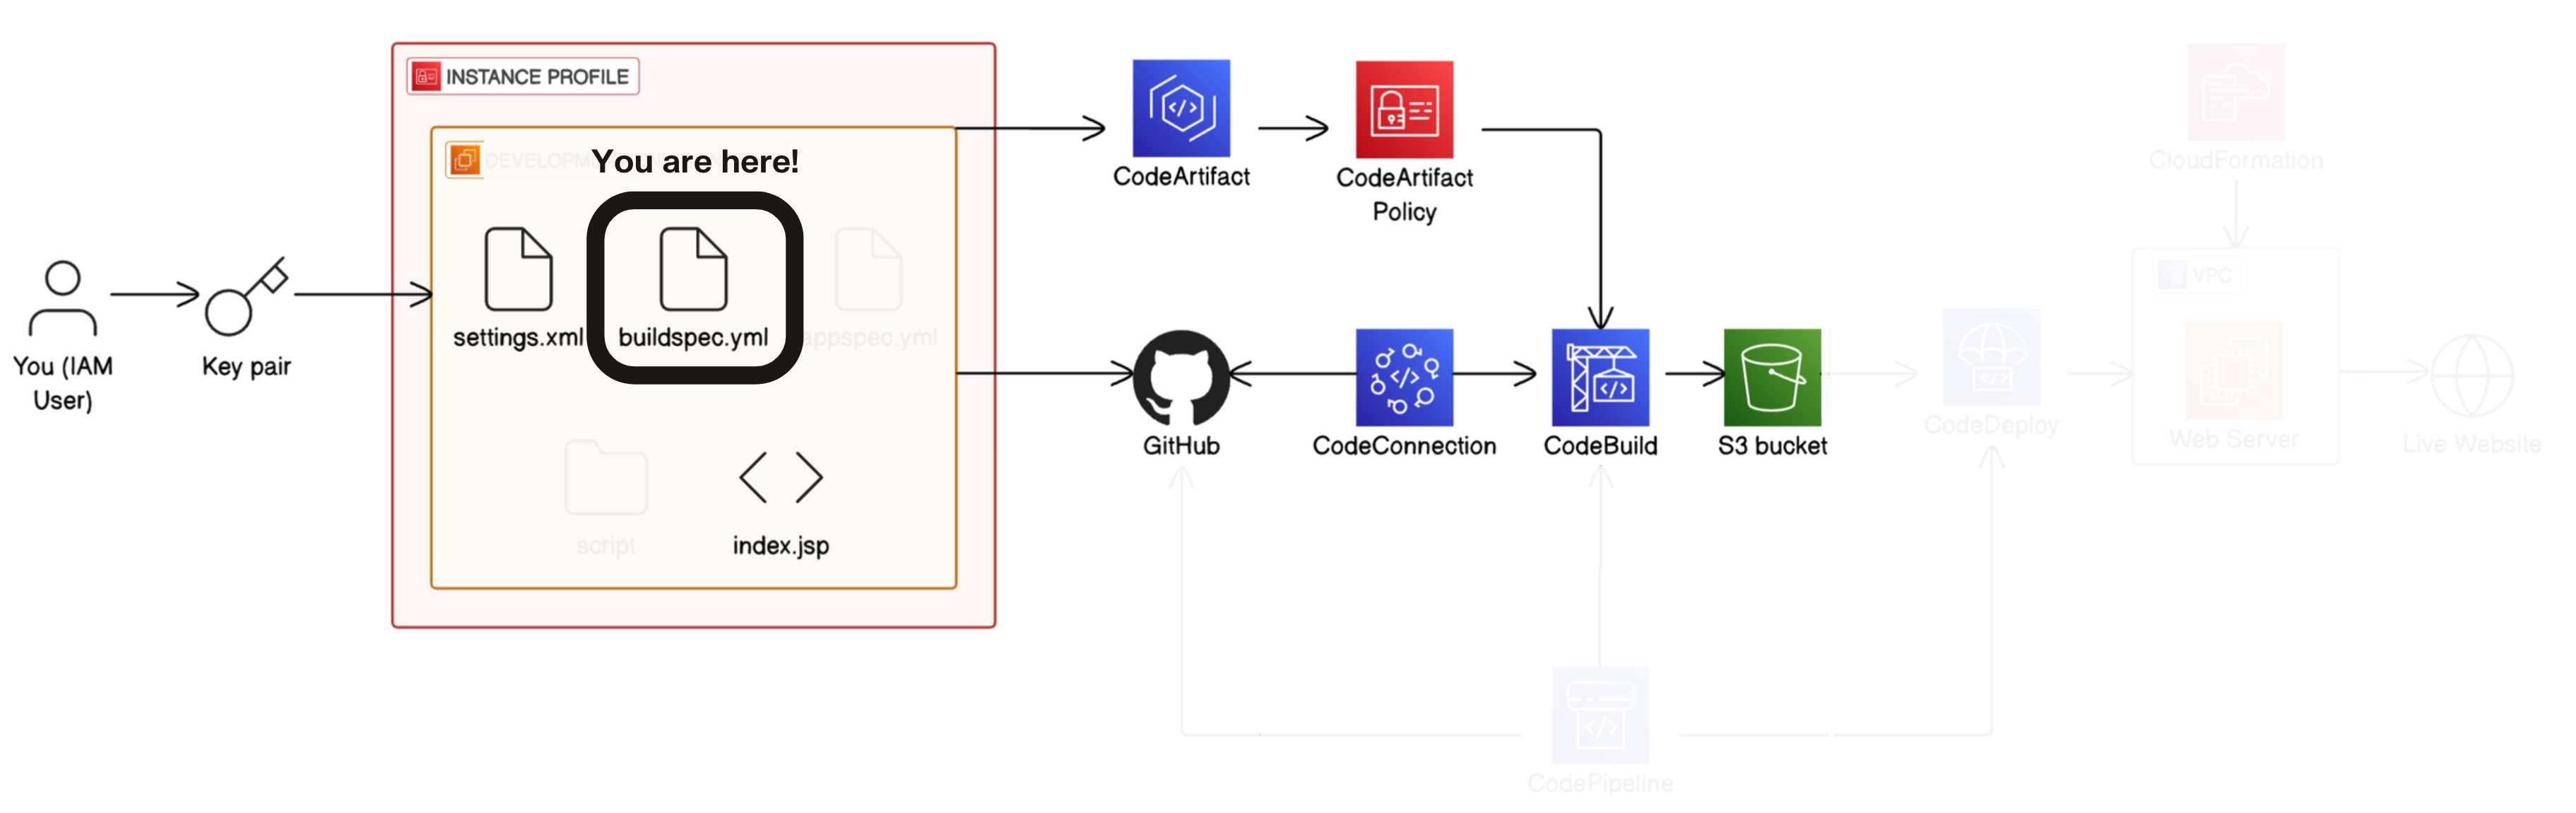
Let's get ready to run our first build! It's okay if it fails initially – that's part of the learning process.
-
Navigate to your newly created CodeBuild project nextwork-devops-cicd.
-
Click the Start build button.

-
You will be redirected to the build execution page.
-
You should see the build status change to In progress.
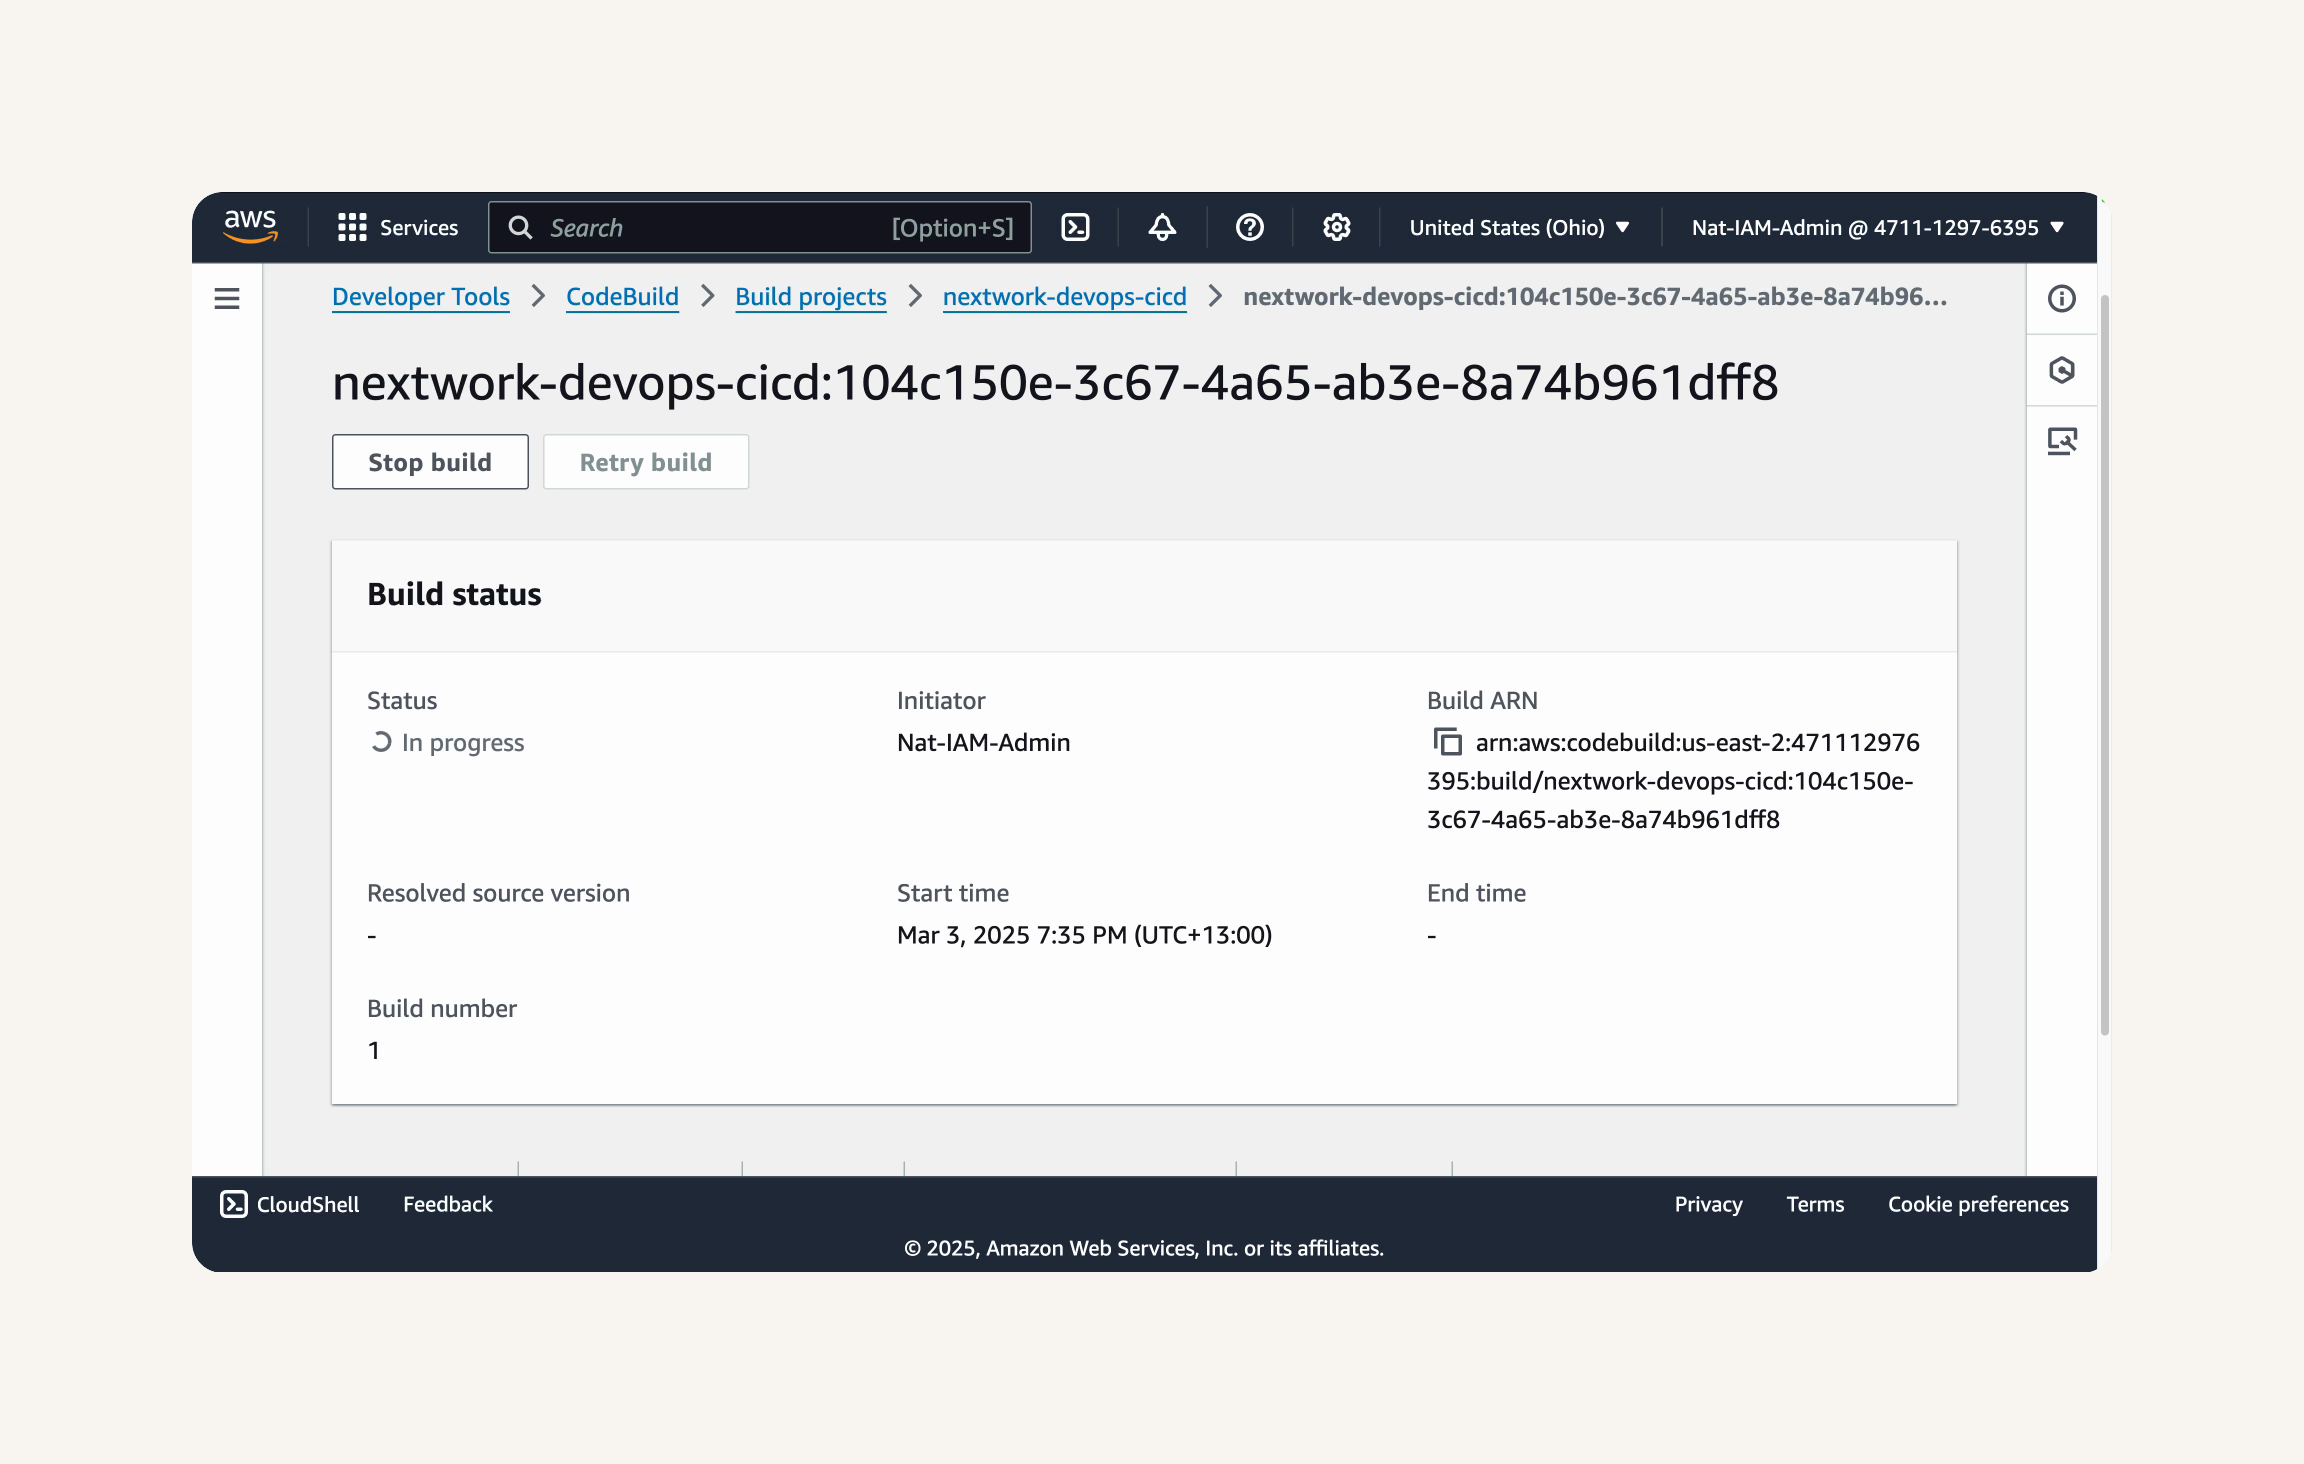
-
Wait for the build to complete.
-
Oooo, looks like the build failed!
-
By checking the logs and phase details, we can pinpoint exactly where and why our build is failing.
-
Select the Phase details tab to understand the failure.
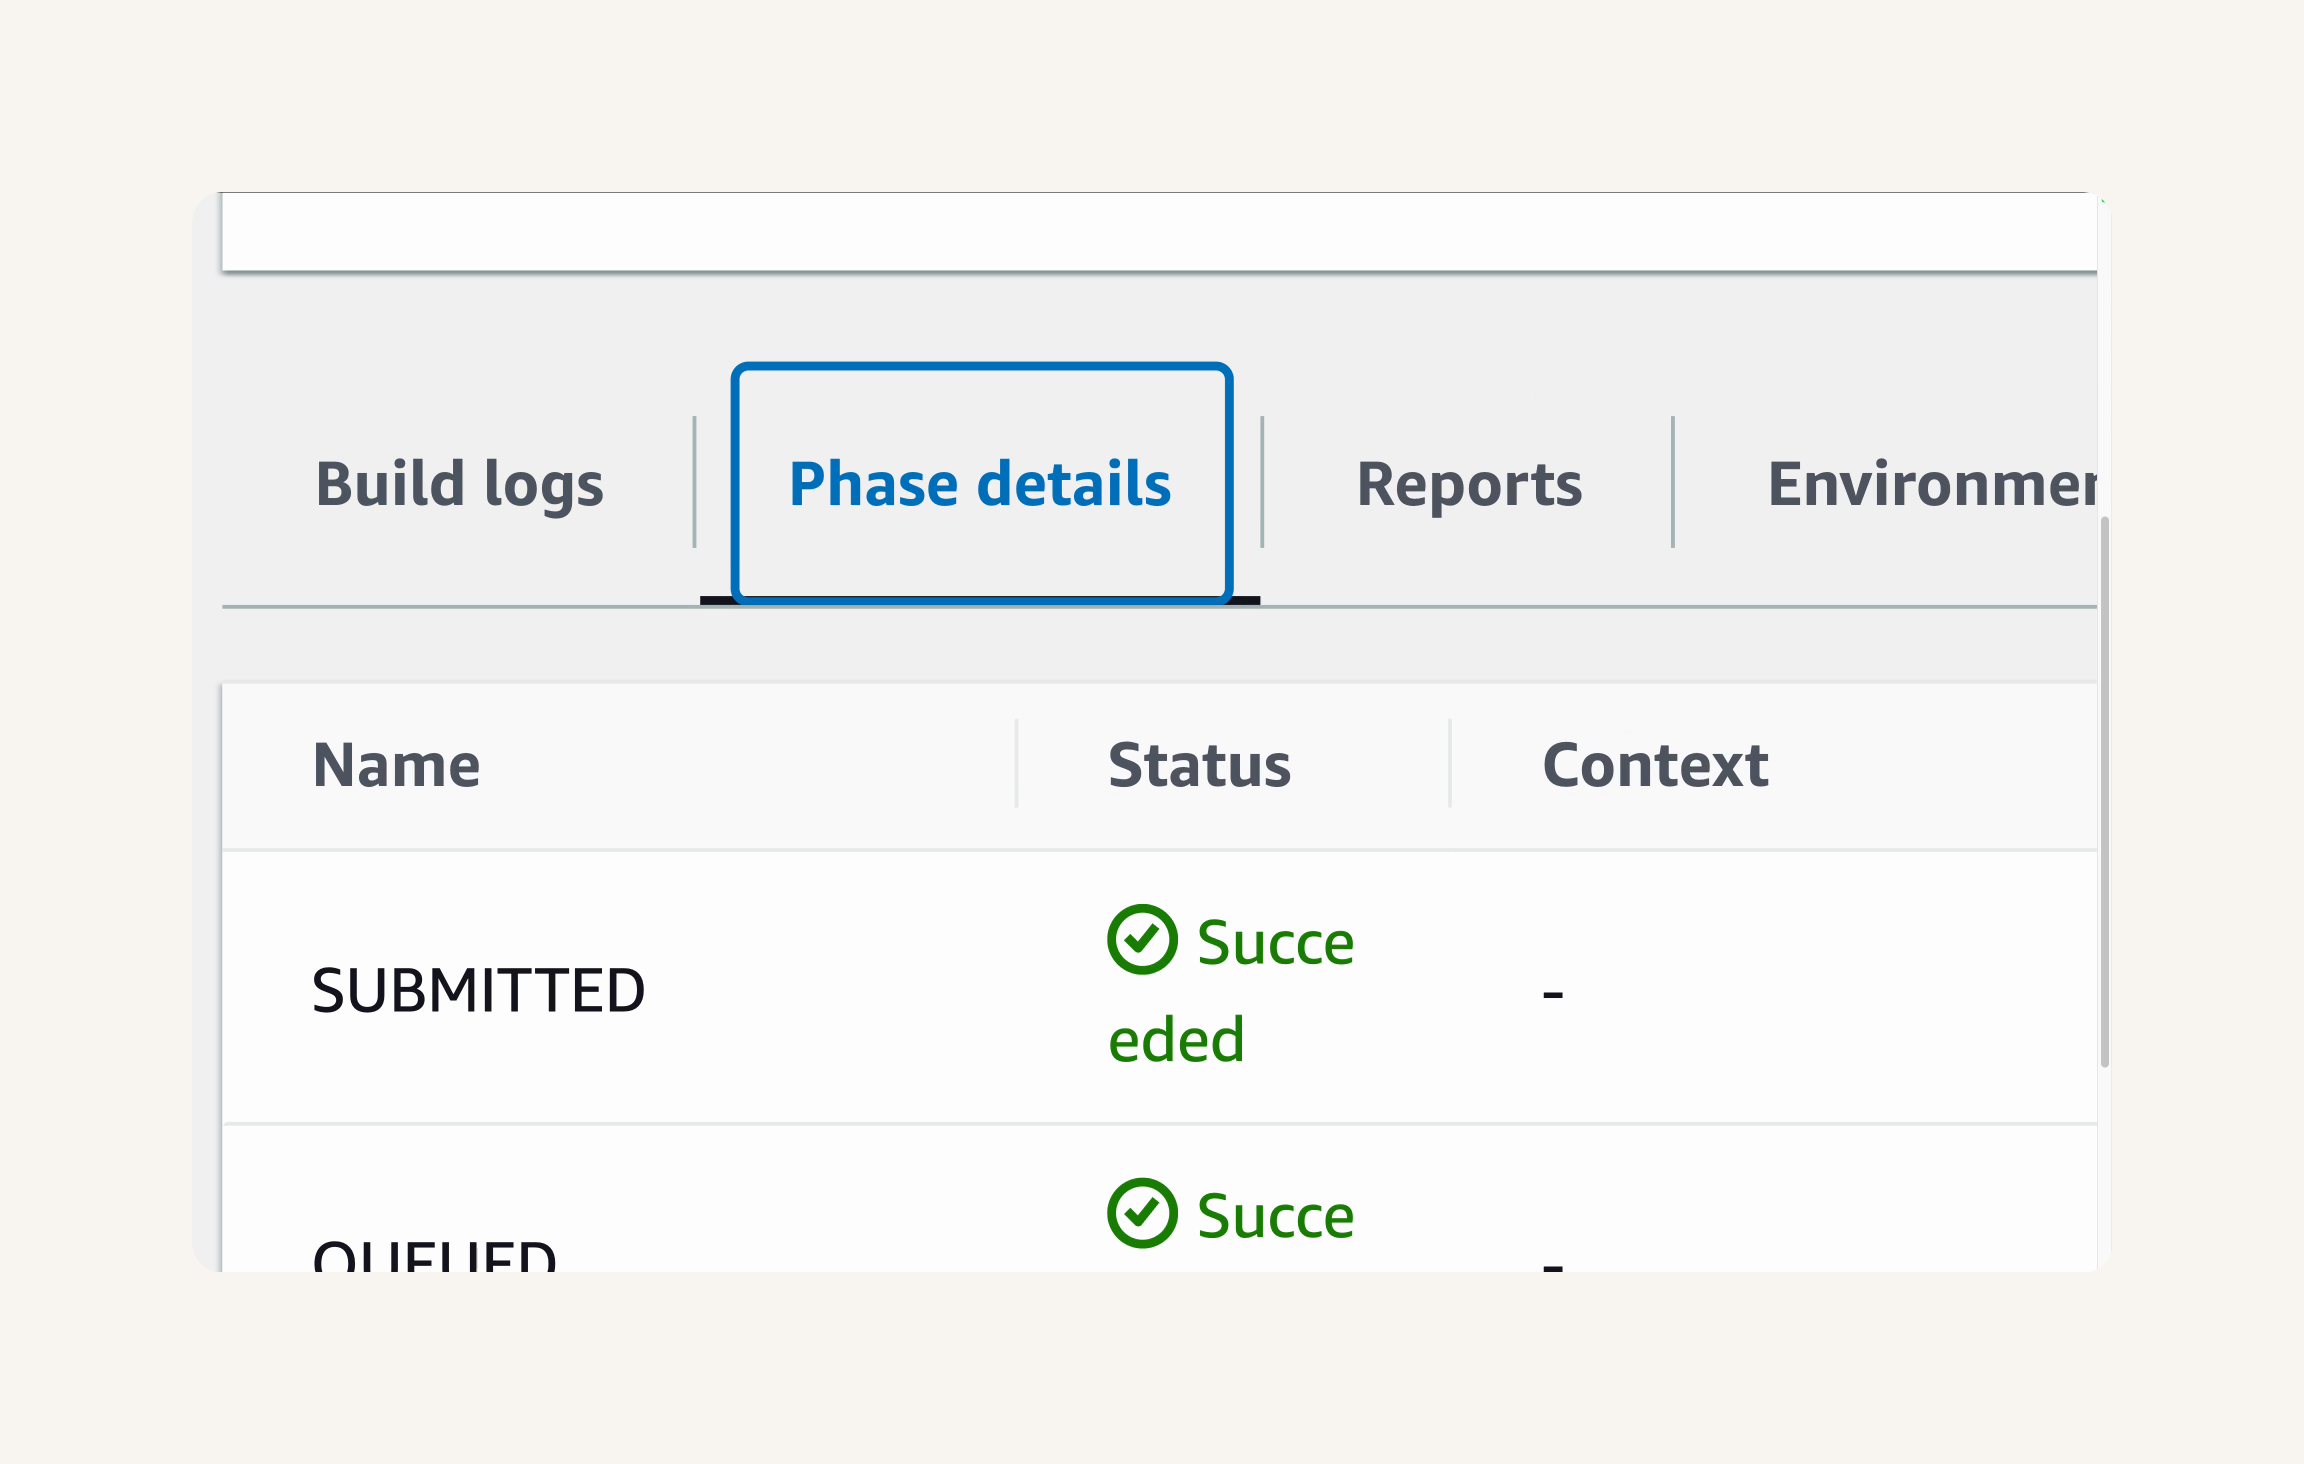
- Aha, the
DOWNLOAD_SOURCEphase has failed with the error messageYAML_FILE_ERROR: YAML file does not exist.
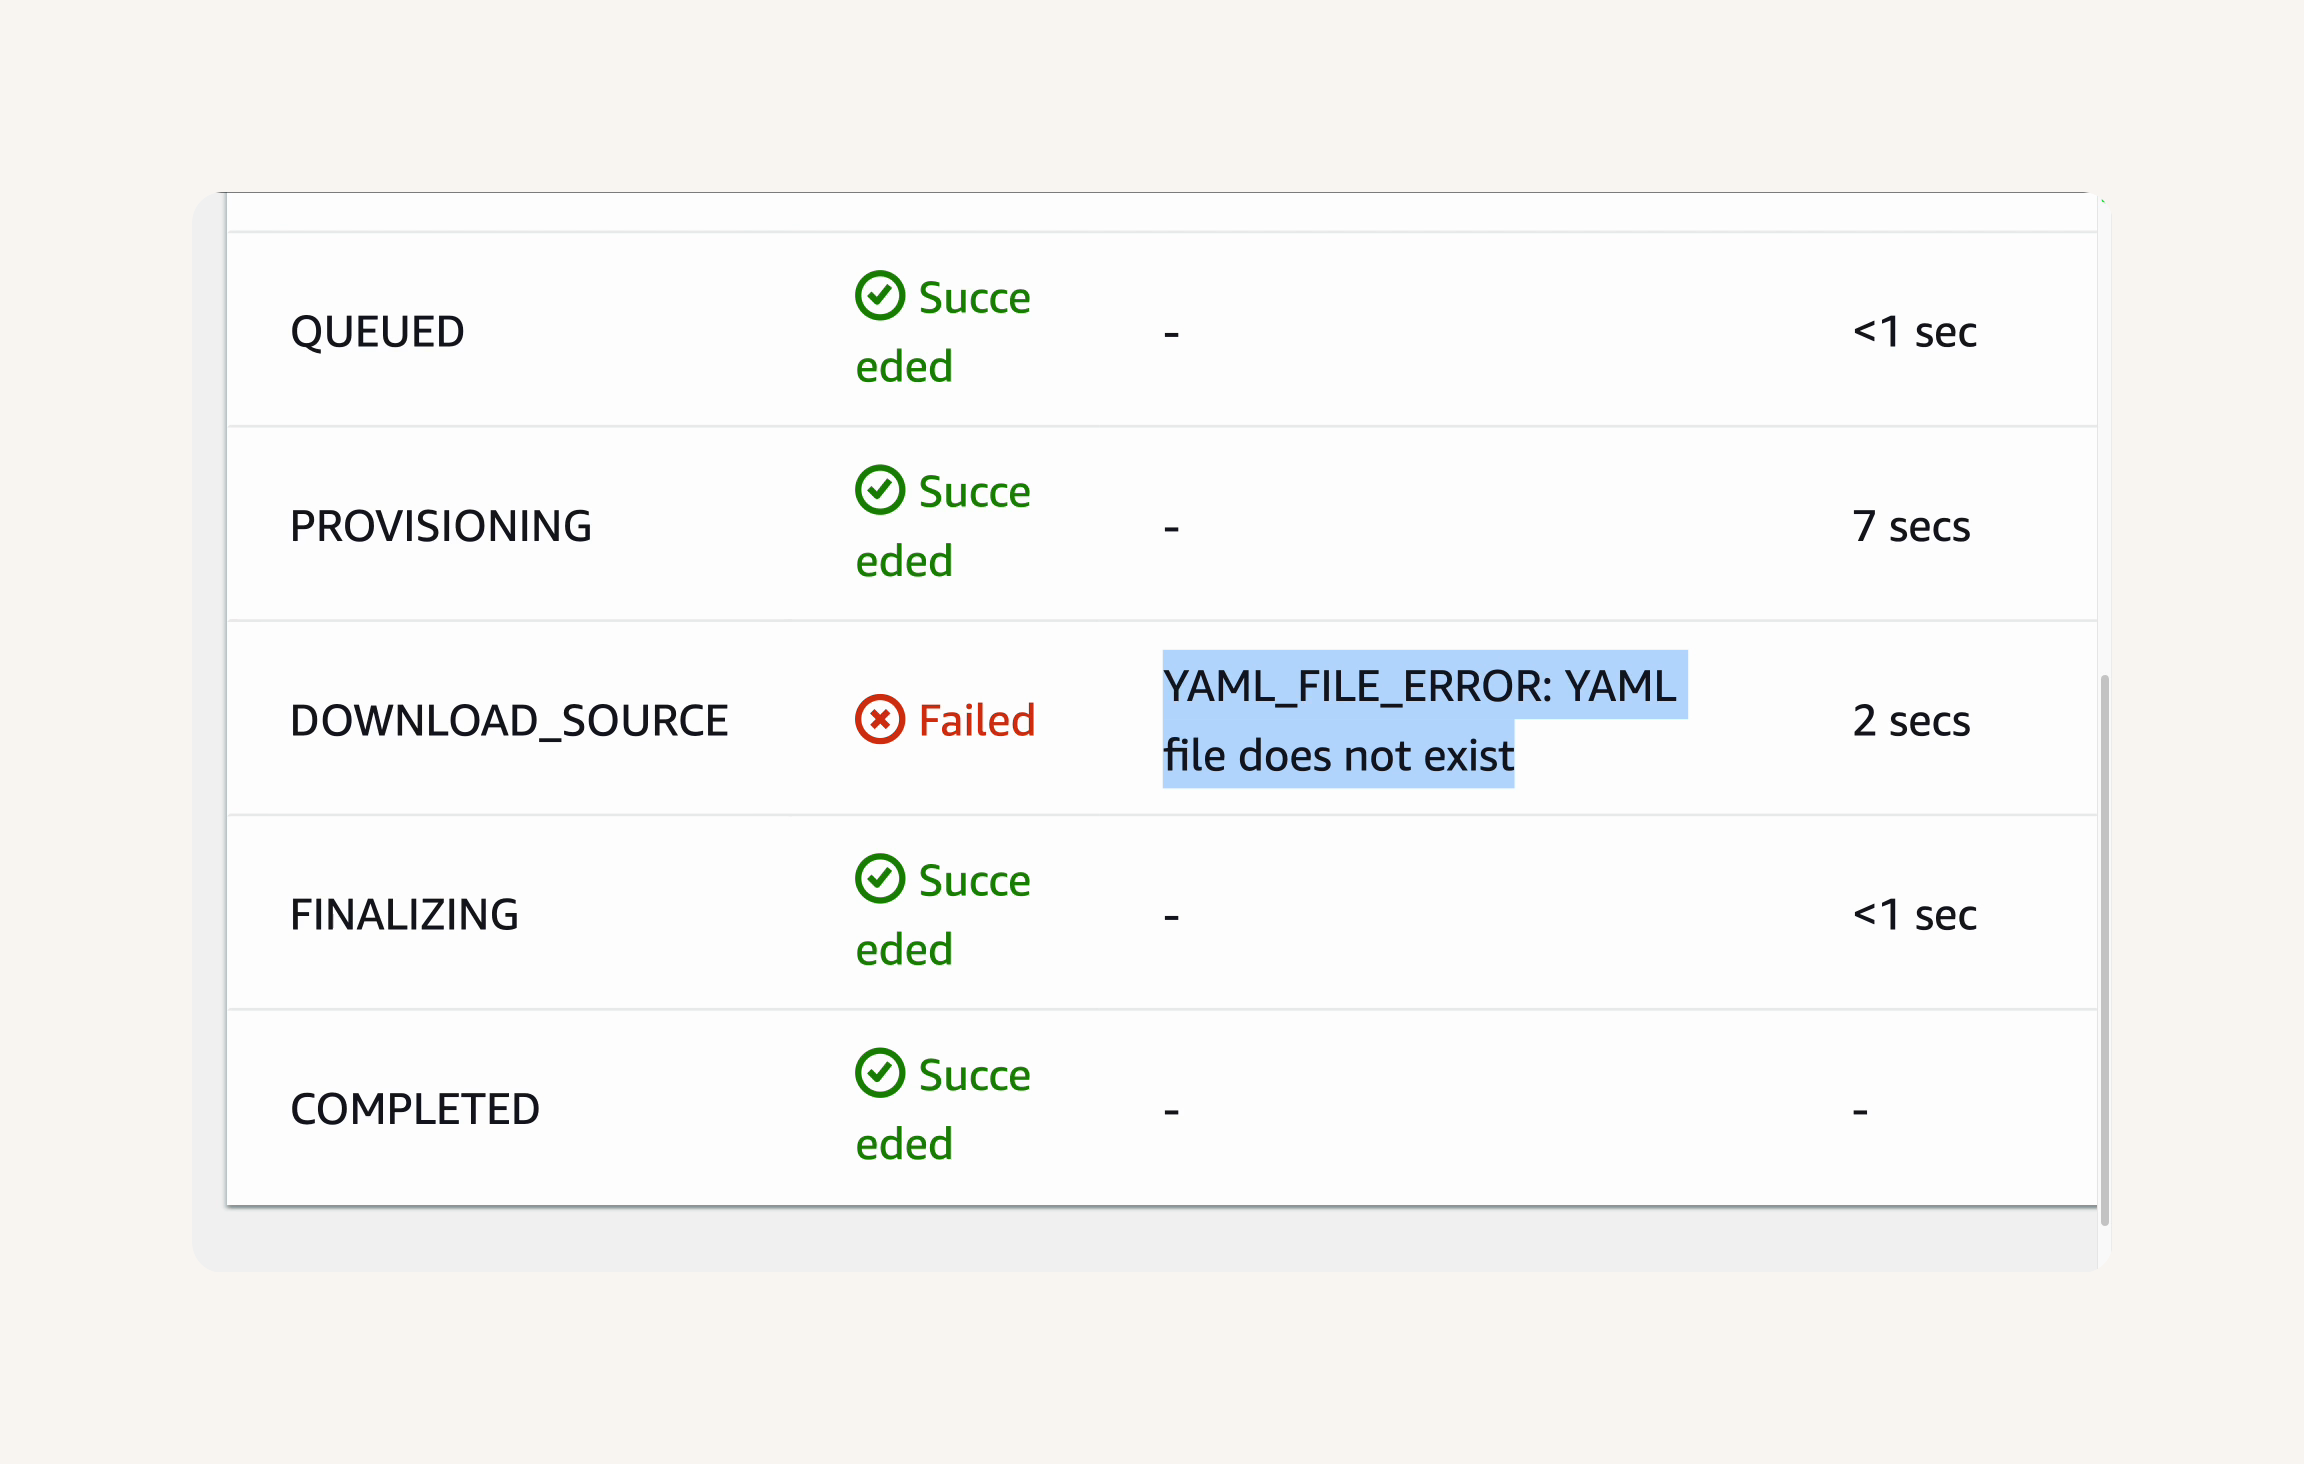
🙋♀️ Why did I see this error?
Good news - this is exactly what we expected to happen! This error simply means CodeBuild couldn't find the buildspec.yml file in your GitHub repository, which makes sense because we haven't created it yet.This is an important learning moment - without this file, CodeBuild doesn't know how to build your project. We'll create this file in the next steps.
-
Click on the Build details tab.
-
Scroll down to the Buildspec section.
-
Let's make sure that it says Using the buildspec.yml in the source code root directory.
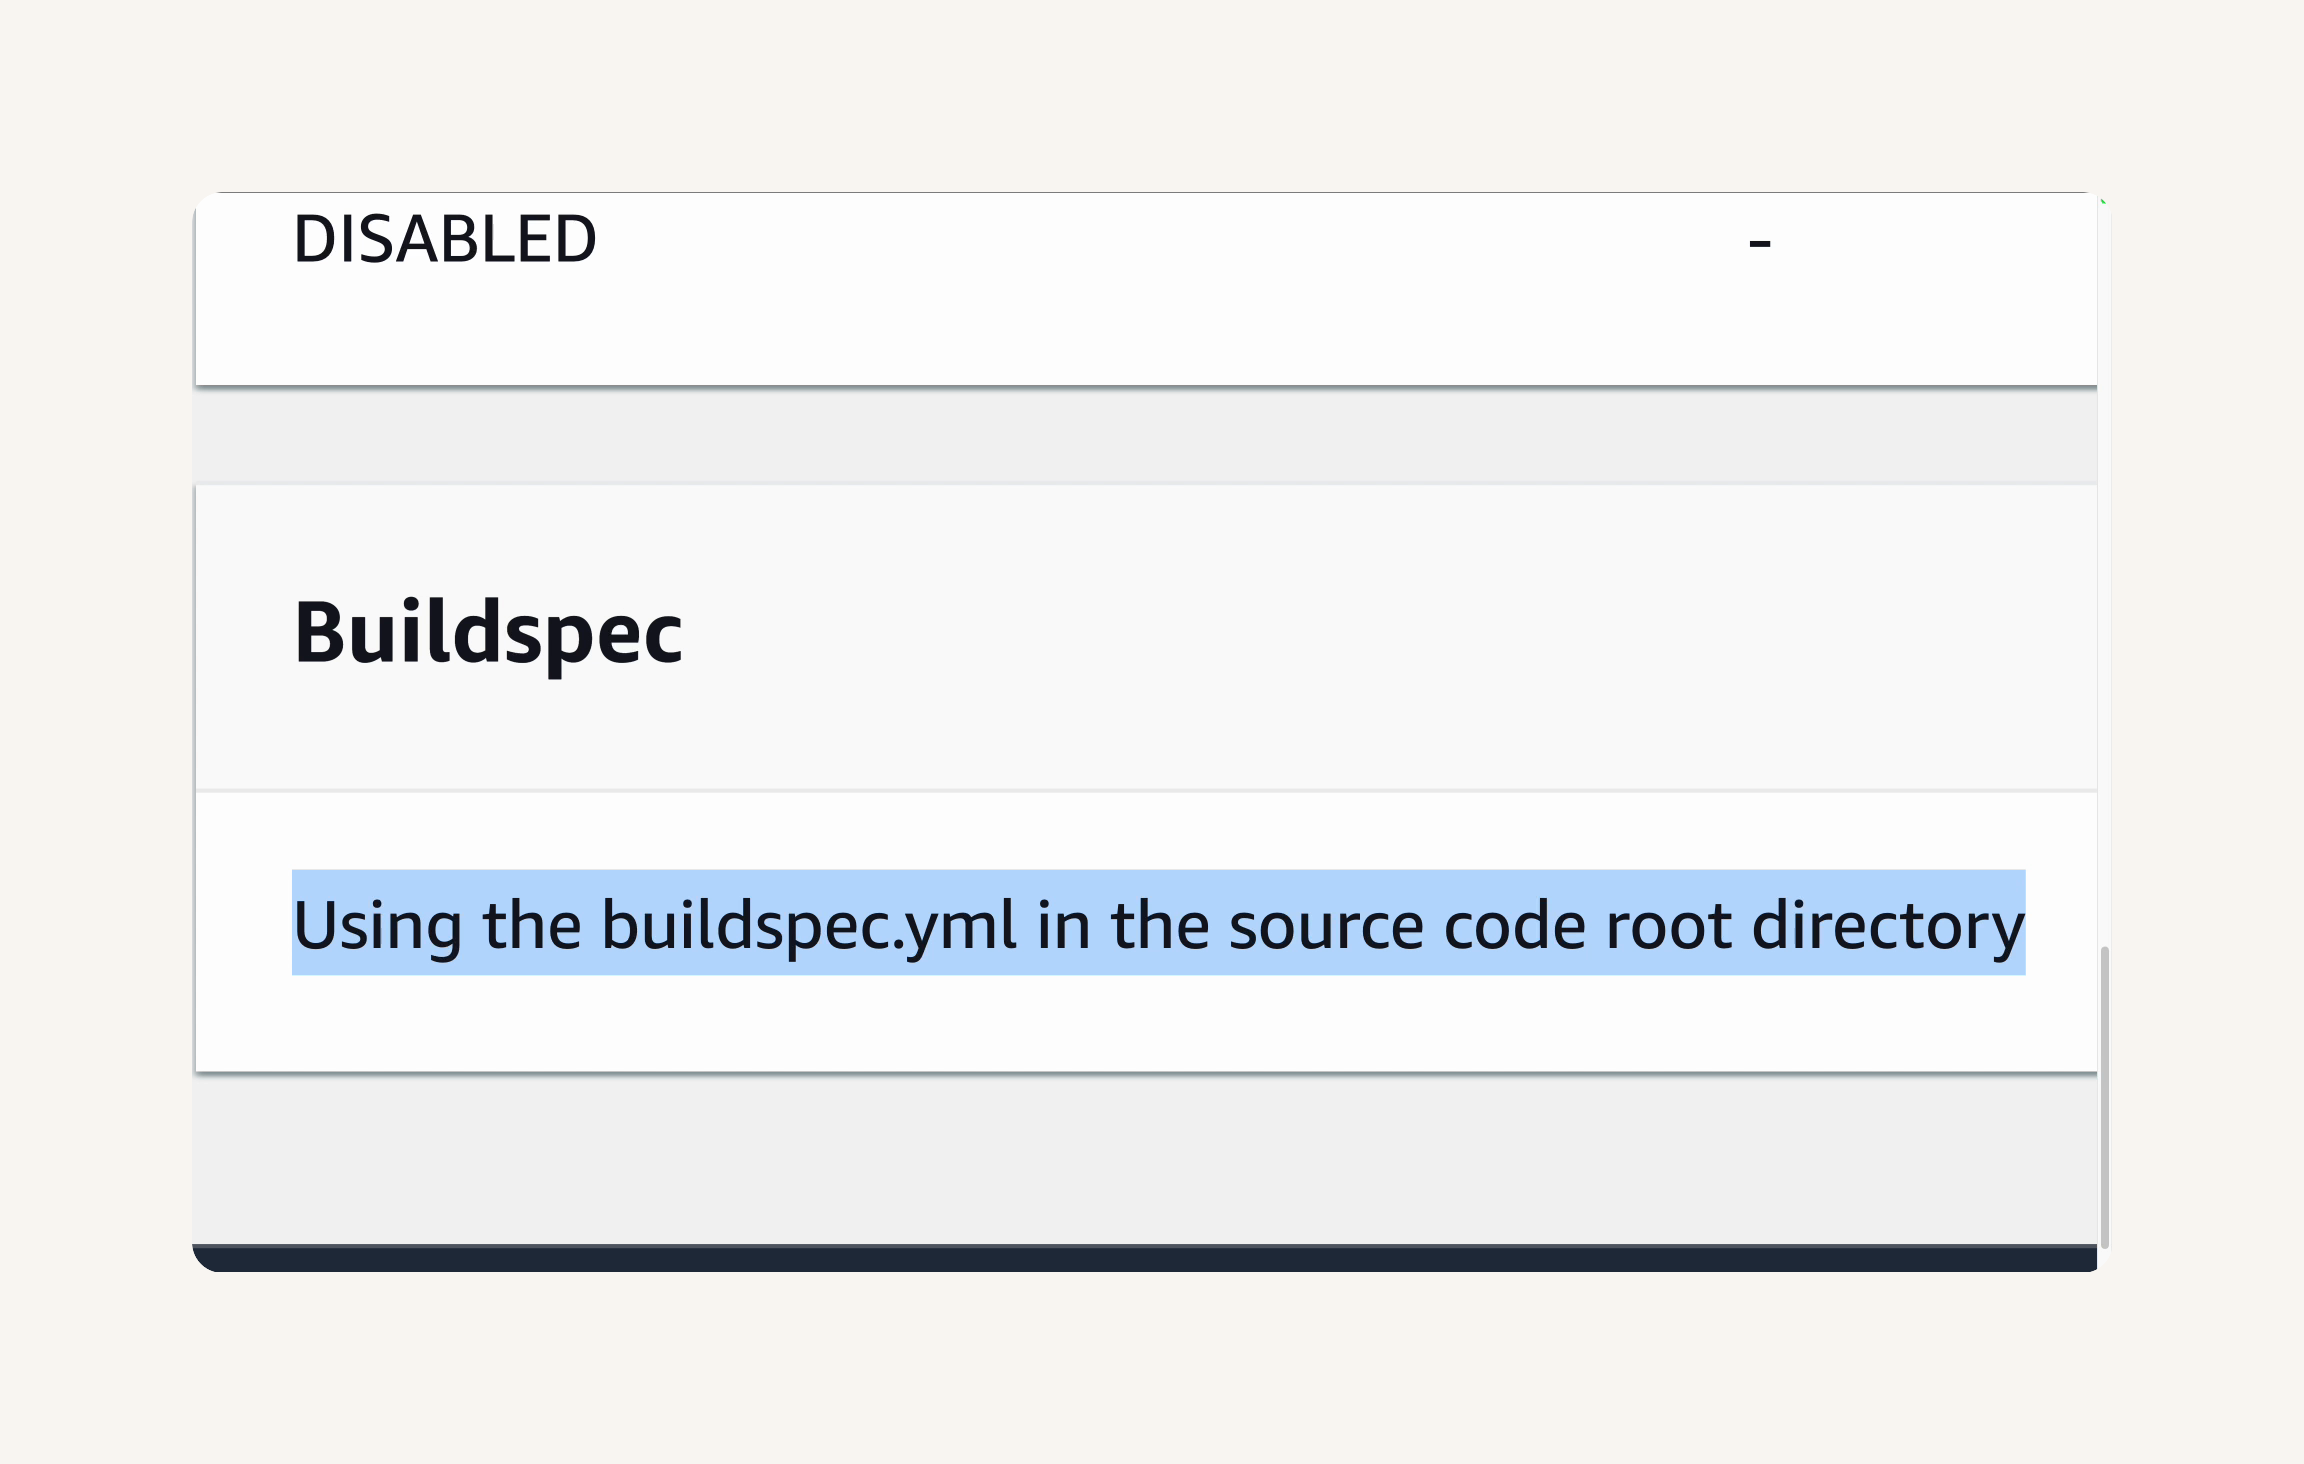
-
This confirms that CodeBuild is looking for buildspec.yml in the root directory of our web app's nextwork-web-project code repository... we haven't created that file yet!
-
In fact, let's check our GitHub repository. Select the Repository link in your CodeBuild project.

- Welcome back to your GitHub repo!

- As you might've noticed, there's no buildspec.yml file - it should be in the root of your web app repository 🙈 Let's create it now.
💡 Remind me: why do we need buildspec.yml?
CodeBuild reads yourbuildspec.ymlfile like a step-by-step instruction manual. It goes through each phase in order - install, pre_build, build, then post_build - running the commands you've specified in each section.The beauty of using
buildspec.ymlis that your build process is defined as code right alongside your application. This means your build process can be versioned, reviewed, and evolved just like any other part of your codebase. Before the era of continuous integration (CI), you would have to manually run a bunch of commands to build your application -buildspec.ymlautomates this process!
-
Open your project in VS Code or your preferred code editor.
-
Select File > Open Folder...

- Open your
nextwork-web-projectfolder.

- Select Ok.

- In VS Code, in the Explorer pane, create a new file on the project root (
nextwork-web-project).

- Enter
buildspec.ymlas the file name.

- Double check:
- Is your file named exactly
buildspec.yml? - Is your file located in the root directory of your project, not inside any subfolders like
srcortarget?
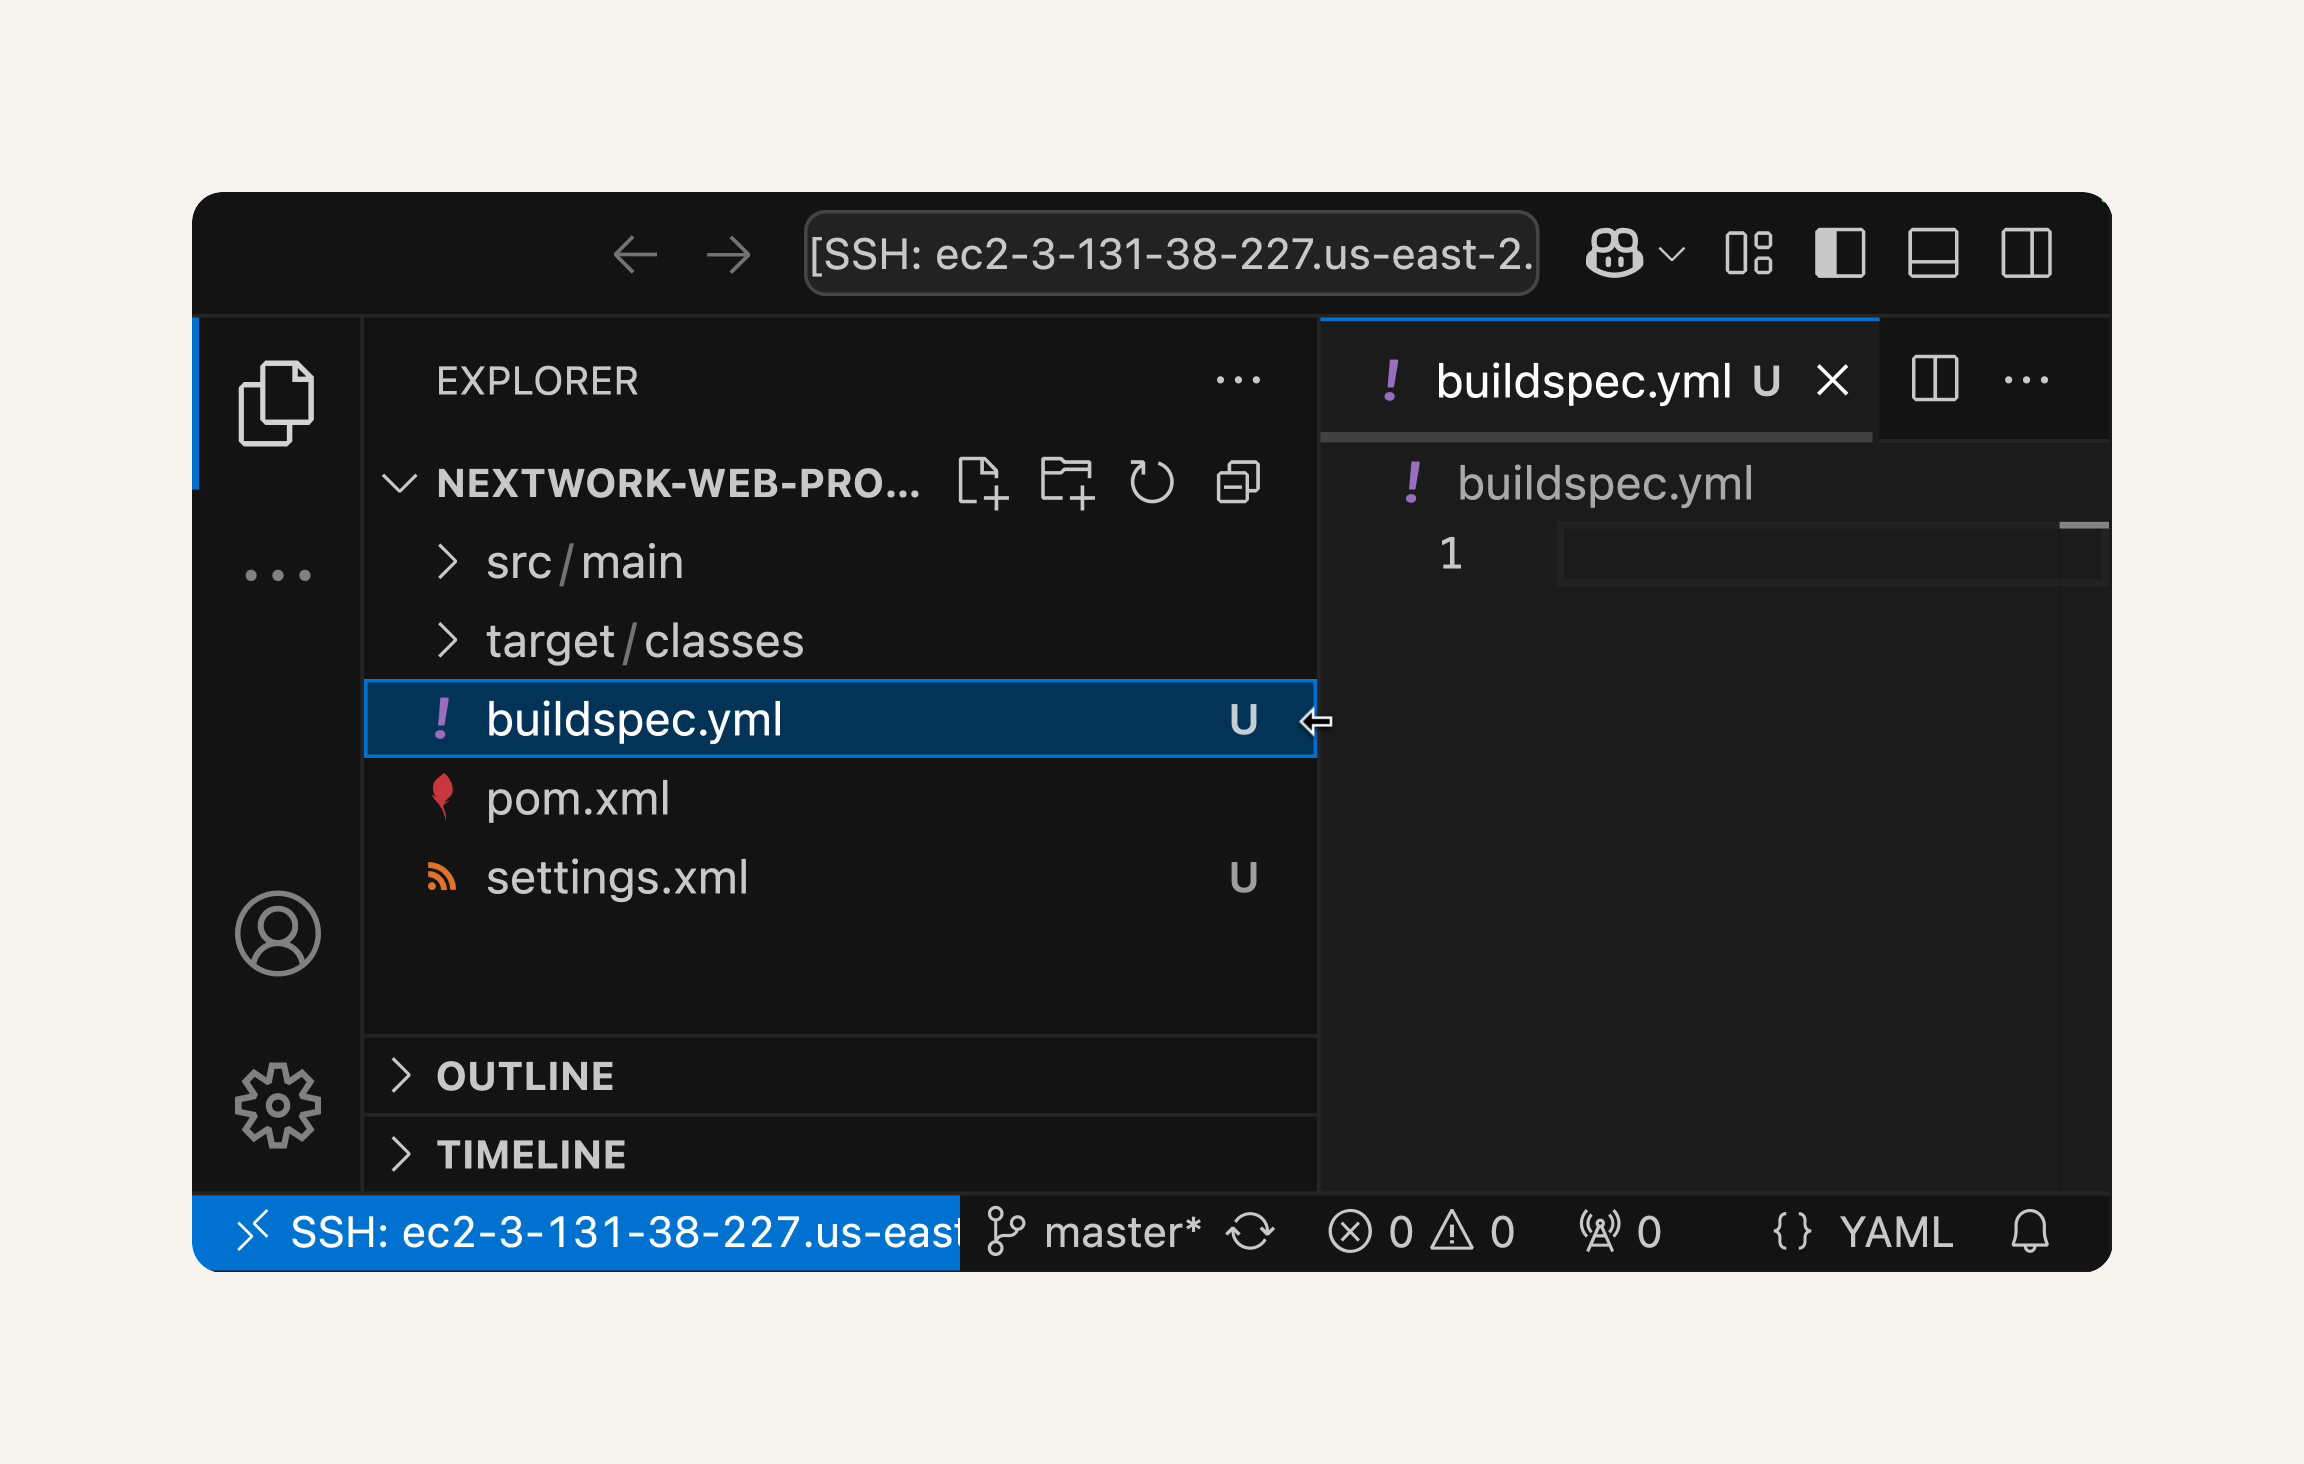
- Paste the following code for
buildspec.yml:
version: 0.2

phases:
  install:
    runtime-versions:
      java: corretto8
  pre_build:
    commands:
      - echo Initializing environment
      - export CODEARTIFACT_AUTH_TOKEN=`aws codeartifact get-authorization-token --domain nextwork --domain-owner 123456789012 --region us-east-2 --query authorizationToken --output text`

  build:
    commands:
      - echo Build started on `date`
      - mvn -s settings.xml compile
  post_build:
    commands:
      - echo Build completed on `date`
      - mvn -s settings.xml package
artifacts:
  files:
    - target/nextwork-web-project.war
  discard-paths: no
💡 What's inside buildspec.yml?
This buildspec.yml file is like a recipe for how to build your Java web app. Let's break it down into simpler terms:
version: 0.2:This just tells AWS which version of the buildspec format we're using.
phases: Think of these as the differentstagesyour build goes through: install is the "prep work" phase - here, we're telling CodeBuild to use Java 8.pre_buildare tasks to do before the main building starts. Here, we're grabbing a security token so we can access our dependencies.buildis where the actual building happens. We're using Maven (a popular Java build tool) to compile our code.post_buildare the finishing touches after the main build is done. Here, we're packaging everything into a WAR file (a format for web applications).
artifactstells CodeBuild which files to save as the output of the build. In our case, we want that WAR file we created during the post_build phase.

-
In the buildspec.yml file:
-
Replace the placeholder AWS Account ID 123456789012 with your actual AWS Account ID.
-
Check that the region code is correct! Update the region section from --region us-east-2 to the AWS region you're using.
-
💡 Where do I find my account ID?
You can find your Account ID in the AWS Management Console, at the top right corner under your username.💡 Where do I find my region code?
Expand the region selector on the top right corner of the AWS Management Console. Spot the code right next to your current region!


- Save the
buildspec.ymlfile (press Ctrl+S or Cmd+S on the keyboard).

Confirm that the small circle indicator on the buildspec.yml file tab disappears after saving, which means the file is saved.
-
Now, we need to commit and push the
buildspec.ymlfile to your GitHub repository so CodeBuild can access it. -
Open the terminal in VS Code (
Ctrl+ or Cmd+). -
Run the following Git commands:
git add .
git commit -m "Adding buildspec.yml file"
git push🙋♀️ Seeing errors when pushing your code?
Try resetting your Git credentials, and starting over again! Run these commands in your terminal:
git config --global --unset credential.helper git config --local --unset credential.helper git remote set-url origin https://<YOUR_GITHUB_USERNAME>@github.com/<YOUR_GITHUB_USERNAME>/<YOUR_REPOSITORY_NAME>.git
Make sure to replace <YOUR_GITHUB_USERNAME> with your GitHub username and <YOUR_REPOSITORY_NAME> with your repository name.
Then try git push again and enter your GitHub PAT when prompted for the password.

💡 Why push
buildspec.ymlto GitHub?
We need to push ourbuildspec.ymlfile to GitHub because CodeBuild doesn't look inside your local computer for build instructions - it looks in your GitHub repository.When CodeBuild connects to your GitHub repo, it first looks for this special file. Without it, CodeBuild has no idea what to do with your code. By pushing the file to GitHub, we're making sure our instructions travel alongside our code.
- Go to your GitHub repository
nextwork-web-projectin your browser and refresh the page to verify thatbuildspec.ymlis now present in the repository.
Check the terminal output to ensure the changes, including the new buildspec.yml file, have been successfully pushed to your GitHub repository.
-
Go to your GitHub repository in a web browser and refresh the page.
-
buildspec.ymlshould be in your GitHub repo now - yay!

- Confirm that you can see the
buildspec.ymlfile listed in your GitHub repository in the browser.
Now that we've fixed our CodeBuild setup, let's re-run the build process. We'll also check our S3 bucket to see if it's storing the build artifact correctly.
In this step, you are going to:
-
Re-run the build process in CodeBuild.
-
Troubleshoot a second build failure, this time by giving CodeBuild the permission to access CodeArtifact.
-
Run and verify a successful build!

-
Return to the CodeBuild console in your browser.
-
Retry the build by clicking the Retry build button.

- The build status should now show In progress. Wait for this build to complete.

-
Damn it, we failed again!
-
Check the Phase details tab again after this retry.
-
You will likely see that the
DOWNLOAD_SOURCEphase succeeded this time, but other phases might have failed!

🙋♀️ What does this error mean?
Goooood question. This error typically means CodeBuild still can't access thesettings.xmlfile.This usually happens because our CodeBuild service role doesn't have permission to access CodeArtifact, which is needed to download project dependencies.
- To fix this, we need to grant CodeBuild's IAM role the permission to access CodeArtifact.
- Head to the
IAMconsole.

- In the IAM console, select Roles in the left navigation menu.

- In the roles search bar, type
codebuildto filter the roles.
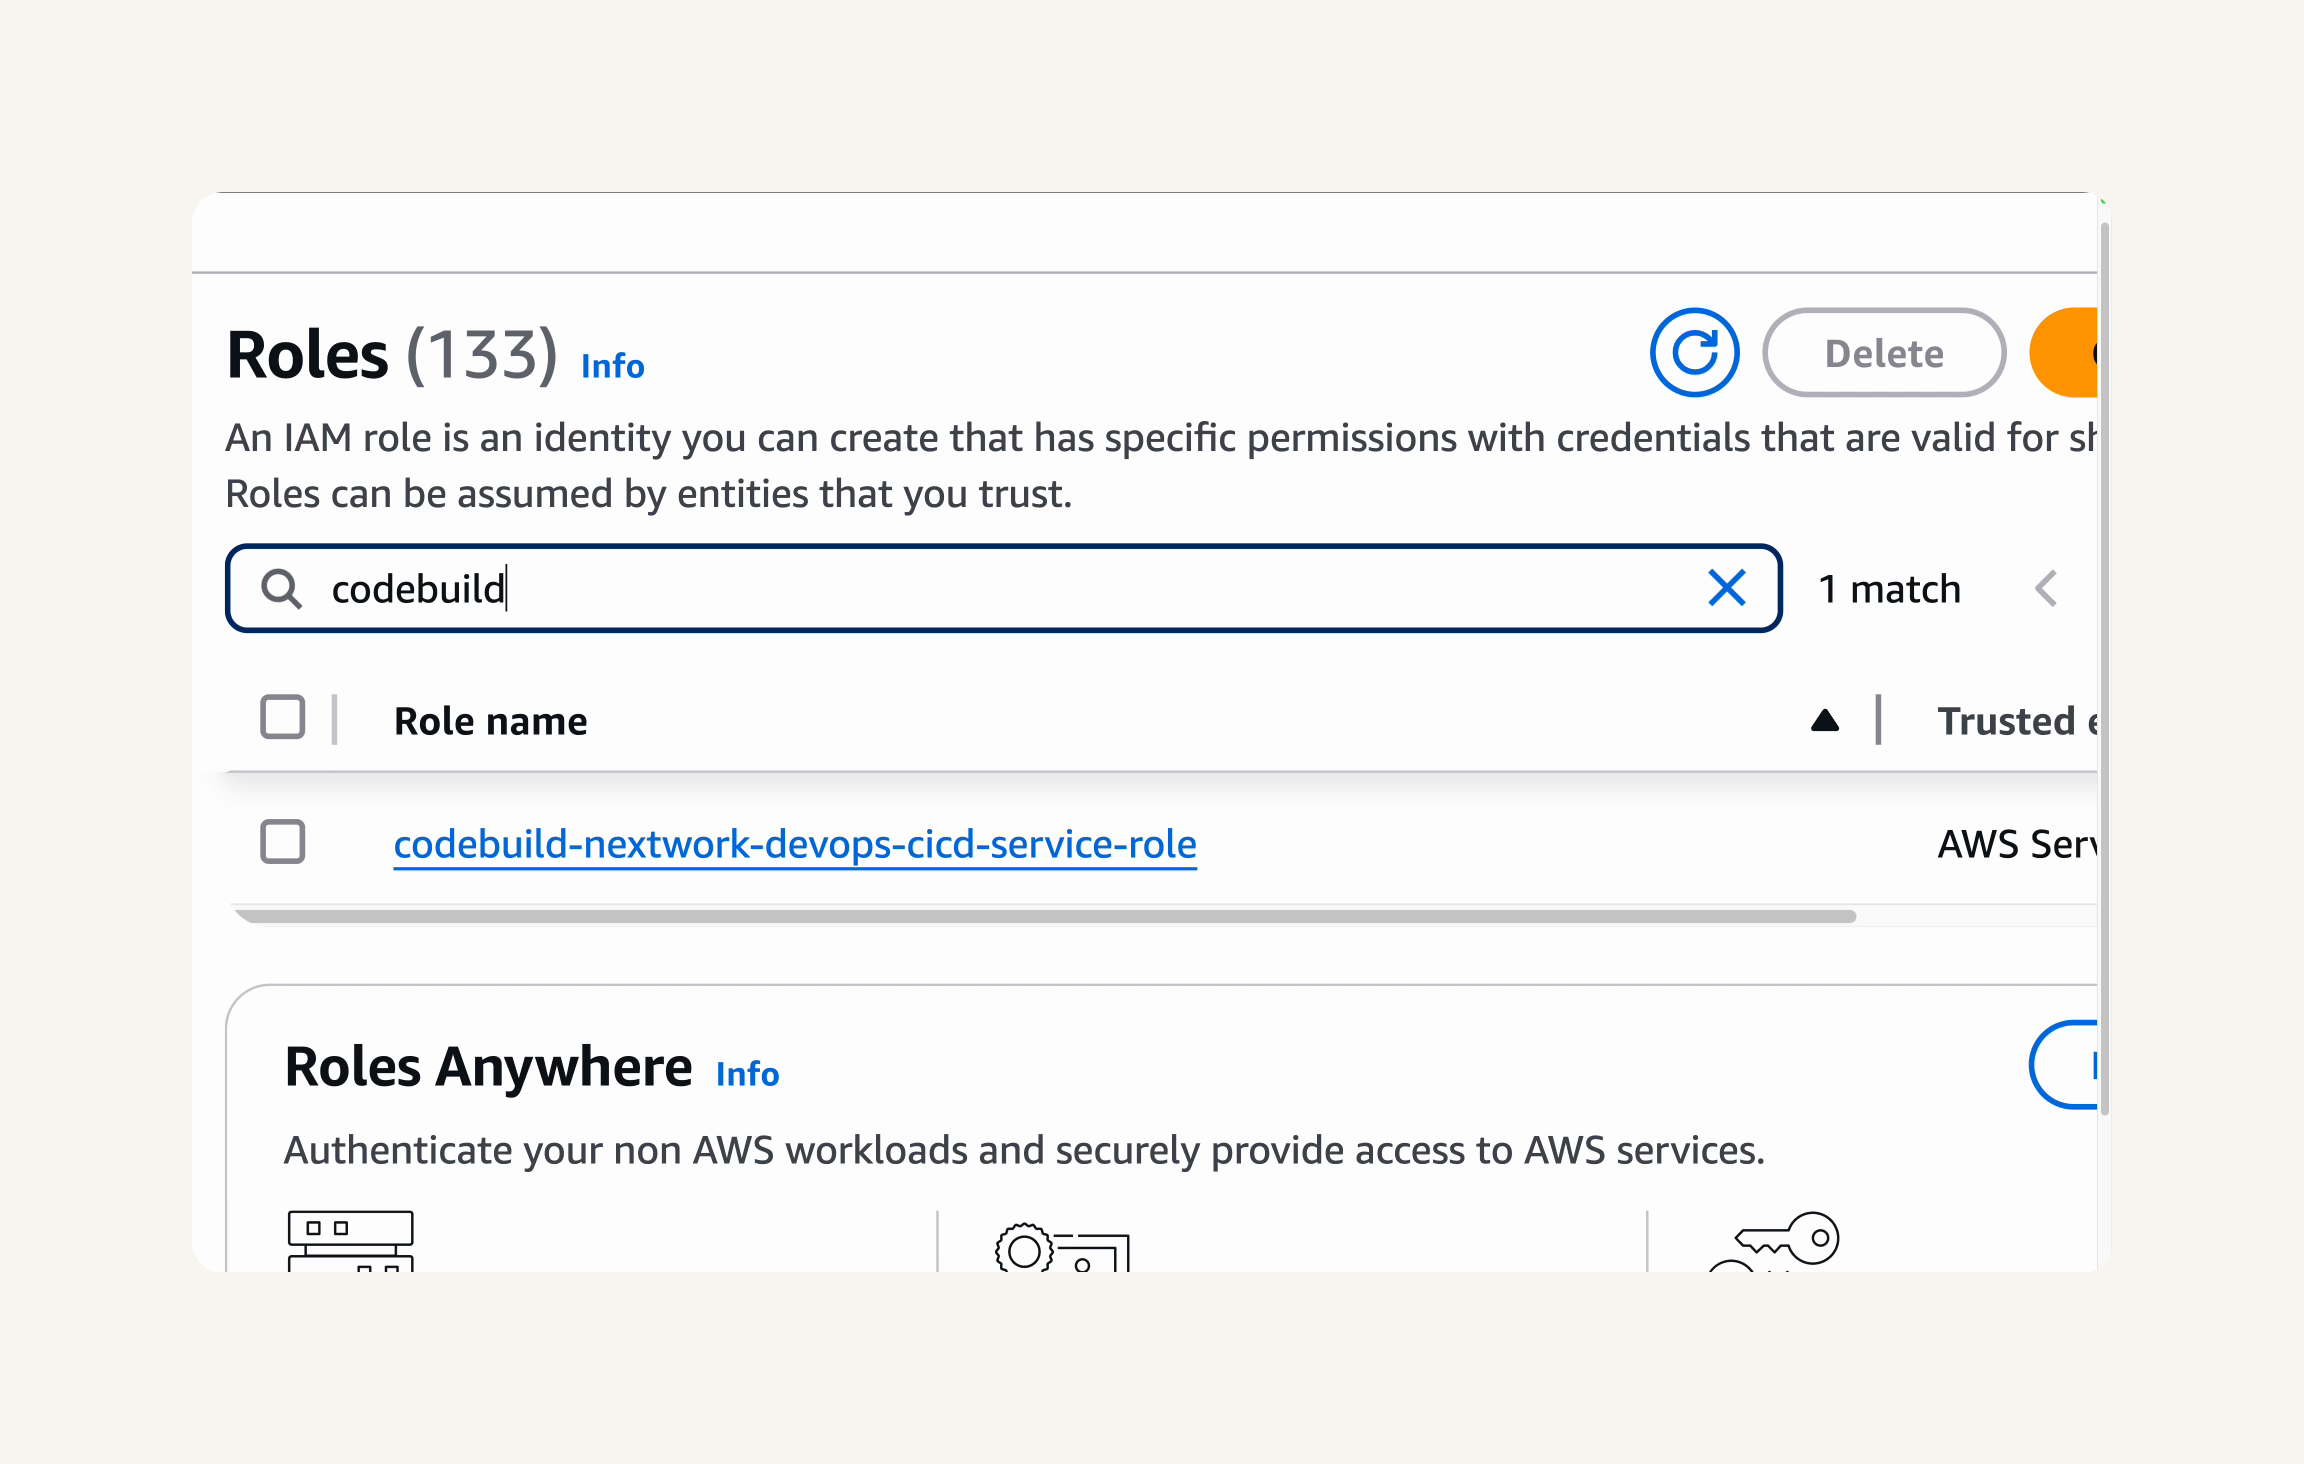
- Select the role that starts with
codebuild-nextwork-devops-cicd-service-role. This is the new service role that CodeBuild created when we set up our build project.

-
Select your CodeBuild service role.
-
Click on the Add permissions button.

- Choose Attach policies.
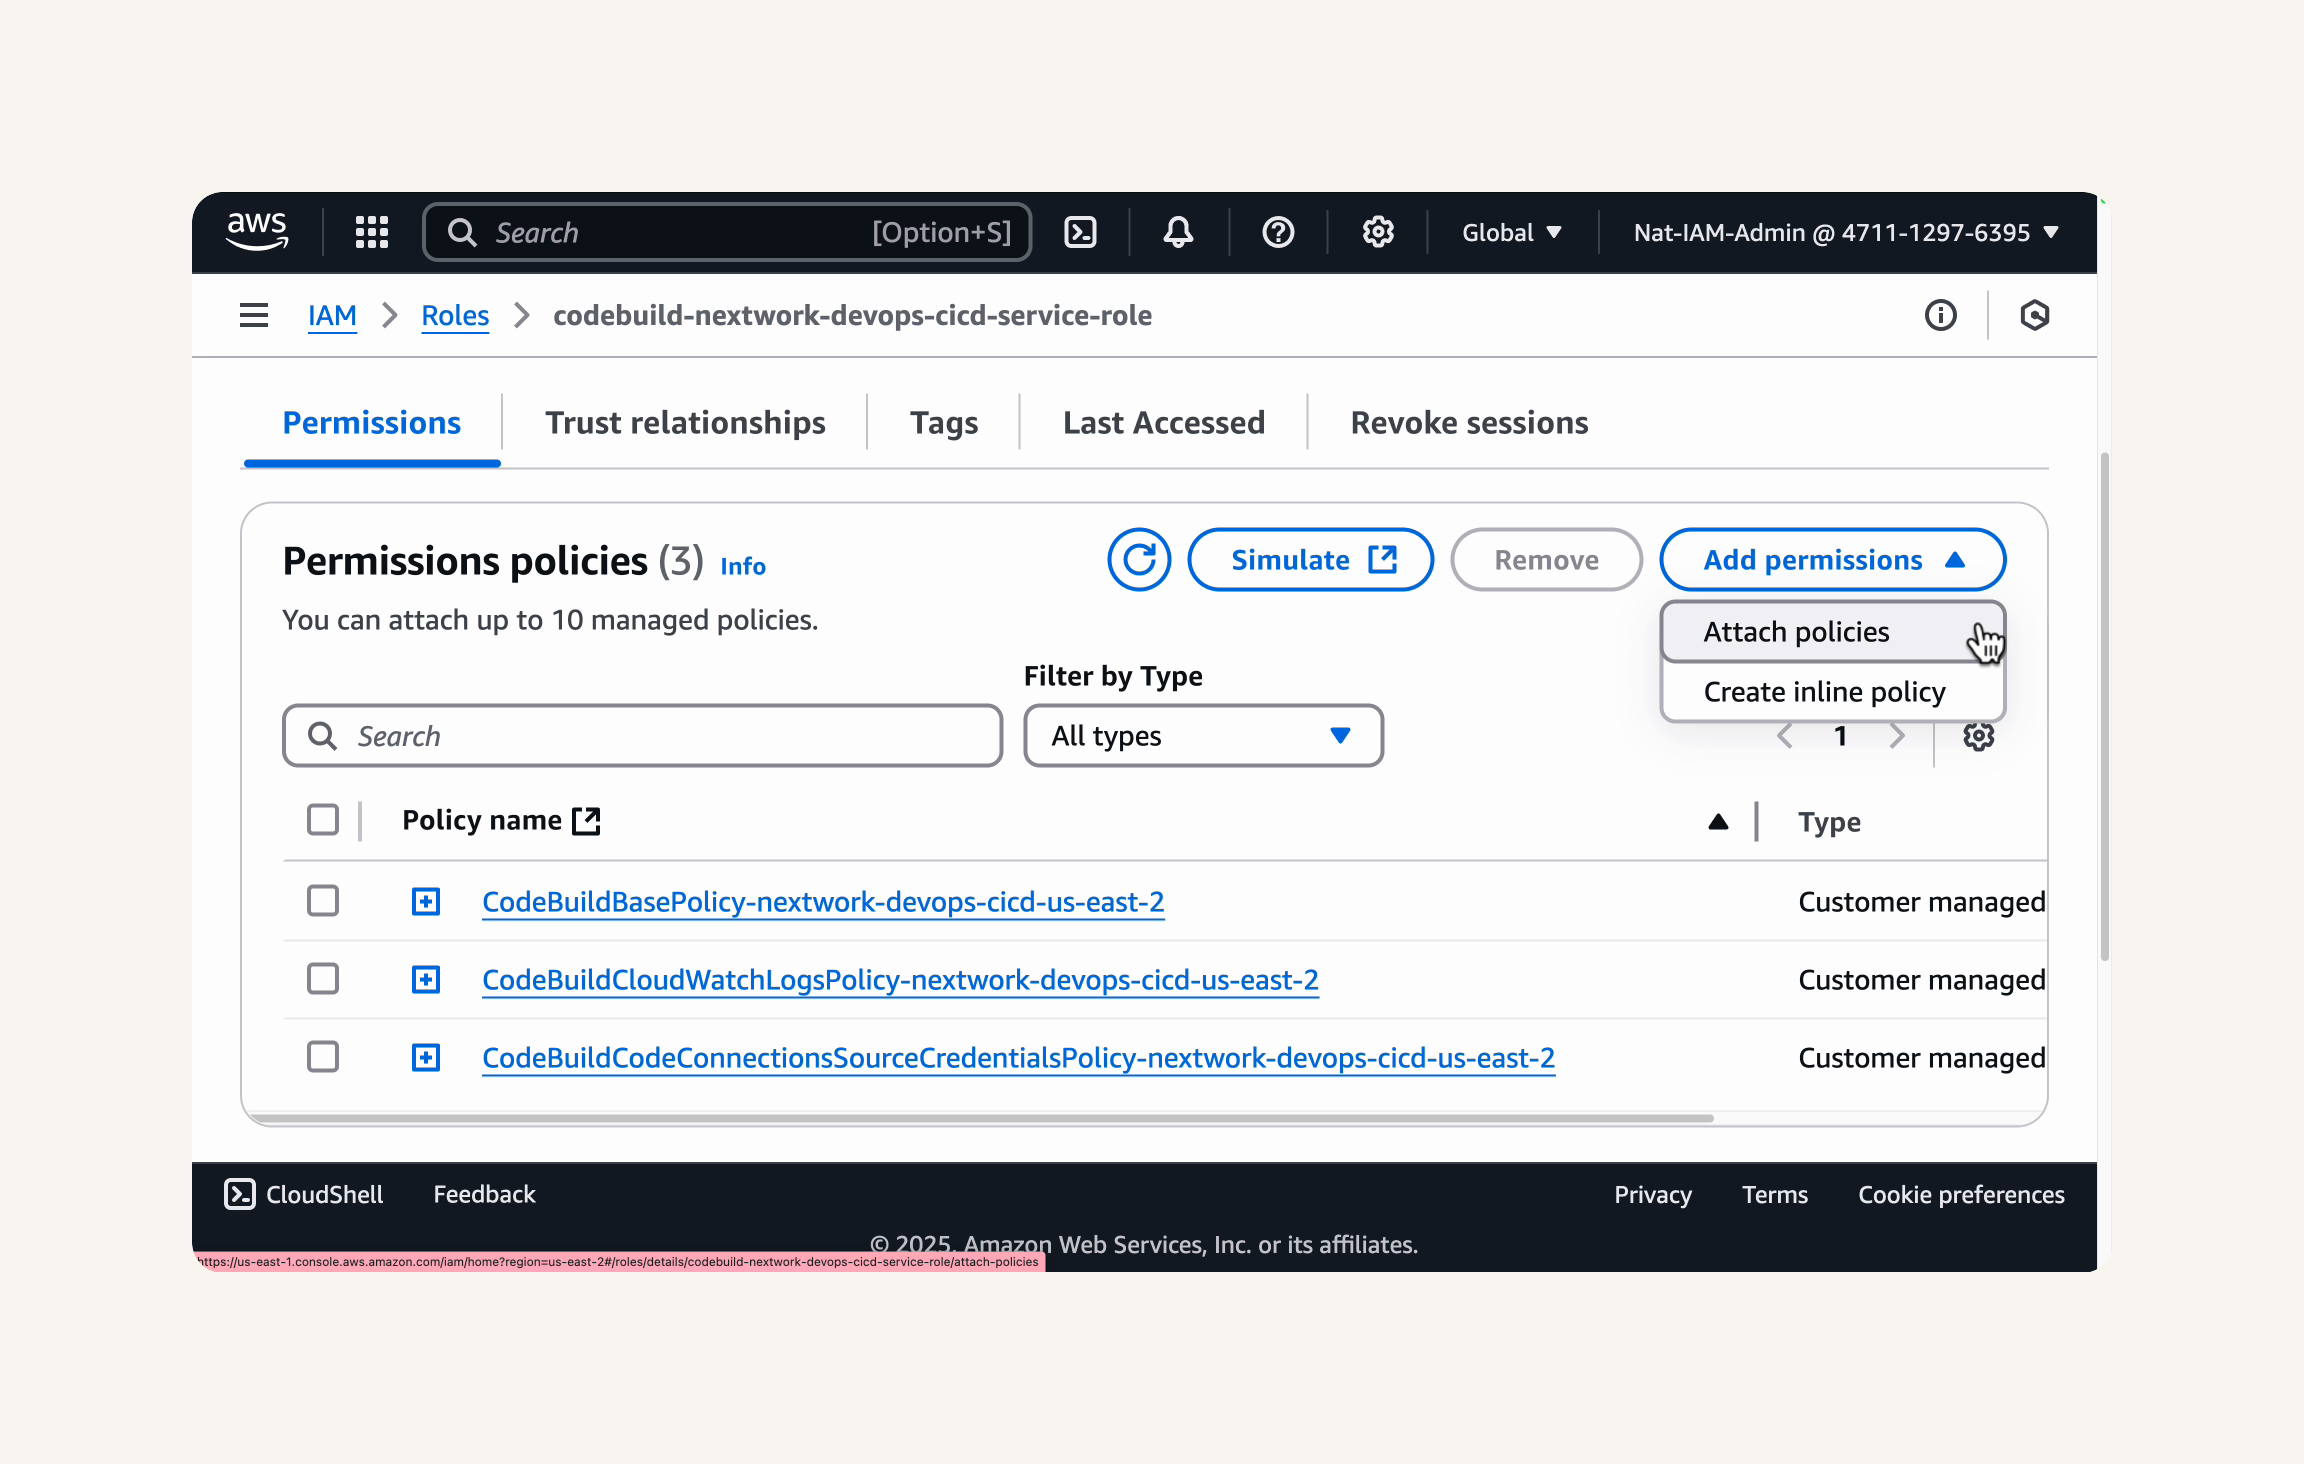
-
In the Filter policies search bar, type
codeartifact-nextwork-consumer-policy. -
Check the checkbox next to the policy named
codeartifact-nextwork-consumer-policy.
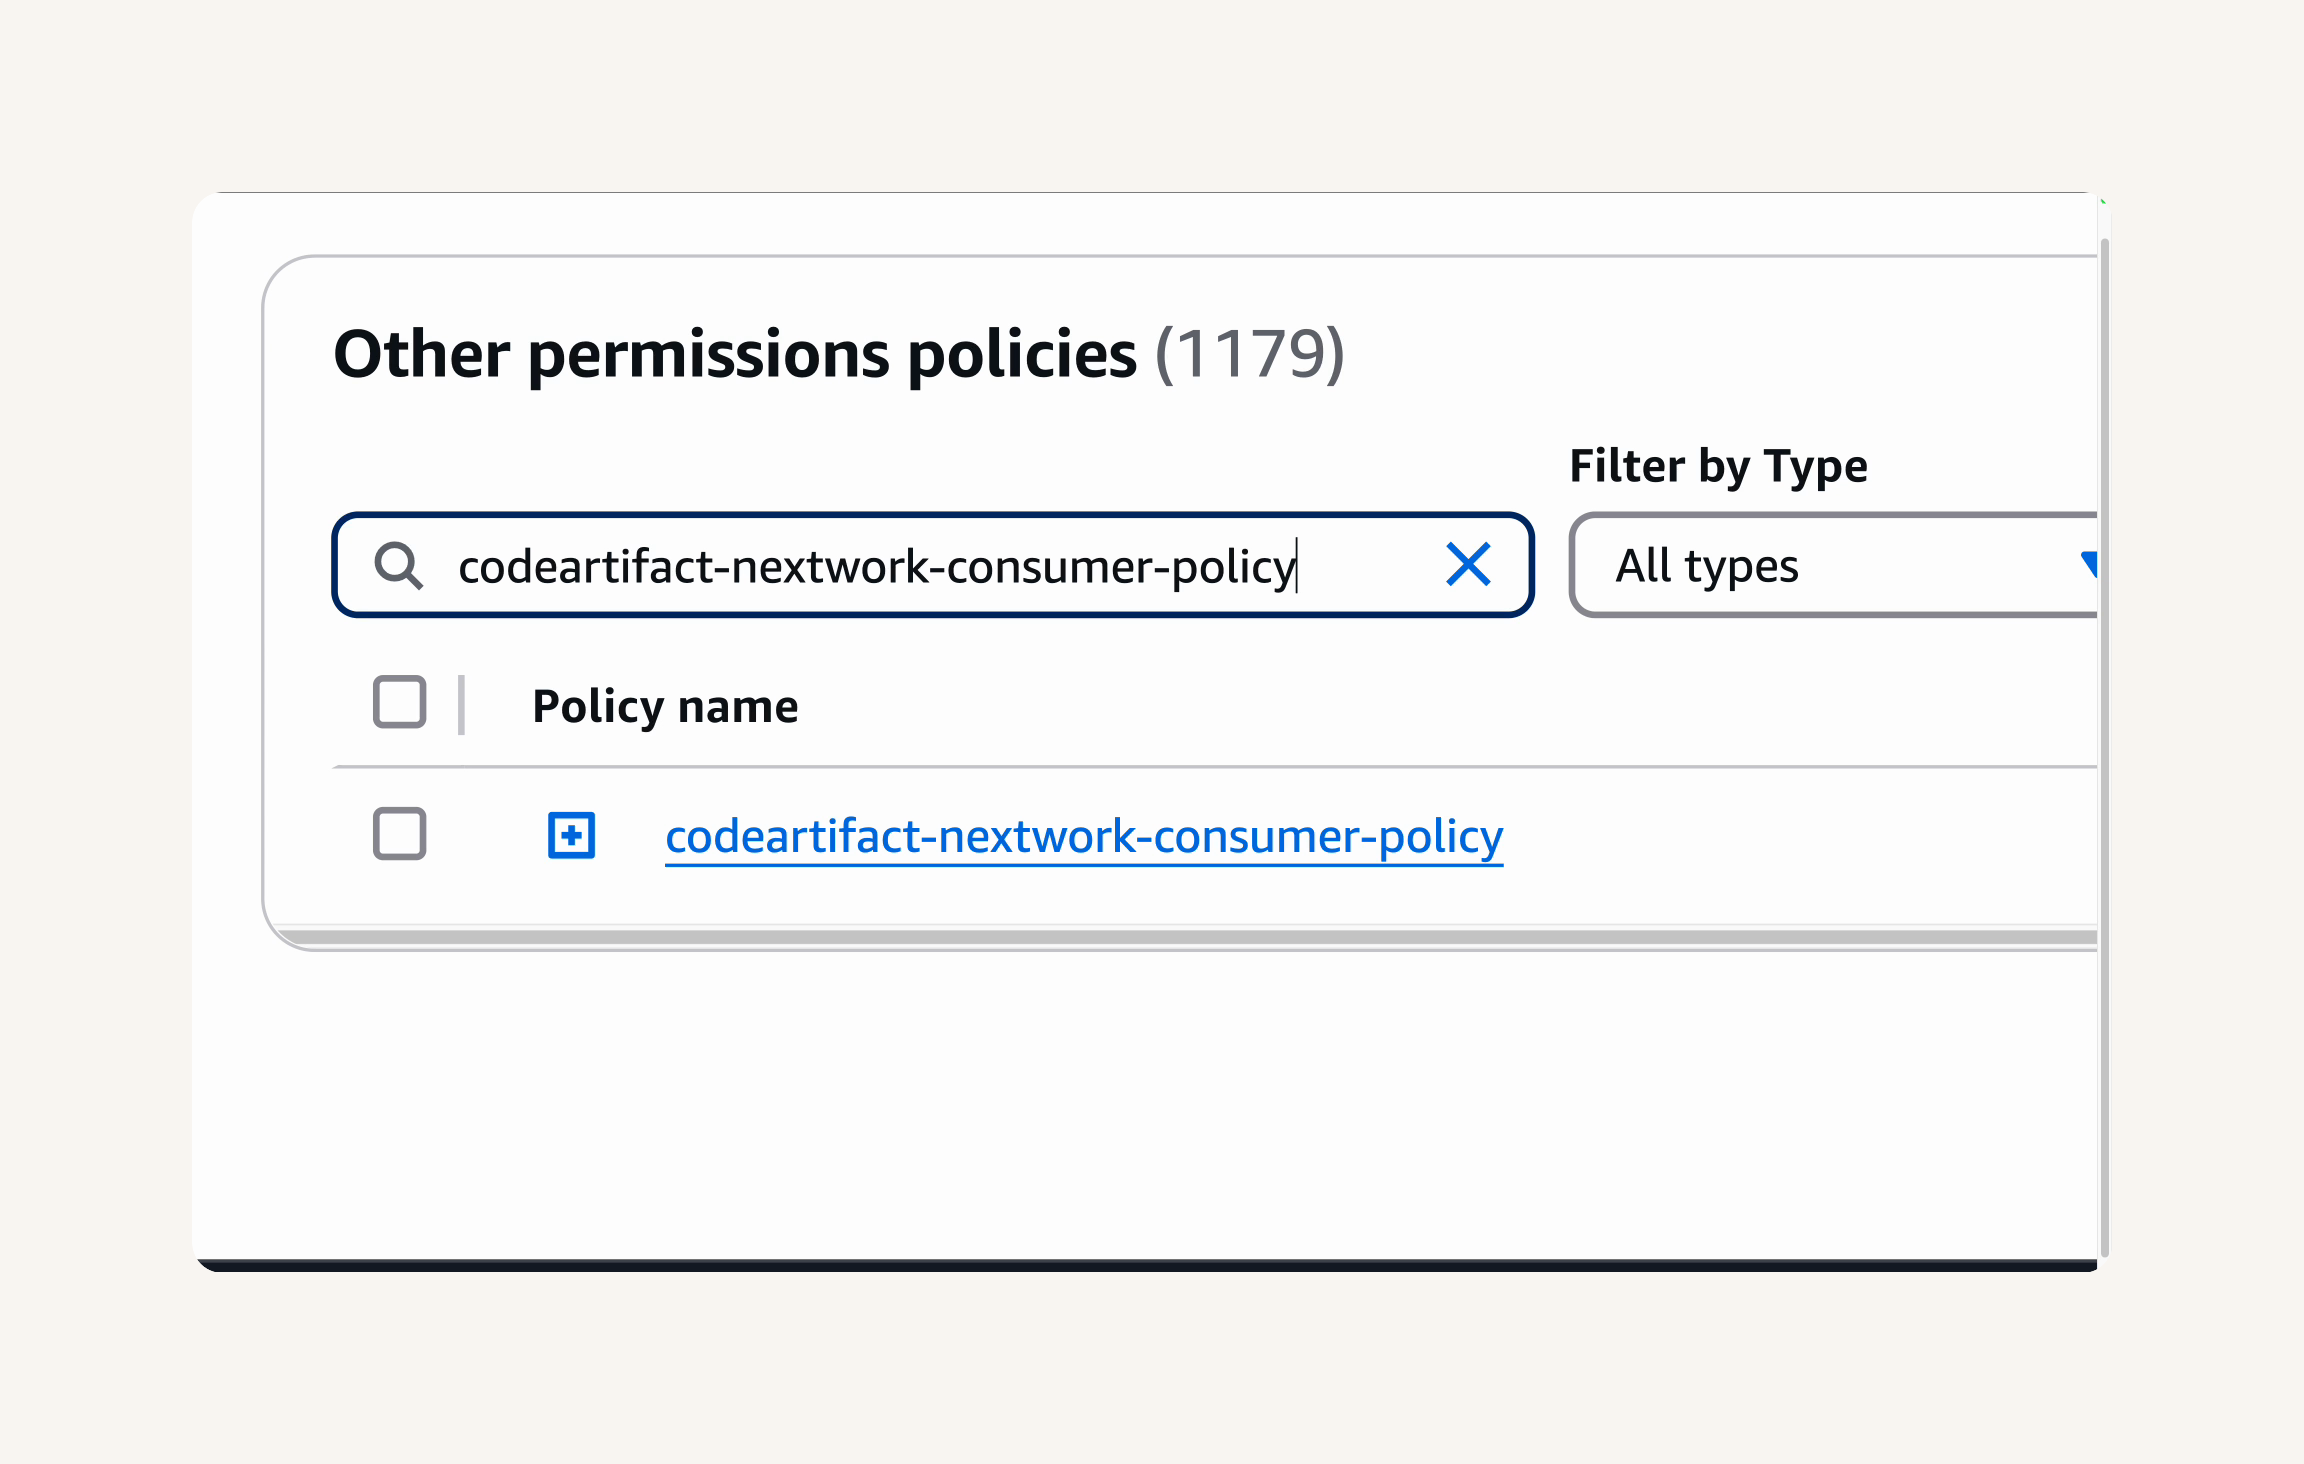
- You can even expand the policy name to review the permissions granted by this policy.

- After selecting the policy, click the Add permissions button.

- You should see a green banner confirming
Policy was successfully attached to role. and the policy should now be listed under the Permissions policies of your CodeBuild service role.

-
Return to the CodeBuild console, navigate to your
nextwork-devops-cicd project. -
Retry the build one more time by clicking Retry build.

The build status should again be In progress. With the added permissions, this time the build should proceed successfully! 🙏

NICE - the build status should now be Succeeded with a green checkmark, indicating a successful CI pipeline run!
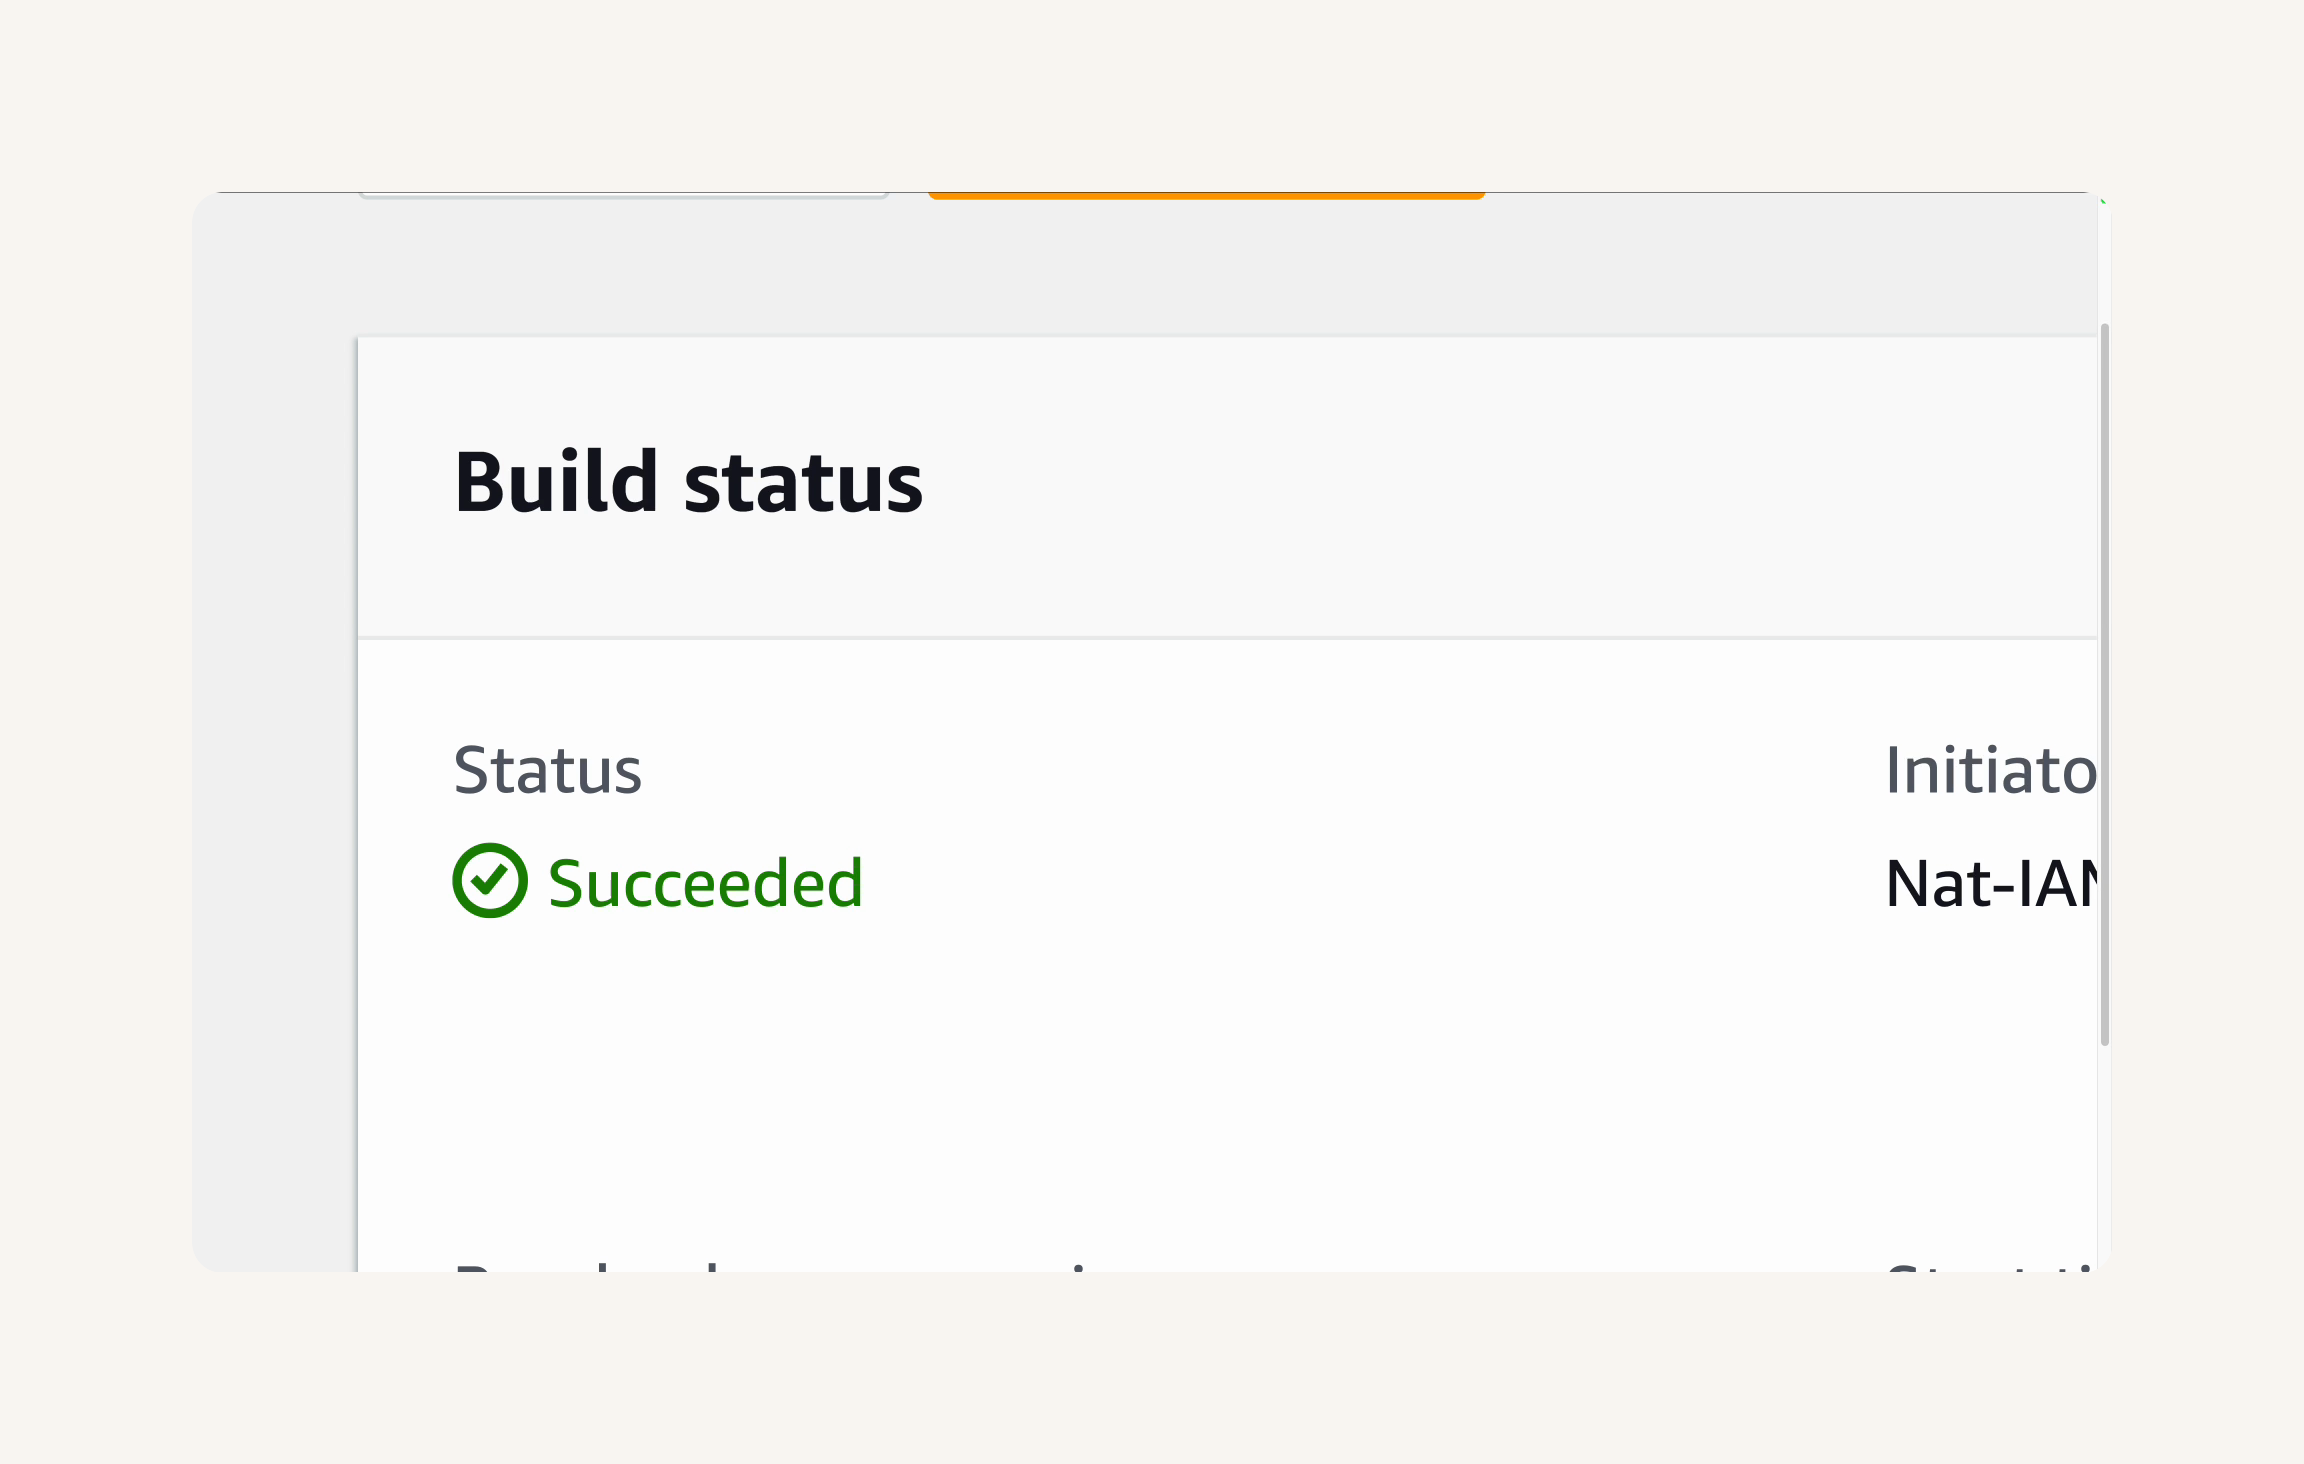
Let's check if our build process has successfully created and stored the artifact 🏃♀️
-
To verify the successful build, let's check if the build artifact was correctly uploaded to our S3 bucket.
-
Head to the
S3console. -
Select Buckets from the left navigation menu.
-
Select the
nextwork-devops-cicdbucket you created earlier.
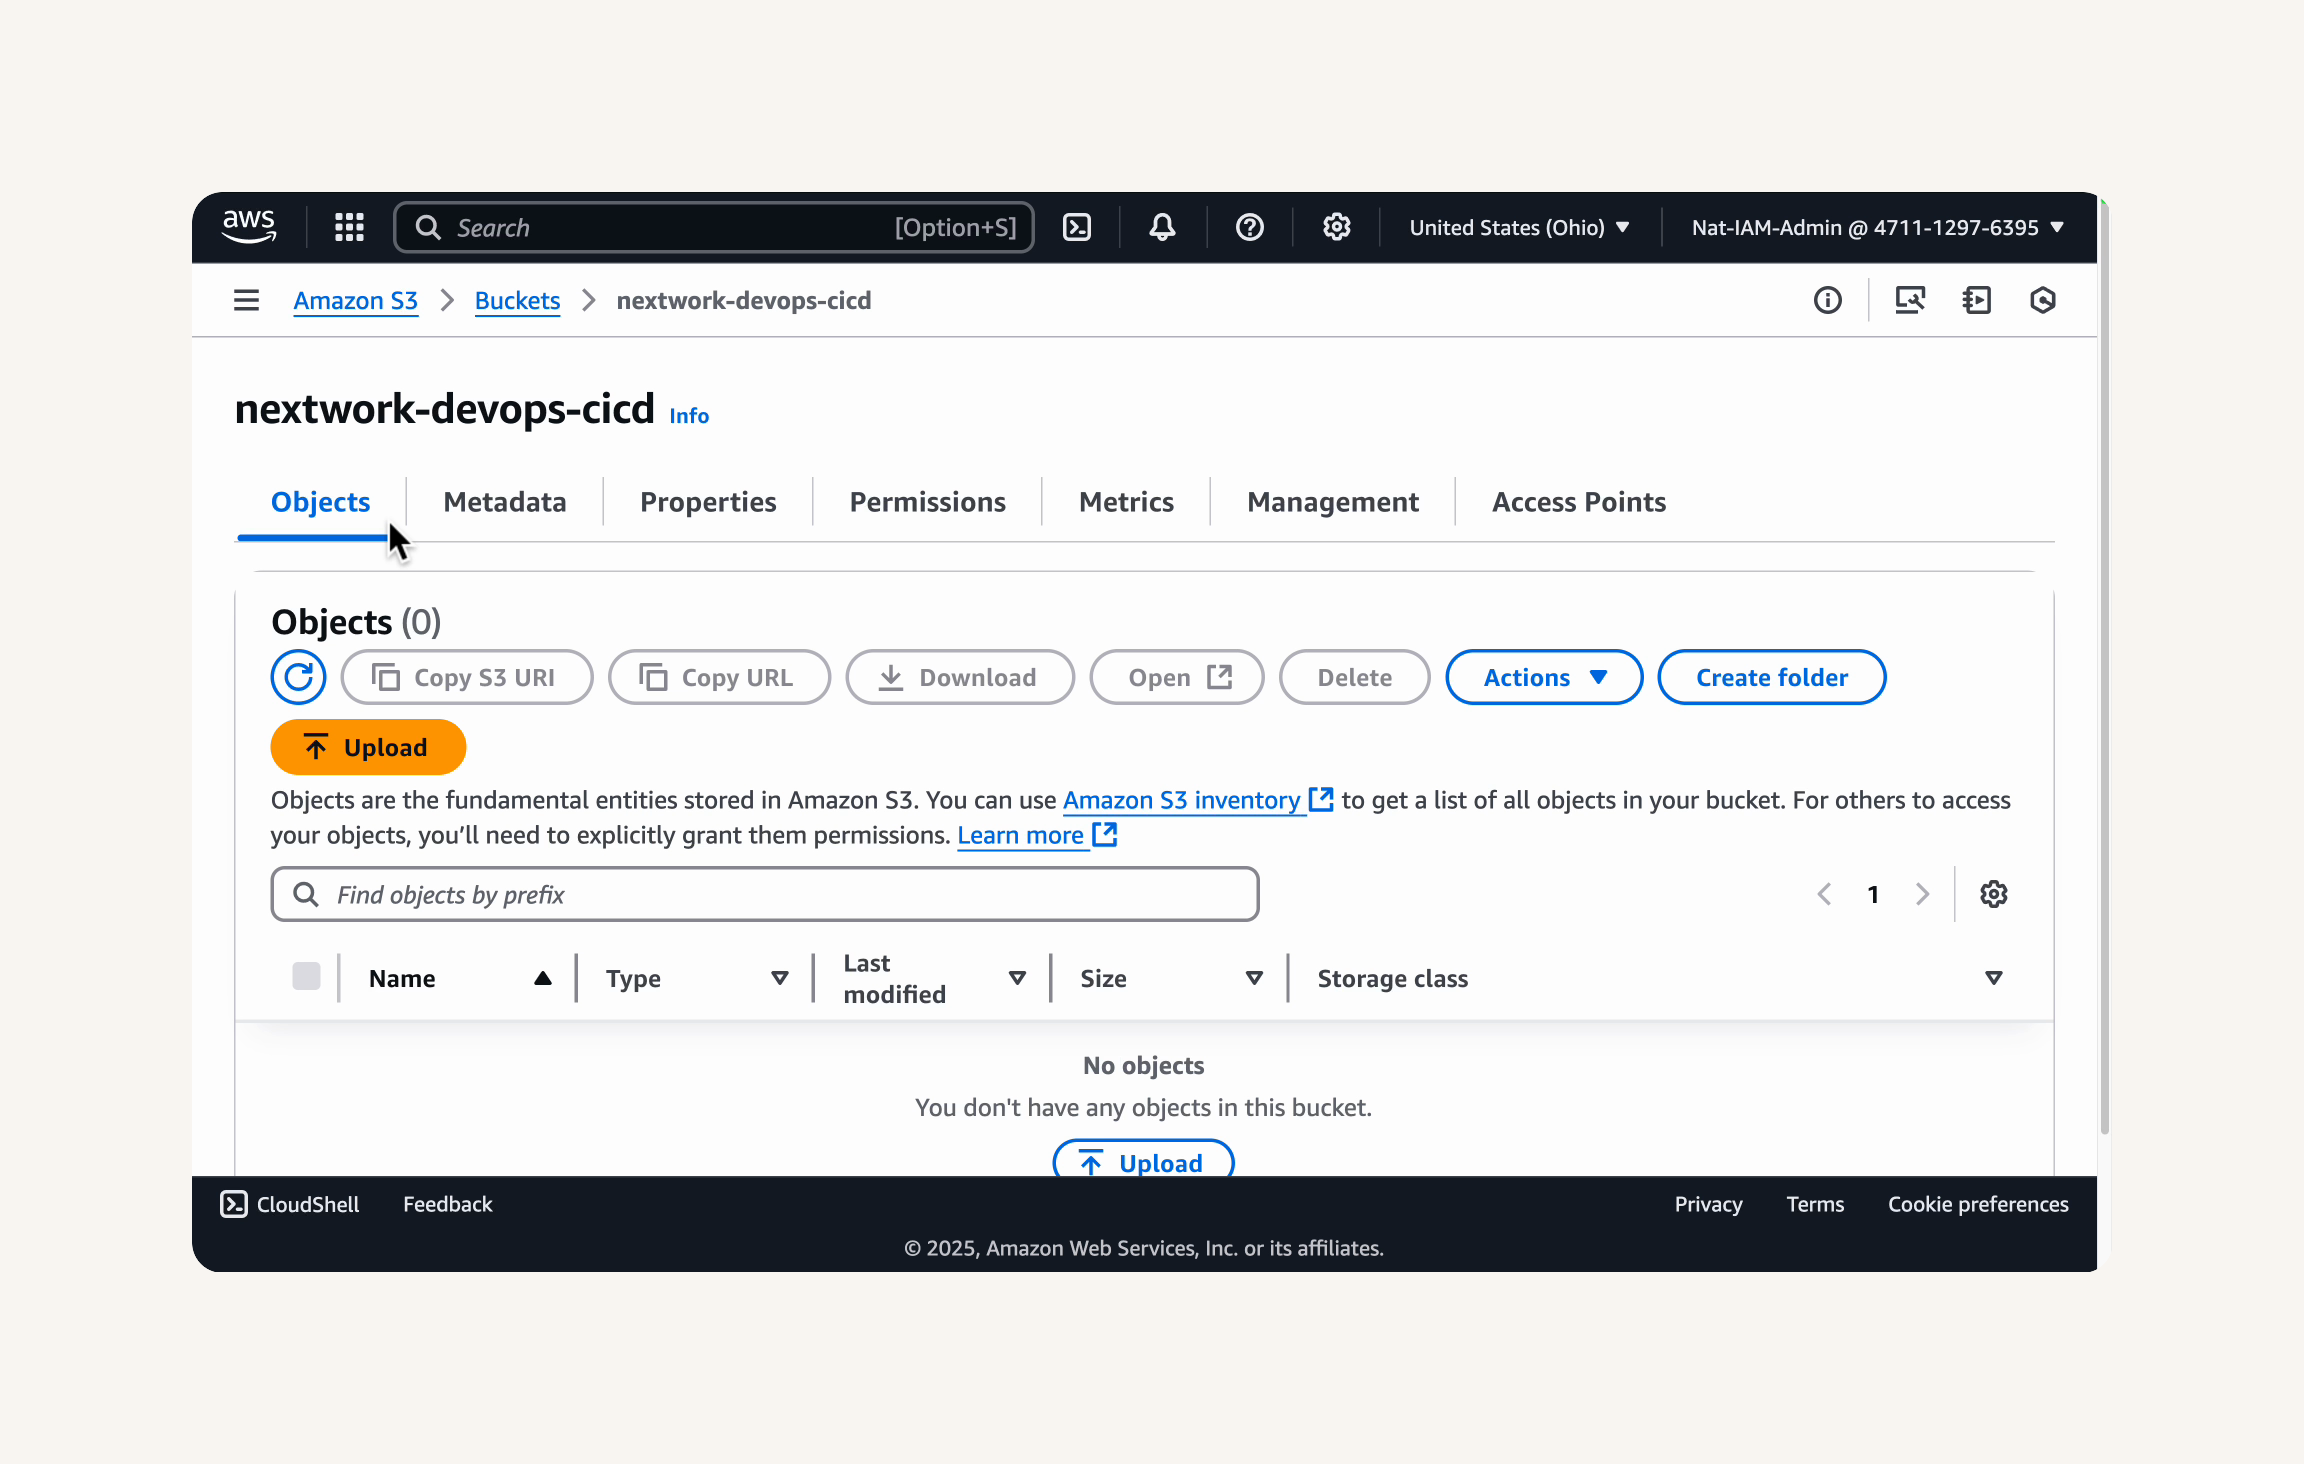
- Initially, the bucket might be empty. Click Refresh to update the bucket content.

💡 Why check for build artifacts in S3?
By confirming that an artifact exists in your S3 bucket, you know that:
Your code was successfully compiled and packaged
The build process completed without errors
The artifact was properly uploaded to its destination
The artifact is now available for the next step in your process (like deployment)
Think of it as the final proof that your CI process is delivering what it promised!
-
Click Refresh again if needed.
-
You should now see the artifact
nextwork-devops-cicd-artifact.ziplisted in your bucket 👀
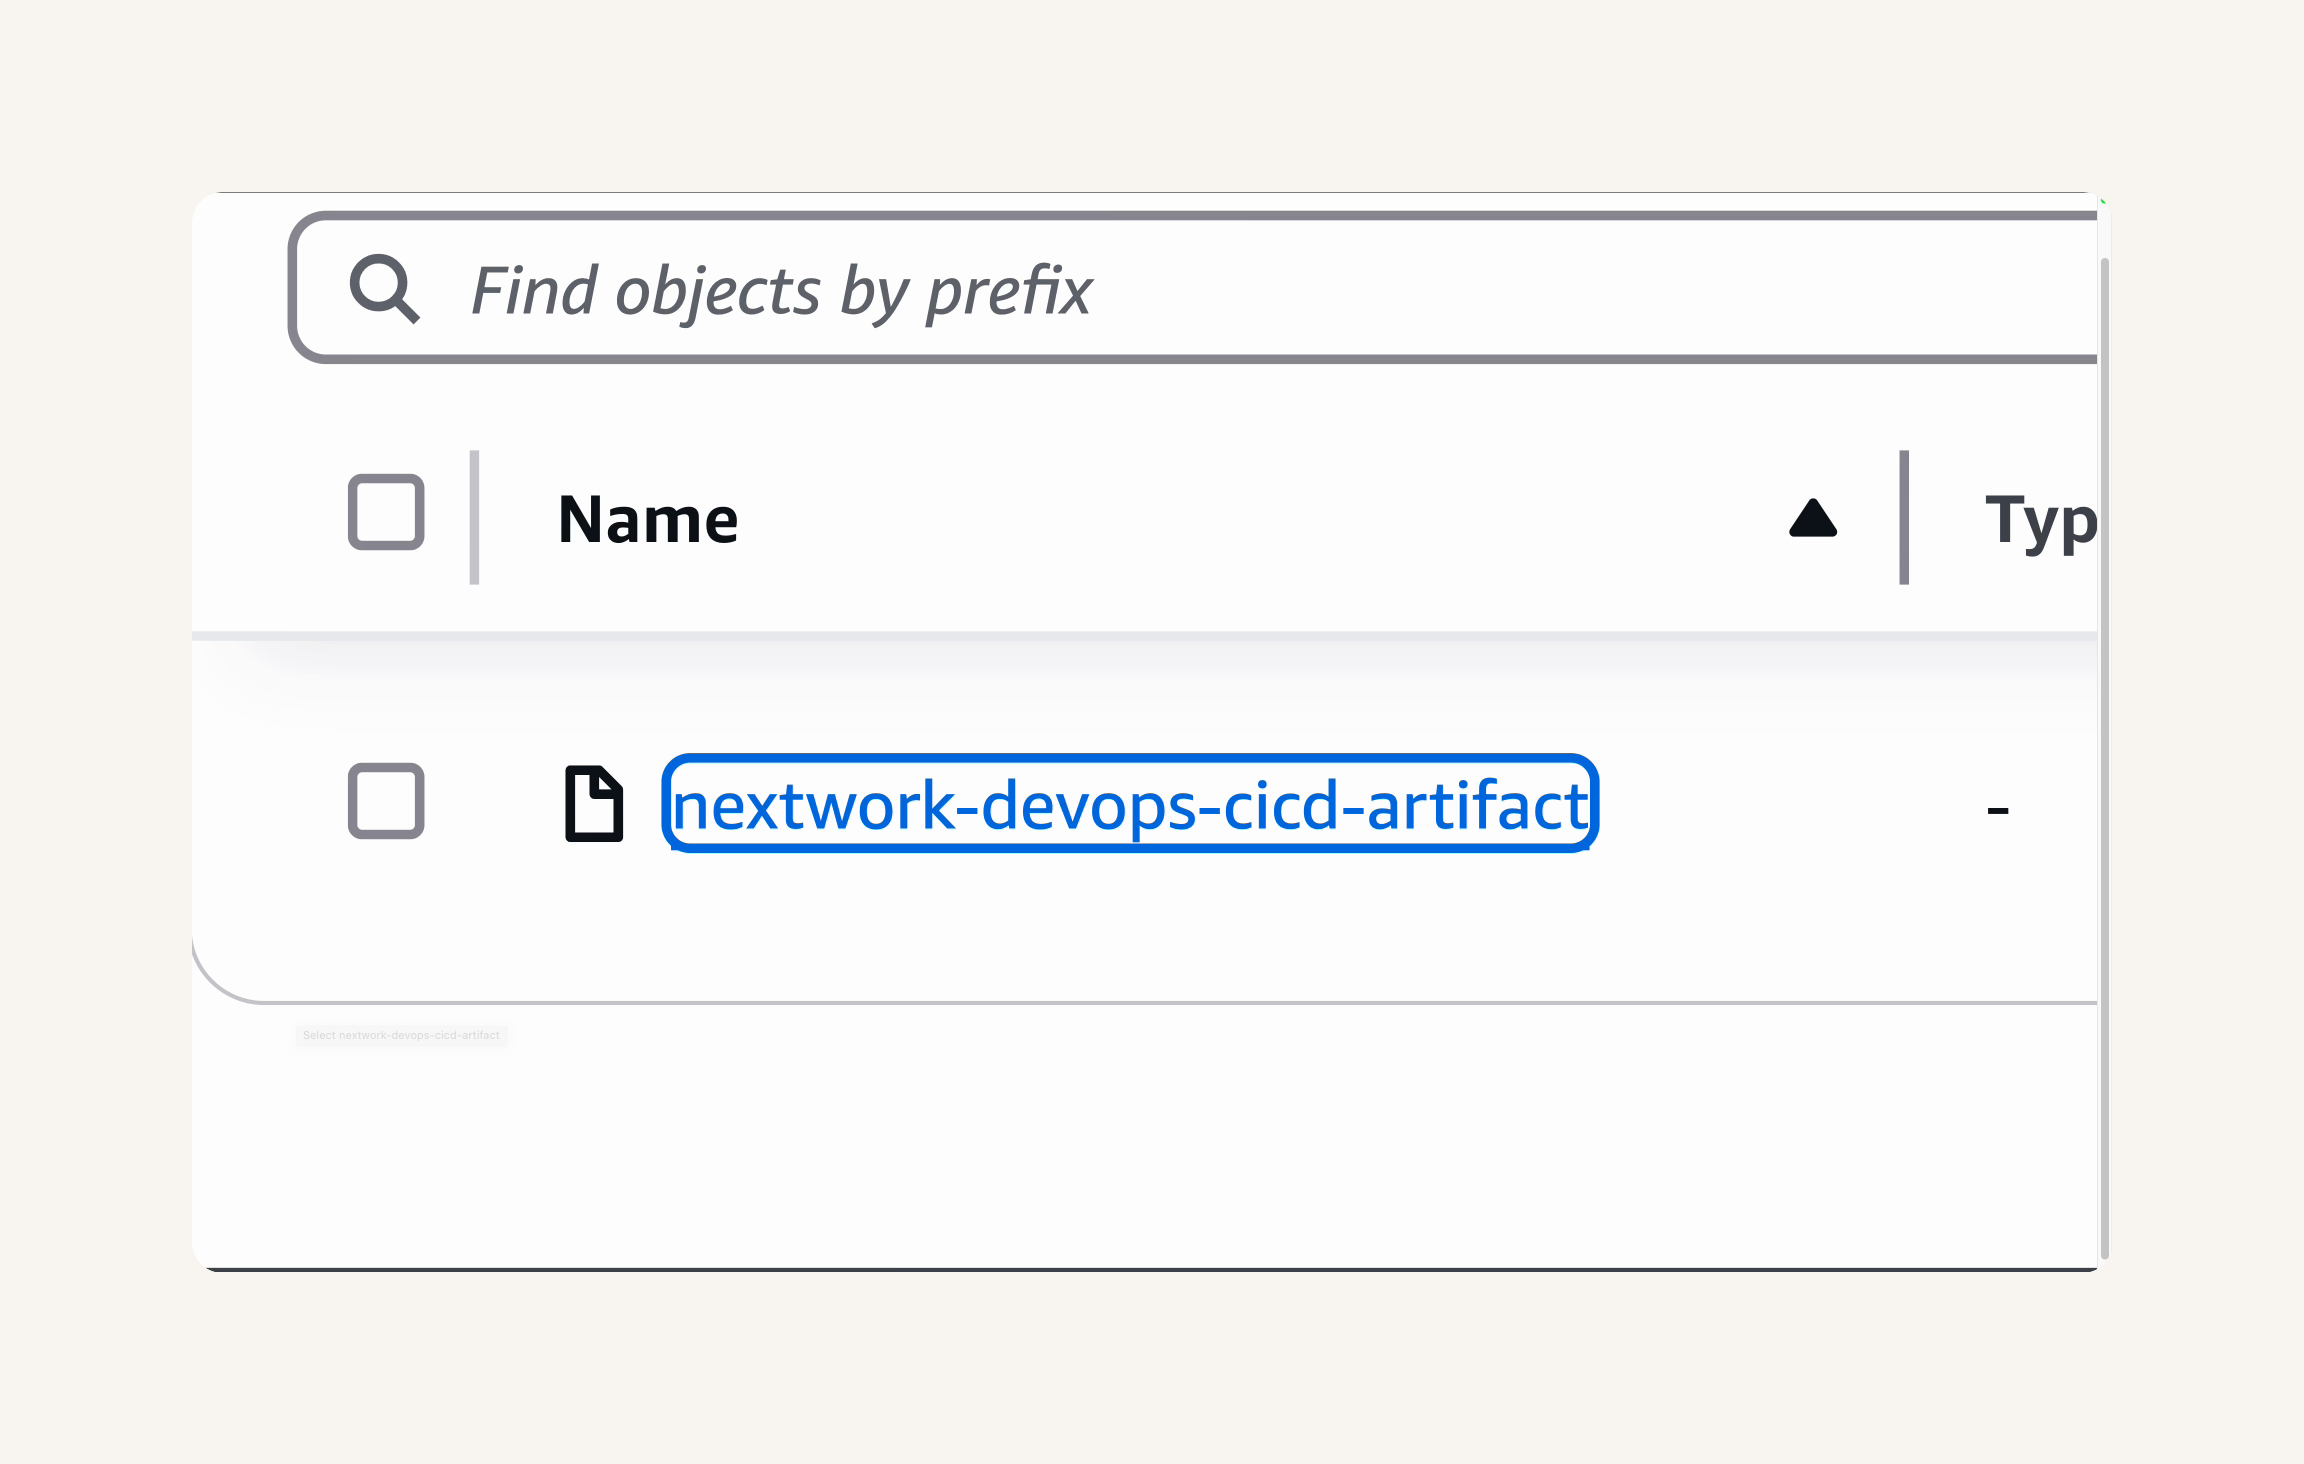
If you choose to download and inspect the artifact, you should find the nextwork-web-project.war file inside the downloaded zip archive, confirming the build process produced the expected output.
Want to experience the full power of CodeBuild?
Here's your chance to go beyond just continuous building!
In this section our goal is to automate testing with CodeBuild.
In this secret mission, you're going to:
-
Create a simple unit test for your Java web application
-
Trigger a build to see your tests run automatically
💡 Why add tests to my CI pipeline?
Automated testing is at the heart of any robust CI/CD pipeline! By having CodeBuild automatically run tests with every code change, you catch bugs earlier (when they're cheaper to fix), ensure code quality, and build confidence in your deployments. This is how professional development teams maintain high standards while moving quickly.
-
Open VS Code connected to your EC2 instance.
-
Run this command in your terminal -
touchwill create a simple test script called run-tests.shin your project root:
touch run-tests.sh- Check your file navigator on the left. You'll notice that you have a new file at the root of your project directory.

- Open the file and add the following shell script:
#!/bin/bash

echo "==== RUNNING SIMPLE TESTS ===="
echo "Test 1: Checking project structure..."
if [ -d "src" ]; then
  echo "✅ PASS: src directory exists"
else
  echo "❌ FAIL: src directory not found"
  exit 1
fi

echo "Test 2: Checking for web app files..."
if [ -f "src/main/webapp/index.jsp" ]; then
  echo "✅ PASS: index.jsp exists"
else
  echo "❌ FAIL: index.jsp not found"
  exit 1
fi

echo "Test 3: Simple validation test..."
echo "✅ PASS: This test always passes"

echo "==== ALL TESTS PASSED ===="
exit 0
What does this script do?
This shell script performs a simple validation tests on your project structure - is there asrcfolder and anindex.jspfile in your project directory? While real-world tests would validate the actual functionality of your web app, our script is a bit simpler so that testing doesn't take longer than a few seconds.The exit code at the end of the script (0 for success, non-zero for failure) determines whether the build continues or fails.
📝 Extra for Experts: Test writing best practices
Always test scripts locally before pushing to CI
Keep tests simple and focused
Use clear, descriptive output messages
Ensure tests can run without manual intervention
- Save the file (press Ctrl/Comand + S).
-
Jump back into your terminal.
-
Run the following command to make your script executable:
chmod +x run-tests.sh💡 What does it mean to make the script 'executable'?
When you use the commandchmod +x, you're changing the file's permissions to make it "executable" - basically telling the system "this isn't just a text file, it's a script that can be run."This is an important move because in Linux/Unix systems (like the EC2 instance you're using), files have different permissions that control who can read, write, or execute them. The +x part specifically adds the execute permission.

- Run the script
./run-tests.sh💡 How does this command work?
When you run./run-tests.sh:
The shell sees the ./ and looks in your current directory
It finds
run-tests.shBecause you made the script executable with
chmod +x, the shell can run it directlyThe shell executes the script line by line
- Woah! You get the results in your terminal right away.
💡 See the test results
If you see all "✅ PASS" messages and "ALL TESTS PASSED", the script ran successfully.
If any test fails, you'll see a "❌ FAIL" message and the script will exit with an error.
🙋♀️ My test failed
Interestinggggg! If tests fail, check:
Are you in the correct directory? Run
pwdin the terminal - you should be in the root directory i.e.nextwork-web-projectDo the expected files and directories exist? i.e. do you have a src folder and
index.jspfile?Do you have the correct file paths? Have you ever changed the location of
srcorindex.jsp?

- Check the exit code in your terminal:
echo $? # This will show the exit code (0 for success, non-zero for failure)💡 What's an exit code?
In Linux, an exit code is a number that a program returns when it finishes running, and it's job is to tell the operating system whether the program completed successfully or encountered an error.An exit code of 0 means success, while any non-zero value is a failure. Exit codes are particularly important in automation contexts like CI/CD pipelines because it enables automated decision-making - for example, a CI/CD pipeline can automatically stop if a critical step fails (and returned a non-zero exit code).

Nice! You've verified the test script works locally 👍 Now you're ready to integrate it into your CodeBuild pipeline.
Let's modify your buildspec.yml file to include the test script you wrote up.
💡 Why are we updating
buildspec.yml?
Thebuildspec.ymlfile is central to AWS CodeBuild - it's the instruction manual that tells CodeBuild exactly what commands to run and in what order! By updating it to include our test script, we're extending our CI pipeline to not just build the code, but to automate testing too. We'll tell CodeBuild to test your code using the run-tests.sh script, and then package up your code (get it ready for deployment) if no problems come up during testing.
- Open
buildspec.ymlin VS Code.

- Update everything from the
buildstage in your file to include your test, and some markers that indicate your build process' progress:
  build:
    commands:
      - echo "====== BEGINNING TEST PHASE ======"
      - echo "Running tests on `date`"
      - chmod +x run-tests.sh
      - ./run-tests.sh
      - echo "====== TEST PHASE COMPLETE ======"
      - echo "====== BEGINNING BUILD PHASE ======"
      - echo "Build started on `date`"
      - mvn -s settings.xml compile
      - echo "====== BUILD PHASE COMPLETE ======"

  post_build:
    commands:
      - echo "Build completed on `date`"
      - mvn -s settings.xml package

artifacts:
  files:
    - target/nextwork-web-project.war
💡 Why add markers?
These visual markers, like echo"====== BEGINNING TEST PHASE ======"make it easy to spot test results in your build logs. When you're troubleshooting build failures, you can quickly tell if the issue occurred during testing or compilation, based on the closest marker.

-
Double check that you didn't completely rewrite the whole file - these edits should only start from line 11 of your buildspec.yml file!
-
Save the file.
- Commit your changes to your repository:
git add .
git commit -m "Add automated testing to CI pipeline"
git push
-
Visit your GitHub repository - let's verify the updated buildspec.yml the CodeBuild should be using now.
-
Cool beans! Your changes are reflected in your GitHub repo.

- Expand the file tree on the left hand side of the screen.

- How good - you can also spot
run-tests.shin your project files.

-
Click into
run-tests.sh -
Sweeeet! Your test script is also in your GitHub repo.

Nice! Now that you your changes are in GitHub, let's jump to CodeBuild and build our project with the updated code.
-
Head back to the CodeBuild console.
-
Let's start a new build that includes the testing phase.
-
Select the button next to your build project.
-
Select Start build.

- Select Start now.

-
CodeBuild will grab the updated code in GitHub, and package up your project based on the new steps in buildspec.yml.
-
Your build will show In progress to start with

Build success! If your build is taking longer than 3 minutes, don't hesitate to refresh your page.

- Select the Build logs tab.

- Look for your test phase markers, which should start around lines 45-50 of the build logs - oooo, there's proof that CodeBuild ran the test commands you added to the build process!

🙋♀️ I ran into an error!
Try running the steps inbuildspec.ymllocally in your EC2 instance - this will help you see more detailed troubleshooting logs. Here are the set of commands in your buildspec file (you can run all of them in one go, after updating theCODEARTIFACT_AUTH_TOKENline with your account ID):
# Install phase (make sure Java 8 is installed)
java -version

# Pre-build phase
export CODEARTIFACT_AUTH_TOKEN=$(aws codeartifact get-authorization-token --domain nextwork --domain-owner YOUR_ACCOUNT_ID --query authorizationToken --output text)

# Test phase
chmod +x run-tests.sh
./run-tests.sh

# Compile phase
mvn -s settings.xml compile

# Package phase
mvn -s settings.xml package
Congratulations! You've just used CodeBuild to automate not only the build process, but also the testing of your web app code.
💡 Extra for Experts: What kind of tests do we usually run for an application?
What you've implemented is just the beginning! In production environments, CI/CD pipelines often include multiple testing layers:
Unit tests: Test individual components in isolation
Integration tests: Test how components work together
End-to-end tests: Test the entire application flow
Performance tests: Ensure the application meets speed requirements
Security scans: Check for vulnerabilities
Each layer adds more confidence but takes more time to run. A common pattern is to run fast tests (unit tests) on every commit, while slower tests run less frequently (perhaps nightly or weekly). This balance ensures quick feedback for developers while still maintaining comprehensive validation.
Nice work! 🚀 You've just configured a CI pipeline using AWS CodeBuild.
You've learned how to:
-
⚙️ Set up a CodeBuild project and connect it to a GitHub repository.
-
📝 Define a build process using buildspec.yml.
-
📦 Store build artifacts in Amazon S3.
-
🔑 Update CodeBuild's IAM roles to allow permissions to CodeArtifact.
-
🛠️ Troubleshoot common build errors and ensure successful builds.
-
💎 Set up CodeBuild to go beyond the build process - and automate testing too!
Next up, we're going to continue the journey of our web app by setting up CodeDeploy to deploy our web app to an EC2 instance. Are you ready to get your web app live and public for the world to see?!

Welcome to Part-5 of the 6 Parts DevOps Challenge!
Today, we're working with AWS CodeDeploy to automate the deployment of your web app.
- An AWS account - Create one here!
f you are following along since part-1 of this project, you may proceed further. However if at any point you deleted your resources, make sure to go back and set up every thing need for this project from DevOps - Complete CICD Pipeline With AWS CodePipeline#Part-1. Set Up a Web App in the Cloud till this part of the project. Good Luck!
So far, you've used:
-
✅ VS Code and GitHub and to write and store your web app's code.
-
✅ CodeArtifact to secure web app's packages.
-
✅ CodeBuild to compile and package your app into a handy WAR file for deployment.
-
⏭️ Now, AWS CodeDeploy is here to deploy that file on web servers, so users can see your web app!
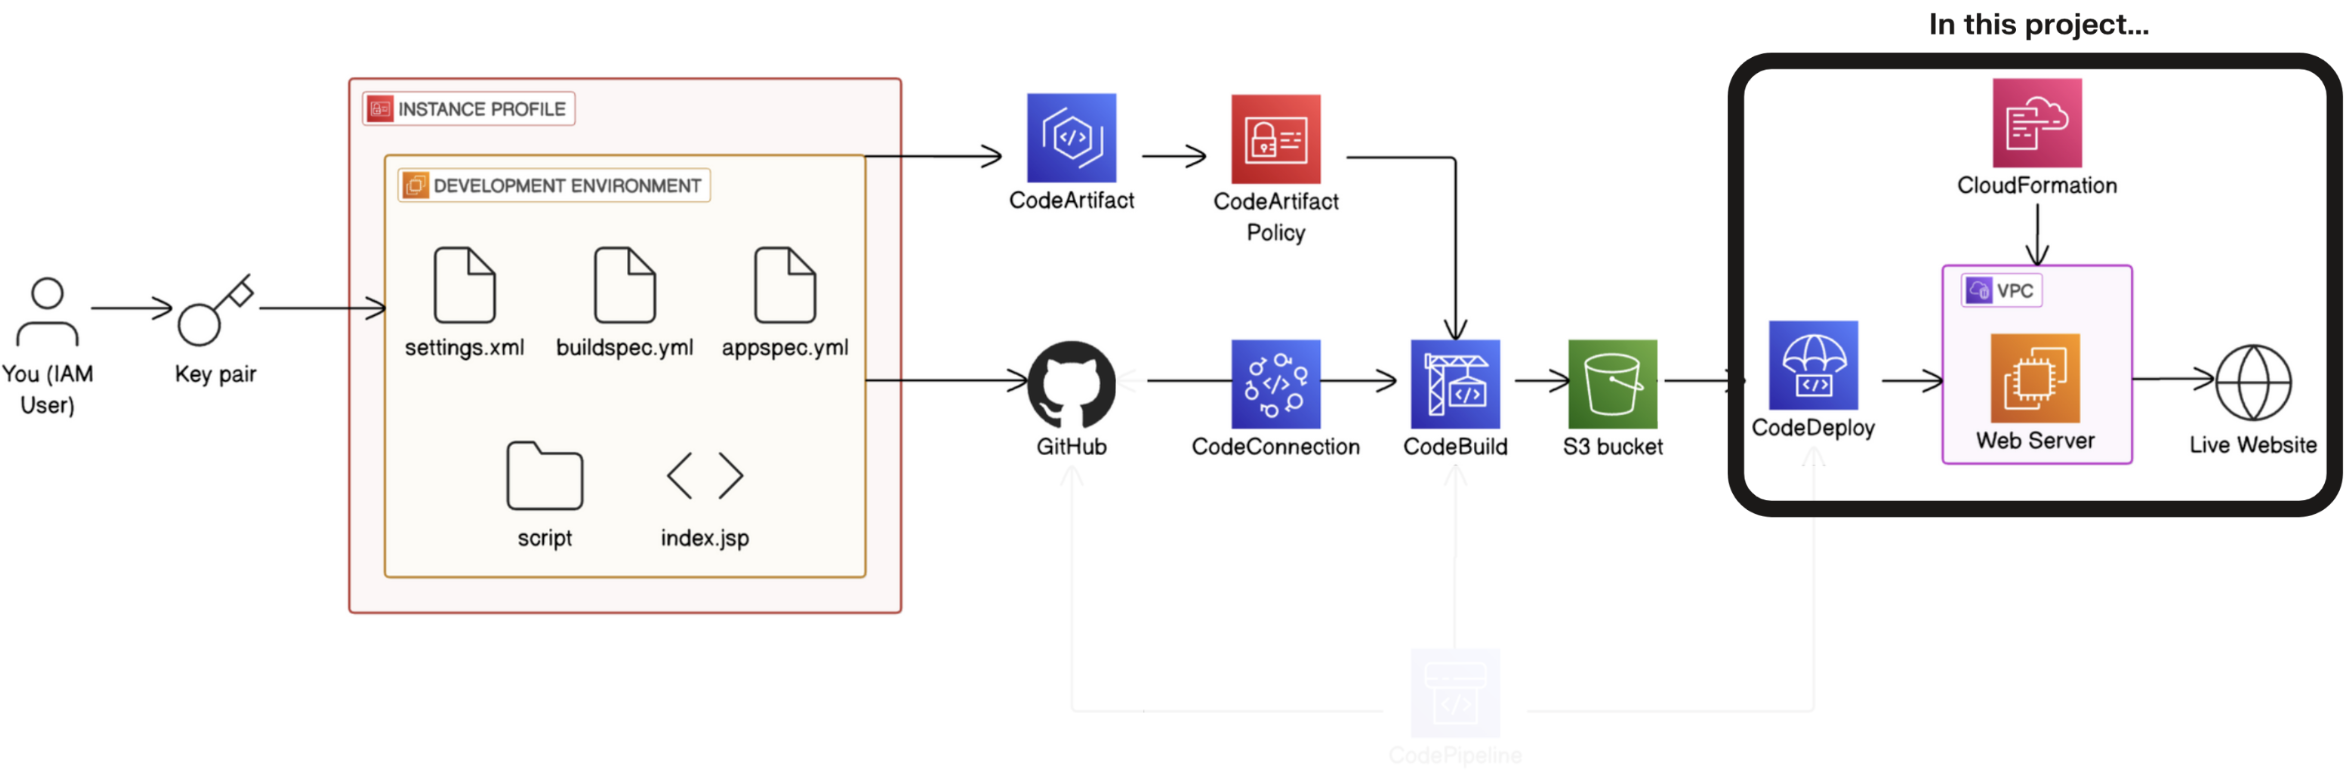
Get ready to:
-
☁️ Launch a deployment environment using AWS CloudFormation.
-
⚙️ Write deployment scripts to automate deployment commands.
-
🚀 Deploy your web app with CodeDeploy and see it live!
-
💎 Implement a disaster recovery technique - roll back a deployment!
💡 Why am I learning about AWS CodeDeploy?
When you're developing software, you need a reliable way to release new versions of your app to the world.AWS CodeDeploy is a continuous deployment service, which means it automates how you get new software versions onto your servers. Instead of manually moving files and restarting services yourself, CodeDeploy automatically runs a deployment using settings and commands that you define.
As part of a CI/CD pipeline, CodeDeploy makes software releases faster, more consistent, and way less stressful.
🌐 What is deployment?
Deployment is a process that takes your code from development to ➡️ a live environment where users can access it.
Deployment usually comes with many manual steps, like copying files to servers or installing depdencies. This can be time-consuming, error-prone, and difficult to reproduce consistently.
🤔 Then... What is AWS CodeDeploy?
AWS CodeDeploy is a continuous deployment service. This means CodeDeploy...
-
Automates deployments: Eliminates error-prone manual steps - no more manually copying files and running commands to deploy your application.
-
Enables consistent rollouts: Your application deploys the same way every time.
-
Minimizes downtime: Can deploy in ways that keep your application available.
-
Handles failures: Can automatically roll back if something goes wrong.
Let's start our deployment by setting up the deployment infrastructure. We'll use CloudFormation to launch an EC2 instance and its networking resources.
💡 Didn't we already create an EC2 instance at the start of this project?
Yes we did! When we created our development instance, we've set up an EC2 instance for us to use as a development environment i.e. to create and edit code for our web app.This new instance is created specifically for running our application in a live, production environment i.e. what users will see. By having a separate EC2 instance for deploying our application, we avoid the risk of testing any code changes/new features in a live production environment that users end up seeing too.
In this step, you're going to:
-
Launch an EC2 instance using CloudFormation.
-
Configure network settings for the EC2 instance.
-
Understand Infrastructure as Code.

- Head to the
CloudFormationconsole.

💡 What is AWS CloudFormation?
Think of CloudFormation is AWS' infrastructure as code tool. Instead of clicking around the AWS console to set up resources (which gets tedious fast!), you write a single template file that describes everything you need - your EC2 instances, security groups, databases, and more. Then, CloudFormation reads this file and builds your entire environment for you, exactly the same way every time.💡 What is Infrastructure as Code?
Just like software developers write code to build applications, Infrastructure as Code (IaC) is a type of software that lets you write code to create your servers, networks, and other infrastructure. Instead of manually configuring each server (time-consuming and error-prone), you have a script that sets everything up perfectly every time. Your infrastructure becomes predictable, repeatable, and much easier to manage!
- Select Create stack.

- Select With new resources (standard) from the dropdown menu

💡 What is a CloudFormation stack?
When you deploy a CloudFormation template, you're creating a stack - think of it as a project folder that holds all your connected resources. The cool thing is that CloudFormation treats this stack as a single unit, so you can create, update, or delete all those resources together with one command.
-
Select Template is ready.
-
Select Upload a template file.
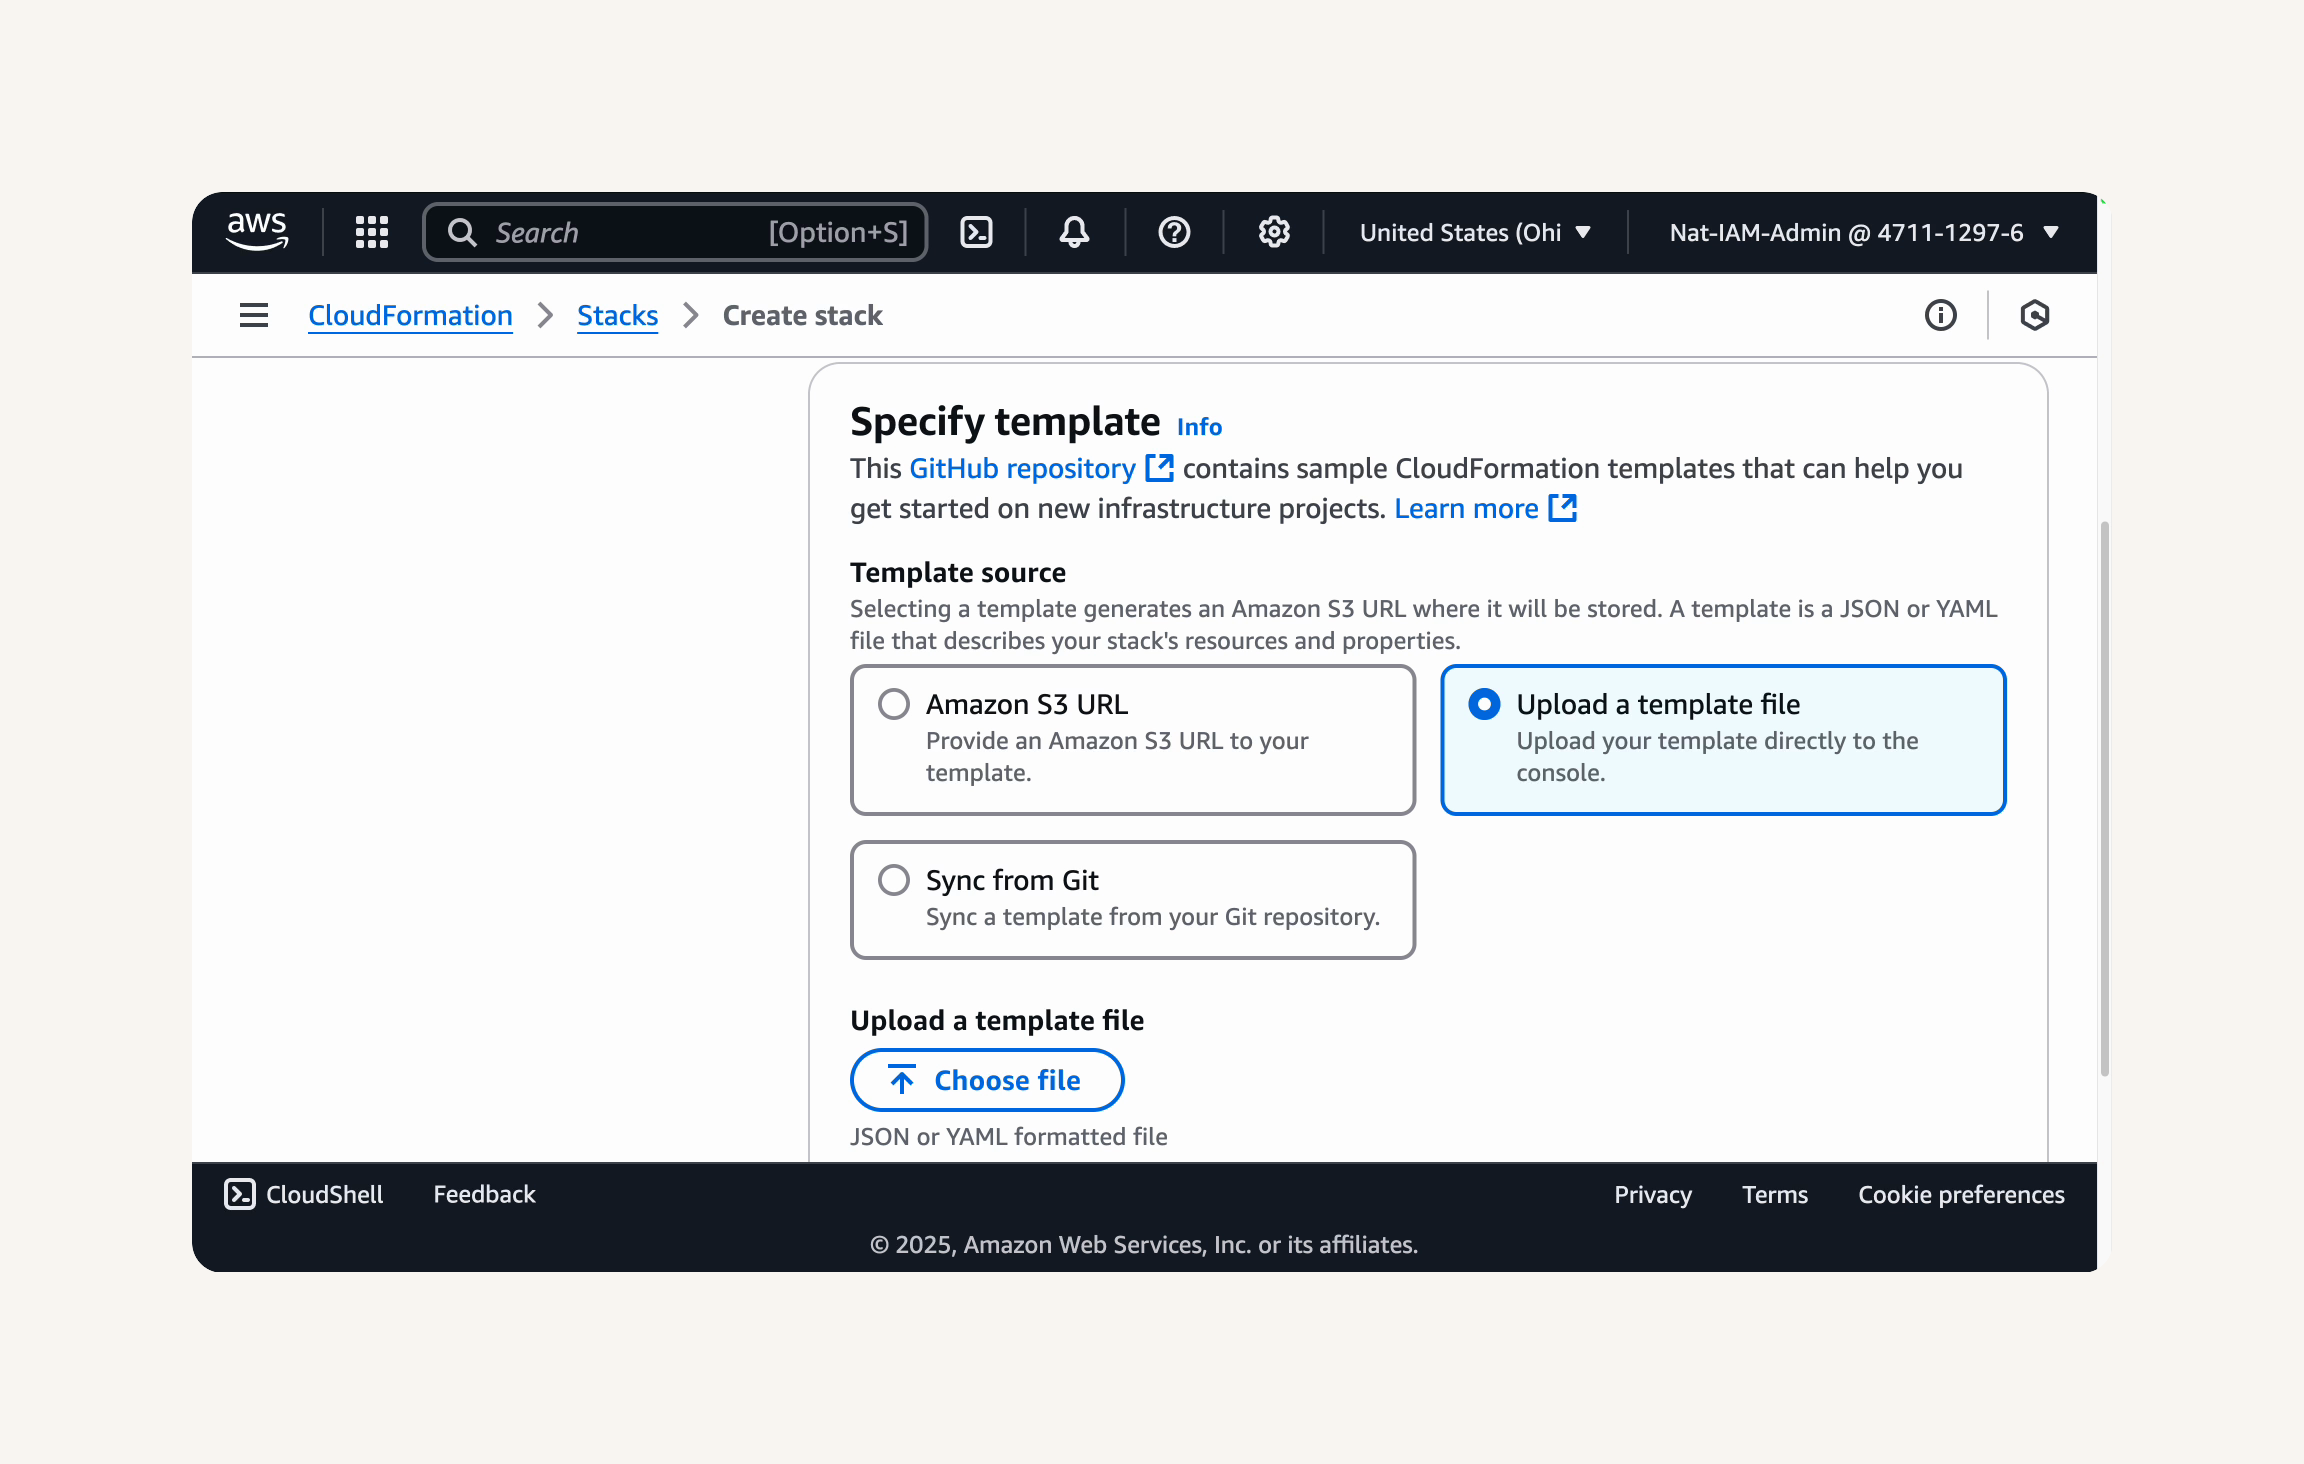
- Select Choose file.

- Upload the following CloudFormation template:
nextworkwebapp.yaml
💡 What is a CloudFormation template?
A CloudFormation template is a text file where you tell CloudFormation the AWS resources you want to create and how they should be configured - like specifying "I want a t2.micro EC2 instance with this security group and permissions to access this S3 bucket." The beauty is that this template is both human-readable AND machine-executable. In our project, we're using YAML because it's a bit friendlier to read than JSON (fewer brackets and quotes to keep track of!).
- Verify the file
nextworkwebapp.yamlis uploaded and select Next.

-
Select Next.
-
Enter NextWorkCodeDeployEC2Stack as the Stack name.

-
Next, we'll need to add our IP address to the template.
-
Head to https://checkip.amazonaws.com/ and copy your IP address.

- Paste your IP address into the MyIP parameter field and add /32 at the end.
💡 Why do we add
/32to the IP address?
Adding/32to your IP address is like telling AWS "I only want this exact address to have access, not any others." The/32is CIDR notation (pronounced "cider" - yes, like the drink!) that specifies exactly how many IP addresses are included in your rule.With /32, it's just one - your specific IP. If we used
/24instead, we'd be allowing 256 different IP addresses! For security, we're being as specific as possible to minimize who can access our EC2 instance.
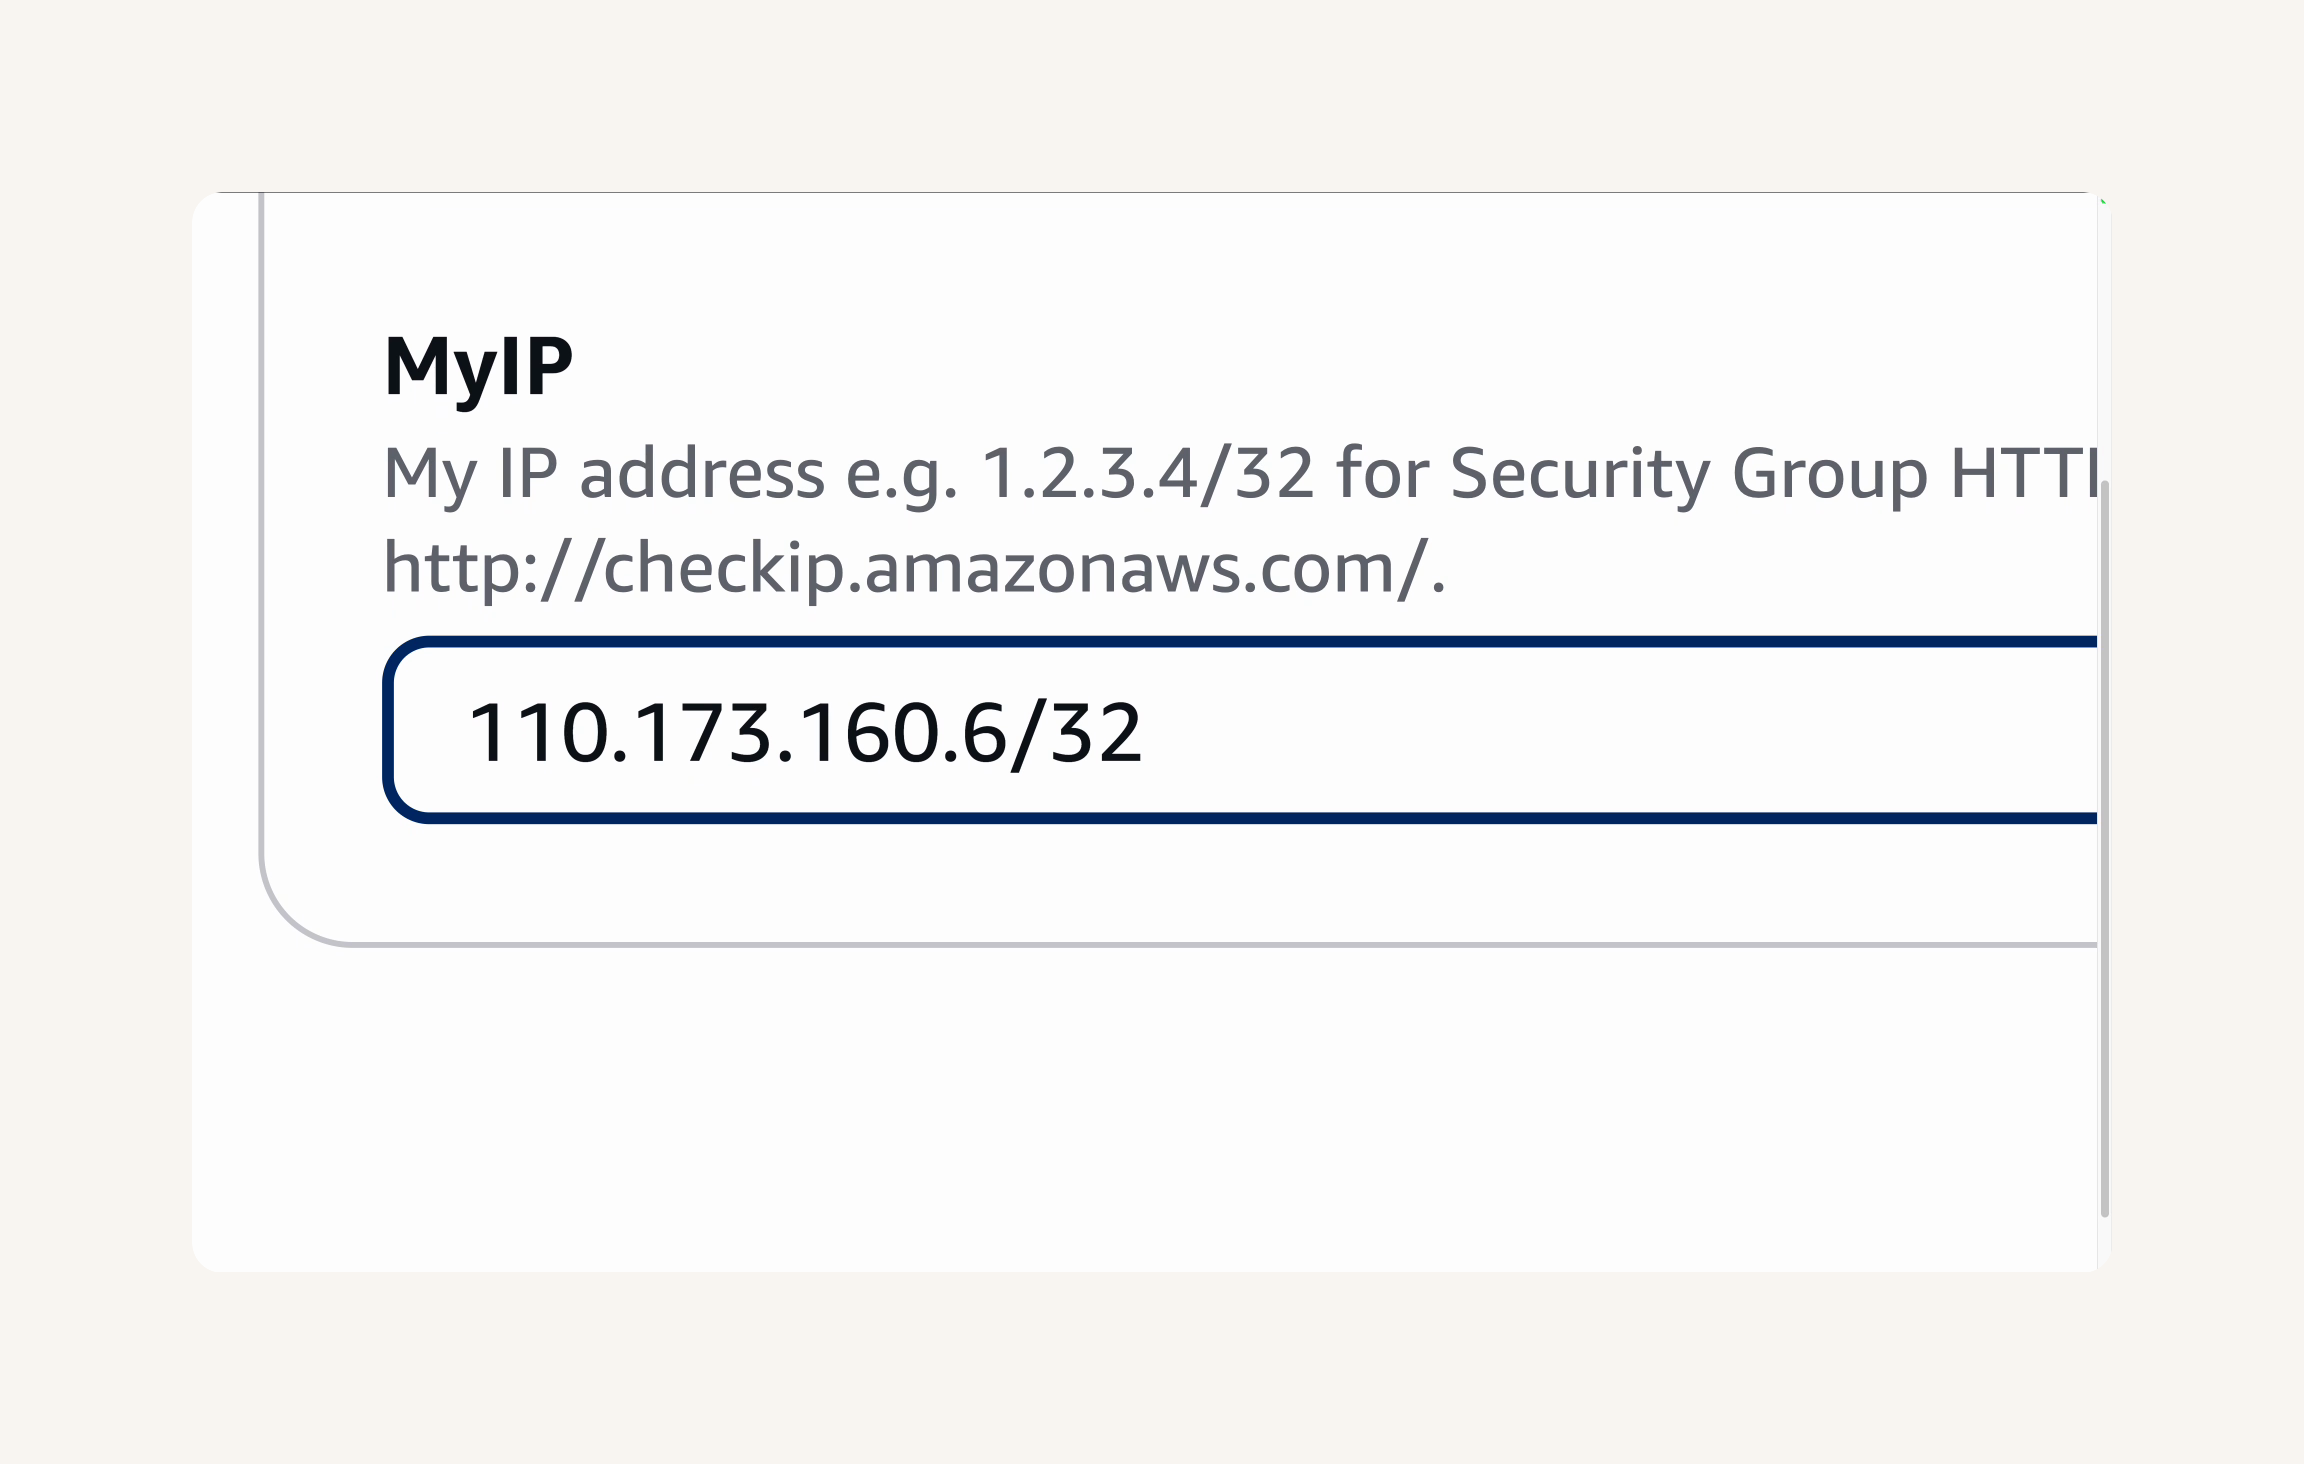
- Select Next.

- In Configure stack options, under Stack failure options, select Roll back all stack resources.

- Next, select Delete all newly created resources.
💡 What are Stack failure options?
Stack failure options are your safety net when things don't go as planned. They determine what CloudFormation should do if it runs into an error while creating your resources:
Roll back all stack resources: This is like having an "undo" button for your entire deployment. If anything fails, CloudFormation will automatically revert everything back to how it was before you started. This prevents you from ending up with a half-built environment that might not work or cost you money unnecessarily.
Delete all newly created resources: This makes sure CloudFormation cleans up after itself during a rollback. No resources left behind to surprise you on your bill next month!
These options are especially valuable when you're learning - they let you experiment without worrying about leaving a mess behind.

- Scroll down to Capabilities and check the box I acknowledge that AWS CloudFormation might create IAM resources.
💡 Why would CloudFormation create an IAM role?
IAM roles are like special visitor passes that AWS services can "wear" to temporarily access other services. In our case, our deployment EC2 instance will use a role to access files from S3.Hmmm... why do you think it'll need access to S3 (have you created an S3 bucket anywhere)? Aha - your deployment environment will need to use the build artifacts stored in your S3 bucket!

- Select Next.

Review and Submit
Let's review our stack's details!
- Template: Template is ready

- Stack name: NextWorkCodeDeployEC2Stack
- Parameters: MyIP is filled with your IP and /32

- Rollback on failure: Activated
- Delete all newly created resources during rollback: Activated
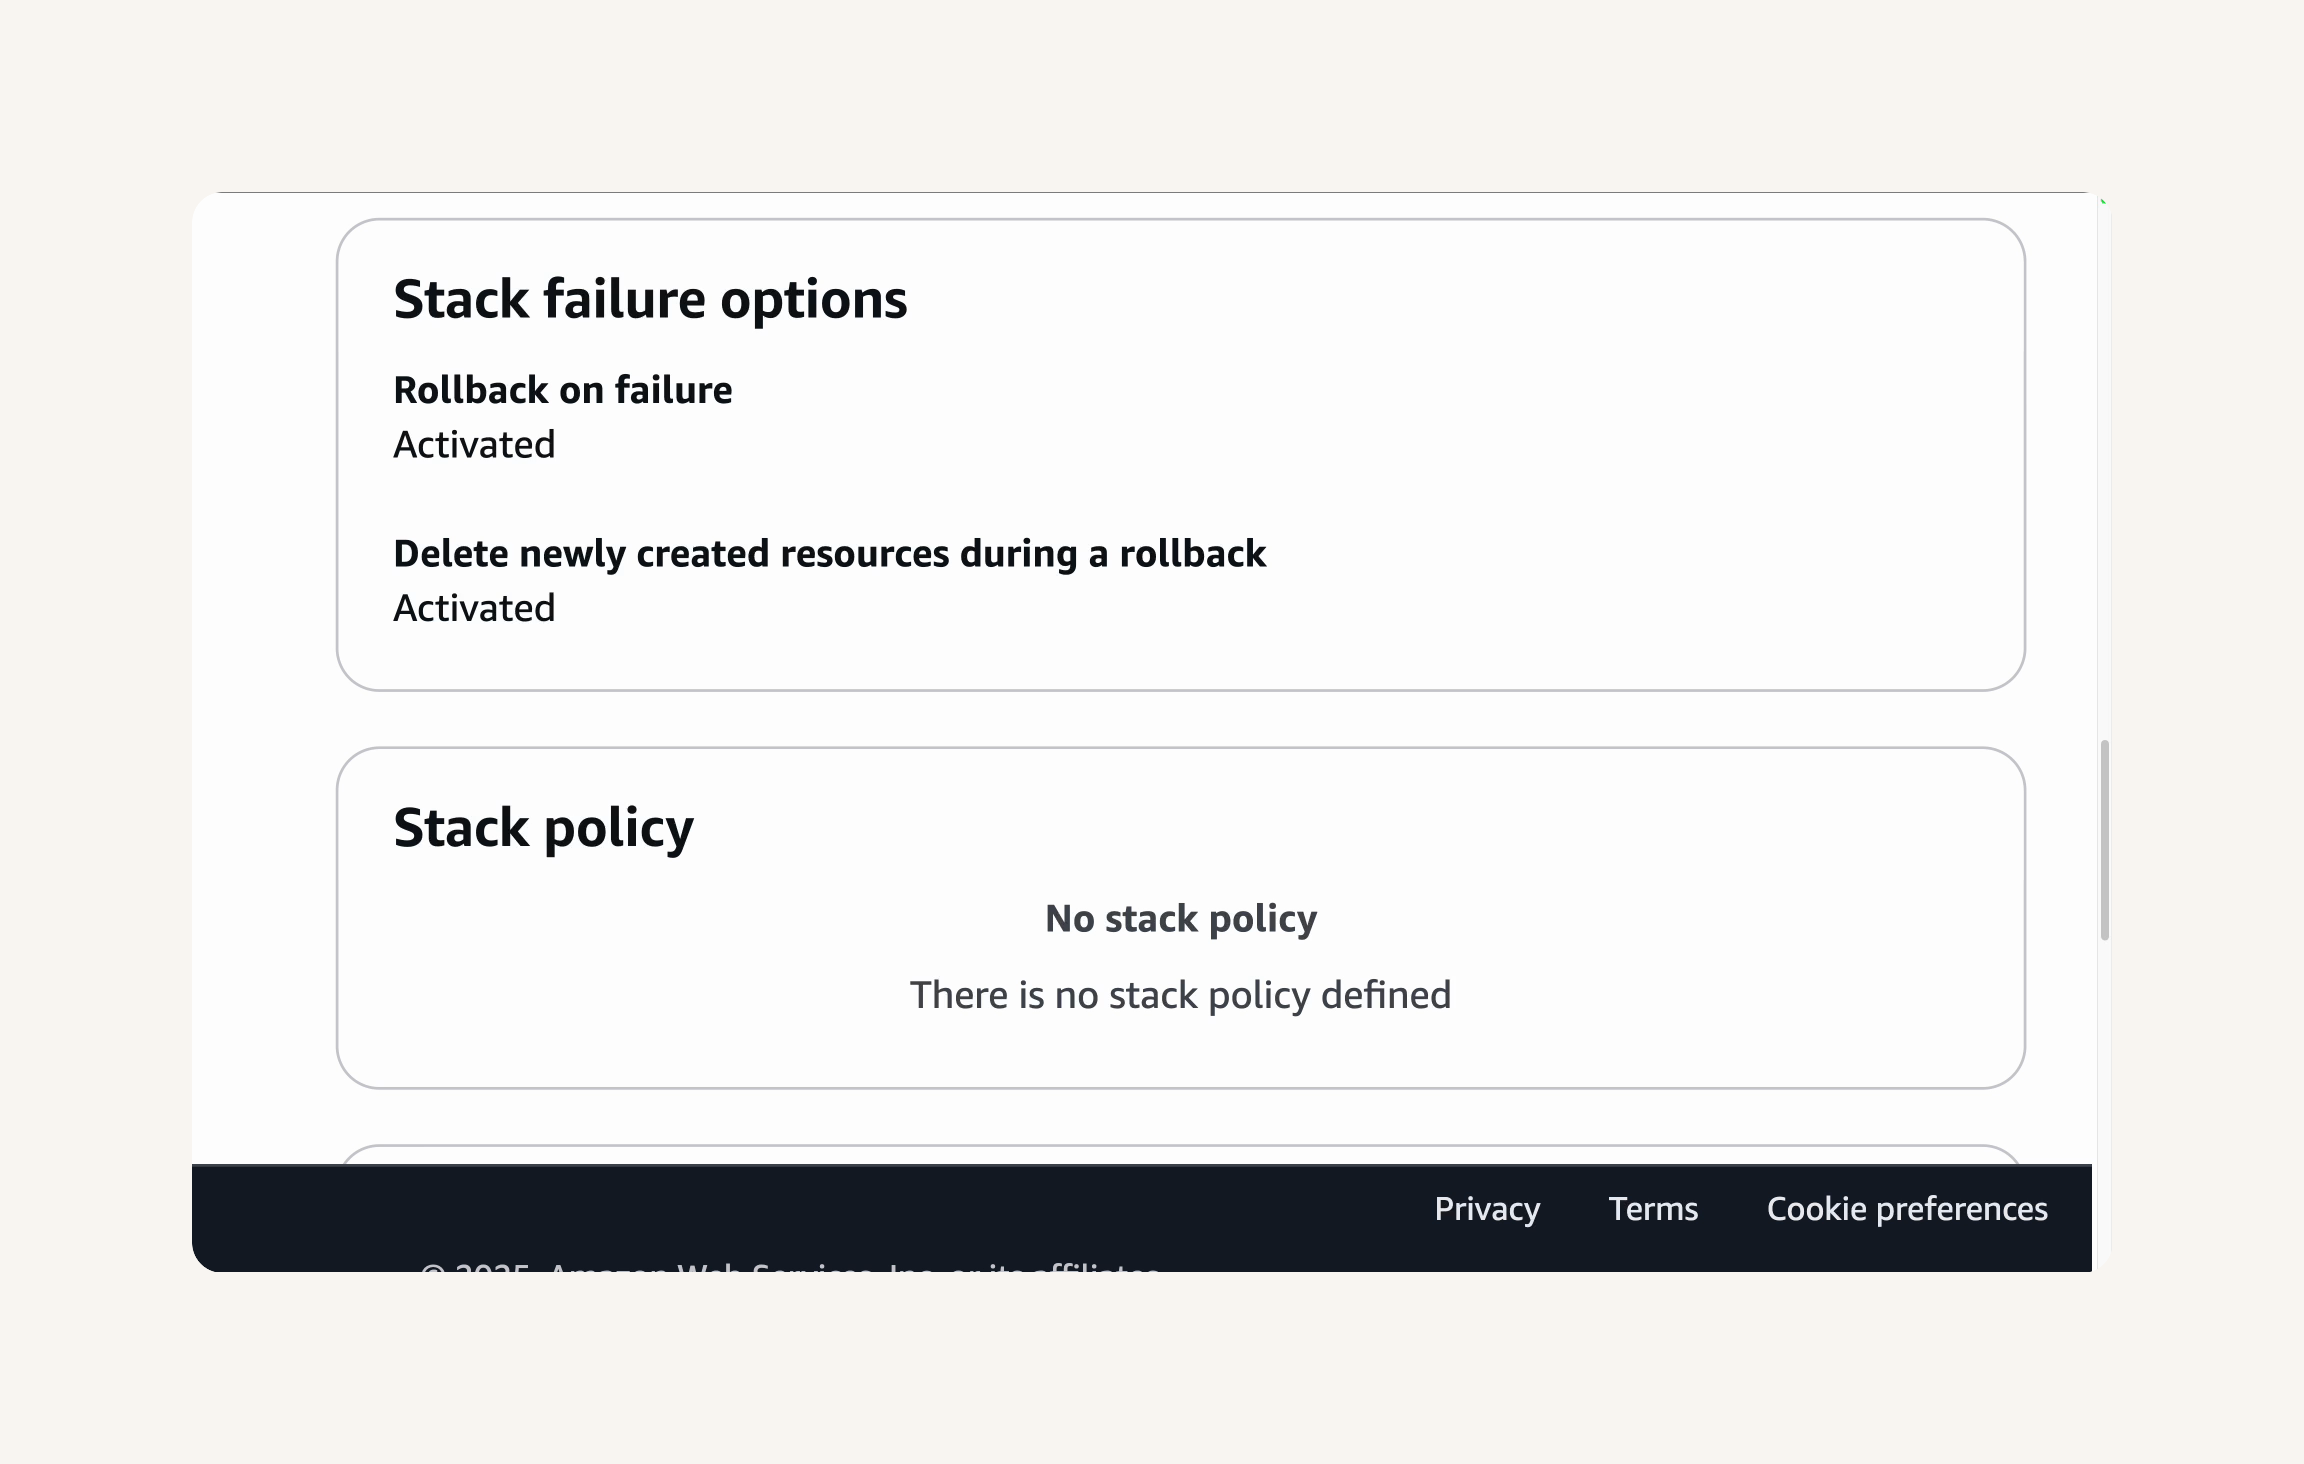
- Select Submit.

-
CloudFormation is now launching the stack in the background! This process will create the EC2 instance and networking resources in the background.
-
While we're wating..
-
Let's check out the Resources tab.
-
You can see a list of the resources being created!
💡 What resources are being created by the CloudFormation template?
The CloudFormation template is creating a:
VPC (Virtual Private Cloud): A virtual network in the cloud for your AWS resources.
Subnet: A subdivision of the VPC where you can place resources.
Route Tables: Define how network traffic is routed within the VPC.
Internet Gateway: Allows resources in your VPC to connect to the internet.
Security Group: Acts as a virtual firewall to control inbound and outbound traffic for your EC2 instance.
EC2 Instance: The virtual server where your web application will be deployed.
💡 Why are we deploying networking resources too?
By defining these networking resources in the template, we're not just launching an EC2 instance, but creating a complete, secure, and configurable infrastructure that can be easily replicated or modified. This is an especially good idea for EC2 instances that are hosting web apps, because they have more complex needs like connecting with multiple databases and controlling both public and private network traffic.

-
Next, you can also check the Events tab.
-
You can watch your CloudFormation stack's events in real-time in the Events tab - just keep refreshing it!
💡 What is a CloudFormation stack event?
Every time CloudFormation creates, updates, or deletes something, it records an event - "Starting to create EC2 instance," "Security group created successfully," "Oh no, there isn't enough capacity to create a new VPC." These events give you visibility into exactly what's happening behind the scenes, which is super helpful for troubleshooting if something goes wrong.
- Wait for the stack's status to become
CREATE_COMPLETE.
🙋♀️ Is your stack creation failing?
If you seeROLLBACK_IN_PROGRESSorROLLBACK_COMPLETEstatus, it means CloudFormation encountered an error while creating your resources. Don't worry! This is a common issue that many students encounter.To fix this:
Check the detailed error messages in the Events tab
Make any needed corrections to template parameters or IAM permissions
Try creating the stack again
Remember, troubleshooting is part of the learning process!
Great job! You've launched your production environment using CloudFormation. It's looking great 😎
Now that our EC2 instance is up and running, can we start deploying our application?
Mmm, not yet. To start deploying our application, we need to prepare a set of scripts and configuration files for CodeDeploy. It's like we need to write a set of instructions for CodeDeploy to follow - otherwise, it wouldn't know how to deploy our application!
In this step, you're going to:
-
Create deployment scripts for installing dependencies, starting, and stopping the server.
-
Create an
appspec.ymlfile to tell CodeDeploy how to handle the deployment process. -
Update
buildspec.ymlto package deployment files in your build artifact.
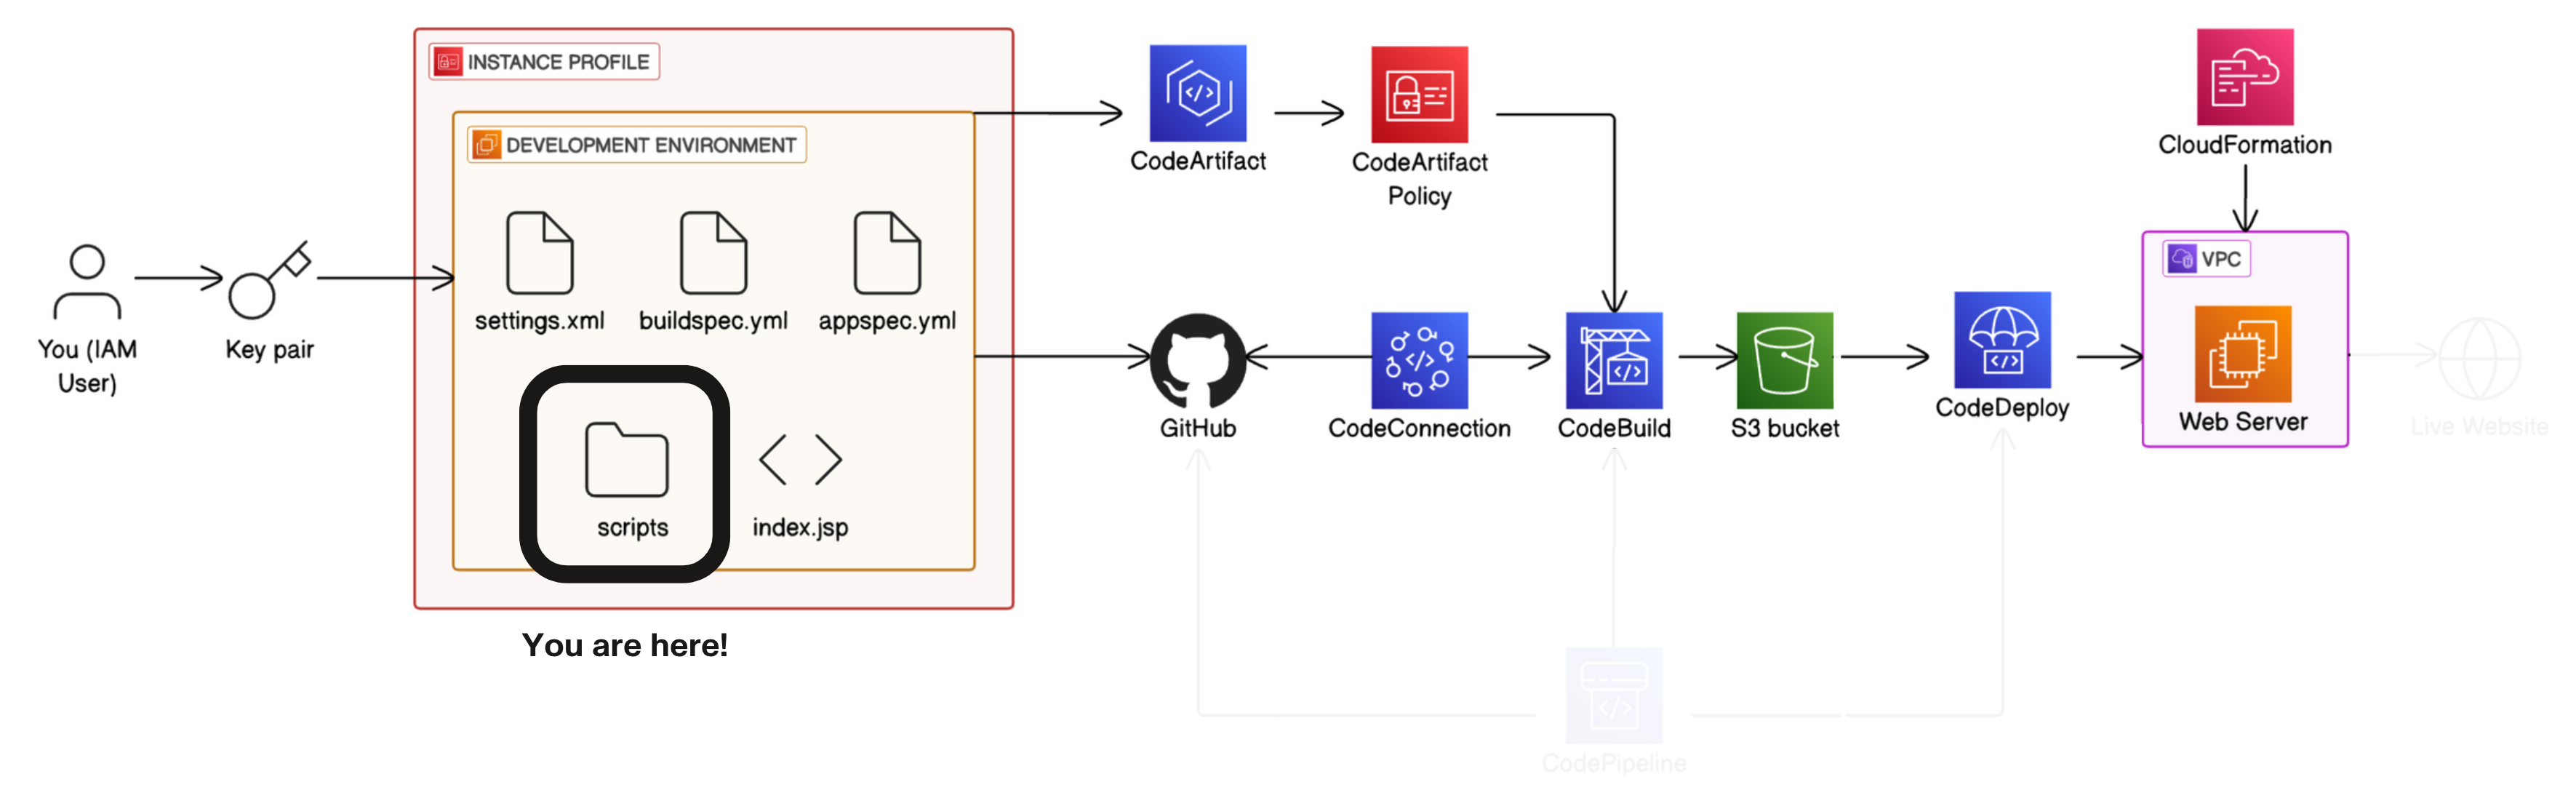
- In your IDE, create a new folder at the root of your project directory.

- Name the folder
scripts.
💡 What are scripts?
Scripts are like mini-programs that automate tasks. They're essentially text files filled with commands that you'd normally type one by one in the terminal, but packaged together so they run automatically in sequence. In our project, we're using scripts to automate deployment tasks.
- Inside the
scriptsfolder, create a new file.

- Let's name the file
install_dependencies.sh

- Add the following content to
install_dependencies.sh:
#!/bin/bash
sudo yum install tomcat -y
sudo yum -y install httpd
sudo cat << EOF > /etc/httpd/conf.d/tomcat_manager.conf
<VirtualHost *:80>
  ServerAdmin root@localhost
  ServerName app.nextwork.com
  DefaultType text/html
  ProxyRequests off
  ProxyPreserveHost On
  ProxyPass / http://localhost:8080/nextwork-web-project/
  ProxyPassReverse / http://localhost:8080/nextwork-web-project/
</VirtualHost>
EOF
💡 What does
install_dependencies.shdo?
Theinstall_dependencies.shscript sets up all the software needed to run our website by installing programs (called Tomcat and Apache) that handle internet traffic and host our application. It then creates special settings that let these programs to work together, making our website accessible to visitors on the internet.💡 Extra for Experts: Can we break down each line in
install_dependencies.sh?
This script sets up everything our application needs to run:
#!/bin/bash: This is like telling the computer "Hey, run this file using bash" (it's called a shebang line).
sudo yum install tomcat -y: Installs Tomcat (our Java application server) - the -y means "yes to all prompts" so it won't stop and ask questions.
sudo yum -y install httpd: Installs Apache HTTP server - this is like the front desk receptionist for our web application.
sudo cat << EOF > /etc/httpd/conf.d/tomcat_manager.conf: This starts a special block that writes multiple lines to a configuration file at once - like dictating a whole letter instead of typing it line by line.The lines between
<VirtualHost *:80>and</VirtualHost>create a configuration file for Apache to act as a reverse proxy for Tomcat. This is like telling Apache: "When visitors come to our website, don't talk to them directly - instead, silently pass their requests to Tomcat who's running our actual application."
ProxyRequests off: Tells Apache not to act as a general proxy for any website (a security measure).
ProxyPreserveHost On: Makes sure Apache remembers who the original request was for.
ProxyPassandProxyPassReverse: These are the magic lines that actually connect Apache to our Tomcat application.EOF: Marks the end of our configuration block - everything between the first EOF and this one gets written to the file.
💡 Extra for Experts: What is a reverse proxy?
A reverse proxy is like a receptionist for your web application. When visitors (users) come to your site, they talk to the receptionist (Apache) first, who then forwards their requests to the right person (Tomcat) behind the scenes. The visitors never interact directly with the backend server! This is a common pattern in web architecture that gives you more control over how requests are handled.
- Notice the round circle next to the file name at the top of the IDE.
-
The round circle tells us that your file is unsaved!
-
Save the
install_dependencies.shfile by pressing Ctrl+S. You should see the round circle disappear.
- Still inside the scripts folder, let's create a new file again.

- This time, let's name the file
start_server.sh

- Add the following content to
start_server.sh:
#!/bin/bash
sudo systemctl start tomcat.service
sudo systemctl enable tomcat.service
sudo systemctl start httpd.service
sudo systemctl enable httpd.service
💡 What does this script do?
This script starts both Tomcat (our Java application server) and Apache (our web server) and makes sure they'll restart automatically if the EC2 instance ever reboots.💡 What is
systemctl?
systemctlis the command-line tool for controlling services on modern Linux systems. Think of it as the master control panel for all the programs running in the background on your server. Withsystemctl, you can start services ("Hey Apache, time to wake up!"), stop them ("Tomcat, take a break"), check their status ("Is MySQL actually running?"), or set them to start automatically on boot. It's an essential tool for server management that gives you a standardized way to control just about any service on your Linux instance.💡 What does each line in start_server.sh do?
#!/bin/bash: This tells the system to use the bash shell to interpret this script.
sudo systemctl start tomcat10: Fires up Tomcat (our Java application server) - like turning the key in the ignition.
sudo systemctl enable tomcat10: Sets Tomcat to auto-start whenever the server reboots - like setting your car to automatically start every morning.
sudo systemctl start httpd: Starts Apache HTTP server - turning on our web server frontend.
sudo systemctl enable httpd: Sets Apache to auto-start on reboot too.Together, these commands ensure our application is up and running and will stay that way even if the server restarts.
- Save the
start_server.shfile by pressing Ctrl+S.
- Inside the scripts folder, create a new file named stop_server.sh
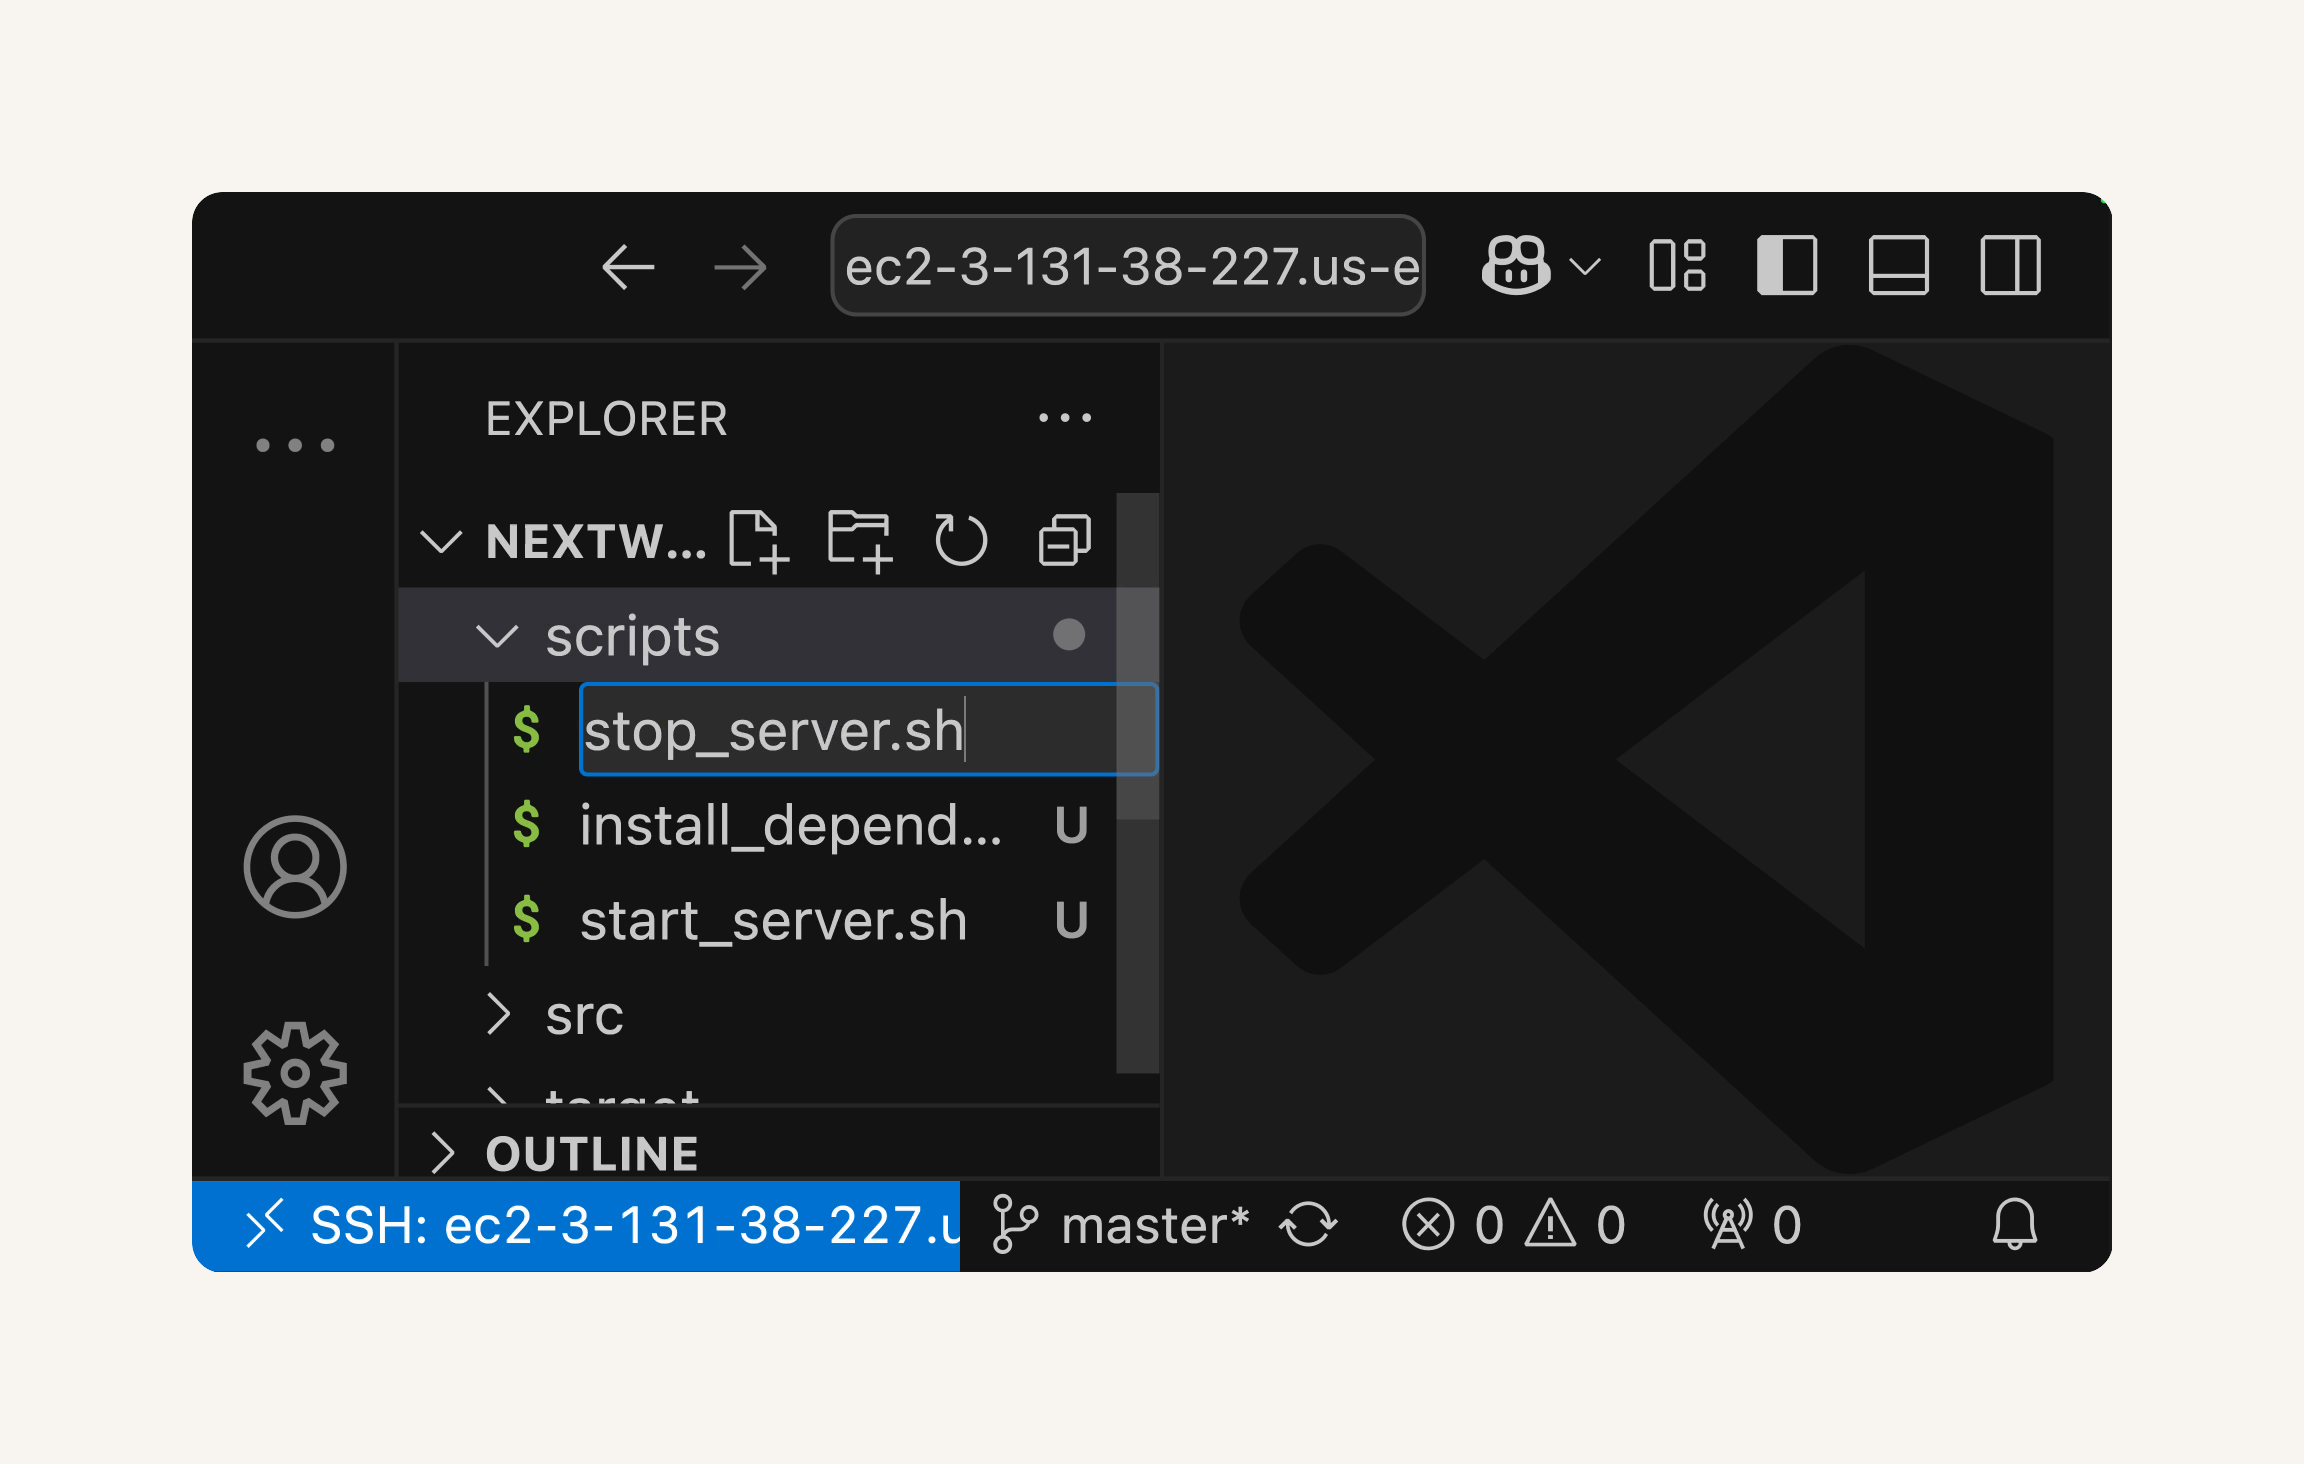
- Add the following content to
stop_server.sh:
#!/bin/bash
isExistApp="$(pgrep httpd)"
if [[ -n $isExistApp ]]; then
sudo systemctl stop httpd.service
fi
isExistApp="$(pgrep tomcat)"
if [[ -n $isExistApp ]]; then
sudo systemctl stop tomcat.service
fi
💡 What does
stop_server.shdo?
This script safely stops web server services by first checking if they're running. It usespgrepto check for running processes of Apache (httpd) and Tomcat, and only attempts to stop the services if they are actually active. This prevents errors that could occur from trying to stop services that aren't running.Specifically, the script:
Checks if Apache (httpd) is running
Stops Apache if it is active
Checks if Tomcat is running
Stops Tomcat if it is active
💡 Extra for Experts: Why do we check if the server is running before stopping it?
We check if the server is running first because trying to stop something that's not running can cause errors that might interrupt our deployment.This makes our script more robust and reliable. If we blindly tried to stop services regardless of their state, we might get error messages that could cause our deployment to fail unnecessarily. Good scripts anticipate potential issues instead of assuming everything is in an ideal state - that's the difference between code that works in perfect conditions versus code that works in the real world!
-
Save the
stop_server.shfile by pressing Ctrl+S. -
Check that you have
install_dependencies.sh,start_server.sh, andstop_server.shinside the scripts folder.
-
Create a new file, but this time at the root of your project.
-
Make sure this file is NOT inside the scripts folder!
-
Let's name the file appspec.yml
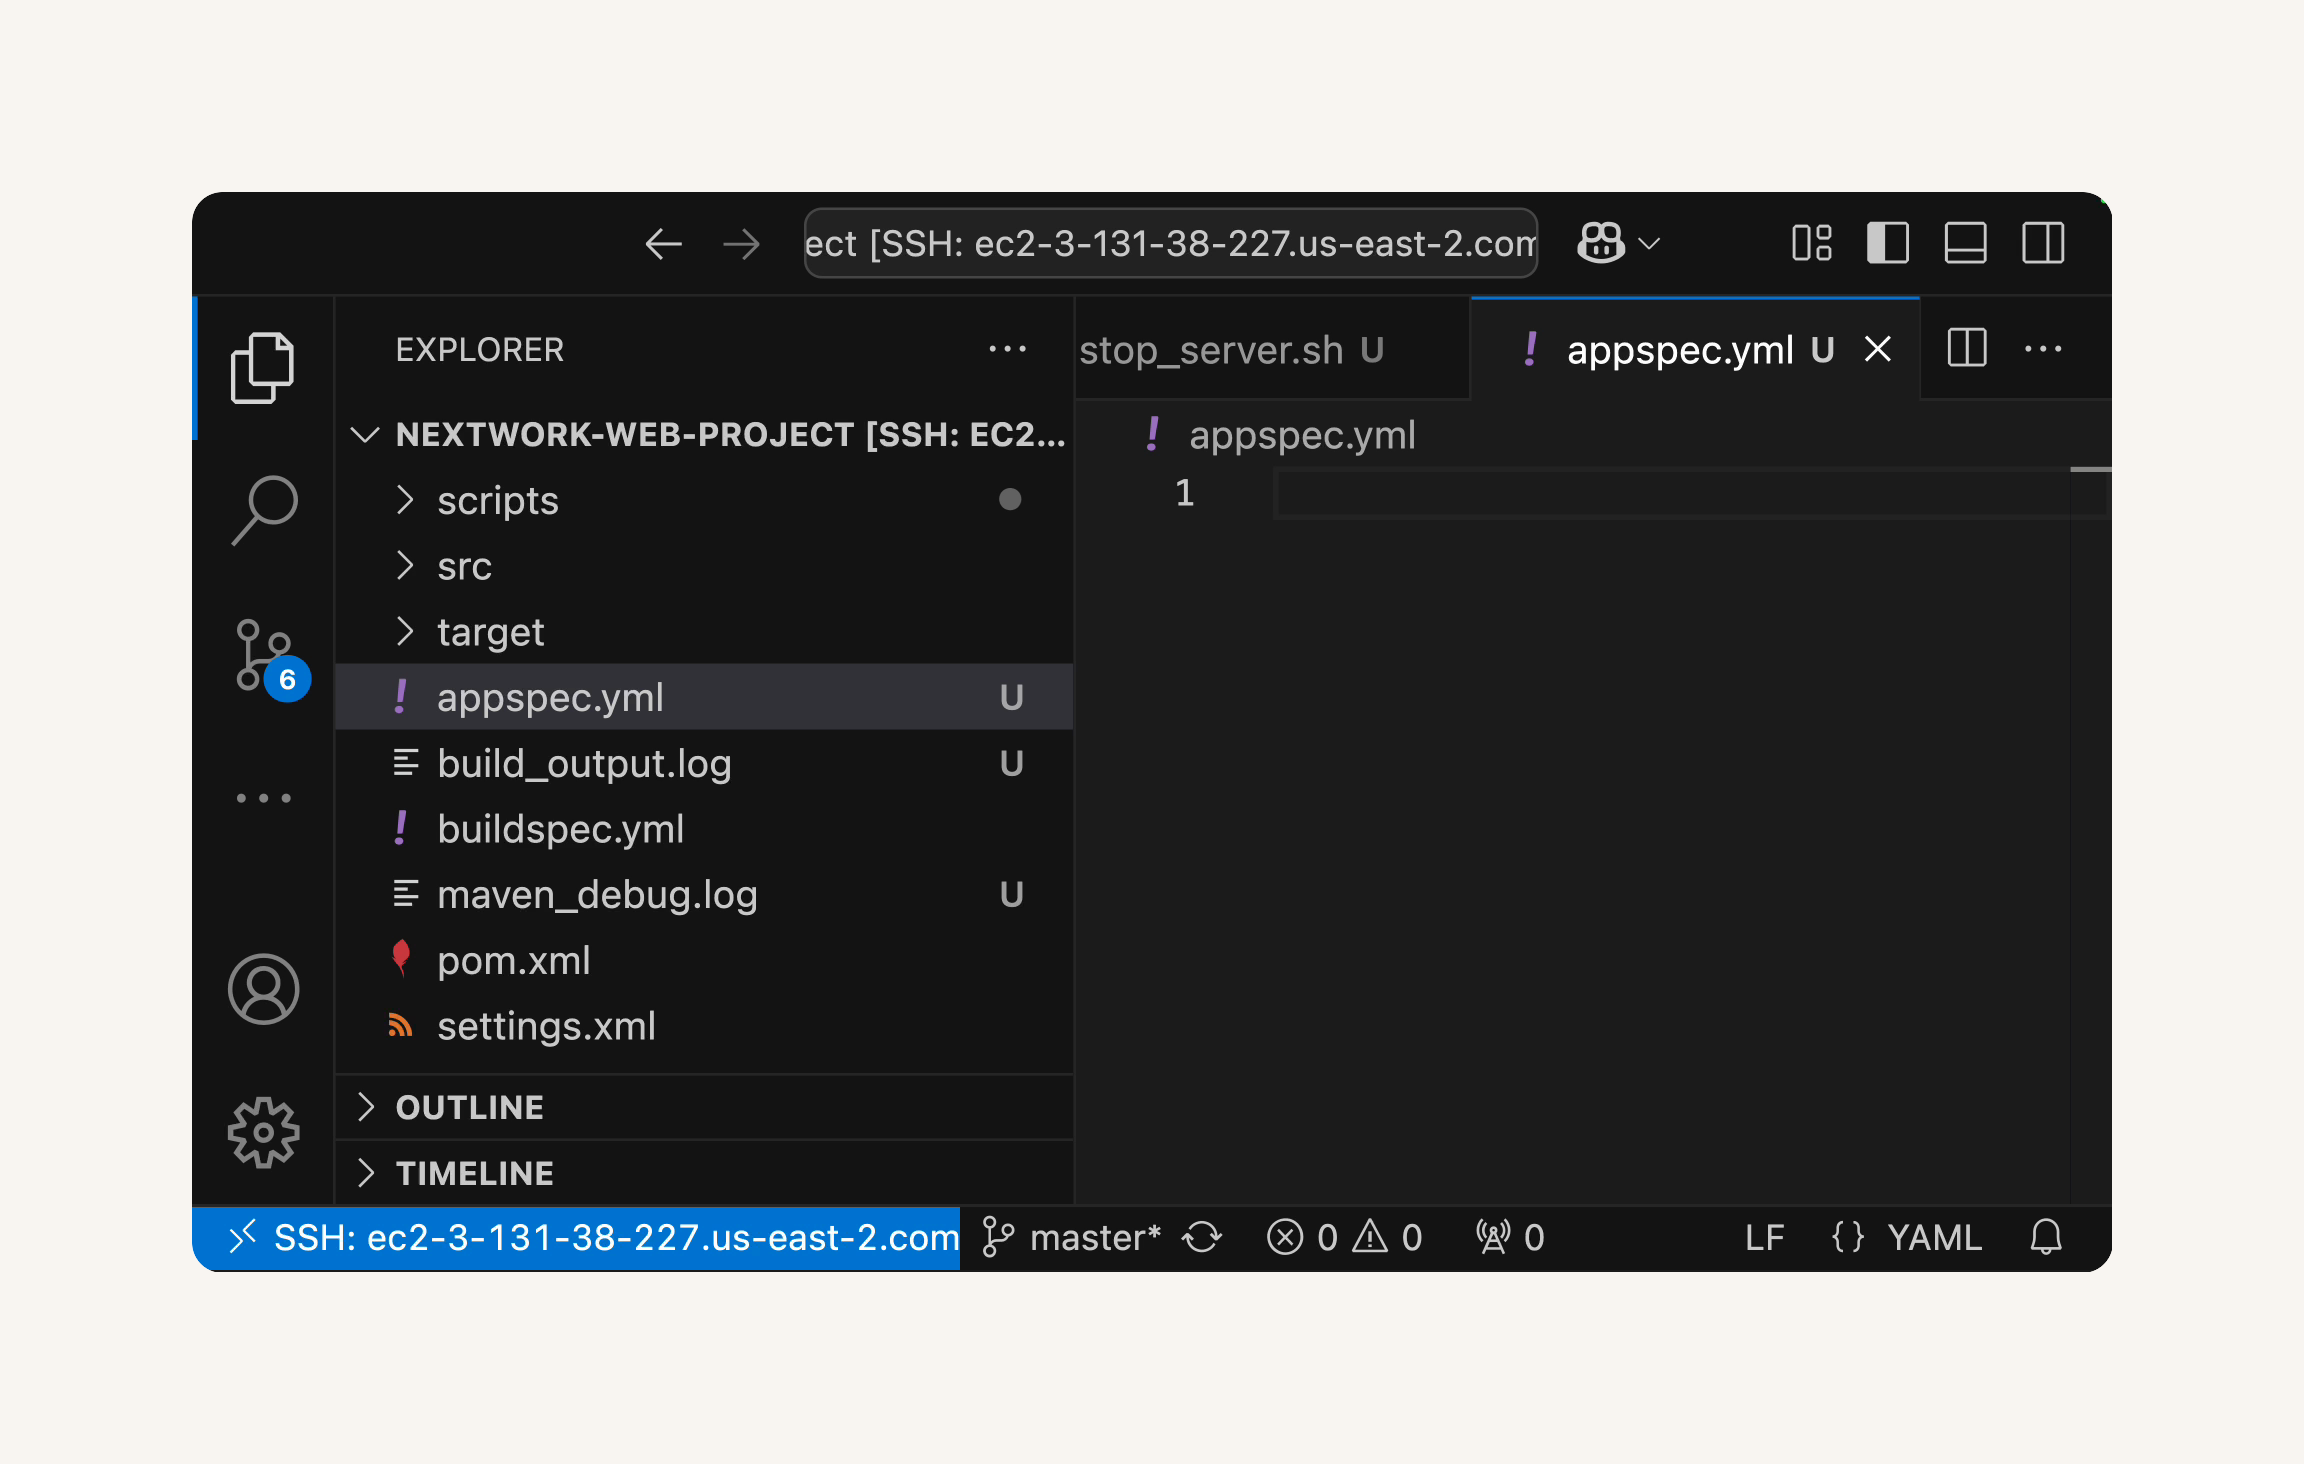
- Add the following content to
appspec.yml:
version: 0.0
os: linux
files:
  - source: /target/nextwork-web-project.war
    destination: /usr/share/tomcat/webapps/
hooks:
  BeforeInstall:
    - location: scripts/install_dependencies.sh
      timeout: 300
      runas: root
  ApplicationStart:
    - location: scripts/start_server.sh
      timeout: 300
      runas: root
  ApplicationStop:
    - location: scripts/stop_server.sh
      timeout: 300
      runas: root
💡 What does each section in
appspec.ymlmean?
Theappspec.ymlfile is essentially the instruction manual for CodeDeploy. Here's what each part does:
version: 0.0: This is just the format version CodeDeploy expects (yes, starting at 0.0 is a bit odd).
os: linux: Tells CodeDeploy we're deploying to a Linux system, not Windows.
files: This section maps what files go where:
source: /target/nextwork-web-project.war: "Take this WAR file from our artifact..."
destination: /usr/share/tomcat10/webapps/: "...and put it here on the EC2 instance."
hooks: These are like event triggers that run at specific points in the deployment:
BeforeInstall: "Before you install the new version, run this script" - we're stopping the server first.
AfterInstall: "After the files are copied, run this" - we're installing dependencies.
ApplicationStart: "Once everything's ready, run this" - we're starting the server.Each hook specifies the script location, a timeout (5 minutes max), and that it should run as the root user.
Think of
appspec.ymlas the choreographer that ensures everyone moves in the right sequence during deployment.💡 Extra for Experts: CodeDeploy lifecycle events
Each phase in theappspec.ymlfile is a CodeDeploy lifecycle event. Lifecycle events are like the chapters in your deployment story - predefined points where you can hook in custom scripts to perform specific actions. They're the key to customizing exactly how your application gets deployed.Think of it like baking a cake: there are distinct phases (mixing ingredients, baking, cooling, frosting) where different actions need to happen. CodeDeploy's lifecycle events are similar - BeforeInstall, Install, AfterInstall, ApplicationStart, etc.
- Save the appspec.yml file by pressing Ctrl+S.
- Open
buildspec.ymland modify the artifacts section to includeappspec.ymland the scripts folder:
artifacts:
  files:
    - target/nextwork-web-project.war
    - appspec.yml
    - scripts/**/*
  discard-paths: no
💡 Recap: What is
buildspec.yml?
buildspec.ymlis like the recipe card for AWS CodeBuild. It contains step-by-step instructions that tell CodeBuild exactly how to turn your raw code into a deployable package. In our project, it tells CodeBuild how to compile the Java application, run any tests, and then package up everything needed for deployment.The artifacts section we just edited is particularly important - it's telling CodeBuild: "After you build the app, make sure to include these additional files in the final package." We're adding our
appspec.ymlandscripts folderbecause CodeDeploy will need them to properly deploy the application. Without them, CodeDeploy wouldn't know what to do with our compiled code!

- Save the buildspec.yml file by pressing Ctrl+S.
-
Open the terminal in VS Code.
-
Stage all changes using git add .

- Commit changes with the message "Adding CodeDeploy files" using
git commit -m "Adding CodeDeploy files"

-
Push changes to your GitHub repository using git push
-
Check the output of
git pushto confirm that your changes are pushed successfully.
🙋♀️ Having trouble with git push?
Try resetting your Git credentials, and starting over again! Run these commands in your terminal:
git config --global --unset credential.helper git config --local --unset credential.helper git remote set-url origin https://<YOUR_GITHUB_USERNAME>@github.com/<YOUR_GITHUB_USERNAME>/<YOUR_REPOSITORY_NAME>.git
Make sure to replace <YOUR_GITHUB_USERNAME> with your GitHub username and <YOUR_REPOSITORY_NAME> with your repository name.
Then try git push again and enter your GitHub PAT when prompted for the password. Check the top of your VS Code window if you're not prompted in the terminal.
Give it another try, and you'll be back on track in no time!

- Head to your GitHub repository in the browser. Let's check that the scripts folder and
appspec.ymlfile are in your repository!
🙋♀️ One of my files are not in the repo!
One of your files might still be unsaved. Make sure to save all your files (open the file in VS Code and press Ctrl+S), rungit add ., and commit and push again.
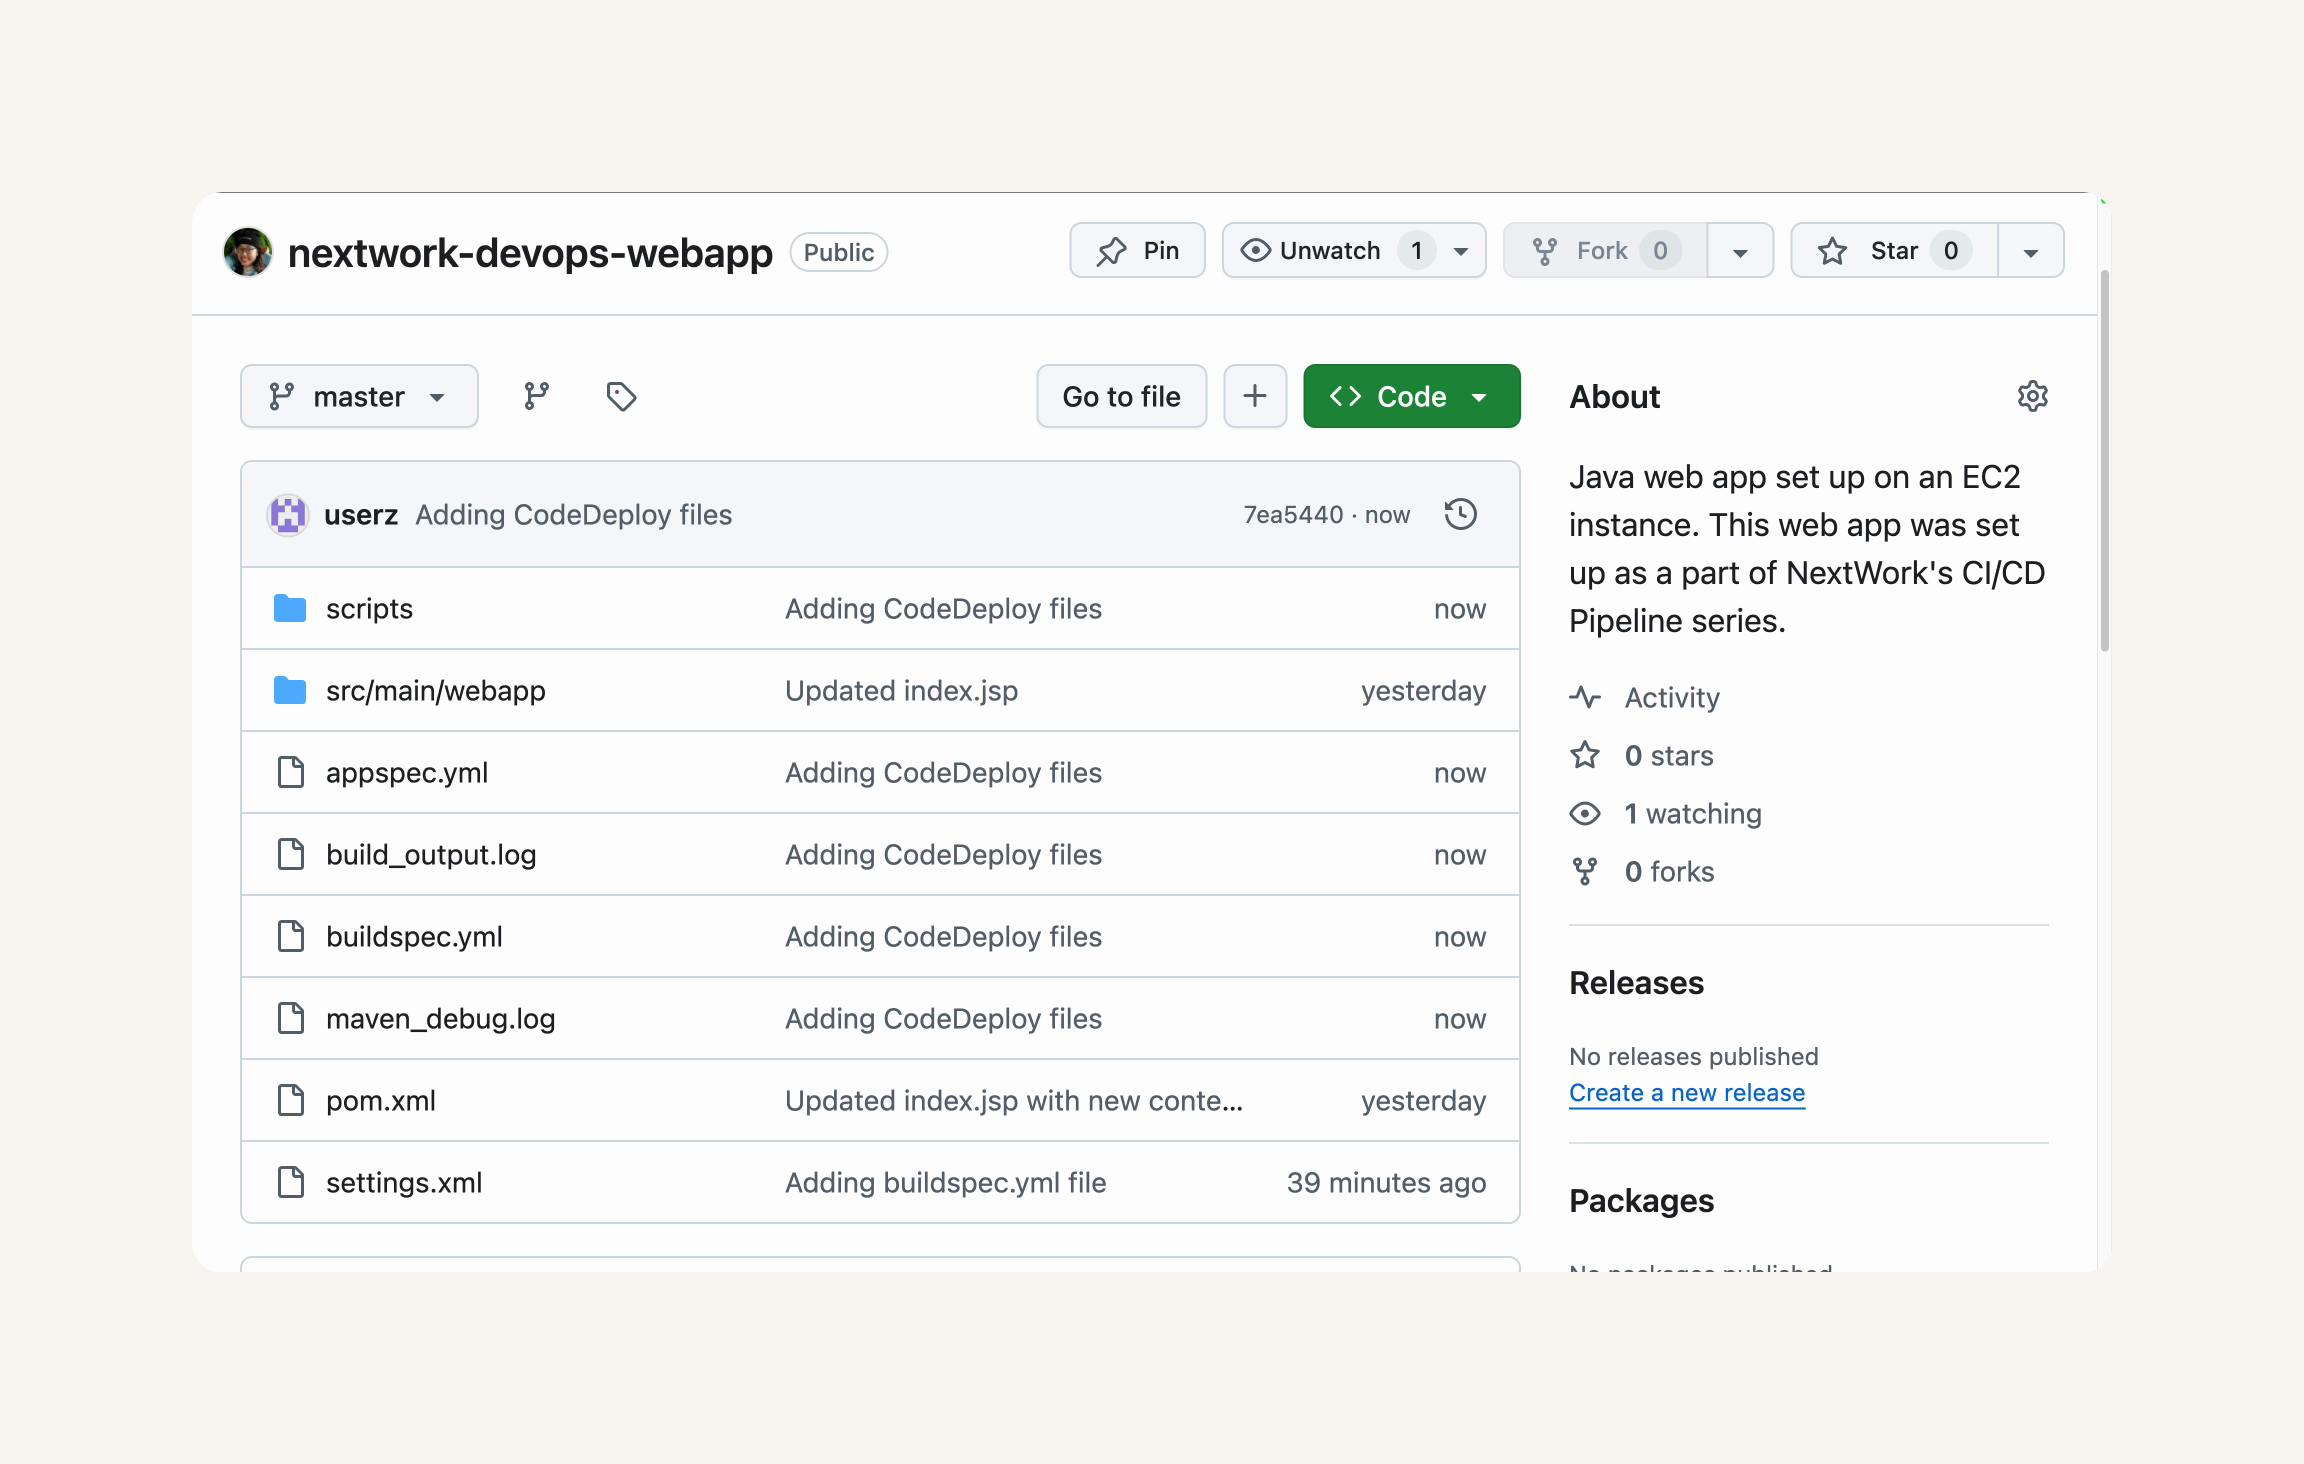
Awesome! You've prepared all the necessary deployment scripts and configuration files. Let's move on to creating a CodeDeploy application.
Now, let's get to know CodeDeploy and set it up to automate the deployment of our web app!
In this step, you're going to:
-
Create a CodeDeploy application, which is an application that you want to deploy.
-
Create a CodeDeploy deployment group, which is like a folder of deployment settings for the same application.
-
Give CodeDeploy the permission to access CodeArtifact.
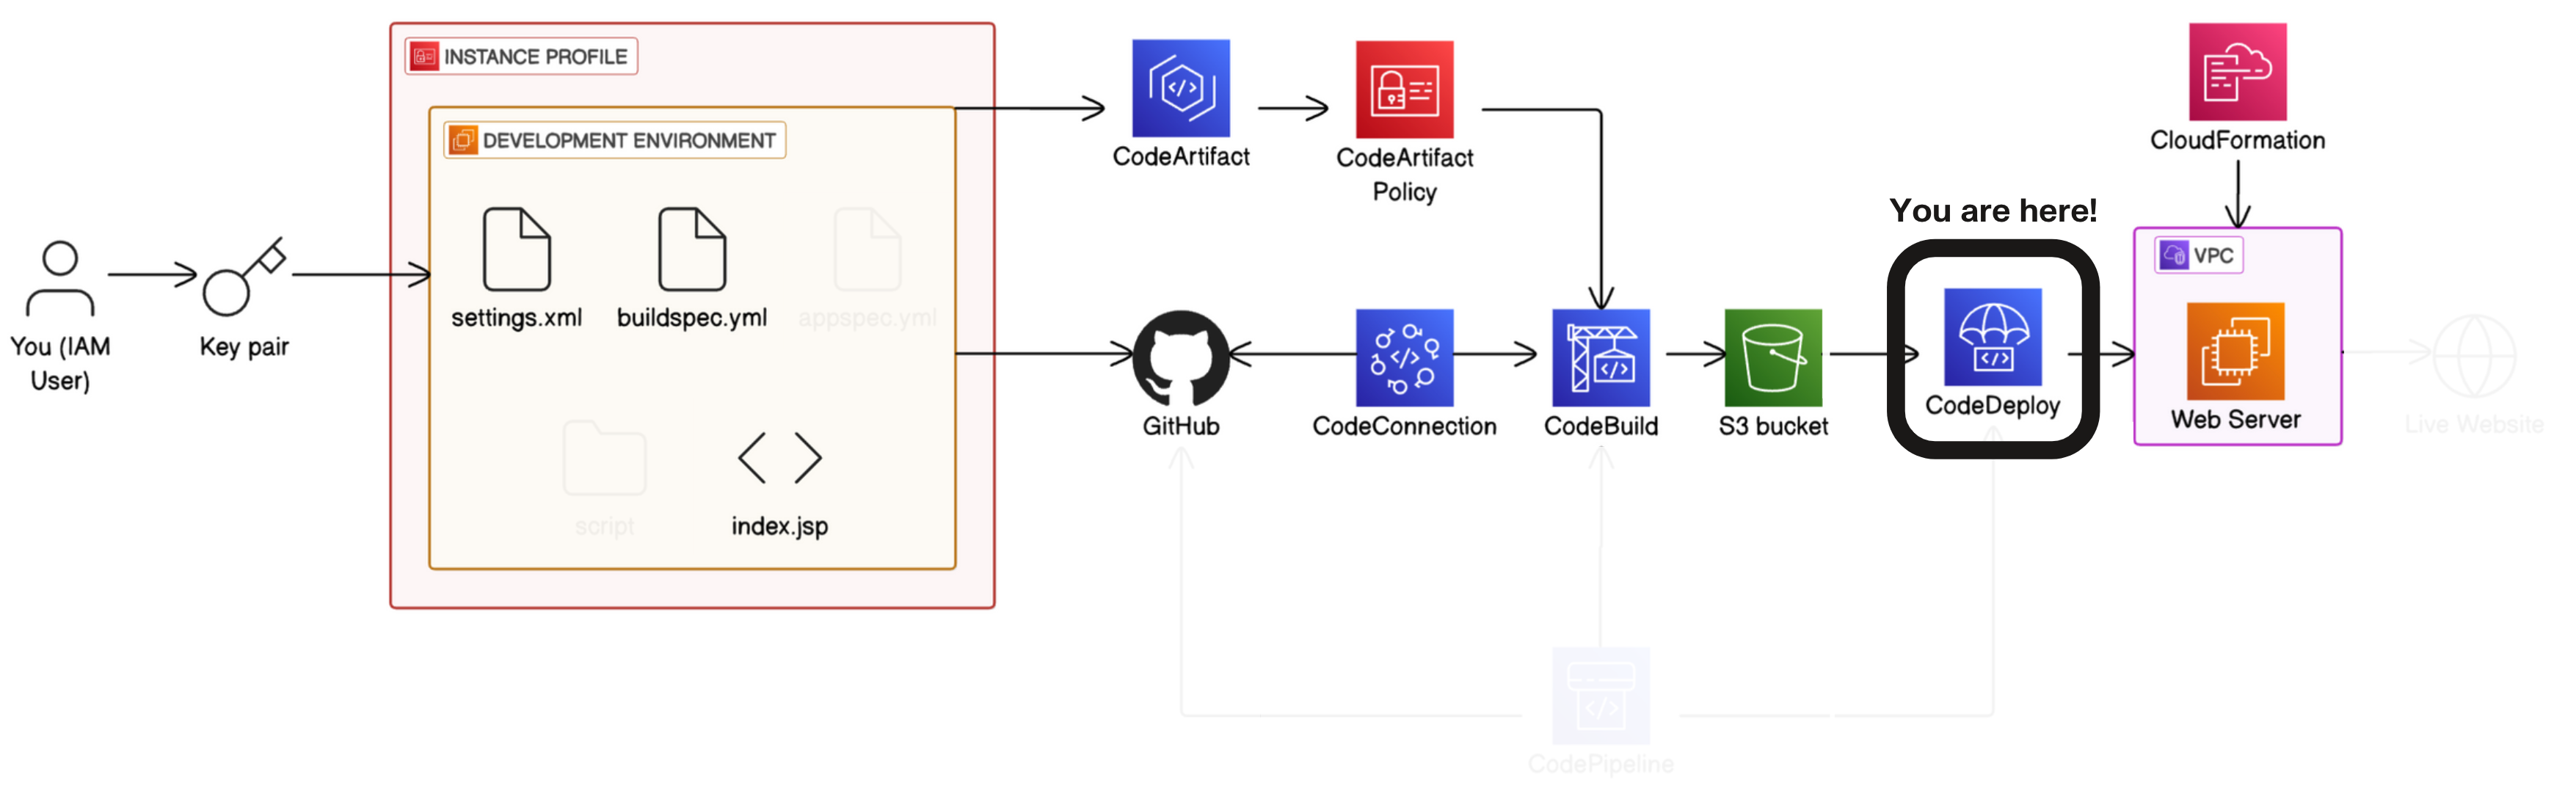
- Head to the
CodeDeployconsole.

- Select Applications in the left hand navigation menu.

- Select Create application.

💡 What is a CodeDeploy application?
A CodeDeploy application is like the main folder for your deployment project. It doesn't do much on its own, but it helps you organize everything related to deploying one application.In more technical, AWS terms, a CodeDeploy application is a namespace or container that groups
deployment configurations,deployment groups, and revisions for a specific application. Having separate CodeDeploy applications helps you manage multiple applications without mixing up their deployment resources.
- Enter
nextwork-devops-cicdas the Application name.

- Choose EC2/On-premises as the Compute platform.
💡 Extra for Experts: What are CodeDeploy compute platforms?
CodeDeploy's compute platforms are basically the different types of environments where your application can live:
EC2/On-premises: This is for traditional server-based applications - like what we're doing in this project. Your app runs on actual servers (either in AWS or in your own data center).
AWS Lambda: This is for serverless applications where you don't manage any servers. Your code just runs when triggered, and AWS handles all the infrastructure.
Amazon ECS: This is for containerized applications running in Docker containers managed by Amazon's Elastic Container Service.
Choosing the right platform depends on how your application is built. Each has its own advantages for different types of applications!

- That's it! Select Create application.

- Wait for the success message that the application nextwork-devops-cicd is created.

- Select Create deployment group.
💡 What is a CodeDeploy deployment group?
A deployment group is a collection of EC2 instances that are grouped to deploy something together.It's also where you plan out exactly where and how your application gets deployed on this group of instances. In other words, it's where you tell CodeDeploy "let's deploy this app to these specific servers, using this deployment pattern, with these load balancing settings, and handle failures this way."
The power of deployment groups is that you can have multiple groups within the same application - maybe one for your test environment, another for staging, and a third for production. Each can have different settings and target different sets of servers, but they all deploy the same core application. This adds to the (many) reasons why CI/CD tools are so powerful - in this case, CodeDeploy saves you the time it'd take to manually deploy the same app to each instance in each environment.

- Enter
nextwork-devops-cicd-deploymentgroupas the Deployment group name.

-
Under Service role, check if you have a service role available...
-
Maybe not!
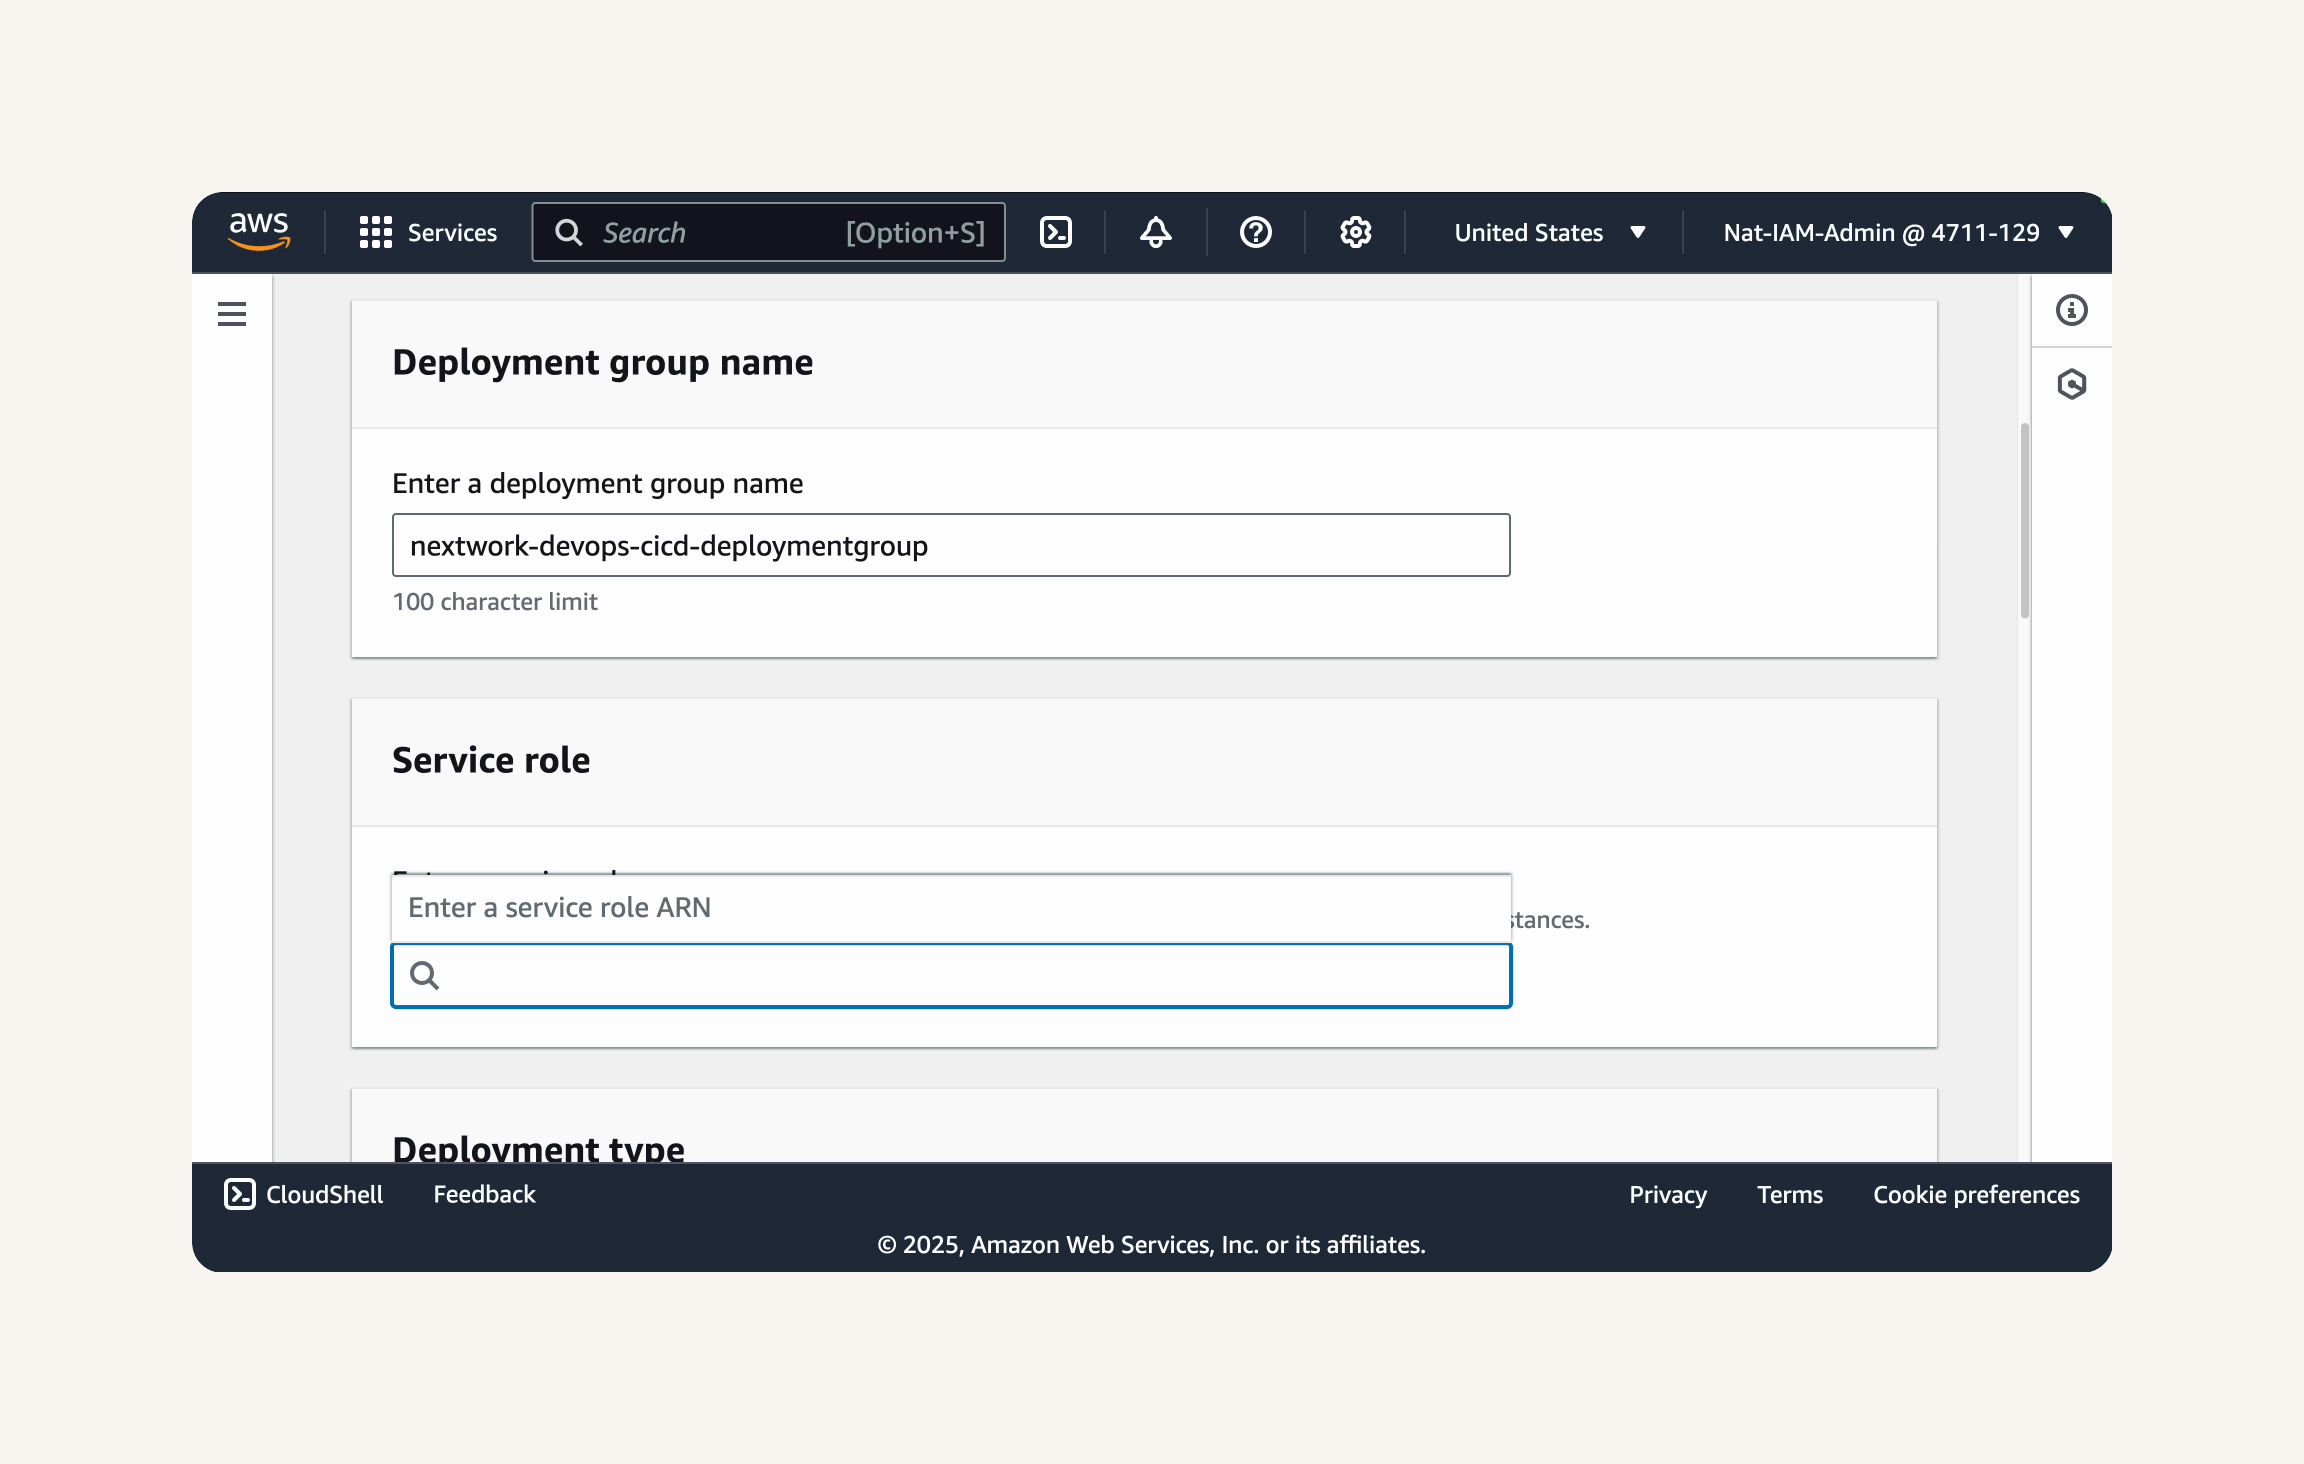
- We'll have to create a new service role.
💡 Why does CodeDeploy need IAM roles?
CodeDeploy needs IAM roles to get permissions to access and manage AWS resources on your behalf. These permissions let CodeDeploy do things like:
Accessing EC2 instances to deploy applications.
Reading application artifacts from S3 buckets.
Updating Auto Scaling groups.
Write CloudWatch logs about what it's doing
- Head to the IAM console.

- In the IAM console, select Roles from the left hand navigation bar.

- Select Create role.

- Choose AWS service as the trusted entity type.

- Choose CodeDeploy as the service and select CodeDeploy as the use case.

- Select Next.

-
You'll notice the
AWSCodeDeployRoledefault policy is suggested already - nice! That's all we need. -
Click on the plus button to take a look at the permissions this grants. There are many actions that we're allowing in this policy!
-
Phew, this saves us the time from defining all these permission policies ourselves.

-
Select Next.
-
Expand the
AWSCodeDeployRolepolicy to review its permissions. -
Review the EC2 permissions within the policy.
💡 What permissions does
AWSCodeDeployRolepolicy include?
TheAWSCodeDeployRolepolicy lets CodeDeploy work with your EC2 instances. It includes permissions for:
Auto Scaling, so CodeDeploy can handle deployments when you're automatically scaling instances up or down
EC2, so CodeDeploy can interact with your instances - tag them, query them, and deploy to them
Elastic Load Balancing, so CodeDeploy can temporarily remove instances from load balancers during deployment
CloudWatch, so CodeDeploy can send logs and metrics so you can monitor what's happening
S3, so CodeDeploy can access the build artifacts stored in S3 buckets
Not that these permissions are carefully scoped to only what CodeDeploy actually needs to do its job, instead of everything in your AWS account. This is a best practice in security called the "principle of least privilege."
-
Select Next.
-
Enter
NextWorkCodeDeployRoleas the Role name. -
Add a description to help you remember why you created this role.
Allows CodeDeploy to call AWS services such as Auto Scaling on your behalf.

Created as a part of NextWork's Cl/CD Pipeline series.
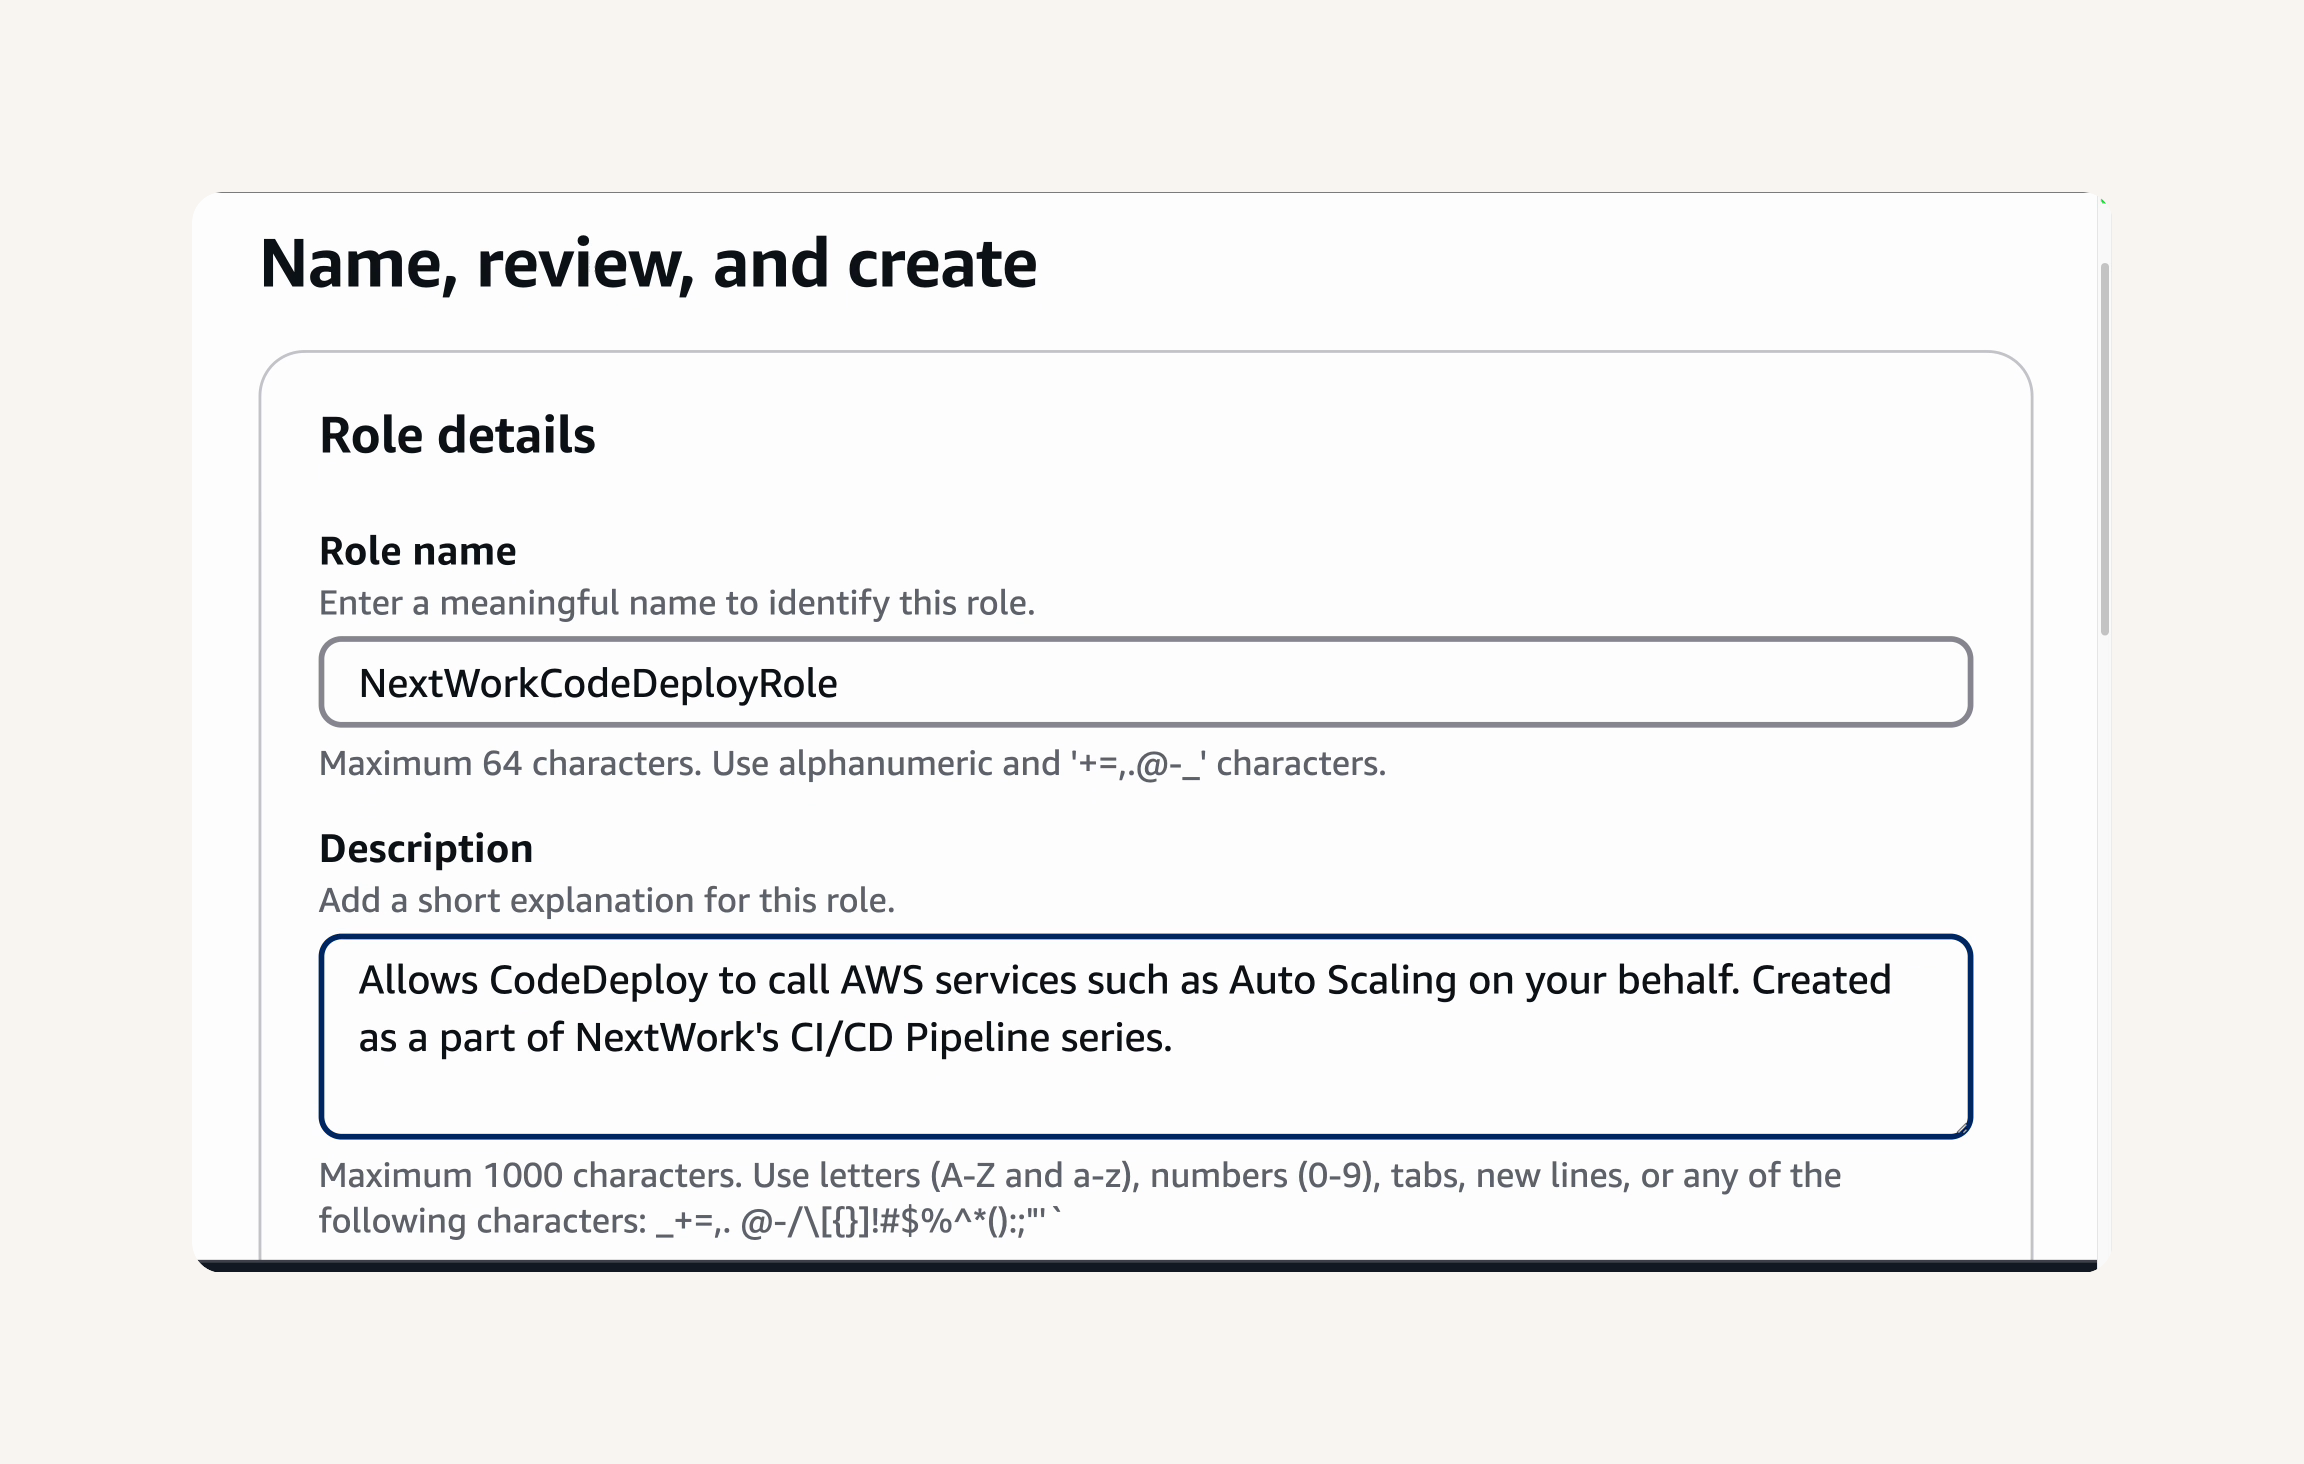
- Review the Permissions policies and make sure
AWSCodeDeployRoleis attached.

- Select Create role.

- Let's double check that the NextWorkCodeDeployRole is created.

-
Head back to the CodeDeploy deployment group configuration tab.
-
Looks like we'll need to refresh the page to use the new service role!
-
Refresh the page, and re-enter
nextwork-devops-cicd-deploymentgroupas Deployment group name.

- Select the newly created
NextWorkCodeDeployRoleas the Service role.

- Choose In-place as the Deployment type.
💡 Extra for Experts: What is the difference between In-place and Blue/Green deployments?
In-place deployment: Updates the application on existing instances. During the deployment, the application on the instances is stopped, the new version is installed, and then the application is restarted. This can cause a brief downtime during deployment.
Blue/green deployment: Creates a new, separate environment (the "green" environment) to deploy the new application version. Once the new version is verified in the green environment, traffic is switched from the old environment (the "blue" environment) to the new one. This minimizes downtime and allows for quick rollbacks.
For most production applications, blue/green is preferred because of the zero downtime and easy rollback, but for our learning project, in-place is simpler and more cost-effective.

- Under Environment configuration, select Amazon EC2 instances.

- In Tag group 1, enter
roleas the Key.

- Enter
webserveras the Value.
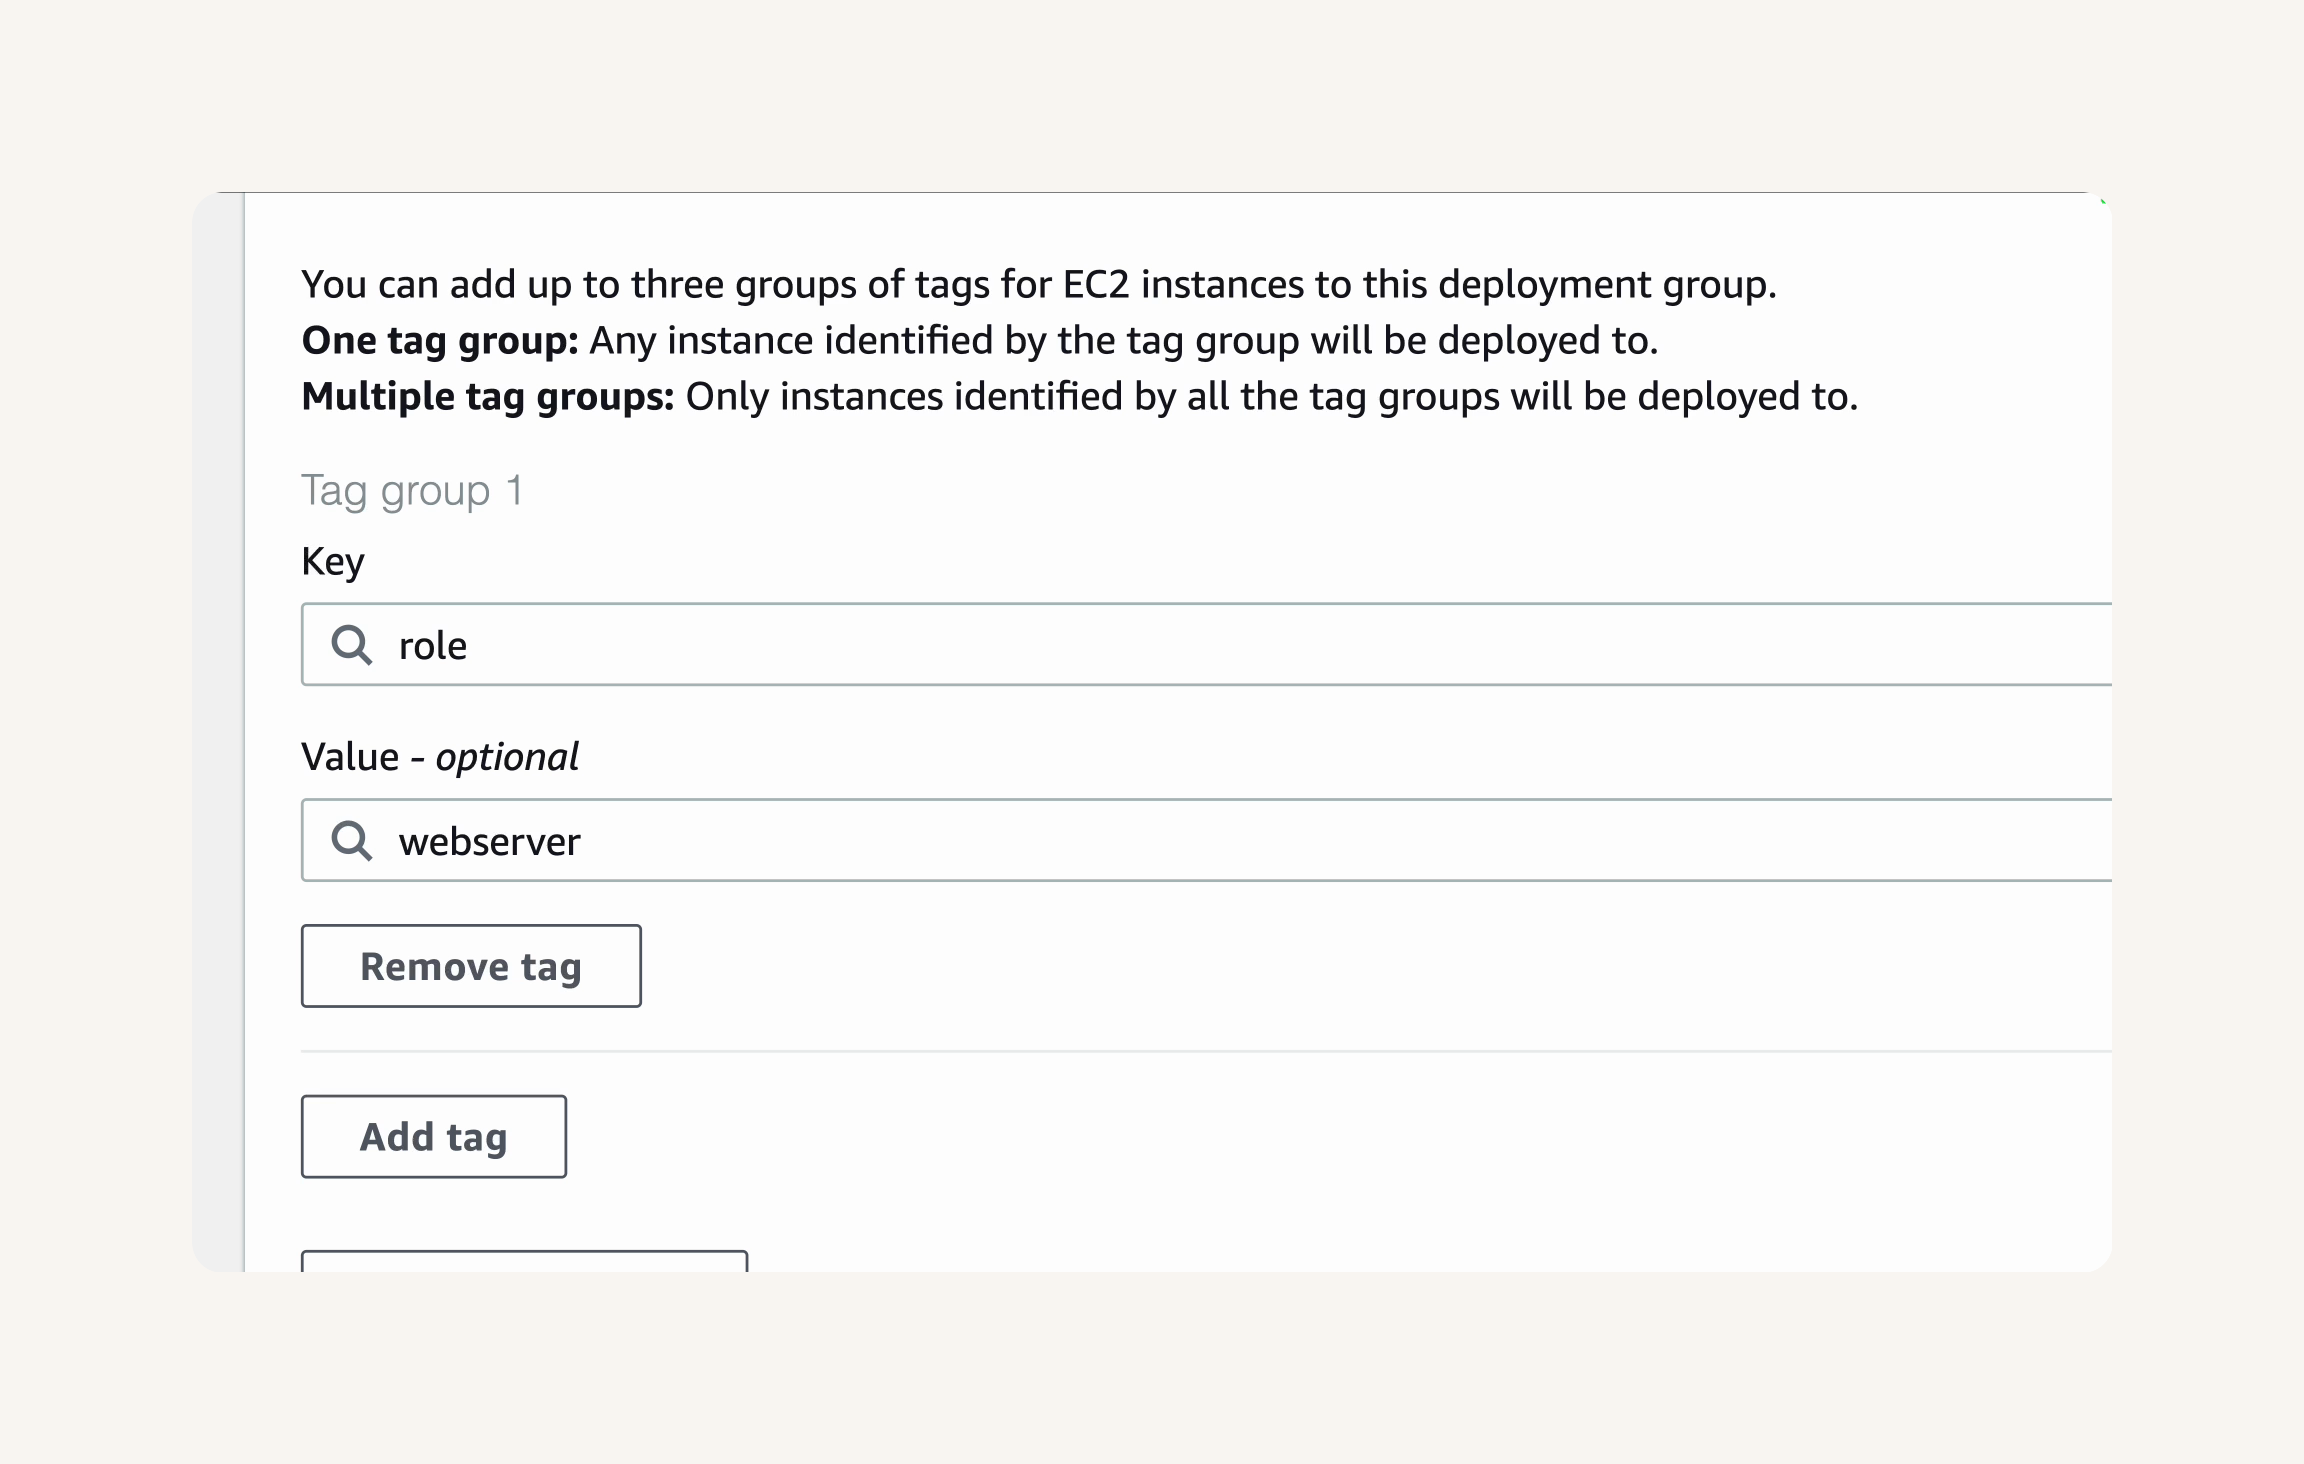
💡 Why are we using tags?
We are using tags here so that CodeDeploy can identify the target EC2 instances for deployment. In our CloudFormation template, we tagged our EC2 instance with role: webserver. CodeDeploy will use this tag to find and deploy to the correct instance.Tags help us be super efficient for three reasons:
Flexibility: If you add new instances with the same tag, CodeDeploy automatically includes them in future deployments.
Self-documentation: Tags like
role: webserverclearly explain what the instance does, making our AWS environment easier to understand.Integration: The CloudFormation template we used earlier already tagged our EC2 instance with
role: webserver, so everything works together seamlessly.
Check the line below your tag settings - you might notice that 1 unique matched instance is found.
🙋♀️ Can't find any matching instances?
If CodeDeploy isn't finding your EC2 instance, don't worry - this is easy to fix! The issue is usually related to the tags we're using to identify the instance.
When you see "0 instances found" instead of "1 unique matched instance," here's what to check:
Verify that you entered the exact tag key
roleand valuewebserverDouble-check for any typos or extra spaces
Check your CloudFormation outputs to confirm the EC2 instance was tagged correctly

-
Click Click here for details to view the matched instance.
-
You'll see an EC2 instance called NextWorkCodeDeployEC2Stack::WebServer - that's the EC2 instance we launched from our CloudFormation template. This confirms to us that the web app will be deployed onto that instance instance.

-
Now let's head back to your CodeDeploy Deployment group set up.
-
Under Agent configuration with AWS Systems Manager, select Now and schedule updates and Basic scheduler with 14 Days.
💡 What is CodeDeploy Agent?
The CodeDeploy Agent is a software that lets your EC2 instance communicate with CodeDeploy.Whenever you initiate a deployment, it's the CodeDeploy Agent that receives the deployment instructions (i.e. bash scripts) from CodeDeploy and carries them out on the EC2 instance.
Setting it to update every 14 days simply makes sure your agent software is always up to date to the latest version that AWS released.
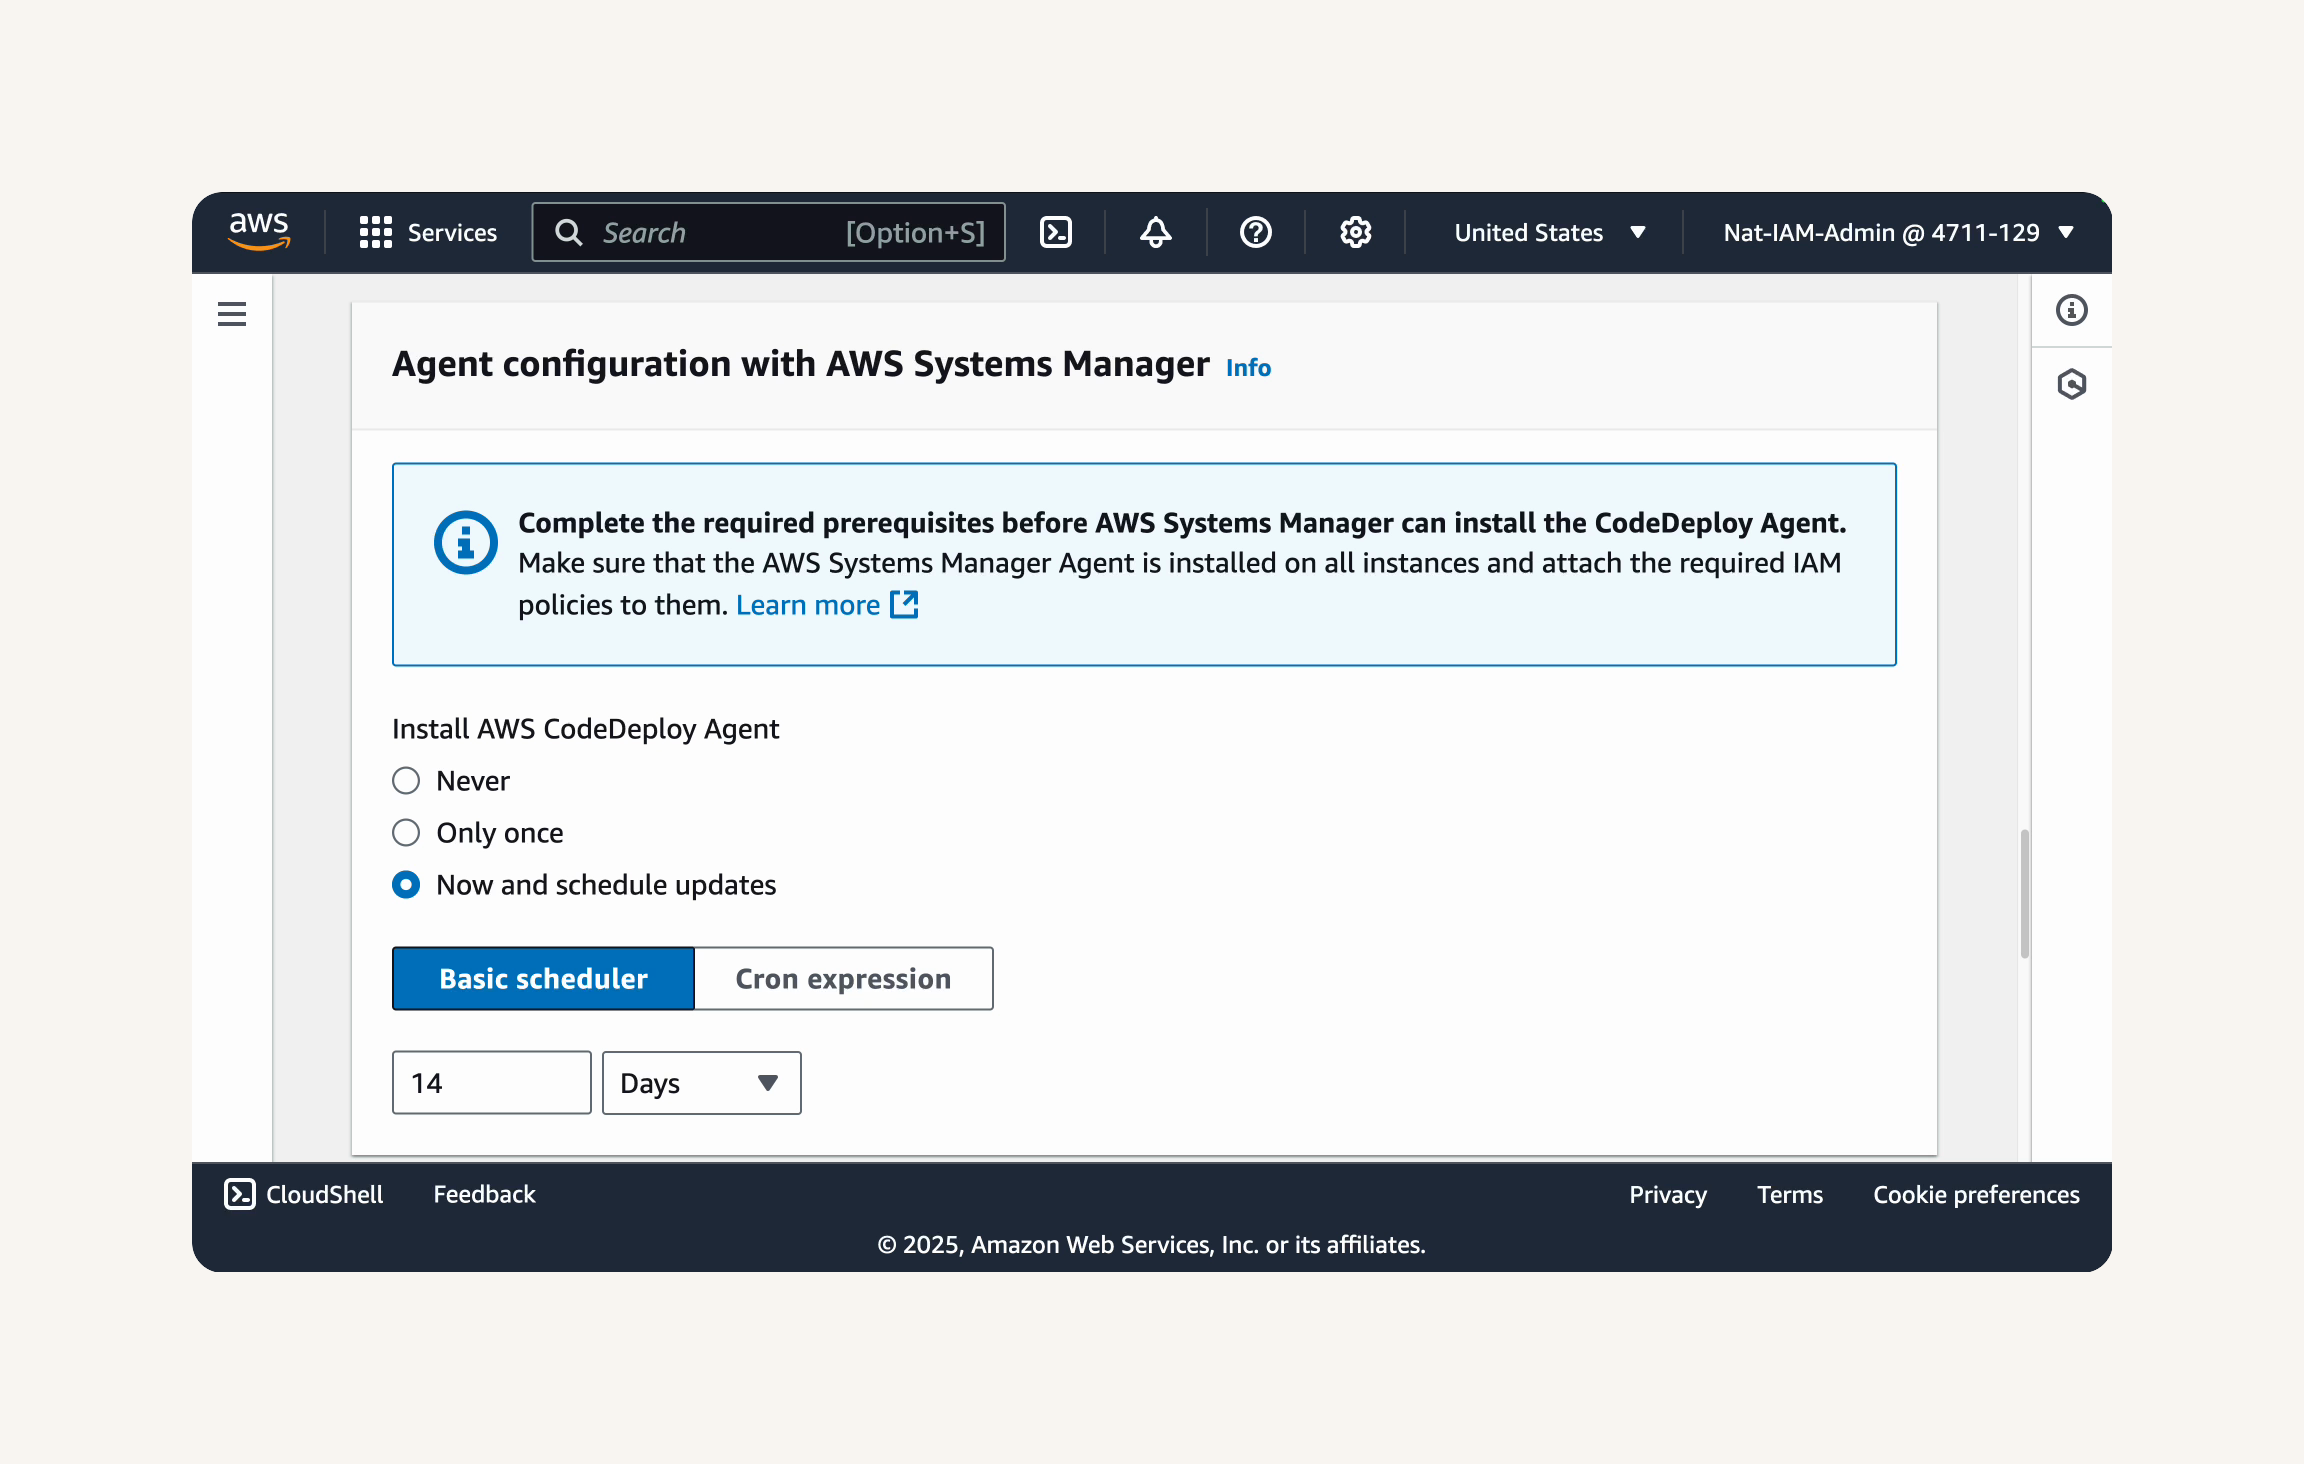
- In Deployment settings, keep the default
CodeDeployDefault.AllAtOnce
💡 What are deployment settings?
Deployment settings help you control how quickly you'd like to roll out your application.
CodeDeployDefault.AllAtOncedeploys the application to all instances in the deployment group at the same time. It's the fastest option, but also the riskiest - if something goes wrong, all your instances could be affected at once.💡 Extra for Experts: How do you know what deployment setting to choose?
For production environments, you might choose more conservative options likeOneAtATime(update one instance, make sure it works, then move to the next) orHalfAtATime(update 50% of instances, verify, then do the rest). These slower approaches reduce risk by limiting the blast radius of any potential issues.For production systems with hundreds of instances, these settings become crucial. Imagine updating your banking app on all servers simultaneously vs. trying it on 10% first to make sure customers can still access their accounts! But since we only have one instance in our project, the cautious approach doesn't offer much benefit.
We're using AllAtOnce in this project because we only have one instance and we're learning - speed is more important than caution here!

- Deselect Enable load balancing.
💡 What is load balancing?
Load balancing directs visitors to whichever server is least busy at the moment. Instead of everyone lining up at one server (which could get overwhelmed), traffic is distributed across multiple servers. When a visitor tries to access your website, they actually connect to the load balancer first. The load balancer then decides which server should handle this particular request - typically choosing the least busy one.We're not using load balancing in this project because we only have one server - there's nothing to balance between! But in a production environment, you'd almost always use it to improve the availability and performance of your application.

- Select Create deployment group

A deployment group is the longest, most detailed part of CodeDeploy's setup. Nice work making it to the end 👏
It's time to put everything together and deploy our web application to the EC2 instance!
In this step, you're going to:
-
Create a CodeDeploy deployment.
-
Monitor the deployment process.
-
Access and verify the deployed web application.
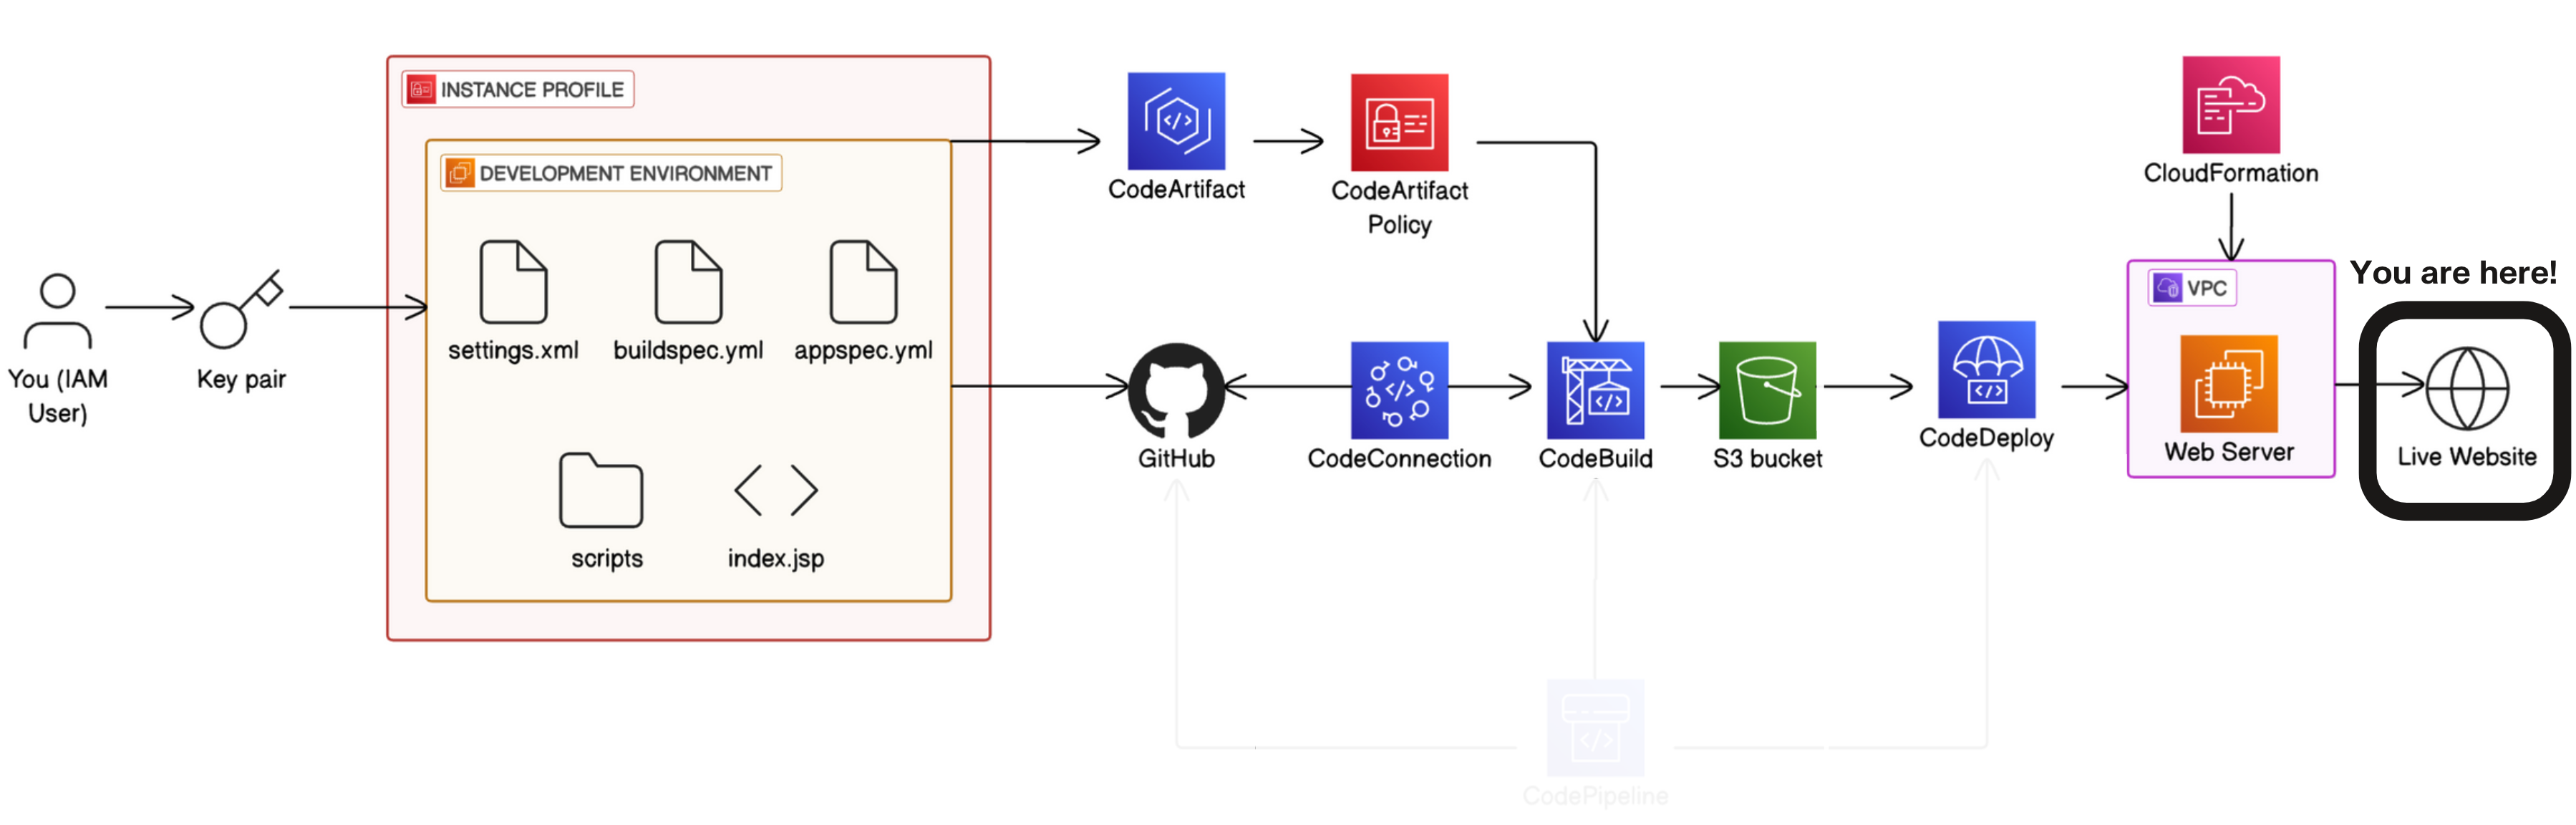
- In the deployment group details page, select Create deployment.
💡 What is a CodeDeploy deployment?
A CodeDeploy deployment represents a single update to your application, with its own unique ID and history. When you create a deployment, you're telling CodeDeploy:
Which version of the application to deploy (the revision)
Where to deploy it (the deployment group)
How to deploy it (the deployment settings)
CodeDeploy then orchestrates the entire process - stopping services, copying files, running scripts, starting services - and keeps track of whether it succeeds or fails. You can monitor it happening in real-time and see a detailed log of each step.
- Sweet! Some of this deployment configuration is already pre-filled for us.
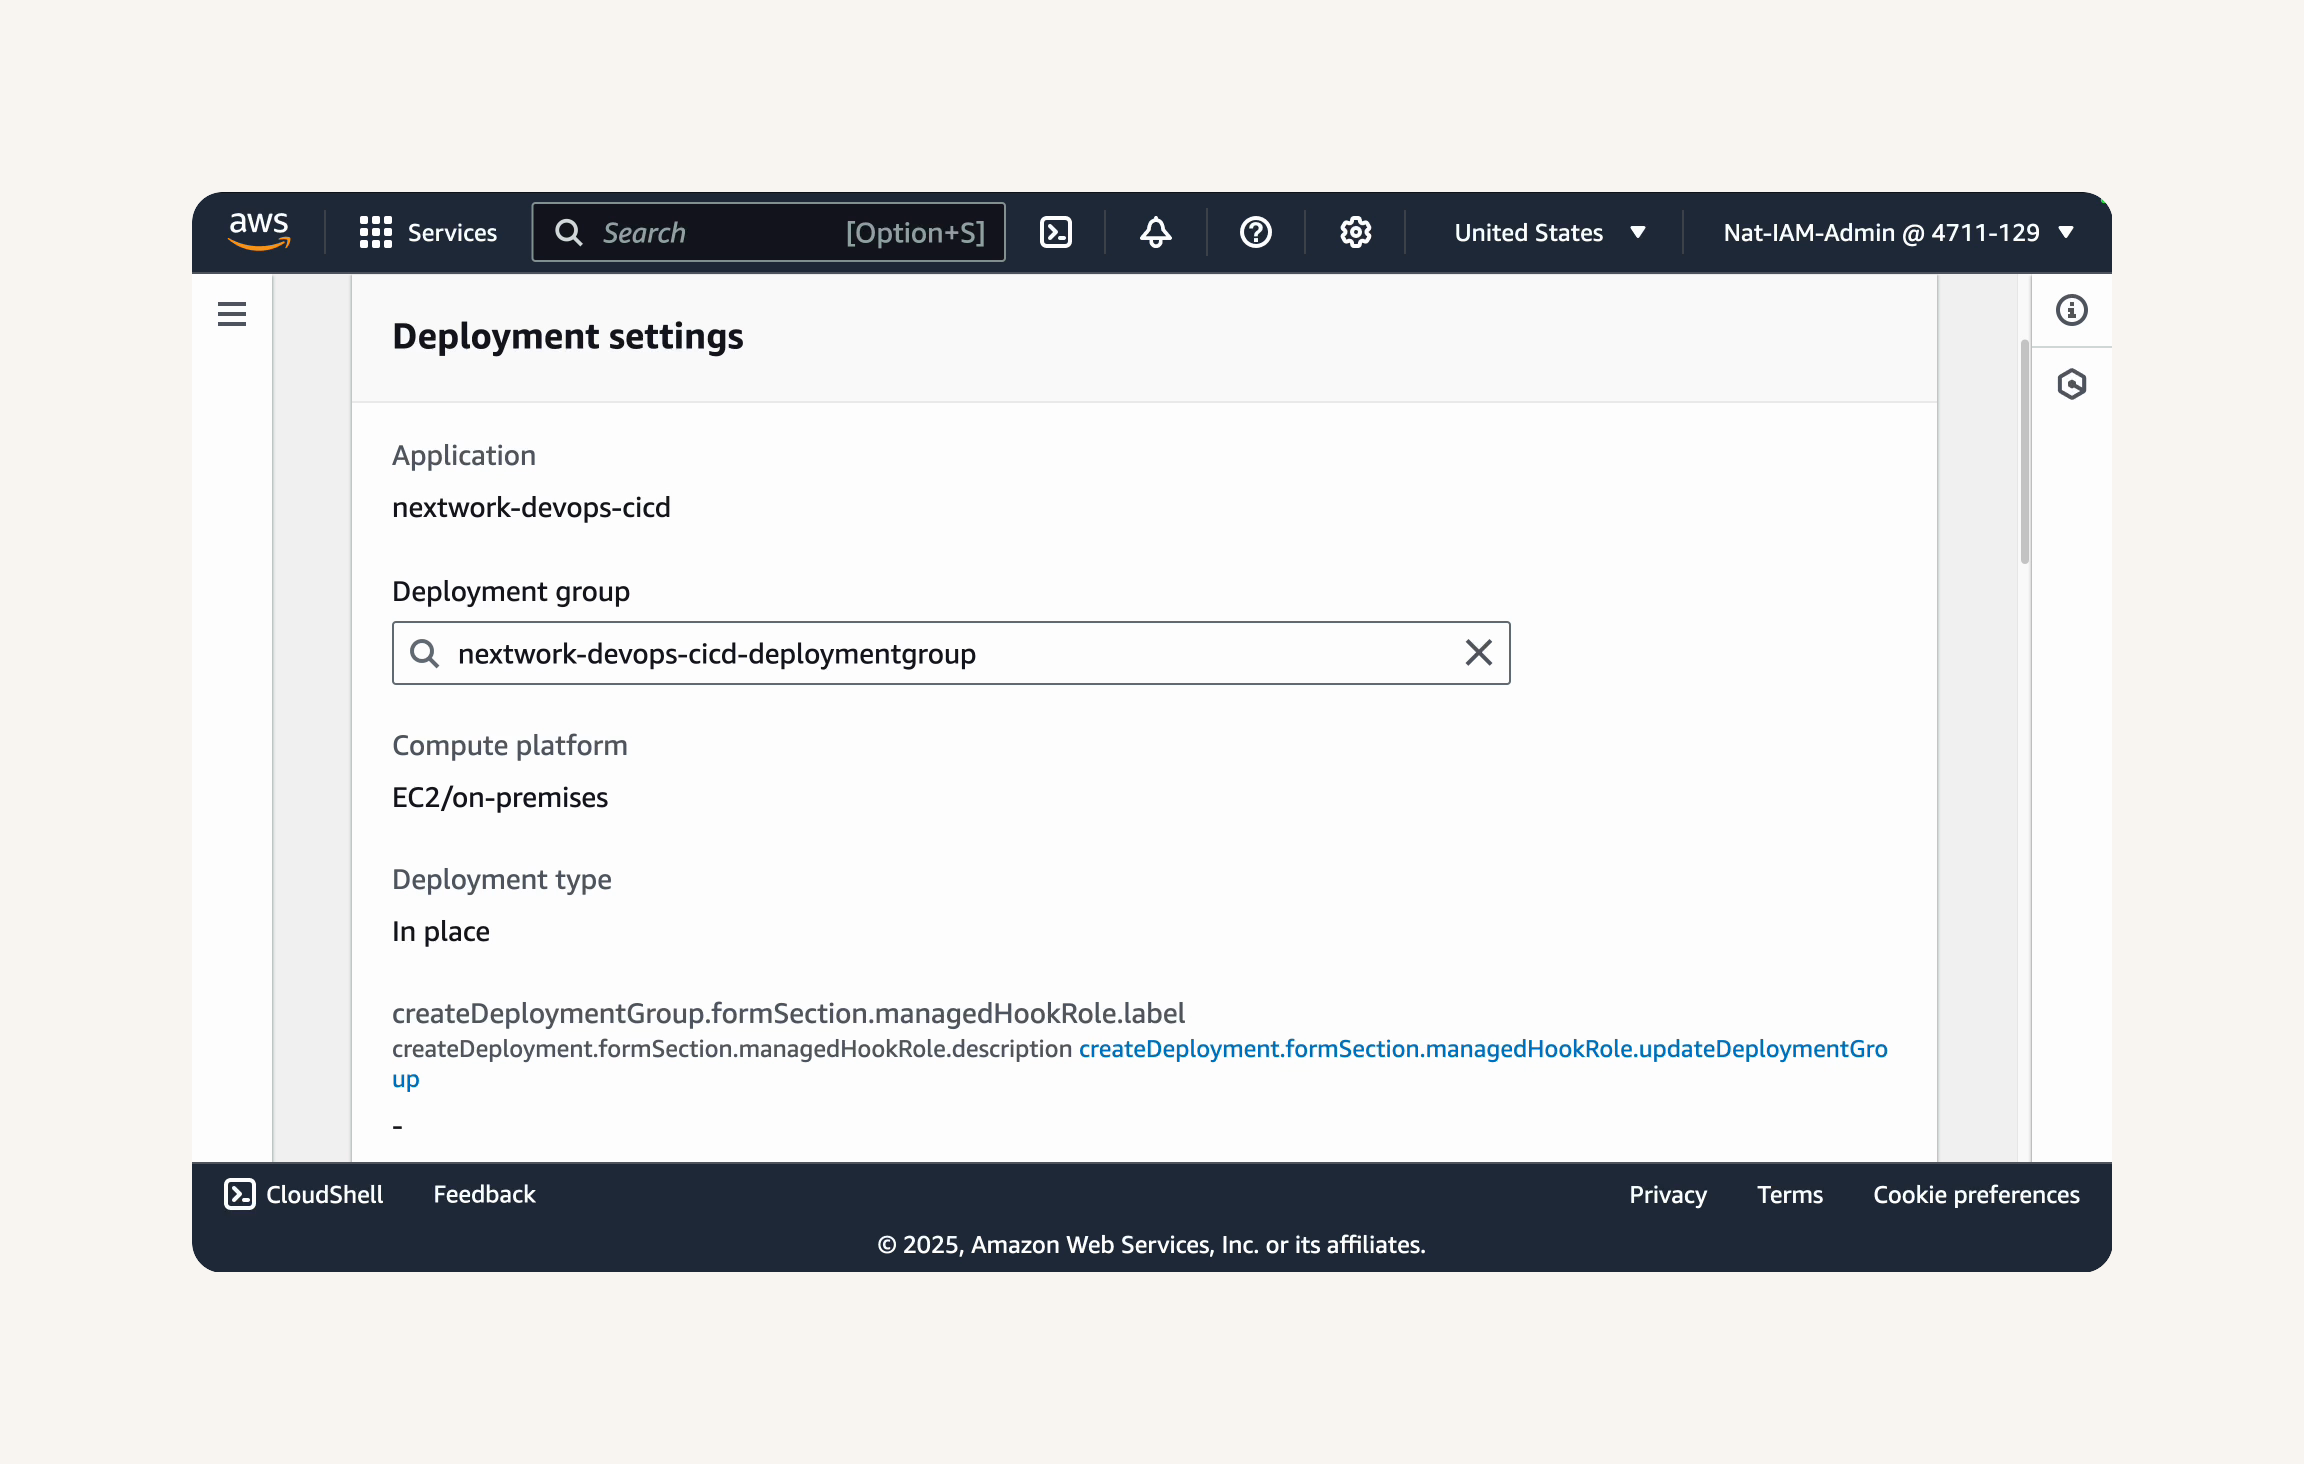
- Under Revision type, make sure My application is stored in Amazon S3 is selected. That's because our deployment artifact is inside an S3 bucket!

-
Head back to your S3 bucket called
nextwork-devops-cicd. -
Click into the
nextwork-devops-cicd-artifactbuild artifact.
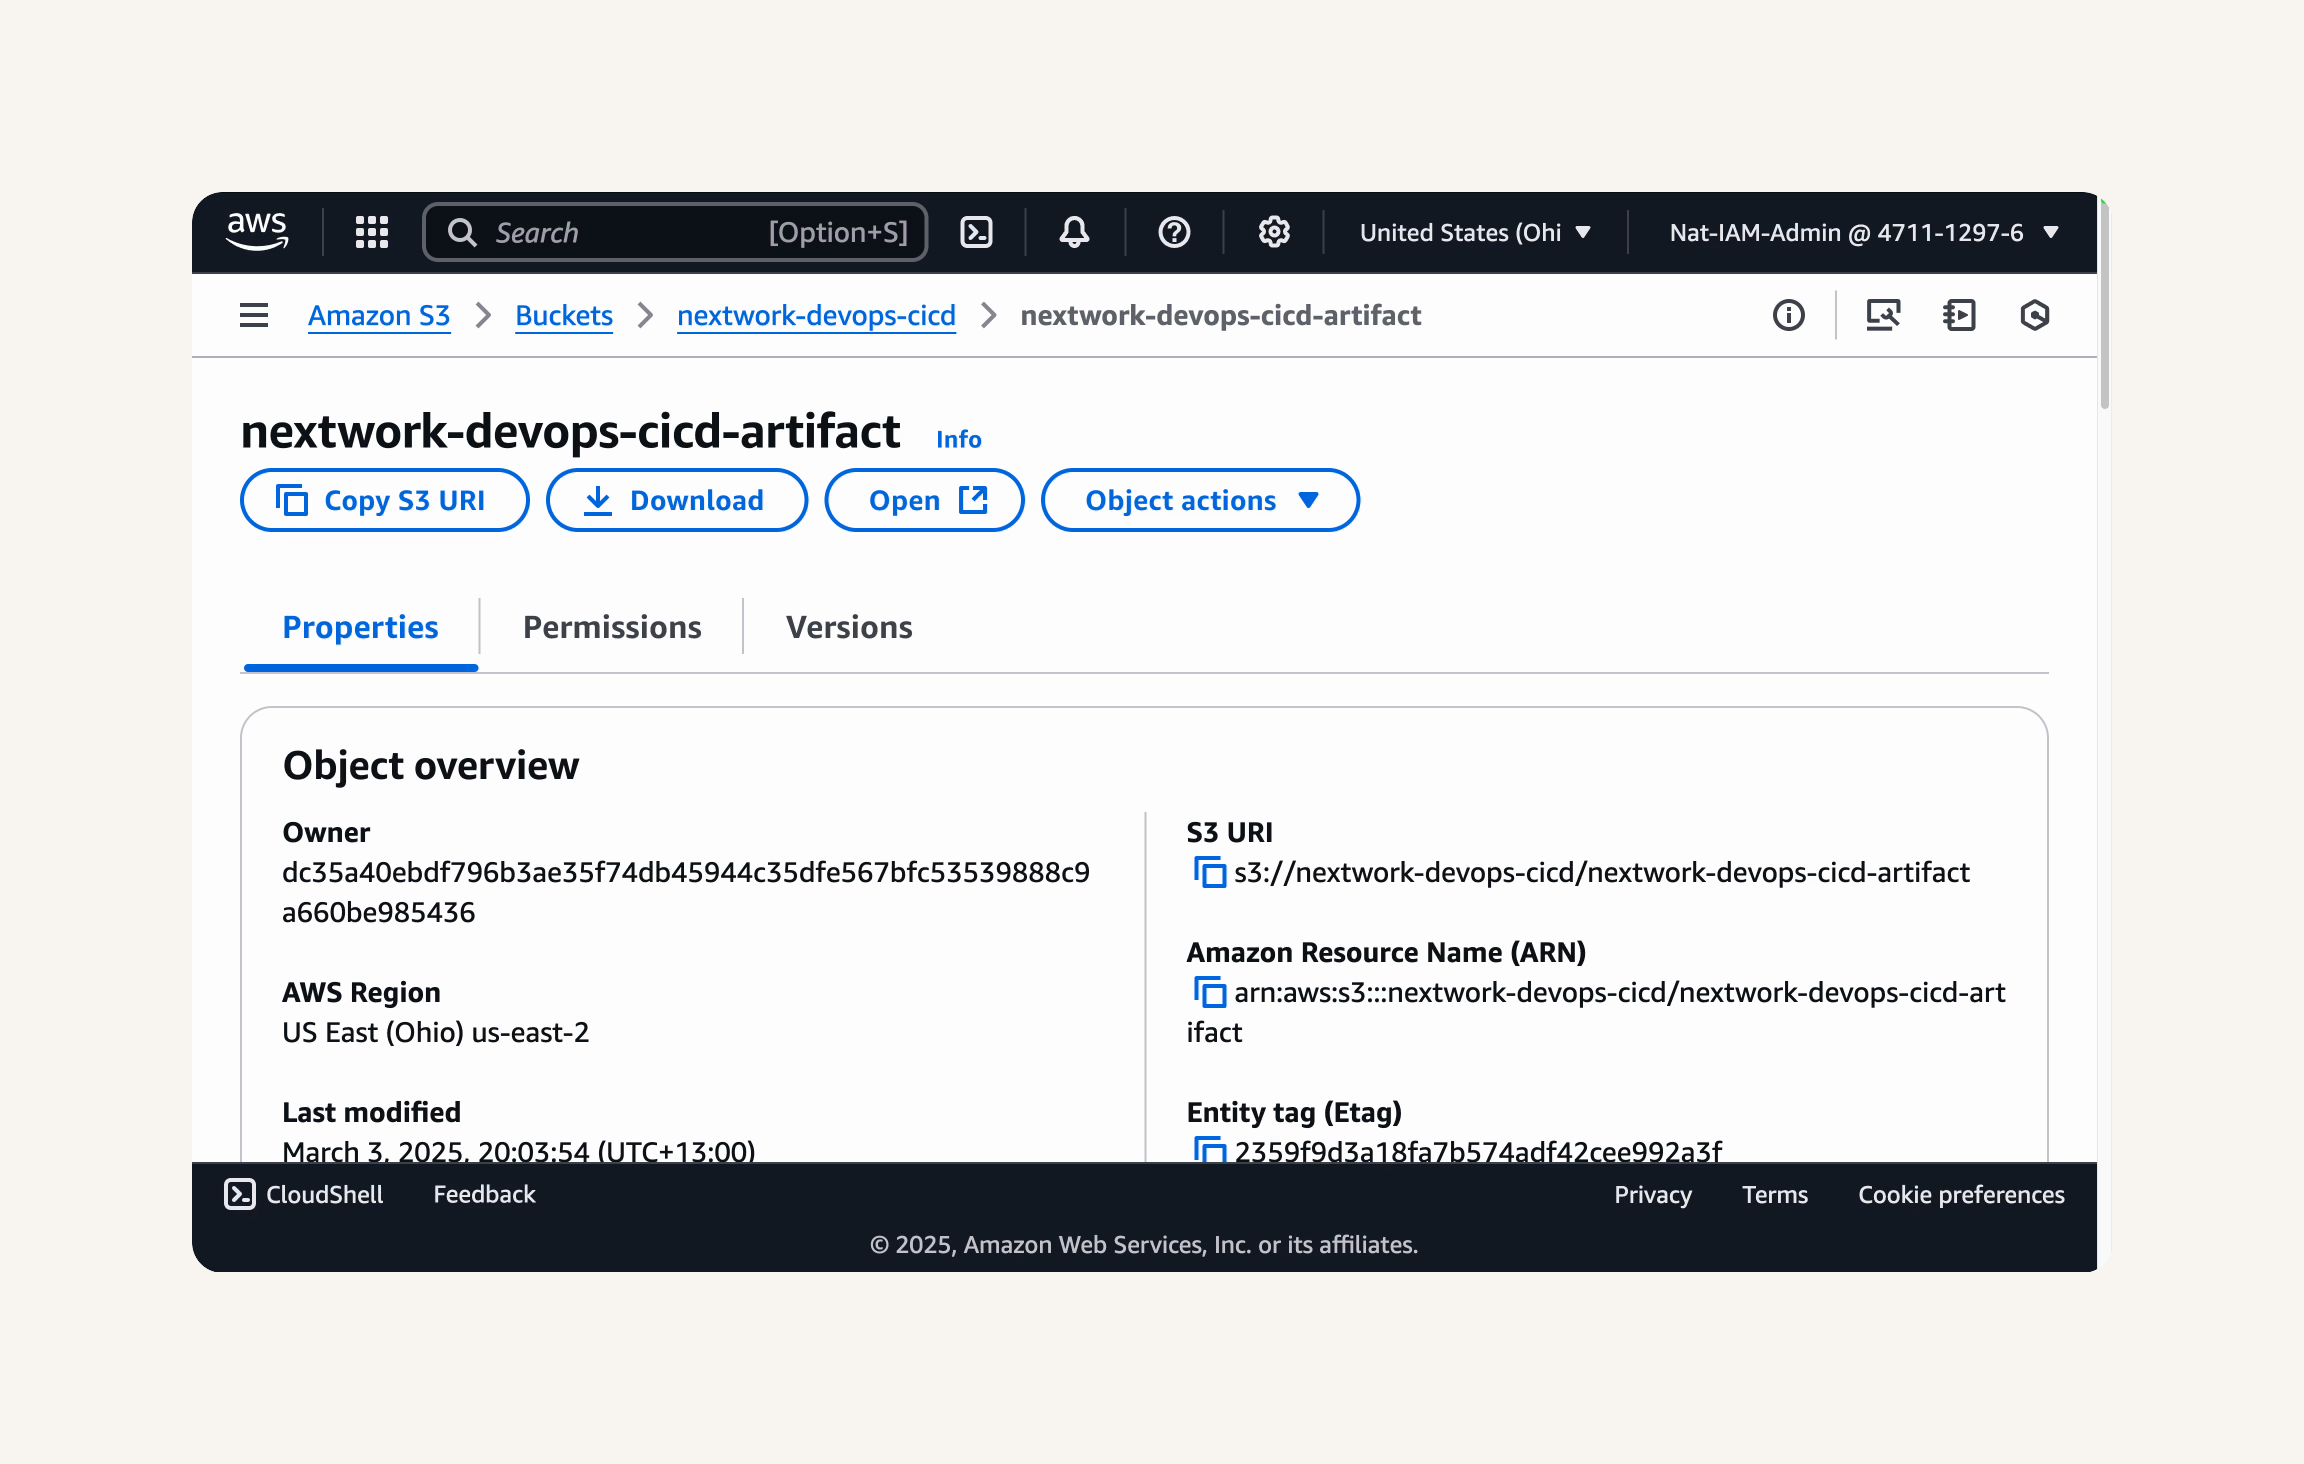
- Copy the file's S3 URI.

-
Paste the S3 URI into the Revision location field in CodeDeploy.
-
Select .zip as the Revision file type.
💡 What is a revision location? Why did we use our WAR/zip file?
The revision location is the place where CodeDeploy looks to find your application's build artifacts. We're using the S3 bucket that's storing our WAR file, so CodeDeploy knows where to find the latest version of our web app it's deploying to the deployment EC2 instances!
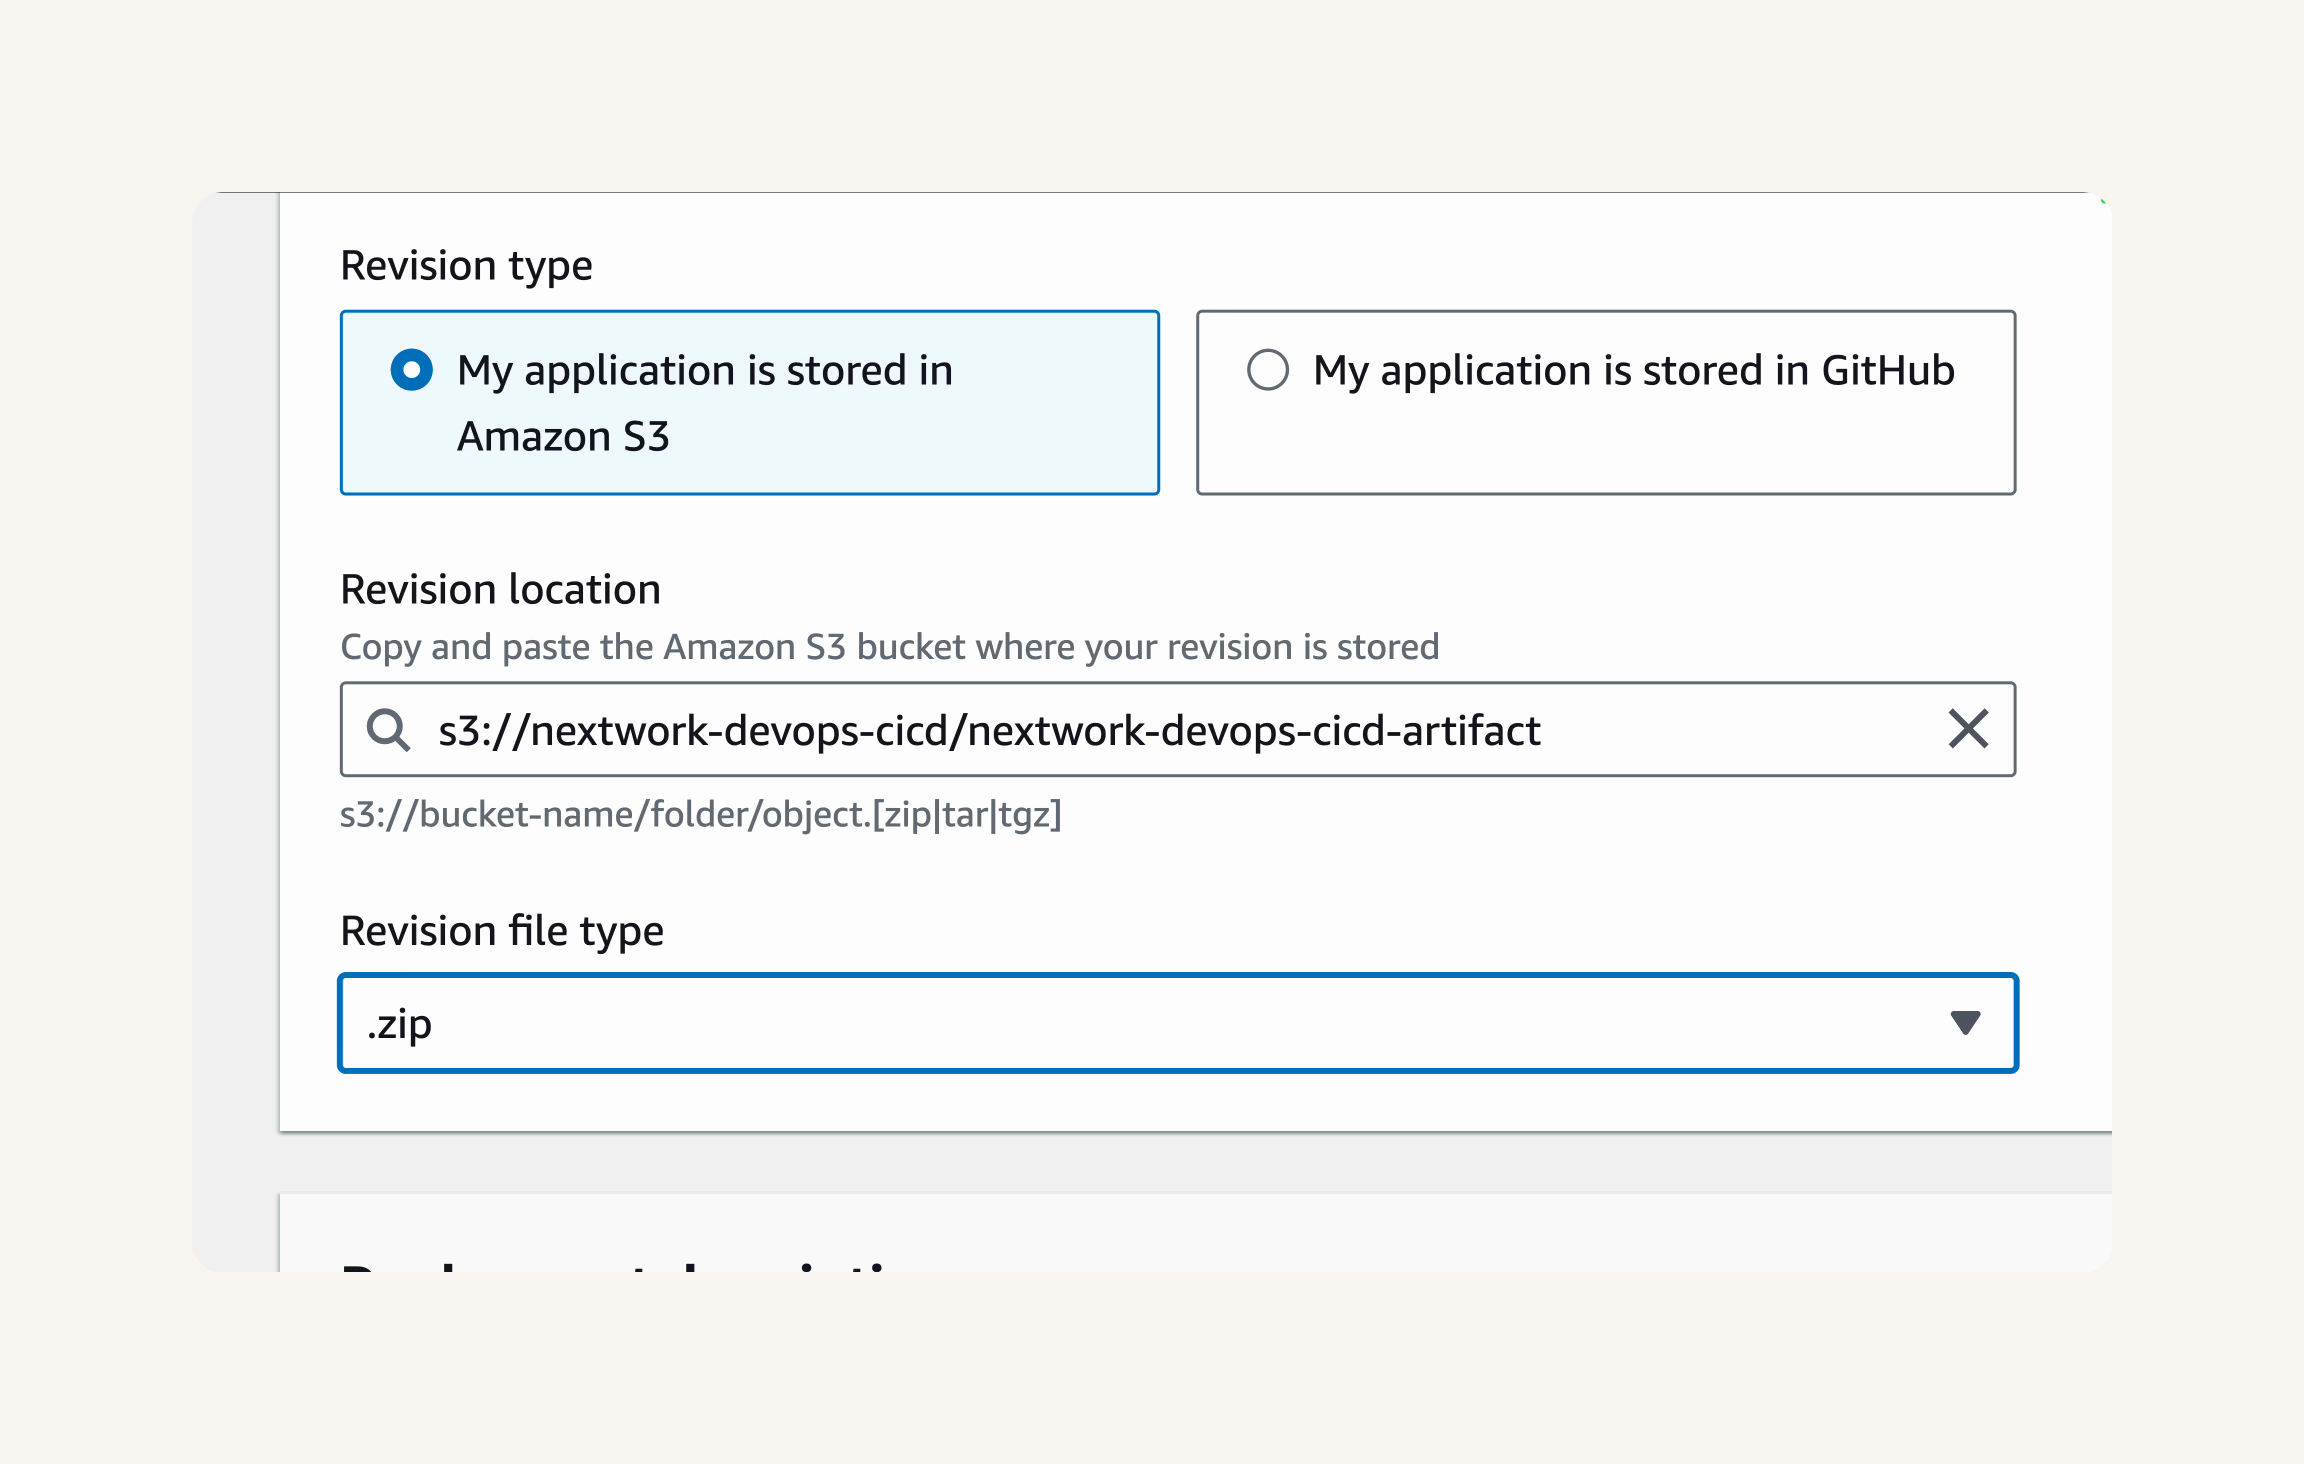
- Next, we'll leave Additional deployment behavior settings as default.
💡 Extra for Experts: What are Additional deployment behaviors settings and Deployment group overrides?
These settings give you extra flexibility when you need to handle special cases without changing your standard deployment settings:
Additional deployment behaviors settings let you configure options like how to handle file permissions during deployment or whether to immediately allow traffic to new instances.
Deployment group overrides let you to override deployment group settings for a specific deployment - maybe you normally deploy one instance at a time (safe but slow), but for a critical security fix, you want to override that and deploy to all instances at once (faster but riskier).
- Select Create deployment.

- Off we go! CodeDeploy kicks off a deployment of your web app.

-
Scroll down to Deployment lifecycle events and monitor the events by clicking View events.
-
See the lifecycle events progressing, such as
BeforeInstall,ApplicationStart, etc. These are the events you defined inappspec.yml!
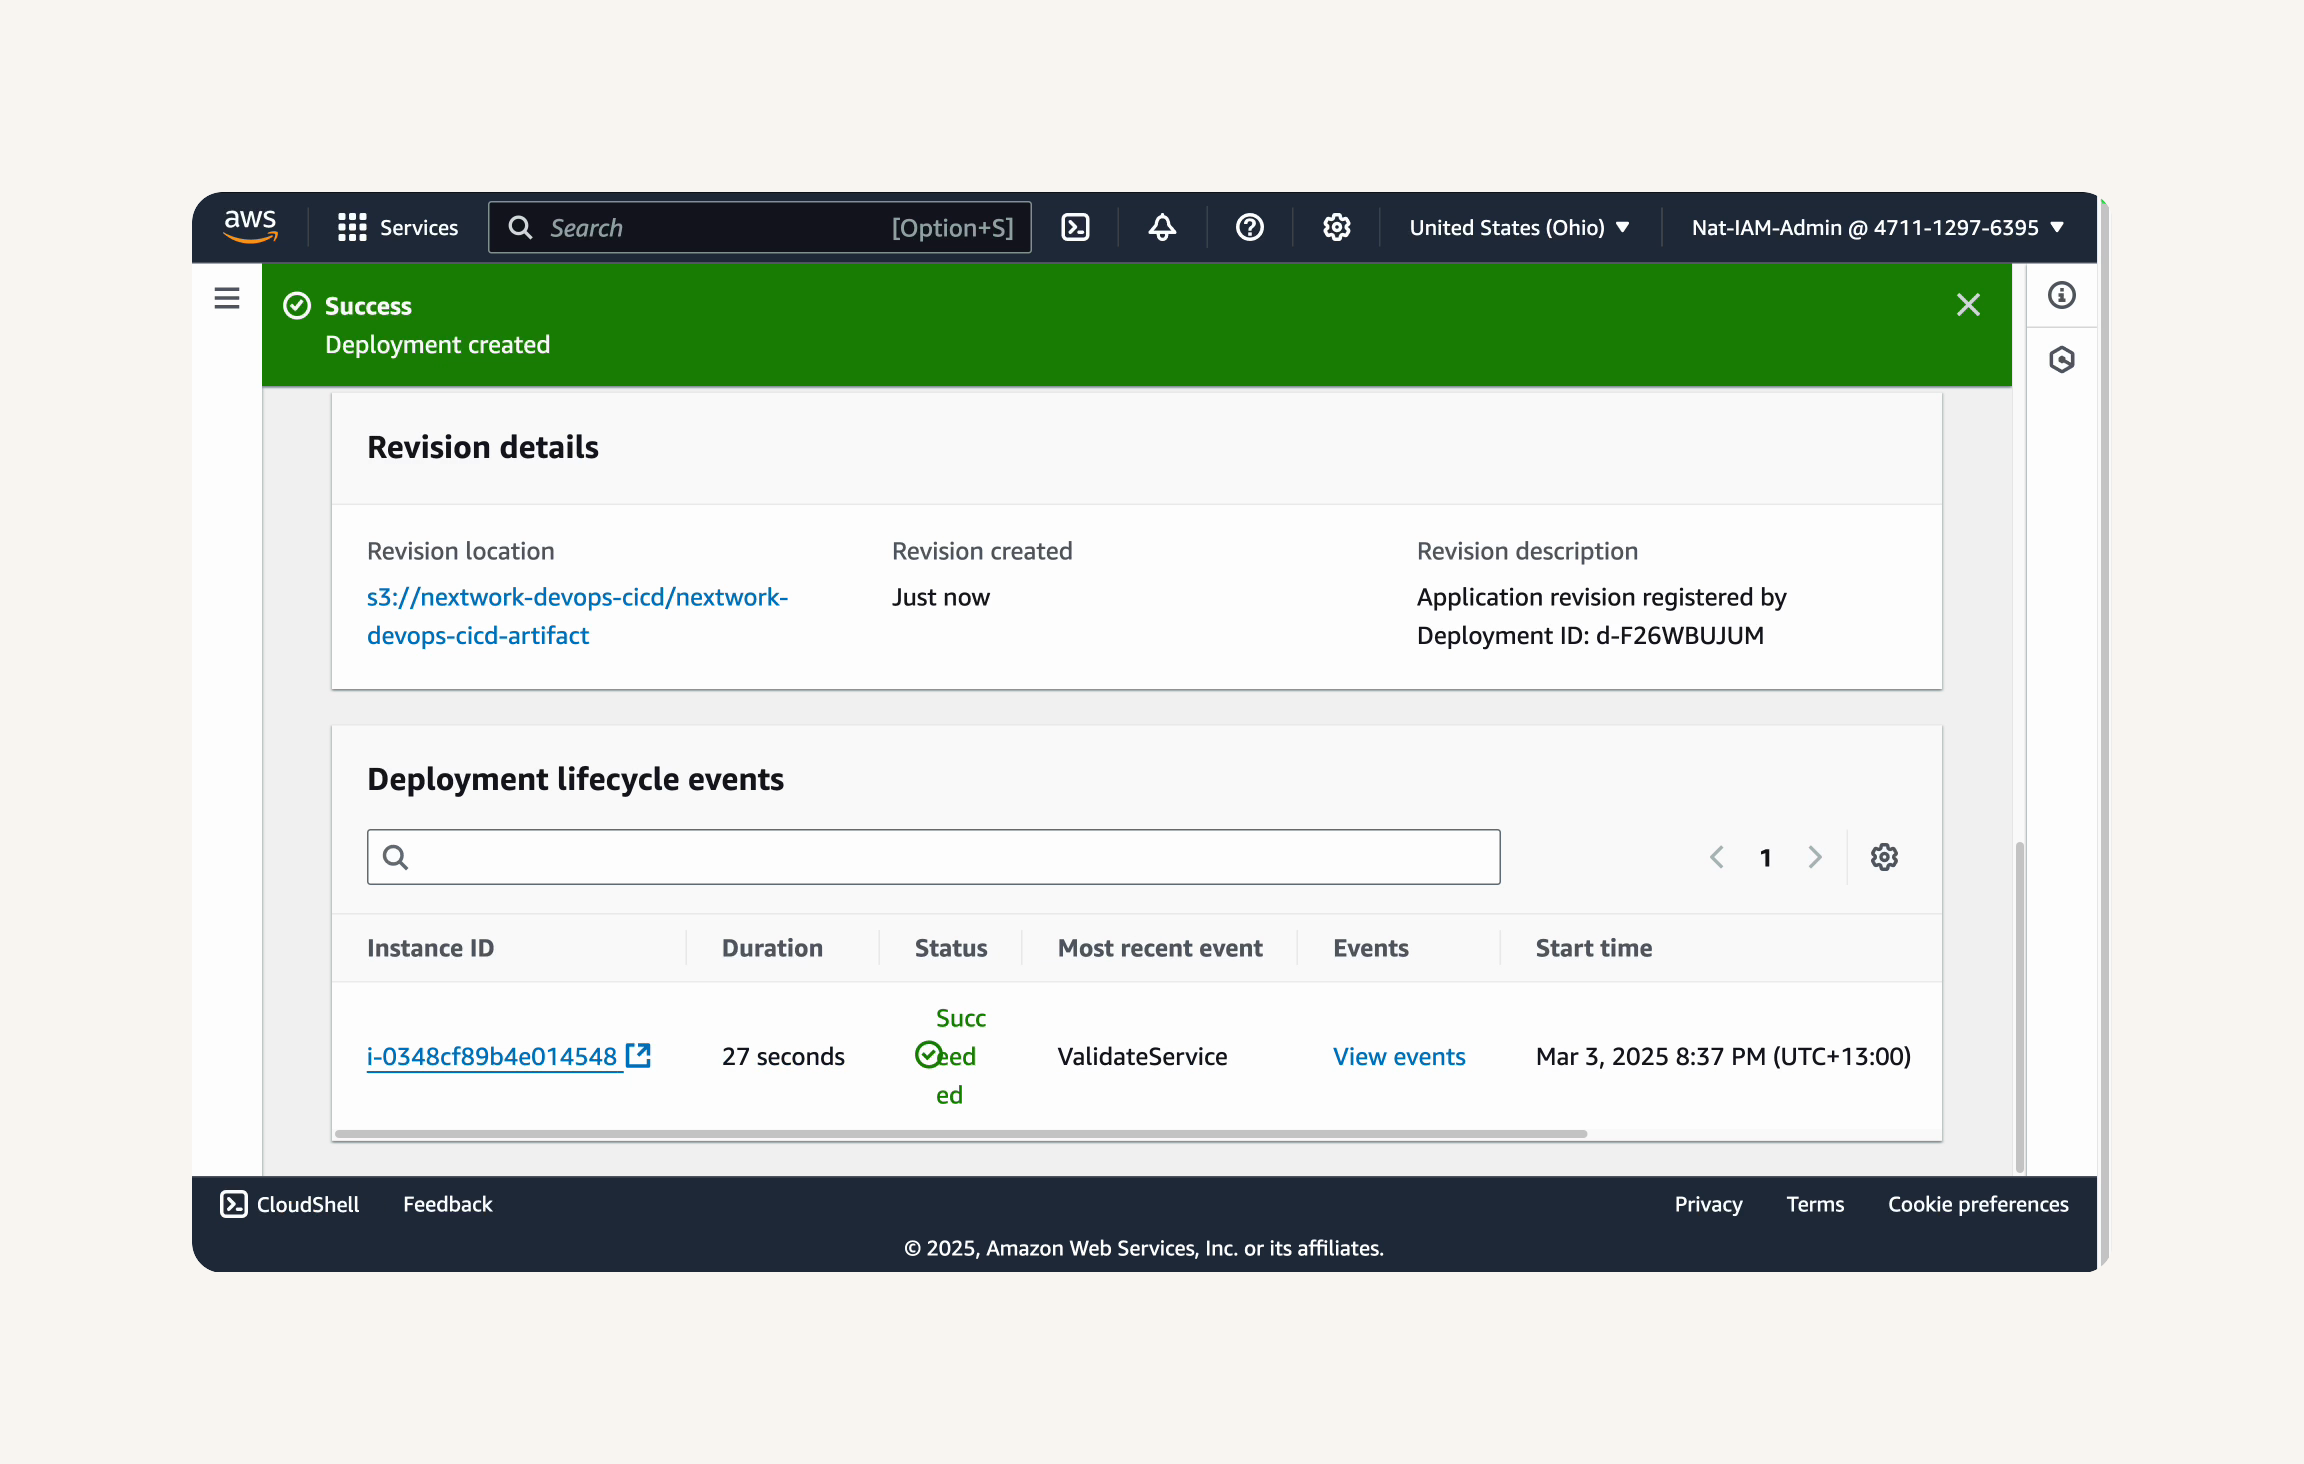
-
Whoops! After a few minutes of waiting, you might notice that you hit an error...
-
Why do you think your deployment failed?
-
Don't forget, CodeDeploy is deploying your web app by grabbing the latest build artifact from your S3 bucket.
-
When was the last time you ran a build on CodeBuild? 🤔
-
Aha - our last time running a build was before we added appspec and the deployment scripts!
-
Because of this, your deployment instance isn't getting any of the scripts you've written - causing the error you're seeing now.
-
Head back to your CodeBuild build project, and rebuild your project.
-
Once your second build is a success, return to CodeDeploy and retry the deployment.
- Wait until the deployment status says Success.
🙋♀️ Is your deployment still failing?
If your deployment isn't succeeding, you're hitting a common challenge in the DevOps journey! Let's troubleshoot together:
Check the CodeDeploy deployment details and lifecycle events for specific error messages
Check your EC2 security group rules to ensure port 80 is open for your IP address
If you end up making any changes to your web app code, make sure to push your changes and rebuild the web app before redeploying!
- Select the Instance ID in the Deployment lifecycle events panel. This takes you to the deployment EC2 instance you launched with CloudFormation.

- Get the Public IPv4 DNS of your EC2 instance from the EC2 console.

-
Open the Public IPv4 DNS in a web browser.
-
It might take a minute or two for the application to become fully accessible after deployment.
🙋♀️ I don't see the application!
Check whether your URL is using https - if it is, change it to http in the browser. This is because the EC2 instance's security group lets in connections on port 80 (HTTP) but not port 443 (HTTPS).If you still don't see the application, it might be because your IP address has changed. You can check your IP address by visiting http://checkip.amazonaws.com/. Double check the IP address with another site, like https://whatismyipaddress.com/. If your IP address changed, head to your EC2 instance's security group and update its settings to allow your new IP address.
- WOOOHOOO! Welcome to your application!
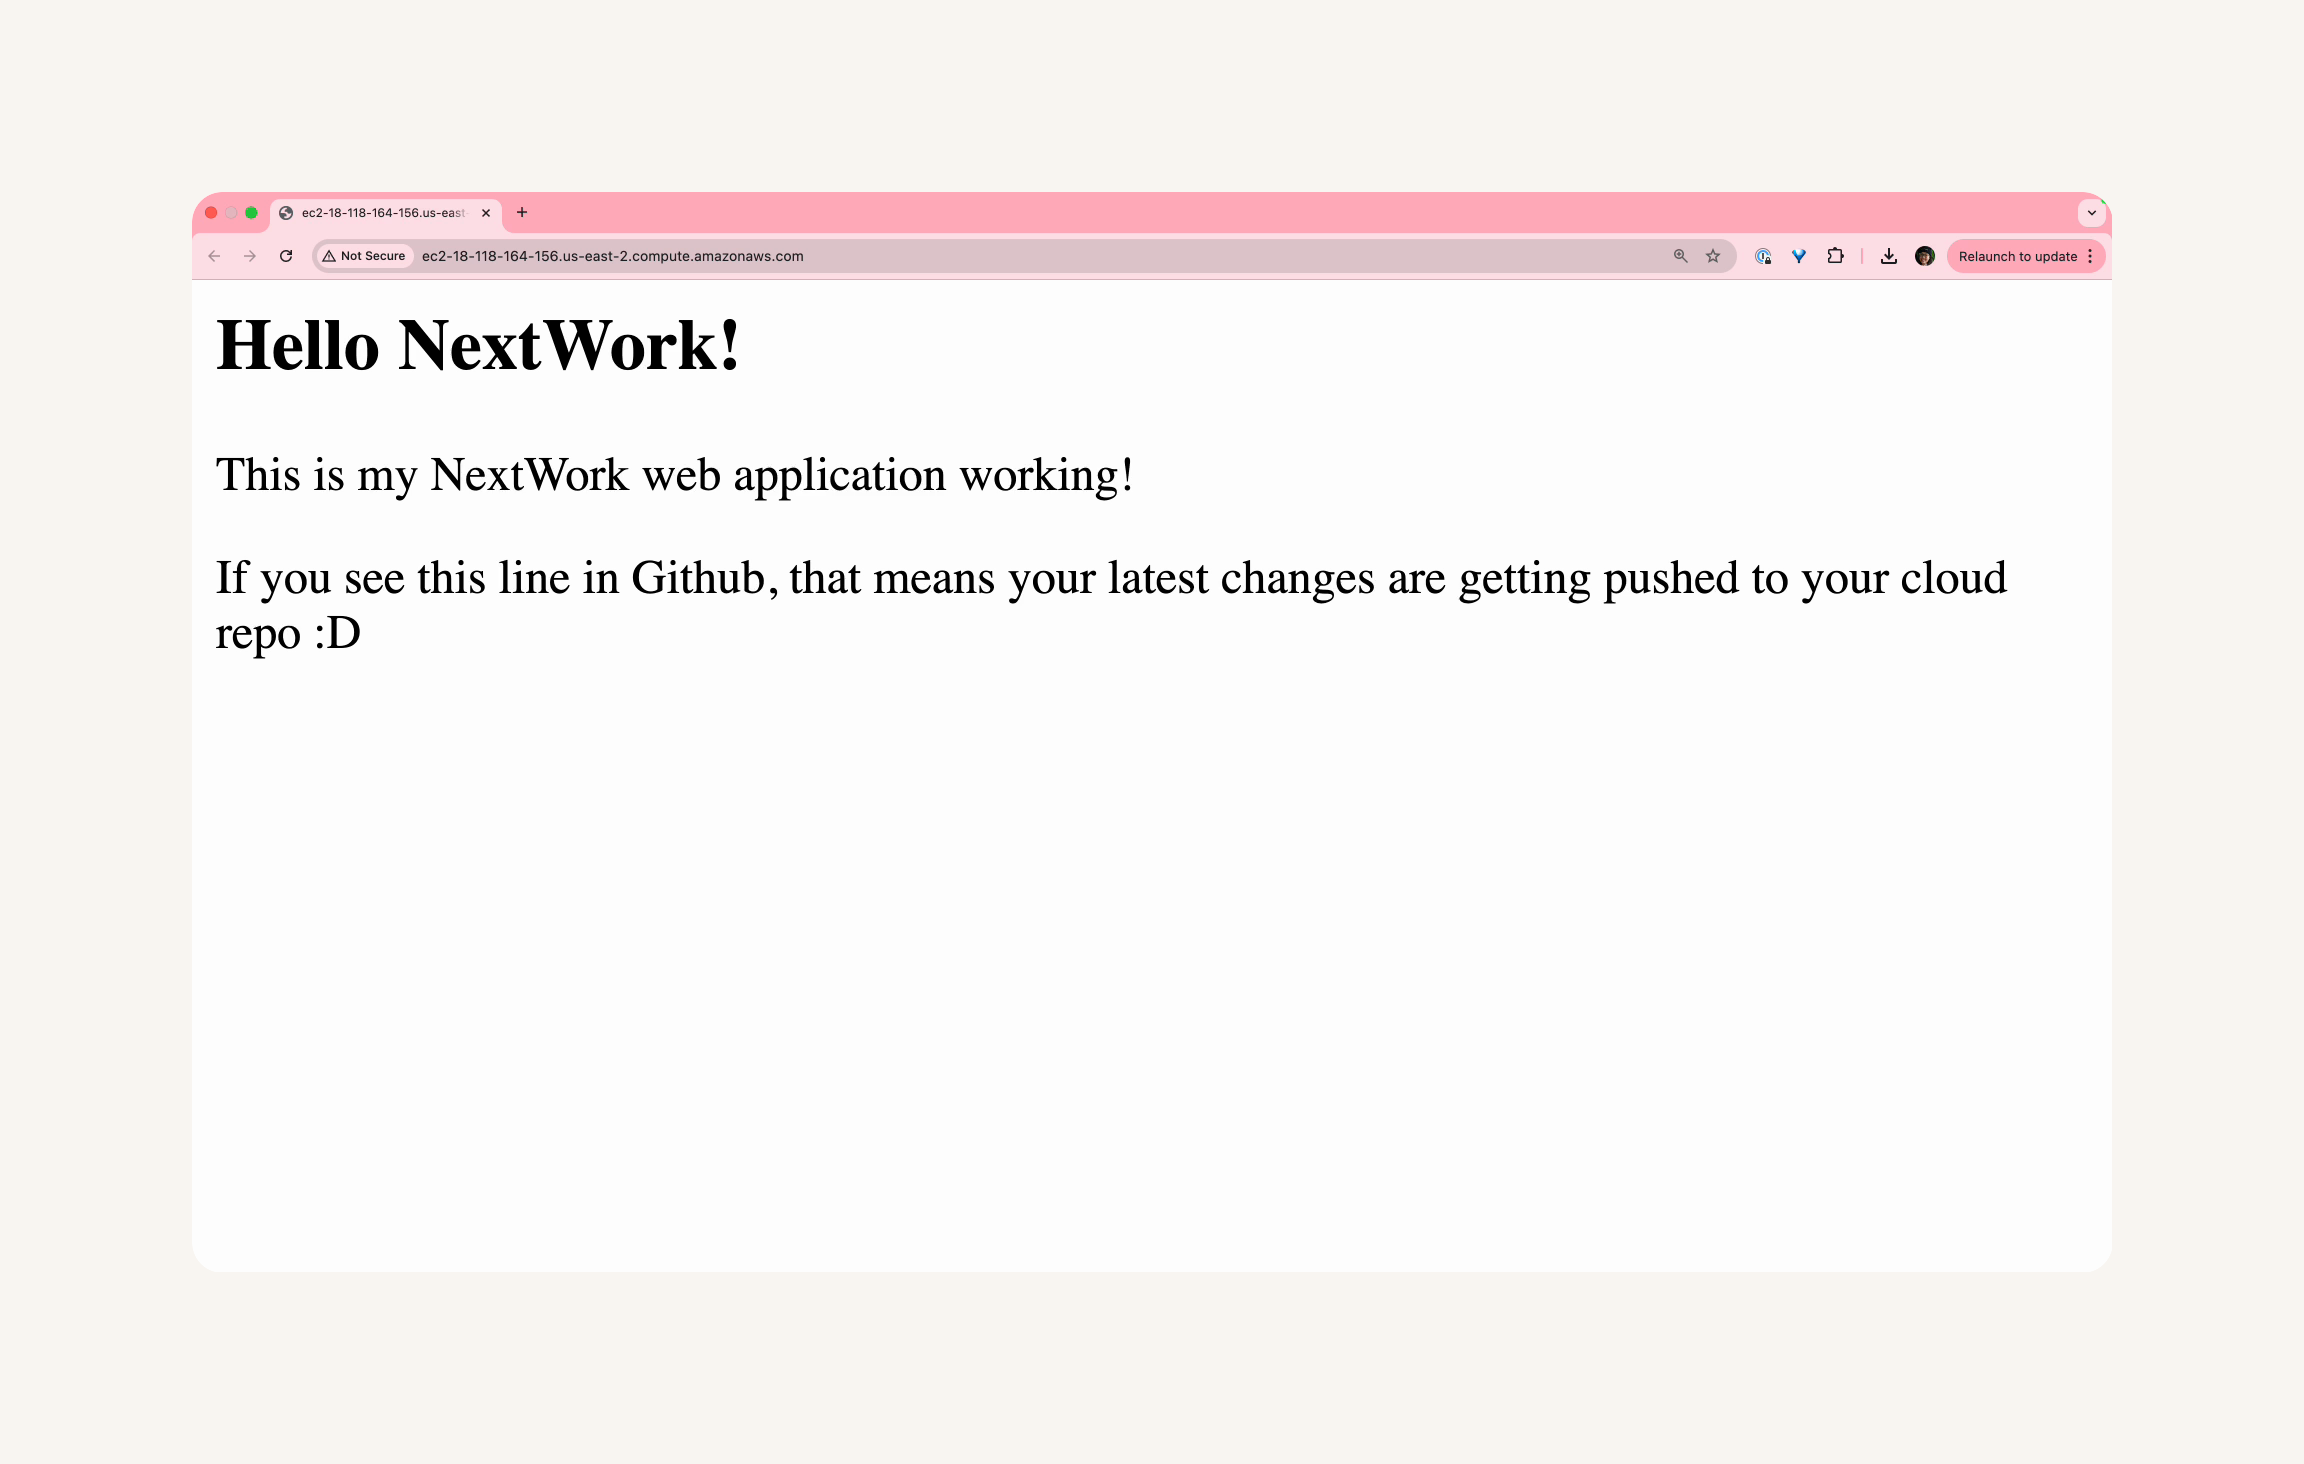
Congratulations! You've successfully automated a web app's deployment to EC2 using AWS CodeDeploy!
Awesome work 👏
Want to experience the full power of CodeDeploy?
Here's your chance to go beyond just deployment automation!
In this section our goal is to conduct a deployment recovery - a critical skill in scenarios where a failed deployment takes down your application.
In this section, you're going to:
-
Intentionally create a broken deployment (don't worry, it's safe!)
-
Watch it fail in real-time
-
Perform an emergency recovery to restore service
- Open VS Code connected to your EC2 instance.

-
Navigate to your
scriptsfolder and open thestop_server.shfile. -
Rewrite the entire
stop_server.shfile. Let's introduce an error by deleting everything, and having only one line that usessystemctllinstead ofsystemctl:
#!/bin/bash
# Add this at the top of your script to make it exit immediately if any command fails
set -e

# Your intentional error
sudo systemctll stop httpd.service  # Misspelled command will now cause script to exit with non-zero status

# To be extra sure, we can also add an explicit exit code
exit 1
💡 Why update stop_server.sh?
This simple typo will cause the script to fail - systemctll is not a valid command! When CodeDeploy tries to run this script during deployment, it will encounter this error and fail to continue. It's a safe error to introduce because it only affects the deployment process, not your existing running application.

- Save the file.
- In your terminal, stage and commit the change:
git add scripts/stop_server.sh
git commit -m "Intentionally adding error to demonstrate rollback"
git push
- You can see in your GitHub repository that your change was pushed to GitHub.

- Can you tell what you should do next to deploy the change?
🙋♀️ Shall I go straight to CodeDeploy?
Nope!Remember the deployment pipeline we set up: your code change is now in GitHub, but CodeDeploy needs a build artifact to deploy. CodeBuild is responsible for packaging your application code (including the scripts) into a deployable artifact. So our next steps are to:
Head to AWS CodeBuild first to build a new artifact that includes your change
Then go to CodeDeploy to deploy this new build.
-
Head back to the CodeBuild service.
-
In the left navigation pane, click on Build projects.
-
Find your build project (it should be named something like nextwork-webapp-build or similar).
-
Select your build project by clicking on its name.
-
Click the Start build button in the upper right corner.

- Your build will now begin processing - you'll see the status change to In progress.

- Wait for the build to complete, which might take just 1-2 minutes. The status should eventually change to Succeeded.

💡 Wait a second - why did the build succeed?
Good question! Your new code contains broken stop_server.sh code, so it might be easy to expect CodeBuild to fail.CodeBuild is creating a new ZIP artifact with all your application files, including the broken script. This build succeeds because it's not actually running the scripts, just packaging them. The error will only be discovered when CodeDeploy tries to run the script during deployment.

-
After your build completes successfully, head to the CodeDeploy service.
-
In the left navigation pane, click on Applications.
-
Select your CodeDeploy application (named something like
nextwork-devops-cicd).

- Select the Deployments tab.

- Select Create deployment.

- Set up your deployment again! Challenge yourself - can you remember which deployment settings to pick?

- Before you finish setting it up, expand the Roll back with configuration overrides arrow.

- Check the checkbox for Roll back when a deployment fails
💡 What is a rollback?
A rollback is like having an "undo" button for your software updates.When you deploy a new version of your application and something goes wrong, a rollback lets you quickly go back to the previous version that was working fine.
For websites and apps, rollbacks are super important because they help minimize downtime when things break. Instead of spending hours trying to fix a broken update while users are frustrated, you can rollback to the working version in minutes, then fix the problems at your own pace.

- Tick!

- Select Create deployment to deploy your app again - this time with your newly built artifact (the one with the broken script).

- Initially, the deployment status will show In progress.

-
While we wait for the deployment... 👇
-
Let's see what happens when you try to run the broken script yourself in VS Code!
-
Head back to VS Code.
-
In your terminal, run
pwdto check that you're in your project's root.

- From the project's root, run this command next to make the
stop_server.shscript executable:
chmod +x ./scripts/stop_server.sh💡 What does it mean to make the script 'executable'?
When you use the commandchmod +x ./scripts/stop_server.sh, you're changing the file's permissions to make it "executable" - basically telling the system "this isn't just a text file, it's a script that can be run."This is an important move because in Linux/Unix systems (like the EC2 instance you're using), files have different permissions that control who can read, write, or execute them. The +x part specifically adds the execute permission.

- Run
./scripts/stop_server.shin your terminal - this lets you run the broken script yourself.
💡 Aha! An error in the terminal
Looks like this is what will happen when our deployment instance tries to run the same script - deployment will fail because of acommand not found error

-
Head back to the
CodeDeployconsole - let's check on your deployment. -
You should see the status of your deployment change to Failed.

-
Scroll to the bottom of your deployment's details page, and select View events.
-
Aha - the error message says "scripts/stop_server.sh run as user root failed".

- Scroll down the page again, and select the error code that says ScriptFailed.

- Now we get the detailed log related to our failure! The log says
systemctll: command not found- exactly like what we saw when we ran the failed script locally.
💡 What happened?
During the deployment process, CodeDeploy tried to execute thestop_server.shscript as part of theApplicationStoplifecycle event. The script failed, exactly as we designed it to. This failed script caused the entire deployment to fail before it could make any changes to your application.

Wait, but didn't we enable rollbacks? What happened with that? Shall we check if the automated rollback saved the day?
- Still in the CodeDeploy console, select Deployments from the left hand navigation bar.

-
Check your deployment history.
-
Huh, looks like there were actually two failed deployments that failed. The deployment at the top of the list is especially interesting - its initiating event is CodeDeploy rollback. This means even the automatic rollback failed 😳
💡 Why did the "rollback" fail?
This is an important lesson on how CodeDeploy works! The automatic rollback doesn't actually reuse the successful deployment's build artifact - it only reuses the previous deployment's deployment configuration.So in our case, CodeDeploy is actually still referencing the latest build artifact available in S3, which still contains your broken script.
This is a common misconception about CodeDeploy's capabilities. In a more sophisticated setup with AWS CodePipeline, you could implement true automated rollbacks that reference specific artifacts, but with the current setup, we need to manually fix the problem.

Now let's fix the issue and restore service properly - here's the four-step process for a manual redeployment:
Our GitHub repository is still storing the incorrect version of our code, so let's restore stop_server.sh script to the correct version.
-
Return to VS Code.
-
Open the stop_server.sh file in the scripts folder.
-
Replace the broken content with the corrected script:
#!/bin/bash
isExistApp="$(pgrep httpd)"
if [[ -n $isExistApp ]]; then
sudo systemctl stop httpd.service
fi
isExistApp="$(pgrep tomcat)"
if [[ -n $isExistApp ]]; then
sudo systemctl stop tomcat.service
fi
- Save the file.
- In your terminal, run the following commands:
git add scripts/stop_server.sh
git commit -m "Fix typo in stop_server.sh"
git push
-
Nice! Your terminal should start sending your fixed code back to your GitHub repository too.
-
Look for
stop_server.shin your GitHub repo - it should show the updated version!

-
Return to the CodeBuild console in AWS and the Build projects page.
-
This time, you could try using the Start build shortcut to start a new build straight away.
-
Click Start now to build a new artifact with the original script.

- Wait for the build to complete - this will take 1-2 minutes!
💡 Recap: Why is rollback/recovery important in deployments?
Deployments don't always go as planned - even with thorough testing! The ability to quickly recover from a failed deployment and restore service to a working state is a critical skill for any DevOps engineer. In production environments, a fast recovery can be the difference between a minor hiccup and hours of downtime affecting thousands of users.
- Build success!

-
Head back to the CodeDeploy console's Deployments page.
-
Pick the latest deployment and select Retry deployment at the top of the page.

-
It's okay to retry the latest deployment even if that one failed - after all, now we know that retrying a deployment still uses the latest build artifact in the S3 bucket!
-
While we wait for the deployment...
💡 Am I manually performing a deployment rollback right now?
What we're doing now is a deployment recovery rather than a true rollback. In a rollback, we would revert to a previous known-good version of the application. In a recovery, we fix the issue and deploy a new version.In production environments, true automated rollbacks are often implemented with more advanced tools. AWS CodePipeline can be configured to automatically roll back to the last successful deployment when a failure is detected, which eliminates the need for manual intervention.
- Yay! The deployment shows Succeeded again.
🙋♀️ Still running into a deployment error?
That's totally possible! Your CodeDeploy Agent could've cached the old deployment scripts using the failedstop_server.shscript. To resolve this, you can:
Reboot your instance.
Remove the cached files via a direct ssh connection to your deployment EC2 instance, and running the following commands:
`sudo rm -rf /opt/codedeploy-agent/deployment-root/deployment-instructions/*
sudo rm -rf /opt/codedeploy-agent/deployment-root/deployment-group-id/*
sudo rm /usr/share/tomcat/webapps/nextwork-web-project.war
sudo service codedeploy-agent restart`Give your deployment another try, and you'll be back on track in no time!

Congrats on learning this valuable DevOps lesson! Understanding how to recover from failures is often more important than knowing how to deploy when everything goes right 🧠
In a production environment, you would typically:
-
Implement a more comprehensive CI/CD pipeline using AWS CodePipeline that includes automated rollback capability - you get to do this in your upcoming part of the project
-
Configure monitoring and alarms to detect deployment failures quickly
-
Have documented procedures for both automated and manual recovery
-
Use deployment strategies like blue/green deployments to minimize user impact
In this section we've learned how to:
-
👏 Launch a deployment architecture using CloudFormation.
-
✍️ Prepare deployment scripts and an appspec.yml file for CodeDeploy.
-
⚙️ Configure a CodeDeploy application and deployment group.
-
🚀 Deploy your web application using CodeDeploy (woah!).
-
💎 Implement disaster recovery and roll back a deployment!
Welcome to Final Part of the DevOps Challenge.
Today, you'll learn how to use AWS CodePipeline to automate your entire CI/CD workflow into one seamless process!
- An AWS account - Create one here!
- A GitHub account - Create one here!
- VS Code
- Remote - SSH extension for VS Code
- AWS CodePipeline
- AWS CodeBuild
- AWS CodeDeploy
- Amazon S3
- Amazon EC2
- AWS IAM
- GitHub
- AWS CloudFormation
- CI/CD
This project brings together everything you've learned in the DevOps Challenge - your source code repository, build process, and deployment process will all work together automatically!
🙋♀️ What is a CI/CD pipeline?
A CI/CD pipeline automatically builds, tests, and deploys your code changes. Instead of manually running these steps, CodePipeline manages the entire process from code commit to deployment.This means faster releases, fewer errors, and more time to focus on writing great code rather than managing the deployment process.
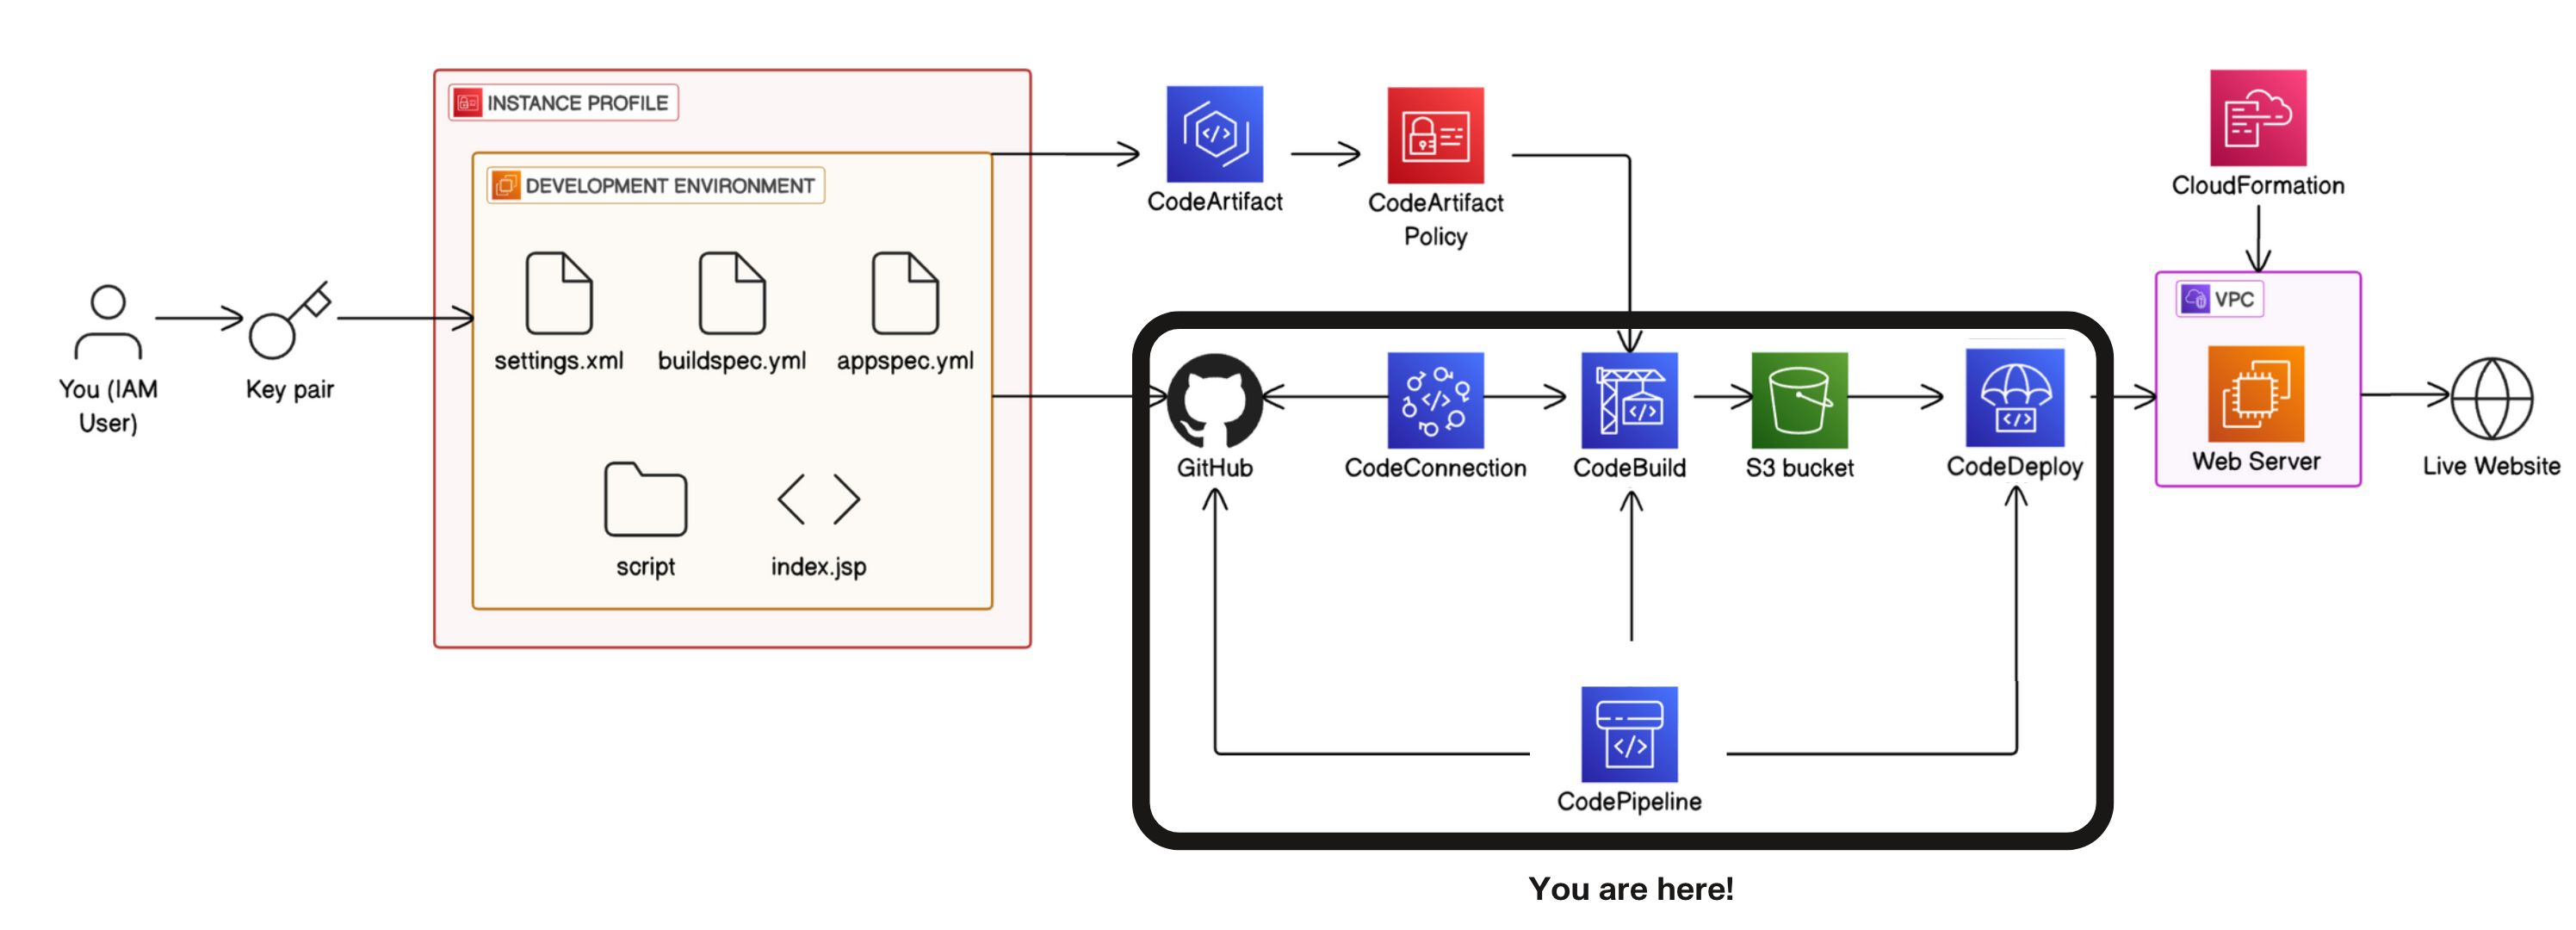
Get ready to:
-
Create a complete CI/CD pipeline with AWS CodePipeline.
-
Connect your source code, build, and deployment stages.
-
Test automatic deployments and learn how to roll back changes!
In today's project, we're putting together an automated CI/CD pipeline with AWS CodePipeline!
💡 What is AWS CodePipeline? Why are we using it?
So far, you've built CodeBuild projects that compile and test your code, and CodeDeploy applications that handle deployment. But there's still a missing piece: how do these services work together automatically?
Right now, you would need to:
-
Manually build your project again if the code changes.
-
Manually track which build artifacts should be deployed.
-
Manually start deployments for new build artifacts.
-
Manually restart the process if something fails.
CodePipeline solves these problems by orchestrating your entire workflow, and giving you visibility into the entire process in one place. It can:
-
✅ Automatically detect code changes in your GitHub repository.
-
✅ Automatically trigger CodeBuild to build a new project.
-
✅ Automatically start CodeDeploy with the new build artifacts.
-
✅ Automatically roll back a change if something fails.
Using CodePipeline transforms separate tools into a true CI/CD system, making deployments consistent, reliable, and fully automated - with no manual steps required from you!
Here's the game plan...
-
If you are following along, make sure that following are already in place:
- Set Up Source (GitHub).
- Build (Code Build).
- Deploy (Code Deploy).
-
We'll create and run our pipeline to see automated deployments in action!
-
Keep an eye out for an 💎 "Optional for Experts" section, where you'll learn how to roll back deployments if something goes wrong.
If you have deleted your resources at any stage, make sure to follow every instruction from start and ensure following:
-
Part 1️⃣: Set Up a Web App in the Cloud
-
Part 2️⃣: Connect a GitHub Repo with AWS
-
Part 3️⃣: Secure Packages with CodeArtifact
-
Part 4️⃣: Continuous Integration with CodeBuild
-
Part 5️⃣: Deploy a Web App with CodeDeploy
Let proceed to our final piece of the puzzle.
Let's dive right into creating our first pipeline! We'll start by setting up the basic pipeline structure and configuring its settings.
In this step, you're going to:
- Start creating a new pipeline in CodePipeline.
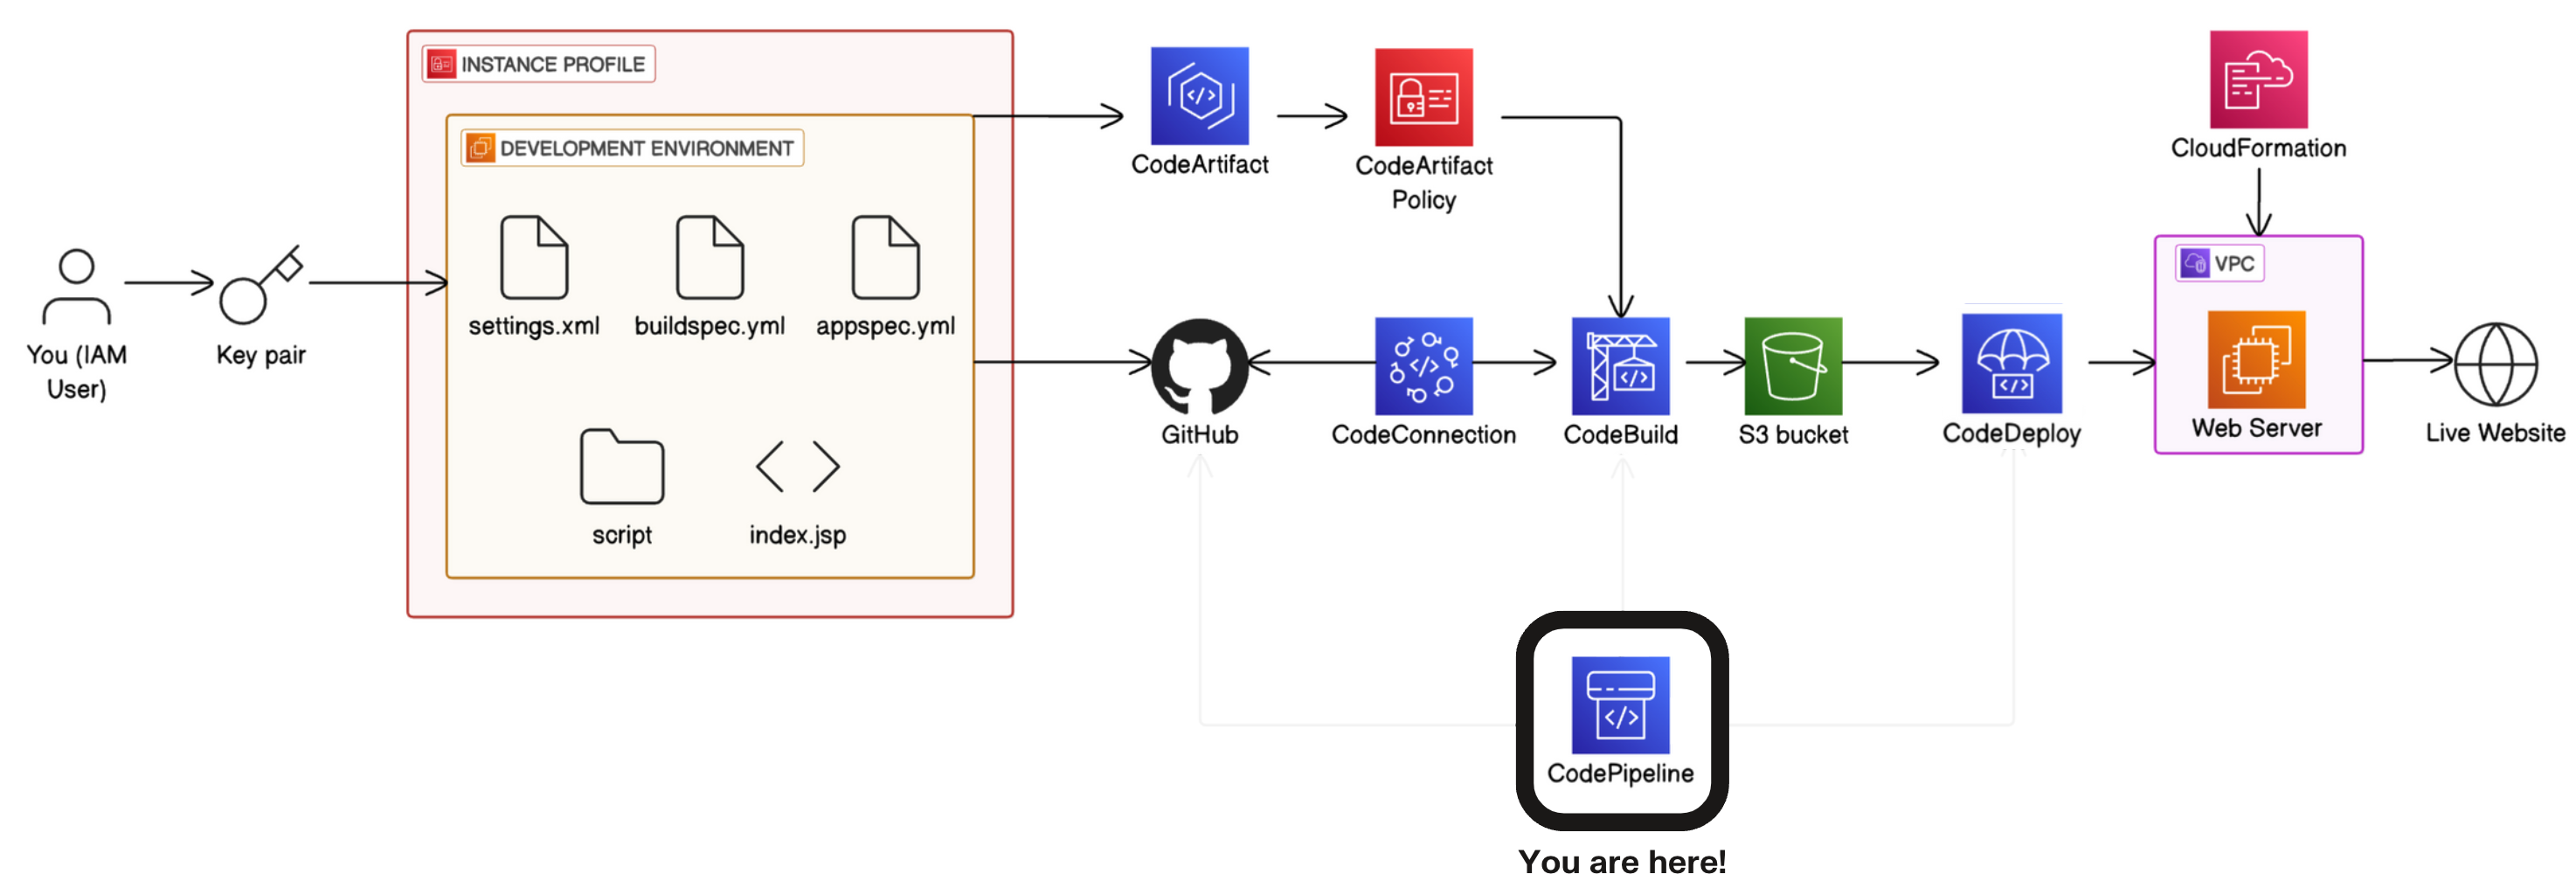
Start a new pipeline
- Head to the
CodePipelineconsole.

- Select the Getting started page. Welcome to CodePipeline!
💡 What is AWS CodePipeline? Why are we using it?
With CodePipeline, you can create a workflow that automatically moves your code changes through the build and deployment stage. In our case, you'll see how a new push to your GitHub repository automtically triggers a build in CodeBuild (continuous integration), and a then a deployment in CodeDeploy (continuous deployment)!Using CodePipeline makes sure your deployments are consistent, reliable and happen automatically whenever you update your code - with less risk of human errors! It saves you time too.
-
In the CodePipeline dashboard, Select Create pipeline.
-
Select Build custom pipeline.
💡 Why build a custom pipeline?
By choosing to build a custom pipeline, we get to define each stage and action step-by-step. This gives us a deeper understanding of how CodePipeline works and allows us to tailor the pipeline precisely to our needs. For learning purposes, building a custom pipeline from scratch is the best way to go !
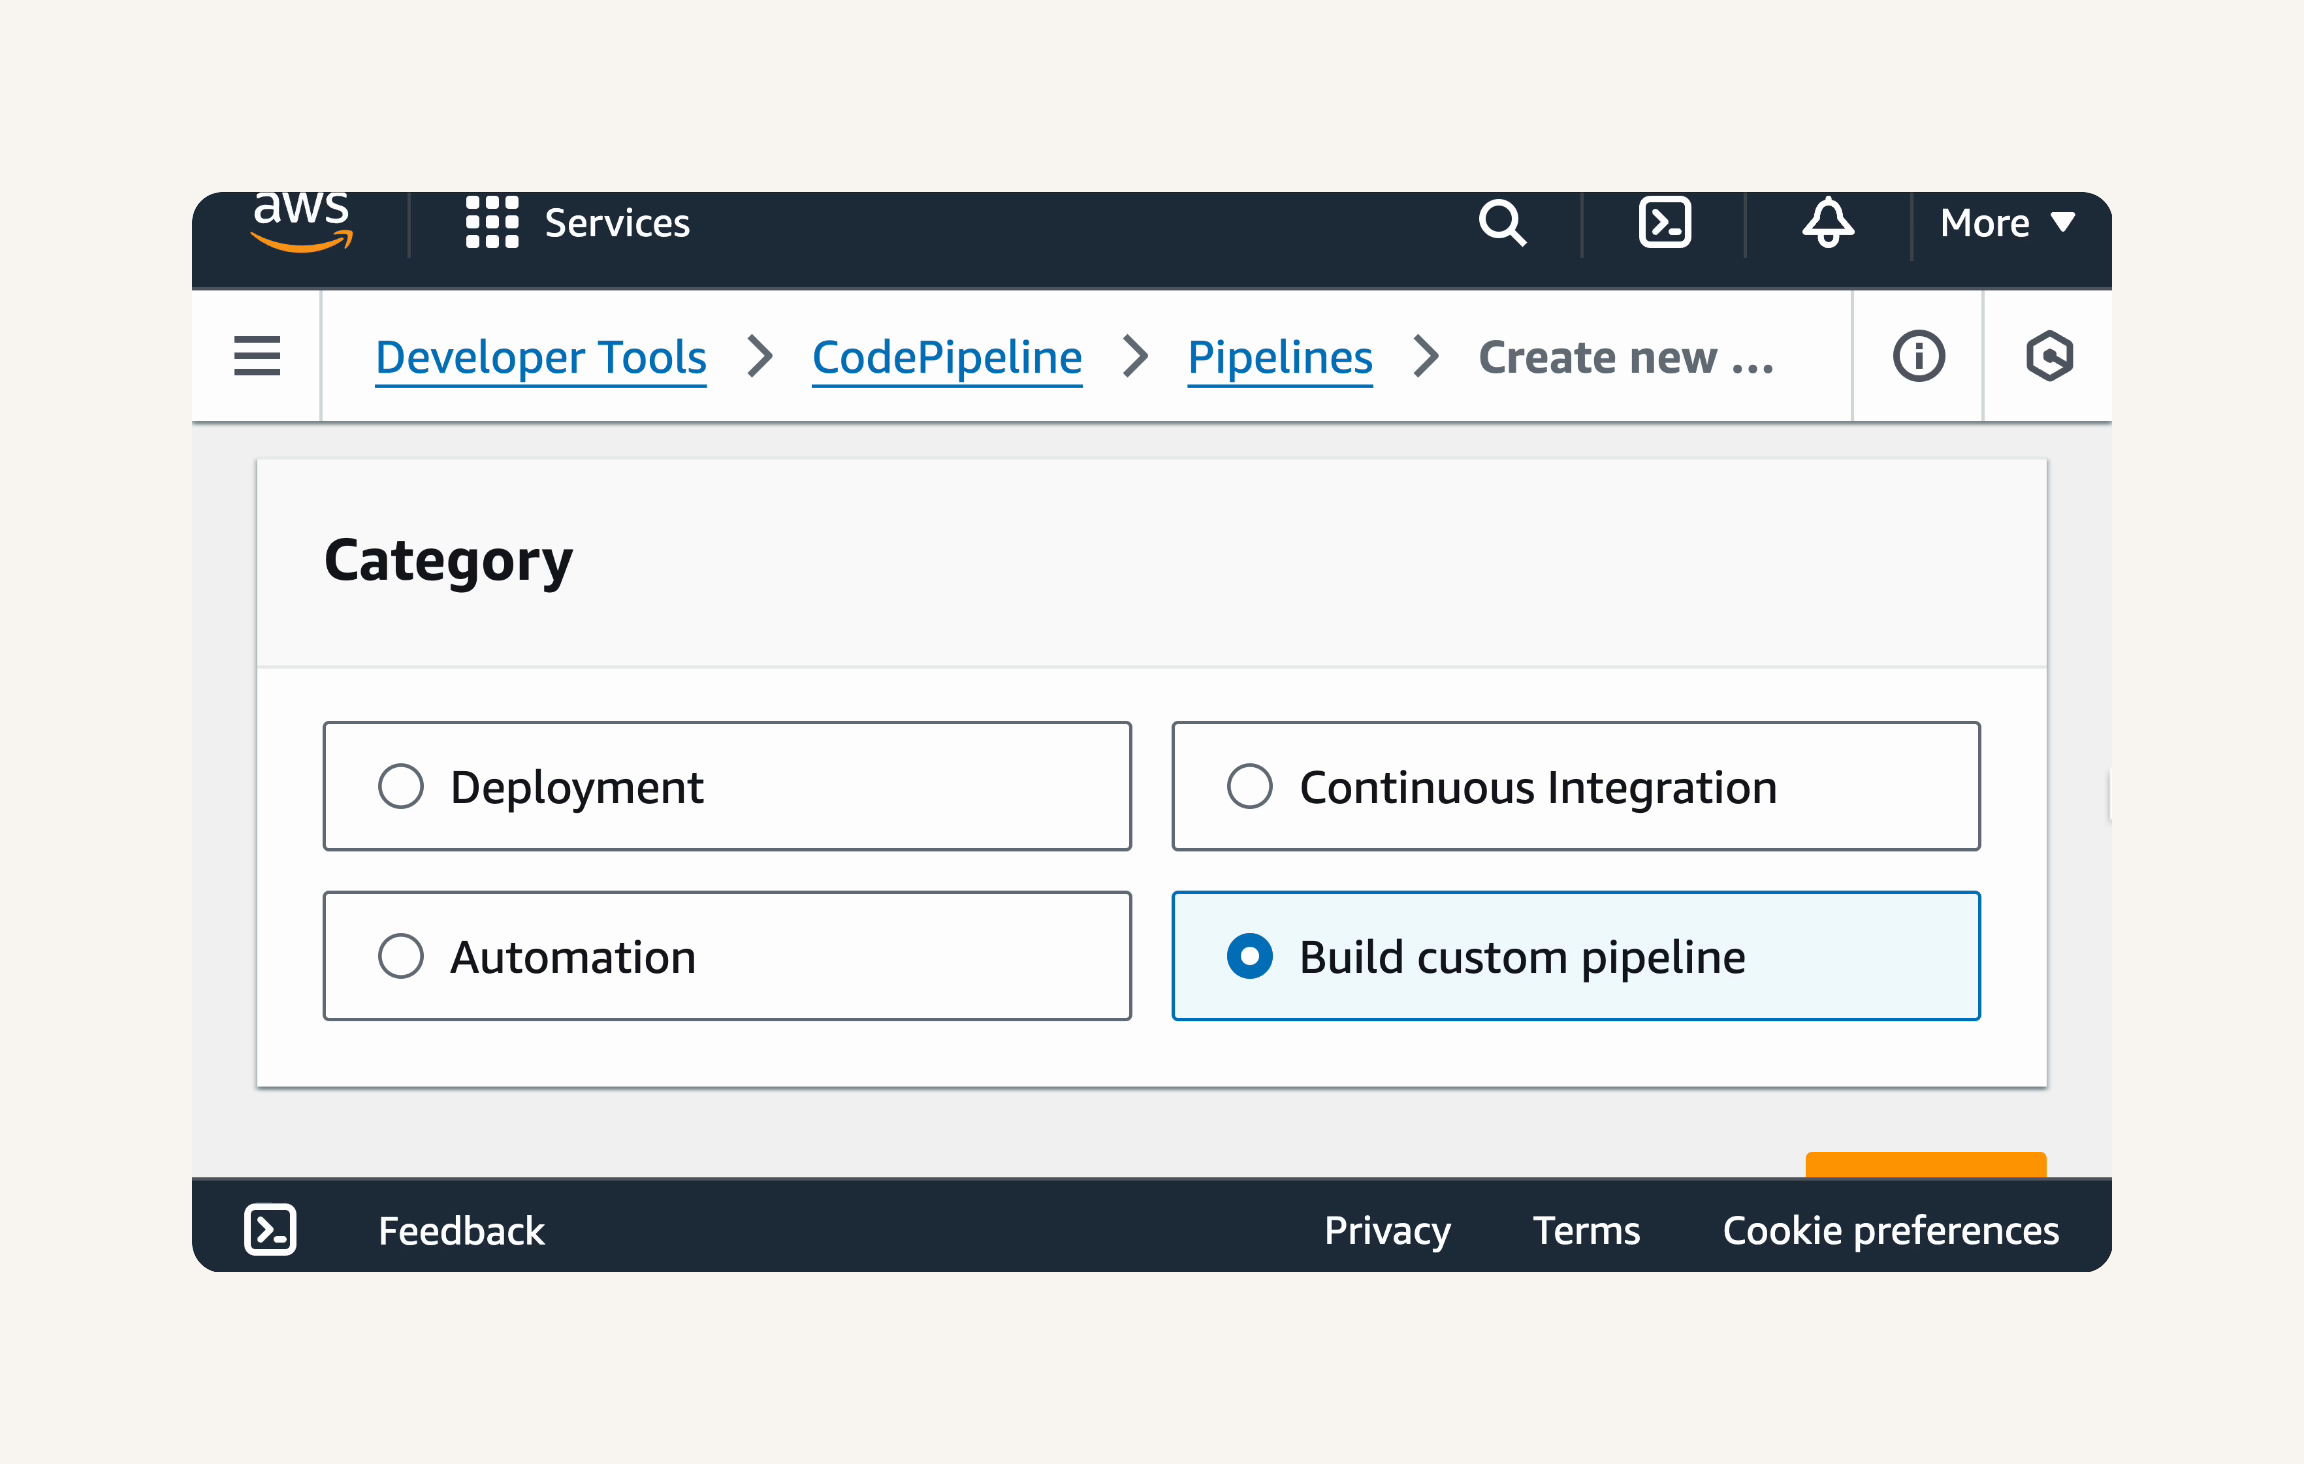
- Click Next.

Configure Pipeline Settings
- Name your pipeline
nextwork-devops-cicd

- Under Execution mode, select Superseded.
💡 What is Execution mode?
Execution mode determines how CodePipeline handles multiple runs of the same pipeline.In Superseded mode, if a new pipeline execution is triggered while another execution is already in progress, the newer execution will immediately take over and cancel the older one. This is perfect for making sure only the latest code changes are processed, which is exactly what we want for our CI/CD pipeline!
There are other execution modes available in CodePipeline:
In Queued mode, executions are processed one after another. If a pipeline is already running, any new executions will wait in a queue until the current execution finishes.
Parallel mode allows multiple executions to run at the same time, completely independently of each other. This can speed up the overall processing time if you have multiple branches or code changes that can be built and deployed concurrently.
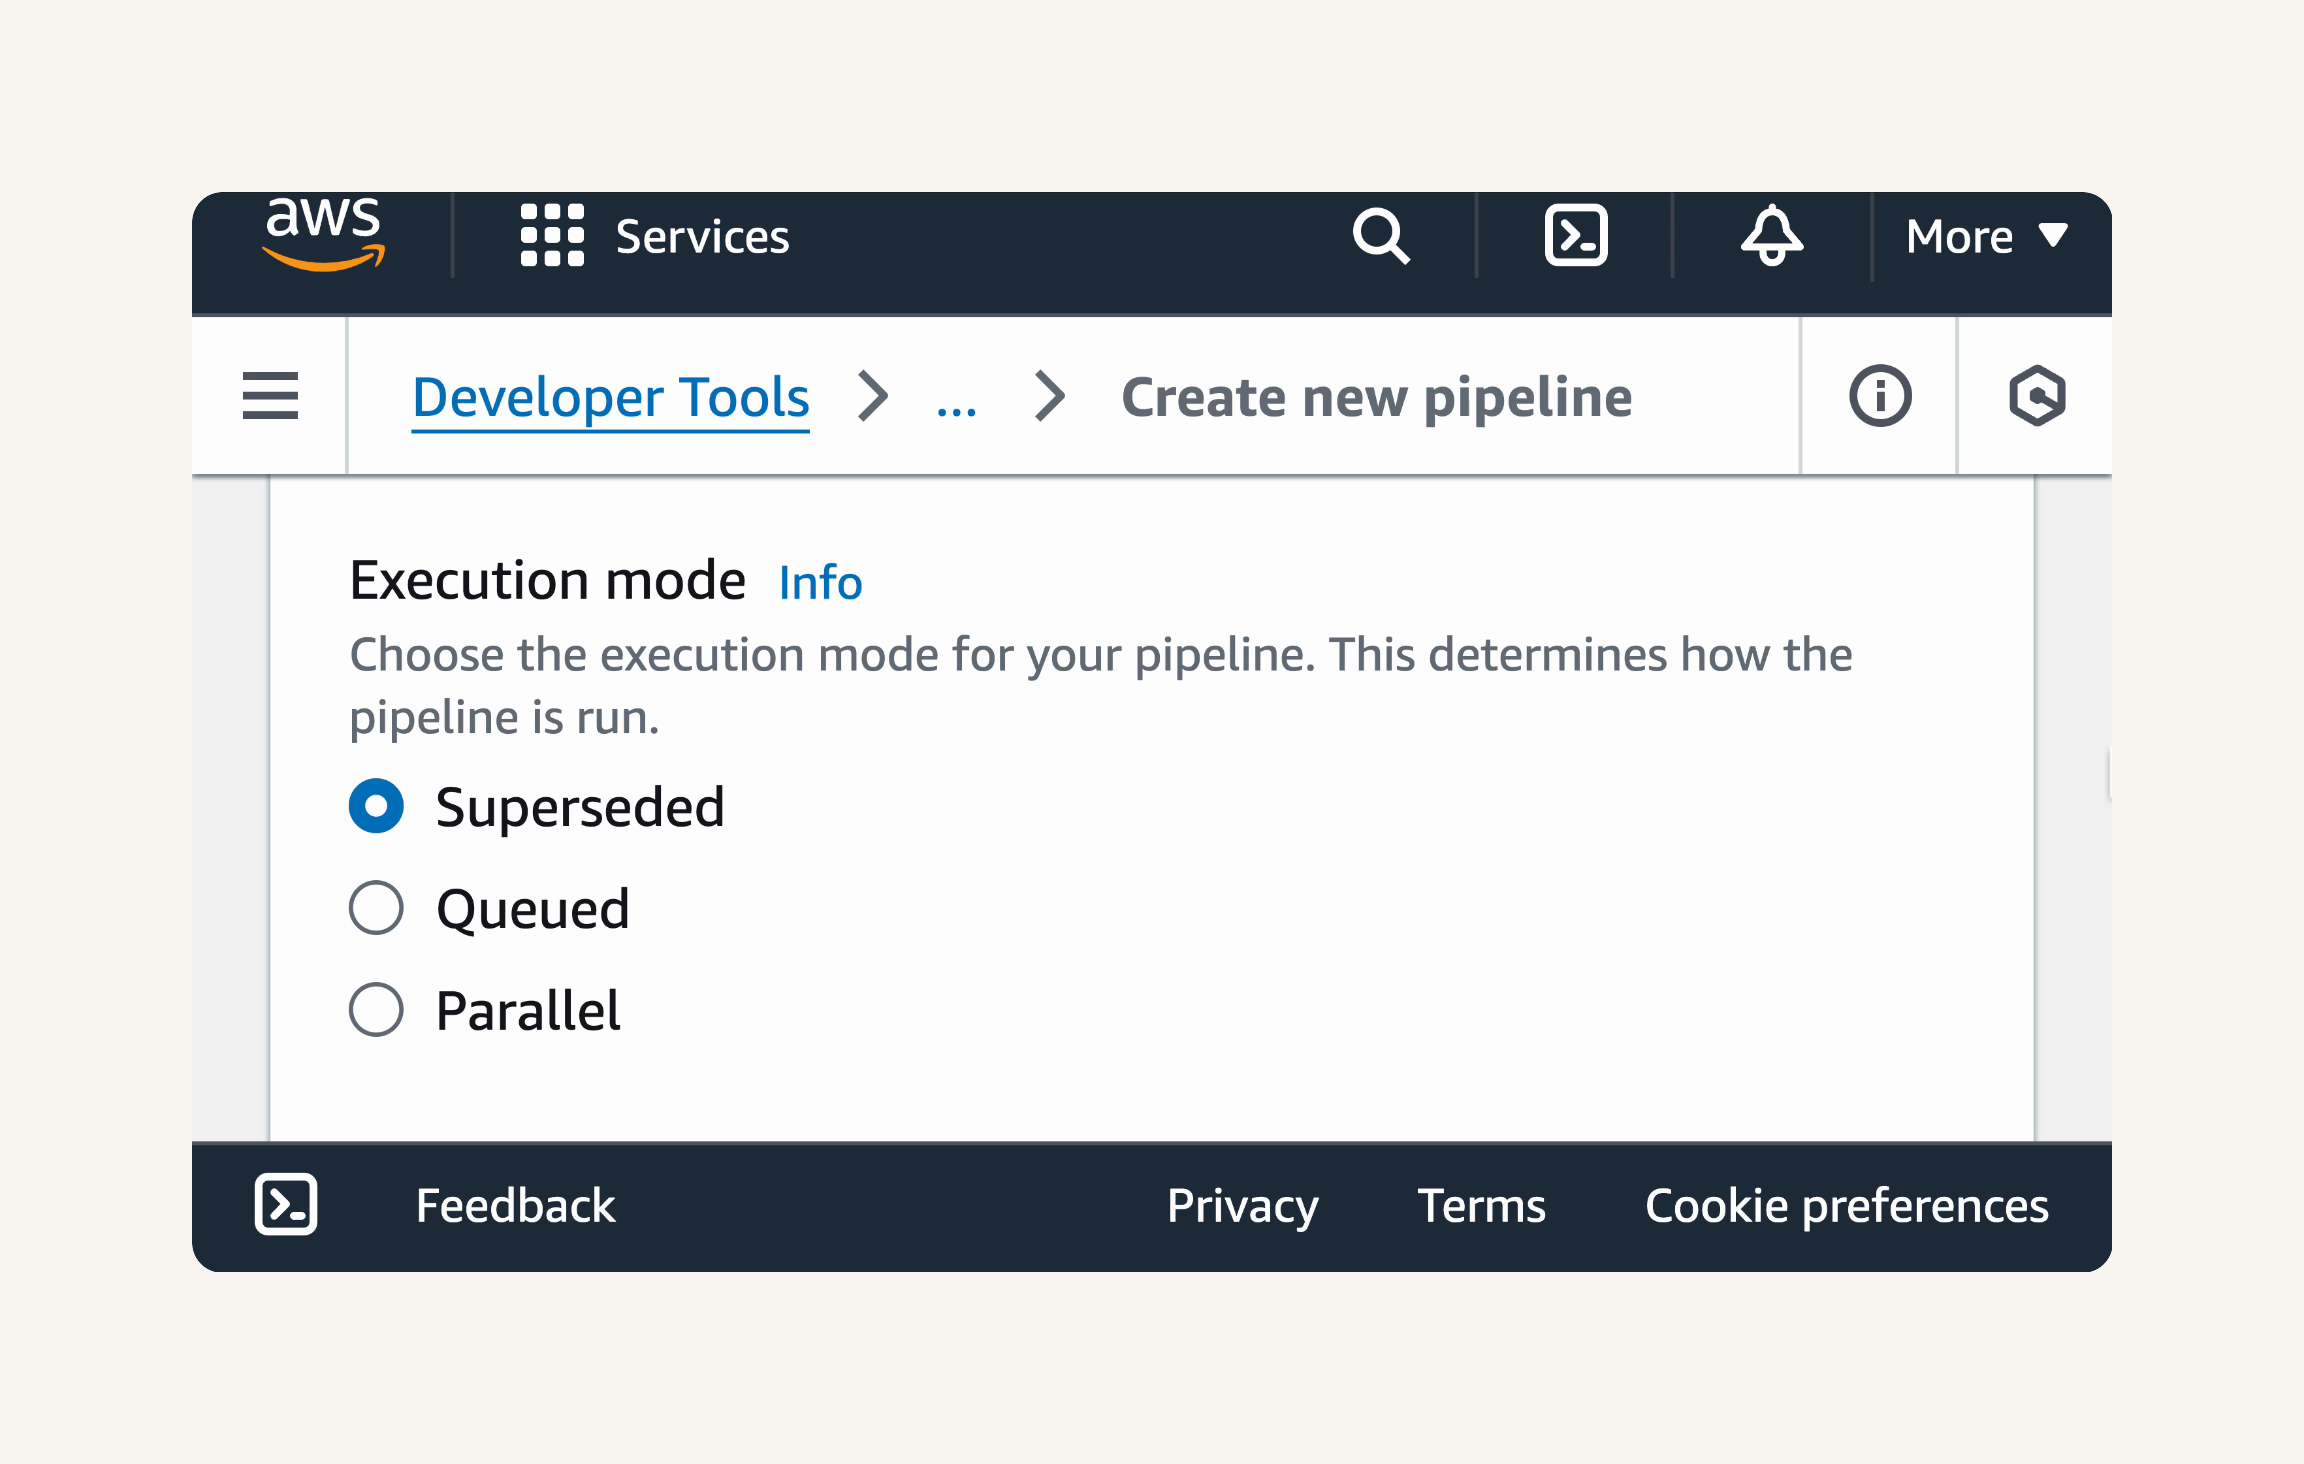
- Under Service role, select New service role. Keep the default role name.
💡 What is a service role?
A service role is a special type of IAM role that AWS services like CodePipeline use to perform actions on your behalf. It's like giving CodePipeline permission to access other AWS resources it needs to run your pipeline, such as S3 buckets for storing artifacts or CodeBuild for building your code.
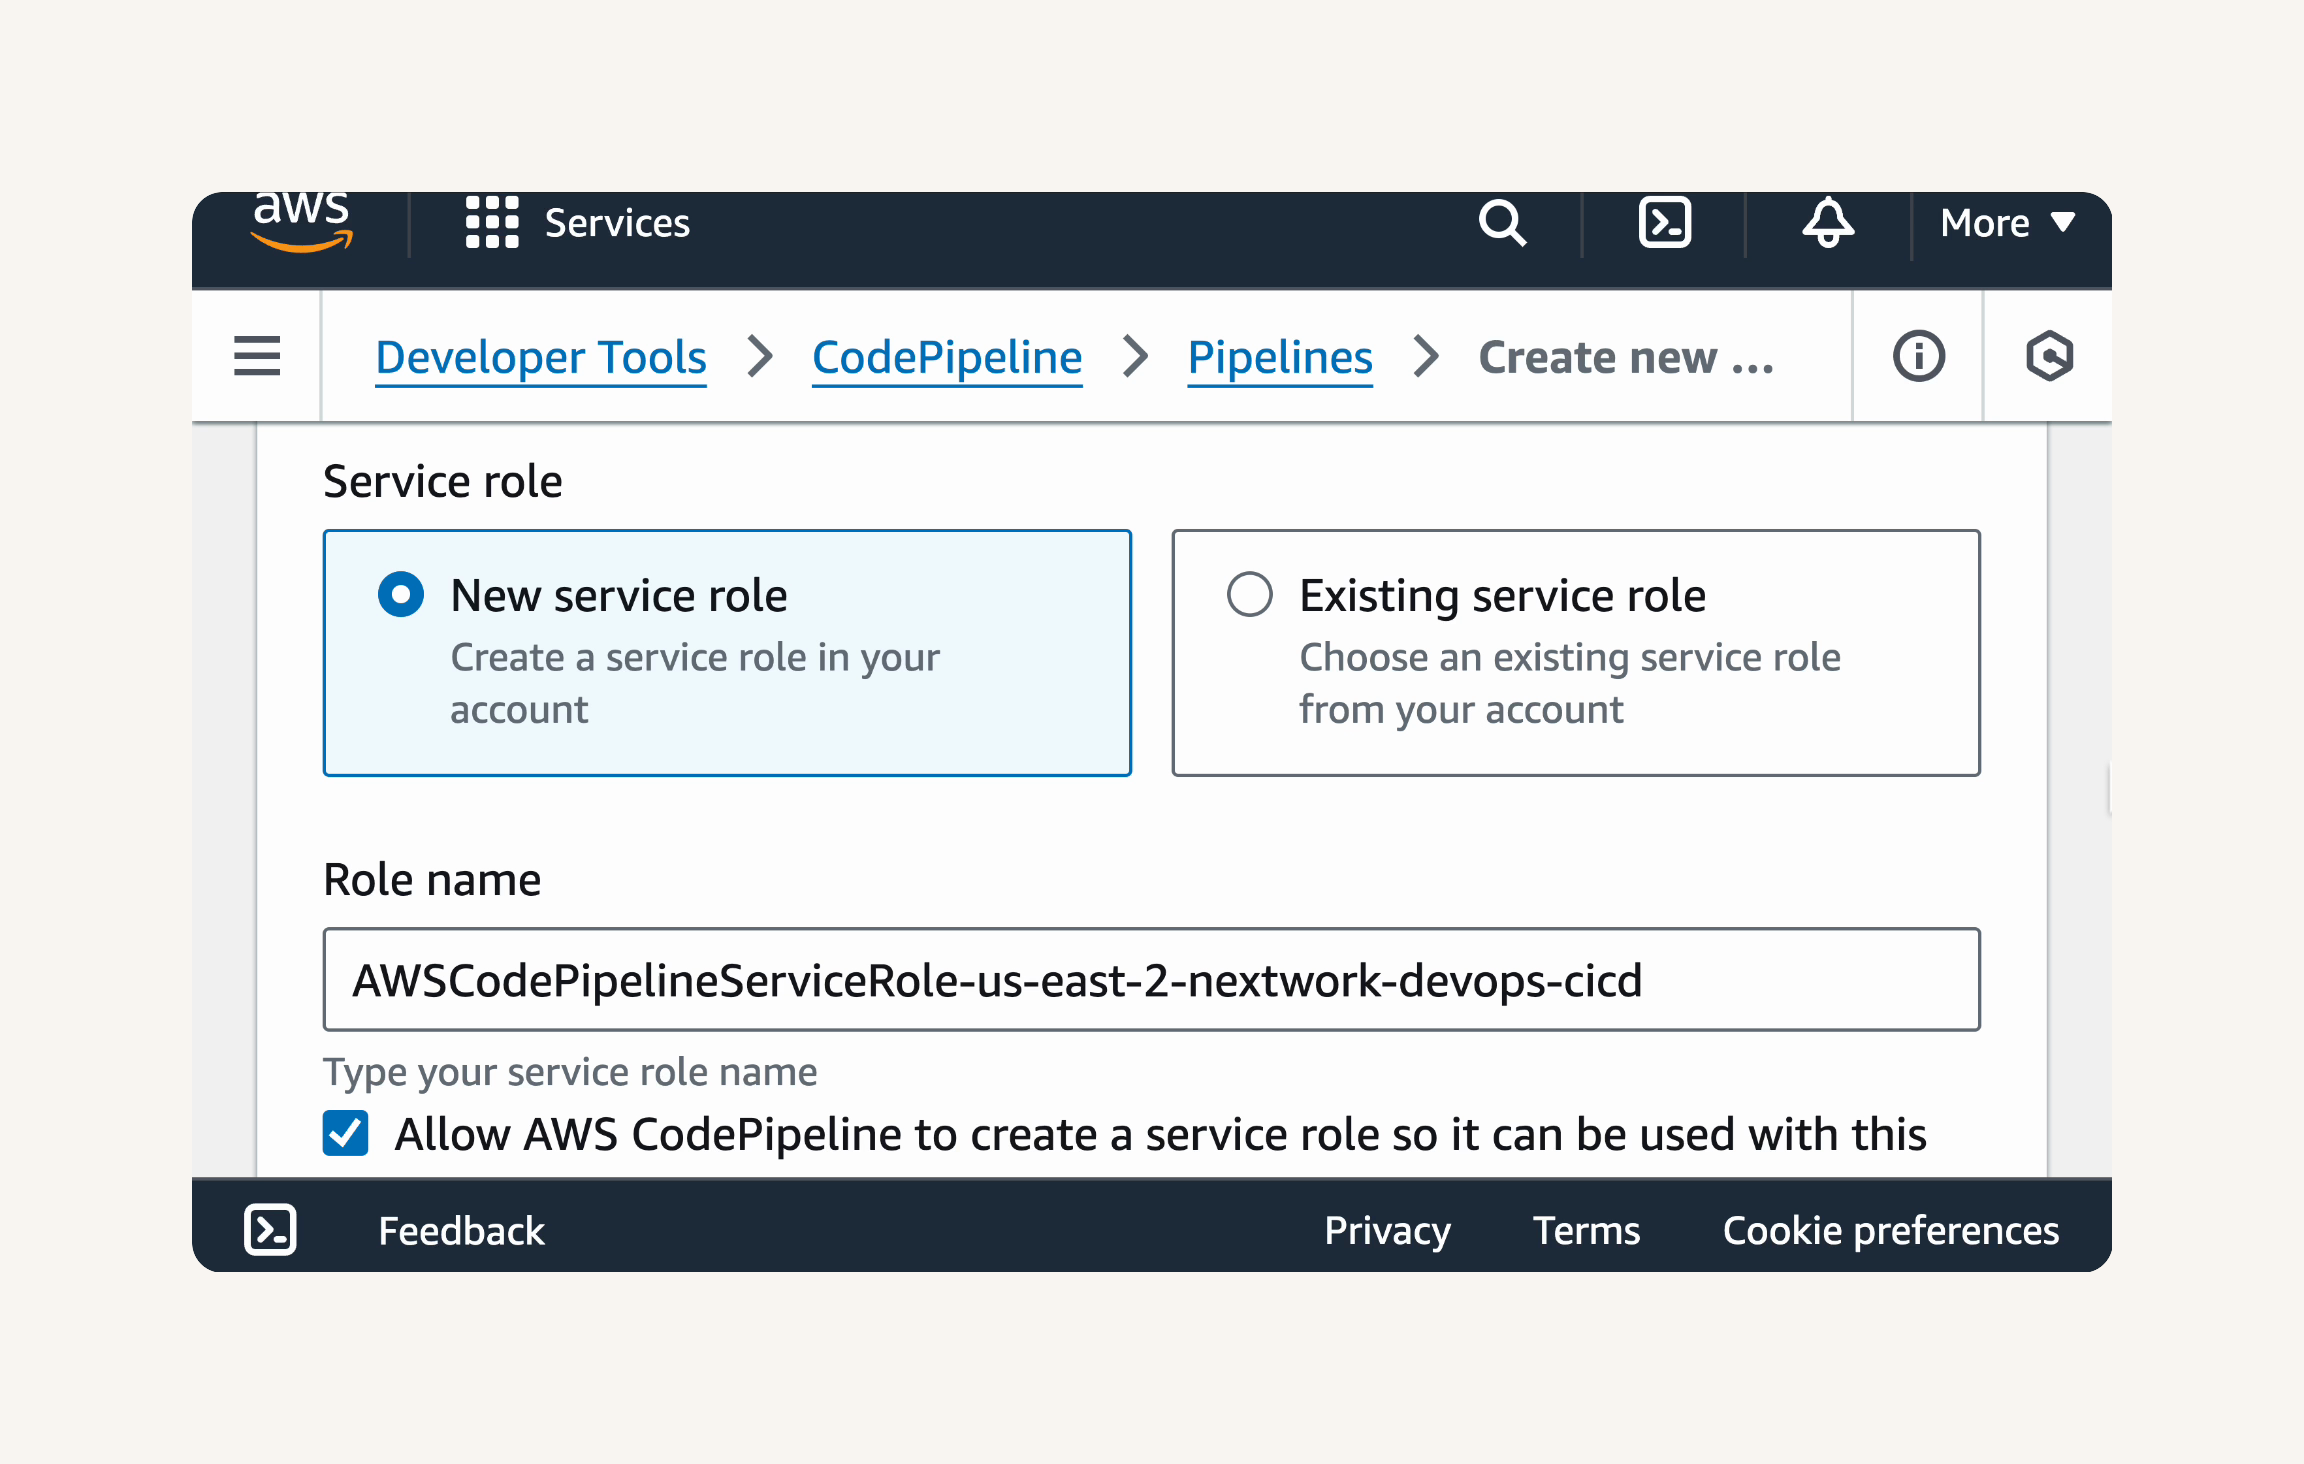
-
Expand Advanced settings.
-
Leave the default settings for Artifact store, Encryption key, and Variables.
💡 What are Artifact store, Encryption key, and Variables?
Artifact store: Without an artifact store, there's no way for your build outputs to be passed to deployment! This S3 bucket is where CodePipeline automatically saves the files created at each stage - like your source code from GitHub and the build artifacts from CodeBuild - making them available to the next stage in your pipeline.
Encryption key: By default, CodePipeline encrypts everything in your artifact store using AWS managed keys. This keeps your code and build artifacts secure while they're being stored and transferred between stages. For most projects, this default encryption is perfectly sufficient.
Variables: Right now you might be manually tracking information like version numbers or build timestamps. Pipeline variables solve this by letting you pass dynamic values between different stages automatically. While we won't use variables in this project, they become essential in more complex pipelines when you need information generated in one stage (like a build number) to be available in another stage (like deployment).

- Click Next.

Fantastic! You've configured the basic settings for your pipeline. Let's move on to setting up the Source stage.
Are you ready to pull together all the different parts of your CI/CD architecture?!
In this step, you're going to:
-
Connect CodePipeline to your GitHub repository and branch.
-
Connect CodePipeline to your CodeBuild project
-
Connect CodePipeline to your CodeDeploy deployment group.
-
Configure webhook events to automatically trigger the pipeline.
Now, let's configure the Source stage of our pipeline. This is where we'll tell CodePipeline where to fetch our source code from.
- In the Source provider dropdown, select GitHub (via GitHub App).

💡 What is the Source stage?
The Source stage is the very first step in any CI/CD pipeline. Its job is simple but crucial: it fetches the latest version of your code from your chosen repository whenever there are updates. Without this stage, your pipeline would have nothing to build or deploy.CodePipeline supports various source providers, but for this project, we're using GitHub because that's where our web app's code is stored.
- Under Connection, select your existing GitHub connection

-
Under Repository name, select
nextwork-web-project -
Under Default branch, select
master.
💡 What is a branch in Git?
In Git, a branch is like a parallel timeline of your project. It allows you to work on new features or bug fixes without affecting the main codebase. The master branch is typically considered the main branch, representing the stable, production-ready code.By specifying the master branch as the default branch, we're telling CodePipeline to monitor this branch for changes and trigger the pipeline whenever there's a commit to it.
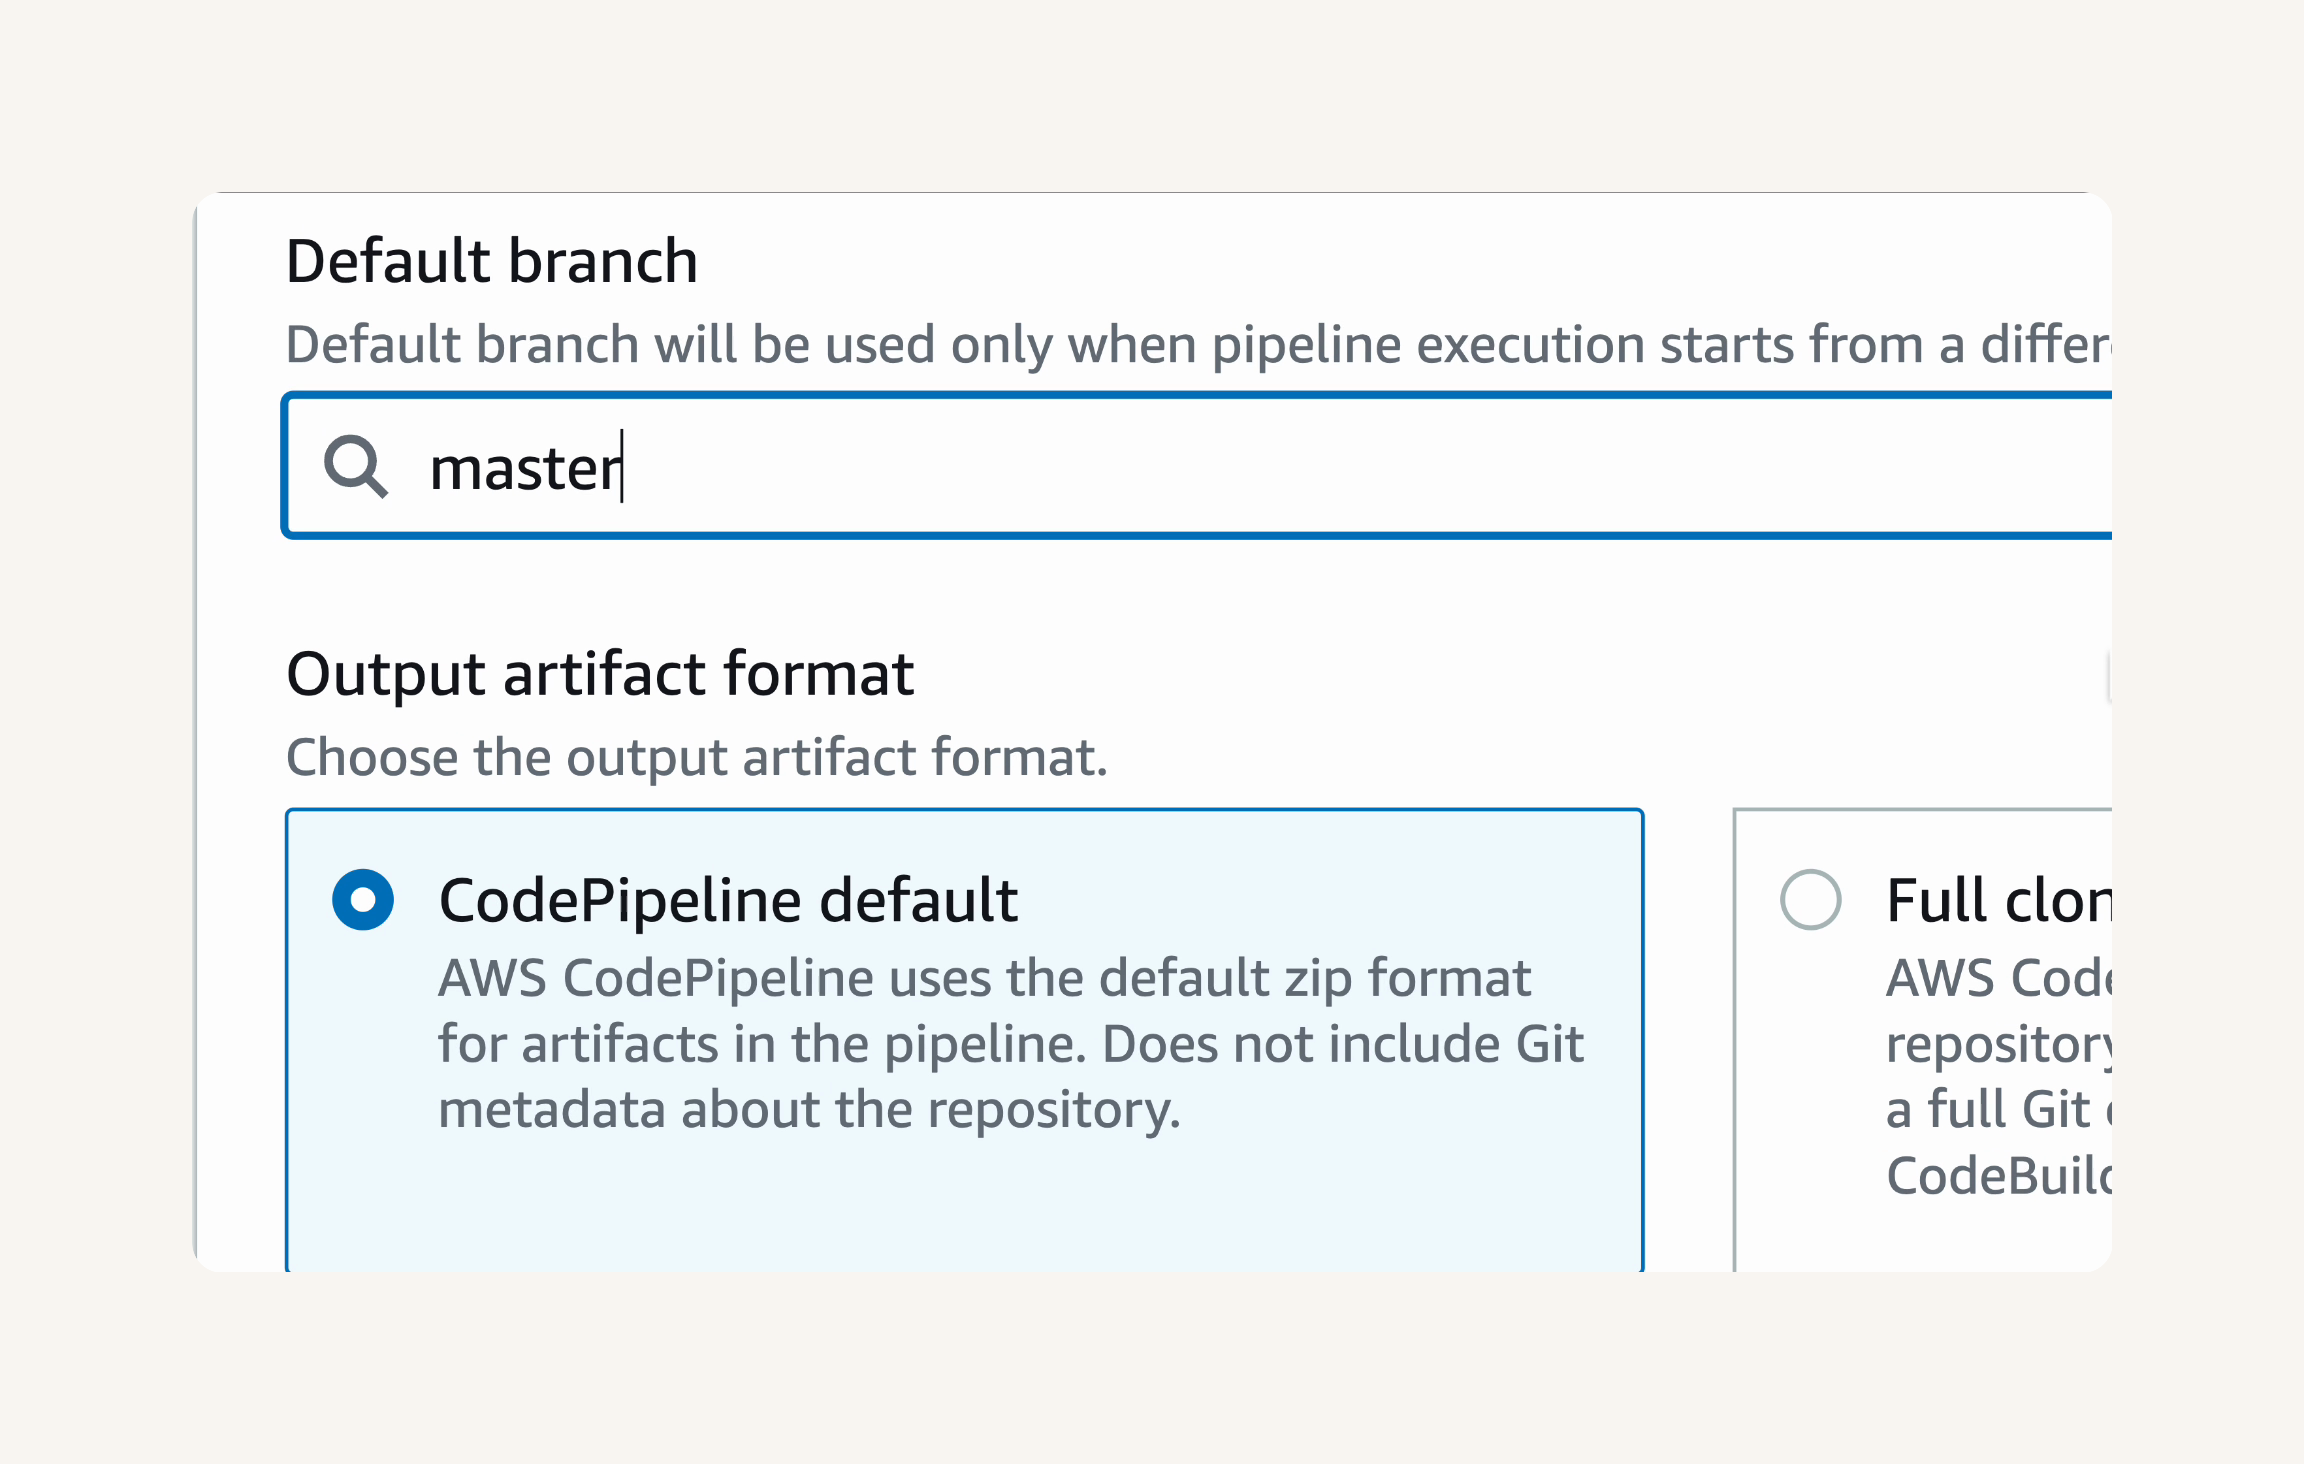
- Under Output artifact format, leave it as CodePipeline default.

💡 What is Output artifact format?
Output artifact format determines how CodePipeline packages the source code it fetches from GitHub.
CodePipeline default: This option packages the source code as a ZIP file, which is efficient for most deployment scenarios. It does not include Git metadata about the repository.
Full clone: This option provides a full clone of the Git repository as an artifact, including Git history and metadata. This is useful if your build process requires Git history, but it results in a larger artifact size.
- Make sure that Webhook events is checked under Detect change events.

💡 What are Webhook events?
Webhook events let CodePipeline automatically start your pipeline whenever code is pushed to your specified branch in GitHub. This is what makes our pipeline truly "continuous" – it reacts to code changes in real-time!💡 How do Webhooks work?
Webhooks are like digital notifications. When you enable webhook events, CodePipeline sets up a webhook in your GitHub repository. This webhook is configured to listen for specific events, such as code pushes to the master branch.Whenever you push code to the master branch, GitHub sends a webhook event (a notification) to CodePipeline. CodePipeline then automatically starts a new pipeline execution in response to this event. It's a seamless way to automate your CI/CD process!
- Click Next.

Great job! You've set up the Source stage of your pipeline. You're now ready to set up the Build stage.
The Build stage is where our source code gets transformed into a deployable build artifact.
We'll tell CodePipeline to use AWS CodeBuild to compile and package our web application.
- In the Build provider dropdown, select AWS CodeBuild from Other build providers.

💡 What is the Build stage?
The Build stage is where your source code gets compiled and packaged into something that can be deployed.
- Under Project name, select your existing CodeBuild project

- In the Project name dropdown, search for and select
nextwork-devops-cicd.

- Leave the default settings for Environment variables, Build type, and Region.
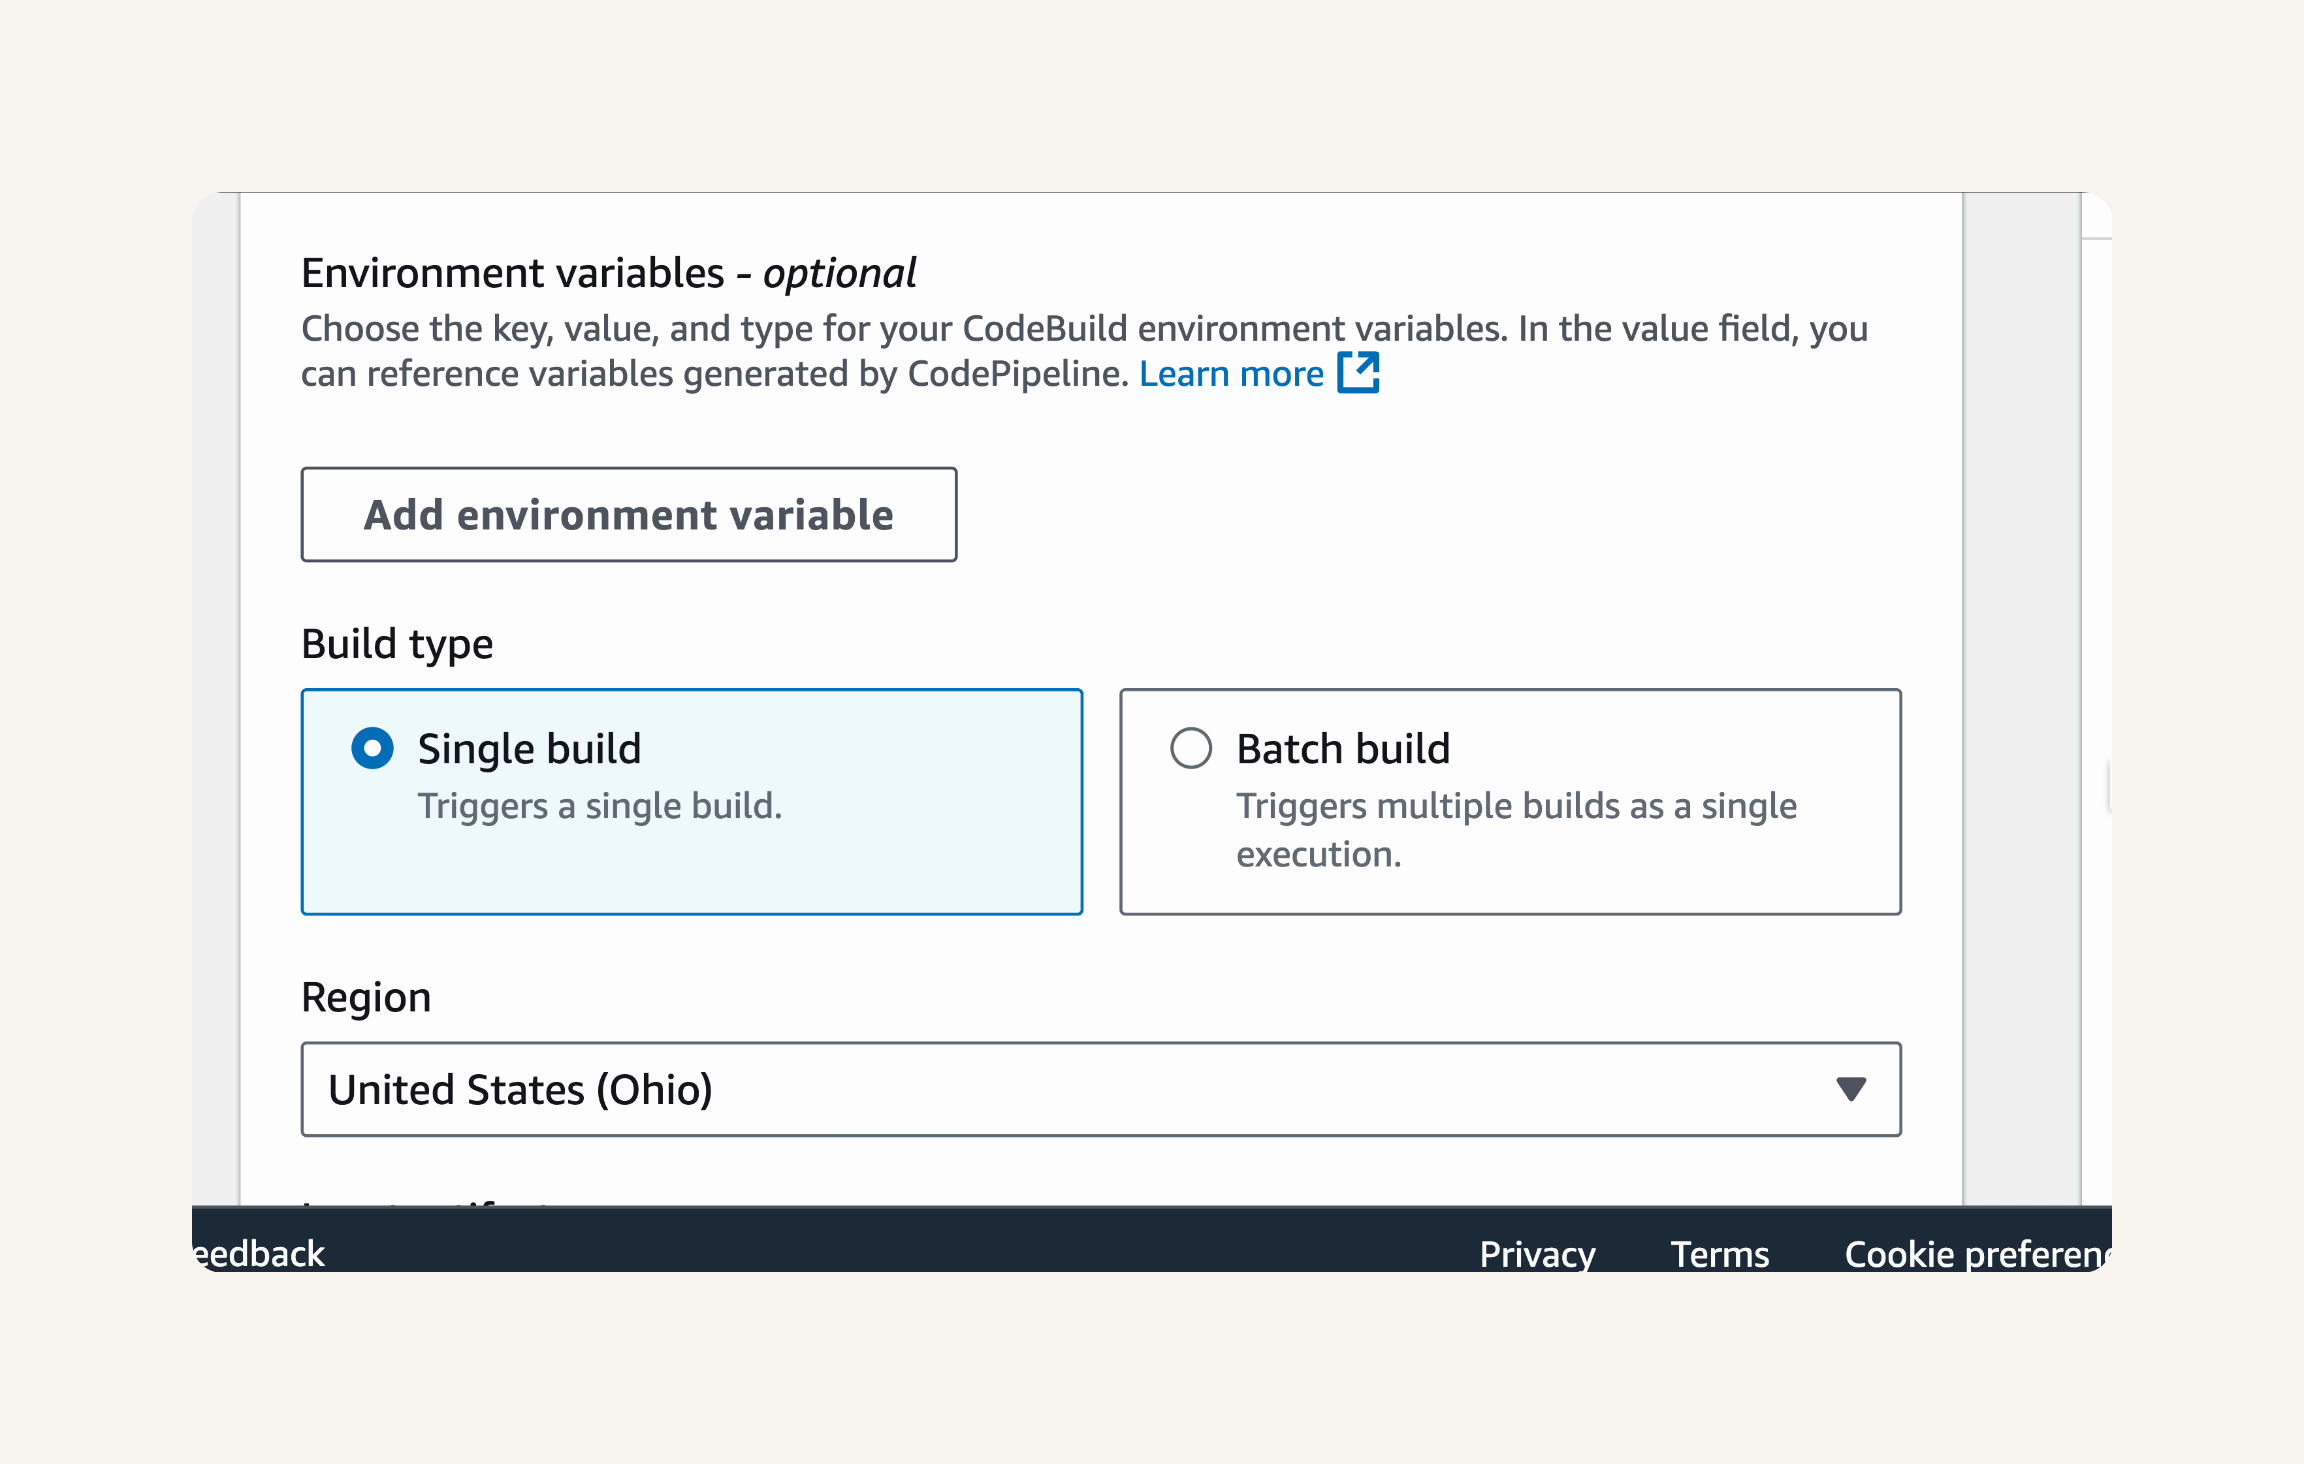
- Under Input artifacts, SourceArtifact should be selected by default.

💡 What are Input artifacts?
Input artifacts are the outputs from the previous stage that are used as inputs for the current stage. In our Build stage, we're using SourceArtifact, which is the ZIP file containing our source code that was outputted by the Source stage.
- Click Next. Let's goooo! You've configured the Build stage of your pipeline. You're now ready to move on to the next stage.
- On the Add test stage page, click Skip test stage.
💡 What is the Test stage?
The Test stage is where you automate testing your application. This can include different types of tests, likes:
Unit tests: Testing individual components or functions of your code.
Integration tests: Testing how different parts of your application work together.
UI tests: Testing the user interface to make sure it works correctly.
The Test stage helps ensure the quality of your code and catch any issues before they reach production. While we're skipping it for this project to simplify things, in real-world scenarios, a Test stage is essential for maintaining software quality and reliability.

- In the Deploy provider dropdown, select AWS CodeDeploy.
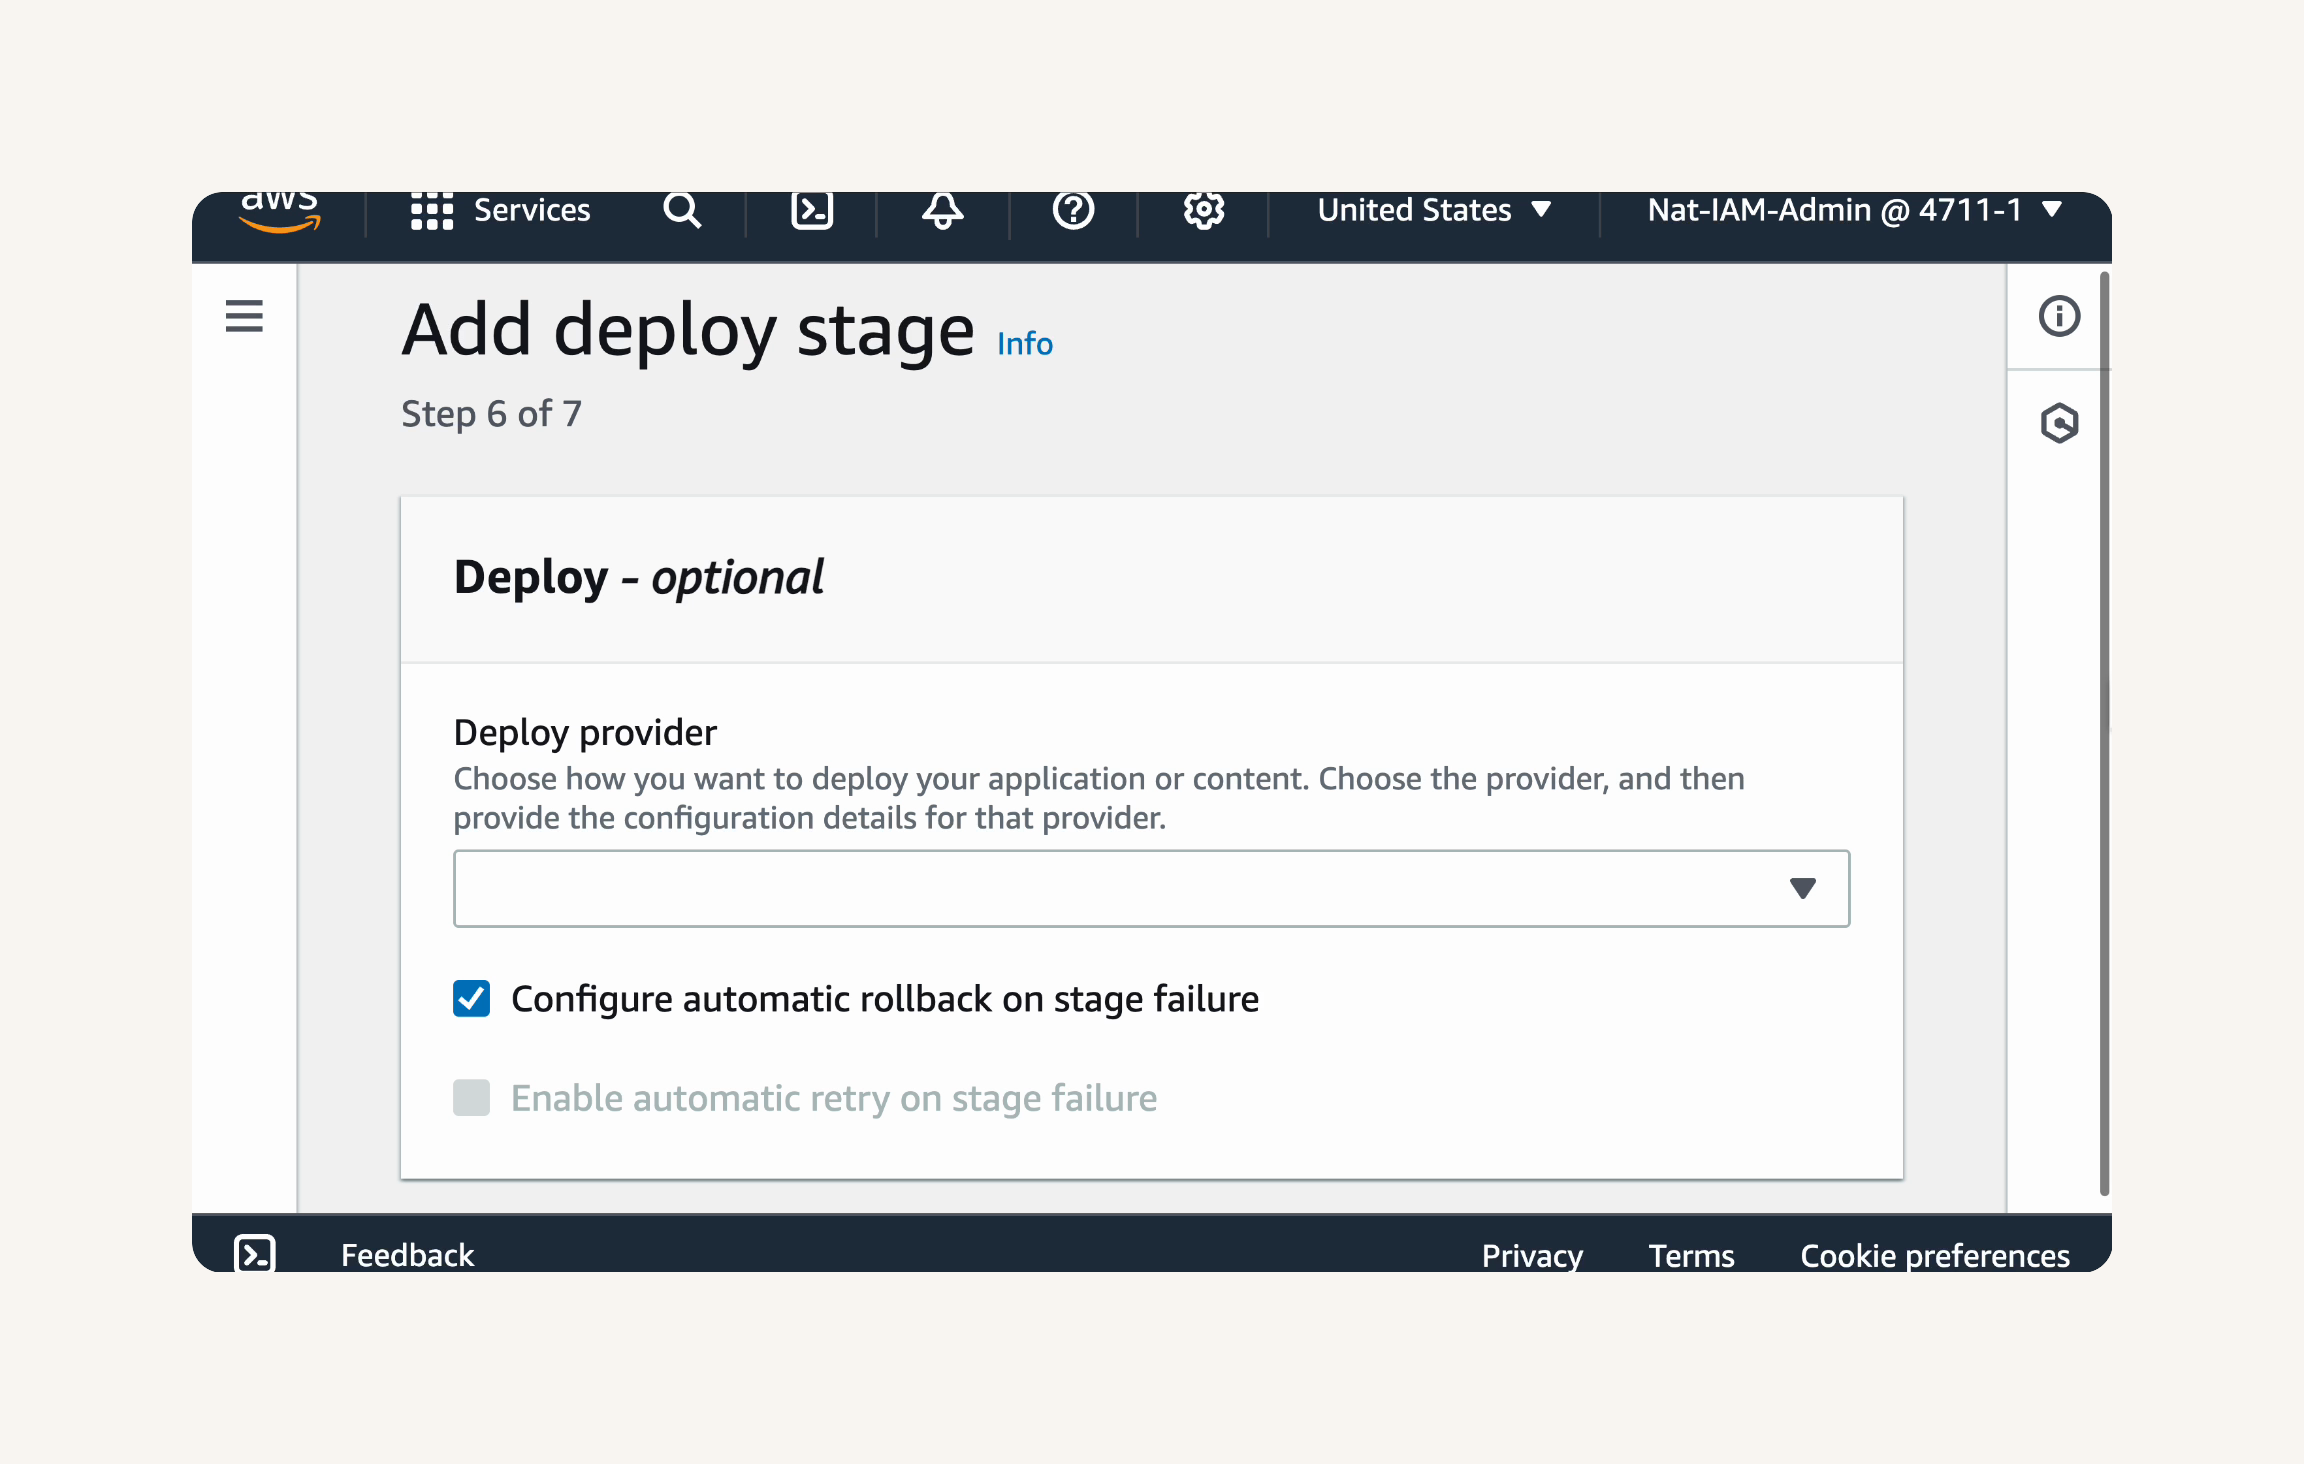
💡 What is the Deploy stage?
The Deploy stage is the final step in our pipeline. It's responsible for taking the application artifacts (the output from the Build stage) and deploying them to the target environment, which in our case is an EC2 instance.
- Under Input artifacts, BuildArtifact should be selected by default.

- Under Application name, select your existing CodeDeploy application.
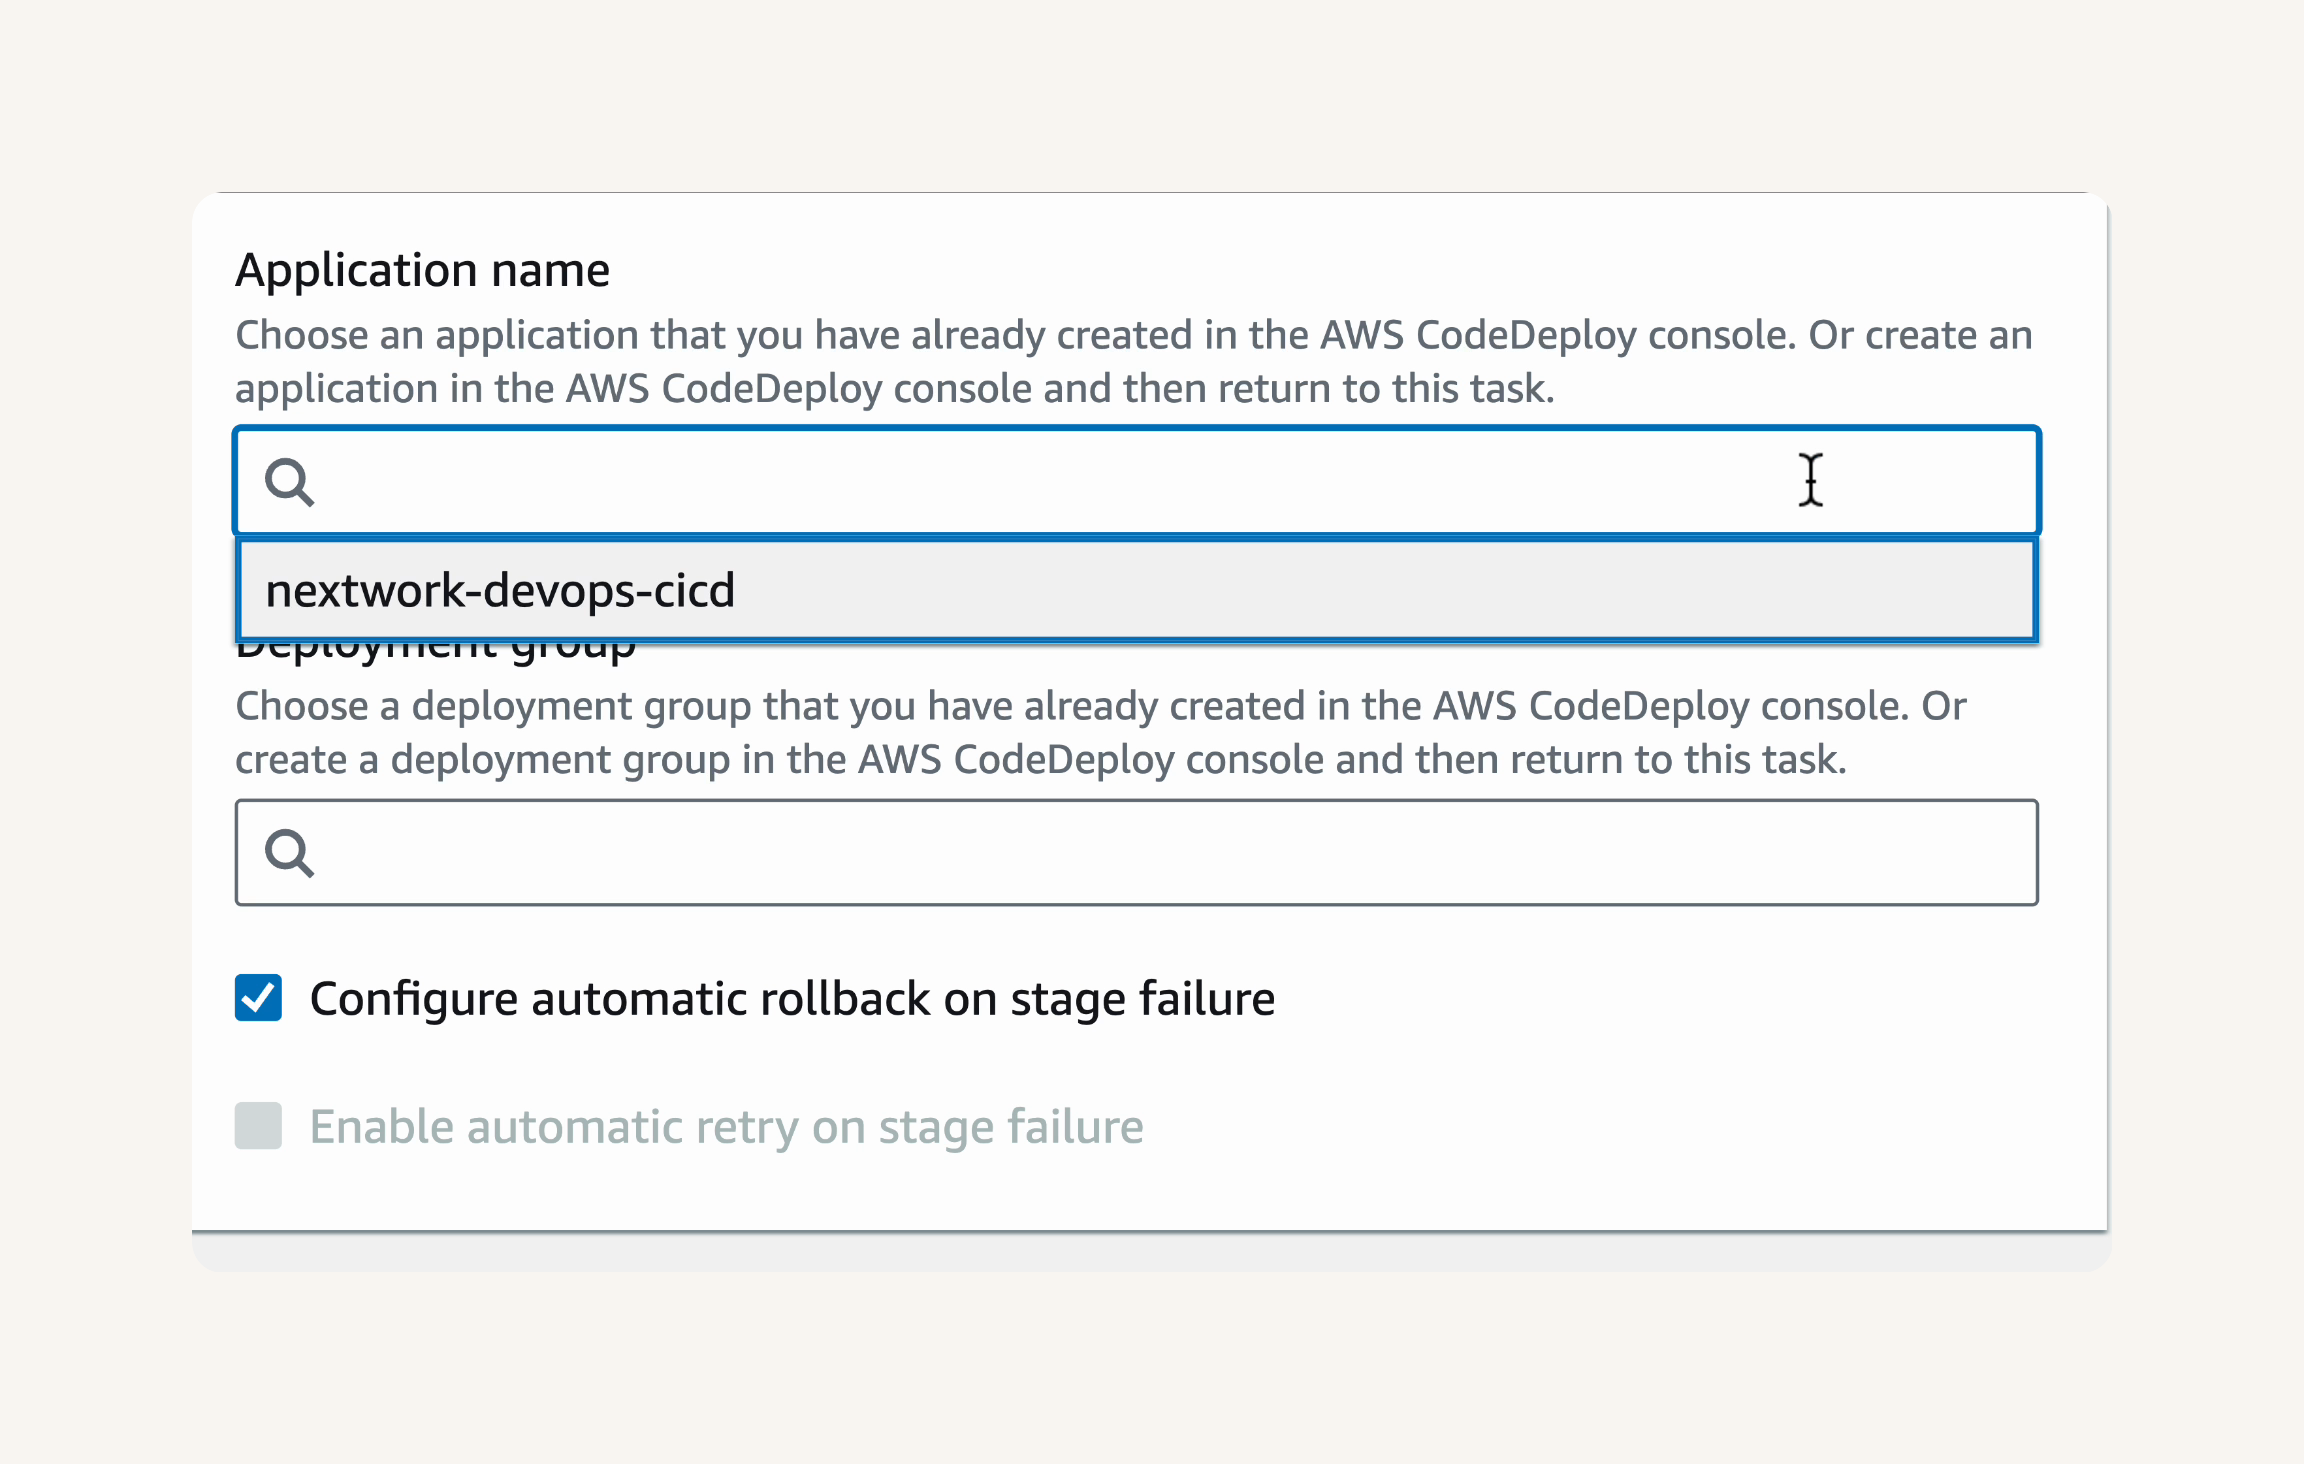
- Under Deployment group, select your existing CodeDeploy deployment group.
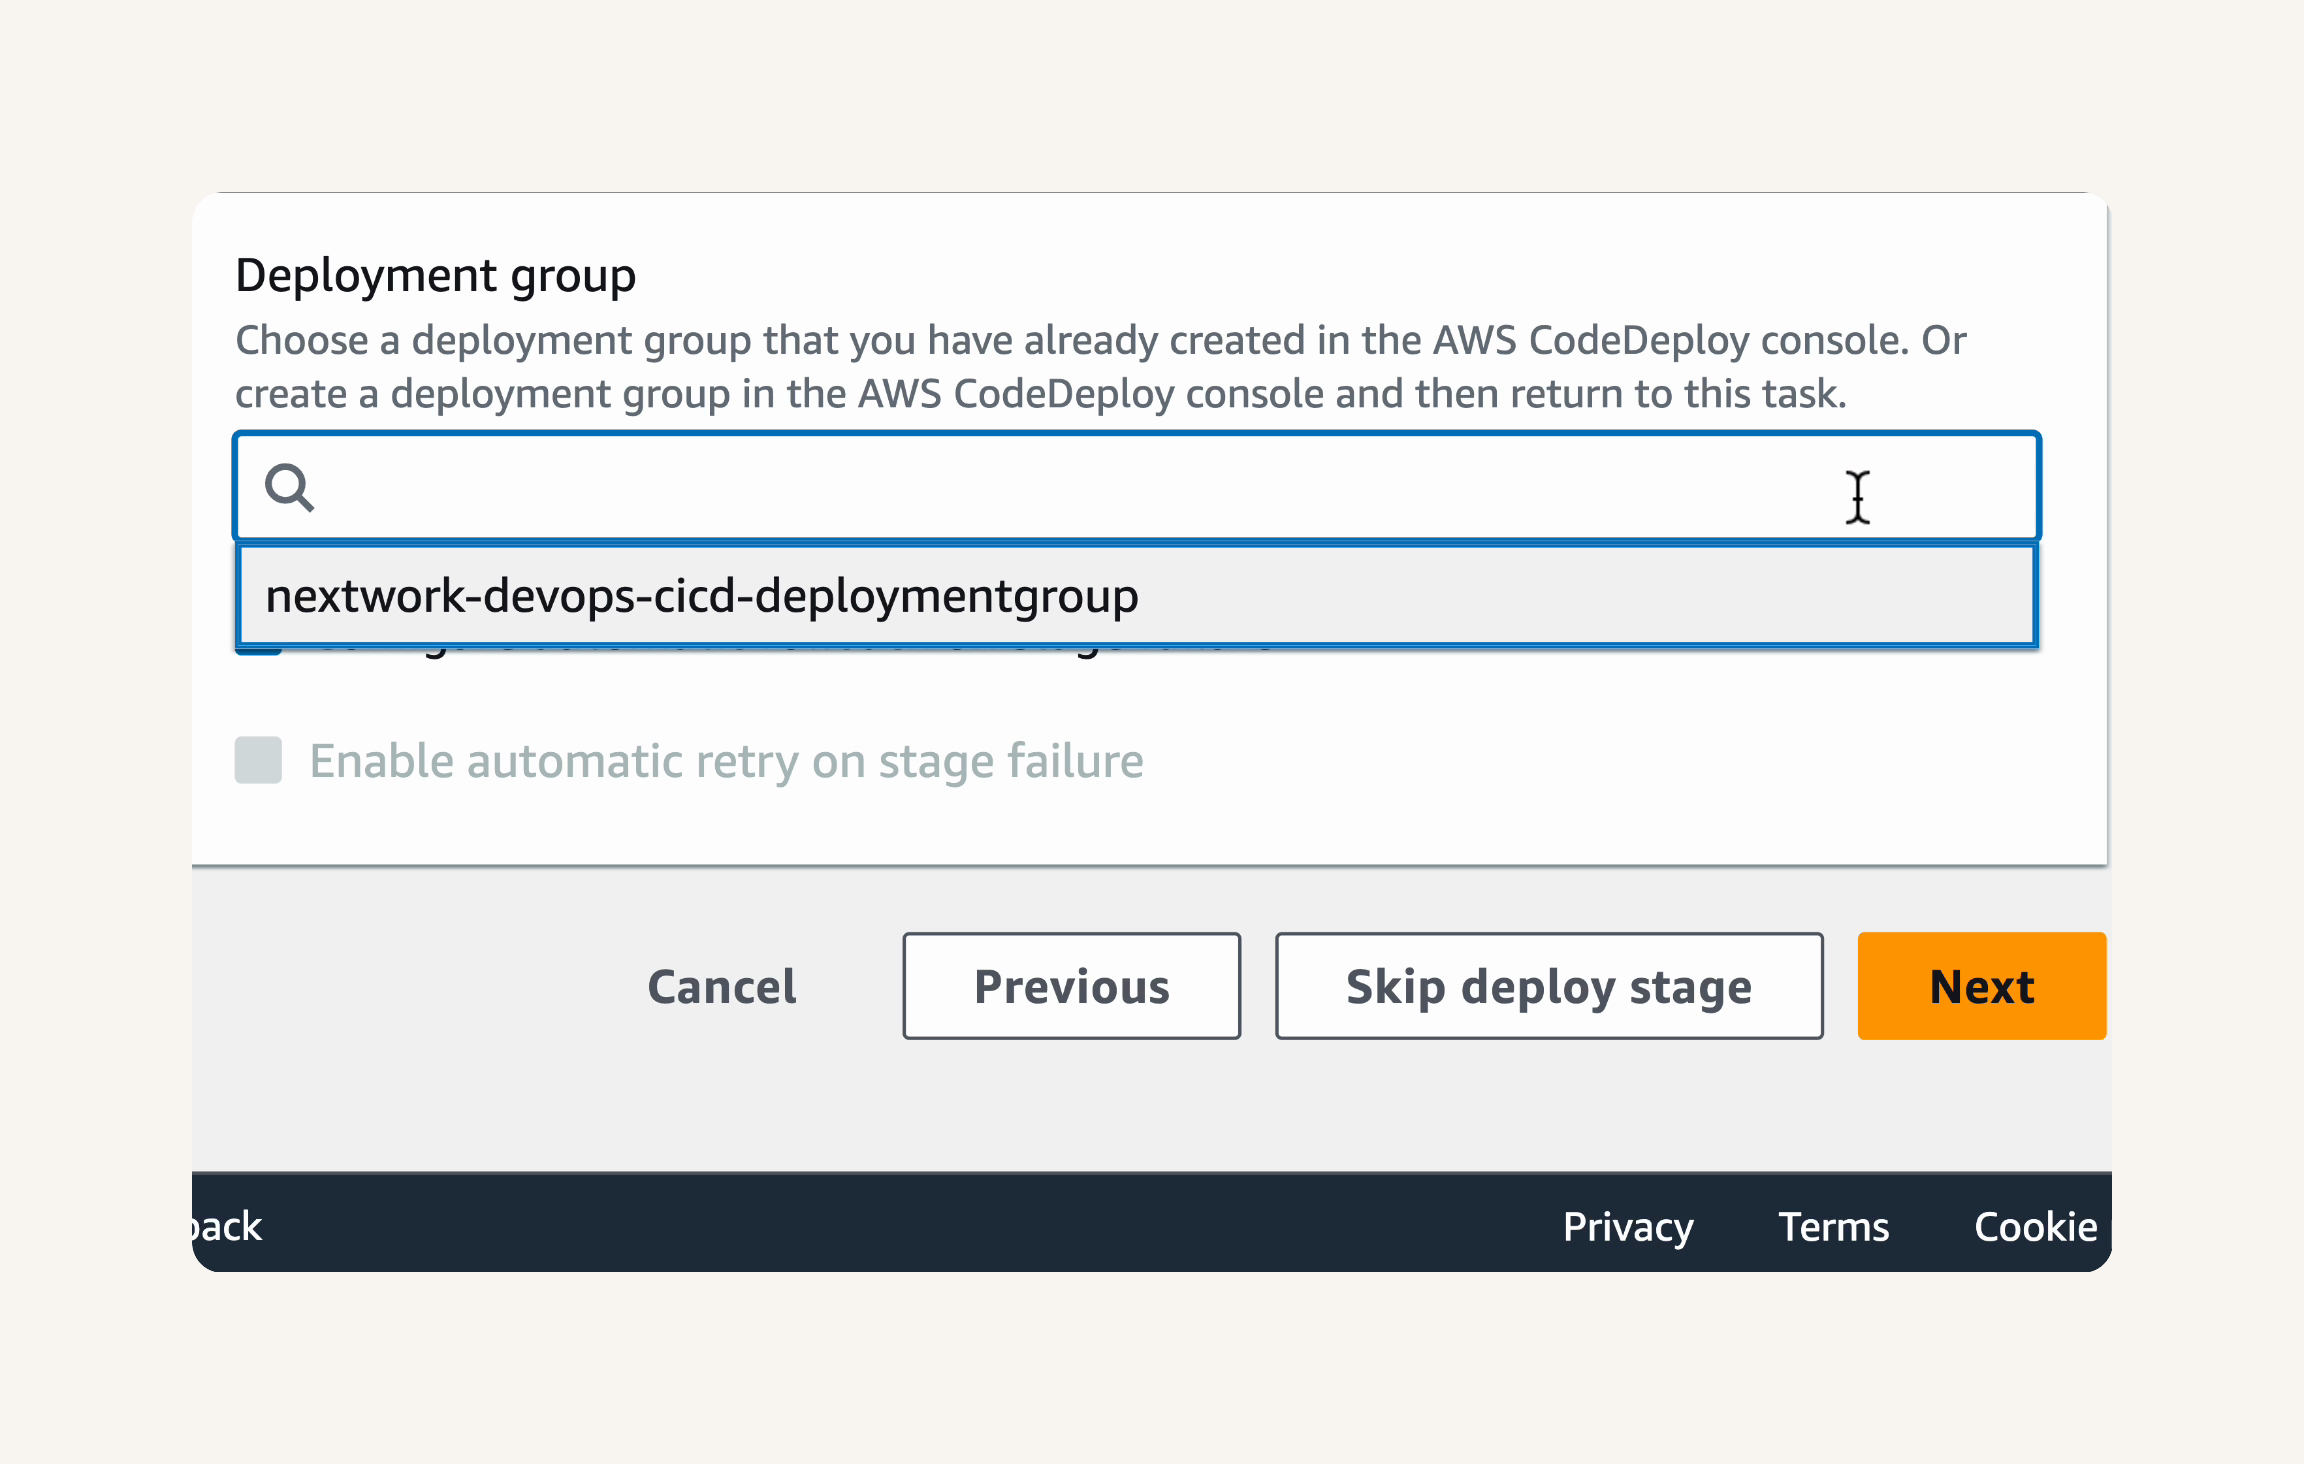
- Check the box for Configure automatic rollback on stage failure.
💡 What is automatic rollback?
Automatic rollback is a safety net for your deployments. By enabling it, you're telling CodePipeline that if the Deploy stage fails for any reason, it should automatically revert to the last successful deployment. This helps minimize downtime and ensures that your application remains stable, even if a new deployment goes wrong.

- Click Next.
Awesome! You've configured the Deploy stage of your pipeline. You're just one step away from creating your pipeline.
Let's watch our pipeline run for the first time! This will help us verify that everything is working correctly.
In this step, you're going to:
-
Finish creating your pipeline.
-
Watch your pipeline start up and connect GitHub, CodeBuild and CodeDeploy!

- On the Review page, take a moment to review all the settings you've configured for your pipeline.
Confirm that the Pipeline settings are:
- Pipeline name:
nextwork-devops-cicd - Pipeline type:
V2 - Execution mode:
SUPERSEDED - Artifact store location:
Default location - Service role:
New service role
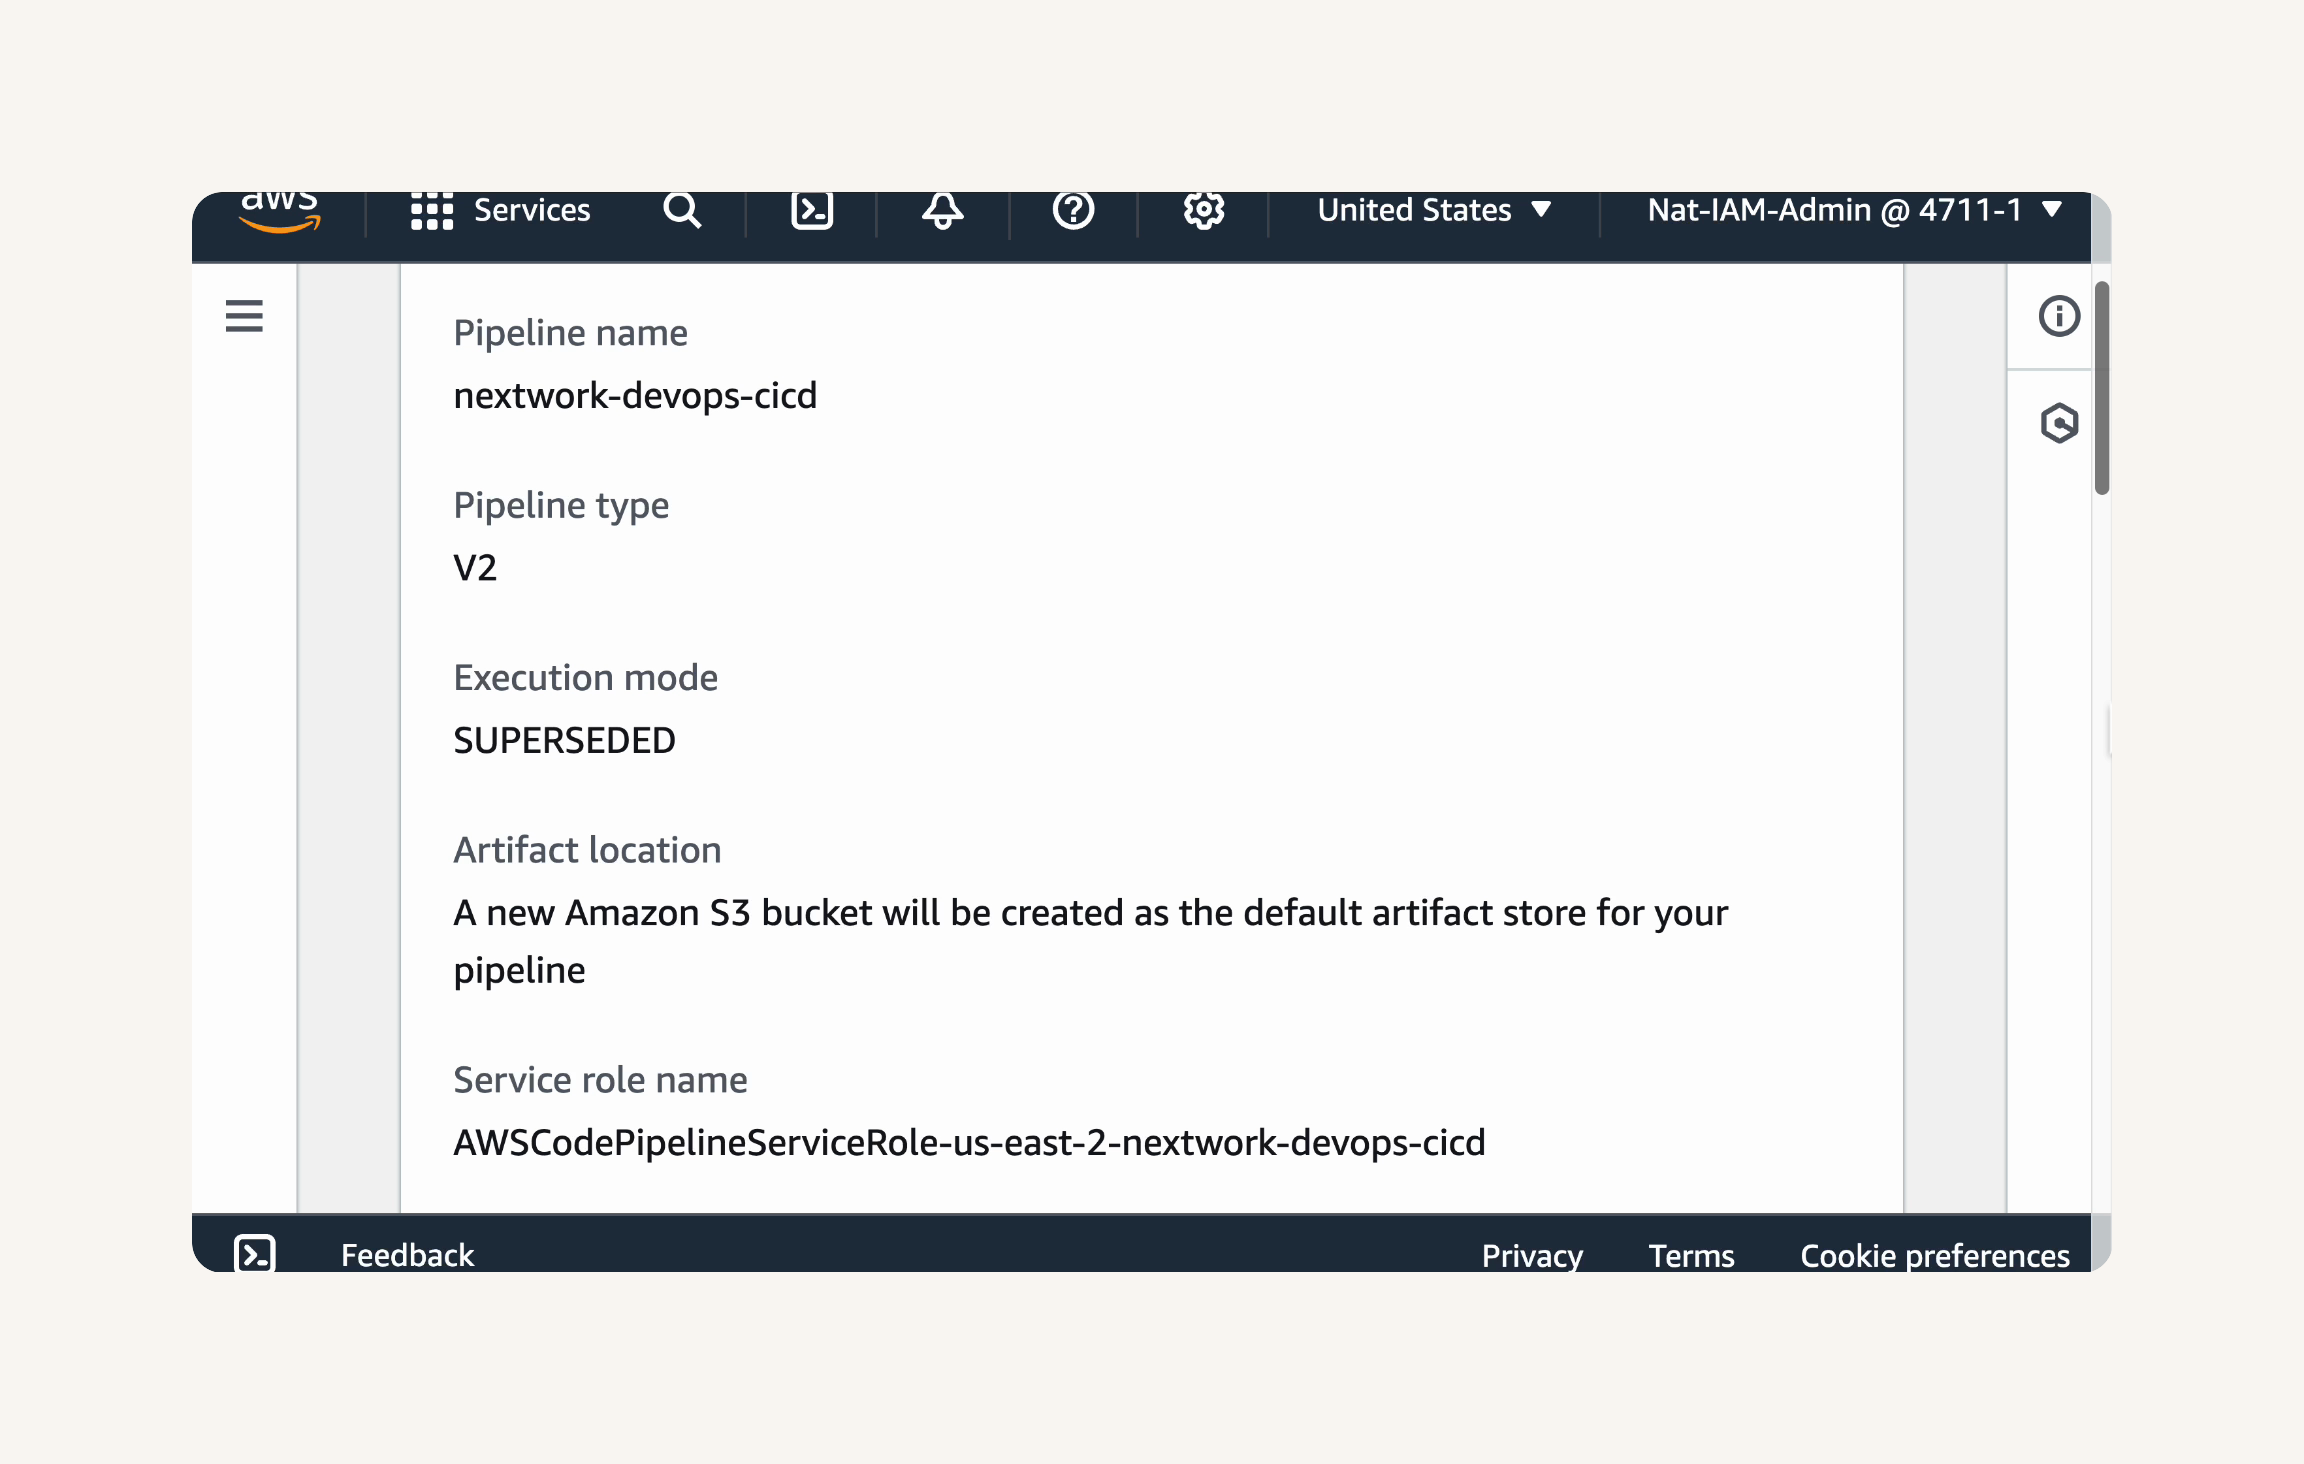
Confirm that the Source stage settings are:
- Source provider:
GitHub (via GitHub App) - Output artifact format:
CODE_ZIP - Detect changes:
true - Connection ARN: Your CodeConnection ARN
- Full repository ID:
Your GitHub account/nextwork-web-project - Default branch:
masterormain(check and confirm) - Enable automatic retry on stage failure:
Enabled
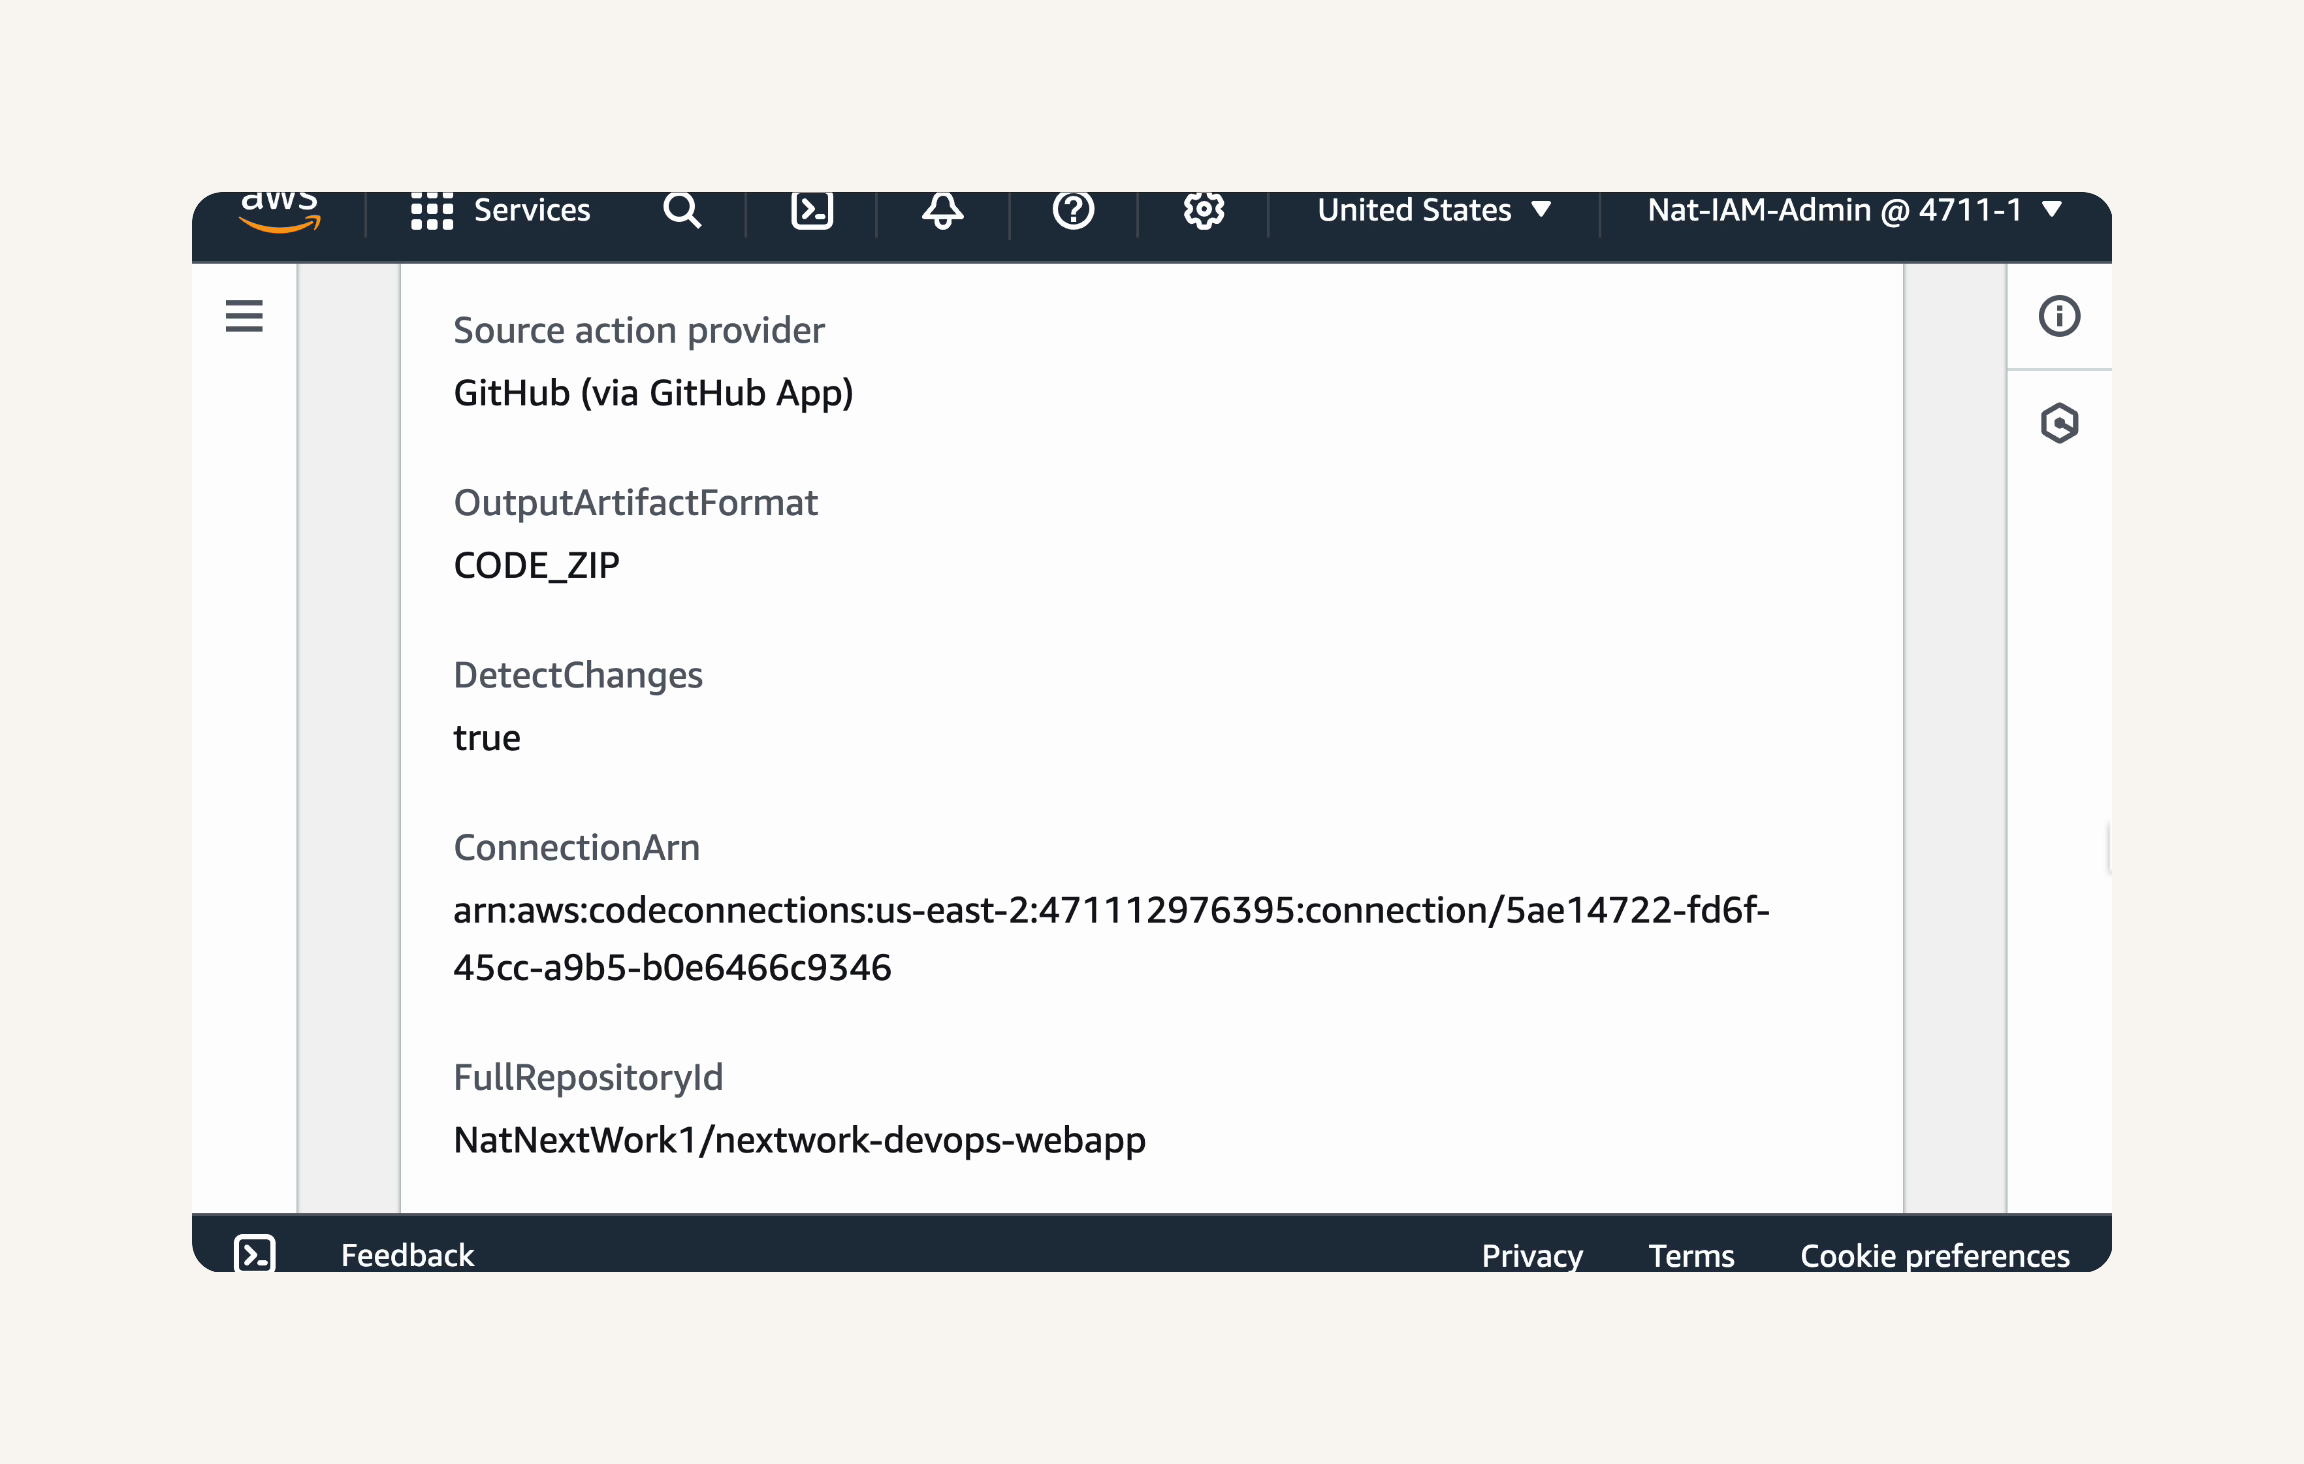
Confirm that the Build stage settings are:
Action provider: AWS CodeBuild
Project name: nextwork-devops-cicd
Enable automatic retry on stage failure: Enabled
Confirm that the Deploy stage settings are:
Action provider: AWS CodeDeploy
Application name: nextwork-devops-cicd
Deployment group name: nextwork-devops-cicd-deploymentgroup
Configure automatic rollback on stage failure: Enabled
Once you've reviewed all the settings and confirmed they are correct, click Create pipeline.

-
After clicking Create pipeline, you will be taken to the pipeline details page.
-
Note the pipeline diagram at the top of the page.
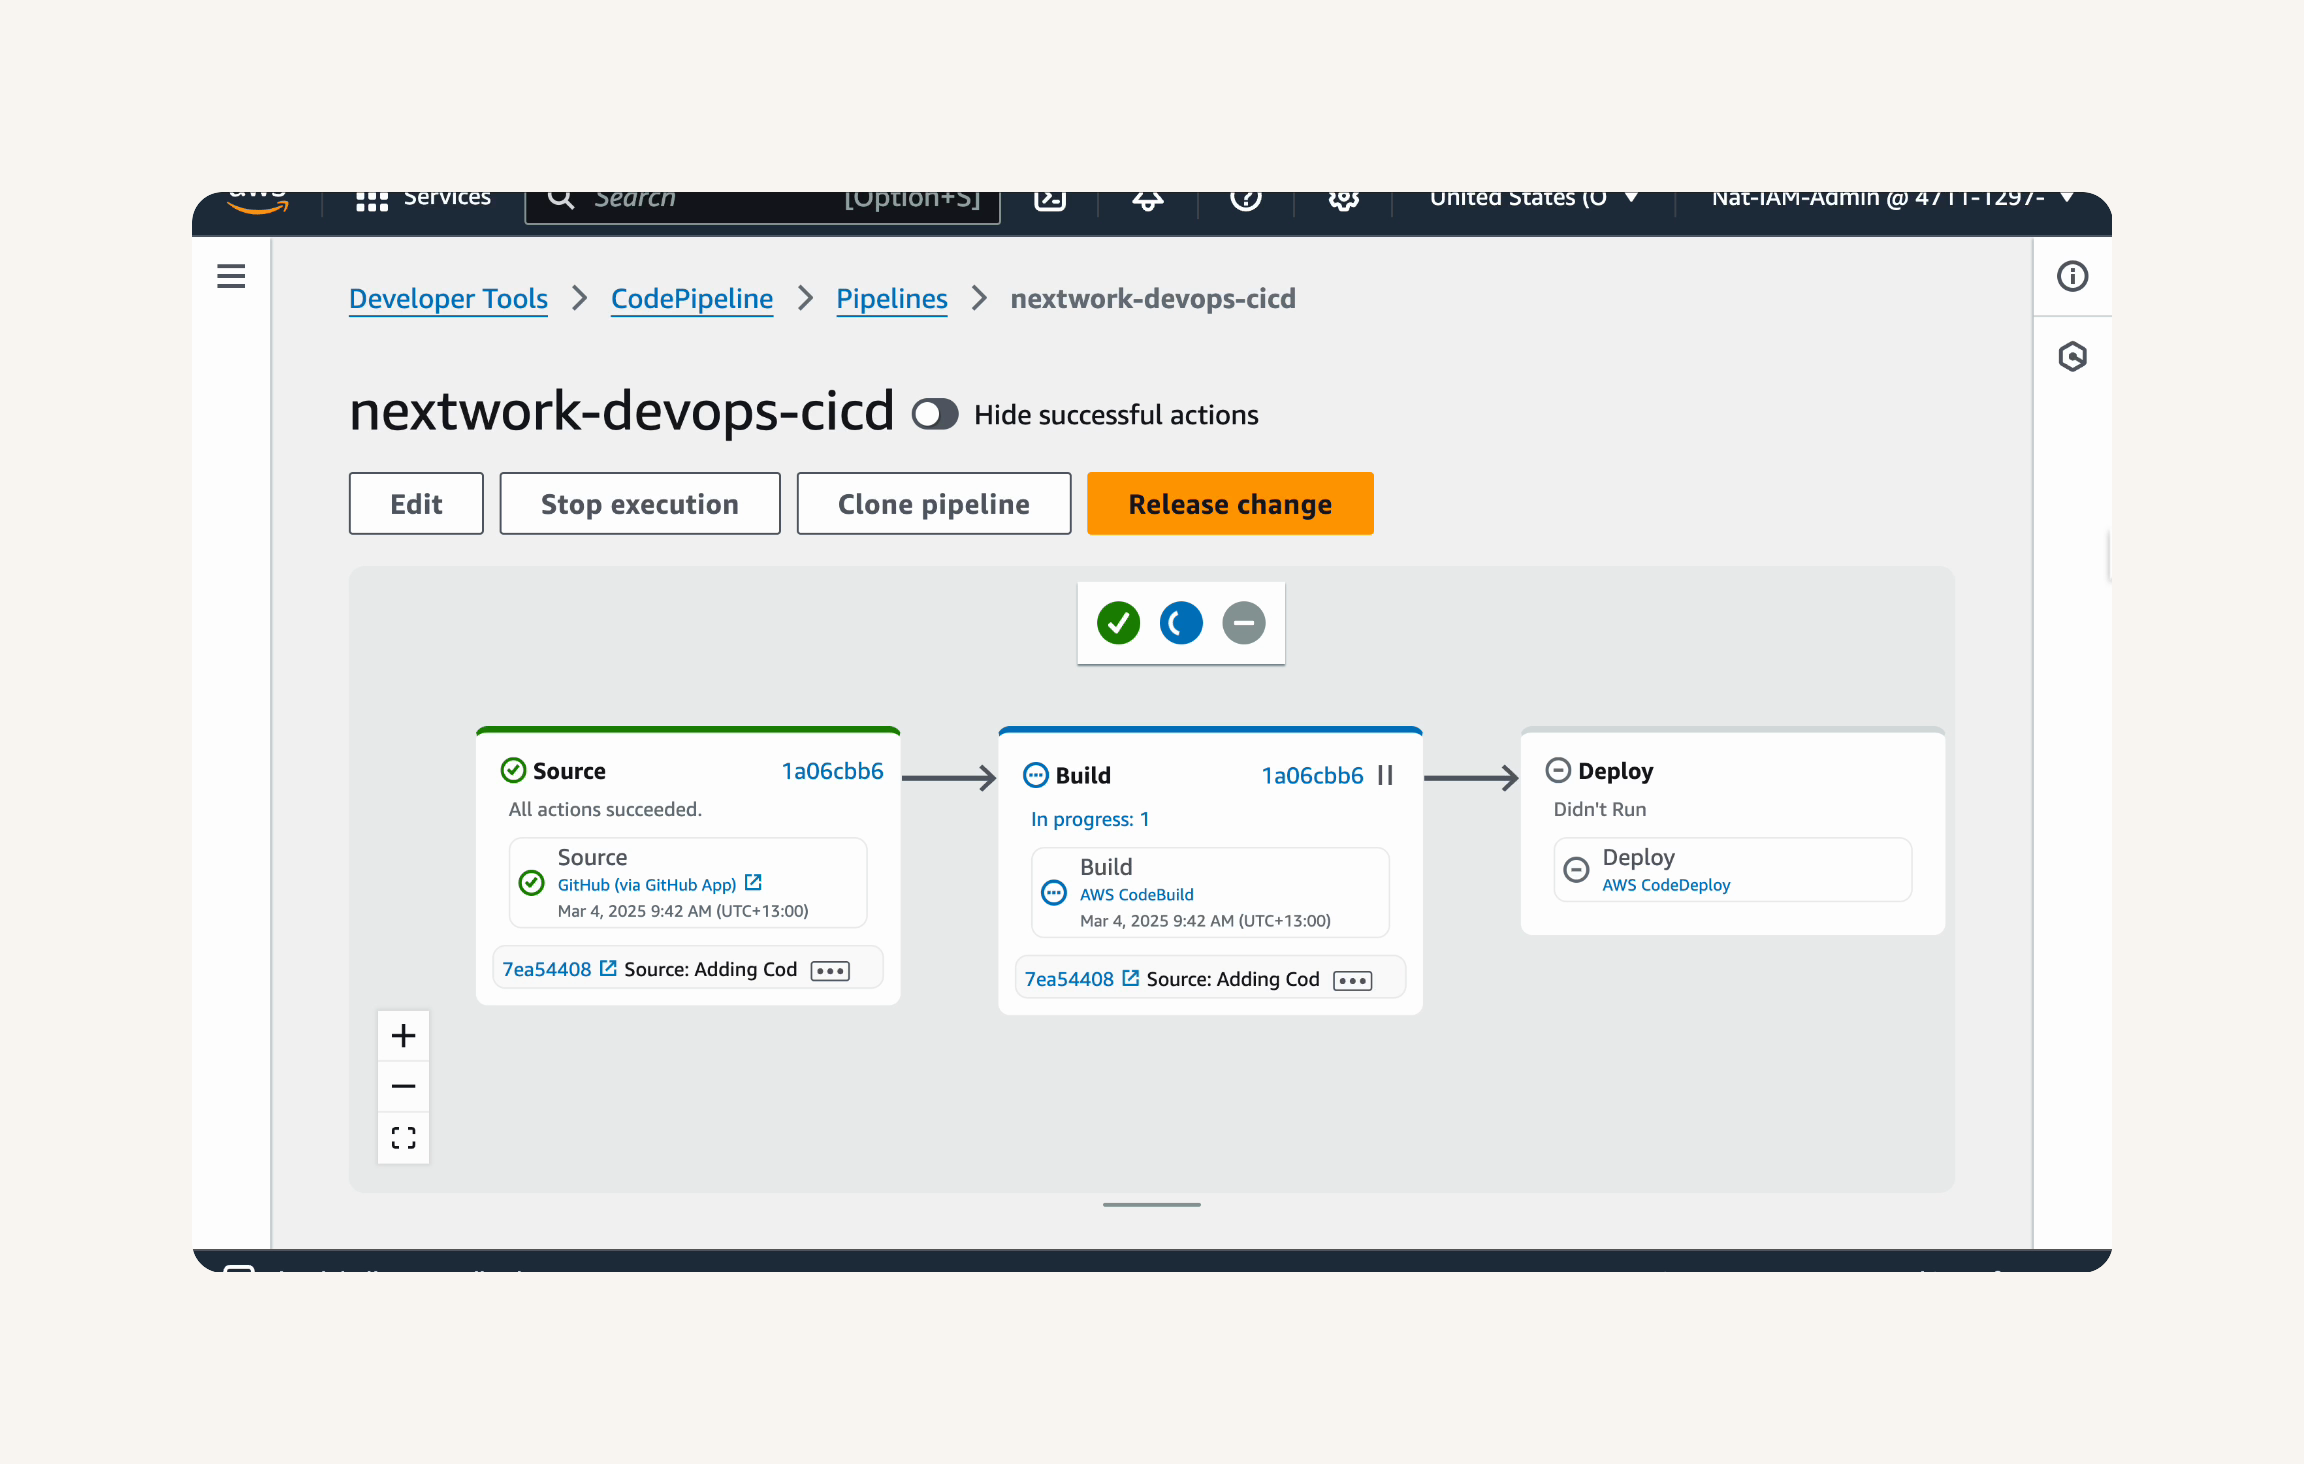
-
CodePipeline automatically starts executing the pipeline as soon as it's created.
-
You can see the progress of each stage in the pipeline diagram. The stages will transition from grey to blue (in progress) to green (success) as the pipeline executes.
💡 What are all the different kinds of statuses?
As your pipeline runs, each stage will display a status:
Grey: Stage has not started yet.
Blue: Stage is currently in progress.
Green: Stage has completed successfully.
Red: Stage has failed.
-
Wait for the pipeline execution to complete. You can monitor the status of each stage in the pipeline diagram.
-
To see more details about each execution, click on the Executions tab above the pipeline diagram.
💡 What are Pipeline executions?
Pipeline executions represent each instance of your pipeline running. Every time your pipeline is triggered (either manually or automatically by a webhook), a new execution is created. Each execution has a unique ID and shows the status and details of each stage in that particular run.
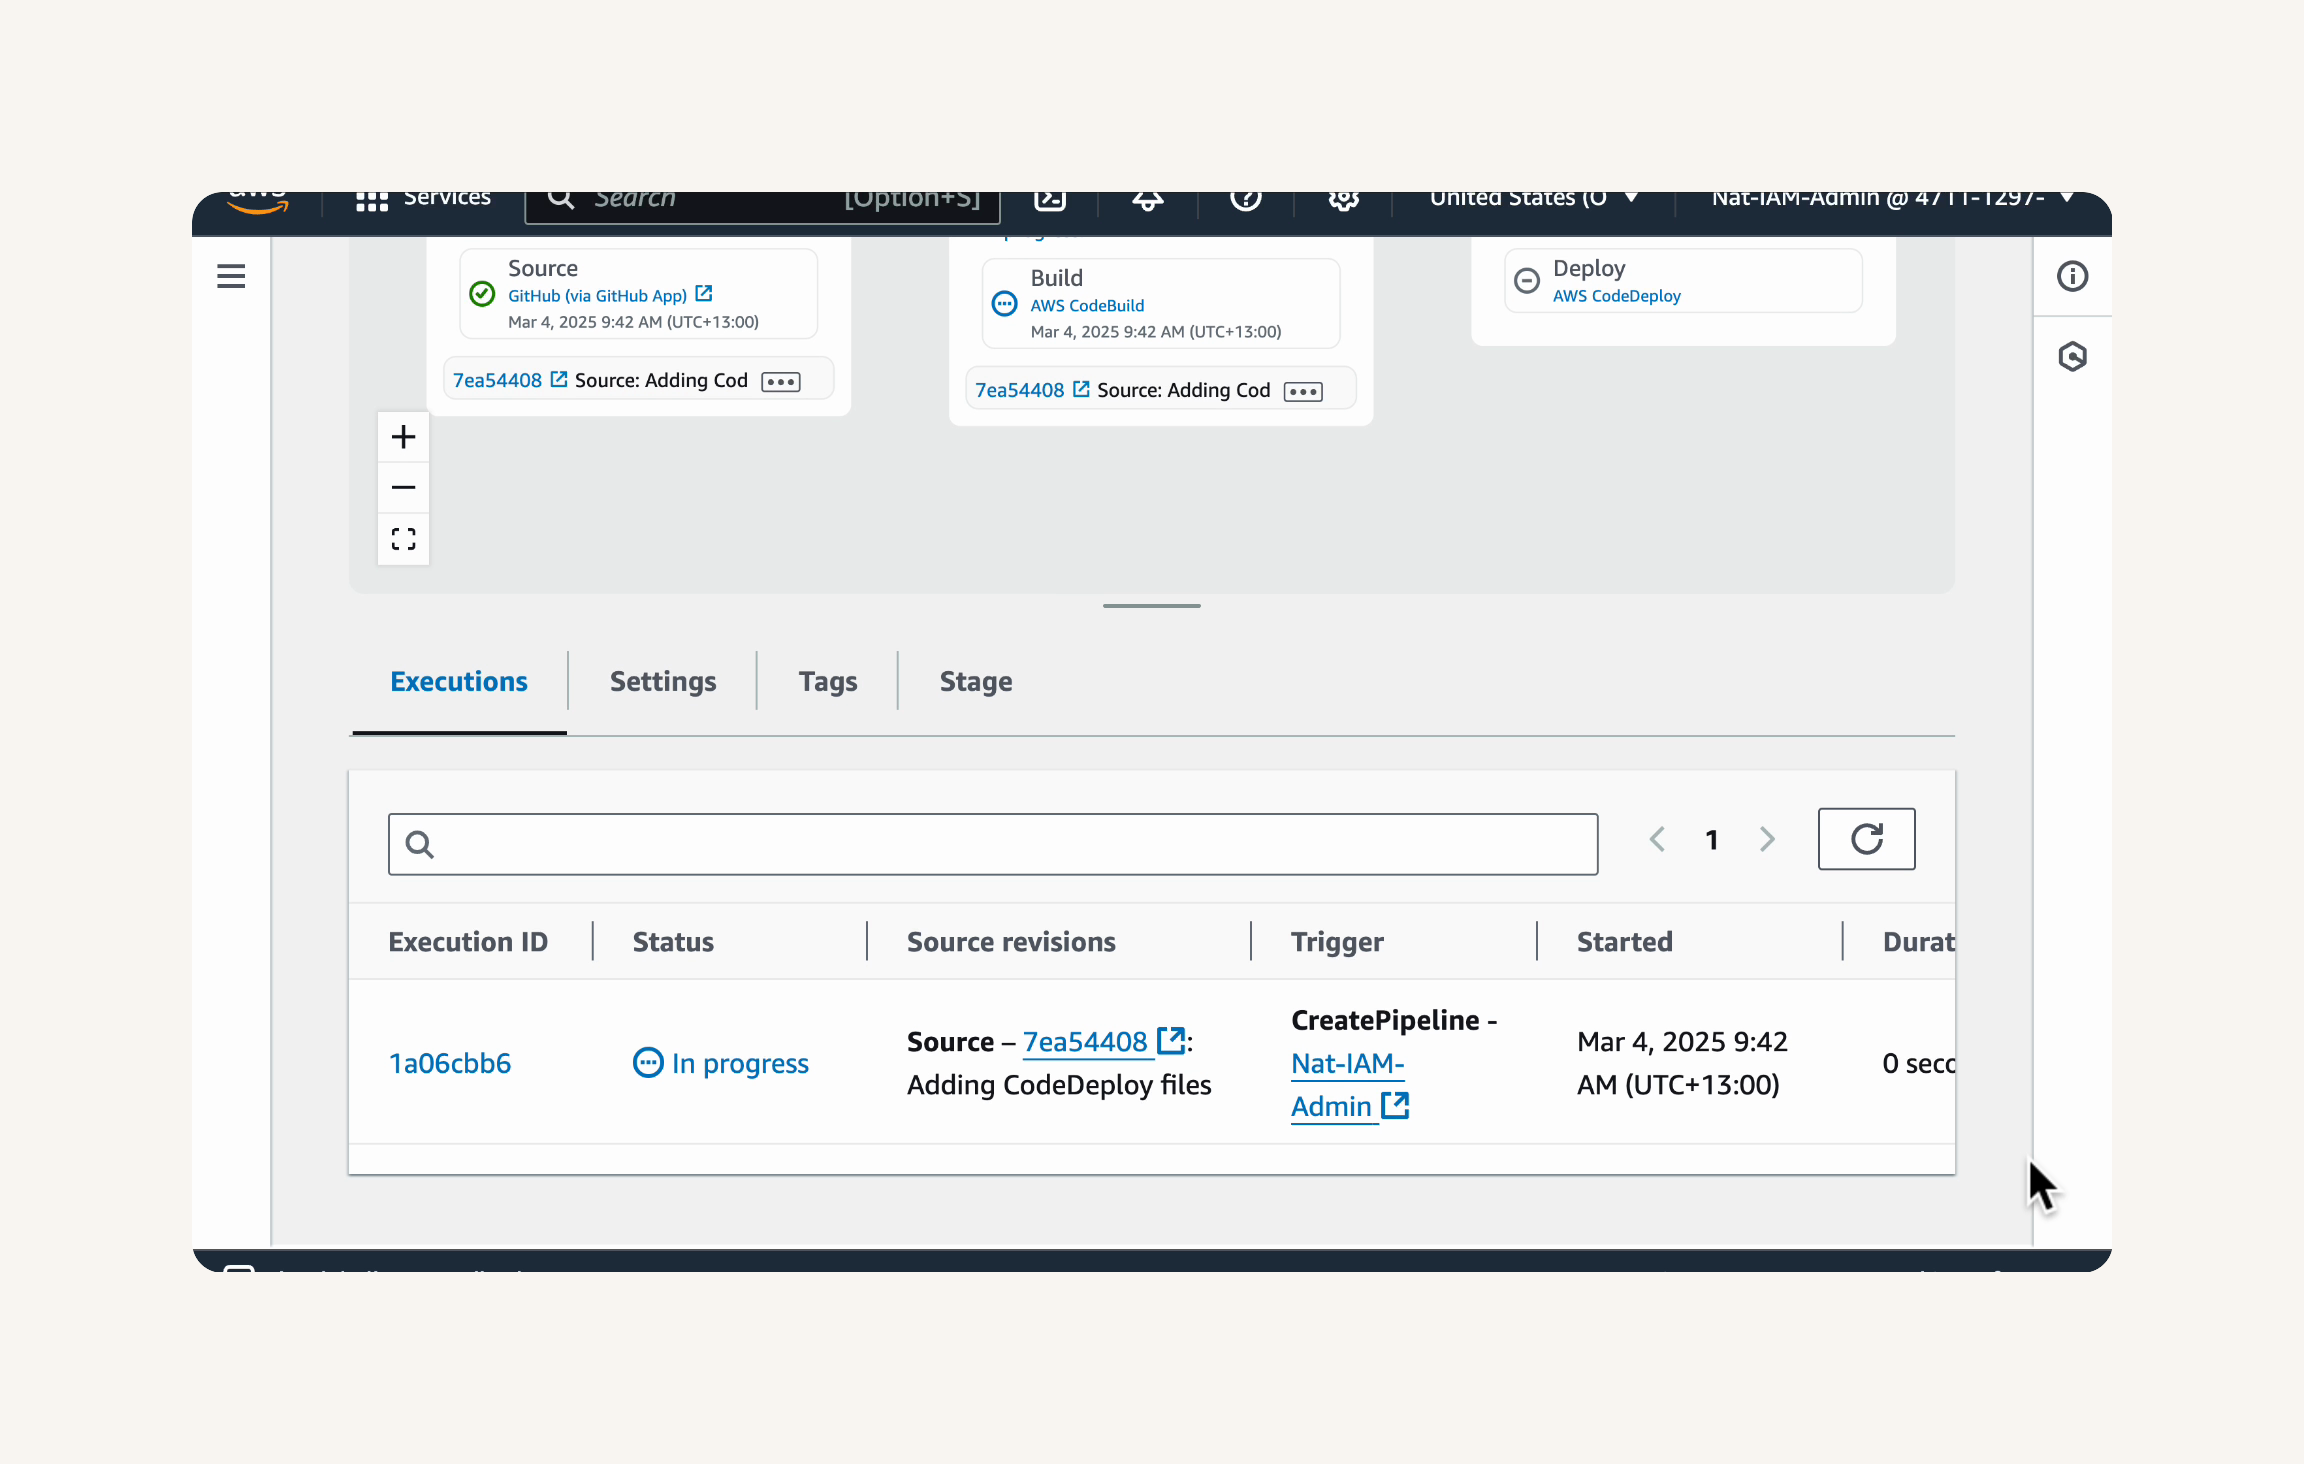
- To view details of a specific stage execution, click on the Stage ID link in the Executions tab. For example, click on the Source stage ID to see details about the source code retrieval.
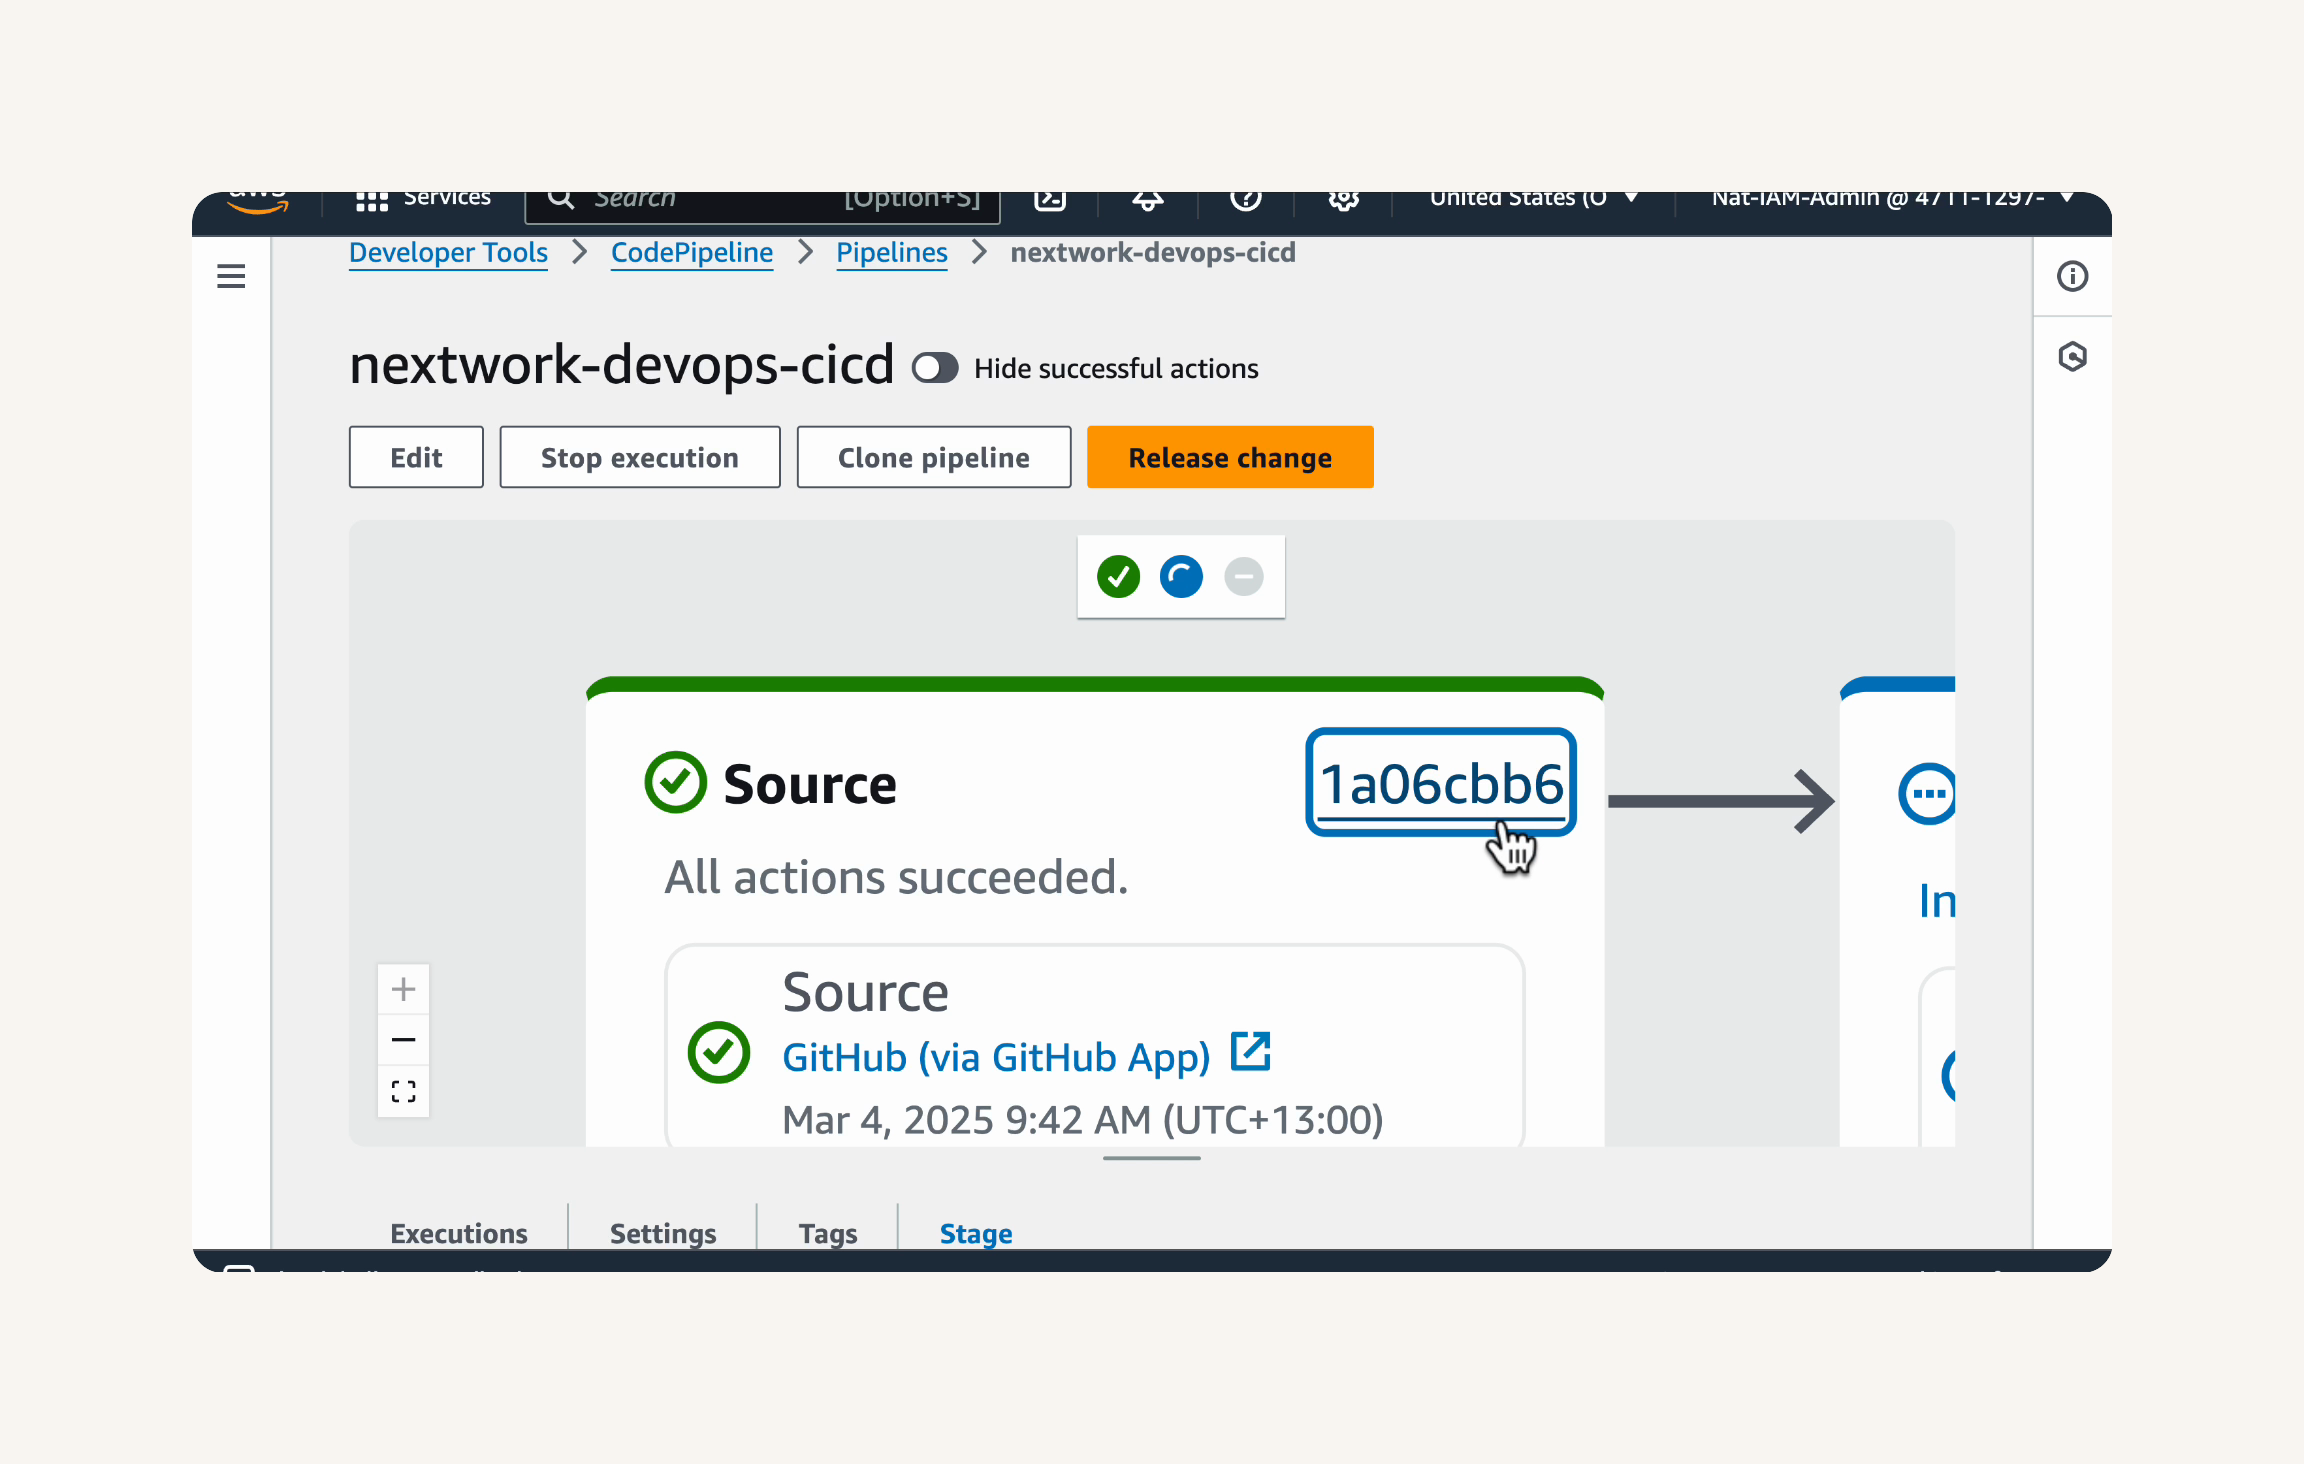
- Wait for all stages in the pipeline diagram to turn green, which means your pipeline is all set up using the latest code change!
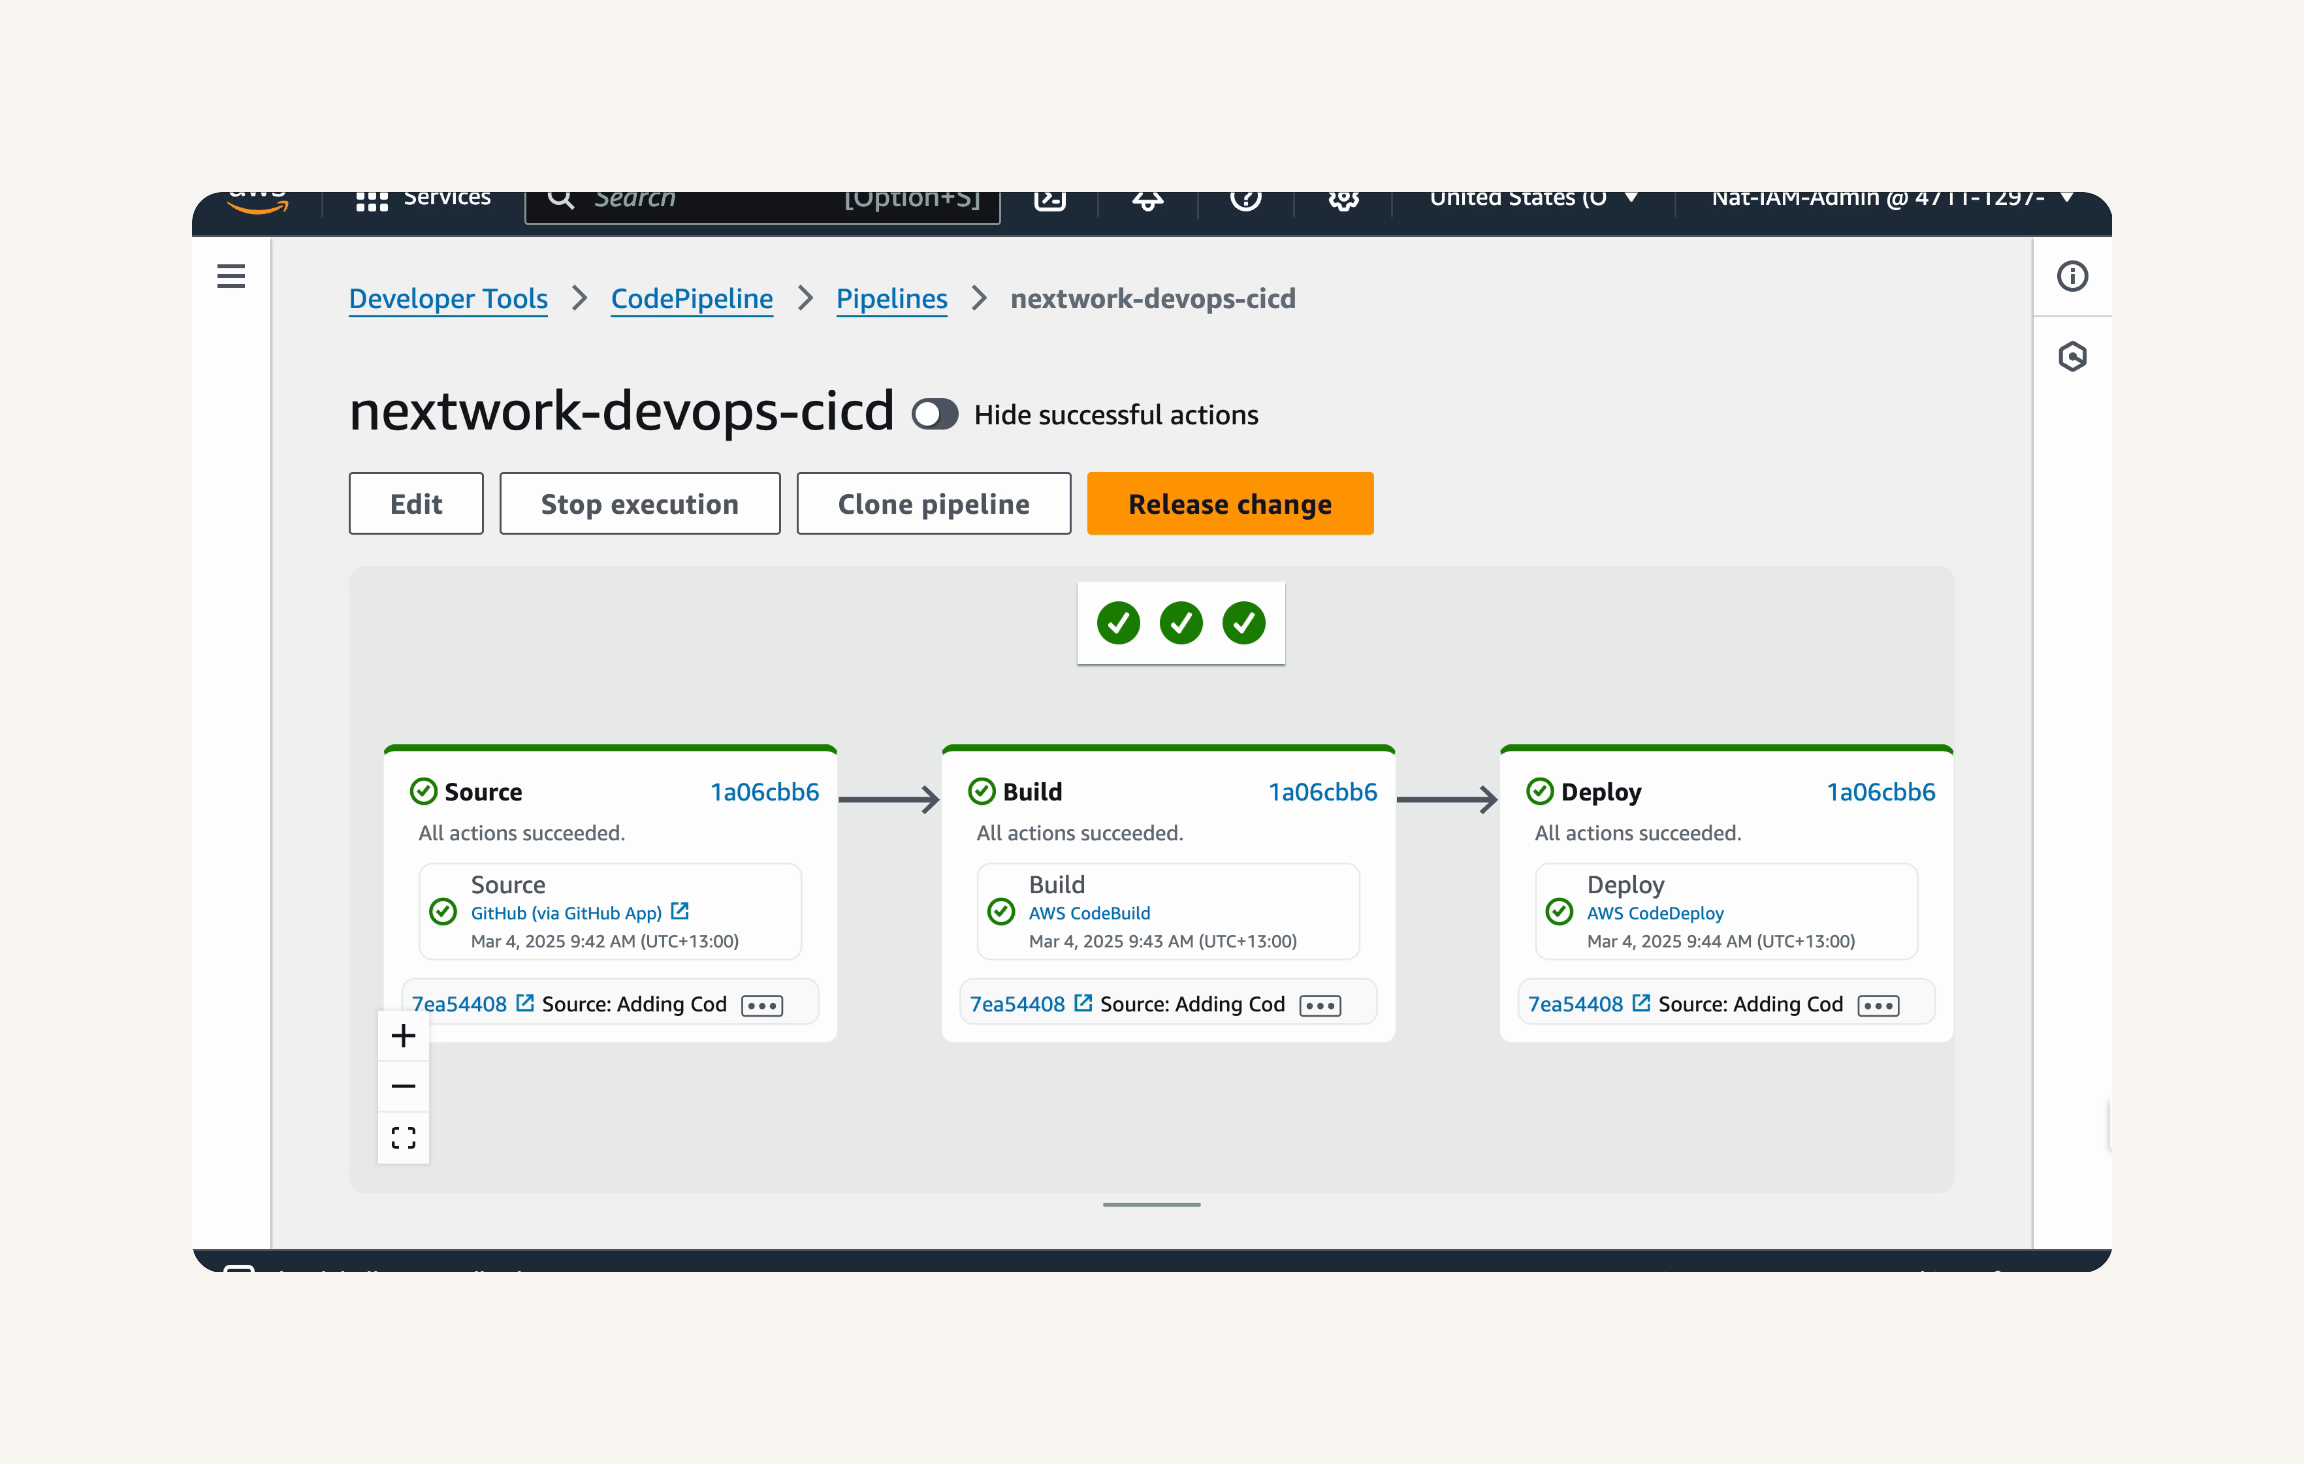
It's time for the ULTIMATE test for this project... let's see how CodePipeline handles a code change!
Testing with a code change will confirm that our pipeline is automatically triggered and deploys our updates.
In this step, you're going to:
- Test the pipeline by making a code change and pushing it to GitHub.
-
Open your web app code in your local IDE (e.g., VS Code).
-
Open the
index.jspfile located insrc/main/webapp/. -
Add a new line in the
<body>section ofindex.jsp:
<p> If you see this line, that means your latest changes are automatically deployed into production by CodePipeline! </p>
-
Save the
index.jspfile. -
Open your terminal and navigate to your local git repository for the web app.
-
Commit and push the changes to your GitHub repository using the following commands:
git add .
git commit -m "Update index.jsp with a new line to test CodePipeline"
git push origin master🙋♀️ Seeing errors when pushing your code?
Try resetting your Git credentials, and starting over again! Run these commands in your terminal:
> git config --global --unset credential.helper git config --local --unset credential.helper git remote set-url origin https://<YOUR_GITHUB_USERNAME>@github.com/<YOUR_GITHUB_USERNAME>/<YOUR_REPOSITORY_NAME>.git
Make sure to replace
<YOUR_GITHUB_USERNAME>with your GitHub username and<YOUR_REPOSITORY_NAME>with your repository name.Then try
git pushagain and enter your GitHub PAT when prompted for the password. Check the top of your VS Code window if you're not prompted in the terminal.

- Go back to the CodePipeline console and watch your pipeline react to the code change 👀
- You should see a new execution starting automatically after you push the changes to GitHub.
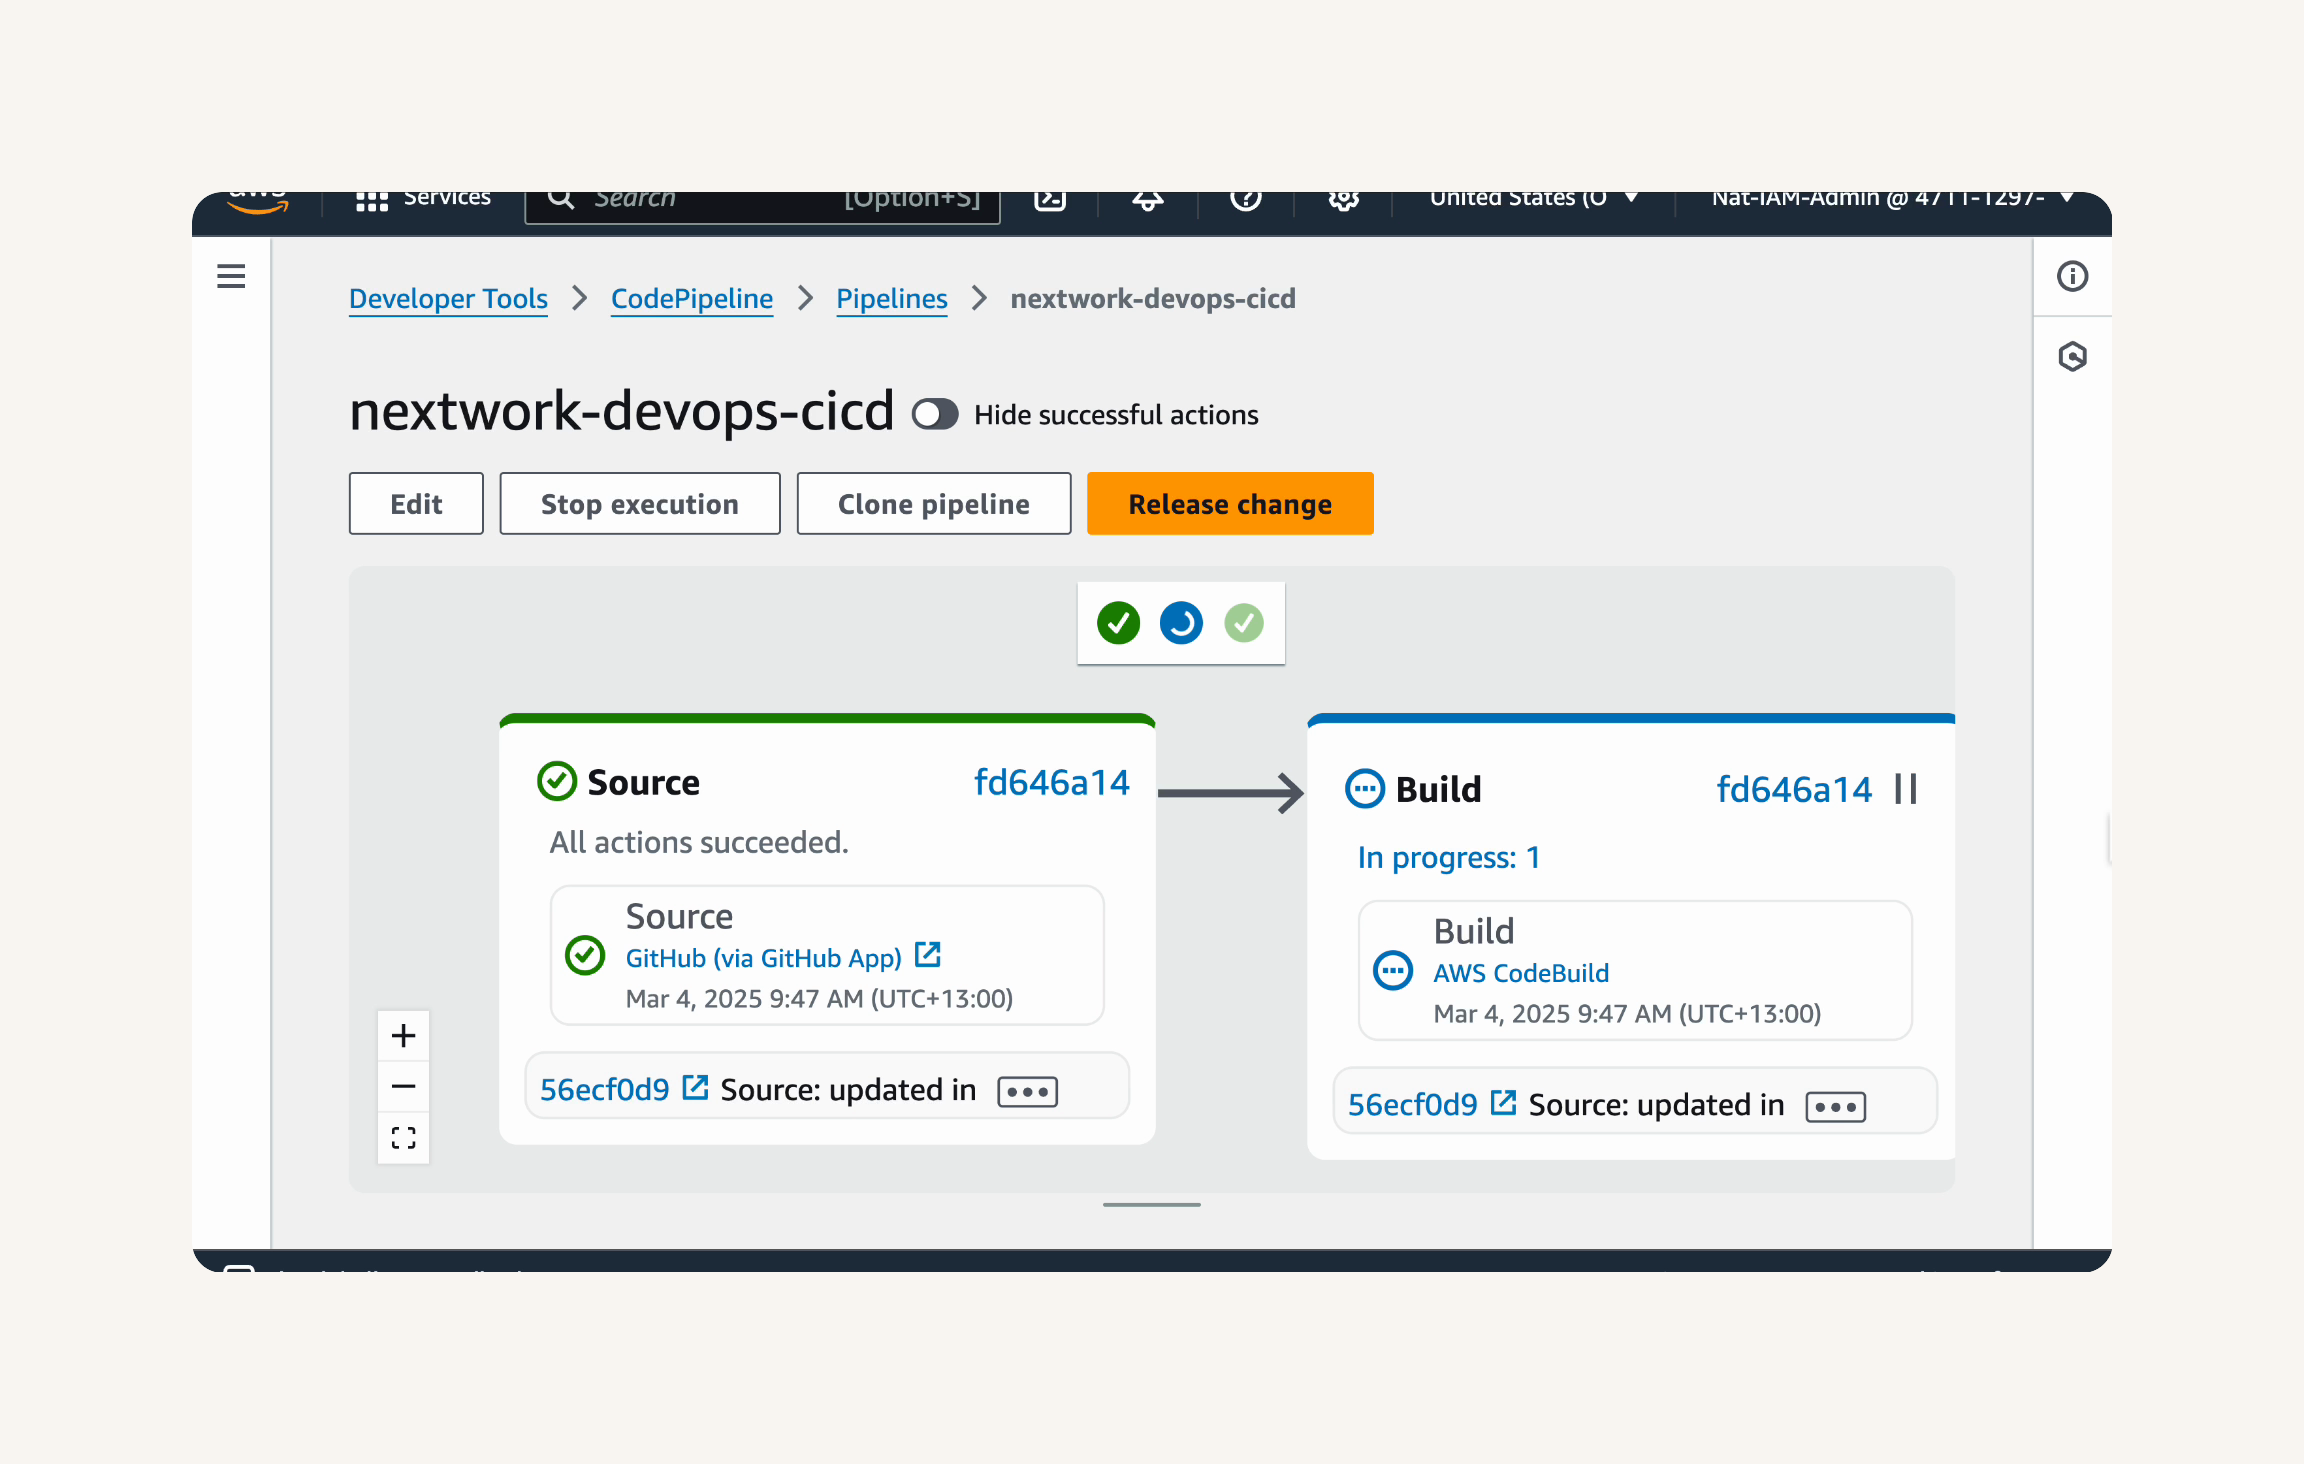
-
Click on the Source stage box in the pipeline diagram.
-
Scroll down in the stage details panel to see the commit message.
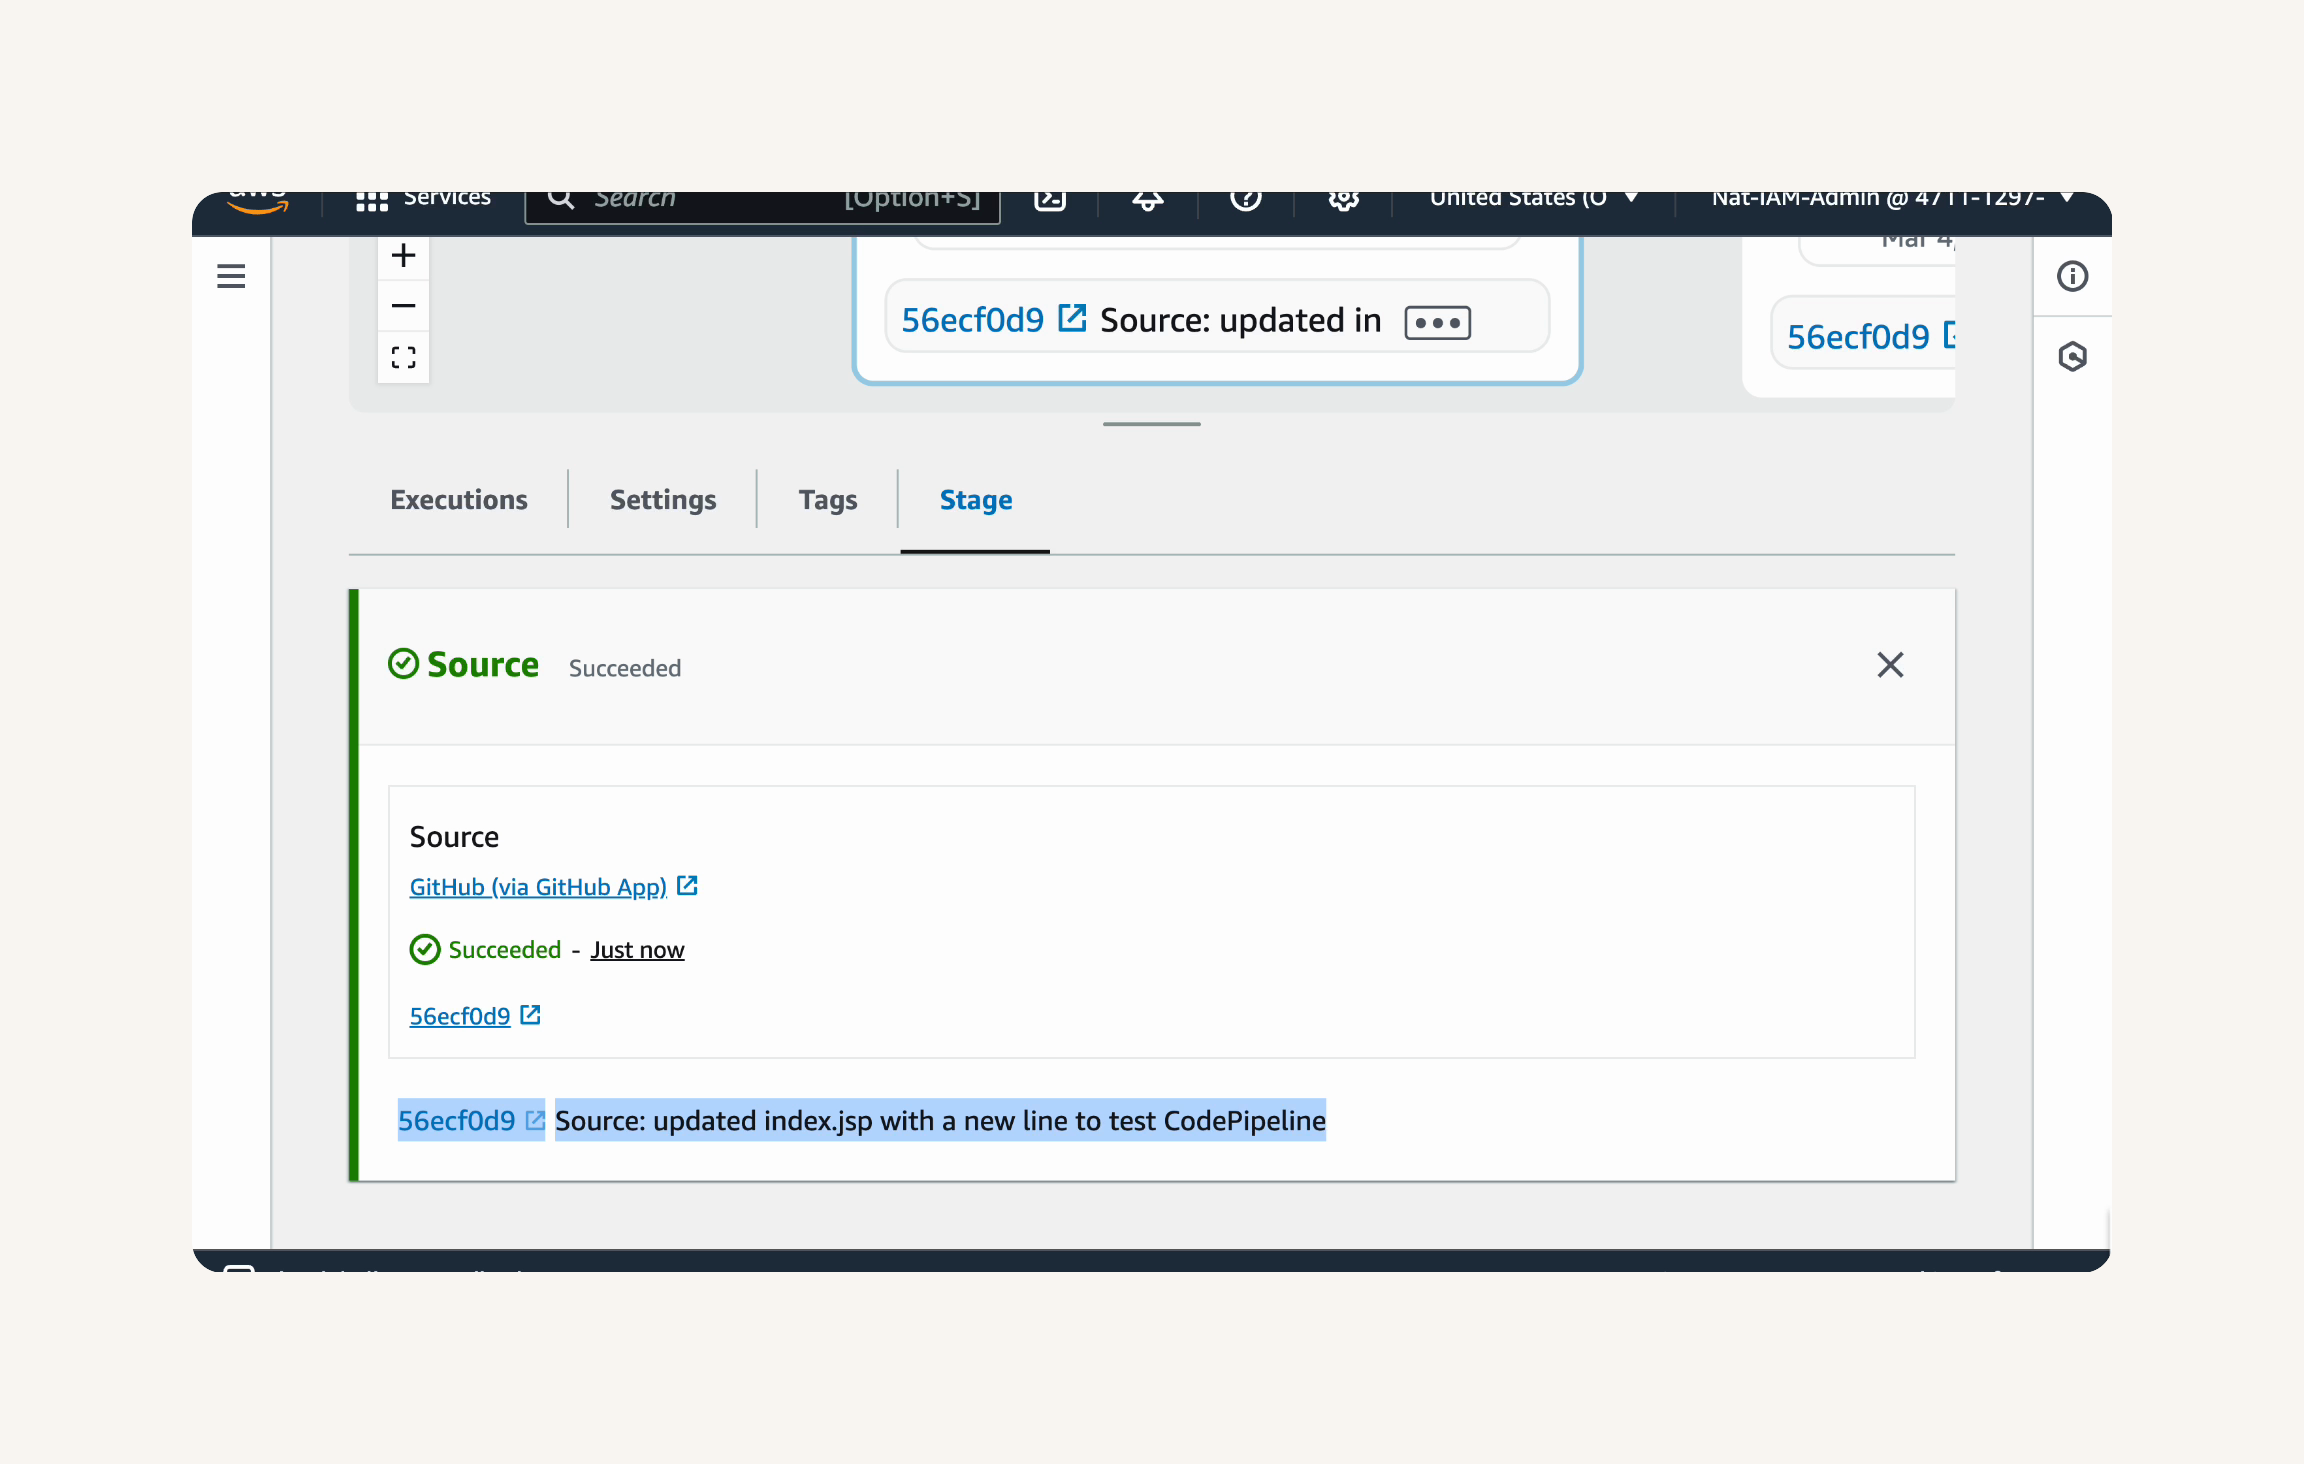
- Click on the Commit ID link in the Source stage details panel.

-
This should open the commit page in your GitHub repository in a new browser tab.
-
Verify that the commit page shows the code changes you just pushed (the new line you added to
index.jsp!

- Wait for the Build and Deploy stages to complete successfully (turn green) in the CodePipeline console.
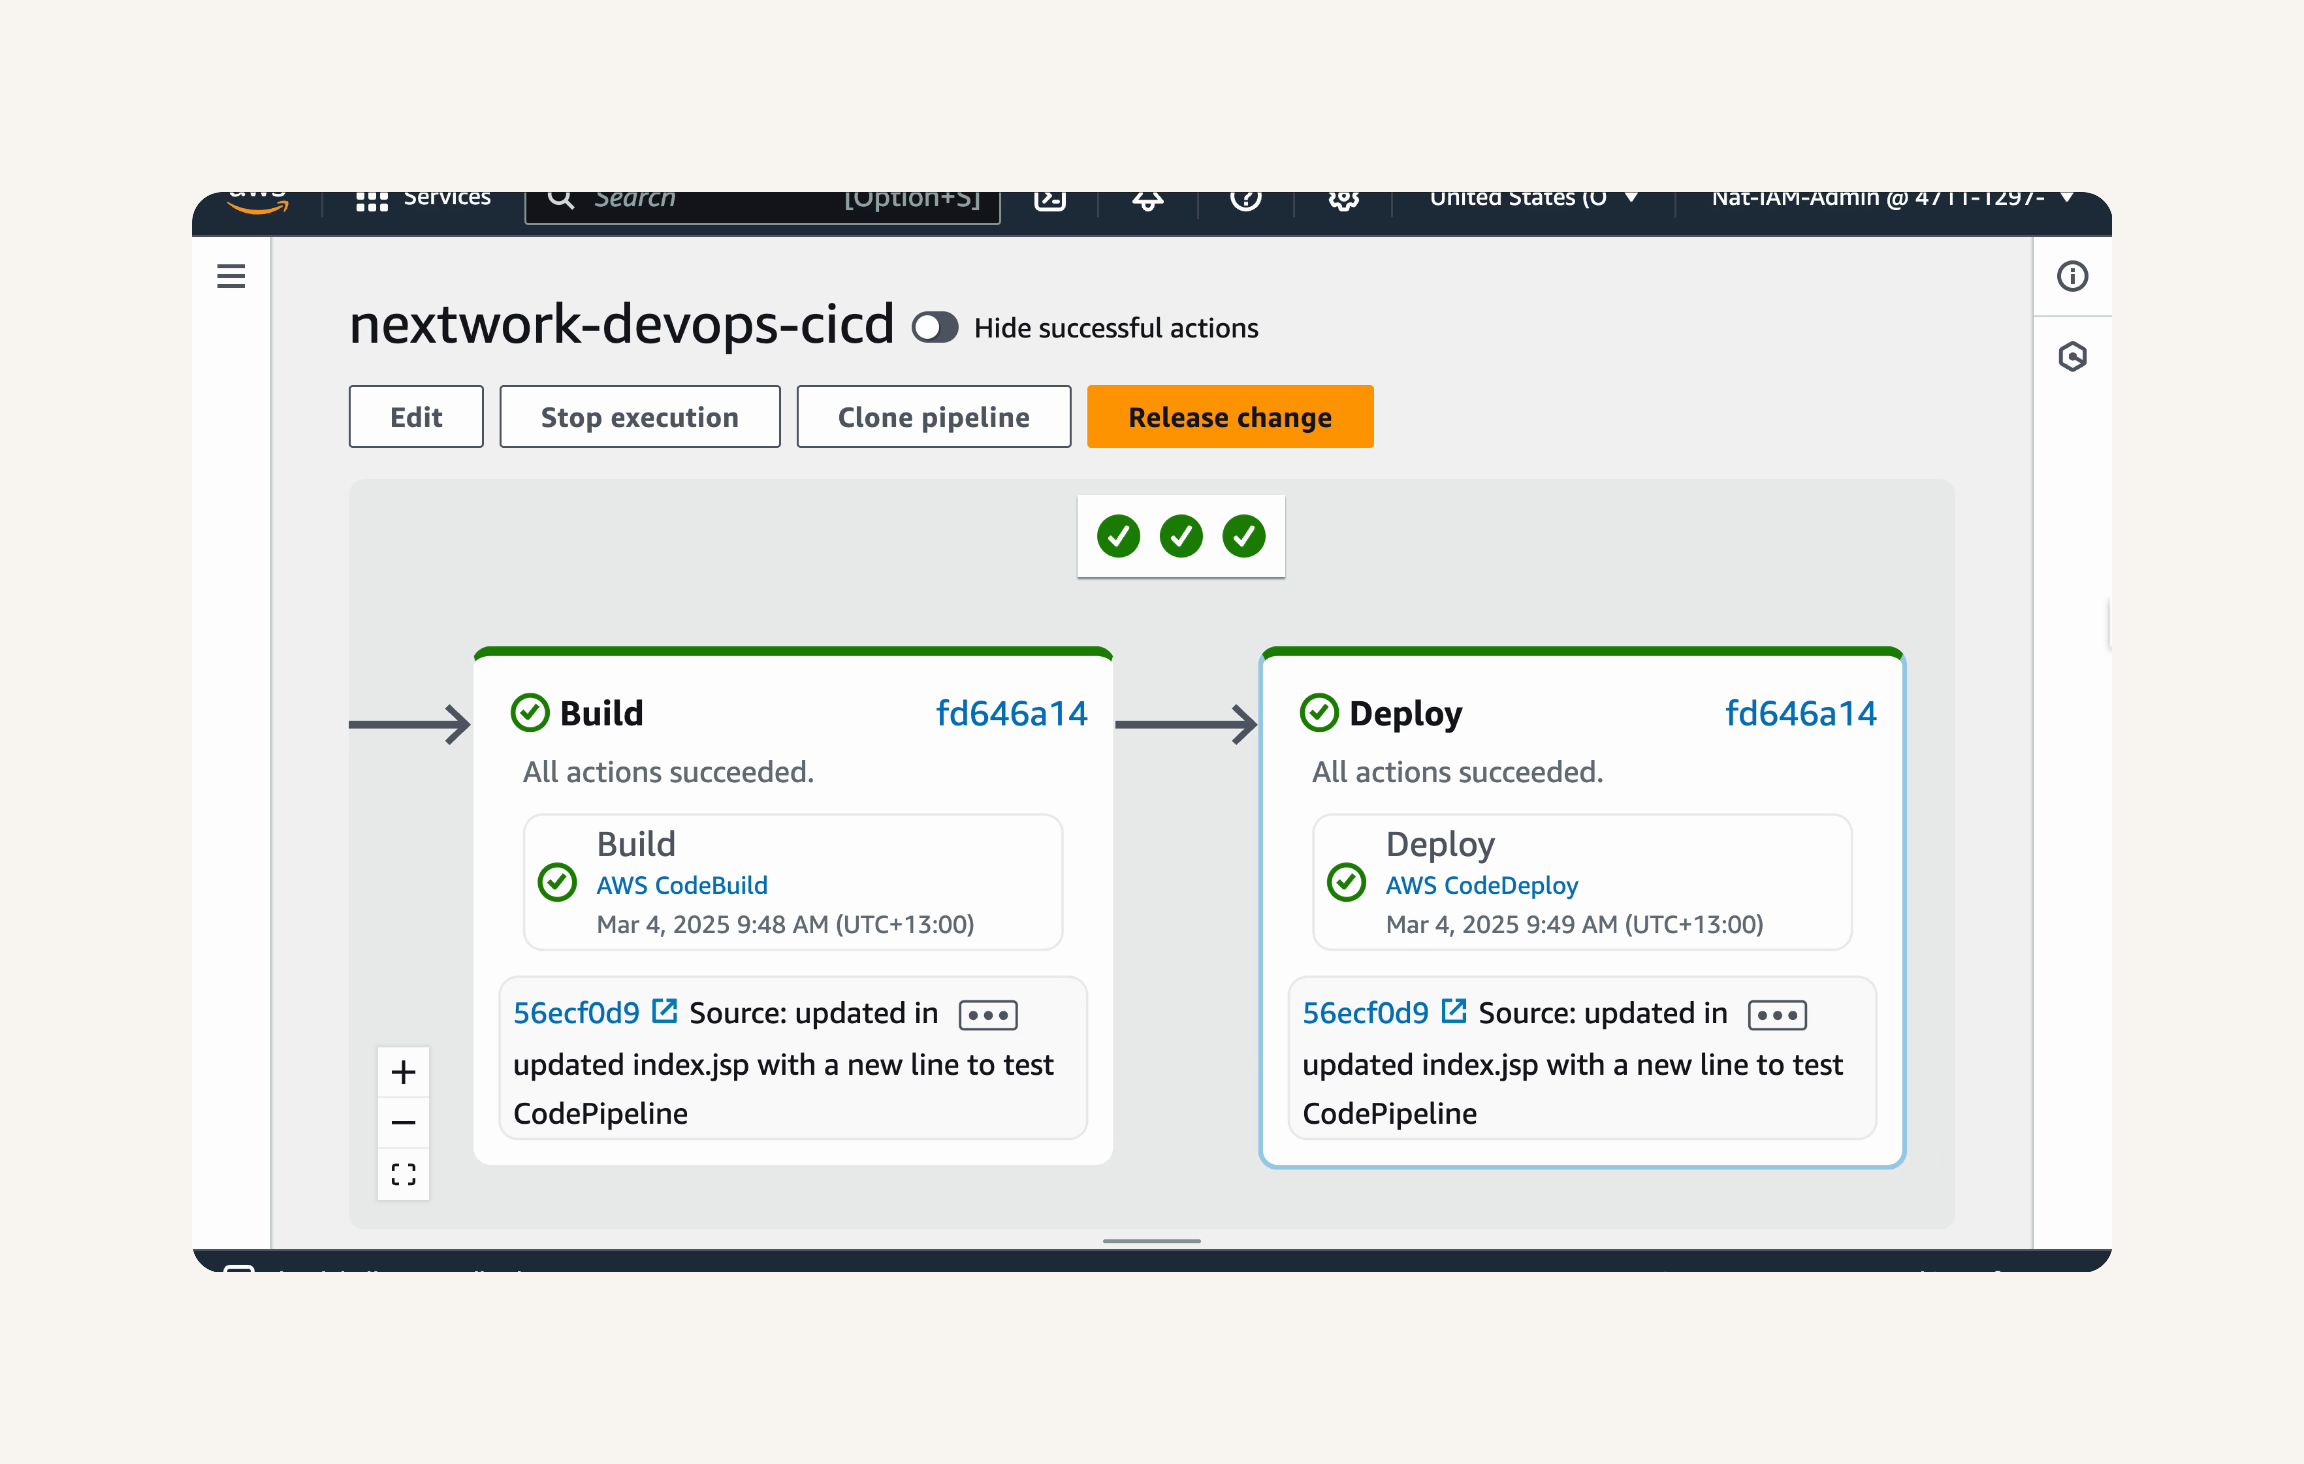
Let's try accessing the web app to see your code change live!

-
To find the Public IPv4 DNS, in the CodePipeline console, click on the Deploy stage, then click on the CodeDeploy link in the details panel.
-
In the CodeDeploy console, scroll down to Deployment lifecycle events and click on the Instance ID.
-
On the EC2 instance summary page, copy the Public IPv4 DNS.
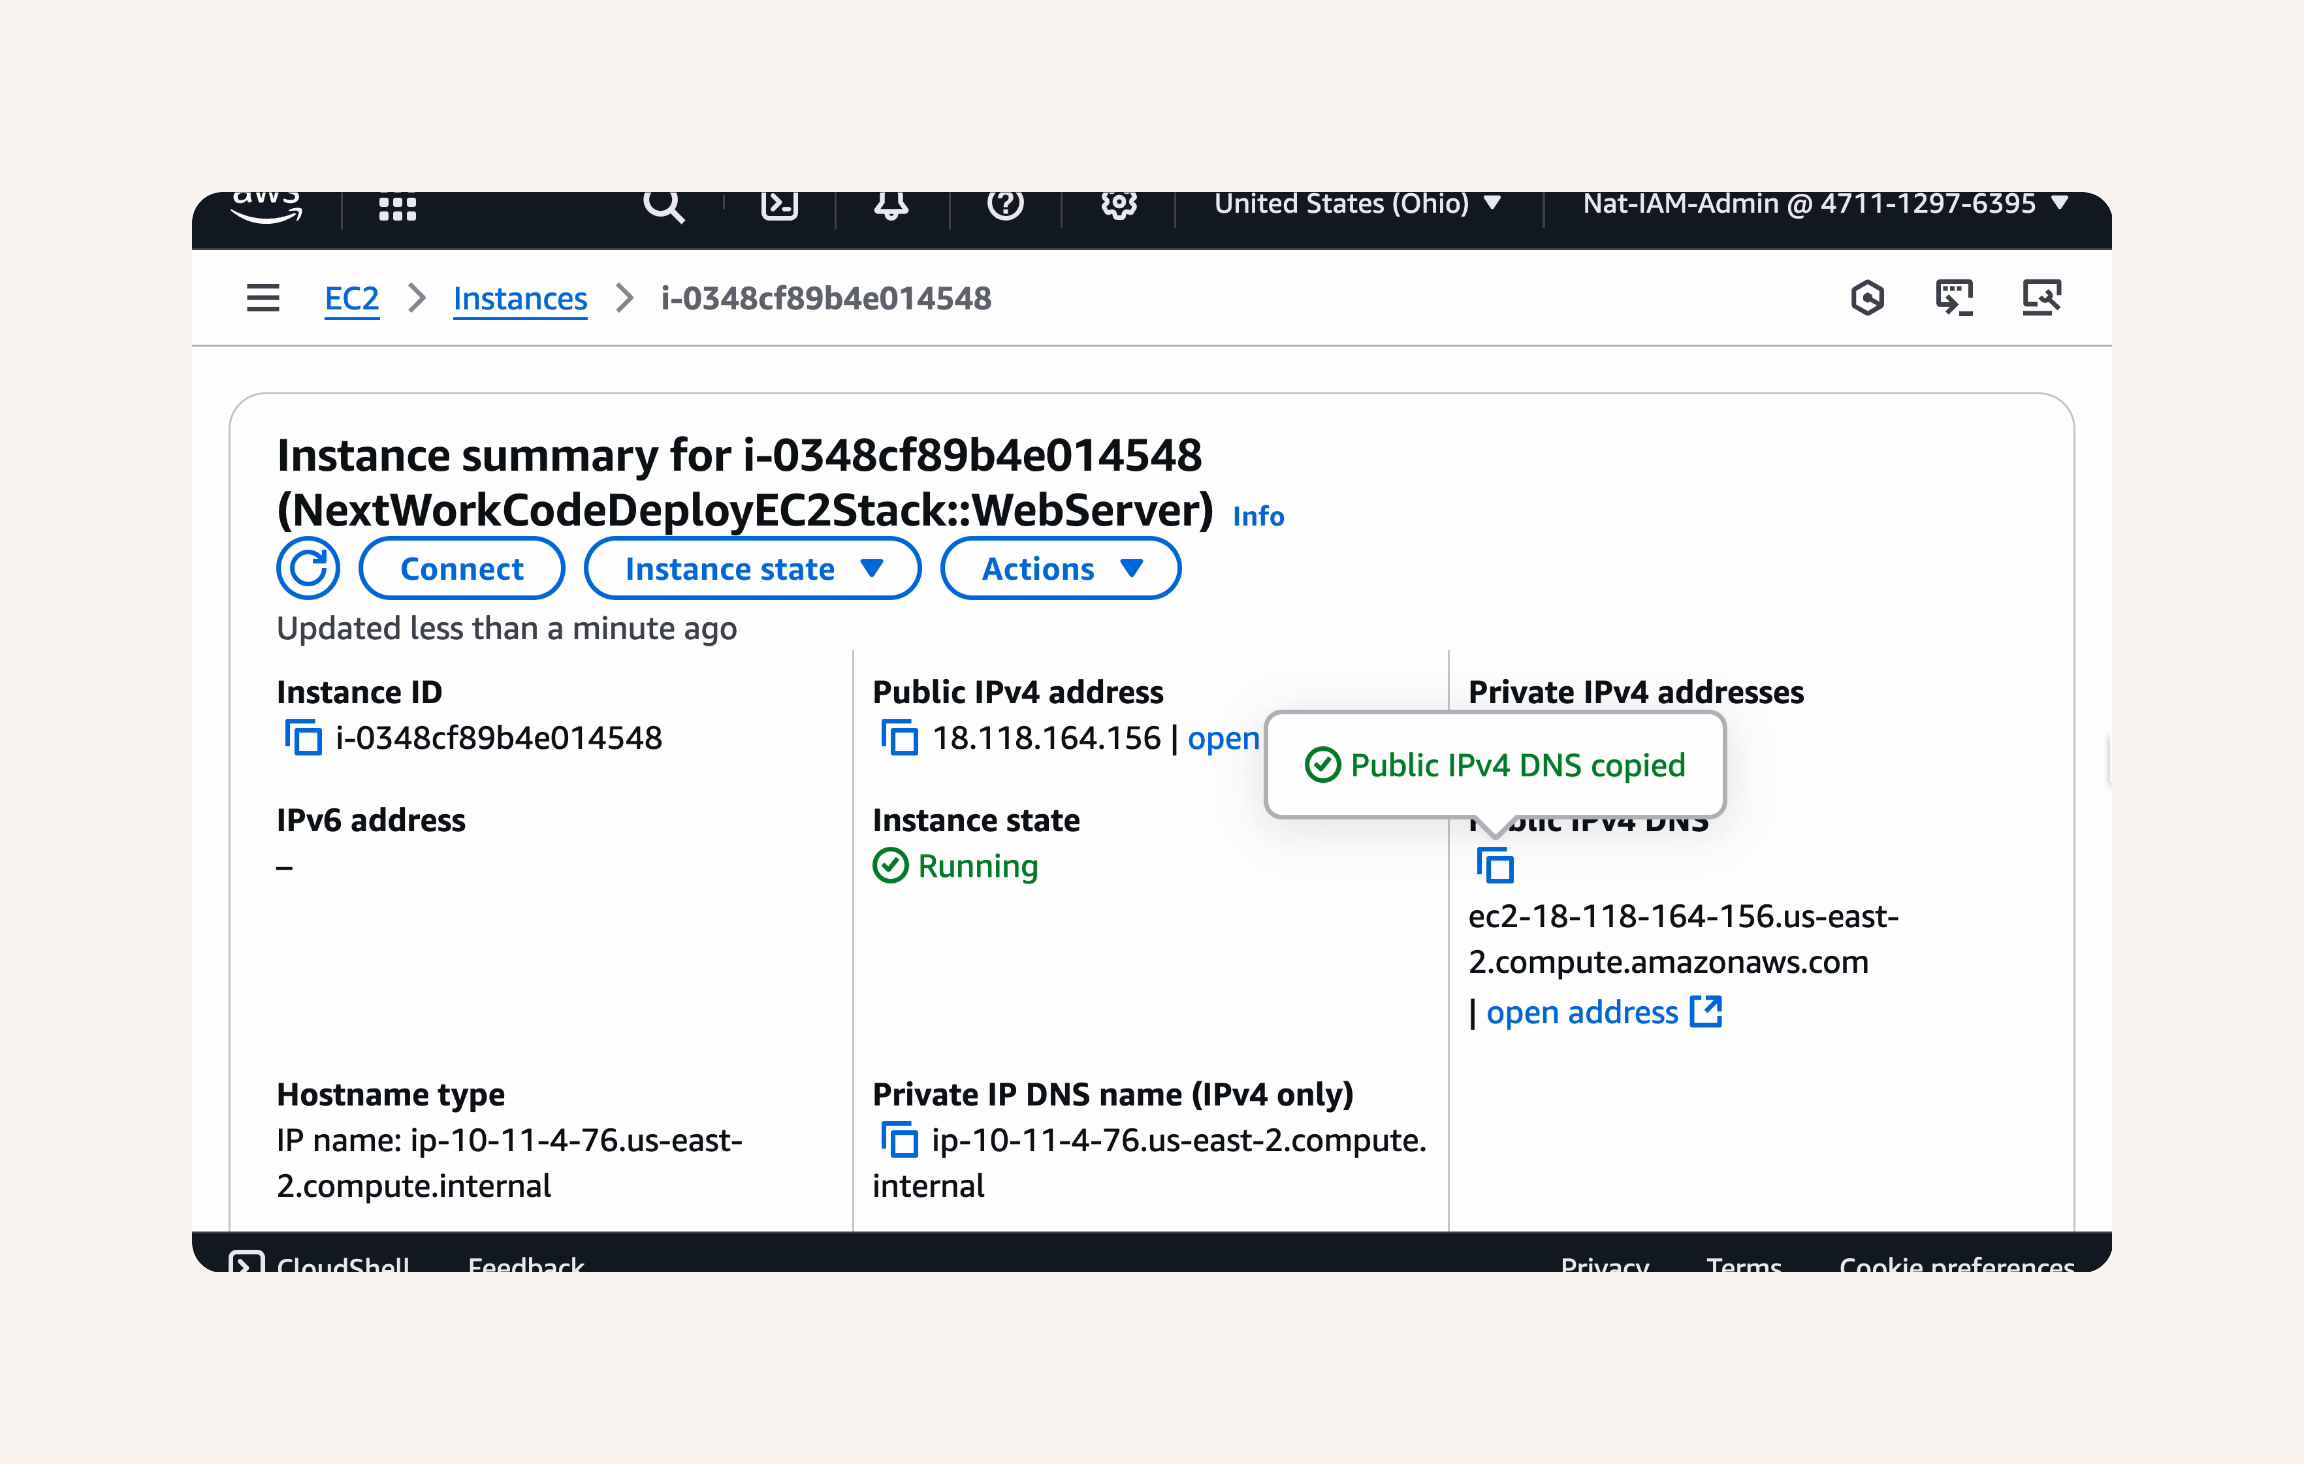
-
Paste the copied Public IPv4 DNS in a new browser tab and press Enter.
-
You should see your web application with the new line you added:
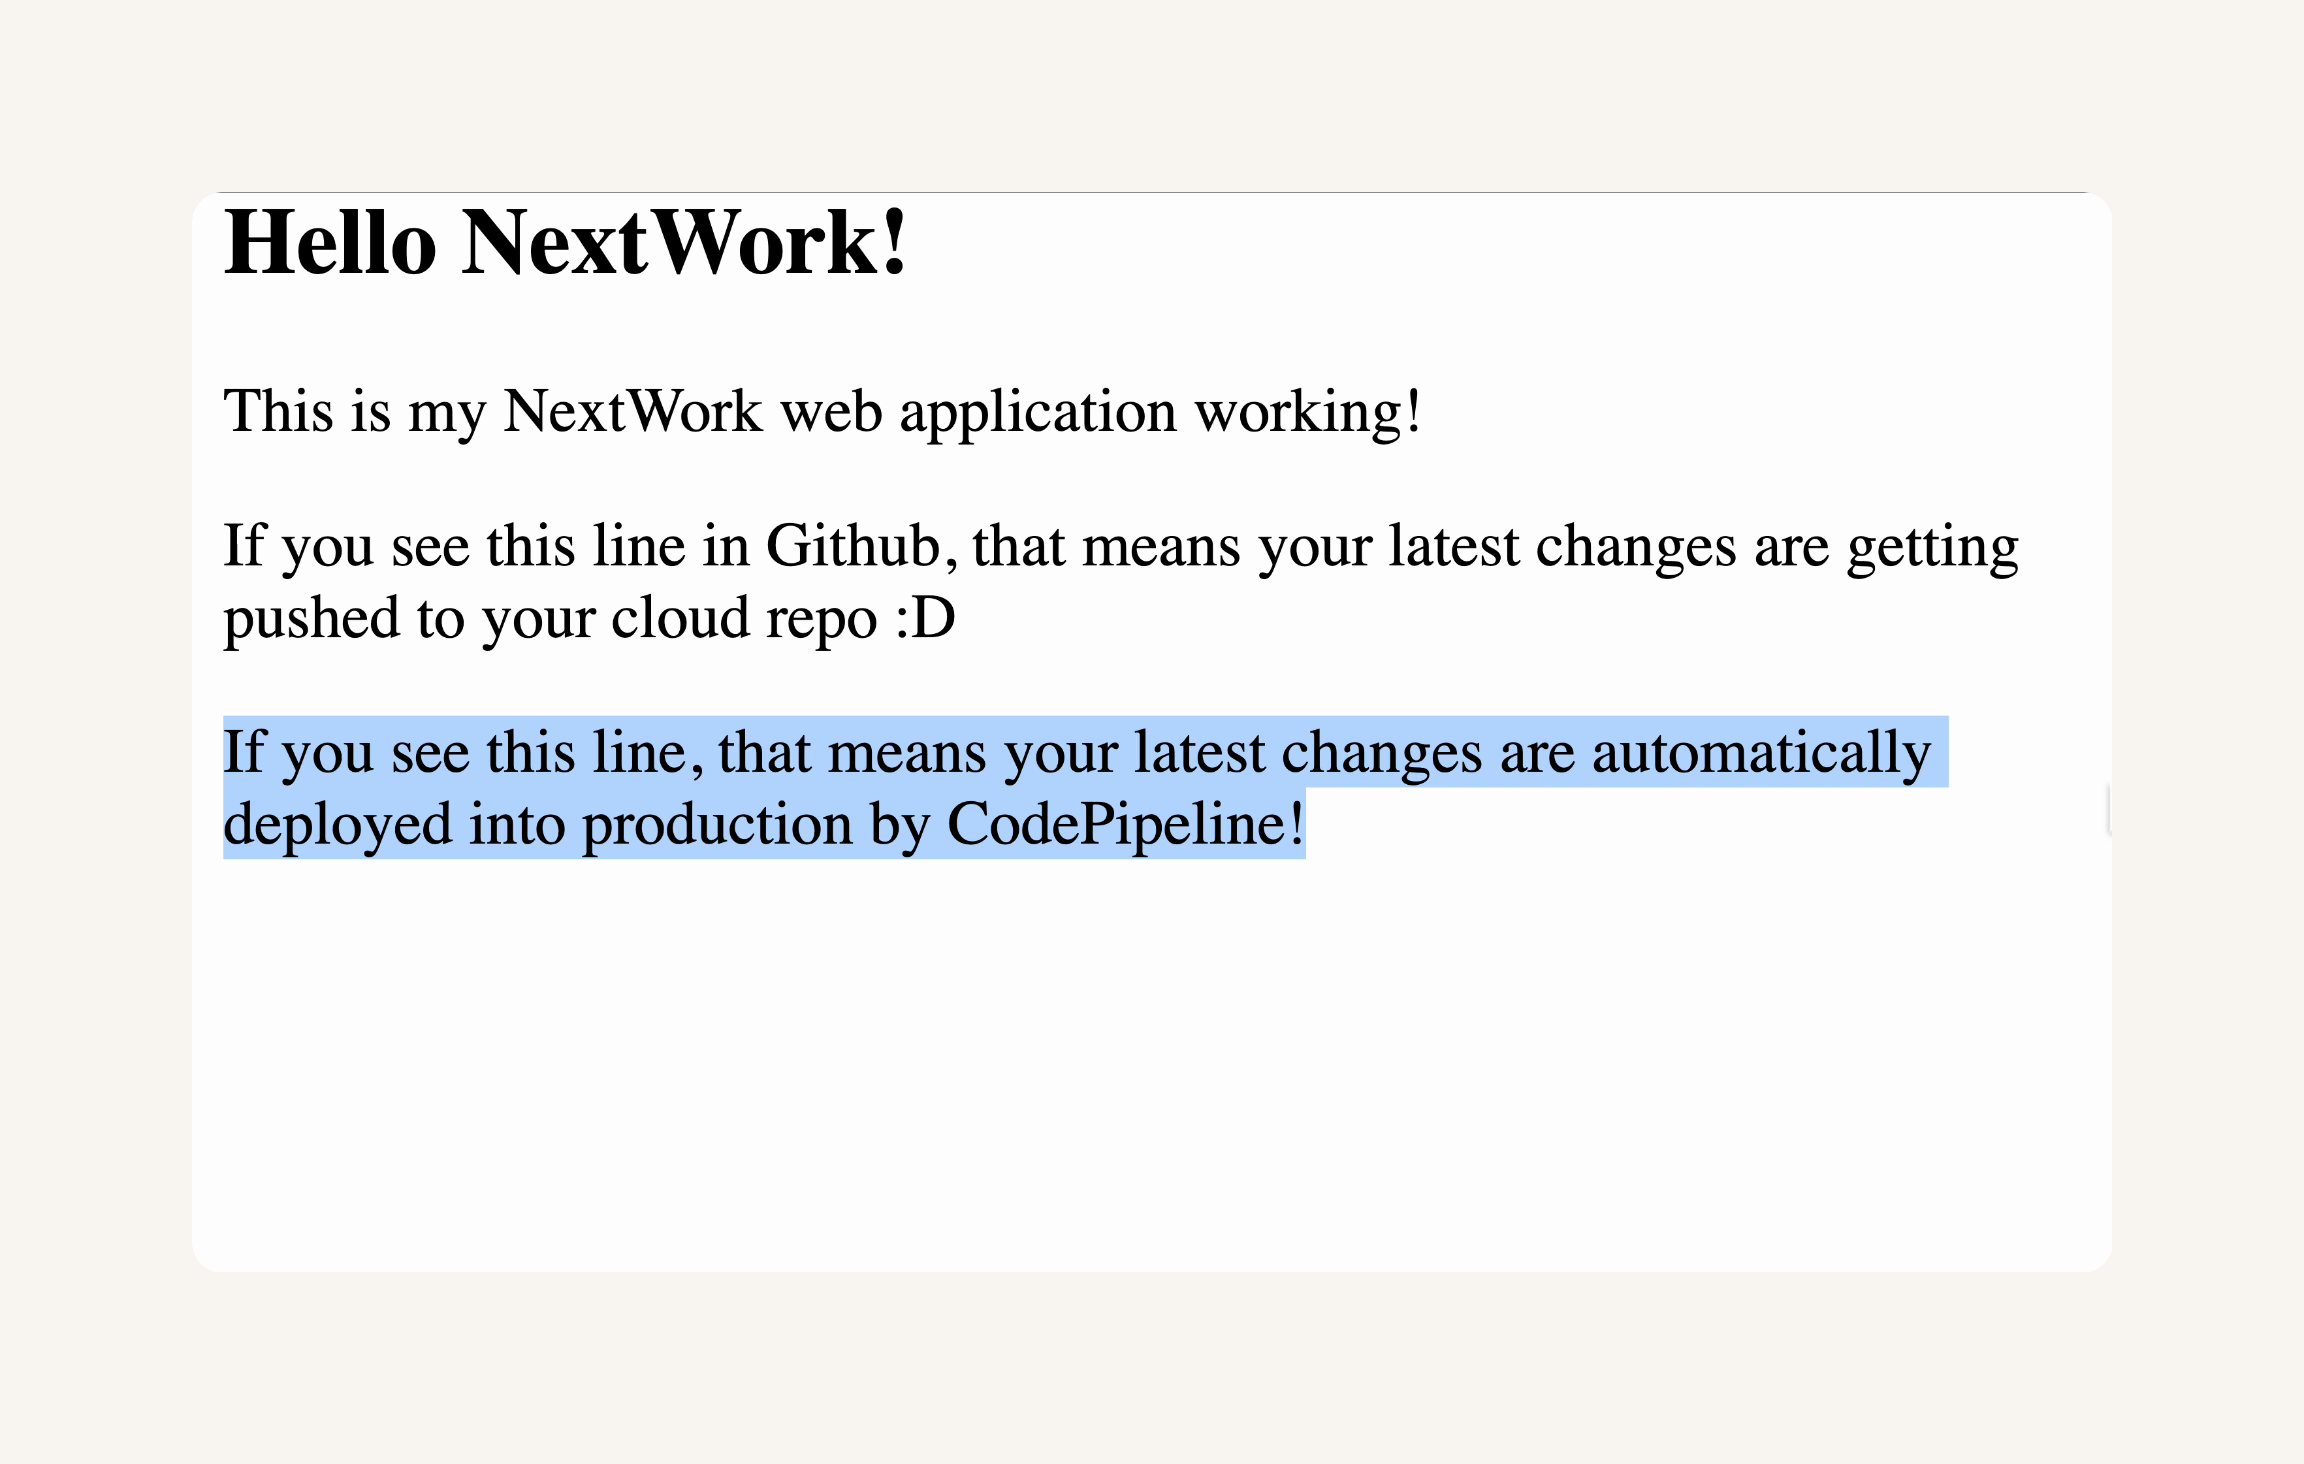
WOOOOOO 😭🙏 This confirms that your latest code changes were automatically deployed by CodePipeline.
Your CI/CD pipeline is now automatically building and deploying your web application whenever you push changes to GitHub.
Before you finish this project - want to test an important emergency procedure?
In this section, out goal is to trigger a manual rollback in your CI/CD pipeline. This is going to give you hands-on experience with one of the most critical operational procedures in a production environment - handling deployment failures and restoring service quickly!
In this section, you're going to:
-
Manually trigger a rollback in your CodePipeline deploy stage.
-
Verify that your web application reverts correctly to its previous state.
-
Demonstrate your disaster recovery skills for your DevOps portfolio!
-
Go back to the CodePipeline console and select your pipeline (
nextwork-devops-cicd). -
In the pipeline diagram, locate the Deploy stage.
-
Click on the three dots (...) in the top-right corner of the Deploy stage box.
-
Select Start rollback from the dropdown menu.
💡 What does a rollback mean?
A rollback means going back to an earlier, working version of your application - a super useful tool if the latest changes caused problems! In this case, you only rolled back the deploy stage. This means your source code and build stay the same, but the application version deployed to the server is reverted back to how it was before your latest commit.

- In the Rollback to dialog box, select the previous execution ID from the dropdown menu.

- Click Start rollback.

-
Observe the pipeline execution in the CodePipeline console.
-
You should see the Deploy stage now showing Rollback in progress.

- Wait for the Deploy stage to complete the rollback (turn green again).

- The Deploy stage should now be using the commit message from the previous successful deployment, indicating a rollback. Compare this to the commit messages in the Deploy and Source stages - they're still using the latest commit!
💡 In what scenarios would this rollback be useful?
Rolling back only the Deploy stage is useful when the latest deployment has errors, but the source code and build processes are correct and we don't want to undo some valid code and build changes.Scenarios where the deployment might have errors include:
One of your deployment scripts e.g. install_dependecies.sh had a bug that failed to set up the environment correctly.
Your latest deployment started using a new third-party service that is currently down or unstable.
The new deployment had performance issues (e.g. assets were loading slower than expected) that didn't come up during testing.
- You can also check the Stage tab on your Deploy card to see the rollback's success.

-
Refresh your web application in the browser using the same Public IPv4 DNS.
-
The new line you added (
<p>If you see this line, that means your latest changes are automatically deployed into production by CodePipeline!</p>) is now gone! -
The web app should be reverted to the previous version, confirming the rollback.
What a vibe! You've now seen how CodePipeline can automatically revert to a previous version in case of deployment failures.
As a bonus, you can even release the change from the Source stage, and update CodeDeploy again!
Now that we've successfully built, tested, and rolled back our CI/CD pipeline, it's time to clean up the AWS resources we created to avoid incurring any unnecessary costs.
- The CloudFormation stacks
- The CodePipeline pipeline
- The CodeDeploy application
- The CodeBuild project
- The CodeArtifact repository
- The CodeArtifact domain
- The CodeConnection connection
- The IAM roles
- The IAM policies
- The S3 bucketThe development EC2 instance
⭐️ If you deployed your CI/CD infrastructure with your own custom CloudFormation template delete that CloudFormation stack now too! This will save you lots of clean up time ahead.
-
Head to the
CloudFormationconsole. -
Select your deployment EC2 stack.
-
Click Delete.
-
Confirm the deletion by clicking Delete stack.
-
Head to the CodePipeline console.
-
Select Pipelines from the left-hand menu.
-
Select the pipeline named nextwork-devops-cicd.
-
Select Delete.
-
Type delete in the confirmation field.
-
Select Delete.
-
Head to the CodeDeploy console.
-
Select Applications from the left hand menu.
-
Select the nextwork-devops-cicd application.
-
Click Delete application.
-
Confirm the deletion by typing delete and clicking Delete.
-
Head to the CodeBuild console.
-
Select Build projects from the left hand menu.
-
Select the nextwork-devops-cicd project.
-
Click Delete build project.
-
Confirm the deletion by typing delete and clicking Delete.
-
Head to the CodeArtifact console.
-
Select Repositories from the left hand menu.
-
Select the nextwork-devops-cicd repository.
-
Click Delete repository.
-
Confirm the deletion by typing delete and clicking Delete repository.
-
Select Domains from the left hand menu.
-
Select the nextwork domain.
-
Click Delete domain.
-
Confirm the deletion by typing delete and clicking Delete domain.
-
Expand the Settings arrow at the bottom of the left hand navigation panel.
-
Select Connections.
-
Select your connection.
-
Select Delete
-
Confirm the deletion by typing delete and clicking Delete.
-
Head to the
IAMconsole. -
Select Roles from the left hand menu.
-
Search for and delete the following roles:
-
`ec2-instance-nextwork-cicd
-
aws-codedeploy-role -
codebuild-nextwork-devops-cicd-service-role -
AWSCodePipelineServiceRole
-
-
Select Policies from the left hand menu.
-
Search for and delete the following polcies:
-
codeartifact-nextwork-consumer-policy -
CodeBuildBasePolicy-nextwork-devops-cicd -
CodeBuildCloudWatchLogsPolicy-nextwork-devops -
CodeBuildCodeConnectionsSourceCredentialsPolicy-nextwork -
AWSCodePipelineServiceRole
-
-
Head to the
EC2console. -
Select Instances from the left hand menu.
-
Select the
nextwork-devops-yournameinstance. -
Click Instance state, then Terminate instance.
-
Confirm termination by clicking Terminate.
-
Head to the
S3console. -
Select Buckets from the left hand menu.
-
Select the
nextwork-devops-cicdS3 bucket (your build artifacts bucket) -
Click Empty bucket.
-
Confirm emptying the bucket by typing
permanently deleteand clicking Empty bucket. -
Once the bucket is empty, select the bucket again and click Delete bucket.
-
Confirm deletion by typing the bucket name and clicking Delete bucket.
-
🚨 Also delete the bucket created by CloudFormation!
-
CloudFormation automatically creates a new bucket to store templates you upload when you create a new stack. The bucket's name should start with
cf -
CodePipeline also creates a new bucket to store artifacts created in the pipeline. The bucket's name should start with
codepipeline
-
We've learned how to:
-
🚀 Set up a CodePipeline pipeline to automate your software release process.
-
📦 Configure a Source stage to fetch code changes from GitHub.
-
🛠️ Set up a Build stage using AWS CodeBuild to compile your web application.
-
⚙️ Configure a Deploy stage using AWS CodeDeploy to deploy your web application to EC2.
-
💎 Test rollbacks on the deployment - without affecting your pipeline's Source or Build!