Automating Backend Deployment: EKS with Kubernetes - git-muhammad-sadique-i987/projects GitHub Wiki
Welcome to the ultimate hands-on guide to deploying a real-world application with Kubernetes! 🚀
Ever wondered how modern tech companies manage and scale their applications seamlessly? The secret is often a powerful combination of containers and orchestration. In this comprehensive four-part series, we'll journey from a simple backend code repository to a fully deployed, containerized application running on a robust Kubernetes cluster in the AWS cloud.
Forget dry theory! We're diving straight into the practical skills you need, tackling real-world challenges, and building a project that showcases your cloud-native expertise. By the end of this series, you won't just know the "what" – you'll master the "how" and "why" of modern application deployment.
Let's get building! ✨
We've broken down this project into four manageable parts, each building on the last:
- Part 1: Launch a Kubernetes Cluster 🌠 - We'll start by provisioning our own production-grade Kubernetes cluster using Amazon EKS, the heart of our application's new home.
- Part 2: Set Up for Deployment 📥 - We'll take a backend application from GitHub, containerize it using Docker, and store our container image in Amazon ECR, getting it ready for deployment.
-
Part 3: Create Kubernetes Manifests 📝 - We'll craft the all-important
DeploymentandServicemanifest files. These YAML blueprints tell Kubernetes exactly how to run and expose our application. -
Part 4: Deploy the Backend! 🚢 - In the final leg, we'll use
kubectlto deploy our application to the EKS cluster, bringing our backend to life and verifying its success.
Get ready to work with the industry-standard tools that power the cloud:
- Cloud Platform: Amazon Web Services (AWS)
- Compute: Amazon EC2
- Container Orchestration: Amazon EKS (Elastic Kubernetes Service)
-
Kubernetes Tooling:
eksctl,kubectl - Containerization: Docker
- Container Registry: Amazon ECR (Elastic Container Registry)
-
Infrastructure as Code: AWS CloudFormation (used under the hood by
eksctl) - Identity & Access: AWS IAM (Identity and Access Management)
- Version Control: Git and GitHub
Credits
This project structure and learning methodology comes from NextWork.org - an exceptional platform for DevOps practitioners who believe in learning through building. Their project-based AWS/Kubernetes track provided the foundation for this implementation.
In part ONE of our four-part Kubernetes series, we will launch a Kubernetes cluster. The end goal of this whole project is to deploy a containerized app 🚀
In this project, we'll deploy our first Kubernetes cluster, learning what it does and why people love it along the way.
Get ready to...
- 🌠 Launch and connect to an EC2 instance.
- ✨ Create your very own Kubernetes cluster.
- ☁️ Monitor cluster creation with CloudFormation.
- 🔑 Access your cluster using an IAM access entry.
- 💎 Test the resilience of your Kubernetes cluster.

By setting up our very own EC2 instance, which we'll use to send commands to Kubernetes in this project series.

In this step we are going to:
-
Launch an EC2 Instance
-
Connect to our EC2 Instance so that we can start sending commands Launch an EC2 Instance
-
Log into our AWS Management Console as IAM Admin user.
-
Head to EC2 in our AWS Management Console.

- Select Instances at the left hand navigation bar.
- Check that you're using the AWS Region that's closest to you. Select the Region name at the top right corner of your console if you'd like to switch.

- In your EC2 console, select Instances from the left hand navigation panel.
- Choose Launch instances.

-
Let's set up our EC2 instance.
-
In Name, enter the value
nextwork-eks-instance. -
Choose Amazon Linux 2023 AMI under Amazon Machine Image(AMI).

- Leave t2.micro under Instance type.

- For the Key pair (login) panel, select Proceed without a key pair (not recommended).

💡 What is a key pair?
A key pair is like a lock and a key for your EC2 instance. Usually you'd need a key pair to SSH connect to your instance, but we're using a simpler way to do this later in this step (EC2 Instance Connect).
- We won't change anything in the Networking section and keep the default security group.
- Notice that the security group allows SSH traffic from anywhere (0.0.0.0/0) which isn't the best security practice, but we'll leave this to make connecting via SSH easier later on.

- Choose Launch Instance.
- The EC2 instance has been launched successfully.
Now that our EC2 instance is up and running, let's connect to it using EC2 Instance Connect.
💡 What is EC2 Instance Connect?
EC2 Instance Connect is a shortcut way to get direct SSH access to your EC2 instance. Instead of having to manage a key pair manually, Instance Connect connects you to your instance within your AWS Management Console - no download required!💡 Extra for PROs: Why are we using EC2 Instance Connect?
When you connect via SSH to an EC2 instance, you usually need to:
- Generate a key pair.
- Associate the public key with your EC2 instance.
- Securely store your private key on your local machine.
- Set up an SSH client (a software that can handle the SSH protocol, like Terminal on Max/Linux or VS Code).
- Provide your private key and run ssh commands to set up an SSH connection to your EC2 instance.
EC2 Instance Connect lets us skip all those steps and connect to your EC2 instances directly using the AWS Management Console. We'd use the usual, manual way when we have some development work to do, but Instance Connect is great if we're just running a few commands in the terminal.

- Select the instance you just launched.

- Select the checkbox next to nextwork-eks-instance.
- Select the Connect button.

Welcome to the instance connection page! This is where AWS gives you different options to connect with your EC2 instance.

💡 What is the yellow warning banner about Port 22?
Good spotting! That warning banner is a security reminder from AWS.Port 22 is the default port for SSH (Secure Shell) connections, which is what we use to connect securely to our EC2 instance.
Back when we set up our EC2 instance, we used the default security group which allows SSH access from any IP address. This opens your instance to the entire internet, which makes it more vulnerable to attacks.
- Select Connect at the bottom of the page.
- This will open a terminal session directly in your browser in a new tab.

Now for the main event – creating our Kubernetes cluster with Amazon EKS! We'll use a handy command-line tool called eksctl to create a cluster within your EC2 instance's terminal.
💡 What is Kubernetes?
Kubernetes is a tool that helps you manage your running containers.Once you've created containers (e.g. using Docker), Kubernetes helps keep them running smoothly by automatically handling tasks like load balancing, scaling, and restarting containers if they fail. It doesn’t build the containers—that’s Docker’s job—but it’s great for keeping them running without you having to do it manually.
💡 What is Amazon EKS?
While Kubernetes makes it easier to work with containers, Amazon EKS makes it easier to work with Kubernetes itself!Setting up Kubernetes from scratch can be quite a time consuming and complex thing to do, because you'd need to configure Kubernetes' networking, scaling, and security settings on your own. Amazon EKS handles all of these set up tasks for you and helps you integrate Kubernetes with other AWS services.
eksctl is a tool specifically for working with EKS in the command line (more on this soon).

In this step we are going to:
- Attempt to create an EKS cluster (and run into an error)!
- Install a tool for creating Kubernetes clusters called eksctl.
Let's try creating a cluster right away.
- In your EC2 Instance Connect window, run this command:
eksctl create cluster \
--name nextwork-eks-cluster \
--nodegroup-name nextwork-nodegroup \
--node-type t2.micro \
--nodes 3 \
--nodes-min 1 \
--nodes-max 3 \
--version 1.31
💡 What does this command do?
This command is meant to set up a Kubernetes cluster! We'll dive into the specifics of this command and Kubernetes in just a second.
We saw an error message saying something like eksctl not found.

This is expected! It means we haven't installed eksctl yet.
💡 What is eksctl?
eksctl is an official AWS tool for managing Amazon EKS clusters in your terminal. It's much, much easier to use compared to setting up a Kubernetes cluster using the AWS CLI!If we were using the AWS CLI, we'd have to create a lot of other components manually before getting to deploy a cluster.
- Run these commands in your terminal:
curl --silent --location "https://github.com/weaveworks/eksctl/releases/latest/download/eksctl_$(uname -s)_amd64.tar.gz" | tar xz -C /tmp
sudo mv -v /tmp/eksctl /usr/local/bin

💡 What do these commands do?
The commands here download and install eksctl on your EC2 instance.The first commands downloads the latest eksctl release from GitHub, then the second command moves it to a directory that lets you run eksctl from anywhere in your terminal.
- Check that eksctl is installed correctly by running
eksctl version. You should see the version number printed in the terminal.

Now that eksctl is all installed, let's give launching an Kubernetes cluster on EKS another go. We'll also learn about giving your EC2 instance the permission to run AWS commands!
🚨 Creating a Kubernetes cluster and using EKS is not AWS Free Tier eligible, so expect to spend $0.10 USD for every hour you leave your EKS cluster running once it's created.
Make sure to follow all the deletion instructions at the end of this project to minimise costs for this project.

In this step we are going to:
- Attempt to create an EKS cluster (and run into an error again)!
- Set up your EC2 instance's IAM role.
- Create an EKS cluster using eksctl.
Now that eksctl is installed, let's try creating our cluster again.
- Run this command:
eksctl create cluster \
--name nextwork-eks-cluster \
--nodegroup-name nextwork-nodegroup \
--node-type t2.micro \
--nodes 3 \
--nodes-min 1 \
--nodes-max 3 \
--version 1.31 \
--region [YOUR-REGION]- Make sure to replace [YOUR-REGION] in the last line of the command with your AWS region code, e.g. us-west-2. Make sure the region you pick is same region where you launched your EC2 instance.

💡 Dang it! What's the error this time?
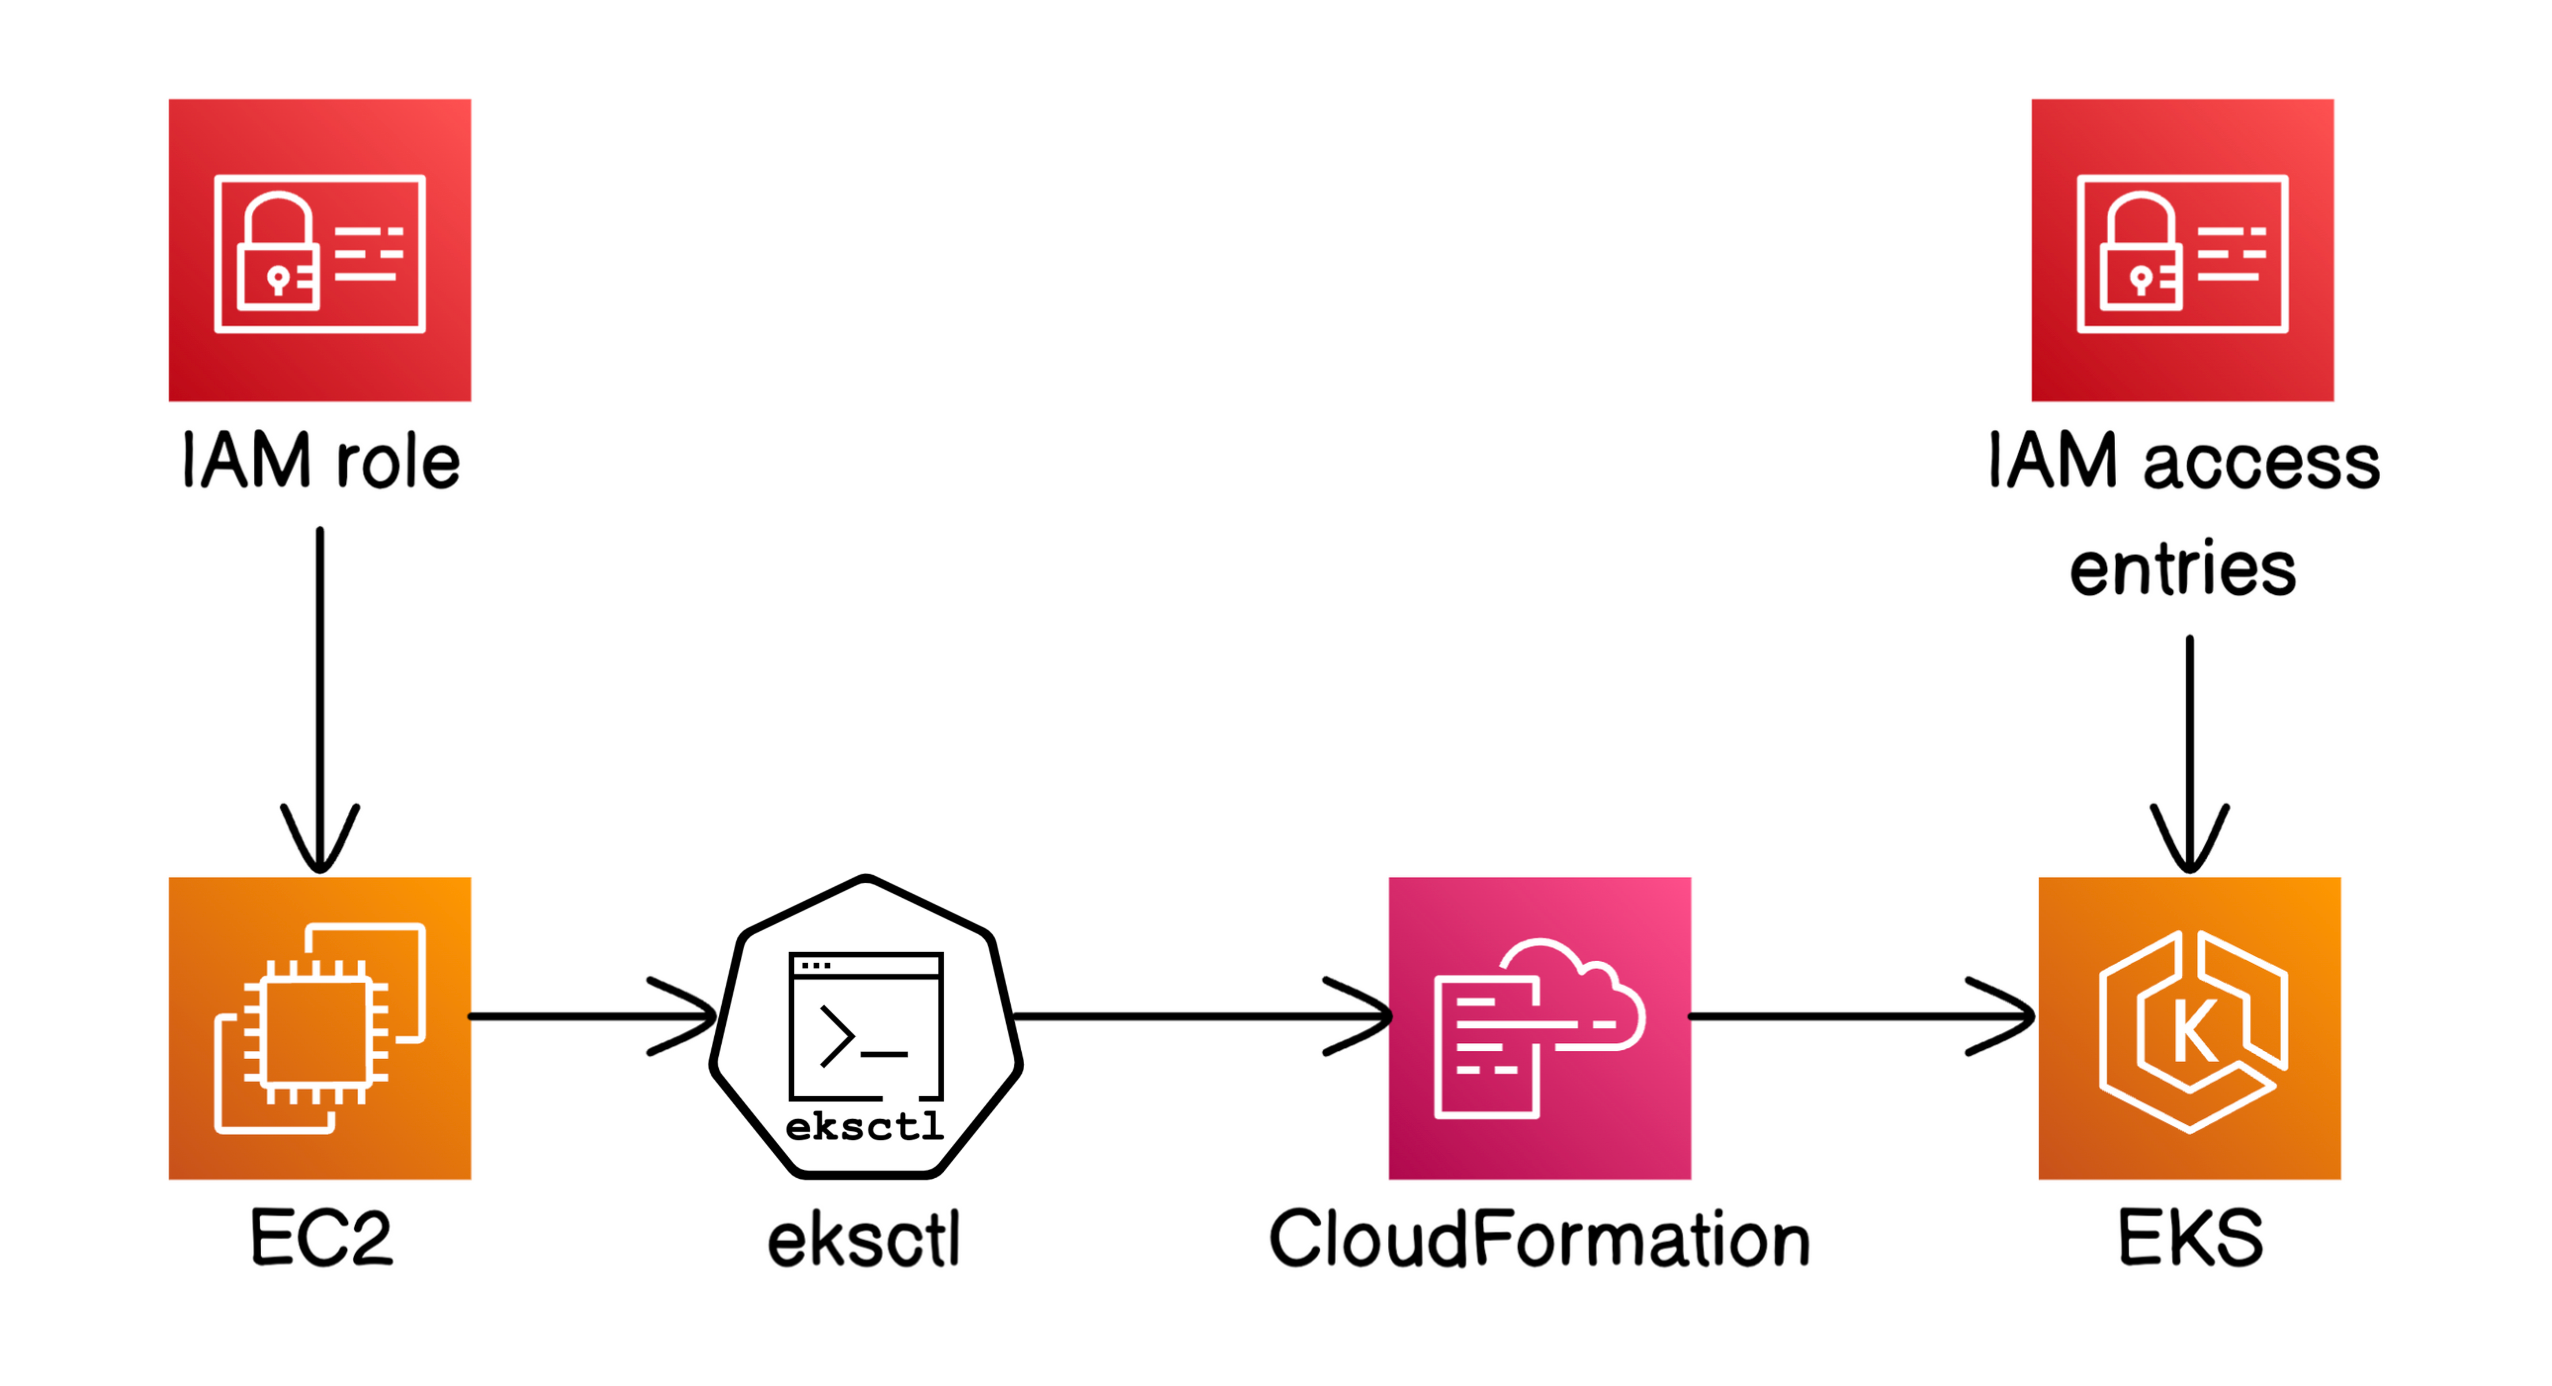
Your EC2 instance doesn’t have the permission to create an EKS cluster. By default, you can think of your EC2 instance as another computer that isn't 'logged in' or has access to your AWS Account yet.We’ll need to set up an IAM role that lets your EC2 instance communicate with services like EKS to create the cluster.
Let's resolve this permissions error by setting up a new Role in AWS IAM.
- In a new tab, head to your AWS IAM console.

- Select Roles from the left hand sidebar.
- Select Create role.

- Under Trusted entity type, select AWS service to tell AWS that we're setting up this role for a AWS serice (Amazon EC2).
- Under Use case, select EC2.

- Select Next.
- Under Permissions policies, we'll grant our EC2 instance AdministratorAccess.
💡 What does this permission policy mean?
This gives your EC2 instance the power to access any AWS resource and service in your AWS account.A super powerful move, which your EC2 instance will need when it deploys and manages your Kubernetes cluster (your instance will be using a lot of different services).
💡 Extra for PROs: Is granting Administrator Access best practice?
Great question! Granting Administrator Access is powerful but not ideal for long-term use. We’re using it now because we don’t know all the services that will be involved in the project yet.Granting the most powerful permissions now means we avoid running into permission issues that could slow us down. Once we know which services your EC2 instance really needs for this project to work, we can dial back to more specific, secure settings.
Solution Architects typically plan security settings before they build anything, aiming to follow the principle of least privilege—only giving the exact permissions needed for the job.

- Make sure the AdministratorAccess option is checked, and select Next.
- Let's give this role a straightforward name - nextwork-eks-instance-role
- Enter a short description:
Grants an EC2 instance AdministratorAccess to my AWS account. Created during NextWork's Kubernetes project.

- Select Create role.
Great! our new role is born. Now we'll add this role to our EC2 instance.
- Head back to the Amazon EC2 console.
- Select Instances from the left hand sidebar.
- Select the checkbox next to your nextwork-eks-instance EC2 instance.
- Select the Actions dropdown, and then Security -> Modify IAM role.

- Under IAM role, select your new nextwork-eks-instance-role role.
- Select Update IAM role.

Create your EKS cluster agains (third time lucky)!
- Still in your browser, head back to your EC2 Instance Connect tab.
- Let's run the command to kick off our Kubernetes cluster one more time
- Still in your browser, head back to your EC2 Instance Connect tab.
- Let's run the command to kick off our Kubernetes cluster one more time.
eksctl create cluster \
--name nextwork-eks-cluster \
--nodegroup-name nextwork-nodegroup \
--node-type t2.micro \
--nodes 3 \
--nodes-min 1 \
--nodes-max 3 \
--version 1.31 \
--region [YOUR-REGION]- Make sure to replace [YOUR-REGION] in the last line of the command with your AWS region code, e.g. us-west-2. Make sure the region you pick is same region where you launched your EC2 instance.
💡 What does this command do?
We'll learn all these terms over the rest of this project, but as a sneak peek, this command will:
- Set up an EKS cluster named nextwork-eks-cluster.
- Launch a node group called nextwork-nodegroup.
- Use t2.micro EC2 instances as nodes.
- Start your node group with 3 nodes and automatically scale between 1 (minimum) and 3 nodes (maximum) based on demand.
- Use Kubernetes version 1.31 for the cluster setup.

Check the time on your computer now. Don't forget that EKS charges $0.10 for every hour your cluster is running.
💡 What is Kubernetes?
Kubernetes is a container orchestration platform, which is a fancy way to say that it coordinates containers so they're running smoothly across all your servers. It makes sure all your containers are running where they should, scales containers automatically to meet demand levels, and even restarts containers if something crashes.It’s THE standard tool for keeping large, container-based applications steady and easy to scale with traffic. That's why big tech companies, startups, and developers worldwide use Kubernetes.
💡 Why do people use Kubernetes?
Without a tool like Kubernetes, you would create and manage every container manually. You’d have to start each container yourself and keep an eye on them to restart any that crash.Traffic to your app going up or down would mean turning containers on or off one by one, and you’d also have to make sure each container has access to storage if it needs it. Updating your app would mean carefully swapping out containers without causing downtime.
As you might imagine, managing hundreds or thousands of containers this way would be a huge amount of work and hard to get right all the time. Kubernetes takes care of all these tasks automatically, so you can focus on building your app's features instead.
Let's take a tour around the AWS Management Console to see how AWS actually creates a Kubernetes cluster. What happens under the hood when you ran eksctl create cluster?

In this step, you're going to:
- Use CloudFormation to track how your cluster is getting created.
- In a new tab, head to the
CloudFormationconsole.

💡 What is CloudFormation?
CloudFormation is AWS’s service for setting up infrastructure as code. You write a template describing the resources you need (like an instruction manual), and CloudFormation handles creating and configuring those resources.💡 Why are we in CloudFormation?
eksctl actually uses CloudFormation under the hood to create your EKS cluster.When you ran the eksctl create cluster command, eksctl sets up a CloudFormation stack to automate the creation of all the necessary resources for the EKS cluster.
 When you ran the eksctl create cluster command, eksctl sets up a CloudFormation stack to automate the creation of all the necessary resources for the EKS cluster.
- In the Stacks page, notice that there is a new stack in progress! The stack should be called eksctl-nextwork-eks-cluster-cluster.
- Select the stack, and track the Events tab.

💡 What are these Events about?
The Events tab gives you a timeline of each action CloudFormation is taking to set up your resources. It’s a live update of what’s happening, which can be helpful for tracking progress or identifying any issues that come up during creation.You can even select the Refresh button at the top of the panel to watch new updates come through on your stack's resources.
- Now select the Resources tab.
- Woah! Lots of resources are getting created here.

💡 What are these resources?
You might notice in your Resources tab all sorts of networking resources - VPC, subnets, route tables, security groups, NAT gateways and internet gateways!These resources set up a private, secure network for your containers to connect with each other and the internet while keeping your app private. It's not required for this project that you understand all these components.
Note that this is one of the big reasons why you'd pick eksctl over the AWS CLI - if we were using AWS CLI, we'd have to create each of these resources manually!
💡 Extra for PROs: Why can't I just use my account's default VPC?
While you could use your AWS account's default VPC, you might need to manually set up new VPC resources and edit a few settings to make it work for a Kubernetes cluster. eksctl creates a whole new VPC for us to let us start fresh.
 💡 Extra for PROs: Why can't I just use my account's default VPC?
- You might also notice a NEW stack pop up in the Stacks page. This should pop up 10-12 minutes from the time you ran the create cluster command.

💡 Why is there a second stack?
The second stack is specifically for your node group, which is a group of EC2 instances that will run your containers.CloudFormation separates the core EKS cluster stack from the node group stack to make it easier to manage and troubleshoot each part independently, especially if one half fails.
💡 What's the difference between a cluster and a node group?
Think of a cluster as the entire environment that Kubernetes manages for your containerized app. This cluster is made up of nodes (the servers that actually run your containers) and a control plane (the brain that decides things like when to create or shut down containers).
Within your cluster, the nodes are organized into node groups. Node groups let you manage multiple nodes more easily by grouping them together, so you can control settings like instance type and resource limits for the whole group instead of adjusting each node individually. This makes it much simpler to scale and configure nodes for specific tasks.
 Think of a cluster as the entire environment that Kubernetes manages for your containerized app. This cluster is made up of nodes (the servers that actually run your containers) and a control plane (the brain that decides things like when to create or shut down containers).
- Select the nodegroup stack, and open up the Events tab to get a preview of what being deployed.
- Wait until the first stack i.e. eksctl-nextwork-eks-cluster-cluster is in CREATE_COMPLETE status.

If our second stack isn't complete yet, that's okay - we can still head to the next step in the meantime!
Now that our EKS cluster is ready, let's see it using the AWS Management Console.

In this step, you're going to:
- Open the EKS console.
- Grant yourself the permissions to interact with your cluster.
- In a new tab, open up the EKS console.
- Select the new nextwork-eks-cluster cluster you just created.
- Welcome to your EKS cluster's dedicated page!
- Select the Compute tab.
- Scroll down to the Node groups panel - aha, it's getting created!

- If it's been some time since you ran your create cluster command, you might even notice that it's already in Created status.
- Scroll back up to the top of your cluster's page. Notice that there are two banners in blue.

💡 What are these two banners saying?
The two blue banners in the EKS console are letting you know that while you have created a node group, you might not have the permission to see the nodes inside.💡 But my IAM User has AdministratorAccess - how could it not have permission?
AWS permissions alone don’t automatically carry over to Kubernetes — Kubernetes has its own way of managing access within a cluster.Even if you have AdministratorAccess in AWS, which grants full access to AWS resources, Kubernetes will only let you into different parts of the cluster if you have permissions under its own system too.
Let's learn about this system and grant ourselves access now!
- Select Create access entry at the blue banner at the top of the page.
🙋♀️ I don't see that top banner
No problemo! There's a second way to get to the same place:
- Head to the Access tab
- Under IAM access entries, select Create access entry.
💡 What are IAM access entries?
IAM access entries connect AWS IAM users with Kubernetes’ Role-Based Access Control (RBAC), which is Kubernetes' system to manage access inside a cluster.In short, your IAM Admin user (the one you're using to open this Management Console) needs a specific access entry to get access to the nodes in your EKS cluster.
Nice work, we can now set up an IAM access entry.
- Under IAM Principal, select your IAM user's ARN. Double check your IAM Admin's name at the top right corner and make sure it matches your ARN.

-
Select Next.
-
Under Policy name, select
AmazonEKSClusterAdminPolicy.

💡 What does this policy do?
The AmazonEKSClusterAdminPolicy gives you full administrative rights over your EKS clusters. Your IAM user will be able to see and control all parts of your EKS cluster - inclusding all the nodes inside!
- Select Add policy.
- Select Next.

- Select Create.
- Head back to your cluster's page.

- Select the refresh button on the console. You should now see your nodes listed under your node group.
💡 Why are there three nodes but one node group?
The node group is a group of nodes that share the same configuration, like instance type and scaling settings. In this case, our node group has three nodes, which means there are three EC2 instances that will run containers like a single unit.🙋♀️ I don't see any nodes
Totally possible!
- Head back to your CloudFormation console.
- Is your nodegroup stack in CREATE_COMPLETE too? If not, wait a few more moments.
- Is your nodegroup cluster showing ROLLBACK_COMPLETE? Select the Events tab for that Stack and select Detect root cause to check why it's failed.
Nice work creating your very first Kubernetes cluster with Amazon EKS!
Well done on setting up the basics of Amazon EKS. You'll go through this process of creating an EKS cluster again in the next project of this Kubernetes series.
Give yourself a pat on the back – that's no small feat.
We have learned how to:
- 🌠 Launch and connect to an EC2 instance.
- 🛠️ Install and use eksctl to create an EKS cluster.
- ☁️ Track cluster creation using CloudFormation.
- 🔑 Manage IAM access policies.
Welcome to part TWO of your four-part Kubernetes with AWS series.
Now, picture this: a team member just developed an entire application and shared the GitHub repository of the app's backend.
Are you ready to pull the app's backend from GitHub and prepare it for deployment with Kubernetes? Let's go!

By the end of this project, we will...
- 📥 Clone a backend application from GitHub.
- 💿 Build a Docker image of the backend.
- 🗃️ Push your image to an Amazon ECR repository.
- 🤯 Troubleshoot installation and configuration errors
- 💎 Dive into the backend code on GitHub.
Let's kick things off by setting up our environment! We'll launch an EC2 instance, which is where we'll send commands to EKS and other tools. Then, we'll create our EKS cluster.
In this step, you're going to:
- Launch and connect to an EC2 instance.
- Set up eksctl and your instance's AWS credentials.
- Create an EKS cluster.

To go through all these steps follow part 1 of this project Automating Backend Deployment - EKS with Kubernetes#Part-1. Launch a Kubernetes Cluster - once you finish setting up EC2 and EKS we are ready to step into the next phase which is - Pull the Code for your Backend. Lets dive in!
Now that our EKS cluster is spinning up, let's find the app backend that we want to deploy. Your team member has pushed the backend code into GitHub repository, so let's start there!
💡 What is 'backend'?
The backend is the "brain" of an application. It's where your app processes user requests and stores and retrieves data. Unlike frontend code, which is what users see and interact with, backend code works on the server side (i.e. in the background) to make sure your app behaves as expected (e.g. loads a new page) when a user does things like clicking on buttons.
In this step, you're going to:
- Install Git.
- Make a copy of application code from GitHub.

- While your EC2 instance is busy with creating your cluster, head back to the EC2 console.
- Select your EC2 instance nextwork-eks-instance-role, and select Connect again.
- Start a new EC2 Instance Connect session with your instance

💡 Woah, I can connect to the same instance twice... at the same time?
It's true—you can open multiple SSH sessions to the same EC2 instance at the same time.This can be super helpful when you want to multitask or monitor logs while running commands in another session. And don’t worry, it doesn’t pause any progress in your other windows.
Let's clone our team member's backend repository.
💡 What does cloning mean?
When we say "clone a repository," we mean creating a full copy of a repository's code stored remotely (in this case, in GitHub) to your machine (in this case, our EC2 instance).This way, you get access to all the files and code without having to manually copy and paste.
In a new tab, visit your team member's GitHub repository.

- Select Code to reveal the instructions for cloning their repository.
- Copy the HTTPS URL.

-
Head back to your EC2 Instance Connect tab.
-
In the terminal, run the command to clone your team member's repository. Replace [GITHUB-URL] with the HTTPS URL you've copied:
git clone [GITHUB-URL]
# Example
git clone https://github.com/NatNextWork1/nextwork-flask-backend.git
- Whoops! You'll probably get an error here...

💡 What is this error about?
The terminal response "Git command not found" means you don't have Git installed in your EC2 instance. You'll need to install it first to clone a GitHub repository.Tip: It's helpful to note that "command not found" typically means you haven't installed the tool you're trying to use!
- Install Git:
sudo dnf update
sudo dnf install git -y

- Verify you've downloaded Git by checking for its version:
git --version
- Configure Git by running the command below. Make sure to replace the placeholder values with your name and email:
git config --global user.name "NextWork"
git config --global user.email "[email protected]"
- Now we should be able to clone the repository:
git clone https://github.com/NatNextWork1/nextwork-flask-backend.git💡 What am I cloning?
You are cloning the nextwork-flask-backend repository from GitHub. This repository contains all the backend code needed for your application, including files like app.py, Dockerfile, and requirements.txt.By cloning this repository, you're copying all the code and resources onto your EC2 instance so you can build, run, and deploy the backend part of your project.
Once you've cloned it, the project will look like a new folder in your EC2 instance with the entire project's files inside.
- Run ls, which is the Linux command to list all files and subdirectories in your current directory.
- Confirm that you have a new folder called nextwork-flask-backend in your EC2 instance now.

💡 Why does the repository name say 'flask'?
The repository is named with flask because the backend code is built using Flask, a web framework for Python that developers use to create backend services or APIs quickly. It's called a "framework" because Flask comes with templates for building web applications, making it easier to create features like handling HTTP requests managing databases.
Nice work, seeing the folder means you've successfully cloned your team member's backend code!
Great, we've got our team member's code sitting in our EC2 instance.
On to deployment?! 👀
Oooo not so fast. When you deploy a containerized app to Kubernetes, Kubernetes needs to pull the app from a container image that it can access.
💡 What is a container image?
A container image is like a blueprint that contains all the instructions, code, libraries, and dependencies needed to run the application. Note that on the other hand, a container is the running instance created from that image, bringing the application to life and running it in an environment.

In this step, you're going to:
- Build a container image of the backend.
- Resolve four installation and configuration errors.

To build a container image, run the following command in your EC2 instance's terminal:
docker build -t nextwork-flask-backend .💡 What does building an image mean?
When your team member prepared the app's backend, they wrote a file called a Dockerfile and stored it inside the GitHub repository that they shared with you. A Dockerfile contains instructions on how to build a container image that packages up an app (in this case, the backend) and all its dependencies.Building an image means you're creating a container image using the Dockerfile that your team member prepared. When you ran the docker build command, you were asking Docker to read the instructions in the Dockerfile and build the container image for you accordingly.
The container image lets Kubernetes set up multiple, identical containers so your application runs consistently across different environments. Whether you're deploying in development, testing, or production, your app behaves the same way because Kubernetes refers to your image each time a new instance/node needs to be created.
💡 What do these commands do?
-t nextwork-flask-backendnames your container imagenextwork-flask-backend, and the.tells Docker to find the Dockerfile in the current directory.


- ! An error

💡 What is this error about?
Remember what a "command not found" error usually tells you?Building a container image using Docker won't work as Docker isn't installed in your EC2 instance yet.
- Install Docker:
sudo yum install -y docker
💡 What is Docker?
Docker is the tool we're using to build a container image of our backend. In general, you'd use Docker to create containers and container images, while Kubernetes coordinate multiple containers (clusters) running the same/related applications.
- Start Docker:
sudo service docker start
- Run the command to build your container image again:
docker build -t nextwork-flask-backend .
💡 What! What's the error this time
The command fails because ec2-user, which is the user you've used to access this instance, doesn't have permission to run Docker commands. When Docker was installed, it was set up for the root user.The previous Docker commands you ran worked because they're prefixed with
sudo, which lets a non-root user run commands with root user rights. But, it's good practice to give your ec2-user the permission instead of usingsudoeach time.💡 Why am I logged in as ec2-user instead of the root user?
When you launch an EC2 instance using certain AMIs like Amazon Linux, the default user for SSH access is ec2-user. This user comes pre-set up with the AMI as a normal user that's allowed to have root user privileges if you run a command withsudo.When you access your instance as ec2-user, it’s like logging into an AWS account as an IAM admin user—you’ve got a lot of control but not the absolute top level unless you're using sudo. If you need to run Docker commands, those require root privileges because Docker needs root-level access to create containers or build container images.
- To confirm which user you're using in the terminal, run the command
whoami - You should see ec2-user in the terminal response.

- Add ec2-user to the Docker group:
sudo usermod -a -G docker ec2-user💡 What is the Docker group?
The Docker group is a group in Linux systems that gives users the permission to run Docker commands. By default, only the root user can run Docker commands. When you add a user (e.g., ec2-user) to the Docker group, it lets that user run Docker commands without typing sudo every time.💡 What does this command do?
The commandsudo usermod -a -G docker ec2-useradds the ec2-user to the docker group.
usermod is used to modify a user's account in the system. It allows you to update attributes like their groups, home directory, login name, and more.
The -a flag (append) makes sure your user doesn't get removed from any other groups they might already belong to. Without -a, the user would be removed from all groups not listed in the command.
The -G flag (group) specifies the groups a user should be added to. In this case, it's the docker group.
- Restart your EC2 Instance Connect session by refreshing your current tab.
💡 Why are we refreshing our tab?
User group changes don’t take effect until you start a new session, so reconnecting to your EC2 instance makes sure your ec2-user picks up the new docker group permissions.

- Make sure your ec2-user has been added to the Docker group:
groups ec2-user💡 What does this command do?
This command will list all the groups that ec2-user is a part of.If you see docker listed, then ec2-user is in the Docker group and can run Docker commands without using sudo. Nice work!

- Re-run the docker image build command:
docker build -t nextwork-flask-backend .
💡 Another error!
Yup! Your command won't work because your terminal needs a Dockerfile to build a container image, but it can't seem to find one right now...
- Run
lsto find your subdirectories.
💡 What are the results telling me?
The terminal is showing us the directories and files from our EC2 instance's root directory. In this case, we see a subdirectory called nextwork-flask-backend.This is the cloned GitHub repository that contains our backend application code and its related files, like the Dockerfile. To build the Docker image, we need to navigate our terminal into the nextwork-flask-backend subdirectory. Otherwise, Docker can't find a Dockerfile to build your container image.
- Navigate to the application directory, which contains the Dockerfile:
cd nextwork-flask-backend- Run
lsto see the contents inside nextwork-flask-backend.

- The terminal should show you all the files inside nextwork-flask-backend, which should include the Dockerfile.
- Run the command to build your Docker image again:
docker build -t nextwork-flask-backend .- The command works now. Watch your terminal update as Docker builds the container image.

Now that your container image is all built, where should Kubernetes find your container image?
Container registries, like Amazon Elastic Container Registry (ECR), are storage spaces for container images. They give container images somewhere to live so they can be accessed by Kubernetes/other services.
💡 Recap: Why are we using Docker and ECR?
We’re using Docker to package up the backend and then pushing that container image to Amazon ECR (Elastic Container Registry). When it's time for Kubernetes to deploy your application, Kubernetes can just pull the image directly from ECR.This setup is the standard way for deploying containerized apps with Kubernetes (instead of deploying code on your local machine) because it helps with consistency and scaling.
In this step, get ready to:
- Store the Docker image of your backend in ECR.
- Create a new Amazon ECR repository using this command:
aws ecr create-repository \
  --repository-name nextwork-flask-backend \
  --image-scanning-configuration scanOnPush=true \
💡 Why are we using ECR?
Amazon ECR (Elastic Container Registry) is a container registry service by AWS, which means you use it to securely store, share, and deploy container images.ECR is an excellent choice for storing your container image because it's an AWS service, which lets Elastic Kubernetes Service (EKS) deploy your container image with minimal authentication setup.


💡 Woah! What does the terminal's response mean?
This response confirms that your ECR repository has been created - it's ready for you to push Docker images!💡 Extra for PROs: Here's a breakdown of the terminal response
repositoryArn: The Amazon Resource Name (ARN) i.e. unique ID for your ECR repository.
repositoryUri: This is the URL you'll use to push and pull container images. It shows where your images will be stored.
repositoryName: The name you've given to your repository—in this case,nextwork-flask-backend.
imageTagMutability: Whether image tags are mutable or immutable. "MUTABLE" means you can overwrite which image has a tag e.g. the latest tag can be taken by a newer image at any time.
imageScanningConfiguration: Whether images will be scanned for vulnerabilities when pushed.
encryptionConfiguration: Your images are encrypted using AES256 for security.
- In a new tab, head to the ECR console.
- Confirm that you can see a new repository called nextwork-flask-backend!

Nice, our Amazon ECR repository is live. We're ready to push our container image into ECR!
- Select your new repository.
- Select View push commands.
💡 What is a push command?
A push command in Amazon ECR is used to upload your Docker container images to an ECR repository.

- Copy the first command.

- Run the command in your EC2 Instance Connect window.

- Head back to your ECR console's push commands window.
- We've already built out container image so we can skip the second command.
- Copy the last two push commands.

- Run the last two in your EC2 Instance Connect terminal to tag and push your container image.

💡 What do tagging and pushing the image do?
Since your ECR repository can hold many versions of the same container image, tags help you keep things organized. Tagging your Docker image is like giving it a nickname so you can easily refer to a specific version.Here, we're tagging our Docker image with latest so Kubernetes knows where it can find the right container image version when it’s time to deploy.
Pushing uploads the tagged image to a remote repository. In our case, we've just uploaded our container image to our ECR repository!
- Head back to the ECR console.
- Close the push commands window.
- Select the refresh button to refresh your console.

- Wooo! Confirm that a new container image is in your console now.

💡 Does Kubernetes only run containerized applications from a repository?
Nope, Kubernetes doesn’t have to pull container images from a remote repository like ECR or Docker Hub.But using a container registry is a great way to deploy containerized apps. Your cluster can pull whatever is the latest image in your repository on demand, which makes deployments stay consistent across all nodes automatically.
If you didn't use a container registry, you’d need to preload every node in your Kubernetes cluster with the image. You'd also need to update each node manually with every change to your container image.

In this section we will explore the backend repository we cloned. By the end of this section, we’ll truly know what was inside the Docker image we built and pushed in this project.
In this section we are going to:
- Open the backend repository on GitHub.
- Explore the three files that make up the backend.
To show you what the backend does, imagine that your team member sends you a link to Search Hacker News and asks you to enter a search query in there.
💡 What is Search Hacker News?
Hacker News is an online platform and community where you can read and discuss tech-related news and industry trends.Search Hacker News is the Hacker News platform's search engine. You'd use it to quickly find relevant content based on your search terms.
- Open this link to Search Hacker News in a new tab, which already has the search query aws pre-filled: https://hn.algolia.com/?q=aws

- Now try changing the aws part of the URL to other topics like cloud or amazon to see different results.
Your coworker explains that the backend app is a tool that:
- Takes a user’s input (e.g. aws).
- Runs the input as a search query in Hacker News Search.
- Processes the search results and formats them into JSON data.
Although we haven't seen the JSON output from our backend yet (since we haven't deployed it), using Search Hacker News now gives you an idea of the type of data the backend will produce.
So how does the backend code do all this? 🤔
Let's find out.
- Open the backend GitHub repository in your browser.

💡 What's in this GitHub repository?
This GitHub repository holds all the source code for your app’s backend.There are three main characters in your backend app's code:
requirements.txt lists the dependencies your app needs.
The Dockerfile provides a set of instructions for building a Docker image for your app.
app.py is the core of your backend. It contains the actual code that determines what your app does and the kind of responses it sends back to the client.
- Look at requirements.txt. This file lists the dependencies your application needs to run properly.

💡 Extra for PROs: Can you break down the dependencies in requirements.txt?
Flask==2.1.3: Flask is the web framework used to build the backend code, which you'll see in app.py.
flask-restx==0.5.1: Our app creates an API using an extension Flask-RESTx so that users or other applications can make requests to our backend.
requests==2.28.1: The Requests library is used to get data from the Hacker News API.
werkzeug==2.1.2: Werkzeug helps Flask handle application-level routing. For example, when a user/service makes a request to our backend, Flask uses its routing system (powered by Werkzeug) to direct that request to the right function in app.py, which then processes the request and responds to it.
- Select the Dockerfile.

💡 What does this Dockerfile do?
The Dockerfile defines how a Docker image of the backend should be built.Notice the contents of this file and how it builds your Docker image step-by-step.
When we talk about the benefits of using container images and containers—such as consistent, reliable deployment across different environments—these commands in a Dockerfile are exactly what make the magic happen!
It installs the necessary dependencies, copies the application code, and sets up the commands a container needs to run to start your Flask app.
💡 Can you break down the commands in this Dockerfile?
FROM python:3.9-alpinesets up the environment for your app by using Python 3.9 on Alpine Linux, which is a very lightweight version of Linux. This keeps your app size small, making it faster to build and run.
LABEL Author="NextWork"adds author metadata to the image.
WORKDIR /app sets /appas the working directory in the container, so the commands in the rest of this Dockerfile will be run from there.
COPY requirements.txt requirements.txtcopies the requirements.txt file from your local machine (i.e. your EC2 instance) into the container's /app directory.
RUN pip3 install -r requirements.txtinstalls the dependencies in requirements.txt.
COPY . .copies all the files from your current directory i.e. requirements.txt and app.py into the /app directory in the container.
CMD ["python3", "app.py"]says the container should run the command python3 app.py to start your Flask app.
- Now select app.py.

💡 What's happening in app.py?
app.py is the main code for your backend. It has three main parts:
Setting up the app and routing: The code starts by importing the Flask framework and tools for creating an API. It defines a route
(/contents/<topic>)that directs incoming requests to the SearchContents class. This means users visiting your backend will need to visit a URL that ends with/contents/<topic>to see any resultsFetching data: In the SearchContents class, the get() method extracts the topic from the URL, sends a request to the Hacker News Search API to find related content, and collects important details like id, title, and url.
Sending the response: The collected data is turned into a formatted JSON response.
💡 What is an API?
An API (Application Programming Interface) is like a bridge that lets different programs talk to each other. It lets one app to ask for data or services from another and get a response.For example, when our backend app runs a search using the Hacker News Search API, it sends a request, gets data back, and processes it into JSON format to return to the user. This helps different parts of software work together easily.
In our own backend app, we also create our own API using Flask. This API takes user input, connects to the Hacker News API to get the data, processes that data, and then sends it back as JSON.
APIs make it easy for our backend to collect data from Hacker News and then share information back to our users and other services.
That's the backend code investigation all done!
Let's wrap up with a quick summary:
- Your app's backend fetches data based on a search topic you enter.
- The backend code uses Flask to connect with an external API (Hacker News Search API) and process the data.
- The backend then sends the data back as formatted JSON.

This the end of this Section
If you followed the project to this point and delete your resources in order avoid cost by AWS - Follow the instructions:
- Delete your EKS cluster using EC2 Instance Connect:
eksctl delete cluster --name nextwork-eks-clusterThis command deletes the EKS cluster and all associated resources! It takes a bit of time before everything's gone, but you can move on to deleting other resources while you wait.
- Head to the EC2 console.
- Select the checkbox next to nextwork-eks-instance.
- Select Instance state -> Terminate (delete) instance.

- Head in the AWS console.
- Select the
nextwork-flask-backendrepository. - Click Delete and confirm.
💡 Please check - is your EKS cluster removed? Is everything in the CloudFormation stack deleted?
Please also check for an Elastic IP address in the EC2 console - some users have been charged by the Elastic IP still being in their account!
We've just learnt how to set up your app for deployment with Kubernetes 🤯
That's awesome! Give yourself a pat on the back.
You've learned how to:
- 👩💻 Use Git to pull the code for the backend of your app.
- 🐳 Build a Docker image of the backend.
- 💿 Push Docker image to ECR.
- 🕵️ Troubleshoot installation and configuration issues.
In the next project of this Kubernetes series, we'll deploy the backend to see your work come to life in a live app!
Welcome to part THREE of your four-part Kubernetes with AWS series.
You've learnt how to prepare an app's backend for deployment in Automating Backend Deployment - EKS with Kubernetes#Part-2. Set Up Kubernetes Deployment.
Now, it's time to create the key files called manifests that tells Kubernetes how to deploy and manage your containerized backend!

By the end of this project, we will...
- 🛫 Set up a Deployment manifest that tells Kubernetes how to deploy your backend.
- 🚚 Set up a Service manifest that tells Kubernetes how to expose your backend to your users.
- 💎 Dive into the details of your manifest files and discover new learnings!
If you are following along, you can continue from here onward. In case you have deleted all your resource and the end of part 2 (Automating Backend Deployment - EKS with Kubernetes#Part-2. Set Up Kubernetes Deployment#Delete Your Resources - (Optional) - than you might want to go back and repeat all the steps till Automating Backend Deployment - EKS with Kubernetes#Part-2. Set Up Kubernetes Deployment#Push your container image to ECR.
With our image safely stored in ECR, we're ready to deploy our application to our EKS cluster. We'll use Kubernetes manifests to tell Kubernetes how we want it to deploy our application.
💡 What are Kubernetes manifests?
Just like a Dockerfile tells Docker how to build a container image, Kubernetes manifest files tell Kubernetes how to run your application in a cluster.They act as blueprints that define the desired state of your app, including which container images to use and how to make your app available to end users or other services.
In this step, you're going to:
- Create the Deployment manifest, which gives Kubernetes instructions on deploying your containerized backend to your Kubernetes cluster.

- Create a new directory from your instance's root called manifests. Run the following commands:
cd ..
mkdir manifests
cd manifests
💡 What are Kubernetes manifests?
Think of a Kubernetes manifest as a set of instructions that tells Kubernetes how to run your app.Manifests are important for deployment because Kubernetes uses this information to know what your app needs, like which containers to run, how many copies to create, and how much memory to allocate.
Without manifests, Kubernetes wouldn’t know how to set up and manage your app automatically. This means you'd have to manually configure each container every time you deploy, which would be confusing, error-prone, and hard to repeat. Manifests make deployment simple, clear, and consistent.
Tip: In general (even outside of Kubernetes), a manifest is an instruction/manual that tells a system how to set up and manage something.
💡 What was the command I just ran?
The commands you ran did three things:
cd ..navigates the terminal out of the amazon-eks-backend folder and back to the root.
mkdir manifestscreates a new directory called manifests.
cd manifestsnavigates the terminal into the newly created manifests directory.
- Create the
flask-deployment.yamlfile:
cat << EOF > flask-deployment.yaml
---
apiVersion: apps/v1
kind: Deployment
metadata:
  name: nextwork-flask-backend
  namespace: default
spec:
  replicas: 3
  selector:
    matchLabels:
      app: nextwork-flask-backend
  template:
    metadata:
      labels:
        app: nextwork-flask-backend
    spec:
      containers:
        - name: nextwork-flask-backend
          image: YOUR-ECR-IMAGE-URI-HERE
          ports:
            - containerPort: 8080
EOF
💡 What is a Deployment manifest?
When you deploy an app with Kubernetes, Kubernetes' job is to set up and manage several copies of your app across different containers in the cluster.A Deployment manifest tells Kubernetes exactly how to manage these tasks. It includes details like the how many copies of your app should run across your cluster, and which settings to apply (e.g. CPU limits, container image, or network settings).
We’re only deploying the backend of our app, but a Deployment manifest can manage multiple components, like frontend servers, databases, and other services; each with its own specific configuration.
💡 How does this command create the Deployment manifest?
The cat command in Linux is a quick way to see what's inside a file or create a new one without opening a text editor.When you use cat with
<< EOF, likecat << EOF > flask-deployment.yaml, you're telling the system: "Take the content I type here and save it in a new file calledflask-deployment.yaml."
💡What's the difference between Kubernetes manifest and Deployment manifest?
In Kubernetes, a manifest is a broad term referring to a YAML or JSON file that describes the desired state of any Kubernetes resource, while a deployment manifest is a specific type of manifest that defines how an application (or a set of applications) is deployed and managed within a Kubernetes cluster. Essentially, a deployment is a specific type of Kubernetes object, and a deployment manifest is the file that defines that object
- Run
nano flask-deployment.yamlin your terminal to see your work.

- Use the arrow keys on your keyboard to navigate down the file.
- Notice the third to last line... is there anything you should replace?

💡 What does the containers section of this file mean?
The containers section tells Kubernetes how it should set up each container that will run inside the pods created by this deployment. It includes:
The name of the container.
The container image to use.
The ports that the container will use, which lets the application communicate within the cluster and with external traffic.
💡 What should I be replacing 'YOUR-ECR-IMAGE-URI-HERE' with?
You should replaceYOUR-ECR-IMAGE-URL-HEREwith the URI of the Docker image you pushed to Amazon ECR. This lets Kubernetes know where to pull the container image from when it deploys your application.
- Head back into your ECR console, and copy the URI of your image tagged latest.

- Use the arrow keys on your keyboard to get to the correct line, and then replace the placeholder text with the URL you've just copied.
- Your updated flask-deployment.yaml file should look like this:

That was your very first manifest file created. We still have one more...
In this step, you're going to:
- Create the Service manifest, which tells Kubernetes how to expose your application and route traffic to it.
- Create the
flask-service.yamlfile:
cat << EOF > flask-service.yaml
---
apiVersion: v1
kind: Service
metadata:
  name: nextwork-flask-backend
spec:
  selector:
    app: nextwork-flask-backend
  type: NodePort
  ports:
    - port: 8080
      targetPort: 8080
      protocol: TCP
EOF
💡 What is a Service manifest?
A Service in Kubernetes is like a traffic controller that makes sure traffic gets to the right pods inside your app.When you create a Kubernetes Service, you're essentially exposing your application i.e. making it accessible to network traffic (from within the cluster or from external sources).
A Service manifest tells Kubernetes to create/update a Service using details like which pods to route traffic to, the type of traffic it should handle, and which ports should be used.
In our case, the Service manifest we created sets up a Service that routes external traffic to port 8080 on pods labeled app: nextwork-flask-backend. This allows traffic from outside the cluster (e.g., your users) to reach your app!
💡 What's the difference between the the Deployment and the Service manifests?
The Deployment manifest focuses on deploying and managing your app inside Kubernetes, while the Service manifest is what you use to expose your app to the outside world or other parts of your system. Both work together to create a fully functional application setup.
Congratulations! You've just learnt how to create your manifest files, which are the final missing pieces for your Kubernetes deployment.
In this section we dive into the details of your Deployment manifest, and share and annotated version back with your team!
💎 Get ready to:
- Review and annotate your Deployment manifest.
By annotating your deployment manifest, you'll gain a much deeper understanding of Kubernetes architecture and how Kubernetes deployments work.
There are new concepts and definitions coming your way, but don't forget that exploring new things is all a part of the learning journey.
Deployment manifest
Let’s begin by taking a closer look at your flask-deployment.yaml file.
- Open it in your text editor:
nano flask-deployment.yamlNow that's we're back in our Deployment manifest, let’s go line by line to break it down.
- Check the first line of the Deployment manifest:
apiVersion: apps/v1

💡 What is
apiVersion?
apiVersiontells Kubernetes which version of its API you’re using to create this resource. Since we’re defining a Deployment, we useapps/v1, which is the version for managing applications.💡 What's an API?
An API (Application Programming Interface) is a way for different software components to communicate with each other.In Kubernetes, the API is how you tell Kubernetes what resources to create, update, or delete.
The apps/v1 API lets Kubernetes know you’re working with applications. Other options include security policies (
policy/v1), storage resources (storage/k8s.io/v1) and more.
- Now let's annotate it to remember what it means!
- Move your cursor to the end of the
apiVersion: apps/v1line, then add:
# Specifies the API version for this Deployment

💡 What does the # do?
The # in a YAML file is used to add comments. Anything written after # is ignored by Kubernetes and is not processed as part of the manifest.
- On to the second line:
kind: Deployment

💡 What is
kind?
kindspecifies the type of Kubernetes resource we’re creating, such as a Deployment or a Service.
kindis a key part of a Kubernetes manifest because it sets the tone for how Kubernetes will process the rest of the file. For example, if the kind is Deployment, Kubernetes will focus on managing and scaling groups of containers. If thekindis Service, Kubernetes will set up networking to expose those groups of containers.
Time to add a comment!
- At the end of your
kind: Deploymentline, add the following comment:
# This is a Deployment object

Nice work, that's the two of the most important lines ticked off.
That was also the last comment we'll provide for you — we’ll let you take the lead on the rest!
- Navigate your keyboard to the next section of your Deployment manifest:

💡 What is metadata?
metadataholds details about the resource, like its name and labels to help organize it.
nameis the unique name we’re giving to this Deployment. Other metadata fields that could get added in a Deployment manifest are labels (e.g. if you wanted to note that this Deployment manifest is for the production environment, you could add anenvironment: productionlabel), descriptions, or a unique ID you'd like to assign it.💡 What is namespace?
Anamespaceis like a virtual "folder" within a Kubernetes cluster. All resources in Kubernetes belong to a namespace, and namespaces help you organize resources by separating them into different groups.In this example, the Deployment is placed in the
defaultnamespace, which is the built-in, catch-all namespace for resources that don’t belong to a specific group.Extra for PROs: In real-world examples, you could use namespaces to split resources across teams or environments i.e.
dev,stagingandprodnamespaces.
- Spice up the lines
metadata:,name: nextwork-flask-backendandnamespace: defaultwith your comments. - Don't be shy and write whatever comes to mind first. You can always edit your comments later! The most important part is to give it a try.

- Once you're ready, head to the next section
spec:
💡 What is spec?
spec stands for specification. This section is the “blueprint” for how Kubernetes should set up and manage this Deployment.The spec section tells Kubernetes things like what type of containers it should use, how many groups of containers it should be running, and any special configurations it needs.
Importantly, the Deployment uses spec to define the desired state of your application, and Kubernetes will constantly work to maintain that state.
- Write your comment next to spec:
- Next up, replicas!

💡 What are replicas?
Replicas are identical copies (or instances) of the app Kubernetes should run. Here, we’re asking for 3 replicas, which means 3 identical Pods will be created.The Deployment is responsible for making sure that if one Pod crashes, a new one is created to maintain 3 replicas. Don't forget that anything under the spec section defines a desired state that Kubernetes will always maintain!
You can scale up replicas to handle increased traffic or scale down to save resources during low-traffic periods.
💡 What is a Pod?
While we've been thinking about a Kubernetes cluster as a bunch of nodes running your containerized applications together, you can zoom in and break down a node even further... introducing Pods!In Kubernetes, Pods are groups of containers that are bundled together so they can work as a unit.
Pods are the smallest things you can deploy - you can't deploy containers on their own; they must be inside a Pod. In more technical terms, this means Pods are the smallest deployable units in Kubernetes.
Containers in a Pod share the same network space and storage so they can communicate and share data more efficiently.
- Note down your comments for
replicas: 3

- Now, scroll down to the
selectorsection:

💡 What is
selector?
Theselectoracts like a filter. Kubernetes looks for Pods with labels that match the filters you define here, and only the Pods that match all of them will be a part of this Deployment.
matchLabelsmatches Pods with a specific label (app: nextwork-flask-backend). WithoutmatchLabels, Kubernetes wouldn’t know which Pods belong to this Deployment!
- Next, scroll down to the
templatesection:
💡 What is
template?
Thetemplateis the blueprint for the Pods that this Deployment will create. It defines exactly how each Pod should look and behave.

💡 What is labels?
labelsare tags that help you organize and identify Pods. Here, every Pod will be labeled withapp: nextwork-flask-backend.Extra for PROs: Remember
matchLabelsfrom the previous section? Note that the label created in this section is exactly the same asmatchLabels!When a Deployment creates new Pods, it uses the
templatesection to define the labels for those Pods. If the labels match thematchLabelsfilter, Kubernetes automatically links those Pods to the Deployment.Kubernetes uses this match to monitor and enforce the desired state of the Deployment. For example, if a Pod crashes or is removed, Kubernetes will create a new Pod with the matching labels to replace it.
If the
matchLabelsand labels don’t align, the Deployment will try to create and maintain the desired number of Pods, but it won’t manage them correctly because it can’t identify them.
- Add your comments for the
templatesection of the Deployment manifest.

- And finally, we've arrived at the spec for the Pods themselves.

💡 What does
specmean here?
You might notice that there was already aspecsection earlier in this manifest!In a Kubernetes Deployment manifest, the two
specsections serve different purposes, because they work at two different levels:
The first
specearlier in this file tells Kubernetes what to do with the Deployment as a whole. It defines things like the number of replicas (Pods) in the Deployment, or which Pods the Deployment should manage (via selector). In other words, it works at the Deployment level.The
specyou see in this template section is the blueprint for the individual Pods that the Deployment will create. It defines what each Pod is running, so it works at the Pod level.💡 What's the difference between the Pod level spec and
template?
Thetemplateis the overall blueprint for Pods, think of it as an "outer envelope" that packages the Pod levelspectogether with metadata likelabelsandnames.The Pod-level
specfocuses only on the containers and operational details of the Pods themselves, such as what’s running inside them and how they behave.
- Write your comments for the Pod's
spec:
      spec:
      containers:
        - name: nextwork-flask-backend
          image: YOUR-ECR-IMAGE-URI-HERE
💡 What is
containers?
containersdefine the actual applications running inside each Pod:
nameis the name of the container.imageis the container image that Kubernetes will use to run the app.
- write your comments on the first half of the
containerssection!

- The last bit of the containers section is all about ports:
          ports:
            - containerPort: 8080
💡 What is
ports?
Aportis like an entry point that allows data to enter or leave an application running inside a container. A container can have many different ports, and each port handles a specific type of traffic.In other words, if your container is a house, the ports are doors, and each door leads to a specific app (or part of an app, e.g. the backend). In Kubernetes, ports allow Kubernetes to map incoming traffic to the correct container inside a Pod.
Typically, a Deployment manifest might have more ports if the app handles multiple types of traffic (e.g., one port for HTTP requests and another for secure HTTPS).
💡 What is
containerPort?
containerPortis the port number used by the app inside the container to send and receive traffic.Here, our backend listens on port 8080, which means it’s ready to receive requests sent to that port. Requests need to specify the correct port to reach the app. If the port is incorrect or missing, the app won’t receive the request.
💡 Extra for PROs: How does a request end up at the right port?
Requests are routed to the correct port through a combination of DNS, port numbers, and Kubernetes Services. Here's how it works:
DNS and IP addressing:
When you visit a website or make a request, DNS translates the domain name (e.g., example.com) to the server's IP address. This makes sure your request is sent to the correct server.Port numbers in the request:
The client (e.g., your browser or API tool) specifies the port number in the request.
Example: http://example.com:8080 explicitly tells the system to send the request to port 8080.
If the port is omitted (e.g., http://example.com), a default port is used (e.g., 80 for HTTP or 443 for HTTPS).
Routing and Services in Kubernetes:
In Kubernetes, Services are responsible for directing traffic to the correct application too.
- Even if external traffic arrives on a different port, you can set up the Service to forward it to the correct containerPort inside the container.
- Finish off your annotations with a comment on the containerPort line

That's your Deployment manifest all annotated.
Notice how as we move down the Deployment manifest file, we’re essentially peeling back layers of Kubernetes’ architecture, going from the API level all the way down to the container level.
- At the very top of the file, we’re interacting with the Kubernetes API, which is the interface that lets us define resources. At this level, we’re telling Kubernetes, “Hey, I want to create a Deployment using this version of the API.”
- Then, we’re looking at the big-picture configuration for the entire Deployment. How many Pods we need (via
replicas), which Pods to manage (viaselector), and how Kubernetes should maintain them. The Deployment makes sure Kubernetes maintains the desired state of your app by watching over the Pods it manages and recreating them if they fail. - As we move deeper, we reach the
templatesection, which defines the blueprint for the Pods the Deployment will create. - Finally, we reach the core of each Pod: the containers. This is where the actual application (in this case, our backend) lives and runs. Our containers section defines the image and port for the app inside the Pod.
The Deployment manifest and how it describes the desired state of your application is truly a core concepts in Kubernetes.
Well done for going above and beyond to understand literally 👏 every 👏 single 👏 piece of it.
Follow steps in part 2 of this project - Automating Backend Deployment - EKS with Kubernetes#Part-2. Set Up Kubernetes Deployment#Delete Your Resources - (Optional)
We've just set up Kubernetes manifest files for your app's backend deployment!
That's awesome, give yourself a pat on the back 😮💨
You've learned how to:
- 🐳 Build and push a container image of the backend of your app.
- 📝 Write a Deployment manifests to tell Kubernetes how to manage and scale your backend app.
- 📝 Write a Service manifests to tell Kubernetes how to expose your backend app to handle traffic.

In the next project of this Kubernetes series, you will deploy the backend with Kubernetes using kubectl 🚢

Welcome to part FOUR of your four-part Kubernetes with AWS series.
In the first three projects of this series, you've learnt how to:
-
Automating Backend Deployment - EKS with Kubernetes#Part-1. Launch a Kubernetes Cluster which is a group of containers that EKS (Elastic Kubernetes Service) will manage.
-
Automating Backend Deployment - EKS with Kubernetes#Part-2. Set Up Kubernetes Deployment which packages up an app's backend code that you want to deploy into a format that Kubernetes can run.
-
Automating Backend Deployment - EKS with Kubernetes#Part-3. Create Kubernetes Manifests which are instructions that tell Kubernetes how to deploy and run your container image on your EKS cluster.
In the final part of this series, it's finally time to deploy that backend with Kubernetes!

Get ready to...
- 🚢 Set up the backend of an app for deployment.
- ⬇️ Install kubectl.
- 🚀 Deploy the backend on a Kubernetes cluster.
- 💎 Track your Kubernetes deployment using EKS.
f you are following along, you can continue from here onward. In case you have deleted all your resource and the end of part 3 (Automating Backend Deployment - EKS with Kubernetes#Part-3. Create Kubernetes Manifests#Delete Your Resources - (Optional)) - than you might want to go back to start and repeat all the steps till Automating Backend Deployment - EKS with Kubernetes#Part-3. Create Kubernetes Manifests#Create your Service Manifest.
Let's deploy our backend application! We'll be using a command-line tool called kubectl to do this.
In this step, you're going to:
- Install kubectl, a command-line tool for using Kubernetes.
- Deploy your app with Kubernetes.
- Apply the manifests:
kubectl apply -f flask-deployment.yaml
kubectl apply -f flask-service.yaml
💡 What does it mean to '
apply' manifests?
Now that you've set up the manifest files, this command tells Kubernetes to create or update resources (i.e. the Deployment and Service) based on the instructions in your manifest files.Since this is our first time running
apply, Kubernetes will create the Deployment and Service resources in the cluster.The next time you run the same apply command with updated manifests, Kubernetes will recognize that these resources already exist and will update them to match the new configurations.

💡 Ah... an error
If you've done the previous projects in this series, you might recognize this error message - you haven't installed the key tool you're using in this command, kubectl!💡 What is kubectl?
kubectl is the command-line tool for interacting with Kubernetes resources (e.g. , Deployment or Service resources) once your cluster is up and running. We're using it to apply our manifests and deploy our application.💡 Don't we already have another tool called eksctl?
Good question! eksctl, which you installed in part-1 Automating Backend Deployment - EKS with Kubernetes#Install EKSCTL of this project, is great for setting up and deleting your EKS cluster and configuring its settings.But, when it comes to deploying applications and managing resources within the cluster, kubectl is the tool to use.
- Run following commands in your Amazon Linux EC2 instance:
sudo curl -o /usr/local/bin/kubectl \
https://s3.us-west-2.amazonaws.com/amazon-eks/1.31.0/2024-09-12/bin/linux/amd64/kubectl
- Just like what you did with Docker, you'll need to give yourself the permission to use kubectl:
sudo chmod +x /usr/local/bin/kubectl- Check you've installed kubectl properly:
kubectl version- Run the commands to apply your manifest files again. We've tried running both commands before, so you should know what they are!

Nice work! You've just used kubectl to apply your manifest files, which deploys your app across your cluster.
In this section we will investigate our deployment's progress using Amazon EKS.
💎 Get ready to:
- View your EKS cluster in the console.
- Verify your backend's deployment in EKS.
- In a new tab, open up the EKS console.
- Select the nextwork-eks-cluster cluster you've created for this project.
- Welcome to your EKS cluster's dedicated page!
- Select the Compute tab.
- Scroll down to the Node groups panel - nice, your node group is here.

- Scroll back up to the top of your cluster's page. Notice that there are two banners in blue.

Note: You might not see those banners if you have already setup "Access Entry" in Part One of the project by following steps in section Automating Backend Deployment - EKS with Kubernetes#Set up access to your cluster nodes. Skip this configuration if you have gone through those steps already.
To give yourself access to your cluster, we went through how to set up IAM access policies in the EKS console in the first project Automating Backend Deployment - EKS with Kubernetes#Set up Access to your Cluster Nodes of this Kubernetes series.
This time, we'll use terminal commands instead for a faster, more efficient way to grant access.
- Head back to your EC2 Instance Connect tab.
- Use the following command to give yourself access to your Kubernetes clusters
- Don't forget to replace
[USER_ARN]and[YOUR-REGION]with your actual IAM User ARN:
eksctl create iamidentitymapping --cluster nextwork-eks-cluster --arn [USER_ARN] --group system:masters --username admin --region [YOUR-REGION]🙋♀️ Where's my IAM User ARN?
In a new tab, visit the IAM console.
From the left hand sidebar, select Users.
Select the IAM User you've logged into for today's project. If you're not sure about your IAM User's name, check the top right corner of your console.
Copy your IAM User's ARN from the Summary panel.

- Your final command should look similar to this:

- Select the refresh button on the console. You should now see your nodes listed under your node group.

💡 Why are there three nodes but one node group?
The node group is a group of nodes that share the same configuration, like instance type and scaling settings. In this case, our node group has three nodes, which means there are three EC2 instances that will run containers like a single unit.🙋♀️ I don't see any nodes
Totally possible!
- Head to your CloudFormation console.
- Is your nodegroup stack in CREATE_COMPLETE too? If not, wait a few more moments.
- Is your nodegroup cluster showing ROLLBACK_COMPLETE in red? Select the Events tab for that Stack and select Detect root cause to check why it's failed. See if you can resolve the root cause on your own.
- Click into one of the nodes to view its details.
- Scroll down to the Pods section.

💡 What is a pod?
While we've been thinking about a Kubernetes cluster as a bunch of nodes running your containerized applications together, you can actually zoom in and break down a node even further... introducing pods!In Kubernetes, pods bundle containers together so they can work as a unit. Pods are the smallest things you can deploy - you can't deploy containers on their own; they must be inside a Pod. In more technical terms, we'd call pods the smallest deployable units in Kubernetes.
Containers in a pod share the same network space and storage so they can communicate and share data more efficiently.
- Select the pod that starts with demo-flask-backend-xx.
- Check out the Events section to see the latest updates for this pod.

💡 What do these events mean?
These events show the steps that happened when Kubernetes was creating your pod:Here's what each step means:
- Successfully assigned default/demo-flask-backend...: Your pod has been given an internal IP address in the cluster.
- Pulling image...: The pod is getting your container image from Amazon ECR.
- Successfully pulled image...: The image was successfully downloaded to the cluster.
- Created container demo-flask-backend: The container was built from your image and prepared for launch.
- Started container demo-flask-backend: The container has been successfully started and is now running in your pod.
💡 What does assigning an image to an IP mean?
This means a container, built from the container image your pod pulled, is now deployed and running at an internal IP address inside the cluster.In simpler terms, your backend is up and working and can be accessed within the cluster's network.
Long story short, your backend has definitely deployed somewhere. We know the IP address of where our backend has been deployed, but we haven't visited that location yet.
You can challenge yourself to find and visit that location, or follow additional steps below to access the backend application.
If you are not able to access the backed application we just have deployed - you might want to create a load balancer and access the back end application through it. Here's how
Your NodePort service (defined in flask-service.yaml) exposes the app internally, but not externally. Kubernetes needs an external-facing component.
-
Modify your Service manifest (
flask-service.yaml):
apiVersion: v1
kind: Service
metadata:
  name: nextwork-flask-backend
spec:
  selector:
    app: nextwork-flask-backend
  type: LoadBalancer  # Changed from NodePort
  ports:
    - port: 80        # External HTTP port
      targetPort: 8080 # Your container's port
protocol: TCP- Apply the updated manifest:
kubectl apply -f flask-service.yaml- Get the public URL
kubectl get svc nextwork-flask-backend- Look for
EXTERNAL-IP(takes 1-2 min to provision). Example output:
NAME                     TYPE           CLUSTER-IP      EXTERNAL-IP                                 PORT(S)        AGE
nextwork-flask-backend LoadBalancer 10.100.32.249 a1b2c3d4e5f6g7h.elb.us-west-2.amazonaws.com 80:32456/TCP 5m- Access your backend:
- For topic "aws":
http://<EXTERNAL-IP>/contents/aws - Replace
awswith any search term
-
Check Load Balancer in AWS Console:
- Go to EC2 > Load Balancers
- Find the new ELB/NLB created automatically
-
Test connectivity:
curl http://<EXTERNAL-IP>/contents/kubernetes✋ STOP
AWS will charge you for resources you leave in your account, especially your EKS cluster (it's not Free Tier eligible).
Challenge yourself to delete everything in this project on your own!
Keeping track of all the resources you've created and deleting them is a skill you should practice so you don't get charged.
🛑 STEPS BELOW IF YOU NEED HELP:
- Delete your EKS cluster within the terminal this time (replace
[YOUR-REGION]with your region's code):
eksctl delete cluster --name nextwork-eks-cluster --region [YOUR-REGION]This command deletes the EKS cluster and all associated resources! It takes a bit of time before everything's gone, so we can move on to other resources.
- Head to the EC2 console.
- Select the checkbox next to nextwork-eks-instance.
- Select Instance state -> Terminate (delete) instance.

- Head in the AWS console.
- Select the nextwork-flask-backend repository.
- Click Delete and confirm.
💡 Please check - is your EKS cluster removed? Is everything in the CloudFormation stack deleted?
Please also check for an Elastic IP address in the EC2 console - some students have been charged by the Elastic IP still being in their account!
We've just deployed the backend of an app with Kubernetes!
That's awesome, give yourself a pat on the back 😮💨
You've learned how to:
- 🐳 Build and push a container image of the backend of an app.
- 📝 Write manifests that tell Kubernetes how you'd like to deploy the backend.
- 🚢 Deploy the backend with Kubernetes using kubectl.
