OLD Integration testing (Eclipse) - ftsrg-edu/swsv-labs GitHub Wiki
Prerequisites
- Java 1.8
- Eclipse Neon or Oxygen (please use the updated Oxygen 1A version)
- Install the Eclipse Plug-in Development Environment (PDE) (Help / )
Integration testing
The goal of the lab is to experience how non-trivial is to test a SUT if it is integrated into a complex environment. Our example will be a simple plug-in for the Eclipse platform that presents in a view the numbers of different extensions the files in the current workspace have.
Trying out the plug-in
The plug-in is available as a standalone jar (see the code repository).
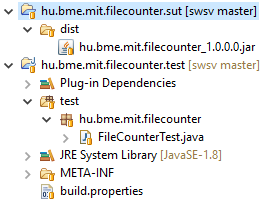
Start Eclipse 4.6, and import the hu.mit.bme.filecounter.sut project, which has a dist folder with the plug-in to test.
However, Eclipse does not know about this new plug-in, we have to create a new target platform that contains also this plug-in.
Target Platform
However, Eclipse does not know about this new plug-in, we have to create a new target platform that contains also this plug-in.
Double-click on the filecounter.target file and click Set as Target Platform. In the center of the screen (Locations) you can see that this target platform contains our plug-in to test.
Run-time Eclipse
We will need two Eclipse instances:
- Host: contains the SUT and test projects and starts the run-time instance,
- Run-time: contains a running version of the plug-in and the workspace and files that are used by the plug-in.
To try out the plug-in a new Eclipse instance has to be started that already contains the plug-in.
- Create a new Run configuration with the type Eclipse Application. In the settings of the run configuration you can see that it will open a new workspace (Main / Workspace Data).
- After starting the Run configuration a new run-time Eclipse instance is started.
- Create a new, empty project in the workspace, and add a few files to it (their contents do no matter).
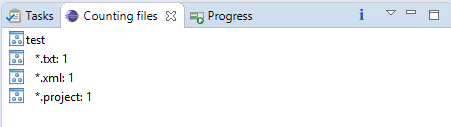
- Show the Counting files view provided by the plug-in under test (Windows / Show view). You can observe the main functionality of the plug-in in action.
- Clicking on the i icon in the top right corner of the view re-executes the file counting.
Method under test
The plug-in has a very simple "business logic" (counting the file extensions) and a GUI (showing the Eclipse view).
Our test object is the business logic that has the following API:
public static Hashtable<String, Integer> getFileNumbersByExtension(String projectName)
The method gets an Eclipse project as an input and returns a hash table, where each element is an <extension, number> pair.
One test condition could be to check that if there is only one file with a given extension, then the value for this given extension in the hash table returned is 1.
Implementing the test in JUnit
The first question is where to put the test code. We have several possibilities:
- It is placed inside the project to test in a separate test folder. This is currently not possible as we do not have the source code of the plug-in. Moreover, we would need to add the plug-in wrapping JUnit as a dependency to the production code, which is not mostly not recommended.
- The test code is placed in a separate plug-in. However, in this case the test code can only call the public interface of the plug-in under test.
- The test code is placed in a so called plug-in fragment that extends the plug-in to test and can access run-time the internals of the plug-in.
We will use this third option, a test project is available in the lab's repository.
Import the test project into the workspace!
You need the Plug-in Development Environment (PDE) component installed in Eclipse to build the test project (Help / Install New Software...).
How should the test code check the behavior of the project? If we would test it manually through the GUI, then probably we would create a project with some test data, start a run-time Eclipse, open the view, and finally check that number displayed for the different extensions.
NOTE: In this case the a test do not only depend on the parameter values supplied to the method under test but on the test data and test environment where it is run (the test project with files to count). In integration testing designing, generating and maintaining this test environment is one of challenges.
When we tried out the plug-in, we already created a test project, thus the first version of the test code is now really simple (replace xml with the extension you used in the first part of the exercise):
@Test
public void testSingleExtension() {
  // Arrange

  // Act
  Hashtable<String, Integer> ht =
    FileContentAnalyzer.getFileNumbersByExtension("testproject");

  // Assert
  assertEquals(Integer.valueOf(1), ht.get("xml"));
	}
Note: Hard-coding test data as string in the test code is not recommended, because it is hard to maintain (if we change the name of the test project, then all test code have to be updated). This needs to be refactored later.
Run the test as a JUnit test! The test will fail and we will probably get an IllegalStateException with the message "Workspace is closed". What can be the problem?

We tried to run the tests as normal Java programs, which is not running in the context of a run-time Eclipse instance. The code of the plug-in was run outside of an Eclipse environment where there is no workspace!
NOTE: We need to stress here that this test is not an isolated unit test although we are using JUnit for test execution. This is an integration test because not only the test plug-in, but numerous other plug-ins of Eclipse are called during the test (querying the workspace, opening file resources in the workspace...). These dependencies should be mocked if we want to have isolated unit tests.
We want to create integration tests, therefore we should start the test as a JUnit Plug-in Test. In this case a new run-time Eclipse instance is started in the background.
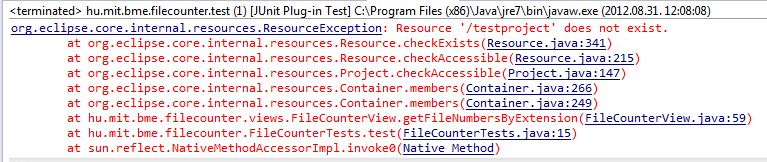
Now we get an other error. What is the problem?
Let's take a look at the settings of the JUnit Plug-in Test run configuration!
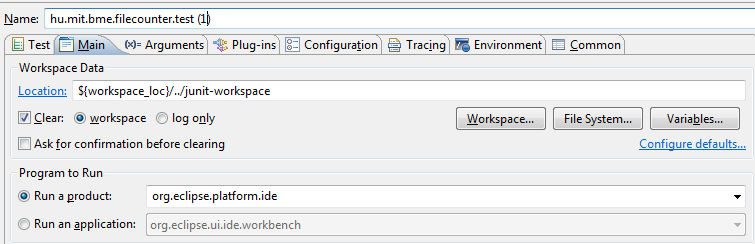
The problem is that test is run in a separate, new workspace called junit-workspace instead of the previously created runtime-EclipseApplication workspace. Handling the test environment is really not trivial!
Let's use the most simplistic solution. In the host Eclipse:
- Uncheck the Clear option to disable clearing the content of the workspace before each execution, then close the run configuration settings dialog. (Danger: different test executions will be not independent!)
- Switch to the
junit-workspaceworkspace (File / Switch workspace) and create the test project and files there. - Switch back to the workspace, where the filecounter projects are. If the projects do not compile, reload the target platform.
- Run the test, it should be successful now.
CHECK Create a screenshot showing the test code and that it was successful.
Further exercises
- Keeping the state of the test workspace could pose problems later. Now the plug-in only reads the content of the workspace, but if it would write them, then it would create hard to debug problems. How would you overcome this problem? Try to implement a simple solution for handling test data!
- Our testing is quite minimal now. Using one of the test design techniques design more tests for the FileCounter plug-in.
CHECK Create a screenshot of your new tests.