2b Integration testing - ftsrg-edu/swsv-labs GitHub Wiki
1. Preparation steps
1.1 Sign up for OpenWeatherMap
We will use OpenWeatherMap, an external weather API during the lab, for which you need a personal access token.
Sign up here: https://openweathermap.org/guide (the confirmation and activation of the registration can take 20 minutes, thus start with this step).
1.2 Installing the necessary environment
If you are working on the virtual machine in the BME cloud, all the tools are prepared in the /home/cloud/tools folder, and you can skip the preparation step.
Otherwise, if you are working on your computer you have to download and install the following:
- git
- PostgreSQL (Install for Windows)
- Java JDK 11
- Visual Studio Code or any editor
- Maven
- Postman for Windows/Linux
1.2.1 Start a PostgreSQL database
You need to install and configure a PostgreSQL database with the following configuration:
 port: 15432
 username: postgres
 password: password
 database name: postgres
(In a production system you shall use more secure usernames, passwords and authorization. For this lab we can use these non-secure authentication information.)
Note: These predefined attributes can be found in application.properties, in case you need to modify them.
2. Technologies
We will use the following tools and technologies during the lab.
2.1 Postman
![]()
Postman makes API development faster and easier. Postman is a tool used to send requests and receive responses through a REST API, and you can use it to organize and save your API tests.

The Postman example above shows a simple HTTP GET request to a NASA API with two attributes.
2.2 WireMock

WireMock is a tool that can mimic the behaviour of an HTTP API and capture the HTTP requests sent to that API.
We can use it
- when we have to implement a feature which uses an HTTP API that is not ready,
- when we write unit tests for classes which use HTTP APIs (external dependency) or
- when we have to write integration, API, or end-to-end tests for features which use external HTTP APIs. For more details, see Introduction to WireMock tutorial.
2.1 REST-assured
![]()
REST-assured is a library that gives you a DSL (domain-specific language) for firing real HTTP requests against an API and evaluating the responses you receive.
3. Example project
This lab is created from the article The Practical Test Pyramid written by Ham Vocke. If you don't understand something you can look there for more details later.
We changed and simplified the exercise for the current lab session, thus some parts of the code differ.
Use this SWSV version: CODE
The application can store data about people (first name, last name), and offers some REST APIs to query people data and the actual weather (using an external weather API, OpenWeather).
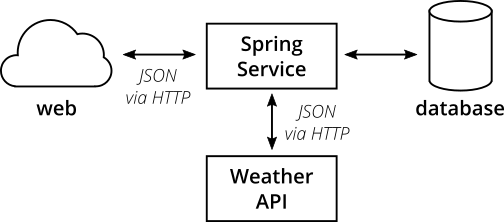
Here are some useful diagram showing how the system was built up. The project was built using the Spring framework.
The high level structure of the microservice system:
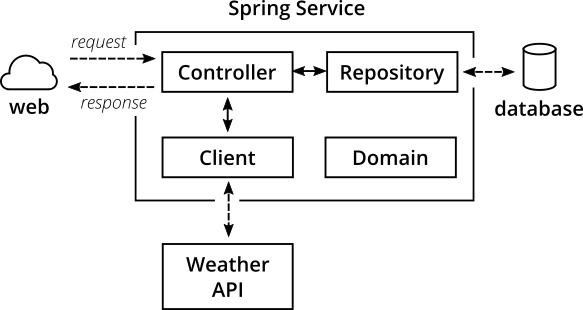
The internal structure of the microservice:
Take some time to get to know the application:
- Check out the structure of the source code (
main/java/example).person/Person.javais the main entity stored by the application. Check its attributes.PersonRepositorymanages the persistence of instances (it is currently just an interface, implementation is generated by the Spring framework).
ExampleController.javadefines the REST endpoints and implements the application logic. Check out how many endpoints have been defined (see@GetMapping).
4. Build & deploy
-
Clone the repository to your machine.
pwd git clone https://github.com/ftsrg-vimima01/lab02-integration.git- Note: The output of
pwdshows where your repository will be cloned.
- Note: The output of
-
Open Visual Studio Code and add the cloned repository to the workspace.
- File -> Add Folder to Workspace...
- (You can use any other editor or IDE you are comfortable with.)
-
Claim an OpenWeatherMap API key (the external weather API).
- Get your private API key. (A key like this: a7f0fee465477b551444385b1*******, intentionally redacted)
- IMPORTANT Modify the
env.samplefile:
export WEATHER_API_KEY=a7f0fee465477b551444385b1******* -
Open a terminal in the root of the project folder. Build, test and package your application .
mvn package -
Now you should deploy the application to your local machine from terminal.
- Make sure you added your API key to the
env.samplefile. - Make sure, that the database is running, accessible on the right port. See help in Verify the installation section.
- Run
env.sampleto define the API key as an environmental variable:
source env.sample- Start and deploy the application:
java -jar target/springtesting-0.1.0.jar- Once you see "Started ExampleApplication" in the log, you can use it.
- Make sure you added your API key to the
-
Try out the REST services.
- Open the following URL in a browser: http://localhost:8080/hello
- Try to query a person. For this, we need to add a person to the
persontable in the PostgreSQL database. - Query the person just added: http://localhost:8080/hello/Doe
- Try to query the weather: http://localhost:8080/weather
-
Try out calling the external weather API directly.
- Open Postman application. See help here .
- Create a new request to query the weather by the GPS coordinates of Budapest. See the API documentation here: https://openweathermap.org/current
CHECK Create a screenshot with the REST API response.
Even for deploying and starting such a simple application, numerous other services and configuration steps were necessary. This is the reason why integration and system-level testing is much harder than unit testing. In unit testing, we mostly mock any environmental dependecies, now we have to consider these dependencies in our tests.
If you are done, stop the application. Let's test.
5. Existing tests
The original author made various tests to showcase the different testing levels and approaches. Lets examine some of them.
Tests for the person functionality:
-
Open
ExampleControllerTest.java. This is a unit test for the Controller, where its methods are called directly, and the calls to the database through PersonRepository are mocked with Mockito. In these tests the database is not called and the application is not started. -
Open
ExampleControllerAPITest. This is an integration test, where the integration with parts of the Spring framework is tested (however, without starting a full web server yet). The database is still mocked.- The API of the Controller is called using the Spring MVC Test Framework instead of calling the Java methods directly. In this way mappings are also tested.
- Check out the syntax used by MockMvc (
perform,andExpect).
-
Finally, open
HelloE2ERestTest. This is an end-to-end test testing every component. The application is called using its external REST API visible to the clients, and the database is not mocked. This test is considerably slower, as it starts the web server.- For firing up REST calls the code uses RestAssured. Notice the syntax for calling and checking (when/get/then/...).
- We need some test data to work on. Notice how a person is created and saved in the beginning of the
shouldReturnGreetingtest, and how the repository is cleared between every tests in the tearDown method. - Note: the tests use an in-memory database and not the PostgreSQL used at runtime.
The following table summarizes the differences between these tests.
| Test | Public API | Spring web | Controller class | Database | Weather API (external) |
|---|---|---|---|---|---|
| ExampleControllerTest | No | No | Yes | Mocked | Mocked (Class) |
| ExampleControllerAPITest | No | Yes | Yes | Mocked | Mocked (Bean) |
| HelloE2ERestTest | Yes | Yes | Yes | In-memory | Not used |
Tests for the Weather API:
- The main difference when testing a function calling an external API is that we usually we do not want to call the external API directly. The external API call can be slow, expensive and return different responses each time. For this reason we can mock the request at various levels.
WeatherClientTestshows an example to mock theRestTemplateclass making the API request using plain Mockito.- The next level is when we are playing back a previously recorded response saved in a JSON file (
test/resources/weatherApiResponse.json). (This approach also has drawbacks, as we cannot detect problems or API changes in the external service.)- Open
WeatherClientIntegrationTestto see this in action. WireMock intercepts URLs and returns predefined responses. - Note: the tests use their own hardcoded test-specific API key ("someAppId"). Do not modify this, as all the test use this string in place of a real API key.
WeatherAcceptanceTestis quite similar, but this time the weather functionality is called through the application's REST API.
- Open
CHECK run these tests and create a screenshot about the test results.
Excercise I.
We extended the person entity with location of their home given with GPS coordinates, and a new endpoint was added to the application (/hello/{lastName}/location). But this part of the code is not tested yet, so extend the existing tests.
- Add a unit test inside
ExampleControllerTestto verify that thelocationmethod correctly returns the home location of a person. - Add an integration test inside
ExampleControllerAPITestto verify that the new endpoint correctly returns the home location of a person. - Add an E2E test inside
HelloE2ERestTestto verify that the new REST API endpoint correctly returns the home location of a person.
For the weather service:
- Capture a new request with Postman. Replace the saved request in
weatherApiResponse.jsonwith the new one. Verify that tests pass the new request, and fix them, if needed.
CHECK: create a screenshot about the code of the new test methods.
Exercise II. (optional)
![]()
Contract testing is a way to ensure that services (such as an API provider and a client) can communicate with each other. Pact is a CDC (consumer-driven contract) testing tool. This means the contract is written as part of the consumer tests. A major advantage of this pattern is that only parts of the communication that are actually used by the consumer(s) get tested.
It has a sophisticated approach of writing tests for the consumer and the provider side, gives you stubs for separate services out of the box and allows you to exchange CDC tests with other teams.

The figure above shows how contract tests ensuring that the provider and all consumers of an interface stick to the defined interface contract. With CDC tests consumers of an interface publish their requirements in the form of automated tests (Executable tests written by the consumer); the providers fetch and execute these tests continuously.
Examine in the original article and project how contract testing works.