0b Build tools - ftsrg-edu/swsv-labs GitHub Wiki
Prerequisites
- Java 11+
- Apache Maven 3.5+
- Visual Studio Code OR IntelliJ Community OR any other text editor / IDE
NOTE: If you are familiar with Maven or Github , you can skip these exercises.
Building complex software projects is a challenging task. Building the different modules and artifacts, tracking the dependencies and doing the integration build requires systematic solution.
In this course we'll use Maven to build Java projects.
Maven is software project management tool that can help to build, test and manage the dependencies of Java projects.
In the home assignment we will use an application that is built with Maven, therefore it is essential to know at least the basics of Maven.
- Declarative approach: build steps are declared in an XML file called Project Object Model (POM) instead of creating script files.
- Dependency management: correct versions of declared dependencies are automatically downloaded and used in the project.
- Convention over configuration: Maven uses conventions (e.g. on project structure, task orders), these defaults need not to be specified, only when the developer wants to deviate from these conventions.
Maven assumes the following directory structure:
my-app
|-- pom.xml
`-- src
    |-- main
    |   `-- java
    |       `-- com
    |           `-- mycompany
    |               `-- app
    |                   `-- App.java
    `-- test
        `-- java
            `-- com
                `-- mycompany
                    `-- app
                        `-- AppTest.java
If the application is structured using this convention, then no configuration is required for compiling the code or running unit tests.
All output generated by the build process will be placed into a folder called target in the project's root.
See: Maven standard directory layout
The Maven tool can be invoked to perform a lifecycle phase:
mvn <phase>
Important Maven build phases (each phase will execute the others before them in the default lifecycle):
-
compile: compile the source code of the project -
test: compile and run unit tests -
package: take the compiled code and package it into distributable format (JAR) -
verify: run integration tests and other checks -
install: install package in the local Maven repository
The local Maven repository is located usually in a folder called .m2 in the user's home directory. Maven uses this folder to store downloaded dependencies and packages.
To clean the project execute the clean phase.
-
clean: remove all files generated by the previous build
See: Maven lifecycle reference
Maven can be configured by extending the pom.xml file. A basic POM file looks like the following:
<project xmlns="http://maven.apache.org/POM/4.0.0" xmlns:xsi="http://www.w3.org/2001/XMLSchema-instance"
  xsi:schemaLocation="http://maven.apache.org/POM/4.0.0 http://maven.apache.org/xsd/maven-4.0.0.xsd">
  <modelVersion>4.0.0</modelVersion>

  <groupId>com.mycompany.app</groupId>
  <artifactId>my-app</artifactId>
  <version>1.0-SNAPSHOT</version>
  <packaging>jar</packaging>

  <name>Maven Quick Start Archetype</name>
  <url>http://maven.apache.org</url>

  <dependencies>
   <dependency>
    <groupId>junit</groupId>
    <artifactId>junit</artifactId>
    <version>4.8.2</version>
    <scope>test</scope>
   </dependency>
  </dependencies>
</project>
The first part defines the metadata of the project. Next, the dependencies of the project are specified. Later, each lifecycle phase can be customized (e.g. look for tests in different folders or use other tools in a phase).
See: POM reference
Maven can be invoked in several ways:
- CLI: the
mvncommand is the command-line interface for Maven. - From an IDE (like Visual Studio Code or IntelliJ).
Try out the most basic use case of Maven.
See: Maven in 5 Minutes for a detailed description of the following steps.
- Create a default project
mvn archetype:generate -DgroupId=com.mycompany.app -DartifactId=my-app -DarchetypeArtifactId=maven-archetype-quickstart -DinteractiveMode=false
- Examine the generated project structure and pom.xml.
- Compile the project
mvn compile
- Examine the contents of the
targetdirectory. What folders and files have been generated? - Compile and run the unit tests (notice in the output that the plugin called surfire is responsible for running unit tests)
mvn test
- Examine the contents of the
targetdirectory again. What new folders and files have been generated? - Create a JAR package from the project
mvn package
CHECK: create a screenshot from the command line output of the last run of Maven.
See: Maven Getting Started Guide for further details on how to add resources and configure plugins.
- Open IntelliJ and select Import project from the start screen. Select the folder where the application's pom.xml is located.
- Check the import options (the defaults will be good for now).
- You can execute Maven goals from the Maven Projects window (docked on the right side initially).
- Execute one of the life cycle goals, and check the output in the Run window.
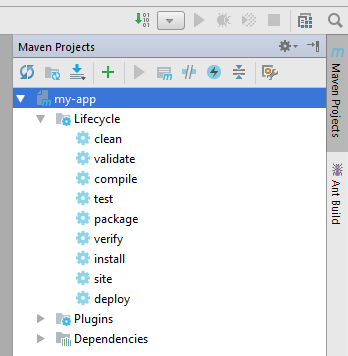
Figure 2: Running Maven build inside IntelliJ
If you update later the pom.xml (e.g. with new dependencies), do not forget to re-import it to reflect the changes inside the IntelliJ IDE.
CHECK: create a screenshot showing a successful Maven build inside IntelliJ
See: Maven in IntelliJ for more details.
Continuous Integration (CI) usually refers to integrating, building, and testing code frequently. It means a pipeline, that starts at the version control system and goes through on the building, testing and also deployment phases (sometimes called also continuous delivery or continuous deployment).
A continuous integration framework provides support to execute the required tools in the continuous integration pipeline and manages the build artifacts.
- Hudson and its fork Jenkins share the same code base and very similar set of features. Both are easy to extend, powerful and free. Their main advantage is in the number of plugins and community support. They are a self-hosted solution and use a web-based GUI to configure and execute the pipelines. Starting from version 2 they provide also support for declarative pipeline description by using a Jenkinsfile.
-
Travis CI is a hosted continuous integration service for the open source community and is very well integrated with GitHub. The main strength of Travis is its simplicity. Unlike Jenkins, which allows almost unlimited plugins, complicated flows, etc., Travis is based on a single file,
.travis.yml, that resides in the root of your code and describes the build pipeline. - GitHub Actions is the built-in automation framework for GitHub that can be used for CI tasks. It uses a YAML configuration file and offers many plugins and ready-to-use tasks.
During the laboratory we'll use GitHub Actions to learn the basics of the CI frameworks.
Keeping CI configuration (.github/workflows/ directory) as integral part of the code brings advantages. Through that configuration, you tell it what to do and it does it.
Read Understanding GitHub Actions to get to know the basics of Actions.
To use GitHub Actions the following steps are needed:
- Upload the sample project to a new public GitHub repository under your own account. (Or if you have a small public project, you can use that also.)
- Click on the 'Actions' tab in the repository.
- GitHub Actions will propose a few relevant workflows based on the content of the repository (e.g., if it finds a POM file, then it recommends 'Java with Maven').
- Check the yml (YAML) file. You can look up the syntax in the referenced page.
- After you have finished, commit the file using the 'Start commit' button. This will trigger a new run for the workflow.
- Check the output of the executed workflow on the Actions tab (click on the name of the commit for the log files, search for the 'Build with Maven' step inside the build job). If you completed everything, then the project should compile.
CHECK: create a screenshot showing a successful GitHub Actions build
For more information see the following tutorials: