Espresso Test Guide - forem/ForemWebView-android GitHub Wiki
Espresso tests help us write automation test cases for user interface (UI) testing. Some key points to keep in mind related to Espresso tests:
- These tests are device dependent ,i.e., based on how a test has been written it can pass or fail depending upon the device.
- These tests are run on emulator and therefore we won't be adding them to CI checks as they will end up consuming a lot of resources.
- These are specifically written for unit testing only.
- These tests can check things only within the app and not outside that scope. For example espresso tests cannot interact with other apps and cannot check notifications.
In the below test case testMainActivity_loadDevVideoArticle_playVideo_opensVideoActivity we are following below mentioned steps in the test case:
- Using
launchActivitywe are starting ourMainActivitywith the specific url. - Using
onWebViewwe are locating a specific ID so that per can perform a click event on that view. - As soon as we click on the above view the app starts the
VideoPlayerActivitywhere the video is played in full screen to check that we are usingintendedto make sure that correct activity is opened and also correct information is transferred to that activity.
@RunWith(AndroidJUnit4::class)
class MainActivityTest {

    private val context: Context = getInstrumentation().targetContext

    @Before
    fun setup() {
        Intents.init()
        EspressoIdlingResource.increment()
    }

    @After
    fun tearDown() {
        Intents.release()
        EspressoIdlingResource.decrement()
    }

    @Test
    fun testMainActivity_loadDevVideoArticle_playVideo_opensVideoActivity() {
        launchActivity<MainActivity>(createMainActivityIntent("https://dev.to/ben/why-forem-is-special-with-ben-halpern-1d61"))

        onWebView()
            .withElement(findElement(Locator.ID, "video-player-407788"))
            .perform(webClick())

        intended(hasComponent(VideoPlayerActivity::class.java.name))
        intended(
            hasExtra(
                VideoPlayerActivity.VIDEO_URL_INTENT_EXTRA,
                "https://dw71fyauz7yz9.cloudfront.net/video-upload__a8eaf9049e79b4def2008c6c4b9bff09/video-upload__a8eaf9049e79b4def2008c6c4b9bff09.m3u8"
            )
        )
        intended(hasExtra(VideoPlayerActivity.VIDEO_TIME_INTENT_EXTRA, "0"))
    }

    private fun createMainActivityIntent(foremUrl: String): Intent {
        return MainActivity.newInstance(context = context, url = foremUrl)
    }
}
File Name: If we are writing test case of MainActivity the corresponding espresso test file name should be MainActivityTest, i.e. <file_name>Test.kt.
Test Name: testAction_withOneCondition_withSecondCondition_hasExpectedOutcome. Example: testMainActivity_loadDevArticle_clickOnMoreOptions_opensShareIntent in this testMainActivity is test action, loadDevArticle & clickOnMoreOptions are two different conditions and opensShareIntent is the expected outcome
Tests should only be written to verify the behaviour of public methods/functions. Private functions should not be used in behavioural tests.
Sometimes because of animations the Espresso tests can fail therefore its safe to make before changes on the device on which the tests are being run.
- Enable the developer options in your android device by following these steps.
- Go to Settings
- Search for
animations - Click on either one of these
Window animation scale,Transition animation scaleorAnimator duration scale. - Or you can even find the above options directly in
Developer Options. - Change the value of all these options to
Animation Off.
Now its safe to run test cases.
Note: Espresso test requires a device to run so make sure you have an emulator setup or a device connected on which the tests will be run.
If your test files are under following directory: app/src/androidTest/java then you can notice the Play icon next to your test file name or a particular test, example:


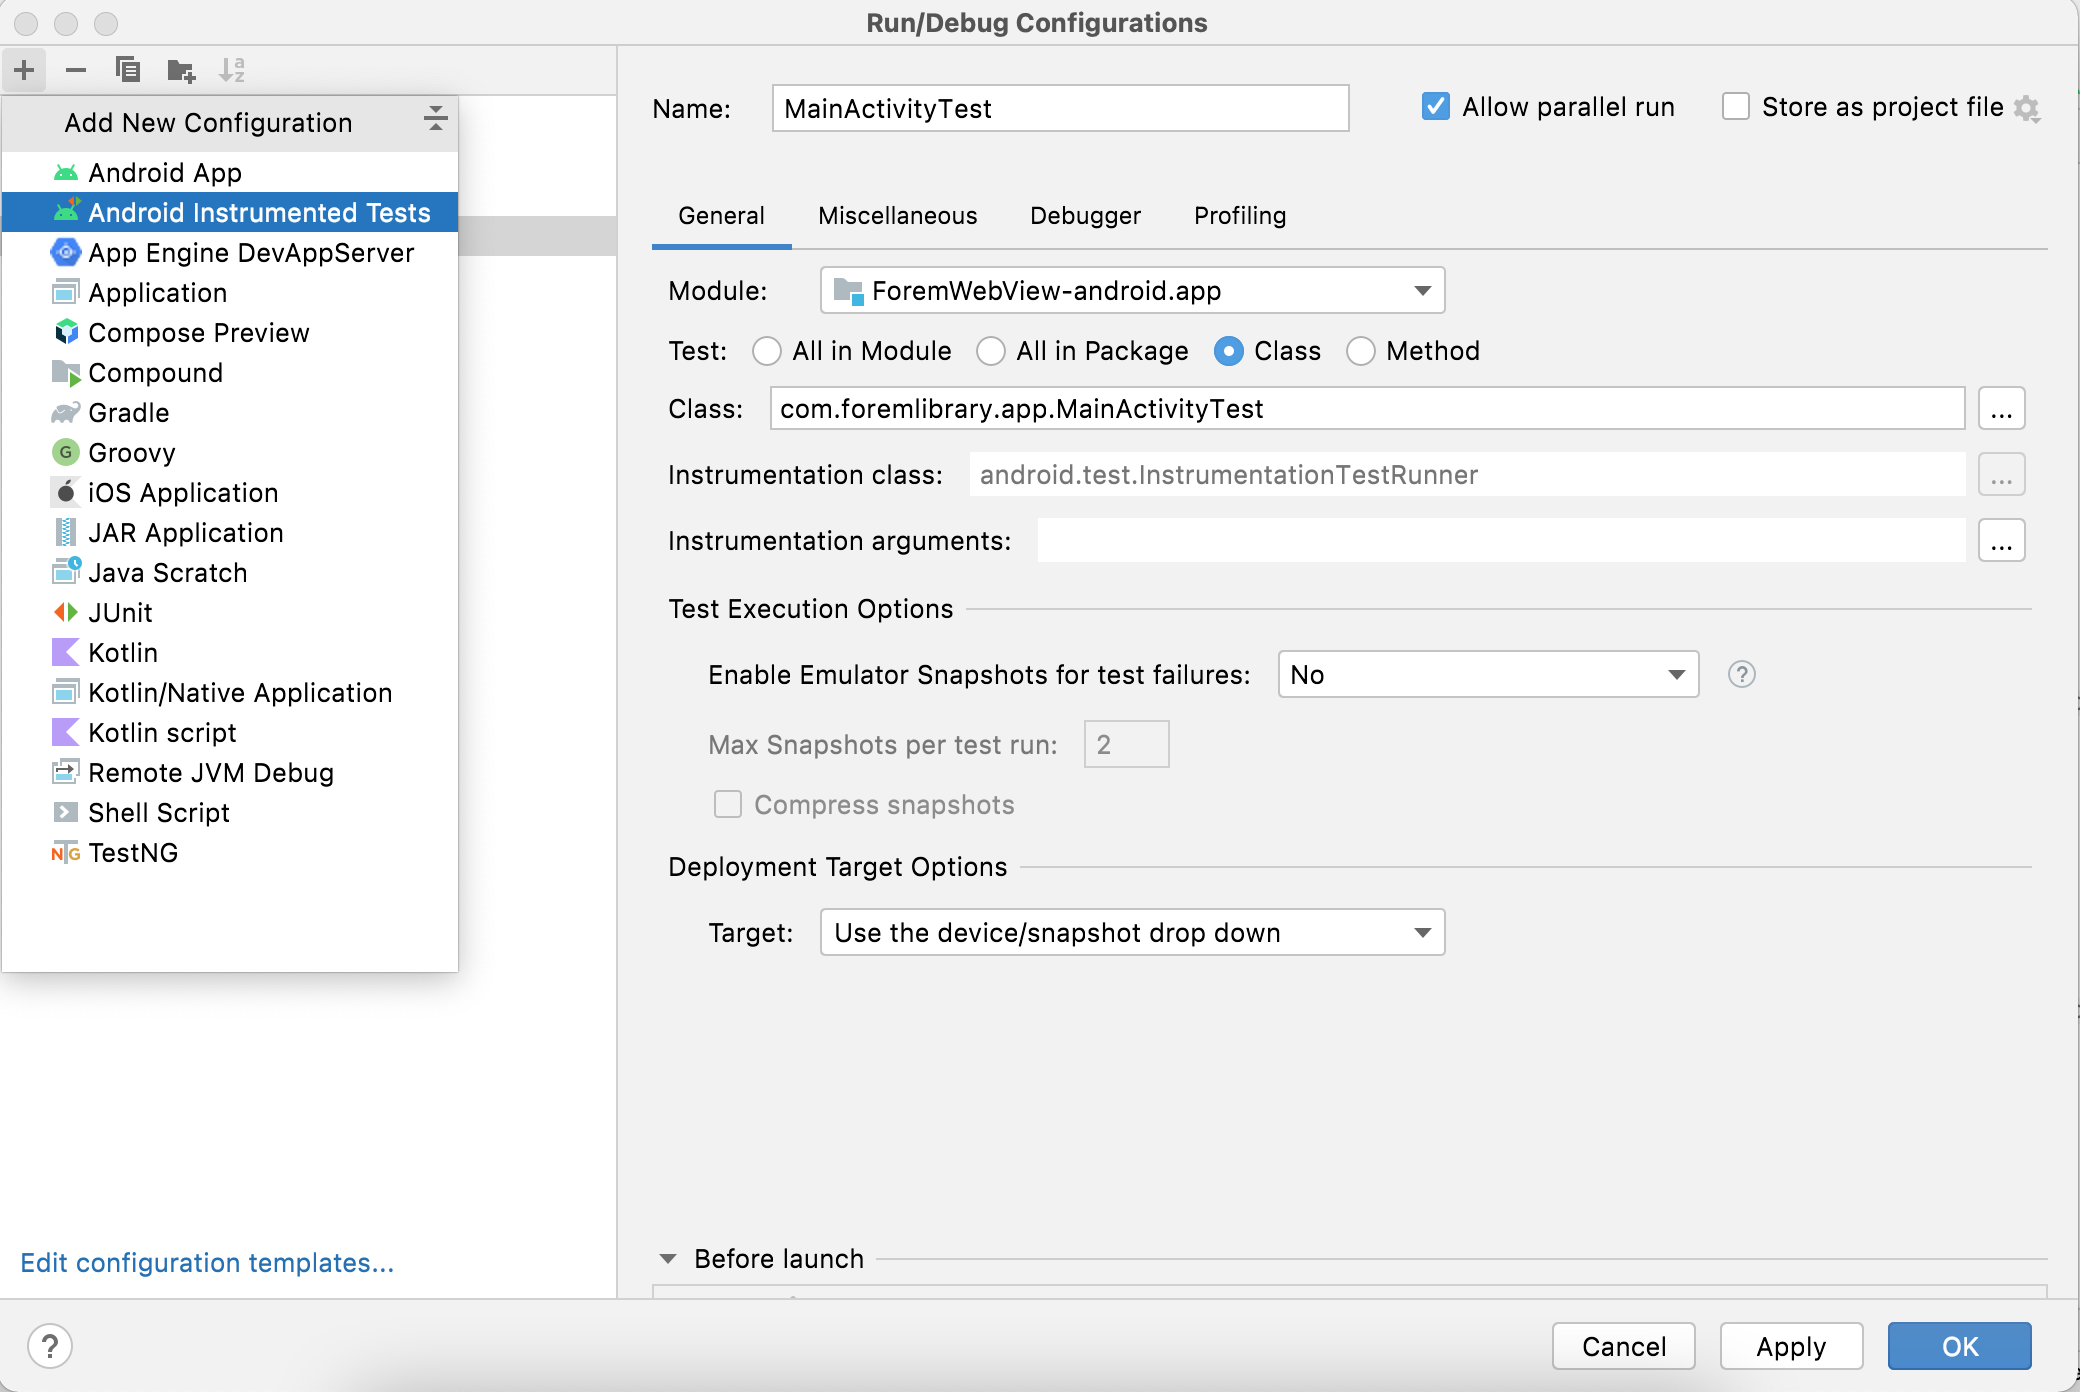
If these icons/buttons are not available to run the test then you can perform following steps:
- Click on
Run->Edit Configurations - Click on
+icon on left-hand side and selectAndroid Instrumentation Tests - In the window select a
module,Test TypelikeClass,Package,Method, etc. and other details similar to below screenshot. - Click on
Apply/OK - Now you can run the espresso tests.
