Fuse tap guide - fochica/fochica-wiki GitHub Wiki
A "fuse tap" is an electrical part that functions as a power splitter and is meant to be installed in the car's fuse box. The tap has an end that looks like a fuse. This end is installed in the fuse slot instead of the original fuse. To provide the original functionality the tap has a "box" with a slot where the original fuse should be installed. That box also has a second slot for an additional fuse for the "split" which leaves the box through a pigtail/cable.

The advantage of using a tap over cutting and reconnecting wires is that the change can be undone and it is possible to return to the original setup. Another advantage is that the fuses in the fuse box are documented and labeled, which simplifies the need to hunt for the right wires.
We are discussing fuse taps here in the context of modifying an existing power socket that is initially on an (ignition) switched power line such that it will be on a "constant" power line (AKA permanent power line). Fuse taps can be used for other purposes too, such as installing a brand-new socket or connecting a brand new power line to a point with power.
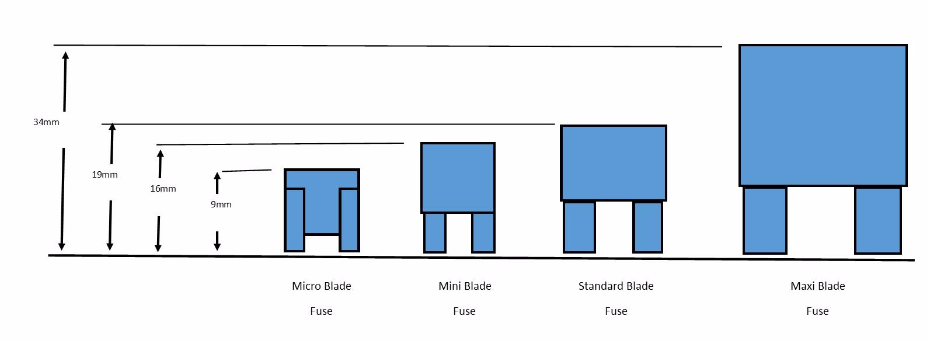
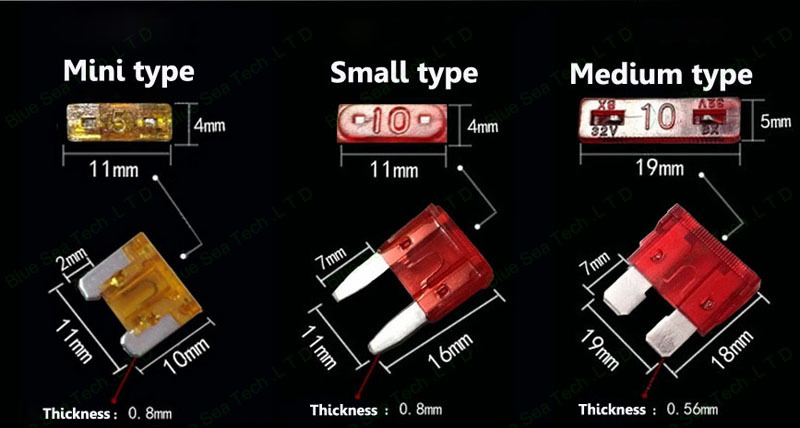
There are various automotive fuse types but 3 are specifically popular
- Medium / Regular
- Mini / Small
- Micro / Low-profile Mini
Please note that names might be conflicting and/or confusing so it is best to both measure the fuse and verify the fuse form factor visually.
.png)
See Wikipedia for information about additional types.
Fuse taps come in matching sizes.
Medium:
Mini:

Micro:

You will need a test light or a digital multi meter. Preferably you will have your car's manual in reach too.

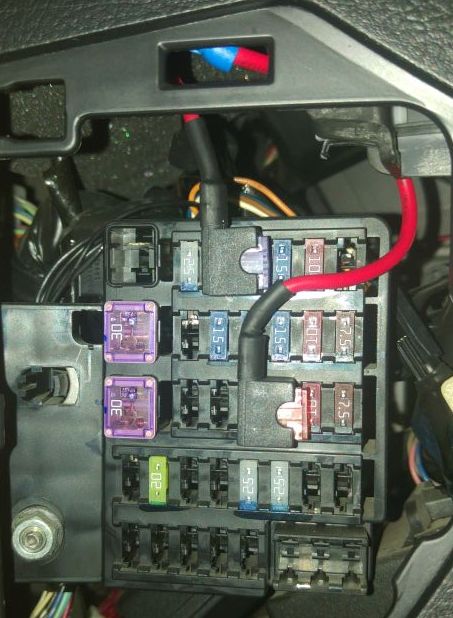
By reading the manual or by looking around, identify the fuse box and fuse that is responsible for the socket that you wish to change. Typical power socket fuses are called "Cigar", "Outlet" or "Utility". Your car will typically have two or more fuse boxes. The power socket fuse is more likely to be in the fuse box that is inside the cabin. The lid of the box (as well as the manual) will list the purpose of each fuse.


Plug a test device, such as a car USB charger in the socket. By rotating the ignition key, identify that the socket is indeed ignition switched. With a test device plugged in and indicating power, remove the relevant fuse and verify that the power was indeed cut to the socket. Inspect the removed fuse. Identify the form factor and the rating in Amps (by color or by numeric value).
With the ignition switch on, connect the negative (black or alligator clip) end of your test tool to a place on the chassis of the car (an unpainted metal body part) or an existing negative terminal. With the positive (red or pointy tip) end of your test tool, touch each side, at a time, of the now empty fuse slot and identify the side that has power. That would be the "battery side", mark it and document the result. The other side is the "load side". Put the fuse back into the slot for now.
With the ignition switch off, test all fuse slots and fuses in the box to see which have power. For empty slots check both slot sides, one at a time. For the slots with fuses in them, you can quickly test them by touching the metal dots that protrude on the top side of the fuse. Those dots can be seen in the photo above to the left and right of the amps rating value that is printed on the fuse. For each slot that has power with the ignition switch completely off, document the slot name and which side is the "battery side". You need to remove the fuse temporary to identify which side is the battery side and which is the load side. While the fuse is in the slot, both sides are bridged (assuming the fuse is ok).
- Prefer one that is currently empty over one that is occupied.
- Prefer a fuse of a utility function (heater, audio, rear wiper) over a fuse of a critical car system function (engine, abs, lights). Consult your car manual for a list of the different functions.
- Prefer a fuse that is located at a distance from the power socket fuse that is to receive the tap. Otherwise those two might not fit in together.
To estimate how those two taps will fit, expect the pigtail end of the tapped fuse slot to be connected to the "load side" of that slot and the pigtail of the power socket slot to be connected to the "battery side" of that slot.

Select the slot you will tap. That slot will be called the "tapped fuse slot".
The Fochica is a low current device. If you are planning for the socket to be used for the Fochica exclusively, you should get a low value fuse, such as one with 2A or 3A, for this socket. If you ever planning to plug-in high power devices in the socket, you should keep the original fuse, which is usually 10A or 15A. The value you choose will be called the "designated fuse rating".
You will need to get two taps. One for the fuse you will tap and one for the fuse to receive the tap. You should have identified those fuses and their form factors in the previous section.
Search for "fuse tap" in the online store. Consider adding the size modifier, such as "mini" or "micro", but do a visual scan/comparison of the images in the listing regardless of what the title of the listing is.
Prefer an item that has a crimpable connector which you can put on the wire which you will plug into the tap's pigtail. The less preferred option is a pigtail with a (typically) blue tube that is meant to be crimped with force. A connector is easier to put on and can be disconnected in the future, if needed.

You will also need an extra fuse whose rating is equal or higher than the "designated fuse rating". The form factor of the extra fuse should match the tapped fuse slot. Some fuse tap listings include a fuse in the kit. Though automotive fuses are simple to acquire, it might be nice to get an extra fuse with the purchase.
We are now going to install our two fuse taps in such a way that the load side of the power socket will be wired to the battery side of the tapped slot, instead of being wired to the battery side of the power socket slot. We will call the slot we are about to tap as "1" and the slot of the power socket as "2".
Here is a schematic of the fuse tap. We will identify the various points using letters A-E

Some examples based on this naming convention:
- A1 or C1 is the "common" side of the tapped slot tap.
- CD2 is the original fuse in the power socket slot.
- D2 is the "original" side of the power socket slot tap.
Connect E1 and E2 pigtails one to another. The connection must to be isolated.

Next follow the relevant section depending on whether the tapped slot is originally empty or occupied.
- CD1 is empty
- AB1 to hold some fuse with rating equal or higher than the "designated fuse rating"
- A1/C1 goes in the "battery side" of slot 1
- CD2 is empty
- AB2 to hold the "designated fuse rating" fuse (or the original fuse that the tap replaces)
- D2 goes in the "battery side" of slot 2
It is important to not mix the sides. Check, verify, mark and document the battery sides of the slots correctly.
Verify that the socket is now powered at all times.
 
- CD1 to hold the original fuse of the tapped fuse slot
- AB1 to hold some fuse with rating equal or higher than the "designated fuse rating"
- A1/C1 goes in the "battery side" of slot 1
- CD2 is empty
- AB2 to hold the "designated fuse rating" fuse (or the original fuse that the tap replaces)
- D2 goes in the "battery side" of slot 2
It is important to not mix the sides. Check, verify, mark and document the battery sides of the slots correctly.
Verify that the socket is now powered at all times.
If you are planning to pass a new wire specifically for the device or to install a new socket you can do that by tapping a constant power line in the fuse box. You would need only one tap instead of two. Instead of connecting E1 and E2, connect E1 directly to your positive wire. Connect the negative to an available negative terminal or exposed metal body part.
https://www.instructables.com/id/How-to-Add-a-Circuit-to-Your-Car/
https://dashcamtalk.com/forum/threads/piggy-back-fuseholders-a-right-way-and-a-wrong-way.7524/