Example_RPi - fablab-wue/piTelex GitHub Wiki

Raspberry Pi Zero W with DIY TW39 board

Combination with power transistor on heatsink


2-sided PCB. Design files can be found in project https://github.com/fablab-wue/piTelex.supplement

| Part | Description |
|---|---|
| ULN2x03 | Open collector driver with 3.3V TTL input compatibility. ULN2003 has 7 drivers. ULN2803 has 8 drivers |
| TIP47 | Any NPN power transistor with heatsink for 2W power and U_CE >= 120V |
| BCxxx | Any small NPN transistor (e.g. BC546) |
| LTV817 | Any optocoupler with more than 50% (e.g. PC817) |
| 1N400x | Any rectifier diode (e.g. 1N4007) |
| Relay | Small signal print relay with two changeover contacts and a rated coil voltage of 5V (e.g. Finder 30.22.7.005.0010) |
| Potentiometer | 1 or 10 turn with 0.2W. Used to calibrate the regulated 40mA current loop |
| Resistors | Standard 1/8W |
| function | GPIO pin ( GPIO #) |
|---|---|
| TXD | 11 (17) |
| RXD | 13 (27) |
| Number Switch | 31 (6) (connected to RXD) |
| Relay | 15 (22) |
| GND | 6 and/or 9, 14, 20, 25, 30, 34, 39 |
| 5V | 2 or 4 |
Note: These are the default pins. Other combinations can be set in
telex.jsonfile.
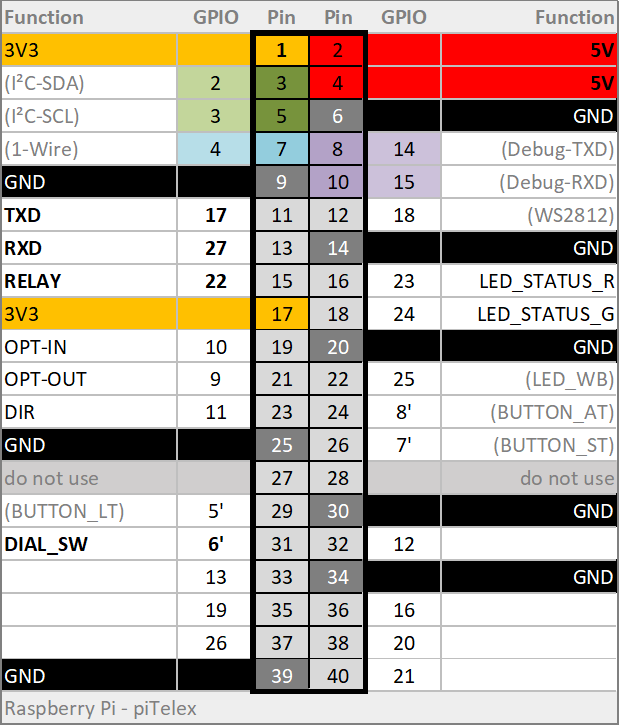
Note: For pulse dial in I-loop connect pin 13 (RXD) with pin 31 (DIAL_SW) and configure GPIO 6 for 'pin_number_switch' in
txConfig.jsonfile.


With a Raspberry Pi and the self-made-PCB in the middle. A DC/DC (Step-Up) for 60V on the left and a DC/DC (Step-Down) for the RPis 5V at front. It is powered by a wall-power-supply with 12V...24V.

This is all you need to connect a teletype (with FSG) to the i-Telex network over internet.
The same interface as above but with an integrated transformer and an ADo8 plug.


For Installation see SW_Install
This electronic is handled by the software module RPiTTY.
Start the program: Change to the piTelex directory and enter
$ ./telex.py Tip
To use the i-Telex communication module start the program with the additional -I option:
$ ./telex.py -I 2342 -V COM3The argument -I starts the i-Telex client ; the argument -I <port> starts client AND the server listening at <port>.
Note
Instead of using command line arguments, you could also (= should better) adapt the configuration file to your needs and then call telex.pywithout further arguments.