1 REST Requests - essenius/FitNesseFitSharpRest GitHub Wiki
On this page, we'll introduce all the request types that you can use in your tests. We assume that you have FitNesse installed and running, according to the instructions in the readme.
You can find the page we use here at http://localhost:8080/FitSharpDemos.RestSuite.TypicodeDemo, but you can also create your own Wiki page and follow along.
A simple POST request
Let's start by creating a POST request. Several simple fake REST services for testing are available at the Typicode site. They allow you to test GET, POST, PUT and DELETE commands, and it uses JSON for both the request and the response. One of its end points is posts, which allows you to work with (fake) articles.
First we define a few libraries that we need (you can also do this in a SetUp page):
|library        |
|Echo Support   |
|Content Handler|
Here is how you define a Post request:
!|script         |RestTester                  |http://jsonplaceholder.typicode.com/|
|Set Request Body|{ "title": "Test Data", "body": "Test Body", "userId":96 }       |
|Send            |POST                        |to              |posts              |
|check           |response code               |200                                 |
|$id=            |value from response matching|id                                  |
The first line tells us we’re going to use the fixture RestTester using the specified server URL. End points are relative to this URL. Next, we’re setting the request body to be sent. Then we send a POST message to the service http://jsonplaceholder.typicode.com/posts, and the request will include the body we just specified. Then we check whether the service returns status code 200 (OK), which implies it succeeded without errors. The last line shows how you can grab values from the response. In this case, we are using a JSON payload, so we need to apply a JPath query to find data of interest. Since the data structure is flat, all it needs is the name of the property (i.e. id).
This is what it looks like when you run it:
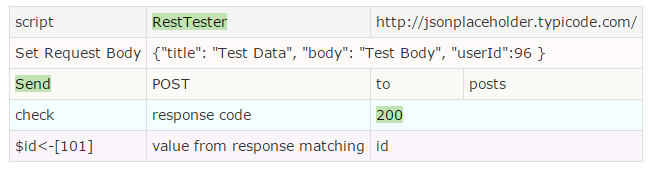
As can be seen, $id, i.e. the identifier of the newly created post now contains 101.
Obtaining Request and Response information
You can also get more information about the service call, e.g. the complete response payload, or the response headers. Add the following lines to the page (including the empty line), and then run it:
|script                                                      |
|show|response                                               |
|show|response headers        |[Content-Length, Content-Type]|
|show|response headers without|[WWW-Authenticate]            |
The fixture method Response gives you the complete response body, in whatever format it was sent. The method Response Headers gives you meta-data about the response. In this case, you can see that the content is in the JSON format, since Content-Type is application/json. There are several ways of interrogating the headers. You can simply ask for all of them (not giving any parameters), or you can specify the headers you are interested in.

The first example shows how you can return only the Content-Length and Content-Type headers. Sometimes it is easier to ask for everything except one or two headers. That can e.g. be the case for the WWW-Authenticate header, which often consists of a very long string of unreadable characters that you won’t be able to do a lot of meaningful things with. The second example shows how you can get all headers back except WWW-Authenticate.
It is also possible to have a look at the request headers, e.g. for debugging purposes:
!|script                                                                   |
|show  |Request Headers without   |[Authorization]                         |
|show  |value from request header |[Accept       |matching|application/(.*)|
|$size=|value from response header|Content-Length|matching|(\d+)           |
|show  |request body                                                       |
The result should be:
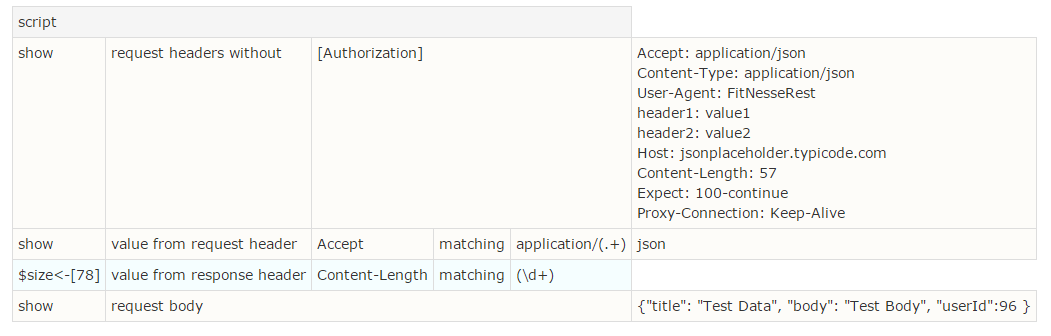
Besides showing the request headers with or without filtering, you can also extract data from the request or response headers, and for that you can use regular expressions. The first example of that shows how you can get the part of the Accept header after application/. The Accept header contains application/json, so this returns only json. The second example shows how to retrieve the content length from the response into a FitNesse symbol. The last line shows how to show the request body.
A DELETE Request
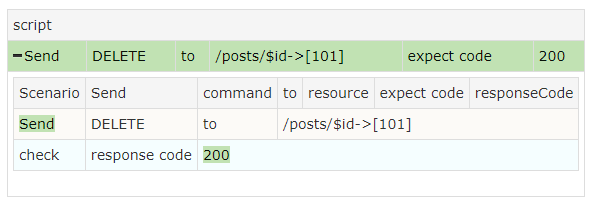
To show that we can use the data we retrieved earlier, let’s try to delete the post we just entered. Since sending a command and checking the status code is something we do quite a bit, we create a scenario table for that (put that just under the Library table, above the script tables):
|Scenario|Send         |command|to|resource|expect code|responseCode|
|Send    |@command     |to     |@resource                           |
|check   |response code|@responseCode                               |
Then, add the following test to the test page:
!|script                                  |
|Send|DELETE|to|/posts/$id|expect code|200|
This will (pretend to) delete the item that we have just added. This also shows how symbols (in this case $id) can be useful.
A GET Request - Handling and Displaying Lists
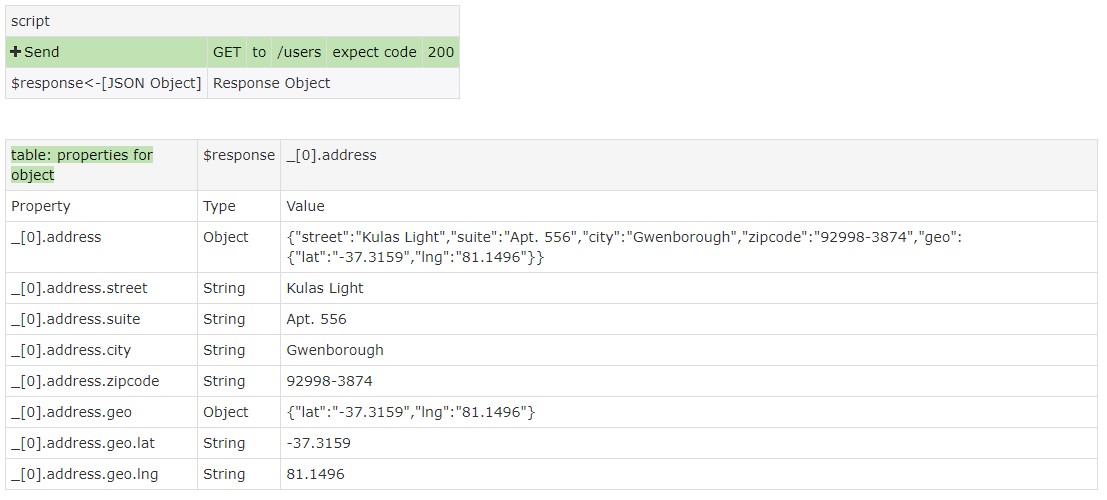
For our next test we are going to request a list of all users:
!|script                                 |
|Send      |GET|to|/users|expect code|200|
|$response=|Response Object              |

|table: properties for object|$response|_[0].address|
This service returns a JSON array (not an object). The fixture converts that into an object by assigning it to a property named _ (underscore). The Table table will show the address property of the first element (numbering starts with 0) of the array.
A PUT Request
As said, a PUT command is intended to update an existing element. Here is how you change the value of an element that was posted earlier, and check that it worked:
!|script                                                                      |
|$body=|echo                        |New Body Text                            |
|Send  |Put                         |to  |/posts/1|with Body|{ "body":"$body"}|
|check |response code               |200                                      |
|check |value from response matching|body|$body                               |

Now we have seen the four request types that the fixture supports, let's take a deeper dive into Handling JSON Payloads