1 Configuring FitNesse And FitSharp - essenius/FitNesseFitSharpFibonacciDemo GitHub Wiki
FitNesse is quite flexible in how you can set it up. In the setup here we keep things simple, and make the FitNesse applications and data folder root the same. A possible alternative is separating application and data.
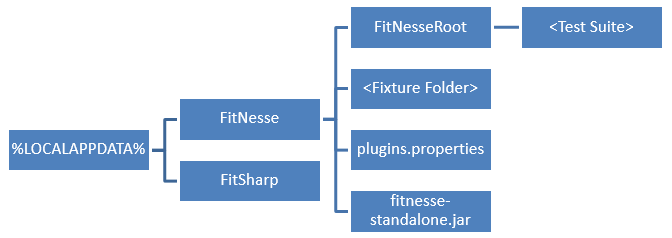
If you use the instructions in the readme, FitNesse will be setup under %LOCALAPPDATA% on Windows, and $HOME on MacOS or Linux. Those folders were chosen because they are local folders which are usually accessible for both reading and writing, also in locked down environments. But you are free to put it somewhere else. For the rest of this page we'll refer to the Windows folder, so simply change that one if you are on a different platform.
The basic structure is shown below.

FitNesse gets its configuration in two ways: the command line and a configuration file called plugins.properties.
The configuration file defines variables, and most of these variables are used by FitNesse to configure itself. We use it to tell FitNesse that we want it to listen on port 8080, and are going to use the SLIM test system, with FitSharp as test runner. We also want a timeout of 10 seconds (i.e. if the test runner doesn't respond within 10 seconds, the command fails). FITSHARP_HOME is a normal variable, which you can use both in other entries and on FitNesse pages.
Port=8080
TEST_SYSTEM=slim
slim.timeout=10
TEST_RUNNER=dotnet

## Windows ##
FITSHARP_HOME=${LOCALAPPDATA}\\FitSharp\\lib\\net5.0
COMMAND_PATTERN=%m ${FITSHARP_HOME}\\Runner.dll -c config.xml
The COMMAND_PATTERN variable refers to a file config.xml. This is the configuration file for FitSharp. It specifies the assemblies and associated namespaces we want to use in the tests, as well as the runner (which is always the same for SLIM). In this example there is only one assembly and one namespace, but there can be multiple.
<?xml version="1.0" encoding="utf-8" ?>
<suiteConfig>
  <ApplicationUnderTest>
    <AddAssembly>ExtendedMathFixtures.dll</AddAssembly>
    <AddNamespace>ExtendedMathFixtures</AddNamespace>
  </ApplicationUnderTest>
  <Settings>
    <Runner>fitSharp.Slim.Service.Runner</Runner>
  </Settings>
</suiteConfig>The command that the readme file uses is
java -jar %LOCALAPPDATA%\FitNesse\fitnesse-standalone.jar -d %LOCALAPPDATA%\FitNesse -e 0
Let's have a closer look. It runs the FitNesse jar file which should fire up the wiki. The -d %LOCALAPPDATA%\FitNesse parameter specifies the data folder. This is the folder where FitNesse expects plugins.properties, as well as the folder FitNesseRoot where the Wiki will be located. The final parameter is -e 0 which specifies that we don't want to use FitNesse's version control mechanism (based on zip files). Instead, we recommend using Git.
You may also have noticed that the readme specifies moving to the assembly folder before we start FitNesse. That makes this folder the current directory of the FitNesse process, which it uses as a basis of relative paths (such as config.xml in COMMAND_PATTERN). In other words, it will look for config.xml in the current directory, and also the paths referred to in that file will be taken relative to the current directory. What you will typically see in all the fixture repos that the current directory is the directory of the fixture assembly.
An alternative would be to put a single config.xml file in the FitNesse folder, and then add the paths to the dll in the AddAssembly entries. This way, you can also add multiple assemblies, enabling you to use more fixtures. For example:
<AddAssembly>ExtendedMath\ExtendedMathFixtures\bin\Deploy\net5.0\ExtendedMathFixtues.dll</AddAssembly>The rest can be left the same.
You would then also need to run FitNesse from within the %LOCALAPPDATA%\FitNesse folder.