2 Wiki Structure - essenius/FitNesseFitSharpFeatureDemos GitHub Wiki
The Front Page is the home page of the wiki; if you have setup FitNesse as described in the repo then that will be the page that you will see when you enter http://localhost:8080 in your browser. This is because FitNesse automatically redirects to the FrontPage. The page is intended as the basis for Wiki navigation. You can edit the page directly by entering http://localhost:8080/FrontPage?edit.
Example content is shown below. It shows some of the markup that you can use in test pages (we will see more of that later) and it shows how you can link to other pages in the wiki: simply by using PascalCase. For example, the word FibonacciTest will be replaced by a link to http://localhost:8080/FibonacciTest. You can also use more elaborate links as shown in the To Learn More section. There it is shown how you can link to a page somewhere in the wiki (FitNesse.UserGuide) while showing User Guide as the link. Finally, notice the use of the dot to denote child pages: FitNesse.UserGuide means the UserGuide page under the FitNesse page.
!1 Welcome to [[FitNesse][FitNesse.FitNesse]]!
!3 ''The fully integrated stand-alone acceptance testing framework and wiki.''

| '''A few demos'''|
| FibonacciTest |  ''A first peek at decision tables'' |
| GameManagementSuite | ''Example of more FitNesse capabilities'' |

| '''To Learn More...'''|
| [[User Guide][FitNesse.UserGuide]]|''Answer the rest of your questions here.''|
| [[Release Notes][FitNesse.ReleaseNotes]]|''Find out about FitNesse's new features''|
The normal view of the page should be like this:
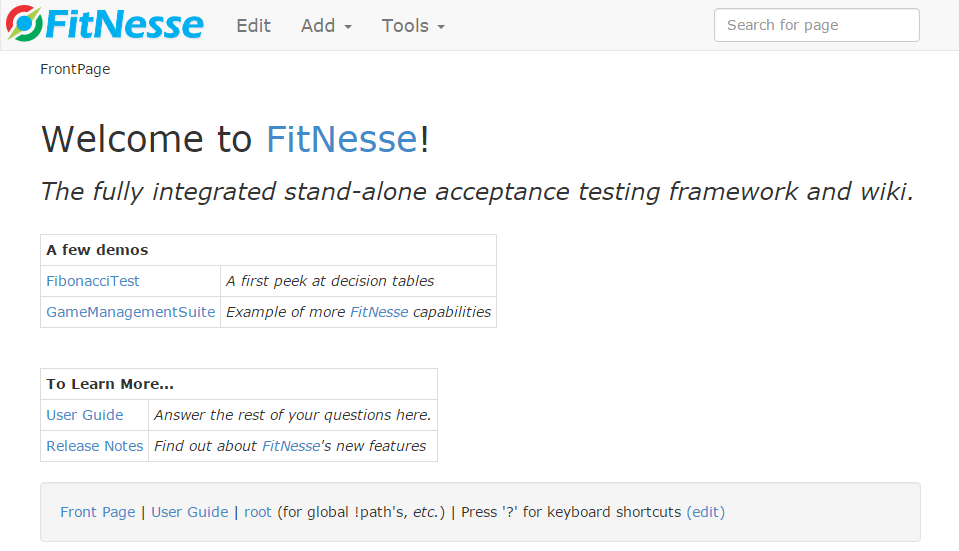
In the home page screen capture in the previous chapter, you will probably have seen that there is more content than is described in the FrontPage: at the bottom there are some more links. That content is defined in the PageFooter page at http://localhost:8080/PageFooter?edit, and it will be shown on every page. Here is where you can e.g. provide quick links to facilitate navigation. The content that provides above result (one line) is:
[[Front Page][.FrontPage]] | [[User Guide][.FitNesse.UserGuide]] | [[root][root]] (for global
!-!path's-!, ''etc.'') | Press '?' for keyboard shortcuts [[(edit)][.PageFooter?edit]]
There is also a PageHeader that you can use – as you may have guessed, this will provide content that shows at the top of every page, just below the logo and menu (which, by the way, are defined in the style sheets, and you normally don’t touch those unless you know exactly what you are doing). It is empty by default.
If you wish, you can create different page headers or page footers for different sections of the page hierarchy. FitNesse will first search the siblings of the current page for a PageHeader or PageFooter, then the siblings of its parent, and so on until it reaches the root. It will use the first one that it finds.
The Root Page is a special page in FitNesse. It is not the same thing as the Front Page, but it is the page that all other pages are children of. You can get to it via the URL http://localhost:8080/root. Since all pages are descendants of this page, it is a good place to store configuration data into variables, which you can then use in any page. You can also specify common !path declarations here.
FitNesse knows 3 page types: Test, Suite and Static. Static pages are pages that only contain content and no tests. A good example is the default Front Page that we showed in the previous section.
A Test page is a page that contains tests. FitNesse will enable a Test button on a test page, allowing you to run the test(s). When you create a new page that begins or ends with Test or Example, FitNesse will automatically make it a Test page. The Fibonacci test that we used earlier is a good example. Notice how there is a Test button now (which the Front Page doesn’t have).

If you don’t use this naming convention, then you can use the Page Properties to manually configure a page as Test Page. For the FibonacciTest above, select Tools > Properties from the menu, or enter http://localhost:8080/FibonacciTest?properties. Don’t forget to save after changing.
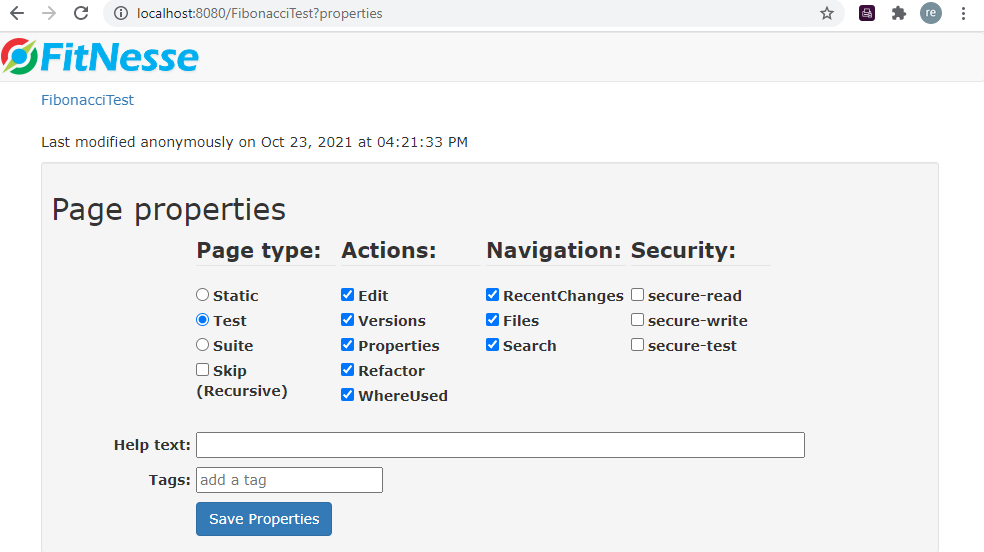
Test Pages can use additional special pages called SetUp and TearDown. They are very useful to avoid repetition across different tests. For example, you can put the arrange activities that are the same for all tests in the SetUp page, so you only need to specify it once. Any common activities that are needed after all tests can be put into the TearDown page. The SetUp page will be inserted just below the Page Header, and the TearDown page just above the Page Footer. FitNesse searches for them in the same way as it searches for page headers and page footers.
Suite Pages are useful to combine related test cases into test suites, with the ability to run all these tests at once. You can recognize a suite page by the presence of a Suite button. If you declare a parent site as a suite page, then it will attempt to run all its test page children recursively. Similarly to Test pages, if you give a new page a name beginning or ending in either Suite or Examples, then FitNesse will automatically make it a suite page.
Note that a suite only executes the test pages under it; e.g. test tables on a suite page will not be executed.
Special pages for suites are SuiteSetup and SuiteTeardown. You can use these to execute activities that you only need to do once for the whole suite, or activities that would considerably slow down test execution if done for each test (e.g. setting up or breaking down database connections, or opening a browser window).
Here is a quick example suite that was created under the overall suite FitSharpDemos, also showing the !contents widget, which provides a table of contents (-R2 means that it needs to show 2 levels):

The definitions per page are very simple:
| Page Name | Contents |
|---|---|
| SuiteExamples | Main Suite !contents -R2 |
| StaticPage | Static Page !contents -R2 |
| SuitePage | Sub Suite !contents -R2 |
| TestPage1 | Test Page 1 |
| TestPage2 | Test Page 2 |
| TestPage3 | Test Page 3 |

This shows that indeed it only executes the test pages – the static and suite pages themselves are not included. Do notice that test cases under static pages and/or other suite pages are executed.
We saw in the previous section that suites can be specified via the page hierarchy: all test pages under a suite page will be part of the suite. There are two other ways to specify test pages that need to be part of a suite.
Sometimes you want to create suites of tests that can come from all over the wiki. A good example when that comes in handy is for creating smoke tests. To support that, you can use the cross-reference widget !see, followed by the test page name.
To show the principle, we define a new suite page XrefSuite using test pages defined in section 6.3.3:
!see SuiteExamples.TestPage3
!see SuiteExamples.SuitePage.TestPage2
Running it should give the following result (we only show the test summaries for brevity):

Another way to specify a test set in a suite is using suite queries. You can do that by defining a page as a suite, and then defining one or more suite query tables in it.
A suite query table always starts with a row containing just Suite. Following that, there can be two or more rows (each with 2 columns) containing 3 types of criteria:
-
Page: the second column is a full page name (i.e. taken from the root) – only include test pages under the specified page -
Title: the second column is a regular expression – only include test pages where the page title matches the regular expression -
Content: the second column is a regular expression – only include test pages where the content matches the regular expression.
The Page criterion is mandatory, and there should be at least one criterion of Title or Content. If more than one criterion is specified, the logical ‘and’ is applied, i.e. only those test cases are executed for which all the criteria apply.
If you specify multiple test queries, then the logical ‘or’ will be applied on the resulting test cases to determine which test cases are run, i.e. if a test case is returned by any of the queries, it will be executed. If it is returned more than once, it will only get executed once.
To show the querying capabilities, we also assume that FeatureDemoSuite.ArrayTest and FeatureDemoSuite.TestPage are available. This will be the case if you followed the installation instructions.
Just a dummy test page containing ArrayTest
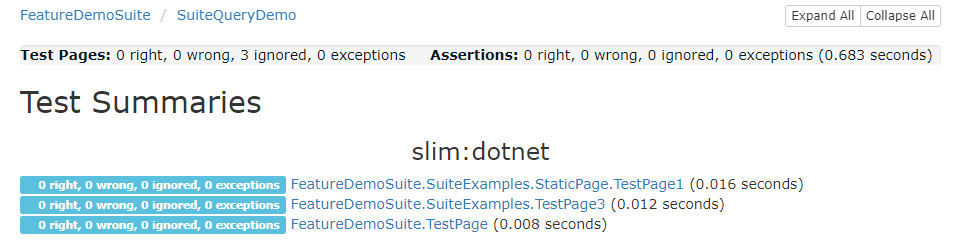
With that, here is an example suite query that starts from the page FeatureDemoSuite, and selects every test case where the title matches the regular expression TestPage[13]$ – which should match TestPage, TestPage1 and TestPage3.
!|Suite                  |
|Page |FeatureDemoSuite  |
|Title|TestPage[13]{0,1}$|
Running it (by pressing Suite) shows that this is indeed the case:
Here is the query that returns all pages under FitSharpDemos containing ArrayTest:
!|Suite               |
|Page|FeatureDemoSuite|
|Content|ArrayTest    |

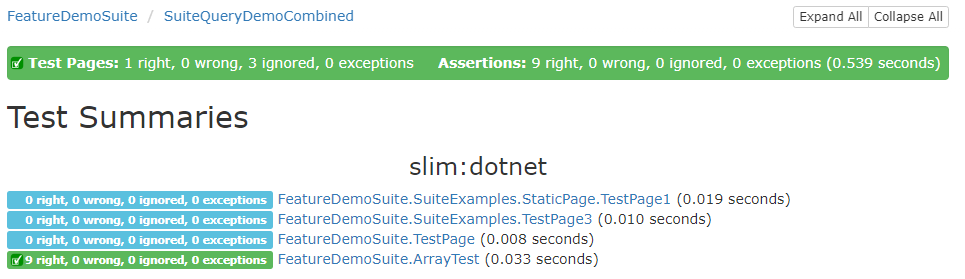
Now we combine the two:
!|Suite                  |
|Page|FeatureDemoSuite   |
|Title|TestPage[13]{0,1}$|

!|Suite               |
|Page|FeatureDemoSuite|
|Content|ArrayTest    |
Notice that TestPage only gets executed once, even though both queries return it:
For more details see the FitNesse Wiki User Guide
The next things that warrant some attention are variables and symbols