Build Instructions - equalsraf/neovim-qt GitHub Wiki
Describes step by step how to build neovim-qt.
If you run into issues, see the Common Issues section below.
Ubuntu 18.04
Get the neovim-qt source code either via Git:
$ sudo apt install -y git`
$ git clone https://github.com/equalsraf/neovim-qt.git
$ cd neovim-qt
Or, download the zip file:
$ sudo apt install -y wget unzip
$ wget -c https://github.com/equalsraf/neovim-qt/archive/master.zip
$ unzip master.zip
$ cd neovim-qt-master
Navigate to the neovim-qt source code directory and install the necessary dependencies (Qt, cmake, compiler and neovim).
$ sudo apt install -y cmake build-essential qt5-qmake qt5-qmake-bin qtbase5-dev \
    qtbase5-dev-tools libqt5svg5-dev qtchooser libqt5concurrent5 libqt5core5a libqt5dbus5 \
    libqt5gui5 libqt5network5 libqt5widgets5 libqt5xml5 neovim
$ mkdir build
$ cd build
$ cmake -DCMAKE_BUILD_TYPE=Release ..
$ make
If the build was successful, you can start neovim-qt.
$ set NVIM_QT_RUNTIME_PATH=../src/gui/runtime ./bin/nvim-qt
Windows 10 and MinGW
Download and install Neovim.
The following commands have been tested with Powershell 5.1.
Get the neovim-qt source code either via Git:
> git clone https://github.com/equalsraf/neovim-qt.git
> cd neovim-qt
Or, download the zip file:
> Invoke-WebRequest -Uri https://github.com/equalsraf/neovim-qt/archive/master.zip -OutFile master.zip
> Expand-Archive -Path master.zip .
> cd neovim-qt-master
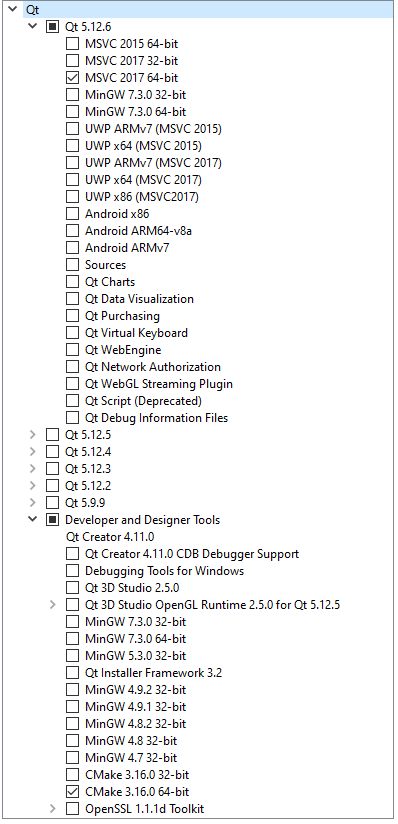
The easiest way to build neovim-qt on Windows 10 is to use the Qt installer (for example the community edition).
Download and run the Qt installer when asked which components to install select:
- Qt Version
- MinGW MinGW Version
- Developer and Designer Tools
- QT Creator
- MinGW MinGW Version
- CMake Cmake Version
For example:

After the successful installation of Qt open a terminal (for example powershell) and navigate to the neovim-qt source code.
> mkdir build
> cd build
> $CMAKE_PATH = "C:\Qt\Tools\CMake_64\bin\"
> $MINGW_PATH = "C:\Qt\Tools\mingw730_64\bin\"
> $QT_PATH = "C:\Qt\5.12.6\mingw73_64\bin\"
> $NVIM_PATH = "C:\Program Files\Neovim\bin"
> $env:Path += "$CMAKE_PATH;$MINGW_PATH;$QT_PATH;$NVIM_PATH;"
> cmake -DCMAKE_PREFIX_PATH="C:\Qt\5.12.6\mingw73_64\lib\cmake" -G "MinGW Makefiles" -DCMAKE_BUILD_TYPE=Release ..
> cmake --build .
(These instructions assume the default installation path C:\Qt for Qt, MinGW Version 7.3 and that the neovim binary is in C:\Program Files\Neovim\bin.)
If the build was successful, you can start neovim-qt.
> set NVIM_QT_RUNTIME_PATH=..\src\gui\runtime
> .\bin\nvim-qt
Windows 10 and Visual Studio 2019
The following commands have been tested with Powershell 5.1.
Download and install neovim and Visual Studio 2019.
Next download Qt (for example the community edition). Run the Qt installer and when asked which components to install select:
- Qt Version
- MSVC 2017 64-bit
- Developer and Designer Tools
- QT Creator
- CMake Cmake Version
For example:
Finally, get the neovim-qt source code either via git
> Invoke-WebRequest -Uri https://github.com/equalsraf/neovim-qt/archive/master.zip -OutFile master.zip
> Expand-Archive -Path master.zip .
> cd neovim-qt-master
After the successfull installation of Qt open a terminal (for example powershell) and navigate to the neovim-qt source code.
> mkdir build
> cd build
> $CMAKE_PATH = "C:\Qt\Tools\CMake_64\bin\"
> $QT_PATH = "C:\Qt\5.12.6\msvc2017_64\bin\"
> $NVIM_PATH = "C:\Program Files\Neovim\bin"
> $env:Path += "$CMAKE_PATH;$QT_PATH;$NVIM_PATH;"
> cmake -DCMAKE_PREFIX_PATH="C:\Qt\5.12.6\msvc2017_64\lib\cmake" -G "Visual Studio 16 2019" -DCMAKE_BUILD_TYPE=Release ..
> cmake --build . --config Release
(These instructions assume the default installation path C:\Qt for Qt, and that the neovim binary is in C:\Program Files\Neovim\bin.)
If the build was successful, you can start neovim-qt.
> set NVIM_QT_RUNTIME_PATH=..\src\gui\runtime
> .\bin\nvim-qt
MacOS
You must be logged in with an Apple ID, and on a recent version of MacOS supporting Xcode.
Open the App Store. Search for "Xcode", and install the latest version of. You may be prompted for log-in credentials.
You will need to install the brew package manager. Brew will also trigger the install of "Xcode Command Line Tools". See the Brew Website for more information.
Run the following command:
$ /usr/bin/ruby -e "$(curl -fsSL https://raw.githubusercontent.com/Homebrew/install/master/install)"
You will need to download the neovim-qt source code via Git:
$ git clone https://github.com/equalsraf/neovim-qt.git
$ cd neovim-qt
Alternatively, you can download a zip file:
$ brew install wget
$ wget -c https://github.com/equalsraf/neovim-qt/archive/master.zip
$ unzip master.zip
$ cd neovim-qt-master
Navigate to the neovim-qt source code directory and install the necessary dependencies:
$ brew install neovim qt@5 cmake
$ mkdir build
$ cd build
$ cmake -DCMAKE_BUILD_TYPE=Release ..
$ cmake --build .
If the build was successful, you can start neovim-qt.
$ set NVIM_QT_RUNTIME_PATH=../src/gui/runtime bin/nvim-qt.app/Contents/MacOS/nvim-qt
Common Issues
Msgpack fails to build implicit-fallthrough
You may see error messages like:
error: this statement may fall through [-Werror=implicit-fallthrough=]
This error occurs when you try to build an older version of neovim-qt with a recent compiler.
You will need to link against the system msgpack:
cmake -DCMAKE_BUILD_TYPE=Release -DUSE_SYSTEM_MSGPACK=1 ..
See Issue 670