Telegram Advanced - dvirby20/BotIt GitHub Wiki
Here you will find advanced actions in the ability of your feature to communicate with the bot.
[[TOC]]
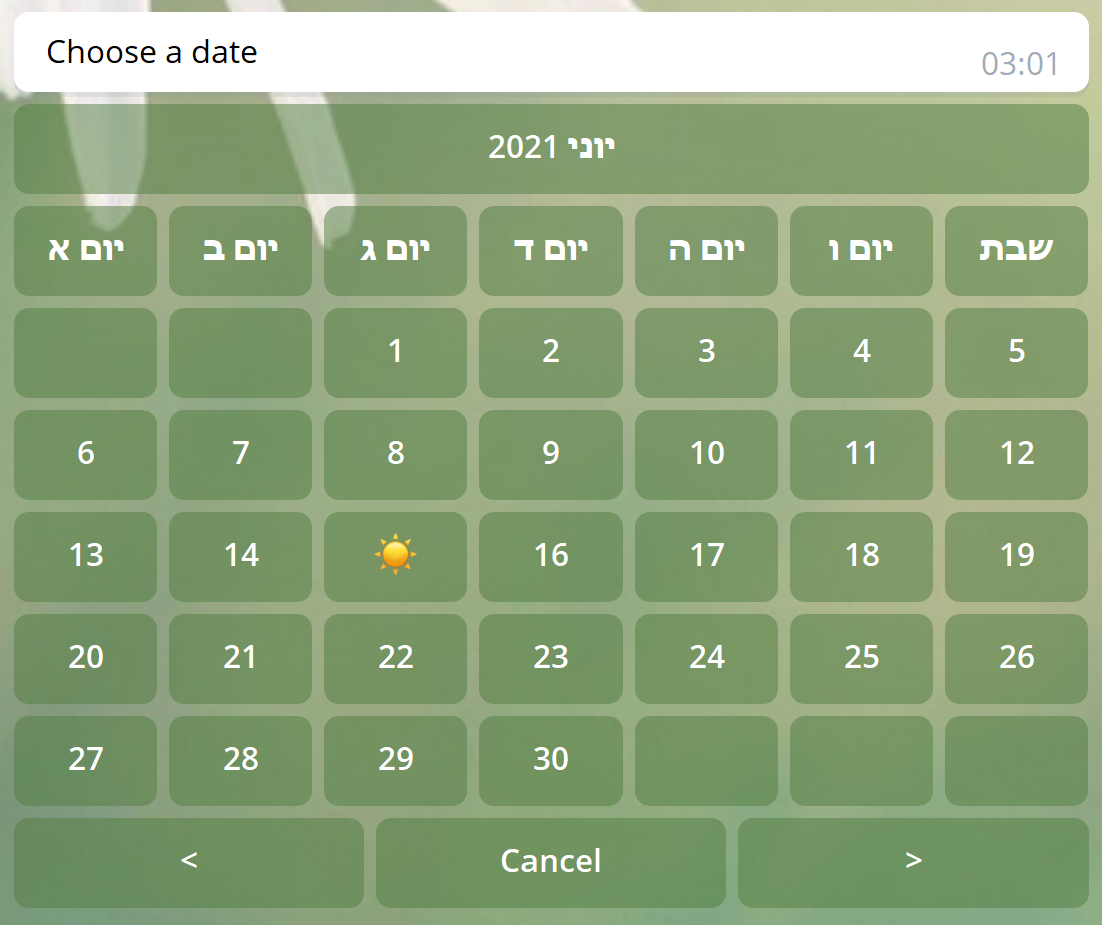
Create a calendar view (select a date) and then draw it as follows:
msg = self.ui.create_date_choose_view(session, choose_callback, chosen_date,view_container,title)

msg.draw()| parameter | explanation |
|---|---|
| session | The usual session object, it is always passed to you as a parameter. |
| choose_callback | The function to be called when the user changes the date selection in the calendar. |
| chosen_date | The date that will be mark at the beginning, when the board is sent to the user. Can be None and then there will be no selected day at first. |
| title | The title we want to put at the top of the calendar. If we don't enter anything, there will be "Select Date". |
After sending a calendar, when the user selects the date of the function choose_callback will be called with the following parameters:
| parameter | explanation |
|---|---|
| view | Pointer to the specific DateChooseView that the user clicked on, in case you didn't save it yourself and you want to edit it after clicking. |
| session | The normal session object |
| date | The selected date. |
The following code snippet will send the user the selected date:
def main(self, session: Session) -> None:
     msg = self.ui.create_date_choose_view(session, self.choose_callback, None)

     msg.draw()

def choose_callback(self, view, session, date):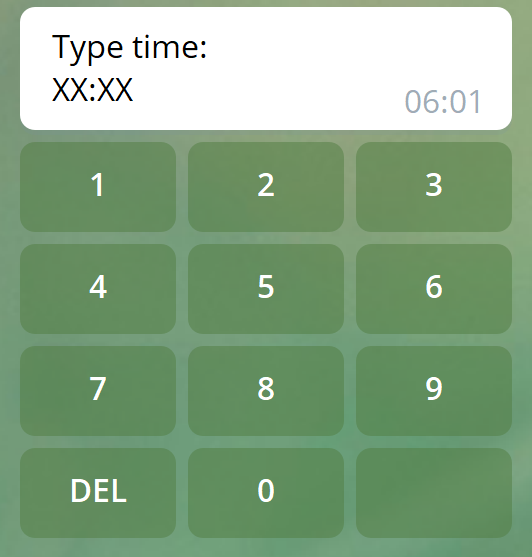
self.ui.create_text_view(session, str(date)).draw()Create a watch view (select an hour) and then draw it as follows:
msg = self.ui.create_time_choose_view(session, choose_callback, chosen_time)

msg.draw()| parameter | explanation |
|---|---|
| session | The usual session object, it is always passed to you as a parameter. |
| choose_callback | The function to be called when the user changes the date selection in the calendar. |
| chosen_time | An hour to be marked at the beginning, when the clock is sent. |
The following code snippet will send the user the time he selected:
def main(self, session: Session) -> None:
     msg = self.ui.create_time_choose_view(session, self.choose_callback, None)
     msg.draw()

def choose_callback(self, view, session, time):
self.ui.create_text_view(session, str(time)).draw()Sending a list of names most similar to a particular text from a repository of objects and their name is done by ClosestNameActivity objects.
Creating an object will be done by ui.create_closest_name_view:
self.ui.create_closest_name_view(session, objects, key, count, func_to_call, try_again)| parameter | explanation |
|---|---|
| session | The usual session object, it is always passed to you as a parameter. |
| objects | A dictionary that fits there for each object. func_to_call will be assigned a list of an object whose name is closest to the key |
| key | The name to search from the dictionary |
| count | The amount of options to be presented |
| func_to_call | A function to be called when the user selects an option. The function should have a session and another variable o that will contain the object with the selected name. |
| try again | A function that will be called if the user clicks the 'try again' button. Should only get session. |
Example of using closest_name_view from arp below:
users = User.objects

data = {}
for user in users:
   data[user] = user.name

def try_again(s: Session) -> None:
    """
    This function call after the user press the try again button
    :return: None
    """
    self.ui.clear(s)
    self.main(s)

self.ui.create_closest_name_view(session, data, name, 5, lambda s,u: self.button_pressed(s, u), try_again).draw()
The first line accepts all existing users.
The for loop creates a dictionary that matches each user's name.
The try_again function is a function that calls the previous method main.
The last line creates closest_name_activity with the current session, with the dictionary of users and their names, with the name they are looking for, with 5 choices, and a function that calls the next action button_pressed with the selected user.
Performing an action at a fixed time in the future (for example, every hour, or every Sunday at 3:00) will be performed by a Job object. A job object consists of three components: the function that will be called at a certain time, the parameters that it will receive when it is called, and the time it will be called.
The method job can only be created in one place, in the get_scheduled_jobs function. This is a function that is found in every feature and returns a list of fixed jobs of the feature.
For example, if we want to make a feature that sends a "good morning" to everybody in the organization every morning at 7:00, we will write the following code inside the good_morning.py class (the feature class).
def main(self, session: Session):
    self.ui.create_text_view(session, "Good Morning!").draw()

def get_scheduled_jobs(self) -> [ScheduledJob]:
    jobs = []
    for user in get_connection()['users_info'].find():
        jobs.append(ScheduledJob(lambda: self.main(Session("good_morning", user)), [], day="*", hour="7"))

    return jobs
The main function just sends a text message to the user in the session as we have done so far. What makes main called every user every morning is the get_scheduled_jobs function. We will go through it line by line.
First of all, create an empty array of jobs.
Then, go through each user by reading from DB.
For each user, add a new Job array. Its first parameter is a mandatory parameter that represents the function to be called. Here we used a lambda that calls self.main with a session that is suitable for a user who is currently working with it. The second parameter (empty list) is the list of parameters that will be passed to the function. Here we used lambda that does not accept parameters and therefore passes an empty list. Each additional parameter after these two mandatory parameters indicates a time at which the action will be called. Here the asterisk in day means every day, and the 3 in hour means at 3 in the morning. Full details on time markers can be seen here.
Messages can also be sent to users other than the user who sent the message.
To do this, a new session object must be created for the user to whom we want to send a message. For example, we demonstrate how to create a annoy feature that sends a message to all users from the organization.
    def main(self, session: Session) -> None:
        users = UserConstraint.get_users_with_constraint(MachzorConstraint(session.user.mahzor))
        txt = session.user.name + " annoyed you!"

        for user in users:
            user_session = self.ui.create_session("annoy", user)
            self.ui.create_text_view(user_session, txt).draw()

        self.ui.create_text_view(session, "I bullied everyone").draw()
We will go over the code section line by line. First, it is in the main function of the feature, meaning it is executed when someone selects a feature in the main menu.
The first line finds all users from the organization of the user who started the feature.
The second line creates the text that will be sent to all users.
The for loop goes through every user in the organization. For each user it creates a new session by the following action:
Session.create_session(feature_name, user)| parameter | explanation |
|---|---|
| feature_name | The name of the feature that creates the session. Should be the same as the name of the feature you are writing. |
| user| The user for whom the session will be created, a user object |
After creating the new session, the message is sent to the user on the new session. Note the passing of the user_session parameter generated for the specific user to whom the message is being sent.
Finally, after sending a message to all users in the organization, a message is also sent to the original user who opened the feature. This time the original session is transferred, which is always associated with the user who initiated the opening of the feature.
A form will be used when you want to get different types of information from the user at once. With FormActivity we can make a from and send it to the user, and when he will press the "send form" button we will get his answers. FormActivity supports the following input types:
| TextField | regular text |
|---|---|
| PictureField | upload a picture |
| CheckBoxField | checklist (multi-choise from given options) |
| DateField | choose a date |
| TimeField | choose a hour |
Each of these fields has an attribut that after you fill the form will be called value. It will store the data the user sent. In the change profile feature, which lets the user change his profile details that are stored in the data base, we use a form. To make the form, we had to creatr an object with a constructor (init function). Each of the function attributes is a field in the form. For instance, to get from the user his name, e-mail adress and is he an admin we will use the following code:
class UserDetailesForm:

    def __init__(self):
        self.eMail = TextField(name="email", msg="What is your E-mail?")
        self.name = TextField(name="name", msg="What is your name?")
        self.is_admin = CheckBoxField(name="admin", msg="Are you admin?",options=['yes'])
Although each field has different input types, it still have two basic arguments.
- name: how the field will look in the form
- msg: the massage that will be showed to the user whes he taps the field
Some of the field types have additional arguments, for example CheckBoxField has an argument options - a string list which is the options the user can choose from.
To show our form, we will import the form object and use the ui.create_form_view command:
from BotFramework.user_detailes_form import UserDetailesForm

self.ui.create_form_view(session, UserDetailesForm(), "please insert the following details:", self.save_to_db).draw()
The command needs to get our form object, a title for the form and the callback function which will get all the user inputs.
The callback function will get self, session, form_activity from type FormActivity and the form object. It will be called when the user presses the "send form" button. To get one of the user inputs we will take the value of the input from the form. For instance, if we want to get the user's name we will use the following code:
 def save_to_db(self, session: Session, form_activity: FormActivity, form: UserDetailesForm):
        user.name = form.name.value

        if user.name == None:
            self.ui.create_text_view(session, "Please insert your name!"
            return
The if statement checks if the user didn't input his name and asks him to do it.
Our feature will look like this:
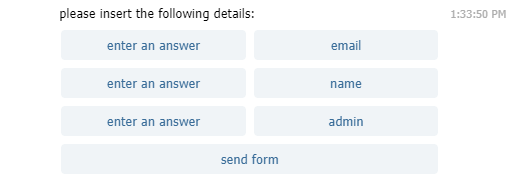
When we will press the "send form" button all our details will be saved in the data base